Quantcast
Channel: Planet Python
Viewing all 22406 articles
Browse latest View live

Django Weblog: Django security releases issued: 3.0.1, 2.2.9, and 1.11.27

$
0
0

In accordance with our security release policy, the Django team is issuing Django 3.0.1, Django 2.2.9 and Django 1.11.27. These release addresses the security issue detailed below. We encourage all users of Django to upgrade as soon as possible.

CVE-2019-19844: Potential account hijack via password reset form

By submitting a suitably crafted email address making use of Unicode characters, that compared equal to an existing user email when lower-cased for comparison, an attacker could be sent a password reset token for the matched account.

In order to avoid this vulnerability, password reset requests now compare the submitted email using the stricter, recommended algorithm for case-insensitive comparison of two identifiers from Unicode Technical Report 36, section 2.11.2(B)(2). Upon a match, the email containing the reset token will be sent to the email address on record rather than the submitted address.

Affected supported versions

  • Django master branch
  • Django 3.0
  • Django 2.2
  • Django 2.1

Resolution

Patches to resolve the issue have been applied to Django's master branch and the 3.0, 2.2, and 1.11 release branches. The patches may be obtained from the following changesets:

The following releases have been issued:

The PGP key ID used for these releases is Mariusz Felisiak: 2EF56372BA48CD1B.

General notes regarding security reporting

As always, we ask that potential security issues be reported via private email to security@djangoproject.com, and not via Django's Trac instance or the django-developers list. Please see our security policies for further information.

This issue was known publicly, therefore we fixed the issue as soon as possible without the usual prenotification process.


Marc Richter: Using pyenv to manage your Python interpreters

$
0
0

This article was published at Using pyenv to manage your Python interpreters .
If you are reading this on any other page, which is not some “planet” or aggregator, you are reading stolen content. Please read this article at its source, which is linked before to ensure to get the best reading experience; thank you! ❤

When I started to learn Python a few years ago, I often wondered about what’s the “correct” or “best” way to prepare your system’s Python environment for the requirements your software project or some Python-based application you’d like to start using may have: Should I install modules using the package manager of my OS? Or by using Python tools for it like pip? What are “virtual environments” and how do I utilize these for my projects? What’s all this pyenv, pip, pipenv, easy_install, setuptools, anaconda, conda, miniconda …

In this article series, I’d like to introduce the most common tools and techniques on how to do this in the Python world.
At the end of the series, I will share some of my thoughts, doubts, and questions I had back then, tell about some experiences I gathered in the meantime and generally share the outcome of this journey and what my Python-Workflow looks like, nowadays.

Introduction to pyenv 🐍

This first article is about pyenv, a lightweight, yet powerful, Python version management tool that works in user – scope and does stay out of the way of systems global Python interpreters.

Installing pyenv

On my development workstations, the first thing I usually do when preparing my Python development environment is to install pyenv. pyenv lets you easily install and switch between multiple versions of Python. There are no administrative permissions required, since everything happens in your user context and

$HOME
  directory (
~
). This way, it is even an option for multi-user environments like a shared system at work or one of those you get when renting cheap hosting for your homepage, in which you do not have root permissions.
It can be installed with one single command like this (make sure to met prerequisites and build dependencies first):

curl https://pyenv.run | bash

Without any changes, this clones the very latest version of pyenv into the directory

~/.pyenv
.
Next, this needs to be loaded in any newly launched shell. pyenv is sharing advice on how to do this on its own just after the install-command has been executed:

# Load pyenv automatically by adding
# the following to ~/.bashrc:

export PATH="/home/mrichter/.pyenv/bin:$PATH"
eval "$(pyenv init -)"
eval "$(pyenv virtualenv-init -)"

👉Note that the PATH defined is prefixed with this new folder. This way, it has precedence over any global interpreter version installed in a different location (like those installed by the PMS) for your own shell only, making sure that executing

python
and
pip
 named commands will always use the versions pointed to from pyenv.

As soon as that code has been entered into your shell configuration file, spawn a subshell to have these loaded in your current environment:

$ exec $SHELL

Now the command

pyenv
is available in your
PATH
, as well as any Python interpreter installed by it in the future.
It is recommended to search for updates right away; even when there should be none after a fresh install we just did, since you see that
pyenv
is working fine at least:

mrichter@ww-arcade:~$ pyenv update
Updating /home/mrichter/.pyenv...
...

Using pyenv to install some Python interpreters

Let’s install a few Python interpreters, shouldn’t we?

A few?!?” – I can hear you say, already 😲
Yeah – welcome to the easy-as-f**k – world of pyenv! 😉 Let’s go for having these versions as an example:

  • 2.7.17
  • 3.6.9
  • 3.8.0

👉 For a list of all available interpreters, execute

pyenv install --list
.

Thanks to pyenv, this is as easy as this now:

$ pyenv install 2.7.17
Downloading Python-2.7.17.tar.xz...
-> https://www.python.org/ftp/python/2.7.17/Python-2.7.17.tar.xz
Installing Python-2.7.17...
Installed Python-2.7.17 to /home/mrichter/.pyenv/versions/2.7.17

$

BAM– you now have Python 2.7.17 available in your environment! And none is cluttering the global environment since they got installed to

~/.pyenv/versions
.
Repeat that for the formerly mentioned versions and you are done.

Watch out for the dependencies!

👉Note: You still need to provide Python’s build dependencies for your OS yourself! If you see something like this during interpreter installation, you are most certainly missing any of them (

zlib
 in this example):

$ pyenv install 3.7.5
Downloading Python-3.7.5.tar.xz...
-> https://www.python.org/ftp/python/3.7.5/Python-3.7.5.tar.xz
Installing Python-3.7.5...

BUILD FAILED (Ubuntu 18.04 using python-build 20180424)

Inspect or clean up the working tree at /tmp/python-build.20191126215827.6156
Results logged to /tmp/python-build.20191126215827.6156.log

Last 10 log lines:
    sys.exit(ensurepip._main())
  File "/tmp/python-build.20191126215827.6156/Python-3.7.5/Lib/ensurepip/__init__.py", line 204, in _main
    default_pip=args.default_pip,
  File "/tmp/python-build.20191126215827.6156/Python-3.7.5/Lib/ensurepip/__init__.py", line 117, in _bootstrap
    return _run_pip(args + [p[0] for p in _PROJECTS], additional_paths)
  File "/tmp/python-build.20191126215827.6156/Python-3.7.5/Lib/ensurepip/__init__.py", line 27, in _run_pip
    import pip._internal
zipimport.ZipImportError: can't decompress data; zlib not available
Makefile:1141: recipe for target 'install' failed
make: *** [install] Error 1
$

Installing them by adding the appropriate “source” URI in Ubuntu plus executing

apt-get build-dep python3.6
, as the Python’s build dependencies page suggests, solves this issue in Ubuntu Linux. Please help yourself with any other OS distribution.

Switching between Python Interpreters

You now have several Python interpreters available – and now? How to use and switch between them? Seems a bit unhandy to change all your shebangs to something like

~/.pyenv/versions/3.8.0/bin/python
, isn’t it?

Don’t worry – it’s far easier than that!
Let’s say, you are about to start your Python project in the empty/new directory

~/project1
. All you need to do is to switch to that directory and enable the interpreter of your choice “locally” (explained in a minute) using pyenv:

~$ cd ~/project1
~/project1$ ls -al
total 0
drwxrwxrwx 1 mrichter mrichter 512 Nov 26 23:39 .
drwxr-xr-x 1 mrichter mrichter 512 Nov 27 00:01 ..
~/project1$ python -V
Python 2.7.15+
~/project1$ pyenv local 3.6.9
~/project1$ python -V
Python 3.6.9
~/project1$ ls -al
total 0
drwxrwxrwx 1 mrichter mrichter 512 Nov 27 00:18 .
drwxr-xr-x 1 mrichter mrichter 512 Nov 27 00:01 ..
-rw-rw-rw- 1 mrichter mrichter   6 Nov 27 00:18 .python-version
~/project1$ cat .python-version
3.6.9
~/project1$

How cool is that?? You can switch your pre-installed environments now with a single command, that only creates a single text file, called

.python-version
in your projects folder!
That pretty much reduces the shebang – issue to use
#!/usr/bin/env python
for all your scripts; no matter which version your projects are using and without the need to change it for future version changes 👍

About pyenv scopes

👉Note: pyenv supports two scopes:

  1. local
    The scope of the current project/directory and its subdirectories is called “the local scope”. When you change the directory to a directory for which no local version is defined, this scope automatically changes to what is defined globally.
    As shown in a minute, this scope’s version can be set using the
    pyenv local
    command.
  2. global
    The scope if no specific local scope has been defined (default) is called “the global scope”. It is defined in the file
    ~/.pyenv/version
    and can be set and changed using the
    pyenv global
      command.

The difference of these defined scopes is shown in this short shell-session:

mrichter@ww-arcade:~/test$ pyenv versions
* system (set by /home/mrichter/.pyenv/version)
  2.7.17
  3.6.9
  3.7.5
  3.8.0
mrichter@ww-arcade:~/test$ pyenv global
system
mrichter@ww-arcade:~/test$ pyenv local
pyenv: no local version configured for this directory
mrichter@ww-arcade:~/test$ python -V
Python 2.7.15+
mrichter@ww-arcade:~/test$ /usr/bin/python -V
Python 2.7.15+
mrichter@ww-arcade:~/test$ pyenv local 3.8.0
mrichter@ww-arcade:~/test$ python -V
Python 3.8.0
mrichter@ww-arcade:~/test$ cd ..
mrichter@ww-arcade:~$ python -V
Python 2.7.15+
mrichter@ww-arcade:~$ cd test/
mrichter@ww-arcade:~/test$ python -V
Python 3.8.0
mrichter@ww-arcade:~/test$ mkdir subdir
cd mrichter@ww-arcade:~/test$ cd subdir/
mrichter@ww-arcade:~/test/subdir$ python -V
Python 3.8.0
mrichter@ww-arcade:~/test/subdir$

  • In the output of
    pyenv versions,
    we see all Python interpreters installed by pyenv. The global one (default) is marked with an asterisk (*);
    system
    in this example.
    • system
      is a special case: It circumvents pyenv installed interpreters and results in the executable
      python
      found in the remaining parts of the
      $PATH
      variable. This means, that it normally resolves to the Python interpreter that didn’t get installed by pyenv but by your PMS or similar.
  • pyenv global
    again shows that global scope is set to
    system
    .
  • pyenv local
    prints what the current directory’s local scope is set to (nothing so far; falling back to global).
  • The first 
    python -V
    shows the version of Python in effect. It is the system’s default version of Python (
    2.7.15+
    ).
    • /usr/bin/python -V
      shows that this is identical to the full path to the system’s default
      python
      executable.
  • pyenv local 3.8.0
    sets the local scope to be Python 3.8.0, as the next execution of
    python -V
    shows.
    👉Note that this very same command yielded a different result before we set the local scope!
  • As soon as we leave the directory again, we are back to the global scope’s version
    2.7.15+
    .
  • Going back into the project directory with its local version defined (containing the file
    .python-version
    ) immediately enables that locally defined version again, without anything else to care about.
    • This even stays active for subdirectories.

This is pretty much all you need to know about pyenv to get started! It covers 100% of what I need in my day-to-day work, so there should not be missing too much in order to get you started with it 😉
Feel free to investigate additional details from the project’s documentation resources.

Next time

I hope you enjoyed this first article!
I always welcome comments of any kind, so feel invited to leave yours in the comment section below ❤

In the next part of this series, I will introduce pipenv– an advanced package-, dependency- and virtualenv-manager for Python.

Stay tuned to get your head wrapped around the workflow this awesome piece of software brings to your Python dependency management workflow!

Born in 1982, Marc Richter is an IT enthusiastic since 1994. He became addicted when he first put hands on their family’s pc and never stopped investigating and exploring new things since then.
He is married to Jennifer Richter and proud father of two wonderful children, Lotta and Linus.
His current professional focus is DevOps and Python development.

An exhaustive bio can be found at this blog post.

Found my articles useful? Maybe you would like to support my efforts and give me a tip then?

Marc Richter's personal site - About Linux, programming in Python and Music

PyPy Development: HPy kick-off sprint report

$
0
0
/* :Author: David Goodger (goodger@python.org) :Id: $Id: html4css1.css 7952 2016-07-26 18:15:59Z milde $ :Copyright: This stylesheet has been placed in the public domain. Default cascading style sheet for the HTML output of Docutils. See http://docutils.sf.net/docs/howto/html-stylesheets.html for how to customize this style sheet. */ /* used to remove borders from tables and images */ .borderless, table.borderless td, table.borderless th { border: 0 } table.borderless td, table.borderless th { /* Override padding for "table.docutils td" with "! important". The right padding separates the table cells. */ padding: 0 0.5em 0 0 ! important } .first { /* Override more specific margin styles with "! important". */ margin-top: 0 ! important } .last, .with-subtitle { margin-bottom: 0 ! important } .hidden { display: none } .subscript { vertical-align: sub; font-size: smaller } .superscript { vertical-align: super; font-size: smaller } a.toc-backref { text-decoration: none ; color: black } blockquote.epigraph { margin: 2em 5em ; } dl.docutils dd { margin-bottom: 0.5em } object[type="image/svg+xml"], object[type="application/x-shockwave-flash"] { overflow: hidden; } /* Uncomment (and remove this text!) to get bold-faced definition list terms dl.docutils dt { font-weight: bold } */ div.abstract { margin: 2em 5em } div.abstract p.topic-title { font-weight: bold ; text-align: center } div.admonition, div.attention, div.caution, div.danger, div.error, div.hint, div.important, div.note, div.tip, div.warning { margin: 2em ; border: medium outset ; padding: 1em } div.admonition p.admonition-title, div.hint p.admonition-title, div.important p.admonition-title, div.note p.admonition-title, div.tip p.admonition-title { font-weight: bold ; font-family: sans-serif } div.attention p.admonition-title, div.caution p.admonition-title, div.danger p.admonition-title, div.error p.admonition-title, div.warning p.admonition-title, .code .error { color: red ; font-weight: bold ; font-family: sans-serif } /* Uncomment (and remove this text!) to get reduced vertical space in compound paragraphs. div.compound .compound-first, div.compound .compound-middle { margin-bottom: 0.5em } div.compound .compound-last, div.compound .compound-middle { margin-top: 0.5em } */ div.dedication { margin: 2em 5em ; text-align: center ; font-style: italic } div.dedication p.topic-title { font-weight: bold ; font-style: normal } div.figure { margin-left: 2em ; margin-right: 2em } div.footer, div.header { clear: both; font-size: smaller } div.line-block { display: block ; margin-top: 1em ; margin-bottom: 1em } div.line-block div.line-block { margin-top: 0 ; margin-bottom: 0 ; margin-left: 1.5em } div.sidebar { margin: 0 0 0.5em 1em ; border: medium outset ; padding: 1em ; background-color: #ffffee ; width: 40% ; float: right ; clear: right } div.sidebar p.rubric { font-family: sans-serif ; font-size: medium } div.system-messages { margin: 5em } div.system-messages h1 { color: red } div.system-message { border: medium outset ; padding: 1em } div.system-message p.system-message-title { color: red ; font-weight: bold } div.topic { margin: 2em } h1.section-subtitle, h2.section-subtitle, h3.section-subtitle, h4.section-subtitle, h5.section-subtitle, h6.section-subtitle { margin-top: 0.4em } h1.title { text-align: center } h2.subtitle { text-align: center } hr.docutils { width: 75% } img.align-left, .figure.align-left, object.align-left, table.align-left { clear: left ; float: left ; margin-right: 1em } img.align-right, .figure.align-right, object.align-right, table.align-right { clear: right ; float: right ; margin-left: 1em } img.align-center, .figure.align-center, object.align-center { display: block; margin-left: auto; margin-right: auto; } table.align-center { margin-left: auto; margin-right: auto; } .align-left { text-align: left } .align-center { clear: both ; text-align: center } .align-right { text-align: right } /* reset inner alignment in figures */ div.align-right { text-align: inherit } /* div.align-center * { */ /* text-align: left } */ .align-top { vertical-align: top } .align-middle { vertical-align: middle } .align-bottom { vertical-align: bottom } ol.simple, ul.simple { margin-bottom: 1em } ol.arabic { list-style: decimal } ol.loweralpha { list-style: lower-alpha } ol.upperalpha { list-style: upper-alpha } ol.lowerroman { list-style: lower-roman } ol.upperroman { list-style: upper-roman } p.attribution { text-align: right ; margin-left: 50% } p.caption { font-style: italic } p.credits { font-style: italic ; font-size: smaller } p.label { white-space: nowrap } p.rubric { font-weight: bold ; font-size: larger ; color: maroon ; text-align: center } p.sidebar-title { font-family: sans-serif ; font-weight: bold ; font-size: larger } p.sidebar-subtitle { font-family: sans-serif ; font-weight: bold } p.topic-title { font-weight: bold } pre.address { margin-bottom: 0 ; margin-top: 0 ; font: inherit } pre.literal-block, pre.doctest-block, pre.math, pre.code { margin-left: 2em ; margin-right: 2em } pre.code .ln { color: grey; } /* line numbers */ pre.code, code { background-color: #eeeeee } pre.code .comment, code .comment { color: #5C6576 } pre.code .keyword, code .keyword { color: #3B0D06; font-weight: bold } pre.code .literal.string, code .literal.string { color: #0C5404 } pre.code .name.builtin, code .name.builtin { color: #352B84 } pre.code .deleted, code .deleted { background-color: #DEB0A1} pre.code .inserted, code .inserted { background-color: #A3D289} span.classifier { font-family: sans-serif ; font-style: oblique } span.classifier-delimiter { font-family: sans-serif ; font-weight: bold } span.interpreted { font-family: sans-serif } span.option { white-space: nowrap } span.pre { white-space: pre } span.problematic { color: red } span.section-subtitle { /* font-size relative to parent (h1..h6 element) */ font-size: 80% } table.citation { border-left: solid 1px gray; margin-left: 1px } table.docinfo { margin: 2em 4em } table.docutils { margin-top: 0.5em ; margin-bottom: 0.5em } table.footnote { border-left: solid 1px black; margin-left: 1px } table.docutils td, table.docutils th, table.docinfo td, table.docinfo th { padding-left: 0.5em ; padding-right: 0.5em ; vertical-align: top } table.docutils th.field-name, table.docinfo th.docinfo-name { font-weight: bold ; text-align: left ; white-space: nowrap ; padding-left: 0 } /* "booktabs" style (no vertical lines) */ table.docutils.booktabs { border: 0px; border-top: 2px solid; border-bottom: 2px solid; border-collapse: collapse; } table.docutils.booktabs * { border: 0px; } table.docutils.booktabs th { border-bottom: thin solid; text-align: left; } h1 tt.docutils, h2 tt.docutils, h3 tt.docutils, h4 tt.docutils, h5 tt.docutils, h6 tt.docutils { font-size: 100% } ul.auto-toc { list-style-type: none }

Recently Antonio, Armin and Ronan had a small internal sprint in the beautiful city of Gdańsk to kick-off the development of HPy. Here is a brief report of what was accomplished during the sprint.

What is HPy?

The TL;DR answer is "a better way to write C extensions for Python".

The idea of HPy was born during EuroPython 2019 in Basel, where there was an informal meeting which included core developers of PyPy, CPython (Victor Stinner and Mark Shannon) and Cython (Stefan Behnel). The ideas were later also discussed with Tim Felgentreff of GraalPython, to make sure they would also be applicable to this very different implementation, Windel Bouwman of RustPython is following the project as well.

All of us agreed that the current design of the CPython C API is problematic for various reasons and, in particular, because it is too tied to the current internal design of CPython. The end result is that:

  • alternative implementations of Python (such as PyPy, but not only) have a hard time loading and executing existing C extensions;
  • CPython itself is unable to change some of its internal implementation details without breaking the world. For example, as of today it would be impossible to switch from using reference counting to using a real GC, which in turns make it hard for example to remove the GIL, as gilectomy attempted.

HPy tries to address these issues by following two major design guidelines:

  1. objects are referenced and passed around using opaque handles, which are similar to e.g., file descriptors in spirit. Multiple, different handles can point to the same underlying object, handles can be duplicated and each handle must be released independently of any other duplicate.
  2. The internal data structures and C-level layout of objects are not visible nor accessible using the API, so each implementation if free to use what fits best.

The other major design goal of HPy is to allow incremental transition and porting, so existing modules can migrate their codebase one method at a time. Moreover, Cython is considering to optionally generate HPy code, so extension module written in Cython would be able to benefit from HPy automatically.

More details can be found in the README of the official HPy repository.

Target ABI

When compiling an HPy extension you can choose one of two different target ABIs:

  • HPy/CPython ABI: in this case, hpy.h contains a set of macros and static inline functions. At compilation time this translates the HPy API into the standard C-API. The compiled module will have no performance penalty, and it will have a "standard" filename like foo.cpython-37m-x86_64-linux-gnu.so.
  • Universal HPy ABI: as the name implies, extension modules compiled this way are "universal" and can be loaded unmodified by multiple Python interpreters and versions. Moreover, it will be possible to dynamically enable a special debug mode which will make it easy to find e.g., open handles or memory leaks, without having to recompile the extension.

Universal modules can also be loaded on CPython, thanks to the hpy_universal module which is under development. An extra layer of indirection enables loading extensions compiled with the universal ABI. Users of hpy_universal will face a small performance penalty compared to the ones using the HPy/CPython ABI.

This setup gives several benefits:

  • Extension developers can use the extra debug features given by the Universal ABI with no need to use a special debug version of Python.
  • Projects which need the maximum level of performance can compile their extension for each relevant version of CPython, as they are doing now.
  • Projects for which runtime speed is less important will have the choice of distributing a single binary which will work on any version and implementation of Python.

A simple example

The HPy repo contains a proof of concept module. Here is a simplified version which illustrates what a HPy module looks like:

#include"hpy.h"HPy_DEF_METH_VARARGS(add_ints)staticHPyadd_ints_impl(HPyContextctx,HPyself,HPy*args,HPy_ssize_tnargs){longa,b;if(!HPyArg_Parse(ctx,args,nargs,"ll",&a,&b))returnHPy_NULL;returnHPyLong_FromLong(ctx,a+b);}staticHPyMethodDefPofMethods[]={{"add_ints",add_ints,HPy_METH_VARARGS,""},{NULL,NULL,0,NULL}};staticHPyModuleDefmoduledef={HPyModuleDef_HEAD_INIT,.m_name="pof",.m_doc="HPy Proof of Concept",.m_size=-1,.m_methods=PofMethods};HPy_MODINIT(pof)staticHPyinit_pof_impl(HPyContextctx){HPym;m=HPyModule_Create(ctx,&moduledef);if(HPy_IsNull(m))returnHPy_NULL;returnm;}

People who are familiar with the current C-API will surely notice many similarities. The biggest differences are:

  • Instead of PyObject *, objects have the type HPy, which as explained above represents a handle.
  • You need to explicitly pass an HPyContext around: the intent is primary to be future-proof and make it easier to implement things like sub- interpreters.
  • HPy_METH_VARARGS is implemented differently than CPython's METH_VARARGS: in particular, these methods receive an array of HPy and its length, instead of a fully constructed tuple: passing a tuple makes sense on CPython where you have it anyway, but it might be an unnecessary burden for alternate implementations. Note that this is similar to the new METH_FASTCALL which was introduced in CPython.
  • HPy relies a lot on C macros, which most of the time are needed to support the HPy/CPython ABI compilation mode. For example, HPy_DEF_METH_VARARGS expands into a trampoline which has the correct C signature that CPython expects (i.e., PyObject (*)(PyObject *self, *PyObject *args)) and which calls add_ints_impl.

Sprint report and current status

After this long preamble, here is a rough list of what we accomplished during the week-long sprint and the days immediatly after.

On the HPy side, we kicked-off the code in the repo: at the moment of writing the layout of the directories is a bit messy because we moved things around several times, but we identified several main sections:

  1. A specification of the API which serves both as documentation and as an input for parts of the projects which are automatically generated. Currently, this lives in public_api.h.

  2. A set of header files which can be used to compile extension modules: depending on whether the flag -DHPY_UNIVERSAL_ABI is passed to the compiler, the extension can target the HPy/CPython ABI or the HPy Universal ABI

  3. A CPython extension module called hpy_universal which makes it possible to import universal modules on CPython

  4. A set of tests which are independent of the implementation and are meant to be an "executable specification" of the semantics. Currently, these tests are run against three different implementations of the HPy API:

    • the headers which implements the "HPy/CPython ABI"
    • the hpy_universal module for CPython
    • the hpy_universal module for PyPy (these tests are run in the PyPy repo)

Moreover, we started a PyPy branch in which to implement the hpy_univeral module: at the moment of writing PyPy can pass all the HPy tests apart the ones which allow conversion to and from PyObject *. Among the other things, this means that it is already possible to load the very same binary module in both CPython and PyPy, which is impressive on its own :).

Finally, we wanted a real-life use case to show how to port a module to HPy and to do benchmarks. After some searching, we choose ultrajson, for the following reasons:

  • it is a real-world extension module which was written with performance in mind
  • when parsing a JSON file it does a lot of calls to the Python API to construct the various parts of the result message
  • it uses only a small subset of the Python API

This repo contains the HPy port of ultrajson. This commit shows an example of what the porting looks like.

ujson_hpy is also a very good example of incremental migration: so far only ujson.loads is implemented using the HPy API, while ujson.dumps is still implemented using the old C-API, and both can coexist nicely in the same compiled module.

Benchmarks

Once we have a fully working ujson_hpy module, we can finally run benchmarks! We tested several different versions of the module:

  • ujson: this is the vanilla implementation of ultrajson using the C-API. On PyPy this is executed by the infamous cpyext compatibility layer, so we expect it to be much slower than on CPython
  • ujson_hpy: our HPy port compiled to target the HPy/CPython ABI. We expect it to be as fast as ujson
  • ujson_hpy_universal: same as above but compiled to target the Universal HPy ABI. We expect it to be slightly slower than ujson on CPython, and much faster on PyPy.

Finally, we also ran the benchmark using the builtin json module. This is not really relevant to HPy, but it might still be an interesting as a reference data point.

The benchmark is very simple and consists of parsing a big JSON file 100 times. Here is the average time per iteration (in milliseconds) using the various versions of the module, CPython 3.7 and the latest version of the hpy PyPy branch:

 CPythonPyPy
ujson154.32633.97
ujson_hpy152.19 
ujson_hpy_universal168.78207.68
json224.59135.43

As expected, the benchmark proves that when targeting the HPy/CPython ABI, HPy doesn't impose any performance penalty on CPython. The universal version is ~10% slower on CPython, but gives an impressive 3x speedup on PyPy! It it worth noting that the PyPy hpy module is not fully optimized yet, and we expect to be able to reach the same performance as CPython for this particular example (or even more, thanks to our better GC).

All in all, not a bad result for two weeks of intense hacking :)

It is also worth noting than PyPy's builtin json module does really well in this benchmark, thanks to the recent optimizations that were described in an earlier blog post.

Conclusion and future directions

We think we can be very satisfied about what we have got so far. The development of HPy is quite new, but these early results seem to indicate that we are on the right track to bring Python extensions into the future.

At the moment, we can anticipate some of the next steps in the development of HPy:

  • Think about a proper API design: what we have done so far has been a "dumb" translation of the API we needed to run ujson. However, one of the declared goal of HPy is to improve the design of the API. There will be a trade-off between the desire of having a clean, fresh new API and the need to be not too different than the old one, to make porting easier. Finding the sweet spot will not be easy!
  • Implement the "debug" mode, which will help developers to find bugs such as leaking handles or using invalid handles.
  • Instruct Cython to emit HPy code on request.
  • Eventually, we will also want to try to port parts of numpy to HPy to finally solve the long-standing problem of sub-optimal numpy performance in PyPy.

Stay tuned!

Matt Layman: A Failed SaaS Postmortem

$
0
0
My Software as a Service failed. After three years of running College Conductor, I’m shutting it down. The service failed for a host of reasons, and this article details what I learned from the whole experience. This is a chance for me to reflect, and give you some ideas of what pitfalls can happen if you’re planning to build a SaaS. The vision Before getting to the lessons, let’s look at my vision for the service so you have some context of what I was building.

Python Bytes: #161 Sloppy Python can mean fast answers!

Real Python: Run Python Versions in Docker: How to Try the Latest Python Release

$
0
0

There’s always a new version of Python under development. However, it can be cumbersome to compile Python yourself to try out a new version! As you work through this tutorial, you’ll see how to run different Python versions using Docker, including how you can have the latest alpha running on your computer within minutes.

In this tutorial, you’ll learn:

  • Which versions of Python are available
  • How to get started with Docker
  • How to run different Python versions in Docker containers
  • How to use Docker containers as Python environments

Let’s get started!

Free Bonus:Click here to get access to a chapter from Python Tricks: The Book that shows you Python's best practices with simple examples you can apply instantly to write more beautiful + Pythonic code.

Understanding Python Versions and Docker

The long journey of moving from Python 2 to Python 3 is coming to a close. Still, it’s important that going forward, you know about the different versions of Python and how to try them out. In general, there are three different kinds of versions you should be aware of:

  1. Released versions: Typically, you’ll be running something like Python 3.6, 3.7, or 3.8. Each of these versions adds new features, so it’s good to be conscious of which version you’re running. For instance, f-strings were introduced in Python 3.6 and won’t work in older versions of Python. Similarly, assignment expressions only became available in Python 3.8.

  2. Development versions: The Python community is continuously working on new versions of Python. At the time of this writing, Python 3.9 is under development. To preview and test new features, users have access to development versions labeled alpha, beta, and release candidate.

  3. Implementations: Python is a language that has several implementations. An implementation of Python contains an interpreter and corresponding libraries. CPython is the reference implementation of Python and the one that is most commonly used. However, there are other implementations like PyPy, IronPython, Jython, MicroPython, and CircuitPython that cover specific use cases.

You’ll usually see which version of Python you’re using when you start a REPL. You can also inspect sys.implementation for more information:

>>>
>>> importsys>>> sys.implementation.name'cpython'>>> sys.implementation.versionsys.version_info(major=3, minor=9, micro=0, releaselevel='alpha', serial=1)

You can see that this code is running the first alpha version of CPython 3.9.

Traditionally, you’d use tools like pyenv and conda to manage different Python versions. Docker can replace these in most cases, and it’s often simpler to use. In the rest of this tutorial, you’ll see how to get started.

Using Docker

Docker is a platform for running containers with prepackaged applications. It’s a very powerful system that’s particularly popular for packaging and deploying applications and microservices. In this section, you’ll see the fundamental concepts you’ll need to know to use Docker.

Installing Docker

Docker is available on all major operating systems: Windows, macOS, and Linux. See the official guide for instructions on how to install Docker on your system. Unless you have special needs, you can use the Docker Engine - Community version.

Running Containers

Docker uses the concepts of images and containers. An image is a self-contained package that can be run by Docker. A container is a running image with a certain state. There are several repositories containing pre-built Docker images. Docker Hub is the default repository that you’ll use in this tutorial. For a first example, run the hello-world image:

$ docker run hello-world
Unable to find image 'hello-world:latest' locallylatest: Pulling from library/hello-world1b930d010525: Pull completeDigest: sha256:451ce787d12369c5df2a32c85e5a03d52cbcef6eb3586dd03075f3...Status: Downloaded newer image for hello-world:latestHello from Docker!This message shows that your installation appears to be working correctly.[ ... Full output clipped ... ]

The first lines show that Docker downloaded hello-world from Docker Hub. When it runs this image, the resulting container produces a "Hello from Docker!" message that prints to your terminal.

Building Your Own Images Using Dockerfiles

You can create your own images using Dockerfiles, which is a plain text file that describes how a Docker image should be set up. The following is an example of a Dockerfile:

 1 FROM ubuntu 2 RUN apt update && apt install -y cowsay
 3 CMD["/usr/games/cowsay","Dockerfiles are cool!"]

A Dockerfile consists of a list of Docker commands. In the example above, there are three steps:

  • Line 1 bases the image on an existing image called ubuntu. You can do this independently of which system you’re running Docker on.
  • Line 2 installs a program named cowsay.
  • Line 3 prepares a command that runs cowsay when the image is executed.

To use this Dockerfile, save it in a text file named Dockerfile, without any file extension.

Note: You can build and run Linux images on any platform, so images like ubuntu are great for building applications that should be available cross-platform.

In contrast, a Windows image will only run on Windows, and a macOS image will only run on macOS.

Next, build an image from your Dockerfile:

$ docker build -t cowsay .

The command will give a lot of output as it’s building the image. -t cowsay will tag your image with the name cowsay. You can use tags to keep track of your images. The final dot in the command specifies the current directory as the build context for your image. This directory should be the one containing Dockerfile.

You can now run your very own Docker image:

$ docker run --rm cowsay
 _______________________< Dockerfiles are cool! > -----------------------        \   ^__^         \  (oo)\_______            (__)\       )\/\                ||----w |                ||     ||

The --rm option will clean up your container after use. It’s a good habit to use --rm to avoid filling up your system with stale Docker containers.

Note: Docker has several commands for managing your images and containers. You can list your images and containers using docker images and docker ps -a, respectively.

Both images and containers are assigned a 12-character ID that you can find in these listings. To delete an image or container, use either docker rmi <image_id> or docker rm <container_id> with the correct ID.

The docker command line is very powerful. Use docker --help and the official documentation for more information.

Running Python in a Docker Container

The Docker community releases and maintains Dockerfiles for all new versions of Python, which you can use to try out new Python features. Additionally, the Python core developers maintain a Docker image with all currently available versions of Python. In this section, you’ll learn how to run different Python versions in Docker.

Playing With the REPL

When you run a Python image from Docker Hub, the interpreter is set up so you can play with the REPL directly. To start the REPL in a Python container, run the following command:

$ docker run -it --rm python:rc
Python 3.8.0rc1 (default, Oct  2 2019, 23:30:03)[GCC 8.3.0] on linuxType "help", "copyright", "credits" or "license" for more information.>>>

This command will download the python:rc image from Docker Hub, start a container, and run python inside that container. The -it options are necessary for running the container interactively. The rc tag is shorthand for release candidate and points to the latest development version of Python. In this case, it’s the last release candidate of Python 3.8:

>>>
>>> importsys>>> f"{sys.version_info[:] = }""sys.version_info[:] = (3, 8, 0, 'candidate', 1)"

The first time you run a container, it may take some time to download. Later invocations will essentially be immediate. You can exit the REPL like usual, for example, by typing exit(). This also exits the container.

Note: The Docker Hub Python images are kept reasonably well up-to-date. As new releases mature, their alpha and beta versions are made available at the rc tag.

However, if you want to test out the absolute latest versions of Python, then the core developers’ image might be a better bet:

$ docker run -it --rm quay.io/python-devs/ci-image:master

You’ll see a few more examples of using this image later.

You can find a list of all available Python images at Docker Hub. python:latest will always give you the latest stable version of Python, while python:rc will provide you with the most recent development version. You can also request specific versions like python:3.6.3 or python:3.8.0b4, the fourth beta version of Python 3.8. You can even run PyPy using a tag like pypy:latest.

Setting Up Your Python Environment

A Docker container is an isolated environment. Therefore, you usually don’t need to add a virtual environment inside the container. Instead, you can run pip directly to install the necessary packages. To modify the container to include the extra packages, you use a Dockerfile. The following example adds parse and realpython-reader to a Python 3.7.5 container:

 1 FROM python:3.7.5-slim 2 RUN python -m pip install \ 3         parse \ 4         realpython-reader

Save this file with the name Dockerfile. The -slim tag in line 1 points to a Dockerfile based on a minimal Debian installation. This tag gives a significantly slimmer Docker image, but the downside is that you may need to install more additional tools yourself.

Other designations include -alpine and -windowsservercore. You can find more information about these image variants on Docker Hub.

Note: If you’d like to use a virtual environment inside a Docker container, then there’s one caveat you should be aware of. Each RUN command runs in a separate process, which means that the typical activation of a virtual environment won’t work inside of a Dockerfile.

Instead, you should manually activate the virtual environment by setting the VIRTUAL_ENV and PATH environment variables:

FROM python:3.7.5-slim# Set up and activate virtual environmentENV VIRTUAL_ENV "/venv"RUN python -m venv $VIRTUAL_ENVENV PATH "$VIRTUAL_ENV/bin:$PATH"# Python commands run inside the virtual environmentRUN python -m pip install \
        parse \
        realpython-reader

See Elegantly activating a virtualenv in a Dockerfile for more information.

To build and run your Dockerfile, use the following commands:

$ docker build -t rp .
[ ... Output clipped ... ]$ docker run -it --rm rp

Again, this will start a REPL session. You can confirm that parse has been installed in the container:

>>>
>>> importparse>>> parse.__version__'1.12.1'

You can also start containers that run custom commands:

$ docker run --rm rp realpython
The latest tutorials from Real Python (https://realpython.com/)  0 Run Python Versions in Docker: How to Try the Latest Python Release[ ... Full output clipped ... ]

Instead of starting a REPL, this runs the realpython command inside the rp container, which lists the latest tutorials published on Real Python. For more information about the realpython-reader package, check out How to Publish an Open-Source Python Package to PyPI.

Running Python Scripts Using Docker

In this section, you’ll see how to run scripts inside Docker. First, save the following example script to a file named headlines.py on your computer:

# headlines.pyimportparsefromreaderimportfeedtutorial=feed.get_article(0)headlines=[r.named["header"]forrinparse.findall("\n## {header}\n",tutorial)]print("\n".join(headlines))

The script first downloads the latest tutorial from Real Python. Then it uses parse to find all headlines in the tutorial and prints them to the console.

There are two general ways to run scripts like this in your Docker container:

  1. Mount a local directory as a volume in the Docker container.
  2. Copy the script into the Docker container.

The first option is especially useful during testing, as you don’t need to rebuild your Docker image when you make changes to your script. To mount your directory as a volume, use the -v option:

$ docker run --rm -v /home/realpython/code:/app rp python /app/headlines.py
Understanding Python Versions and DockerUsing DockerRunning Python in a Docker ContainerConclusionFurther Reading

The option -v /home/realpython/code:/app says that the local directory /home/realpython/code should be mounted as /app inside the container. You can then run the script with the command python /app/headlines.py.

You’ll want to copy your script into your container if you’re going to deploy your script to another machine. You do this by adding a few steps to your Dockerfile:

FROM python:3.7.5-slimWORKDIR /usr/src/appRUN python -m pip install \
        parse \
        realpython-reader
COPY headlines.py .
CMD["python","headlines.py"]

You set a working directory inside your container to control where commands are run. You can then copy headlines.py to that working directory inside the container, and change the default command to run headlines.py with python. Rebuild your image as usual, and run the container:

$ docker build -t rp .
[ ... Output clipped ... ]$ docker run --rm rp
Understanding Python Versions and DockerUsing DockerRunning Python in a Docker ContainerConclusionFurther Reading

Note that your script is run when you run the container because you specified the CMD command in the Dockerfile.

See the Python image description on Docker Hub for more information about building your own Dockerfiles.

Running the Latest Alpha

So far, you’ve been pulling images from Docker Hub, but there are many image repositories available. For instance, many cloud providers like AWS, GCP, and DigitalOcean offer dedicated container registries.

The core developers’ Python image is available at Quay.io. To use images from non-default repositories, you use the fully qualified named. For instance, you can run the core developers’ image as follows:

$ docker run -it --rm quay.io/python-devs/ci-image:master

By default, this starts a shell session inside the container. From the shell session, you can explicitly run Python:

$ python3.9 -c "import sys; print(sys.version_info)"sys.version_info(major=3, minor=9, micro=0, releaselevel='alpha', serial=1)

You can see all available versions of Python by looking inside /usr/local/bin:

$ ls /usr/local/bin/
2to3              get-pythons.sh  pydoc3.5           python3.7m2to3-3.4          idle            pydoc3.6           python3.7m-config2to3-3.5          idle3.4         pydoc3.7           python3.82to3-3.6          idle3.5         pydoc3.8           python3.8-config2to3-3.7          idle3.6         pydoc3.9           python3.92to3-3.8          idle3.7         python2.7          python3.9-config2to3-3.9          idle3.8         python2.7-config   pyvenv-3.4codecov           idle3.9         python3.4          pyvenv-3.5coverage          mypy            python3.4m         pyvenv-3.6coverage-3.6      mypyc           python3.4m-config  pyvenv-3.7coverage3         pip3.5          python3.5          smtpd.pydmypy             pip3.6          python3.5m         stubgeneasy_install-3.5  pip3.7          python3.5m-config  toxeasy_install-3.6  pip3.8          python3.6          tox-quickstarteasy_install-3.7  pip3.9          python3.6m         virtualenveasy_install-3.8  pydoc           python3.6m-configeasy_install-3.9  pydoc3.4        python3.7

This image is especially useful if you want to test your code on several Python versions. The Docker image is updated often and includes the latest development versions of Python. If you’re interested in checking out the latest features of Python, even before they’re officially released, then this image is a great choice.

Conclusion

In this tutorial, you’ve seen a quick introduction to working with different Python versions using Docker. This is a great way to test and see that your code is compatible with newer versions of Python. It only takes a few minutes to wrap your Python script in a Docker container, so you can try out the latest alpha as soon as it’s released!

Now you can:

  • Start a Python REPL through Docker
  • Set up your Python environment inside a Docker image
  • Run scripts inside Docker containers

As you test new Python versions in Docker, you’re providing invaluable help to the Python community. If you have any questions or comments, then please leave them in the comments section below.

Further Reading

For more information about Docker, and especially workflows for larger projects, check out Docker in Action - Fitter, Happier, More Productive.

You can also read about other examples of working with Python and Docker in the following tutorials:


[ Improve Your Python With 🐍 Python Tricks 💌 – Get a short & sweet Python Trick delivered to your inbox every couple of days. >> Click here to learn more and see examples ]

Python Data: Python Data Weekly Roundup – Dec 18 2019

$
0
0

In this week’s Python Data Weekly Roundup:

The Last Matplotlib Tweaking Guide You’ll Ever Need

This is a very good  ‘how to’ for beginners to learn to tweak the Matplotlib visualization library.  This article explains how to tweak matplotlib charts including changing the size, removing borders, changing colors and widths of chart lines.  Each tweak includes python code to make the tweaks.

Arithmetic, Geometric, and Harmonic Means for Machine Learning

Did you know there are different types of averages (aka means)?  After reading this article, you’ll have an understanding of what the difference is between the arithmetic, geometric and harmonic means are, why you should use one over the other and how to calculate them using python code.

What is My Data Worth?

Should you be paid for all the personal data that you’ve made available online? If so, what is that data worth?  In this fantastic article, Ruoxi Jia describes how to value personal data and describes how to apply the Shapley Value in data valuation and in general machine learning usages (e.g., interpreting black-box model predictions). An example of the Shapley Value is below. The below graphic shows two images from the article:

(a) The Shapley value produced by our proposed exact approach and the baseline Monte-Carlo approximation algorithm for the KNN classifier constructed with 1000 randomly selected training points from MNIST. (b) Runtime comparison of the two approaches as the training size increases.

Shapely Value Graph

FastSpeech: New text-to-speech model improves on speed, accuracy, and controllability

In this article, Microsoft Senior Research Xu Tan describes a new text-to speech model called FastSpeech. This new model is claimed to be fast, robust, controllable and high quality (which are all valuable and necessary features).   A deep dive of this model can be found here.

How to Develop Super Learner Ensembles in Python

Another great article from Jason Brownlee describing how to combine multiple models into an ensemble model for use in predictive modeling.  Jason provides python code that you can use to build your own Super Learner with scikit-learn. Additionally – and more importantly – Jason does a fantastic job of highlight the theory behind Super Learners with many links to articles and journals on the topic.

Strengthening the AI community

An overview of the DeepMind scholarship program as well as a description of why it makes sense to help others move into the field of AI.

Text Generation with Python

Natural Language Processing is well known as a way to analyze text.  I’ve written a bit about using NLP here on the site (see here and here). In this article, Julien Heiduk describes how he was able to use the GPT-2 model to generate text with python. In fact, the article is almost completely generated text via the GPT-2 model..and it does a good job of creating readable and understandable content.

Best Degree for Data Science (in One Picture)

Is there a ‘best’ degree for data science? Personally, I don’t think there is….but I can see there being better degrees for people that are just starting out.   For example, all things being equal on the personal front, a degree in statistics is going to be much better for you than a degree in horticulture…but…that’s not to say the statistics degree makes you a better data scientist…it just gives you the tools to get into the field quicker than someone with the horticulture degree. That said, I do like what Stephanie Glen says in this article when she writes: “getting a degree should be looked at as a stepping block, not a train ride to a destination. No single degree is likely to get you in the door.”


That’s it for this week’s Python Data Weekly Roundup. Subscribe to our newsletter to receive this weekly roundup in your email.

The post Python Data Weekly Roundup – Dec 18 2019 appeared first on Python Data.

Matt Layman: django-environ and django-debug-toolbar - Building SaaS #39

$
0
0
In this episode, we set up a couple of tools that will be at the base of development. The first tool was django-environ to control Django settings from environment variables. The second tool was the django-debug-toolbar to help with debugging pages in future work. We started the stream with an upgrade to Django 3.0.1 because of a security release that was announced today. For a new project, I don’t recommend upgrading packages all the time, but security releases are my exception to that rule.

Python Insider: Python 3.8.1, 3.7.6, 3.6.10, and 3.9.0a2 are now available!

$
0
0
from locale import seasons_greetings
seasons_greetings()

On behalf of the entire Python development community, and the currently serving Python release team in particular, I'm pleased to announce the unprecedented combined release of no less than four versions of Python. Let's dig in!

Python 3.8.1
Python 3.8.1 is the first maintenance release of Python 3.8. The Python 3.8 series is the newest feature release of the Python language, and it contains many new features and optimizations. You can find Python 3.8.1 here:

See the “What’s New in Python 3.8” document for more information about features included in the 3.8 series. Detailed information about all changes made in 3.8.1 can be found in its change log.

Maintenance releases for the 3.8 series will continue at regular bi-monthly intervals, with 3.8.2 planned for February 2020.

Python 3.7.6
Python 3.7.6, the next bugfix release of Python 3.7, is also available. You can find the release files, a link to the change log, and more information here:

Python 3.9.0a2
An early developer preview of Python 3.9 is also ready:
https://www.python.org/downloads/release/python-390a2/

Python 3.9 is still in development. This releasee, 3.9.0a2 is the second of six planned alpha releases. Alpha releases are intended to make it easier to test the current state of new features and bug fixes and to test the release process. During the alpha phase, features may be added up until the start of the beta phase (2020-05-18) and, if necessary, may be modified or deleted up until the release candidate phase (2020-08-10). Please keep in mind that this is a preview release and its use is not recommended for production environments.

Python 3.6.10
And, one more thing: Python 3.6.10, the next security fix release of Python 3.6, is also available:

We hope you enjoy all those!
Thanks to all of the many volunteers who help make Python Development and these releases possible! Please consider supporting our efforts by volunteering yourself or through organization contributions to the Python Software Foundation.

Your friendly release team,
Ned Deily
Steve Dower
Łukasz Langa

PyCharm: PyCharm 2019.3.1

$
0
0

Have you made some plans to build a cool side project over the holidays? We polished PyCharm further to make sure you can focus on getting it done! Tweet us @pycharm to tell us about your project!

Improved in PyCharm

  • As a part of our Python 3.8 support, we give you code insight for TypedDicts. In this version of PyCharm, we’ve resolved some false positives and other small errors.
  • PyCharm supports using reStructuredText (reST) in docstrings, unfortunately, PyCharm 2019.3 was a little overzealous and interpreted every docstring as reST for some users. We’ve curbed its enthusiasm.
  • MongoDB is supported in PyCharm Professional Edition since 2019.3. Some small issues have now been resolved, for example: we showed only the date portion of an ISODate, and now we’ve restored them to their full length.

And many more small fixes, see our release notes for details.

Getting the New Version

You can update PyCharm by choosing Help | Check for Updates (or PyCharm | Check for Updates on macOS) in the IDE. PyCharm will be able to patch itself to the new version, there should no longer be a need to run the full installer.

If you’re on Ubuntu 16.04 or later, or any other Linux distribution that supports snap, you should not need to upgrade manually, you’ll automatically receive the new version.


Stack Abuse: Working with Redis in Python with Django

$
0
0

Introduction

Data is increasingly becoming a valuable commodity in the current era of technology and this necessitates the optimization of storage and access to this data.

There are quite a few notable solutions for the storage of data, including Relational Database Management Systems (RDBMS) such as MySQL and PostgreSQL, which store data in a structured format using rows and columns and the relationships within the data.

Apart from RDBMS, there are key-value stores that store data based on unique keys and values like a dictionary. Key-value databases fall under the NoSQL family of databases that do not conform to the relational nature of RDBMS.

In this post, we will explore Redis as a key-value store and use it in a project to explore its functionality.

What is Redis and why use it?

Redis (REmote DIctionary Server), is an in-memory data structure store that can be utilized as a database, cache, or a message broker.

Data is stored in Redis in the form of key-values where the keys are used to locate and extract the data stored on the Redis instance.

Normal databases store data to disk, which brings in the extra cost, in terms of time and hardware resources. Redis avoids this by storing all the data in memory, which makes the data readily available and increases the speed of data access and manipulation, as compared to normal databases.

This is the reason why Redis is known for its exceptional high-performance capability.

Redis allows us to store data in multiple high-level data structures including strings, hashes, lists, sets, and sorted sets. This gives us more flexibility on the type and amount of information we can store on a Redis data store.

Having been written in ANSI C, Redis is lightweight and without external dependencies. It is also quite friendly to developers since it supports most high-level languages such as Python, JavaScript, Java, C/C++, and PHP.

When should you use Redis?

The common use cases of Redis include:

  • Caching: Given its speed over traditional databases, in terms of read and write operations, Redis has become an ideal solution for temporarily storing data in a cache to accelerate data access in the future.
  • Message Queueing: With the capability of implementing the Publish/Subscribe messaging paradigm, Redis has become a message broker for message queueing systems.
  • Data storage: Redis can be used to store key-value data as a NoSQL database.

Companies such as Twitter, Pinterest, Github, Snapchat, and StackOverflow all utilize Redis to store and make data highly available for their users.

For instance, Twitter stores the most recent incoming tweets for a user on Redis to speed up the delivery of the tweets to client applications.

Pinterest uses Redis to store a list of users and boards a user follows, a list of a user's followers, and a list of people who follow your boards, among other lists to enhance the experience on the platform.

Installing Redis

To further explore Redis, we need to download and install the Redis server using the instructions from the official webpage. Redis is also available as a Docker image on Docker Hub.

It also ships with a Redis-CLI tool that we can use to interact with and manipulate data in our Redis server.

Redis is also available for installation via Homebrew (for MacOS) and via the default apt repository for Debian Linux and its variants, such as Ubuntu.

To install Redis on MacOS, simply run:

$ brew install redis

On Debian Linux:

$ sudo apt-get install redis-server

To verify our Redis installation, type the redis-cli command, then type ping on the prompt that comes up:

$ redis-cli -v
redis-cli 5.0.6
$ redis-cli
127.0.0.1:6379> ping
PONG
127.0.0.1:6379>

We can see that our Redis server is ready with the reply - PONG.

Redis Commands

Redis, through Redis-CLI, provides some handy commands that we can use to interact with the Redis server and manipulate the data stored there. By default, Redis servers run on the port 6379 and this will be visible on our prompt.

The commands available within the Redis-CLI prompt include:

  1. SET: This command is used to set a key and its value, with additional optional parameters to specify the expiration of the key-value entry. Let's set a key hello with the value of world with an expiry of 10 seconds:
127.0.0.1:6379> SET hello "world" EX 10
OK
  1. GET: This command is used to get the value associated with a key. In case the key-value entry has surpassed its expiration period, nil will be returned:
127.0.0.1:6379> GET hello
“world”

# After expiry
127.0.0.1:6379> GET hello
(nil)
  1. DELETE: This command deletes a key and the associated value:
127.0.0.1:6379> DEL hello
(integer) 1
  1. TTL: When a key is set with an expiry, this command can be used to view how much time is left:
127.0.0.1:6379> SET foo "bar" EX 100     # 100 is the number of seconds
OK

127.0.0.1:6379> TTL foo
(integer) 97      # Number of seconds remaining till expiry

127.0.0.1:6379> TTL foo
(integer) 95

127.0.0.1:6379> TTL foo
(integer) 93
  1. PERSIST: If we change our mind about a key's expiry, we can use this command to remove the expiry period:
127.0.0.1:6379> PERSIST foo
(integer) 1

127.0.0.1:6379> TTL foo
(integer) -1

127.0.0.1:6379> GET foo
"bar"
  1. RENAME: This command is used to rename the keys in our Redis server:
127.0.0.1:6379> RENAME foo foo2
OK

127.0.0.1:6379> GET foo
(nil)

127.0.0.1:6379> GET foo2
"bar"
  1. FLUSHALL: This command is used to purge all the key-value entries we have set in our current session:
127.0.0.1:6379> RENAME foo foo2
OK

127.0.0.1:6379> GET foo
(nil)

127.0.0.1:6379> GET foo2
(nil)

127.0.0.1:6379> GET hello
(nil)

More information on these and other Redis commands can be found on the official website.

Redis with Django

To demonstrate how to integrate Redis in a web application, we will build an API using Django and Django REST that can receive a key-value pair and store it in our Redis server.

Our API will also be able to retrieve values for given keys, retrieve all key-value pairs stored and also delete a key-value entry.

Let us start by creating a folder to house our project:

$ mkdir redis_demo && cd $_

Then, let's create a virtual environment and activate it:

$ virtualenv --python=python3 env --no-site-packages
$ source env/bin/activate

And finaly, let's install the needed libraries:

$ pip install django djangorestframework redis

Our application's API will receive requests and interact with our Redis server using the Redis-py library.

Let's now create the app:

# Create the project
$ django-admin startproject django_redis_demo
$ cd django_redis_demo

# Create the app
$ django-admin startapp api

# Migrate
$ python manage.py migrate

To verify that our Django setup was successful, we start the server:

$ python manage.py runserver

When we navigate to http:127.0.0.1:8000, we are welcomed by:

django setup

The next step is to add our api application and Django REST to our project by updating the INSTALLED_APPS list found in django_redis_demo/settings.py:

INSTALLED_APPS = [
    'django.contrib.admin',
    'django.contrib.auth',
    'django.contrib.contenttypes',
    'django.contrib.sessions',
    'django.contrib.messages',
    'django.contrib.staticfiles',
    # Add these two
    'rest_framework',
    'api',
]

Redis-py needs a running instance of Redis to interact with. We will have to configure this in our django_redis_demo/settings.py by adding:

REDIS_HOST = 'localhost'
REDIS_PORT = 6379

With this setting, we can also use a Redis instance running inside a Docker container or a remote Redis instance, even though we might need to provide authentication details for that case. For now, we will use our local Redis instance that we set up.

Next, we are going to create the route that will be used to access our API and link it to our main Django application. First, we will create an empty api/urls.py file, then create our path in the django_redis_demo/urls.py:

# Modify this import
from django.urls import path, include

urlpatterns = [
    ...
    # Add this entry
    path('api/', include('api.urls')),
]

All requests coming in through the api/ endpoint will be now handled by our api application. What's missing now are the views that will handle the requests.

Our views will be simple function-based views that will allow us to interact with the Redis server. First, let us create the URLs that we will interact with in our api/urls.py:

from django.urls import path
from rest_framework.urlpatterns import format_suffix_patterns
from .views import manage_items, manage_item

urlpatterns = {
    path('', manage_items, name="items"),
    path('<slug:key>', manage_item, name="single_item")
}
urlpatterns = format_suffix_patterns(urlpatterns)

The first path will allow us to create entries and view all entries, while the second path will give us granular management of single entries.

We will have two function-based views: manage_items() and manage_item() that will handle the requests and interact with our Redis instance. They will both reside in our api/views.py file.

To better explain the code, we'll break it down into more concise chunks. If you want to see the full code, there's a link to the GitHub repo with the source code in the conclusion of this article.

We'll start off by importing the needed libraries and connecting to our Redis instance:

import json
from django.conf import settings
import redis
from rest_framework.decorators import api_view
from rest_framework import status
from rest_framework.response import Response

# Connect to our Redis instance
redis_instance = redis.StrictRedis(host=settings.REDIS_HOST,
                                  port=settings.REDIS_PORT, db=0)

Here, we create our connection object by passing the Redis host and port as earlier configured in our django_redis_demo/settings.py.

Then, we create our first view manage_items() that will be used to retrieve all the items currently set in our running Redis instance. This view will also allow us to create new entries in our Redis instance by passing a JSON object:

@api_view(['GET', 'POST'])
def manage_items(request, *args, **kwargs):
    if request.method == 'GET':
        items = {}
        count = 0
        for key in redis_instance.keys("*"):
            items[key.decode("utf-8")] = redis_instance.get(key)
            count += 1
        response = {
            'count': count,
            'msg': f"Found {count} items.",
            'items': items
        }
        return Response(response, status=200)
    elif request.method == 'POST':
        item = json.loads(request.body)
        key = list(item.keys())[0]
        value = item[key]
        redis_instance.set(key, value)
        response = {
            'msg': f"{key} successfully set to {value}"
        }
        return Response(response, 201)

Then, let's define manage_item():

@api_view(['GET', 'PUT', 'DELETE'])
def manage_item(request, *args, **kwargs):
    if request.method == 'GET':
        if kwargs['key']:
            value = redis_instance.get(kwargs['key'])
            if value:
                response = {
                    'key': kwargs['key'],
                    'value': value,
                    'msg': 'success'
                }
                return Response(response, status=200)
            else:
                response = {
                    'key': kwargs['key'],
                    'value': None,
                    'msg': 'Not found'
                }
                return Response(response, status=404)
    elif request.method == 'PUT':
        if kwargs['key']:
            request_data = json.loads(request.body)
            new_value = request_data['new_value']
            value = redis_instance.get(kwargs['key'])
            if value:
                redis_instance.set(kwargs['key'], new_value)
                response = {
                    'key': kwargs['key'],
                    'value': value,
                    'msg': f"Successfully updated {kwargs['key']}"
                }
                return Response(response, status=200)
            else:
                response = {
                    'key': kwargs['key'],
                    'value': None,
                    'msg': 'Not found'
                }
                return Response(response, status=404)

    elif request.method == 'DELETE':
        if kwargs['key']:
            result = redis_instance.delete(kwargs['key'])
            if result == 1:
                response = {
                    'msg': f"{kwargs['key']} successfully deleted"
                }
                return Response(response, status=404)
            else:
                response = {
                    'key': kwargs['key'],
                    'value': None,
                    'msg': 'Not found'
                }
                return Response(response, status=404)

manage_item() gives us access to individual entries in our Redis instance. This view requires the caller to pass the key of the item we need in the URL.

This key is then used to locate the value as stored in our instance. By using the PUT HTTP method and passing the new value of a key, we can update the value of the key.

Through the DELETE method, we can delete a key-value pair from our Redis instance.

To see our API in action, we will use Postman. But first, let us create an entry or two by using the redis-cli tool:

$ redis-cli
127.0.0.1:6379> SET HELLO "WORLD"
OK
127.0.0.1:6379> SET REDIS "DEMO"
OK

After setting the data, let us send a GET request to localhost:8000/api/items:

get all items

Our API is able to fetch all the key-value pairs in our current Redis instance. Let us now send a POST request with the following payload to the same URL:

{
"mighty": "mug"
}

Let us send another GET request to the same endpoint:

get all items after update

We can see that the key we created using our API is saved on our Redis instance. We can verify it's existence by using the CLI tool.

Let us now test the second endpoint that returns the value of a single key by sending a GET request to http://localhost:8000/api/items/HELLO:

get single item

That went well. Let us now update the value associated to the HELLO key by sending the following JSON via a PUT request to the same endpoint:

{
"new_value": "stackabuse.com"
}

When we fetch the key HELLO again:

update single item

Our value has been updated successfully. The final bit that is remaining is the deletion of keys, so let us go ahead and send a DELETE request to http://localhost:8000/api/items/HELLO to delete the key we have just updated.

When we try to access the same item after deleting it:

post deletion single item

We are informed that our key has been deleted. Our Django API has successfully interfaced with our Redis instance using the Redis-py library.

Conclusion

Redis is a powerful and fast data storage option, that if used in the right situation can bring a lot of benefits. It does not have a steep learning curve so it is easy to pick up and it also comes with a handy CLI tool to help us interact with it through simple and intuitive commands.

We have been able to integrate our Django API with a locally running Redis instance seamlessly which is a testament to its ease of use with common high-level programming languages.

The source code for the script in this project can be found here on GitHub.

Python Software Foundation: Python 2 series to be retired by April 2020

$
0
0
The CPython core development community is urging users to migrate to Python 3 as it will be the only version that will be updated for bugs and security vulnerabilities.

After nearly 20 years of development on the Python 2 series, the last major version 2.7 will be released in April 2020, and then all development will cease for Python 2. Users are urged to migrate to Python 3 to benefit from its many improvements, as well as to avoid potential security vulnerabilities in Python 2.x after April 2020. This move will free limited resources for the CPthyon core developer community for other important work.

The final Python 2.7 maintenance release was originally planned for 2015. However, it was delayed 5 years to give people adequate time to migrate and to work closely with vendors and redistributors to ensure that supported Python 3 migration options were available. Part of the reason for this delay was because the stricter text model in Python 3 was forcing the resolution of non-trivial Unicode handling issues in the reference interpreter and standard library, and in migrated libraries and applications

Python 3 is a noticeable improvement to Python. There is ground-up support for Unicode and internationalization. It better expresses common idioms and patterns, which in code makes it easier to read and reason about. Improvements in concurrency, fault handling, testing, and debugging provide developers with the opportunity to create more robust and secure applications.

Going forward, Python 3 will be the only major version of CPython that is actively maintained for bugs and security issues.

More information:

Catalin George Festila: Python 3.7.5 : Simple web search with google python package.

$
0
0
This is a simple search on the web with python google package. [mythcat@desk ~]$ pip3 install google --user Collecting google ... Installing collected packages: google Successfully installed google-2.0.3 This is a simple example for search on web with this words: protv news 2019. From the python package, I need to import just the search and used it. The python package need a variable string named

Weekly Python StackOverflow Report: (ccvii) stackoverflow python report

$
0
0

Catalin George Festila: Python 3.7.5 : The new PyQt5 released.

$
0
0
The PyQt v5.14.0 has been released with support for Qt v5.14.0. [mythcat@desk ~]$ pip3 install --upgrade PyQt5 --user Collecting PyQt5 ... Installing collected packages: PyQt5-sip, PyQt5 Successfully installed PyQt5-5.14.0 PyQt5-sip-12.7.0Let's see how can see the version: [mythcat@desk ~]$ python3 Python 3.7.5 (default, Dec 15 2019, 17:54:26) [GCC 9.2.1 20190827 (Red Hat 9.2.1-1)] on linux

Erik Marsja: How to Change the Size of Seaborn Plots

$
0
0

The post How to Change the Size of Seaborn Plots appeared first on Erik Marsja.

In this short tutorial, we will learn how to change the figure size of Seaborn plots. For many reasons, we may need to either increase the size or decrease the size, of our plots created with Seaborn.

When do We Need to Change the Size of a Plot?

One example, for instance, when we might want to change the size of a plot could be when we are going to communicate the results from our data analysis. In this case, we may compile the descriptive statistics, data visualization, and results from data analysis into a report, or manuscript for scientific publication.

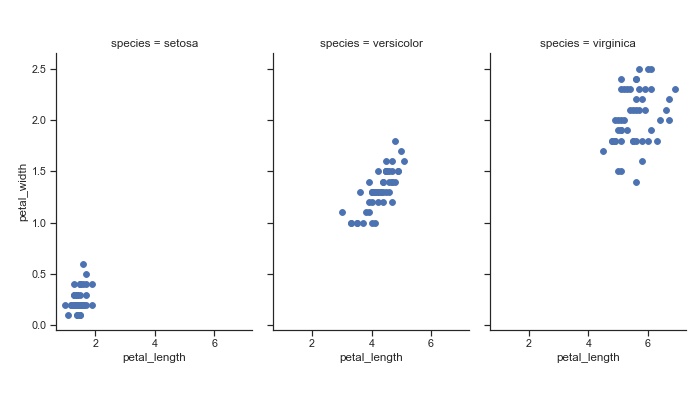
FacetGrid Plot

Here, we may need to change the size so it fits the way we want to communicate our results. Note, for scientific publication (or printing, in general) we may want to also save the figures as high-resolution images.

What is Seaborn?

First, before learning how to install Seaborn, we are briefly going to discuss what this Python package is. This Python package is, obviously, a package for data visualization in Python. Furthermore, it is based on matplotlib and provides us with a high-level interface for creating beautiful and informative statistical graphics. It is easier to use compared to Matplotlib and, using Seaborn, we can create a number of commonly used data visualizations in Python.

How to Install Python Packages

Now, if we want to install python packages we can use both conda and pip. Conda is the package manager for the Anaconda Python distribution and pip is a package manager that comes with the installation of Python. Both of these methods are quite easy to use: conda install -c anaconda seaborn and pip -m install seaborn will both install Seaborn and it’s dependencies using conda and pip, respectively. Here’s more information on installing Python packages using Pip and Conda.

Changing the Size of Python Plots

In this section, we are going to learn several methods for changing the size of plots created with Seaborn. First, we need to install the Python packages needed. Second, we are going to create a couple of different plots (e.g., a scatter plot, a histogram, a violin plot). Finally, when we have our different plots we are going to learn how to increase, and decrease, the size of the plot and then save it to high-resolution images.

How to Change the Size of a Seaborn Scatter Plot

In the first example, we are going to increase the size of a scatter plot created with Seaborn’s scatterplot method. First, however, we need some data. Conveniently, Seaborn has some example datasets that we can use when plotting. Here, we are going to use the Iris dataset and we use the method load_dataset to load this into a Pandas dataframe.

import seaborn as sns

iris_df = sns.load_dataset('iris')

iris_df.head()
Pandas Dataframe for Data Visualization

In the code chunk above, we first import seaborn as sns, we load the dataset, and, finally, we print the first five rows of the dataframe. Now that we have our data to plot using Python, we can go one and create a scatter plot:

%matplotlib inline

sns.scatterplot(x='sepal_length', 
                y='petal_length', 
                data=iris_df)
Scatter Plot in PythonScatter Plot
import matplotlib.pyplot as plt

fig = plt.gcf()
fig.set_size_inches(12, 8)

sns.scatterplot(x='sepal_length', 
                y='petal_length', 
                data=iris_df)
Scattergraph created with SeabornScatter plot in Python

How to Change the Size of a Seaborn Catplot

In this section, we are going to create a violin plot using the method catplot. Now, we are going to load another dataset (mpg). This is, again, done using the load_dataset method:

mpg_df = sns.load_dataset('mpg')
mpg_df.head()

Now, when working with the catplot method we cannot change the size in the same manner as when creating a scatter plot.

g = sns.catplot(data=cc_df, x='origin', kind="violin",
                y='horsepower', hue='cylinders')
g.fig.set_figwidth(12)
g.fig.set_figheight(10)
Violin Plot in PythonViolin Plot

Changing the Font Size on a Seaborn Plot

As can be seen in all the example plots, in which we’ve changed the size of the plots, the fonts are now relatively small. We can change the fonts using the set method and the font_scale argument. Again, we are going to use the iris dataset so we may need to load it again.

In this example, we are going to create a scatter plot, again, and change the scale of the font size. That is, we are changing the size of the scatter plot using Matplotlib Pyplot, gcf(), and the set_size_inches() method:

iris_df = sns.load_dataset('iris')

fig = plt.gcf()
fig.set_size_inches(12, 8)

# Setting the font scale
sns.set(font_scale=2)
sns.scatterplot(x='sepal_length', 
                y='petal_length', 
                data=iris_df)

Saving Seaborn Plots

Finally, we are going to learn how to save our Seaborn Figures as image files. This is accomplished using the savefig method from Pyplot and we can save it as a number of different file types (e.g., jpeg, png, eps, pdf). In this section, we are going to save a scatter plot as jpeg and EPS. Note, EPS will enable us to save the file in high-resolution and we can use the files e.g. when submitting to scientific journals.

Saving a Seaborn Plot as JPEG

In this section, we are going to use Pyplot savefig to save a scatter plot as a JPEG. First, we create 3 scatter plots by species and, as previously, we change the size of the plot. Note, we use the FacetGrid class, here, to create three columns for each species.

import matplotlib.pyplot as plt
import seaborn as sns

iris_df = sns.load_dataset('iris')
sns.set(style="ticks")
g = sns.FacetGrid(iris_df, col="species")
g = g.map(plt.scatter, "petal_length", "petal_width")
g.fig.set_figheight(6)
g.fig.set_figwidth(10)

plt.savefig('our_plot_name.jpg', format='jpeg', dpi=70)

In the code chunk above, we save the plot in the final line of code. Here, the first argument is the filename (and path), we want it to be a jpeg and, thus, provide the string “jpeg” to the argument format. Finally, we added 70 dpi for the resolution. Note, dpi can be changed so that we get print-ready Figures.

Saving a Seaborn Plot as EPS

In this last code chunk, we are creating the same plot as above. Note, however, how we changed the format argument to “eps” (Encapsulated Postscript) and the dpi to 300. This way we get our Seaborn plot in vector graphic format and in high-resolution:

import matplotlib.pyplot as plt
import seaborn as sns

iris_df = sns.load_dataset('iris')
sns.set(style="ticks")
g = sns.FacetGrid(iris_df, col="species")
g = g.map(plt.scatter, "petal_length", "petal_width")

plt.savefig('our_plot_name.eps', format='eps', dpi=300)

Conclusion

In this post, we have learned how to change the size of the plots, change the size of the font, and how to save our plots as JPEG and EPS files. More specifically, here we have learned how to specify the size of Seaborn scatter plots, violin plots (catplot), and FacetGrids.

Comment below, if there are any questions or suggestions to this post (e.g., if some techniques do not work for a particular data visualization technique).

The post How to Change the Size of Seaborn Plots appeared first on Erik Marsja.

Python Circle: How to setup Django app on EC2 instance (AWS)

$
0
0
Step by step guide on hosting Django application on AWS ec2 instance, How to host the Django app on AWS ec2 instance from scratch, Django on EC2, Django app hosting on AWS, Free hosting of Django App

Python Circle: Hosting Django app for free on Amazon (AWS) EC2 with Gunicorn and Nginx

$
0
0
Step by step guide on hosting Django application on AWS ec2 instance, How to host the Django app on AWS ec2 instance from scratch, Django on EC2, Django app hosting on AWS, Free hosting of Django App

Python Circle: How to setup Django app on EC2 instance (AWS) - Part 2

$
0
0
Step by step guide on hosting Django application on AWS ec2 instance, How to host the Django app on AWS ec2 instance from scratch, Django on EC2, Django app hosting on AWS, Free hosting of Django App

Python Circle: AWS EC2 Vs PythonAnyWhere for hosting Django application

$
0
0
AWS EC2 Vs PythonAnyWhere for hosting Django application, hosting Django application for free on AWS EC2, Hosting Django application for free on PythonAnyWhere, comparing ec2 and pythonanywhere
Viewing all 22406 articles
Browse latest View live


<script src="https://jsc.adskeeper.com/r/s/rssing.com.1596347.js" async> </script>