Quantcast
Channel: Planet Python
Viewing all 22409 articles
Browse latest View live

Podcast.__init__: Riding The Rising Tides Of Python

$
0
0
The past two decades have seen massive growth in the language, community, and ecosystem of Python. The career of Pete Fein has occurred during that same period and his use of the language has paralleled some of the major shifts in focus that have occurred. In this episode he shares his experiences moving from a trader writing scripts, through the rise of the web, to the current renaissance in data. He also discusses how his engagement with the community has evolved, why he hasn't needed to use any other languages in his career, and what he is keeping an eye on for the future.

Summary

The past two decades have seen massive growth in the language, community, and ecosystem of Python. The career of Pete Fein has occurred during that same period and his use of the language has paralleled some of the major shifts in focus that have occurred. In this episode he shares his experiences moving from a trader writing scripts, through the rise of the web, to the current renaissance in data. He also discusses how his engagement with the community has evolved, why he hasn’t needed to use any other languages in his career, and what he is keeping an eye on for the future.

Announcements

  • Hello and welcome to Podcast.__init__, the podcast about Python and the people who make it great.
  • When you’re ready to launch your next app or want to try a project you hear about on the show, you’ll need somewhere to deploy it, so take a look at our friends over at Linode. With 200 Gbit/s private networking, scalable shared block storage, node balancers, and a 40 Gbit/s public network, all controlled by a brand new API you’ve got everything you need to scale up. And for your tasks that need fast computation, such as training machine learning models, they just launched dedicated CPU instances. Go to pythonpodcast.com/linode to get a $20 credit and launch a new server in under a minute. And don’t forget to thank them for their continued support of this show!
  • You listen to this show to learn and stay up to date with the ways that Python is being used, including the latest in machine learning and data analysis. For even more opportunities to meet, listen, and learn from your peers you don’t want to miss out on this year’s conference season. We have partnered with organizations such as O’Reilly Media, Dataversity, Corinium Global Intelligence, Alluxio, and Data Council. Upcoming events include the combined events of the Data Architecture Summit and Graphorum, the Data Orchestration Summit, and Data Council in NYC. Go to pythonpodcast.com/conferences to learn more about these and other events, and take advantage of our partner discounts to save money when you register today.
  • Your host as usual is Tobias Macey and today I’m interviewing Pete Fein about his voyage on the rising tide of Python

Interview

  • Introductions
  • How did you get introduced to Python?
  • I understand that you have used Python exclusively in your professional life. What other languages have you been exposed to and taken inspiration from?
  • What are some of the projects that you have been involved with which you are most proud of?
  • How has the community and your involvement with it changed over the years?
    • In your experience, how has the growth in the size and breadth of the community impacted its accessibility to newcomers?
  • You have been using Python and participating in the community for quite some time now, and there have been significant changes in both within that period. What are some of the most significant technological shifts that you have noticed and been a part of?
    • How have those shifts influenced the direction of your career?
  • As you have moved through the different phases of your career with different areas of focus, what are some of the aspects of the work which have remained constant?
    • What have been the biggest differences across the different problem domains?
  • What are some of the aspects of the language or its ecosystem which you feel are lacking or don’t get enough attention?
  • What are some of the industry trends which you are keeping a close eye on and how do you anticipate them influencing the direction of the community and your career in the upcoming years?

Keep In Touch

Picks

Closing Announcements

  • Thank you for listening! Don’t forget to check out our other show, the Data Engineering Podcast for the latest on modern data management.
  • Visit the site to subscribe to the show, sign up for the mailing list, and read the show notes.
  • If you’ve learned something or tried out a project from the show then tell us about it! Email hosts@podcastinit.com) with your story.
  • To help other people find the show please leave a review on iTunes and tell your friends and co-workers
  • Join the community in the new Zulip chat workspace at pythonpodcast.com/chat

Links

The intro and outro music is from Requiem for a Fish The Freak Fandango Orchestra / CC BY-SA


Codementor: LAST Part - teach your kids to build their own game with Python.

$
0
0
a tutorial that teaches kids/beginners how to develop the famous Space Invaders game with Python.

Chris Moffitt: Finding Natural Breaks in Data with the Fisher-Jenks Algorithm

$
0
0

Introduction

This article is inspired by a tweet from Peter Baumgartner. In the tweet he mentioned the Fisher-Jenks algorithm and showed a simple example of ranking data into natural breaks using the algorithm. Since I had never heard about it before, I did some research.

After learning more about it, I realized that it is very complimentary to my previous article on Binning Data and it is intuitive and easy to use in standard pandas analysis. It is definitely an approach I would have used in the past if I had known it existed.

I suspect many people are like me and have never heard of the concept of natural breaks before but have probably done something similar on their own data. I hope this article will expose this simple and useful approach to others so that they can add it to their python toolbox.

The rest of this article will discuss what the Jenks optimization method (or Fisher-Jenks algorithm) is and how it can be used as a simple tool to cluster data using “natural breaks”.

Background

Thanks again to Peter Baumgartner for this tweet which piqued my interest.

This algorithm was originally designed as a way to make chloropleth maps more visually representative of the underlying data. This approach certainly works for maps but I think it is also useful for other applications. This method can be used in much the same way that simple binning of data might be used to group numbers together.

What we are trying to do is identify natural groupings of numbers that are “close” together while also maximizing the distance between the other groupings. Fisher developed a clustering algorithm that does this with 1 dimensional data (essentially a single list of numbers). In many ways it is similar to k-means clustering but is ultimately a simpler and faster algorithm because it only works on 1 dimensional data. Like k-means, you do need to specify the number of clusters. Therefore domain knowledge and understanding of the data are still essential to using this effectively.

The algorithm uses an iterative approach to find the best groupings of numbers based on how close they are together (based on variance from the group’s mean) while also trying to ensure the different groupings are as distinct as possible (by maximizing the group’s variance between groups). I found this page really useful to understanding some of the history of the algorithm and this article goes into more depth behind the math of the approach.

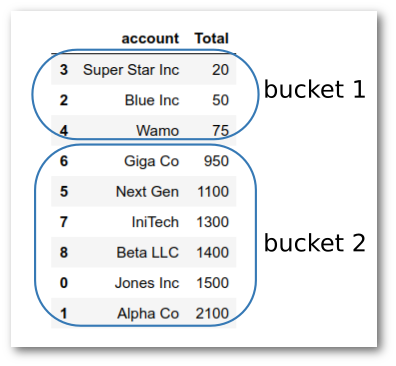
Regardless of the math, the concept is very similar to how you would intuitively break groups of numbers. For example, let’s look at some sample sales numbers for 9 accounts. Given the data below, if you were asked to break the accounts into 2 buckets, based solely on sales, you would likely do something like this:

First example of natural breaks

Without knowing the actual details of the algorithm, you would have known that 20, 50 and 75 are all pretty close to each other. Then, there is a big gap between 75 and 950 so that would be a “natural break” that you would utilize to bucket the rest of your accounts.

This is exactly what the Jenks optimization algorithm does. It uses an iterative approach to identify the “natural breaks” in the data.

What I find especially appealing about this algorithm is that the breaks are meant to be intuitive. It is relatively easy to explain to business users how these groupings were developed.

Before I go any further, I do want to make clear that in my research, I found this approach referred to by the following names: “Jenks Natural Breaks”, “Fisher-Jenks optimization”, “Jenks natural breaks optimization”, “Jenks natural breaks classification method”, “Fisher-Jenks algorithm” and likely some others. I mean no disrespect to anyone involved but for the sake of simplicity I will use the term Jenks optimization or natural breaks as a generic description of the method going forward.

Implementation

For the purposes of this article, I will use jenkspy from Matthieu Viry. This specific implementation appears to be actively maintained and has a compiled c component to ensure fast implementation. The algorithm is relatively simple so there are other approaches out there but as of this writing, this one seems to be the best I can find.

On my system, the install with conda install -c conda-forge jenkspy worked seamlessly. You can follow along in this notebook if you want to.

We can get started with a simple data set to clearly illustrate finding natural breaks in the data and how it compares to other binning approaches discussed in the past.

First, we import the modules and load the sample data:

importpandasaspdimportjenkspysales={'account':['Jones Inc','Alpha Co','Blue Inc','Super Star Inc','Wamo','Next Gen','Giga Co','IniTech','Beta LLC'],'Total':[1500,2100,50,20,75,1100,950,1300,1400]}df=pd.DataFrame(sales)df.sort_values(by='Total')

Which yields the DataFrame:

Dataframe

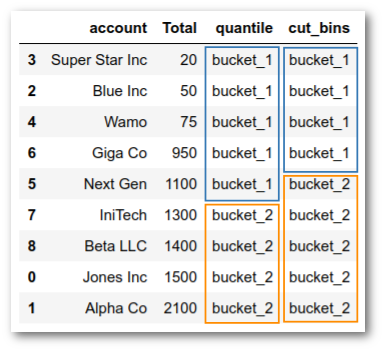
In order to illustrate how natural breaks are found, we can start by contrasting it with how quantiles are determined. For example, what happens if we try to use pd.qcut with 2 quantiles? Will that give us a similar result?

df['quantile']=pd.qcut(df['Total'],q=2,labels=['bucket_1','bucket_2'])
Dataframe

As you can see this approach tries to find two equal distribution of the numbers. The result is that bucket_1 covers the values from 20 - 1100 and bucket_2 includes the rest.

This does not feel like where we would like to have the break if we were seeking to explain a grouping in a business setting. If the question was something like “How do we divide our customers into Top and and Bottom customer segment groups?”

We can also use pd.cut to create two buckets:

df['cut_bins']=pd.cut(df['Total'],bins=2,labels=['bucket_1','bucket_2'])

Which gets us closer but still not quite where we would ideally like to be:

Dataframe

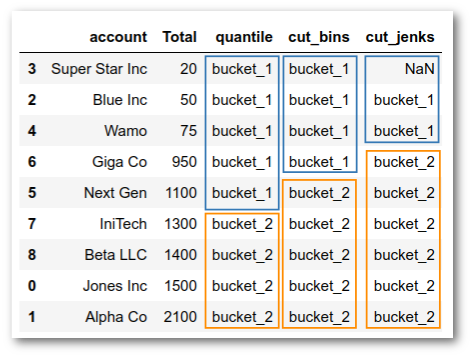
If we want to find the natural breaks using jenks_breaks , we need to pass the column of data and the number of clusters we want, then the function will give us a simple list with our boundaries:

breaks=jenkspy.jenks_breaks(df['Total'],nb_class=2)print(breaks)
[20.0,75.0,2100.0]

As I discussed in the previous article, we can pass these boundaries to cut and assign back to our DataFrame for more analysis:

df['cut_jenks']=pd.cut(df['Total'],bins=breaks,labels=['bucket_1','bucket_2'])

We are almost there, except for the pesky NaN in the first row:

Dataframe

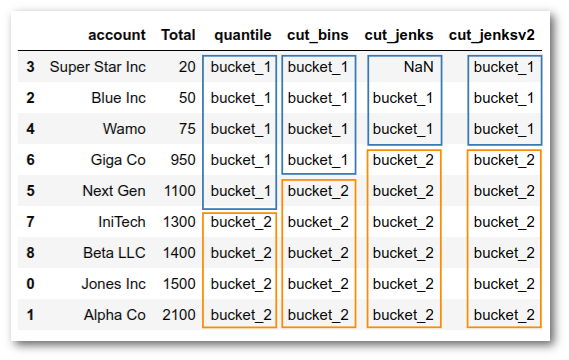
The easiest approach to fix the NaN is to use the include_lowest=True parameter to make sure that the lowest value in the data is included:

df['cut_jenksv2']=pd.cut(df['Total'],bins=breaks,labels=['bucket_1','bucket_2'],include_lowest=True)
Dataframe

Now, we have the buckets set up like our intuition would expect.

I think you will agree that the process of determining the natural breaks was pretty straightforward and easy to use when combined with pd.cut.

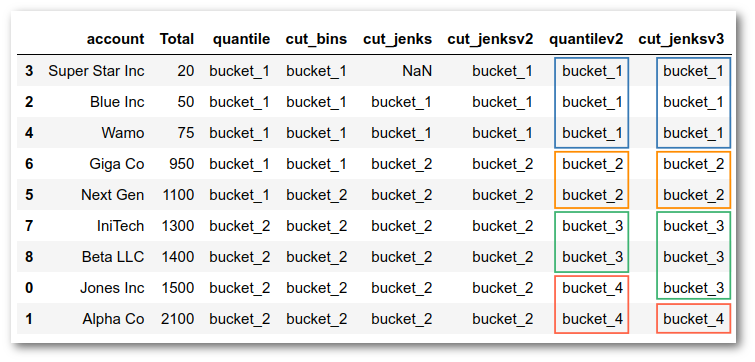
Just to get one more example, we can see what 4 buckets would look like with natural breaks and with a quantile cut approach:

df['quantilev2']=pd.qcut(df['Total'],q=4,labels=['bucket_1','bucket_2','bucket_3','bucket_4'])df['cut_jenksv3']=pd.cut(df['Total'],bins=jenkspy.jenks_breaks(df['Total'],nb_class=4),labels=['bucket_1','bucket_2','bucket_3','bucket_4'],include_lowest=True)df.sort_values(by='Total')
Dataframe

By experimenting with different numbers of groups, you can get a feel for how natural breaks behave differently than the quantile approach we may normally use. In most cases, you will need to rely on your business knowledge to determine which approach makes most sense and how many groups to create.

Summary

The simple example in this article illustrates how to use Jenks optimization to find natural breaks in your numeric data. For these examples, you could easily calculate the breaks by hand or by visually inspecting the data. However, once your data grows to thousands or millions of rows, that approach is impractical.

As a small side note, if you want to make yourself feel good about using python, take a look at what it takes to implement something similar in Excel. Painful, to say the least.

What is exciting about this technique is that it is very easy to incorporate into your data analysis process and provides a simple technique to look at grouping or clustering your data that can be intuitively obvious to your business stakeholders. It is certainly no substitution for a true customer segmentation approach where you might use a scikit-learn clustering algorithm. However it is a handy option to have available as you start exploring your data and eventually evolve into more sophisticated clustering approaches.

credit: Photo by Alice Pasqual

Stack Abuse: Design Patterns in Python

$
0
0

Introduction

Design Patterns are reusable models for solving known and common problems in software architecture.

They're best described as templates for dealing with a certain usual situation. An architect might have a template for designing certain kinds of door-frames which he fits into many of his projects, and a software engineer, or software architect, should know templates for solving frequent programming challenges.

A good presentation of a design pattern should include:

  • Name
  • Motivating problem
  • Solution
  • Consequences

Equivalent Problems

If you were thinking that that's a pretty fuzzy concept, you'd be right. For instance, we could say that the following "pattern" solves all of your problems:

  1. Fetch and prepare the necessary data and other resources
  2. Do the calculations needed and perform the necessary work
  3. Make logs of what you're doing
  4. Release all resources
  5. ???
  6. Profit

This is an example of thinking too abstract. You can't really call this a pattern because it's not really a good model for solving any problem, despite being technically applicable to any of them (including making dinner).

On the other extreme, you can have solutions that are just too concrete to be called a pattern. For instance, you could wonder whether QuickSort is a pattern for solving the sorting problem.

It certainly is a common programming problem, and QuickSort is a good solution for it. However, it can be applied to any sorting problem with little to no modification.

Once you have it in a library and you can call it, your only real job is to make your object comparable somehow, you don't really have to deal with the essence of it yourself to modify it to fit your particular problem.

Equivalent problems are somewhere between these concepts. These are different problems that are sufficiently similar that you can apply a same model to them, but sufficiently different that this model has to be customized considerably to be applicable in each case.

Patterns that could be applied to these sorts of problems are what we can meaningfully dub design patterns.

Why use Design Patterns?

You're probably familiar with some design patterns already through practice of writing code. A lot of good programmers eventually gravitate towards them even without being explicitly taught or they just pick them up from seniors along the way.

Motivations for making, learning, and utilizing design patterns are manyfold. They're a way to give names to complex abstract concepts to enable discussion and teaching.

They make communication within teams faster, because someone can just use the pattern's name instead of whipping out a whiteboard. They enable you to learn from the experiences of people who came before you, rather than having to reinvent the wheel by going through the whole crucible of gradually improving practices yourself (and having to constantly cringe at your old code).

Bad solutions that tend to be commonly invented because they seem logical on the first glance are often called anti-patterns. In order for something to justly be called an anti-pattern it needs to be commonly reinvented and there needs to be a pattern for the same problem which solves it better.

Despite the obvious utility in practice, design patterns are also useful for learning. They introduce you to many problems that you may not have considered and allow you to think about scenarios that you may not have had hands-on experience with in-depth.

They're a must-learn for all, and they're an exceptionally good learning resource for all aspiring architects and developers who may be at the beginning of their careers and lacking the first-hand experience of grappling with various problems the industry provides.

Design Patterns in Python

Traditionally, design patterns have been classified into three main categories: Creational, Structural, and Behavioral. There are other categories, like architectural or concurrency patterns, but they're beyond the scope of this article.

There are also Python-specific design patterns that are created specifically around the problems that the structure of the language itself provides or that deal with problems in special ways that are only allowed because of the structure of the language.

Creational Design Patterns deal with creation of classes or objects. They serve to abstract away the specifics of classes so that we'd be less dependent on their exact implementation, or so that we wouldn't have to deal with complex construction whenever we need them, or so we'd ensure some special instantiation properties. They're very useful for lowering levels of dependency and controlling how the user interacts with our classes.

Structural Design Patterns deal with assembling objects and classes into larger structures, while keeping those structures flexible and efficient. They tend to be really useful for improving readability and maintainability of the code, ensure functionalities are properly separated, encapsulated, and that there are effective minimal interfaces between interdependent things.

Behavioral Design Patterns deal with algorithms in general, and assignment of responsibility between interacting objects. For example, they're good practices in cases where you may be tempted to implement a naive solution, like busy waiting, or load your classes with unnecessary code for one specific purpose that isn't the core of their functionality.

Creational Design Patterns

Structural Design Patterns

Coming soon!

  • Adapter
  • Bridge
  • Composite
  • Decorator
  • Facade
  • Flyweight
  • Proxy

Behavioral Design Patterns

Coming soon!

  • Chain of Responsibility
  • Command
  • Iterator
  • Mediator
  • Memento
  • Observer
  • State
  • Strategy
  • Visitor

Python-Specific Design Patterns

Coming soon!

  • Global Object Pattern
  • Prebound Method Pattern
  • Sentinel Object Pattern

See Also

Stack Abuse: Creational Design Patterns in Python

$
0
0

Overview

This is the first article in a short series dedicated to Design Patterns in Python.

Creational Design Patterns

Creational Design Patterns, as the name implies, deal with the creation of classes or objects.

They serve to abstract away the specifics of classes so that we'd be less dependent on their exact implementation, or so that we wouldn't have to deal with complex construction whenever we need them, or so we'd ensure some special instantiation properties.

They're very useful for lowering the level of dependency between our classes and controlling how the user interacts with them as well.

The design patterns covered in this article are:

Factory

Problem

Say you're making software for an insurance company which offers insurance to people who're employed full-time. You've made the application using a class called Worker.

However, the client decides to expand their business and will now provide their services to unemployed people as well, albeit with different procedures and conditions.

Now you have to make an entirely new class for the unemployed, which will take a completely different constructor! But now you don't know which constructor to call in a general case, much less which arguments to pass to it.

You can have some ugly conditionals all over your code where every constructor invocation is surrounded by if statements, and you use some possibly expensive operation to check the type of the object itself.

If there are errors during initialization, they're caught and the code is edited to do that at every of the hundred places the constructors are used at.

Without stressing it out to you, you're well aware that this approach is less than desirable, non-scalable and all-around unsustainable.

Alternatively, you could consider the Factory Pattern.

Solution

Factories are used to encapsulate the information about classes we're using, while instantiating them based on certain parameters we provide them with.

By using a factory, we can switch out an implementation with another by simply changing the parameter that was used to decide the original implementation in the first place.

This decouples the implementation from the usage in such a way that we can easily scale the application by adding new implementations and simply instantiating them through the factory - with the exact same codebase.

If we just get another factory as a parameter, we don't even need to know which class it produces. We just need to have a uniform factory method which returns a class guaranteed to have a certain set of behaviors. Let's take a look.

For starters, don't forget to include abstract methods:

from abc import ABC, abstractmethod

We need our produced classes to implement some set of methods which enable us to work with them uniformly. For that purpose, we implement the following interface:

class Product(ABC):

    @abstractmethod
    def calculate_risk(self):
        pass

And now we inherit from it through a Worker and Unemployed:

class Worker(Product):
    def __init__(self, name, age, hours):
        self.name = name
        self.age = age
        self.hours = hours

    def calculate_risk(self):
        # Please imagine a more plausible implementation
        return self.age + 100/self.hours

    def __str__(self):
        return self.name+" ["+str(self.age)+"] - "+str(self.hours)+"h/week"


class Unemployed(Product):
    def __init__(self, name, age, able):
        self.name = name
        self.age = age
        self.able = able

    def calculate_risk(self):
        # Please imagine a more plausible implementation
        if able:
            return self.age+10
        else:
            return self.age+30

    def __str__(self):
        if self.able:
            return self.name+" ["+str(self.age)+"] - able to work"
        else:
            return self.name+" ["+str(self.age)+"] - unable to work"

Now that we have our people, let's make their factory:

class PersonFactory:
    def get_person(self, type_of_person):
        if type_of_person == "worker":
            return Worker("Oliver", 22, 30)
        if type_of_person == "unemployed":
            return Unemployed("Sophie", 33, False)

Here, we've hardcoded the parameters for clarity, though typically you'd just instantiate the class and have it do its thing.

To test out how all of this works, let's instantiate our factory and let it produce a couple of people:

factory = PersonFactory()

product = factory.get_person("worker")
print(product)

product2 = factory.get_person("unemployed")
print(product2)
Oliver [22] - 30h/week
Sophie [33] - unable to work

Abstract Factory

Problem

You need to create a family of different objects. Although they're different, they're somehow grouped together by a certain trait.

For example, you may need to create a main course and a dessert at an Italian and a French restaurant, but you won't mix one cuisine with the other.

Solution

The idea is very similar to the normal Factory Pattern, the only difference being that all of the factories have multiple separate methods for creating objects, and the kind of factory is what determines the family of objects.

An abstract factory is responsible for the creation of entire groups of objects, alongside their respective factories - but it doesn't concern itself with the concrete implementations of these objects. That part is left for their respective factories:

from abc import ABC, abstractmethod

class Product(ABC):

    @abstractmethod
    def cook(self):
        pass

class FettuccineAlfredo(Product):
    name = "Fettuccine Alfredo"
    def cook(self):
        print("Italian main course prepared: "+self.name)

class Tiramisu(Product):
    name = "Tiramisu"
    def cook(self):
        print("Italian dessert prepared: "+self.name)

class DuckALOrange(Product):
    name = "Duck À L'Orange"
    def cook(self):
        print("French main course prepared: "+self.name)

class CremeBrulee(Product):
    name = "Crème brûlée"
    def cook(self):
        print("French dessert prepared: "+self.name)

class Factory(ABC):

    @abstractmethod
    def get_dish(type_of_meal):
        pass

class ItalianDishesFactory(Factory):
    def get_dish(type_of_meal):
        if type_of_meal == "main":
            return FettuccineAlfredo()
        if type_of_meal == "dessert":
            return Tiramisu()

    def create_dessert(self):
        return Tiramisu()

class FrenchDishesFactory(Factory):
    def get_dish(type_of_meal):
        if type_of_meal == "main":
            return DuckALOrange()

        if type_of_meal == "dessert":
            return CremeBrulee()

class FactoryProducer:
    def get_factory(self, type_of_factory):
        if type_of_factory == "italian":
            return ItalianDishesFactory
        if type_of_factory == "french":
            return FrenchDishesFactory

We can test the results by creating both factories and calling respective cook() methods on all objects:

fp = FactoryProducer()

fac = fp.get_factory("italian")
main = fac.get_dish("main")
main.cook()
dessert = fac.get_dish("dessert")
dessert.cook()

fac1 = fp.get_factory("french")
main = fac1.get_dish("main")
main.cook()
dessert = fac1.get_dish("dessert")
dessert.cook()
Italian main course prepared: Fettuccine Alfredo
Italian dessert prepared: Tiramisu
French main course prepared: Duck À L'Orange
French dessert prepared: Crème brûlée

Builder

Problem

You need to represent a robot with your object structure. The robot can be humanoid with four limbs and upward standing, or it can be animal-like with a tail, wings, etc.

It can use wheels to move, or it can use helicopter blades. It can use cameras, an infrared detection module... you get the picture.

Imagine the constructor for this thing:

def __init__(self, left_leg, right_leg, left_arm, right_arm,
             left_wing, right_wing, tail, blades, cameras,
             infrared_module, #...
             ):
    self.left_leg = left_leg
    if left_leg == None:
        bipedal = False
    self.right_leg = right_leg
    self.left_arm = left_arm
    self.right_arm = right_arm
    # ...

Instantiating this class would be extremely unreadable, it would be very easy to get some of the argument types wrong since we're working in Python and piling up countless arguments in a constructor is hard to manage.

Also, what if we don't want the robot to implement all the fields within the class? What if we want it to only have legs instead of having both legs and wheels?

Python doesn't support overloading constructors, which would help us define such cases (and even if we could, it would only lead to even more messy constructors).

Solution

We can make a Builder class that constructs our object and adds appropriate modules to our robot. Instead of a convoluted constructor, we can instantiate an object and add the needed components using functions.

We call the construction of each module separately, after instantiating the object. Let's go ahead and define a Robot with some default values:

class Robot:
    def __init__(self):
        self.bipedal = False
        self.quadripedal = False
        self.wheeled = False
        self.flying = False
        self.traversal = []
        self.detection_systems = []

    def __str__(self):
        string = ""
        if self.bipedal:
            string += "BIPEDAL "
        if self.quadripedal:
            string += "QUADRIPEDAL "
        if self.flying:
            string += "FLYING ROBOT "
        if self.wheeled:
            string += "ROBOT ON WHEELS\n"
        else:
            string += "ROBOT\n"

        if self.traversal:
            string += "Traversal modules installed:\n"

        for module in self.traversal:
            string += "- " + str(module) + "\n"

        if self.detection_systems:
            string += "Detection systems installed:\n"

        for system in self.detection_systems:
            string += "- " + str(system) + "\n"

        return string

class BipedalLegs:
    def __str__(self):
        return "two legs"

class QuadripedalLegs:
    def __str__(self):
        return "four legs"

class Arms:
    def __str__(self):
        return "four legs"

class Wings:
    def __str__(self):
        return "wings"

class Blades:
    def __str__(self):
        return "blades"

class FourWheels:
    def __str__(self):
        return "four wheels"

class TwoWheels:
    def __str__(self):
        return "two wheels"

class CameraDetectionSystem:
    def __str__(self):
        return "cameras"

class InfraredDetectionSystem:
    def __str__(self):
        return "infrared"

Notice that we've omitted specific initializations in the constructor, and used default values instead. This is because we'll use the Builder classes to initialize these values.

First, we implement an abstract Builder which defines our interface for building:

from abc import ABC, abstractmethod

class RobotBuilder(ABC):

    @abstractmethod
    def reset(self):
        pass

    @abstractmethod
    def build_traversal(self):
        pass

    @abstractmethod
    def build_detection_system(self):
        pass

Now we can implement multiple kinds of Builders that obey this interface, for instance for an android, and for an autonomous car:

class AndroidBuilder(RobotBuilder):
    def __init__(self):
        self.product = Robot()

    def reset(self):
        self.product = Robot()

    def get_product(self):
        return self.product

    def build_traversal(self):
        self.product.bipedal = True
        self.product.traversal.append(BipedalLegs())
        self.product.traversal.append(Arms())

    def build_detection_system(self):
        self.product.detection_systems.append(CameraDetectionSystem())

class AutonomousCarBuilder(RobotBuilder):
    def __init__(self):
        self.product = Robot()

    def reset(self):
        self.product = Robot()

    def get_product(self):
        return self.product

    def build_traversal(self):
        self.product.wheeled = True
        self.product.traversal.append(FourWheels())

    def build_detection_system(self):
        self.product.detection_systems.append(InfraredDetectionSystem())

Notice how they implement the same methods, but there's an inherently different structure of objects underneath, and the end user doesn't need to deal with particulars of that structure?

Of course, we could make a Robot which can have both legs and wheels, and the user would have to add each one separately, but we can also make very specific builders which add only one appropriate module for each "part".

Let's try out using an AndroidBuilder to build an android:

builder = AndroidBuilder()
builder.build_traversal()
builder.build_detection_system()
print(builder.get_product())

Running this code will yield:

BIPEDAL ROBOT
Traversal modules installed:
- two legs
- four legs
Detection systems installed:
- cameras

And now, let's use an AutonomousCarBuilder to build a car:

builder = AutonomousCarBuilder()
builder.build_traversal()
builder.build_detection_system()
print(builder.get_product())

Running this code will yield:

ROBOT ON WHEELS
Traversal modules installed:
- four wheels
Detection systems installed:
- infrared

The initialization is a lot more clean and readable compared to the messy constructor from before and we have the flexibility of adding the modules we want.

If the fields in our product use relatively standard constructors, we can even make a so-called Director to manage the particular builders:

class Director:
    def make_android(self, builder):
        builder.build_traversal()
        builder.build_detection_system()
        return builder.get_product()

    def make_autonomous_car(self, builder):
        builder.build_traversal()
        builder.build_detection_system()
        return builder.get_product()

director = Director()
builder = AndroidBuilder()
print(director.make_android(builder))

Running this piece of code will yield:

BIPEDAL ROBOT
Traversal modules installed:
- two legs
- four legs
Detection systems installed:
- cameras

That being said, the Builder pattern doesn't make much sense on small, simple classes as the added logic for building them just adds more complexity.

Though, when it comes to big, complicated classes with numerous fields, such as multi-layer neural networks - the Builder pattern is a life saver.

Prototype

Problem

We need to clone an object, but may not know its exact type, parameters, they may not all be assigned through the constructor itself or may depend on system state at a particular point during the runtime.

If we try to do it directly we'll add a lot of dependencies branching in our code, and it may not even work at the end.

Solution

The Prototype design pattern addresses the problem of copying objects by delegating it to the objects themselves. All objects that are copyable must implement a method called clone and use it to return exact copies of themselves.

Let's go ahead and define a common clone function for all the child-classes and then inherit it from the parent class:

from abc import ABC, abstractmethod

class Prototype(ABC):
    def clone(self):
        pass

class MyObject(Prototype):
    def __init__(self, arg1, arg2):
        self.field1 = arg1
        self.field2 = arg2

    def __operation__(self):
        self.performed_operation = True

    def clone(self):
        obj = MyObject(self.field1, field2)
        obj.performed_operation = self.performed_operation
        return obj

Alternatively, you can use the deepcopy function instead of simply assigning fields like in the previous example:

class MyObject(Prototype):
    def __init__(self, arg1, arg2):
        self.field1 = arg1
        self.field2 = arg2

    def __operation__(self):
        self.performed_operation = True

    def clone(self):
        return deepcopy(self)

The Prototype pattern can be really useful in large-scale applications that instantiate a lot of objects. Sometimes, copying an already existing object is less costly than instantiating a new one.

Singleton

Problem

A Singleton is an object with two main characteristics:

  • It can have at most one instance
  • It should be globally accessible in the program

These properties are both important, although in practice you'll often hear people calling something a Singleton even if it has only one of these properties.

Having only one instance is usually a mechanism for controlling access to some shared resource. For example, two threads may work with the same file, so instead of both opening it separately, a Singleton can provide a unique access point to both of them.

Global accessibility is important because after your class has been instantiated once, you'd need to pass that single instance around in order to work with it. It can't be instantiated again. That's why it's easier to make sure that whenever you try to instantiate the class again, you just get the same instance you've already had.

Solution

Let's go ahead and implement the Singleton pattern by making an object globally accessible and limited to a single instance:

from typing import Optional

class MetaSingleton(type):
    _instance : Optional[type] = None
    def __call__(cls, *args, **kwargs):
        if cls._instance is None:
            cls._instance = super(MetaSingleton, cls).__call__(*args, **kwargs)
        return cls._instance

class BaseClass:
    field = 5

class Singleton(BaseClass, metaclass=MetaSingleton):
    pass

Optional here is a data type which can contain either a class stated in [] or None.

Defining a __call__ method allows you to use instances of the class as functions. The method is also called during initialization, so when we call something like a = Singleton() under the hood it will call its base class' __call__ method.

In Python, everything is an object. That includes classes. All of the usual classes you write, as well as the standard classes, have type as their object type. Even type is of type type.

What this means is that type is a metaclass - other classes are instances of type, just like variable objects are instances of those classes. In our case, Singleton is an instance of MetaSingleton.

All of this means that our __call__ method will be called whenever a new object is created and it will provide a new instance if we haven't already initialized one. If we have, it will just return the already initialized instance.

super(MetaSingleton, cls).__call__(*args, **kwargs) calls the super class' __call__. Our super class in this case is type, which has a __call__ implementation that will perform initialization with the given arguments.

We've specified our type (MetaSingleton), value to be assigned to the _instance field (cls) and other arguments we may be passing.

The purpose of using a metaclass in this case rather than a simpler implementation is essentially the ability to reuse the code.

We derived one class from it in this case, but if we needed another Singleton for another purpose we could just derive the same metaclass instead of implementing essentially the same thing.

Now we can try using it:

a = Singleton()
b = Singleton()

a == b
True

Because of its global access point, it's wise to integrate thread-safety into Singleton. Luckily, we don't have to edit it too much to do that. We can simply edit MetaSingleton slightly:

def __call__(cls, *args, **kwargs):
    with cls._lock:
        if not cls._instance:
            cls._instance = super().__call__(*args, **kwargs)
    return cls._instance

This way, if two threads start to instantiate the Singleton at the same time, one will stop at the lock. When the context manager releases the lock, the other one will enter the if statement and see that the instance has indeed already been created by the other thread.

Object Pool

Problem

We have a class in our project, let's call it MyClass. MyClass is very useful and is often used throughout the project, albeit for short periods of time.

Its instantiation and initialization are very expensive, however, and our program runs very slowly because it constantly needs to make new instances just to use them for a few operations.

Solution

We'll make a pool of objects that will be instantiated when we create the pool itself. Whenever we need to use the object of type MyClass, we'll acquire it from the pool, use it, and then release it back into the pool to be used again.

If the object has some sort of default starting state, releasing will always restart it to it. If the pool is left empty, we'll initialize a new object for the user, but when the user is finished with it they'll release it back into the pool to be used again.

Let's go ahead and first define MyClass:

class MyClass:
    # Return the resource to default setting
    def reset(self):
        self.setting = 0

class ObjectPool:

    def __init__(self, size):
        self.objects = [MyClass() for _ in range(size)]

    def acquire(self):
        if self.objects:
            return self.objects.pop()
        else:
            self.objects.append(MyClass())
            return self.objects.pop()

    def release(self, reusable):
        reusable.reset()
        self.objects.append(reusable)

And to test it out:

pool = ObjectPool(10)
reusable = pool.acquire()
pool.release(reusable)

Note that this is a bare-bones implementation and that in practice this pattern may be used together with Singleton to provide a single globally accessible pool.

Note that utility of this pattern is disputed in languages which use the garbage collector.

Allocation of objects that take up only memory (meaning no external resources) tends to be relatively inexpensive in such languages, while a lot of "live" references to objects can slow down garbage collection because GC goes through all of the references.

Conclusion

With this, we have covered most important Creational Design Patterns in Python - the problems they solve and how they solve them.

Being familiar with design patterns is an extremely handy skill-set for all developers as they provide solutions to common problems encountered in programming.

Being aware of both the motivations and solutions, you can also avoid accidentally coming up with an anti-pattern while trying to solve a problem.
Test and Code: 96: Azure Pipelines - Thomas Eckert

$
0
0

Pipelines are used a lot in software projects to automated much of the work around build, test, deployment and more. Thomas Eckert talks with me about pipelines, specifically Azure Pipelines. Some of the history, and how we can use pipelines for modern Python projects.

Special Guest: Thomas Eckert.

Sponsored By:

Support Test & Code: Python Software Testing & Engineering

Links:

<p>Pipelines are used a lot in software projects to automated much of the work around build, test, deployment and more. Thomas Eckert talks with me about pipelines, specifically Azure Pipelines. Some of the history, and how we can use pipelines for modern Python projects.</p><p>Special Guest: Thomas Eckert.</p><p>Sponsored By:</p><ul><li><a href="https://testandcode.com/pycharm" rel="nofollow">PyCharm Professional</a>: <a href="https://testandcode.com/pycharm" rel="nofollow">Try PyCharm Pro with a 4 month free trial. </a> Promo Code: TESTNCODE2019</li></ul><p><a href="https://www.patreon.com/testpodcast" rel="payment">Support Test & Code: Python Software Testing & Engineering</a></p><p>Links:</p><ul><li><a href="https://github.com/pallets/click" title="click repo" rel="nofollow">click repo</a></li><li><a href="https://github.com/marketplace/actions/azure-pipelines-action" title="Azure Pipelines Action · Actions · GitHub Marketplace" rel="nofollow">Azure Pipelines Action · Actions · GitHub Marketplace</a></li></ul>

Vladimir Iakolev: Sound lights with Spotify and ESP8266

$
0
0

As unfortunately my old fancy sound lights setup only works on Linux, it stopped working after I switched to a new laptop. So I decided to make a cross-platform solution.

TLDR:Source code of the desktop app, ESP8266 “firmware”, a jupyter notebook with a preresearch and a video of sound lights in action (the best my phone can do):


Lights colors from audio

Apparently, it’s not so easy to capture and analyze audio stream from a random music app on macOS, so I chose a bit of vendor locked solution with a precalculated track analysis from Spotify API. The API provides a bunch of differently sized intervals with characteristics like loudness, mode and etc:

Available blocks

By trial and error and some random changes, I came up with a function that returns a list of tuples representing RGB colors. It’s not something fancy or at least correct, but can produce different colors and works fast enough:

defget_current_colors(t):segment=get_current_segmnet(t)section=get_current_section(t)beat=get_current_beat(t)beat_color=BASE_COLOR_MULTIPLIER*(t-beat['start']+beat['duration'])/beat['duration']tempo_color=BASE_COLOR_MULTIPLIER*scale_tempo(section['tempo'])pitch_colors=[BASE_COLOR_MULTIPLIER*pforpinsegment['pitches']]loudness_multiplier=1+LOUDNESS_MULTIPLIER*scale_loudness(section['loudness'])colors=((beat_color*loudness_multiplier,tempo_color*loudness_multiplier,pitch_colors[n//(leds//12)]*loudness_multiplier)forninrange(leds))ifsection['mode']==0:order=(0,1,2)elifsection['mode']==1:order=(1,2,0)else:order=(2,0,1)ordered_colors=((color[order[0]],color[order[1]],color[order[2]])forcolorincolors)return[_scale_pixel(color)forcolorinordered_colors]

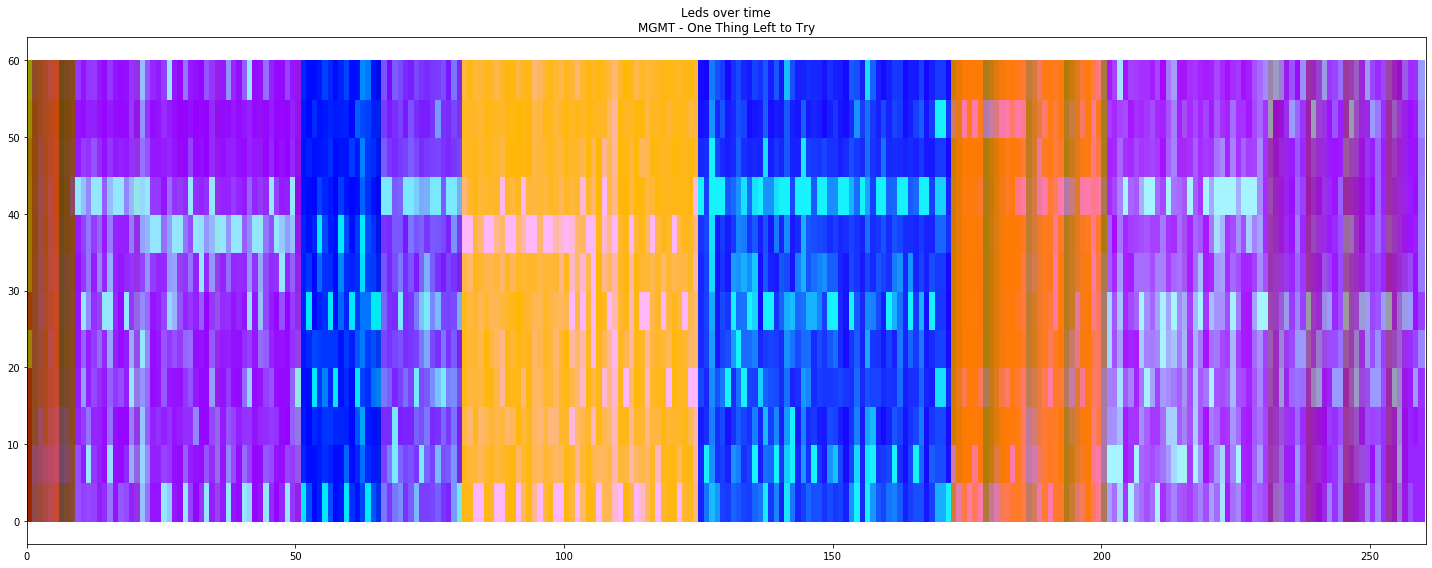
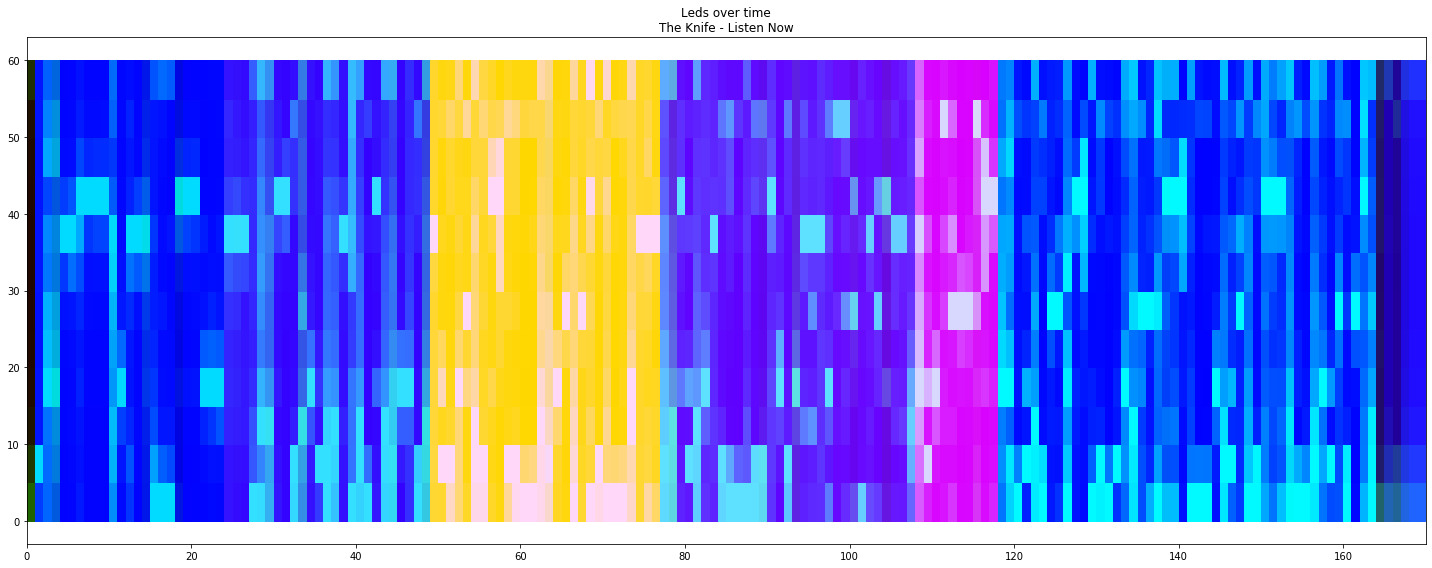
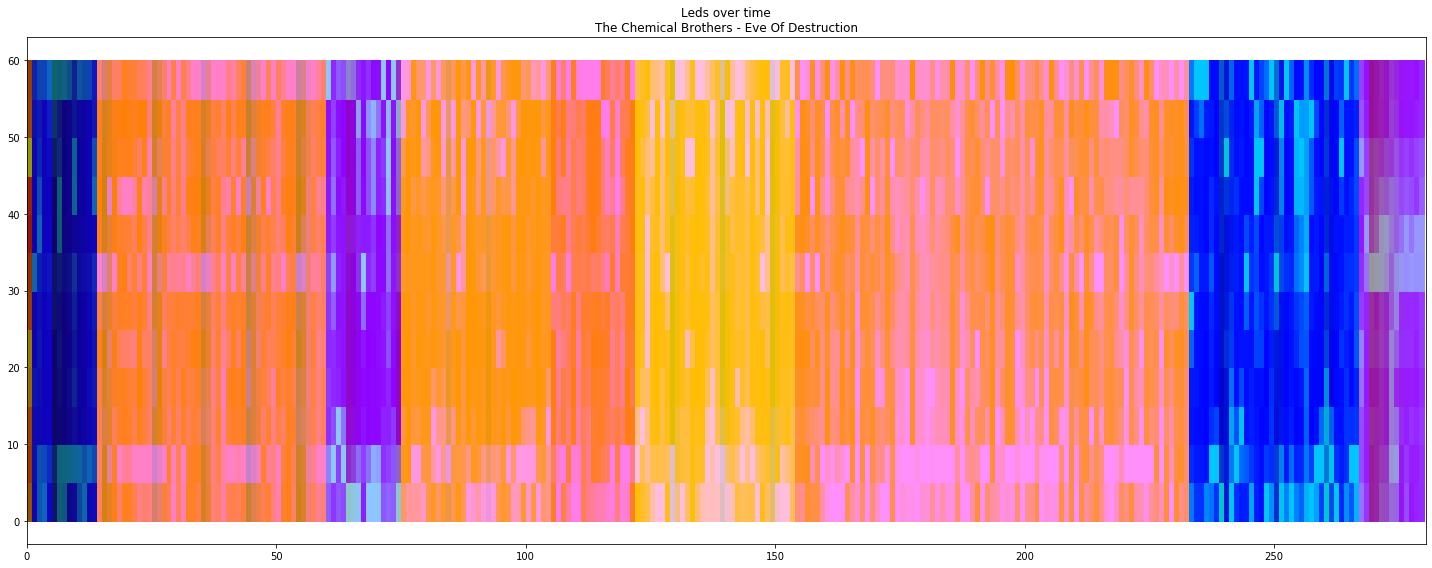
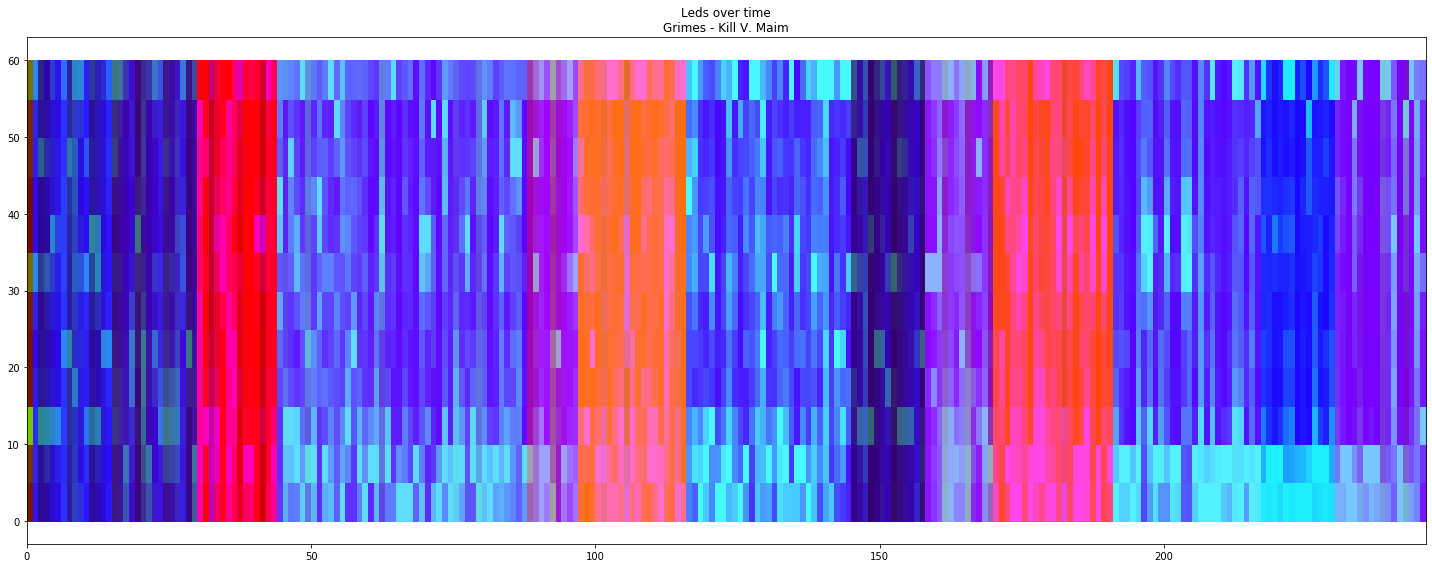
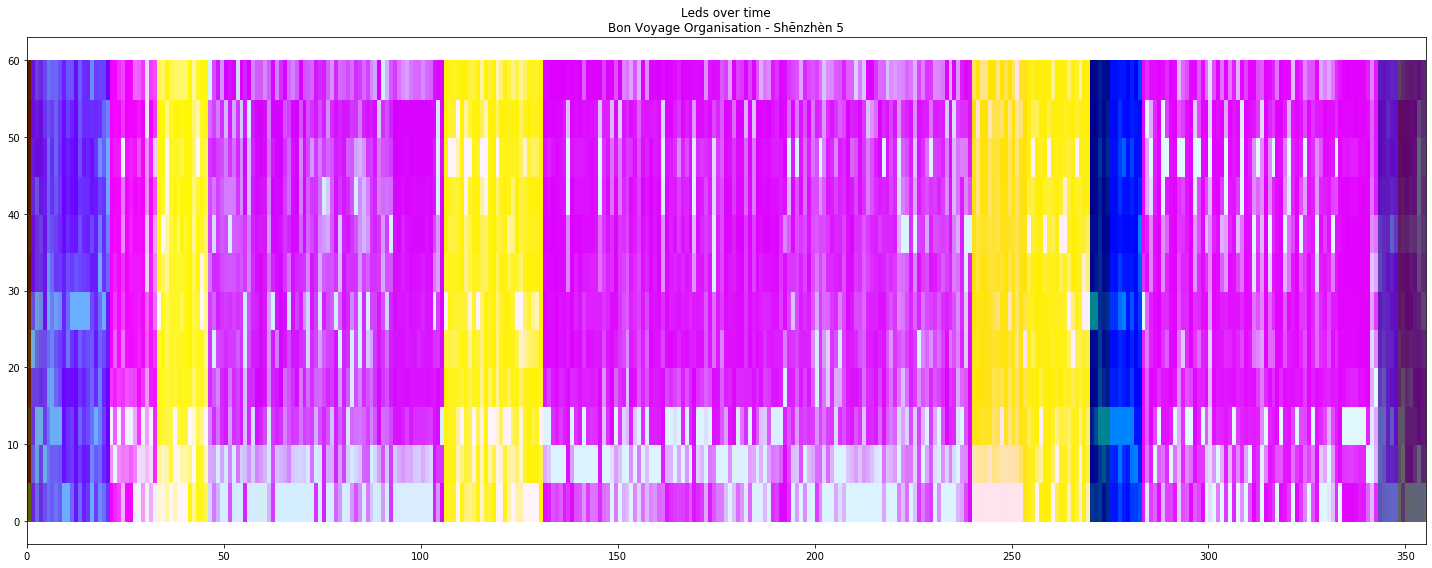
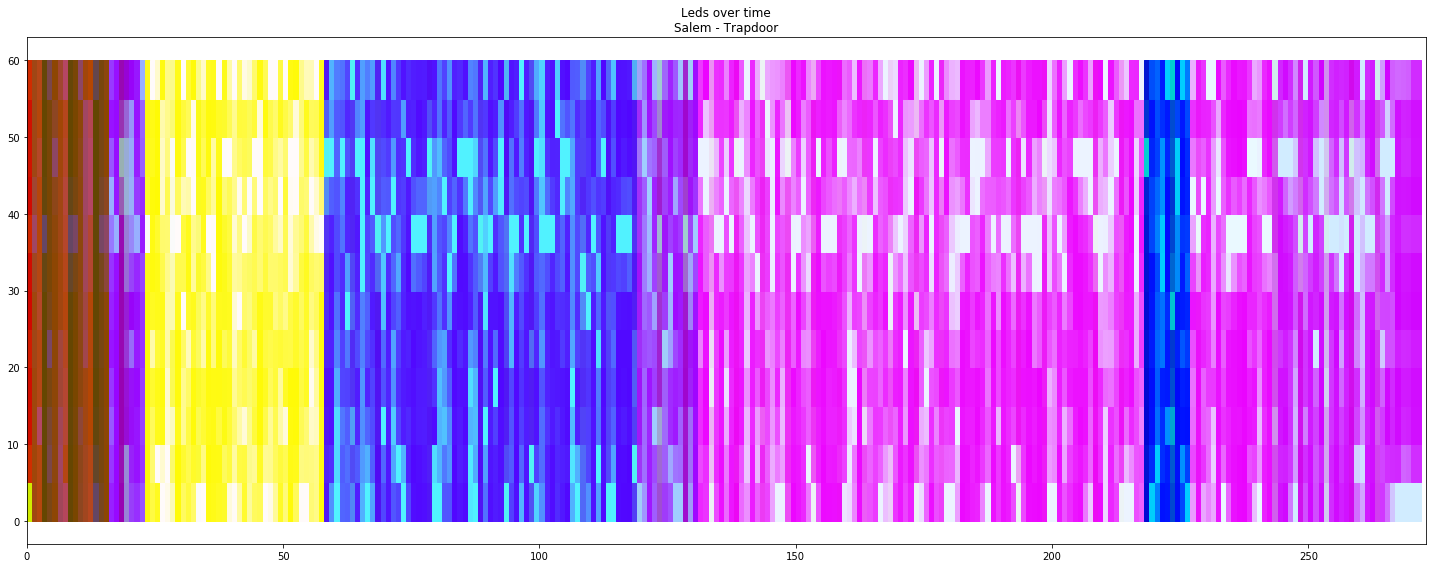
To ensure that it works I ran it on a bunch of songs with a 60 “LEDs” column for an each second:

MGMT - One Thing Left to TryThe Knife - Listen NowThe Chemical Brothers - Eve Of DestructionGrimes - Kill V. MaimBon Voyage Organisation - Shenzhen VSalem - Trapdoor

It looks different enough and not that ugly for different songs and different parts of songs.

The full jupyter notebook available in the gist.

Led strip and EPS8266

The EPS8266 part is really easy, it listens UDP on 42424, waits for 180 bytes and changes colors of 60 LEDs strip with NeoPixels MicroPython library:

np=neopixel.NeoPixel(machine.Pin(5),60)sock=socket.socket(socket.AF_INET,socket.SOCK_DGRAM)sock.bind(('',42424))whileTrue:line,_=sock.recvfrom(180)iflen(line)<180:continueforiinrange(60):np[i]=(line[i*3],line[i*3+1],line[i*3+2])np.write()

Controlling it from a computer is also very easy:

sock=socket.socket(socket.AF_INET,socket.SOCK_DGRAM)sock.setsockopt(socket.SOL_SOCKET,socket.SO_REUSEADDR,1)sock.setsockopt(socket.SOL_SOCKET,socket.SO_BROADCAST,1)defsend(pixels):colors=[colorforpixelinpixelsforcolorinpixel]line=array.array('B',colors).tostring()sock.sendto(line,('192.168.2.255',42424))

And it even works:

send([(50,0,0)]*60)

Photo only red color

send([(0,0,50)]*60)

Photo only blue color

send([(50,50,50)]*5+[(50,0,0)]*10+[(50,50,0)]*10+[(0,50,0)]*10+[(0,50,50)]*10+[(0,0,50)]*10+[(50,50,50)]*5)

Photo mixed leds colors

The full source code is simple and available in the gist.

The app that connects everything

Architecture diagram

The app is fairly simple and essentially consists of two asyncio coroutines and a queue as a messaging bus.

The first coroutine calls Spotify API current playing endpoint, fetches audio analysis when the current playing song changes and produces three events:

  • EventStop– nothing is playing;
  • EventSongChanged(analysis, start_time)– song changed;
  • EventAdjustStartTime(start_time)– sync song start time in case of discrepancies or manual changes.
asyncdef_listen_to_spotify_changes(session:aiohttp.ClientSession)->AsyncIterable[Event]:current_id=NonewhileTrue:request_time=time.time()current=await_get_current_playing(session)ifnotcurrent['is_playing']:current_id=NoneyieldEventStop()elifcurrent['item']['id']!=current_id:current_id=current['item']['id']analysis=await_get_audio_analysis(session,current_id)yieldEventSongChanged(analysis,_get_start_time(current,request_time))else:yieldEventAdjustStartTime(_get_start_time(current,request_time))awaitasyncio.sleep(SPOTIFY_CHANGES_LISTENER_DEALY)asyncdefspotify_changes_listener(user_id:str,client_id:str,client_secret:str,events_queue:asyncio.Queue[Event])->NoReturn:whileTrue:...asyncwithaiohttp.ClientSession(headers=headers)assession:try:asyncforeventin_listen_to_spotify_changes(session):awaitevents_queue.put(event)exceptException:logging.exception('Something went wrong with spotify_changes_listener')awaitasyncio.sleep(SPOTIFY_CHANGES_LISTENER_FAILURE_DELAY)

The second coroutine listens to those events and sends packets to ESP8266:

asyncdeflights_controller(device_ip:str,device_port:int,leds:int,events_queue:asyncio.Queue[Event])->NoReturn:whileTrue:send_to_device=awaitmake_send_to_device(device_ip,device_port)try:asyncforcolorsin_events_to_colors(leds,events_queue):send_to_device(colors)exceptException:logging.exception("Something went wrong with lights_controller")awaitasyncio.sleep(CONTROLLER_ERROR_DELAY)

Full source code is a bit boring and available in the gist, to use it you will need to define some required environment variables.

The result

It works, kind of reusable and even looks a bit nice in real life, but not so nice when recorded on my phone:

Gist with everything.

PyCon: Python Education Summit - 8 years in 2020!

$
0
0


Teachers, educators, and Pythonistas: come and share your projects, experiences, and tools of the trade as you teach coding and Python to your students. The Annual Python Education Summit is being held at PyCon 2020, taking place on Thursday April 16th .

Our Call for Proposals is open until December 20th, 2019 , and we want to hear from you!
See https://us.pycon.org/2020/speaking/edusummit/ for more details.

In 2020, the Summit has three sessions:
  • Keynotes and selected talks (morning)
  • Mini-sprints - collaborative sessions to create meaningful educational content together (afternoon)
  • Lightning Talks! Between the two sessions
We are inviting submissions for all three sessions.

What we look for in Education Summit talks are ideas, experiences, and best practices on how teachers and programmers have implemented instruction in their schools, communities,books,tutorials and other educational places by using Python.
  • Have you implemented a program that you've been dying to talk about?
  • Have you tried something that failed but learned some great lessons that you can share?
  • Have you been successful implementing a particular program?
For the Mini-sprints session, we are looking for topics and activities that could benefit from some intensive in-person discussion and hands-on collaboration. Our focus this year is on open educational resources (OER), materials which can be shared and adapted in the same spirit as the Python language itself. The 'mini-sprints' will be intensive work in small groups formed by Summit attendees. These proposals for the mini-sprint sessions should describe working group activities. 

Submit an idea for something you’d like to lead with a small group of people and work on for 1-2 hours.

Some topics may include:
  • Gathering best practices for teaching specific populations, tools, classroom styles, etc.
  • Drafting open educational content and resources (such as workbooks, exercises, teaching materials)
  • Documenting active learning activities across age groups
  • Inventory and cataloging of Open Educational Resources online
Our Lightning talks are 5 minutes long on a topic of interest to PyCon Education Summit attendees. It could be an education related project that you worked on, event that you participated in or tools/techniques you think other people will be interested in.
Depending on the number of entries , we may take submissions for lightning talks on the day of the event too.

We urge anyone in this space to submit a talk! You do not need to be an experienced speaker to apply!

How to submit a talk or a mini-sprint idea:
Submit via your dashboard at https://us.pycon.org/2020/users/dashboard/. In the submission form please select the “Session type” and make a choice.

We hope to see you at the Education Summit in 2020. Hurry! Submission deadline is December 20th, 2019.

Ned Batchelder: Coverage 5.0, finally

$
0
0

After a quiet week of beta 2 being available, and not hearing from anyone, I released coverage.py 5.0 on Saturday.

I’ve been through this before, so I knew what would happen: people with unpinned requirements would invisibly upgrade their coverage version, and stuff would break. Coverage.py is used by many projects, so it was inevitable.

Saturday afternoon was quiet. Sunday I heard from two people. Then Monday, people came back to work to find their continuous integration broken, and now I’m up to 11 issues to deal with.

It remains difficult to get people to provide instructions that are specific enough and detailed enough for me to see their problem. A link to your broken CI build doesn’t tell me how to do it myself. A link to your repo is confusing if you then add a commit that pins the old version of coverage to prevent the problem, forcing me to dig through your history to try to find the old commit that was broken. And so on.

Of course, this is nothing new, but it drove home again how hard it is to extract good information from distracted and annoyed users. If anyone has good examples of issue templates that get people’s attention and guide them well, point me to them!

While dealing with the issues, I came up with two new techniques, interesting enough to deserve their own blog posts:

Needless to say, fixes are underway for a coverage.py 5.0.1 to be released soon.

Ned Batchelder: Pytest trick: subsetting unknown suites

$
0
0

While trying to reproduce an issue with coverage.py 5.0, I had a test suite that showed the problem, but it was inconvenient to run the whole suite repeatedly, because it took too long. I wanted to find just one test (or small handful of tests) that would demonstrate the problem.

But I knew nothing about these tests. I didn’t know what subset might be useful, or even what subsets there were, so I had to try random subsets and hope for the best.

I selected random subsets with a new trick: I used the -k option (select tests by a substring of their names) using single consonants. “pytest -k b” will run only the tests with a b in their name, for example. Then I tried “-k c”, “-k d”, “-k f”, and so on. Some will run the whole test suite (“-k t” is useless because t is in every test name), but some ran usefully small collections.

This is a mindless way to select tests, but I knew nothing about this test suite, so it was a quick way to run fewer than all of them. Running “-k q” was the best (only 16 tests). Then I looked at the test names, and selected yet smaller subsets with more thought. In the end, I could reduce it to just one test that demonstrated the problem.

Ned Batchelder: Fancy console output in GitHub comments

$
0
0

Providing detailed command output in GitHub issues is hard: I want to be complete, but I don’t want to paste unreadable walls of text. Some commands have long output that is usually uninteresting (pip install), but which every once in a while has a useful clue. I want to include that output without making it hard to find the important stuff.

While working on an issue with coverage.py 5.0, I came up with a way to show commands and their output that I think works well.

I used GitHub’s <details> support to show the commands I ran with their output in collapsible sections. I like the way it came out: you can copy all the commands, or open a section to see what happened for the command you’re interested in.

The raw markdown looks like this:

<details>
<summary>cd meltano</summary>
</details>

<details>
<summary>pip install '.[dev]'</summary>

```
Processing /private/tmp/bug881a/meltano
Collecting aenum==2.1.2
  Using cached https://files.pythonhosted.org/packages/0d/46/5b6a6c13fee40f9dfaba84de1394bfe082c0c7d95952ba0ffbd56ce3a3f7/aenum-2.1.2-py3-none-any.whl
Collecting idna==2.7
  Using cached https://files.pythonhosted.org/packages/4b/2a/0276479a4b3caeb8a8c1af2f8e4355746a97fab05a372e4a2c6a6b876165/idna-2.7-py2.py3-none-any.whl
Collecting asn1crypto==0.24.0
  Using cached https://files.pythonhosted.org/packages/ea/cd/35485615f45f30a510576f1a56d1e0a7ad7bd8ab5ed7cdc600ef7cd06222/asn1crypto-0.24.0-py2.py3-none-any.whl
(etc)
```

</details>

(The GitHub renderer was very particular about the blank lines around the <details> and <summary> tags, so be sure to include them if you try this.)

Other people have done this: after I wrote this comment, one of the newer coverage.py issues used the same technique, but with <tt> in the summaries to make them look like commands, nice. There are a few manual steps to get that result, but I’ll be refining how to produce that style more conveniently from a terminal console.

Real Python: Documenting Python Code: A Complete Guide

$
0
0

In this course, you’ll learn how to document your Python code! Documenting your code is important because it can help developers and users fully understand its usage and purpose.

You’ll learn about:

  • The reasons that documenting your code is so important
  • The differences between commenting and documenting
  • Best practices for docstrings

[ Improve Your Python With 🐍 Python Tricks 💌 – Get a short & sweet Python Trick delivered to your inbox every couple of days. >> Click here to learn more and see examples ]

Tiago Montes: Kids on Python: A Workshop

$
0
0

Kids on Python is a kids oriented introduction to programming workshop I prepared after having that thought in my mind for quite some time. In early 2019, a close friend came to me looking for ways of initiating one of his kids to computer programming. After countless discussions, thinking things through down to the most tiny details, figuring out which skills we might be taking for granted and either avoiding their need or including them in the journey, at some point, I finally sat down and wrote the thing: this is what came out of it.

Continuum Analytics Blog: 2019: A Year in Review

$
0
0

Before we dive into a new decade, we’re looking back on all we’ve accomplished together as a company and as a community in 2019. We’re excited to be part of such a vibrant and growing…

The post 2019: A Year in Review appeared first on Anaconda.

PyCoder’s Weekly: Issue #399 (Dec. 17, 2019)

$
0
0

#399 – DECEMBER 17, 2019
View in Browser »

The PyCoder’s Weekly Logo


What Makes Python a Great Language?

“What makes Python a great language? It gets the need to know balance right. […] I would argue that the Python language has an incredibly well-balanced sense of what developers need to know. Better than any other language I’ve used.”
STEVE DOWER

Python Statistics Fundamentals: How to Describe Your Data

In this step-by-step tutorial, you’ll learn the fundamentals of descriptive statistics and how to calculate them in Python. You’ll find out how to describe, summarize, and represent your data visually using NumPy, SciPy, Pandas, Matplotlib, and the built-in Python statistics library.
REAL PYTHON

Automate & Standardize Code Reviews For Python

alt

Take the hassle out of code reviews - Codacy flags errors automatically, directly from your Git workflow. Customize standards on coverage, duplication, complexity & style violations. Use in the cloud or on your servers for 30 different languages. Get started for free →
CODACYsponsor

Python Anti-Patterns

“Learning about these anti-patterns will help you to avoid them in your own code and make you a better programmer (hopefully). Each pattern comes with a small description, examples and possible solutions.”
QUANTIFIEDCODE.COM

Documenting Python Code: A Complete Guide

Whether you’re documenting a small script or a large project, whether you’re a beginner or seasoned Pythonista, this video series will cover everything you need to know.
REAL PYTHONvideo

How to Use Pandas to Access Databases

Tips and best practices for exploring SQL databases with Pandas and SQLAlchemy.
IRINA TRUONG

Discussions

Python Jobs

Senior Python Engineer (Munich, Germany)

Stylight GmbH

Senior Python/Django Developer (Eindhoven, Netherlands)

Sendcloud

Contract Python / RaspPi / EPICS (Remote)

D-Pace Inc

More Python Jobs >>>

Articles & Tutorials

Data Engineer Interview Questions With Python

This tutorial will prepare you for some common questions you’ll encounter during your data engineer interview. You’ll learn how to answer questions about databases, ETL pipelines, and big data workflows. You’ll also take a look at SQL, NoSQL, and Redis use cases and query examples.
REAL PYTHON

A Tiny Python Exception Oddity

“This would likely going to be found totally irrelevant by 99.999% of Python programmers. If you are not the type of person who is annoyed by tiny oddities, you probably do not want to read any further.”
ANDRÉ ROBERGE

Python Developers Are in Demand on Vettery

alt

Vettery is an online hiring marketplace that’s changing the way people hire and get hired. Ready for a bold career move? Make a free profile, name your salary, and connect with hiring managers from top employers today →
VETTERYsponsor

Experiments in Constraint-Based Graphic Design

“I’ve been hacking on this new [Python] DSL for design that allows the designer to specify figures in terms of relationships, which are compiled down to constraints and solved using an SMT solver.”
ANISH ATHALYE

Reducing NumPy Memory Usage With Lossless Compression

How to reduce memory usage via smaller dtypes and sparse arrays, and what to do in situations where these solutions won’t work.
ITAMAR TURNER-TRAURING

How to Document Python Code With Sphinx

A quick tutorial on documenting your Python project with the Sphinx documentation generator and tox for build automation.
MOSHE ZADKA

Python Internals: Symbol Tables (2010)

How CPython implements and uses symbol tables in its quest to compile Python source code into bytecode.
ELI BENDERSKY

Property-Based Testing for API Schemas

Thoughts about how API schemas could be used for property-based testing.
DMITRY DYGALO• Shared by Dmitry Dygalo

Measure and Improve Python Code Performance With Blackfire.io

Profile in development, test/staging, and production, with no overhead for end users! Blackfire supports any Python version from 2.7.x and 3.x. Find bottlenecks in wall-time, I/O, CPU, memory, HTTP requests, and SQL queries.
BLACKFIREsponsor

Projects & Code

Events

PyLadies Dublin

December 19, 2019
PYLADIES.COM

BangPypers

December 21, 2019
MEETUP.COM


Happy Pythoning!
This was PyCoder’s Weekly Issue #399.
View in Browser »

alt

[ Subscribe to 🐍 PyCoder’s Weekly 💌 – Get the best Python news, articles, and tutorials delivered to your inbox once a week >> Click here to learn more ]


RMOTR: Spatial data with python — Let’s begin!

$
0
0

Spatial Data with Python — Let’s Begin!

Latitude and longitude. Points, lines, and polygons. GIS. CRS. EPSG. Vector or raster. Shapefile, TIF. At some point in your adventures with Python and/or data, you’ve probably come across some of these words and acronyms. We can easily deduce what some of them reference, but others aren’t as intuitive. In this post, I’ll explain these concepts, which will help you take the first steps into the world of spatial data with Python.

Work on this example interactively with a Jupyter Notebook

Raster vs Vector

There are two ways of storing geospatial data: raster or vector.

The data in a raster format is in a table (rows and columns) where each cell (also called pixels) contains information on the area it represents. Most of the time, the cells are square-shaped and regularly spaced. The information in each cell can be a color, an altitude, a temperature, or any other indicator that the file’s author wants to convey.

On the other hand, vector files represent geographical entities from three basic elements: points, lines, and polygons (areas). In turn, each geographical entity/object can store additional elements. For example, if each entity is a country, then the country’s name, population size, official language, etc. could be stored.

The same information can be represented with a raster or vector format

Let’s analyze a concrete example.

Raster File

NASA (through its Visible Earth project) offers tons of images and data of our planet. Thanks to them, we can download an image in raster format from this link (2MB — TIF). The downloaded file has a .tif extension. Keep in mind that there are many other raster files formats. Some of the more popular ones include Esri Grid, JPEG 2000, MrSID, and ECW.

As we’ve previously mentioned, a raster file is a table with information stored in each of its cells. In this case, since we’re using a color image of Earth, each cell must have the corresponding color to that portion of the planet.

We’ll use Python and rasterio to verify it.

https://medium.com/media/cf5c0d0c6b7b73335b6b8c04c8d9ad56/href
count: 3
height: 1024
width: 2048

This tells us that the raster file has a height of 1024 (rows), a width of 2048 (columns), and three bands. Each bandindicates a corresponding layer of information contained in each cell. In this case, this means that each cell contains three values (corresponding to the RGB values).

Let’s see what we can find in each of these bands:

https://medium.com/media/41baf332de2c76072ca4a6276aae481c/href
<class ‘numpy.ndarray’>
(1024, 2048)
[[ 10 10 10 … 10 10 10]
[ 10 10 10 … 10 10 10]
[ 10 10 10 … 10 10 10]
[213 219 219 … 218 220 206]
[213 219 219 … 218 220 206]
[206 211 210 … 210 212 199]]

As you can see, the band is a 1024x2048 matrix with values between zero and 255, which indicate the intensity of the color they represent (red, green, and blue).

Finally, we can show the raster file as an image (and then save it in a .png file)

https://medium.com/media/134d4451eb175c7fac8d94c569a4109d/hrefworld_raster.png

Vector File

Now let’s see how the vector files can help us represent the information from all the countries in the world and the location of all active volcanoes from the last 10,000 years. For the countries, we’ll use the shapefile provided by Thematic Mapping in this link ( titled TM_WORLD_BORDERS-0.3.zip). The information for the volcanoes can be downloaded from this link from Stanford University ( titled harvard-glb-volc-shapefile.zip).

The shapefile format is the most popular GIS file format. However, it’s not the only one. You may see other file formats such as GeoJSON, KML, KMZ, and even CSV.

If we decompress the .zip files, you’ll notice they’re made up of various files. Regardless, we shouldn’t worry about looking at it as if it were only one file.

We’ll use the geopandas library from Python to read and analyze the vector files.

https://medium.com/media/d2153d52dfbddd4270a8647c8455389e/href
world_gdf shape (246, 12)
volcanoes_gdf shape (1509, 10)

This last part tells us that world_gdf (the variable where we read the vector file of the countries) has 246 rows, each of them with information from one country, as well as 12 columns representing the countries’ attributes. At the same time, volcanoes_gdf has 1509 volcanoes and 10 attributes.

display(world_gdf.head())

The first rows give us a better understanding of what this file is about. Columns 1–11 have data from the countries (name, codes, etc.) and the 12th column (geometry) has the vector information that represents the country. In this case, each country is represented by a polygon.

display(volcanoes_gdf.head())

For each volcano, we also have several attributes with information on them. Here, each volcano is represented by a point. (Note that the values inside each point coincide with the LAT and LON attributes).

Let’s see how this looks…

https://medium.com/media/9560008e166bcd83b8a3f4e48fb1a895/hrefworld_volcanoes_vector.png

One Last Piece of Advice…

If the raster or vector files refer to locations on Earth (like in this example), we must pay attention to the Coordinate Reference System (CRS) that the file is using. The CRS tells us how the locations indicated in the raster or vector file correspond with Earth.

Furthermore, it establishes which technique must be used to “flatten” or “project” the Earth into two dimensions. It’s a somewhat complex subject, but keep it in mind to avoid some headaches.

In this example, we were lucky. Both vector files use the same CRS (EPSG 4326). If we hadn’t been so lucky, we would’ve had to convert the CRS in one of the two layers (the to_crs()method from geopandas is useful for this!).

There you have it. By taking your first step into spatial data with Python, you’ve traveled around the world in minutes.

Resources

Visible Earth (NASA): https://visibleearth.nasa.gov/images/57752/blue-marble-land-surface-shallow-water-and-shaded-topography

Thematic Mapping: http://thematicmapping.org/downloads/world_borders.php

Rasterio Documentation: https://rasterio.readthedocs.io/en/stable/index.html

Geopandas Documentation: http://geopandas.org/


Spatial data with python — Let’s begin! was originally published in rmotr.com on Medium, where people are continuing the conversation by highlighting and responding to this story.

Django Weblog: 2019 Malcolm Tredinnick Memorial Prize awarded to Jeff Triplett

$
0
0

The Board of the Django Software Foundation is pleased to announce that the 2019 Malcolm Tredinnick Memorial Prize has been awarded to Jeff Triplett (@webology).

Jeff has been heavily involved in the Django Community basically since there was a Django Community. He's served on the Code of Conduct committee for many years but most notably Jeff helped found DEFNA which has run DjangoCon US since 2015. Jeff is also a Board Member of the Python Software Foundation.

Sara Gore, who nominated Jeff, gave this as her main reason for nominating Jeff:

Jeff has served the Django community through the DSF, DEFNA, and the PSF. He turned DjangoCon US into the amazing volunteer run conference that it is today, and mentored many conference organizers and junior developers. He is a true ally who stands up for people in our community.

The other nominees this year were:

  • Trey Hunner
  • Timothy Allen
  • Mariusz Felisiak
  • William Vincent

Every year we receive many nominations and it's always hard to pick the winner. In fact, some people like Jeff have been nominated in multiple years. Malcolm would be very proud of the legacy he has fostered in our community!

Congratulations Jeff!

PyCon: PyCon US 2020 CFP Submissions are due!

$
0
0

PyCon US 2020 Call for Proposal deadline is December 20, 2019 AoE!

If you have a talk, poster or education summit idea, don't wait, submit your proposals this week!

To submit your proposal start by creating an account on us.pycon.org/2020. Details on submitting a proposal can be found here.  

Remember that you can edit or update a previously submitted proposal until the deadline by accessing the submission on your dashboard.

PyCon US 2020 Conference Registration

Our Early Bird tickets are going quickly. If you are hoping to purchase your Student, Individual, or Corporate ticket at our discounted rate, then your time is now.  Registration is accessed from your dashboard - register as soon as you can! 

The schedules for all tutorials and talks will be posted in early February 2020.

We look forward to seeing you in Pittsburgh in April 2020!

Moshe Zadka: Precise Unit Tests with PyHamcrest

$
0
0

(This is based on my article on opensource.com)

Unit test suites help maintain high-quality products by signaling problems early in the development process. An effective unit test catches bugs before the code has left the developer machine, or at least in a continuous integration environment on a dedicated branch. This marks the difference between good and bad unit tests: good tests increase developer productivity by catching bugs early and making testing faster. Bad tests decrease developer productivity.

Productivity decreases when testing incidental features. The test fails when the code changes, even if it is still correct. This happens because the output is different, but in a way that is not part of the function's contract.

A good unit test, therefore, is one that helps enforce the contract to which the function is committed.

If a good unit test breaks, the contract is violated and should be either explicitly amended (by changing the documentation and tests), or fixed (by fixing the code and leaving the tests as is).

A good unit test is also strict. It does its best to ensure the output is valid. This helps it catch more bugs.

While limiting tests to enforce only the public contract is a complicated skill to learn, there are tools that can help.

One of these tools is Hamcrest, a framework for writing assertions. Originally invented for Java-based unit tests, today the Hamcrest framework supports several languages, including Python.

Hamcrest is designed to make test assertions easier to write and more precise.

def add(a, b):
    return a + b

from hamcrest import assert_that, equal_to

def test_add():
    assert_that(add(2, 2), equal_to(4))

This is a simple assertion, for simple functionality. What if we wanted to assert something more complicated?

def test_set_removal():
    my_set = {1, 2, 3, 4}
    my_set.remove(3)
    assert_that(my_set, contains_inanyorder([1, 2, 4]))
    assert_that(my_set, is_not(has_item(3)))

Note that we can succinctly assert that the result has 1, 2, and 4 in any order since sets do not guarantee order.

We also easily negate assertions with is_not. This helps us write precise assertions, which allow us to limit ourselves to enforcing public contracts of functions.

Sometimes, however, none of the built-in functionality is precisely what we need. In those cases, Hamcrest allows us to write our own matchers.

Imagine the following function:

def scale_one(a, b):
    scale = random.randint(0, 5)
    pick = random.choice([a,b])
    return scale * pick

We can confidently assert that the result divides into at least one of the inputs evenly.

A matcher inherits from hamcrest.core.base_matcher.BaseMatcher, and overrides two methods:

class DivisibleBy(hamcrest.core.base_matcher.BaseMatcher):

    def __init__(self, factor):
        self.factor = factor

    def _matches(self, item):
        return (item % self.factor) == 0

    def describe_to(self, description):
        description.append_text('number divisible by')
        description.append_text(repr(self.factor))

Writing high-quality describe_to methods is important, since this is part of the message that will show up if the test fails.

def divisible_by(num):
    return DivisibleBy(num)

By convention, we wrap matchers in a function. Sometimes this gives us a chance to further process the inputs, but in this case, no further processing is needed.

def test_scale():
    result = scale_one(3, 7)
    assert_that(result,
                any_of(divisible_by(3),
                       divisible_by(7)))

Note that we combined our divisible_by matcher with the built-in any_of matcher to ensure that we test only what the contract commits to.

While editing the article, I heard a rumor that the name "Hamcrest" was chosen as an anagram for "matches". Hrm...

>>> assert_that("matches", contains_inanyorder(*"hamcrest")
Traceback (most recent call last):
  File "<stdin>", line 1, in <module>
  File "/home/moshez/src/devops-python/build/devops/lib/python3.6/site-packages/hamcrest/core/assert_that.py", line 43, in assert_that
    _assert_match(actual=arg1, matcher=arg2, reason=arg3)
  File "/home/moshez/src/devops-python/build/devops/lib/python3.6/site-packages/hamcrest/core/assert_that.py", line 57, in _assert_match
    raise AssertionError(description)
AssertionError:
Expected: a sequence over ['h', 'a', 'm', 'c', 'r', 'e', 's', 't'] in any order
      but: no item matches: 'r' in ['m', 'a', 't', 'c', 'h', 'e', 's']

Researching more, I found the source of the rumor: it is an anagram for "matchers".

>>> assert_that("matchers", contains_inanyorder(*"hamcrest"))
>>>

If you are not yet writing unit tests for your Python code, now is a good time to start. If you are writing unit tests for your Python code, using Hamcrest will allow you to make your assertion precise—neither more nor less than what you intend to test. This will lead to fewer false negatives when modifying code and less time spent modifying tests for working code.

Talk Python to Me: #243 Python on Windows is OK, actually

$
0
0
We all love the Python language. But it's the 200,000+ packages that actually make Python incredibly useful and productive. But installing these libraries and sometimes even Python itself can vary across platforms. In particular, Windows has had a hard time.
Viewing all 22409 articles
Browse latest View live


<script src="https://jsc.adskeeper.com/r/s/rssing.com.1596347.js" async> </script>