↧
Python Bytes: #153 Auto format my Python please!
↧
Reuven Lerner: Level up your coding skills with Weekly Python Exercise
Most days, I’m on-site at companies around the world, teaching various Python courses. And by far, the most common question that I get from students is: Once the course is over, how can I keep improving my Python skills?
The answer is simple: Practice. Just as you have to practice using a language in order to become fluent, you must keep using and practicing Python to become more proficient and efficient.
Weekly Python Exercise is a family of 15-week courses, each of which gives you a chance to improve your Python skills. On November 5th, I’ll be opening a new advanced-level cohort, aimed at people with at least 6 months of day-to-day Python experience.
During the course, you’ll improve your understanding of iterators, generators, decorators, threads, functional programming, and even a bunch of useful packages from PyPI.
Here’s how WPE works:
- Every Tuesday, you receive a problem/question, along with “pytest” tests that your code should pass.
- On the following Monday, you receive the solution code, along with explanatory text.
- In between (as well as before and after), you can participate in our private forum, sharing code and solutions, and asking me questions.
- Every month or two, I hold live office hours, at which you can ask me questions in real time.
Sounds simple? It is — and it should only take you about an hour every week. But by getting regular practice, your coding skills will improve, and your Python fluency will improve, too. You’ll be able to do more in less time, and will think more “Pythonically” than before.
Moreover: Join before October 29th, and you can take advantage of the early-bird pricing of $80. After that, you’ll still be able to join … but you’ll have to pay more.
Questions? Want to see some sample exercises? Or maybe you qualify for one of my many discounts? It’s all explained at http://WeeklyPythonExercise.com/ . Or just send me e-mail at reuven@lerner.co.il, and I’ll be delighted to answer.
The post Level up your coding skills with Weekly Python Exercise appeared first on Reuven Lerner.
↧
↧
Real Python: Python and PyQt: Building a GUI Desktop Calculator
Even as web and mobile applications appear to overtake the software development market, there’s still a demand for traditional Graphical User Interface (GUI) desktop applications. For developers who are interested in building these kinds of applications in Python, there are a wide variety of libraries to choose from, including Tkinter, wxPython, PyQt, PySide2, and others. In this tutorial, you’ll develop GUI desktop applications with Python and PyQt.
You’ll learn how to:
- Create Graphical User Interfaces with Python and PyQt
- Give life to your applications by connecting user events to concrete actions
- Create fully-functional GUI applications to solve real-world problems
For this tutorial, you’ll create a calculator application with Python and PyQt. This will help you grasp the fundamentals and get you up and running with the library. You can download the source code for the project and all examples in this tutorial by clicking on the link below:
Download Code:Click here to download the code you'll use to build a calculator in Python with PyQt in this tutorial.
Understanding PyQt
PyQt is a Python binding for Qt, which is a set of C++ libraries and development tools that include platform-independent abstractions for Graphical User Interfaces (GUI), as well as networking, threads, regular expressions, SQL databases, SVG, OpenGL, XML, and many other powerful features. Developed by RiverBank Computing Ltd, PyQt is available in two editions:
- PyQt4: an edition that’s built against Qt 4.x and 5.x
- PyQt5: an edition that’s only built against Qt 5.x
Even though PyQt4 can be built against Qt 5.x, only a small subset that is also compatible with Qt 4.x will be supported. This means that if you decide to use PyQt4, then you’ll probably miss out on some of the new features and improvements in PyQt5. See the PyQt4 documentation for more information on this topic.
You’ll be covering PyQt5 in this tutorial, as it seems to be the future of the library. From now on, be sure to consider any mention of PyQt as a reference to PyQt5.
Note: If you want to dive deeper into the differences between the two versions of the library, then you can take a look at the related page on the PyQt5 documentation.
PyQt5 is based on Qt v5 and includes classes that cover Graphical User Interfaces as well as XML handling, network communication, regular expressions, threads, SQL databases, multimedia, web browsing, and other technologies available in Qt. PyQt5 implements over one thousand of these Qt classes in a set of Python modules, all of which are contained within a top-level Python package called PyQt5.
PyQt5 is compatible with Windows, Unix, Linux, macOS, iOS, and Android. This can be an attractive feature if you’re looking for a library or framework to develop multi-platform applications with a native look and feel on each platform.
PyQt5 is available under two licenses:
Your PyQt5 license must be compatible with your Qt license. If you use the GPL version, then your code must also use a GPL-compatible license. If you want to use PyQt5 to create commercial applications, then you’ll need a commercial license for your installation.
Note: The Qt Company has developed and currently maintains its own Python binding for the Qt library. The Python library is called Qt for Python and is considered to be the official Qt for Python. In this case, the Python package is called PySide2.
As PyQt5 and PySide2 are both built on top of Qt, their APIs are quite similar, even almost identical. That’s why porting PyQt5 code to PySide2 can be as simple as updating some imports. If you learn one of them, then you’ll be able to work with the other with minimal effort. If you want to dive deeper into the differences between these two libraries, then you can check out the following resources:
Installing PyQt
You have several options to choose from when you install PyQt on your system or development environment. The first option is to build from source. This can be a bit complicated, so you might want to avoid it if possible. If you really need to build from source, then you can take a look at what the library’s documentation recommends in those cases.
Note: Most of the installation options you’ll cover here require that you have a working Python installation. If you need to dive deeper into how to install Python, then check out Installing Python on Windows, macOS, and Linux.
Another option would be to use binary wheels. Wheels are a very popular way to manage the installation of Python packages. However, you need to consider that wheels for PyQt5 are only available for Python 3.5 and later. There are wheels for:
- Linux (64-bit)
- macOS
- Windows (32-bit and 64-bit)
All of these wheels include copies of the corresponding Qt libraries, so you won’t need to install them separately.
Your third option is to use package managers on Linux distributions and macOS. For Windows, you can use a binary .exe file. Your fourth and final option is to use the Anaconda distribution to install PyQt on your system. The next few sections will walk you through some of the options you have to properly install PyQt5 from different sources and on different platforms.
System-Wide Installation With pip
If you’re using Python 3.5 or later, then you can install PyQt5 from PyPI by running the following command:
$ pip3 install pyqt5
With this command, you’ll install PyQt5 in your base system. You can start using the library immediately after the installation finishes. Depending on your operating system, you may need root or administrator privileges for this installation to work.
Virtual Environment Installation With pip
You may decide not to install PyQt directly on your base system to avoid messing up your configuration. In this case, you can use a Python virtual environment. Use the following commands to create one and install PyQt5:
$ python3 -m venv pyqtvenv
$source pyqtvenv/bin/activate
(pyqtvenv) $ pip install pyqt5
Collecting pyqt5...Successfully installed PyQt5-sip-4.19.17 pyqt5-5.12.2
Here, you create a virtual environment with venv. Once you activate it, you install pyqt5 in that environment with pip install pyqt5. This installation alternative is the most recommended option if you want to keep your base system clean.
Platform-Specific Installation
In the Linux ecosystem, several distributions include binary packages for PyQt in their repositories. If this is true for your distribution, then you can install the library using the distribution’s package manager. On Ubuntu 18.04 for example, you can use the following command:
$ sudo apt install python3-pyqt5
With this command, you’ll install PyQt5 and all its dependencies in your base system, so you can use the library in any of your GUI projects. Note that root privileges are needed, which you invoke here with sudo.
If you’re a Mac user, then you can install PyQt5 using the Homebrew package manager. To do that, open a terminal and type in the following command:
$ brew install pyqt5
If all goes well, then you’ll have PyQt5 installed on your base system, ready for you to use.
Note: If you use a package manager on Linux or macOS, then there’s a chance you won’t get the latest version of PyQt5. A pip installation would be better if you want to ensure that you have the latest release.
If you prefer to use Windows, but you decide not to use the binary wheels, then your path through PyQt installation can be painful. That’s because the PyQt5 download page appears to no longer provide Windows binaries (.exe files) for later versions. Still, you can find some Windows binary packages for older versions of the library at the project page. The latest binary file was built for PyQt v5.6.
If you really need to install PyQt this way, then you’ll need to:
- Determine what version of Python you’re running and whether you have 32-bit or 64-bit Python
- Download the right version for your Python installation
- Install PyQt by running the
.exefile and following the on-screen instructions
Anaconda Installation
Another alternative you can use to install PyQt is Anaconda, a Python distribution for data science. Anaconda is a free and multi-platform package and environment manager that includes a collection of over 1,500 open source packages.
Anaconda provides a user-friendly installation wizard that you can use to install PyQt on your system. You can download the appropriate version for your current platform and follow the on-screen instructions. If you install the latest version of Anaconda, then you’ll have the following packages:
pyqt: a Python binding for the cross-platform GUI toolkit Qt (Commercial, GPL-2.0, GPL-3.0 licenses)anyqt: a compatibility layer for PyQt4/PyQt5 (GPL-3.0 license)qtpy: an abstraction layer PyQt5/PyQt4/PySide (MIT license)pyqtgraph: a Python library for Scientific Graphics (MIT license)
With this set of packages, you’ll have all that you need to develop GUI desktop applications with Python and PyQt.
Note: Note that the Anaconda installation will occupy a large amount of disk space. If you install Anaconda only to use the PyQt packages, then you’ll have a serious amount of unused packages and libraries on your system. Keep this in mind when you consider using the Anaconda distribution.
Creating Your First PyQt Application
Now that you have a working PyQt installation, you’re ready to start coding. You’re going to create a “Hello, World!” application with Python and PyQt. Here are the steps you’ll follow:
- Import
QApplicationand all the required widgets fromPyQt5.QtWidgets. - Create an instance of
QApplication. - Create an instance of your application’s GUI.
- Show your application’s GUI.
- Run your application’s event loop (or main loop).
You can download the source code for the examples you’ll cover in this section at the link below:
Download Code:Click here to download the code you'll use to build a calculator in Python with PyQt in this tutorial.
You’ll start with a file called hello.py in your current working directory:
# Filename: hello.py"""Simple Hello World example with PyQt5."""importsys# 1. Import `QApplication` and all the required widgetsfromPyQt5.QtWidgetsimportQApplicationfromPyQt5.QtWidgetsimportQLabelfromPyQt5.QtWidgetsimportQWidgetFirst, you import sys, which will allow you to handle the exit status of the application. Then, you import QApplication, QWidget, and QLabel from QtWidgets, which is part of the package called PyQt5. You’ll be using these imports later on, but for now, you’re done with step one.
For step two, you need to create an instance of QApplication as follows:
# 2. Create an instance of QApplicationapp=QApplication(sys.argv)Here, you create the instance of QApplication. Since the QApplication object (app) does so much initialization, you should create it before you create any other object related to the GUI. The QApplication object also deals with common command line arguments, so you also need to pass in sys.argv as an argument when you create app.
Note:sys.argv contains the list of command-line arguments passed into a Python script. If your application is not going to accept command line arguments, then you can use an empty list instead of sys.argv. That is, you can do something like app = QApplication([]).
Step three is to create the application’s GUI. For this example, your GUI will be based on QWidget, which is the base class of all user interface objects in PyQt. Let’s create the GUI:
# 3. Create an instance of your application's GUIwindow=QWidget()window.setWindowTitle('PyQt5 App')window.setGeometry(100,100,280,80)window.move(60,15)helloMsg=QLabel('<h1>Hello World!</h1>',parent=window)helloMsg.move(60,15)In this code, window is an instance of QWidget, which provides all the features you’ll need to create the application’s window (or form). With .setWindowTitle(), you can add a title to your application’s window. In this case, the title to show is PyQt5 App.
You can use .setGeometry() to define the size of the window and where to place it on your screen. The first two parameters are the x and y coordinates at which the window will be placed on the screen. The third and fourth parameters are the width and height of the window.
Every functional GUI application needs widgets! Here, you use a QLabel object (helloMsg) to show the message Hello World! on your application’s window. QLabel objects can accept HTML text, so you can use the HTML element '<h1>Hello World!</h1>' to format the text as an h1 header. Finally, you use .move() to place helloMsg at the coordinates (60, 15) on your application’s window.
Note: In PyQt5, you can use any widget (a subclass of QWidget) as a top-level window, or even a button or a label. The only condition is that you pass no parent to it. When you use a widget like this, PyQt5 automatically gives it a title bar and turns it into a normal window.
The parent-child relationship is used for two complementary purposes:
- A widget that doesn’t have a
parentis a main window or a top-level window. - A widget that has a
parent(which is always another widget) is contained (or shown) within itsparent.
This relationship also defines ownership, with parents owning their children. The PyQt5 ownership model ensures that if you delete a parent (for example, a top-level window), then all of its children (widgets) are automatically deleted as well.
To avoid memory leaks, you should always make sure that any QWidget object has a parent, with the sole exception of top-level windows.
You’re done with step three, so let’s code the last two steps and get your first PyQt GUI application ready to go live:
# 4. Show your application's GUIwindow.show()# 5. Run your application's event loop (or main loop)sys.exit(app.exec_())Here, you call .show() on window. The call to .show() schedules a paint event. In other words, it adds a new event to the application’s event queue. You cover the event loop in a later section.
Note: A paint event is a request for painting the widgets that compose a GUI.
Finally, you start the application’s event loop by calling app.exec_(). The call to .exec_() is wrapped in a call to sys.exit(), which allows you to cleanly exit Python and release memory resources when the application terminates. You can run hello.py with the following command:
$ python3 hello.py
When you run this script, you should see a window like this:

Here, your application shows a window (based on QWidget) with the message Hello World! on it. To show the message, you use a QLabel that contains the message in HTML format.
Congrats! You’ve created your first PyQt GUI desktop application!
Considering Code Styles
If you take a closer look at the code for your first application, then you’ll notice that PyQt doesn’t follow PEP 8 coding style and naming conventions. PyQt is built on top of Qt, which is written in C++ and uses a camelCase naming style for functions, methods, and variables. That said, you’ll need to decide what naming style you’re going to use for your own PyQt GUI applications.
With regard to this issue, PEP 8 states that:
New modules and packages (including third party frameworks) should be written to these standards, but where an existing library has a different style, internal consistency is preferred. (Source)
In addition, the Zen of Python says:
…practicality beats purity. (Source)
If you want to write consistent code, then you might want to disregard PEP 8 naming style and stick to the PyQt naming style. This is a decision that you need to make. In this tutorial, you’ll follow the PyQt naming style for consistency.
Learning the Basics of PyQt
You’ll need to master the basic concepts of PyQt logic in order to efficiently use the library to develop GUI applications. Some of these concepts include:
- Widgets
- Layout managers
- Dialogs
- Main windows
- Applications
- Event loops
- Signals and slots
These elements will be the building blocks of your PyQt GUI applications. Most of them are represented as Python classes. PyQt5.QtWidgets is the module that provides all these classes. These elements are extremely important, so you’ll cover them in the next few sections.
Widgets
QWidget is the base class for all user interface objects, or widgets. These are rectangular-shaped graphical components that you can place on your application’s windows to build the GUI. Widgets contain a series of attributes and methods that allow you to model their appearance and behavior. They can also paint a representation of themselves on the screen.
Widgets also receive mouse clicks, keypresses, and other events from the user, the window system, and many other sources. Each time a widget catches an event, it emits a signal to announce its state change. PyQt5 has a rich and modern collection of widgets that serve several purposes. Some of the most common and useful widgets are:
- Buttons
- Labels
- Line edits
- Combo boxes
- Radio buttons
Let’s take a closer look at each of these widgets. First up is the button. You can create a button by instantiating QPushButton, a class that provides a classical command button. Typical buttons are OK, Cancel, Apply, Yes, No, and Close. Here’s how they look on a Linux system:
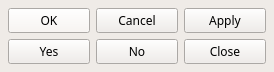
Buttons like these are perhaps the most commonly used widget in any GUI. When you click them, you can command the computer to perform actions. You can even perform actions in response to a user clicking a button.
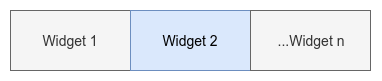
Up next are labels, which you can create with QLabel. Labels give you a way to display useful information in the form of text or images:

You can use labels like these to better explain the purpose or usage of your GUI. You can tweak their appearance in several ways, and they can even accept HTML text, as you saw earlier. Labels can also be used to specify a focus mnemonic key for another widget.
Another common widget is the line edit, a single-line text box that you can create with QLineEdit. Line edits are useful when you need the user to enter or edit data in plain text format. Here’s how they look on a Linux system:
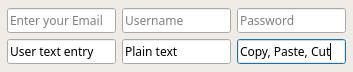
Line edits like these provide basic editing operations like copy, paste, undo, redo, drag, drop, and so on. In the above figure, you can also see that the objects on the first row show placeholder text to inform the user what kind of input is required.
Combo boxes are another useful widget that you can create with QComboBox. A combo box will present your user with a list of options in a way that takes up a minimal amount of screen space. Here’s an example of a dropdown list on a Linux system:
This combo box is read-only, which means the user can select one of several options but can’t add their own. Combo boxes can also be editable, allowing the user to add new options. They can contain pixmaps, strings, or both.
The last widget you’ll cover here is the radio button, which you can create with QRadioButton. A QRadioButton object is an option button that can be switched on (checked) or off (unchecked). Radio buttons are useful when you need the user to select one of many options. In this case, all options are visible on the screen at the same time:
In this group of radio buttons, only one button can be checked at a given time. If the user selects another radio button, then the previously selected button will switch off automatically.
PyQt5 has a large collection of widgets. At the time of this writing, there are over forty available for you to use to create your application’s GUI. Those you’ve covered so far are only a small sample, but they show you the power and flexibility of PyQt5. In the next section, you’ll cover how to lay out different widgets to create modern and functional GUIs for your applications.
Layout Managers
Now you know what widgets are and how to use them to build GUIs. But how can you arrange a set of widgets to create a GUI that is both coherent and functional? There are a variety of techniques that you can use to lay out the widgets on a form or window. For instance, you can use .resize() and .move() to give widgets absolute sizes and positions. However, this can have some drawbacks:
- You’ll have to do a lot of manual calculations to determine the correct size and position of every single widget in your forms.
- You’ll have to do some extra calculations to correctly respond to changes in form size (resize event).
- You’ll have to redo all the calculations whenever you change the layout of your forms or add or remove widgets.
One alternative is to use .resizeEvent() to calculate widget size and position dynamically. However, the most effective alternative is might be to use layout managers, which will both increase your productivity and improve your code’s maintainability.
Layout managers are classes that allow you to size and position your widgets at the places you want them to be on the application’s form. Layout managers automatically adapt to resize events and content changes. They also control the size of the widgets within them. This means that the widgets in a layout are automatically resized whenever the form is resized.
Note: If you develop international applications, then you may have seen how translated labels can be cut short. This is particularly likely when the target language is more verbose than the original language. Layout managers can help you avoid this common pitfall. However, this feature can be a bit tricky and can sometimes fail with particularly wordy languages.
PyQt provides four basic layout manager classes:
The first layout manager class is QHBoxLayout, which arranges widgets horizontally from left to right:
The widgets will appear one next to the other, starting from the left.
This code example shows you how to use QHBoxLayout to arrange buttons horizontally:
1 # Filename: h_layout.py 2 3 """Horizontal layout example.""" 4 5 importsys 6 7 fromPyQt5.QtWidgetsimportQApplication 8 fromPyQt5.QtWidgetsimportQHBoxLayout 9 fromPyQt5.QtWidgetsimportQPushButton10 fromPyQt5.QtWidgetsimportQWidget11 12 app=QApplication(sys.argv)13 window=QWidget()14 window.setWindowTitle('QHBoxLayout')15 layout=QHBoxLayout()16 layout.addWidget(QPushButton('Left'))17 layout.addWidget(QPushButton('Center'))18 layout.addWidget(QPushButton('Right'))19 window.setLayout(layout)20 window.show()21 sys.exit(app.exec_())The highlighted lines do the magic here:
- Line 15 creates a
QHBoxLayoutobject calledlayout. - Lines 16 to 18 add three buttons to
layoutwith.addWidget() - Line 19 sets
layoutas your window’s layout with.setLayout().
When you run python3 h_layout.py from your command line, you’ll get the following output:
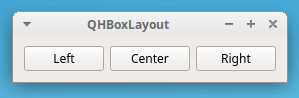
In the above figure, you added three buttons in a horizontal arrangement. Notice that the buttons are shown from left to right in the same order as you added them in your code.
The next layout manager class is QVBoxLayout, which arranges widgets vertically, from top to bottom:
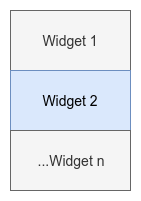
Each new widget will appear beneath the previous one. You can use this class to construct vertical box layout objects and organize your widget from top to bottom.
Here’s how you can create and use a QVBoxLayout object:
1 # Filename: v_layout.py 2 3 """Vertical layout example.""" 4 5 importsys 6 7 fromPyQt5.QtWidgetsimportQApplication 8 fromPyQt5.QtWidgetsimportQPushButton 9 fromPyQt5.QtWidgetsimportQVBoxLayout10 fromPyQt5.QtWidgetsimportQWidget11 12 app=QApplication(sys.argv)13 window=QWidget()14 window.setWindowTitle('QVBoxLayout')15 layout=QVBoxLayout()16 layout.addWidget(QPushButton('Top'))17 layout.addWidget(QPushButton('Center'))18 layout.addWidget(QPushButton('Bottom'))19 window.setLayout(layout)20 window.show()21 sys.exit(app.exec_())In line 15, you create an instance of QVBoxLayout. In the next three lines, you add three buttons to layout. Finally, you use layout to arrange the widget in a vertical layout.
When you run this application, you’ll get an output like this:
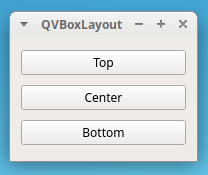
This application shows three buttons in a vertical layout, one below the other. The buttons appear in the same order as you added them in your code, from top to bottom.
The third layout manager class is QGridLayout, which arranges widgets into a grid of rows and columns. Every widget will have a relative position on the grid. You can define a widget’s position by passing it a pair of coordinates in the form of (row, column). These coordinates should be valid int numbers. They define which cell of the grid you’re going to place the widget on. The grid layout works as follows:
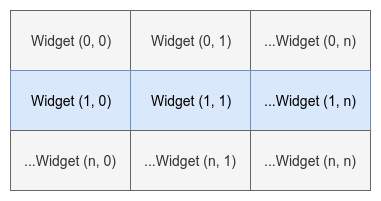
QGridLayout takes the space made available to it by its parent, divides it up into rows and columns, and puts each widget into its own cell.
Here’s how to use QGridLayout in your GUI:
1 # Filename: g_layout.py 2 3 """Grid layout example.""" 4 5 importsys 6 7 fromPyQt5.QtWidgetsimportQApplication 8 fromPyQt5.QtWidgetsimportQGridLayout 9 fromPyQt5.QtWidgetsimportQPushButton10 fromPyQt5.QtWidgetsimportQWidget11 12 app=QApplication(sys.argv)13 window=QWidget()14 window.setWindowTitle('QGridLayout')15 layout=QGridLayout()16 layout.addWidget(QPushButton('Button (0, 0)'),0,0)17 layout.addWidget(QPushButton('Button (0, 1)'),0,1)18 layout.addWidget(QPushButton('Button (0, 2)'),0,2)19 layout.addWidget(QPushButton('Button (1, 0)'),1,0)20 layout.addWidget(QPushButton('Button (1, 1)'),1,1)21 layout.addWidget(QPushButton('Button (1, 2)'),1,2)22 layout.addWidget(QPushButton('Button (2, 0)'),2,0)23 layout.addWidget(QPushButton('Button (2, 1) + 2 Columns Span'),2,1,1,2)24 window.setLayout(layout)25 window.show()26 sys.exit(app.exec_())In this example, you create an application that uses a QGridLayout object to organize its widgets. Notice that, in this case, the second and third arguments you pass to .addWidget() are int arguments that define the position of each widget.
In line 23, you add two more arguments to .addWidget(). These arguments are called rowSpan and columnSpan, and they’re the fourth and fifth arguments passed to the function. You can use them to make a widget occupy more than one row or column like you did with QPushButton('Button (2, 1) + 2 Columns Span') here.
If you run this code from your command line, then you’ll get a window like this:
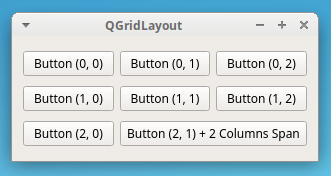
You can see your widgets arranged in a grid of rows and columns. The last widget occupies more than one cell, as you specified in line 23.
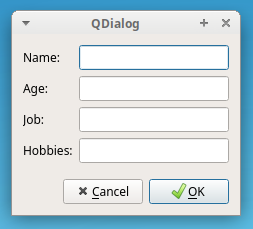
The last layout manager class is QFormLayout, which arranges widgets in a two-column layout. The first column usually displays messages in labels. The second column generally contains widgets like QLineEdit, QComboBox, QSpinBox, and so on. These allow the user to enter or edit data regarding the information in the first column. The following diagram shows how form layouts work in practice:
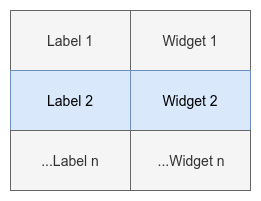
The left column consists of labels, and the right column consists of field widgets. If you’re dealing with a database application, then this kind of layout can be an attractive option for increased productivity when you’re creating your forms.
The following example shows you how to create an application that uses a QFormLayout object to arrange its widgets:
1 # Filename: f_layout.py 2 3 """Form layout example.""" 4 5 importsys 6 7 fromPyQt5.QtWidgetsimportQApplication 8 fromPyQt5.QtWidgetsimportQFormLayout 9 fromPyQt5.QtWidgetsimportQLineEdit10 fromPyQt5.QtWidgetsimportQWidget11 12 app=QApplication(sys.argv)13 window=QWidget()14 window.setWindowTitle('QFormLayout')15 layout=QFormLayout()16 layout.addRow('Name:',QLineEdit())17 layout.addRow('Age:',QLineEdit())18 layout.addRow('Job:',QLineEdit())19 layout.addRow('Hobbies:',QLineEdit())20 window.setLayout(layout)21 window.show()22 sys.exit(app.exec_())Lines 15 to 20 do the hard work in this example. Notice that QFormLayout has a convenient method called .addRow(). You can use this method to add a two-widget row to the layout. The first argument of .addRow() should be a label, and the second argument should be any other widget that allows the user to enter or edit data.
If you run this code, then you’ll get the following output:
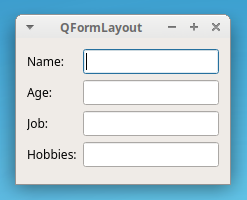
The above figure shows a GUI that uses a form layout. The first column contains labels to ask the user for some information. The second column shows widgets that allow the user to enter or edit the information you asked from them.
Dialogs
With PyQt, you can develop two types of GUI desktop applications. Depending on the class you use to create the main form or window, you’ll have one of the following:
- A Main Window-Style application: The application’s main window inherits from
QMainWindow. - A Dialog-Style application: The application’s main window inherits from
QDialog.
You’ll start with Dialog-Style applications first. In the next section, you’ll cover Main Window-Style applications.
To develop a Dialog-Style application, you need to create a GUI class that inherits from QDialog, which is the base class of all dialog windows. A dialog window is always a top-level window that you can use as the main window for your Dialog-Style application.
Note: Dialog windows are also commonly used in Main Window-Style applications for brief communication and interaction with the user.
When dialog windows are used to communicate with the user, they may be:
- Modal dialogs: block input to any other visible windows in the same application. You can display a modal dialog by calling
.exec_(). - Modeless dialogs: operate independently of other windows in the same application. You can display a modeless dialog by using
.show().
Dialog windows can also provide a return value and have default buttons (for example, OK and Cancel).
A dialog is always a top-level widget. If it has a parent, then its default location is centered on top of the parent’s top-level widget. This kind of dialog will also share the parent’s taskbar entry. If you don’t set a parent for a given dialog, then the dialog will get its own entry in the system’s taskbar.
Here’s an example of how you’d use QDialog to develop a Dialog-Style application:
1 # Filename: dialog.py 2 3 """Dialog-Style application.""" 4 5 importsys 6 7 fromPyQt5.QtWidgetsimportQApplication 8 fromPyQt5.QtWidgetsimportQDialog 9 fromPyQt5.QtWidgetsimportQDialogButtonBox10 fromPyQt5.QtWidgetsimportQFormLayout11 fromPyQt5.QtWidgetsimportQLineEdit12 fromPyQt5.QtWidgetsimportQVBoxLayout13 14 classDialog(QDialog):15 """Dialog."""16 def__init__(self,parent=None):17 """Initializer."""18 super().__init__(parent)19 self.setWindowTitle('QDialog')20 dlgLayout=QVBoxLayout()21 formLayout=QFormLayout()22 formLayout.addRow('Name:',QLineEdit())23 formLayout.addRow('Age:',QLineEdit())24 formLayout.addRow('Job:',QLineEdit())25 formLayout.addRow('Hobbies:',QLineEdit())26 dlgLayout.addLayout(formLayout)27 btns=QDialogButtonBox()28 btns.setStandardButtons(29 QDialogButtonBox.Cancel|QDialogButtonBox.Ok)30 dlgLayout.addWidget(btns)31 self.setLayout(dlgLayout)32 33 if__name__=='__main__':34 app=QApplication(sys.argv)35 dlg=Dialog()36 dlg.show()37 sys.exit(app.exec_())This application is a bit more elaborate. Here’s what’s going on:
- Line 14 creates a full class
Dialogfor the GUI, which inherits fromQDialog. - Line 20 assigns a
QVBoxLayoutobject todlgLaout. - Line 21 assigns a
QVFormLayoutobject toformLayout. - Line 22 to 25 add widgets to
formLayout. - Line 26 uses
dlgLayoutto arrange all the widgets on the form. - Line 27 provides a convenient object to place the dialog buttons.
- Lines 28 and 29 add two standard buttons:
OkandCancel. - Lines 33 to 37 wrap the boilerplate code in an
if __name__ == '__main__':idiom. This is considered a best practice for Pythonistas.
Note: If you look at line 26 in the code block above, then you’ll notice that layout managers can be nested inside one another. You can nest layouts by calling .addLayout() on the container layout and passing in the nested layout as an argument to this method.
The code block above displays the following window:
This is the GUI that you created using QFormLayout for the widgets and QVBoxLayout for the general application’s layout (dlgLayout in line 20).
Main Windows
Most of the time, your GUI applications will be Main Window-Style. This means that they’ll have a menu bar, some toolbars, a status bar, and a central widget that will be the GUI’s main element. It’s also common that your apps will have several dialog windows to accomplish secondary actions that depend on user input.
You’ll use the class QMainWindow to develop Main Window-Style applications. You need to inherit from QMainWindow to create your main GUI class. An instance of a class that derives from QMainWindow is considered to be a main window. QMainWindow provides a framework for building your application’s GUI. The class has its own built-in layout, which you can use to place the following:
One menu bar is at the top of the window. The menu bar holds the application’s main menu.
Several toolbars are on the sides of the window. Toolbars are suitable for holding tool buttons and other kinds of widgets such as
QComboBox,QSpinBox, and more.One central widget is in the center of the window. The central widget can be of any type, or it can be a composite widget.
Several dock widgets are around the central widget. Dock widgets are small, movable windows.
One status bar is at the bottom of the window. The status bar shows information on the application’s general status.
You can’t create a main window without first setting a central widget. You must have a central widget, even if it’s just a placeholder. When this is the case, you can use a QWidget object as your central widget. You can set the main window’s central widget with .setCentralWidget(). The main window’s layout will allow you to have only one central widget, but it can be a single or a composite widget.
The following code example shows you how to use QMainWindow to create a Main Window-Style application:
1 # Filename: main_window.py 2 3 """Main Window-Style application.""" 4 5 importsys 6 7 fromPyQt5.QtWidgetsimportQApplication 8 fromPyQt5.QtWidgetsimportQLabel 9 fromPyQt5.QtWidgetsimportQMainWindow10 fromPyQt5.QtWidgetsimportQStatusBar11 fromPyQt5.QtWidgetsimportQToolBar12 13 classWindow(QMainWindow):14 """Main Window."""15 def__init__(self,parent=None):16 """Initializer."""17 super().__init__(parent)18 self.setWindowTitle('QMainWindow')19 self.setCentralWidget(QLabel("I'm the Central Widget"))20 self._createMenu()21 self._createToolBar()22 self._createStatusBar()23 24 def_createMenu(self):25 self.menu=self.menuBar().addMenu("&Menu")26 self.menu.addAction('&Exit',self.close)27 28 def_createToolBar(self):29 tools=QToolBar()30 self.addToolBar(tools)31 tools.addAction('Exit',self.close)32 33 def_createStatusBar(self):34 status=QStatusBar()35 status.showMessage("I'm the Status Bar")36 self.setStatusBar(status)37 38 if__name__=='__main__':39 app=QApplication(sys.argv)40 win=Window()41 win.show()42 sys.exit(app.exec_())Here’s how this code works:
- Line 13 creates a class
Windowthat inherits fromQMainWindow. - Line 18 sets the window’s title.
- Line 19 sets a
QLabelas the central widget. - Lines 20 to 22 call private methods in the lines that follow in order to create different GUI elements:
- Lines 24 to 26 create the main menu.
- Lines 28 to 31 create the toolbar.
- Lines 33 to 36 create the status bar.
Note: When you implement different GUI components in their own method, you’re making your code more readable and more maintainable. This is not a requirement, however, so you’re free to organize your code in the way you like best.
When you run the above code, you’ll see a window like the following:
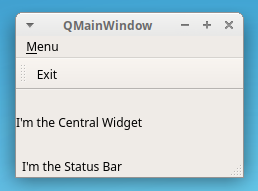
You can see that your Main Window-Style application has the following components:
- One main menu called
Menu - One toolbar with a functional
Exittool button - One central widget (a
QLabelobject) - One status bar at the bottom of the window
So far, you’ve covered some of the more important graphical components of PyQt5’s set of widgets. In the next two sections, you’ll cover some other important concepts related to PyQt GUI applications.
Applications
The most basic class you’ll use when developing PyQt GUI applications is QApplication. This class is at the core of any PyQt application. It manages the application’s control flow as well as its main settings. In PyQt, any instance of QApplication is considered to be an application. Every PyQt GUI application must have one QApplication object. Some of the application’s responsibilities include:
- Handling initialization and finalization
- Providing the event loop and event handling
- Handling most of the system-wide and application-wide settings
- Providing access to global information, such as the application’s directory, screen size, and so on
- Parsing common command-line arguments
- Defining the application’s look and feel
- Providing localization capabilities
These are just some of the core responsibilities of QApplication. As you can see, this is a fundamental class when it comes to developing PyQt GUI applications!
One of the most important responsibilities of QApplication is to provide the event loop and the entire event handling mechanism. Let’s take a closer look at the event loop now.
Event Loops
GUI applications are event-driven. This means that functions and methods are executed in response to user actions like clicking on a button, selecting an item from a combo box, entering or updating the text in a text edit, pressing a key on the keyboard, and so on. These user actions are generally called events.
Events are commonly handled by an event loop (also called the main loop). An event loop is an infinite loop in which all events from the user, the window system, and any other sources are processed and dispatched. The event loop waits for an event to occur and then dispatches it to perform some task. The event loop continues to work until the application is terminated.
Event loops are used by all GUI applications. The event loop is kind of an infinite loop that waits for the occurrence of events. If an event happens, then the loop checks if the event is a Terminate event. In that case, the loop is terminated and the application exits. Otherwise, the event is sent to the application’s event queue for further processing, and the loop starts again.
In PyQt, you can run the application’s event loop by calling .exec_() on the QApplication object.
Note: PyQt was first developed to target Python 2, which already has an exec keyword. In earlier versions, an underscore was added to the end .exec_() to help avoid name conflicts.
PyQt5 targets Python 3, which doesn’t have an exec keyword. Still, the library provides two methods that start the event loop:
.exec_().exec()
This means that you can remove .exec_() from your code, and you can safely use .exec() instead.
For an event to trigger a response action, you need to connect the event with the action you want to be executed. In PyQt5, you can establish that connection by using the signals and slots mechanism. You’ll cover these in the next section.
Signals and Slots
PyQt widgets act as event-catchers. This means that every widget can catch a specific number of events, like mouse clicks, keypresses, and so on. In response to these events, widgets always emit a signal, which is a kind of message that announces a change in its state.
The signal on its own doesn’t perform any action. If you want a signal to trigger an action, then you need to connect it to a slot. This is the function or method that will perform an action whenever the connecting signal is emitted. You can use any Python callable (or callback) as a slot.
If a signal is connected to a slot, then the slot is called whenever the signal is emitted. If a signal isn’t connected to any slot, then nothing happens and the signal is ignored. Here are some of the most useful features of this mechanism:
- A signal can be connected to one or many slots.
- A signal may also be connected to another signal.
- A slot may be connected to one or many signals.
You can use the following syntax to connect a signal to a slot:
widget.signal.connect(slot_function)This will connect slot_function to widget.signal. Whenever signal is emitted, slot_function() will be called.
This code shows you how to use the signals and slots mechanism:
1 # Filename: signals_slots.py 2 3 """Signals and slots example.""" 4 5 importsys 6 7 fromPyQt5.QtWidgetsimportQApplication 8 fromPyQt5.QtWidgetsimportQLabel 9 fromPyQt5.QtWidgetsimportQPushButton10 fromPyQt5.QtWidgetsimportQVBoxLayout11 fromPyQt5.QtWidgetsimportQWidget12 13 defgreeting():14 """Slot function."""15 ifmsg.text():16 msg.setText("")17 else:18 msg.setText("Hello World!")19 20 app=QApplication(sys.argv)21 window=QWidget()22 window.setWindowTitle('Signals and slots')23 layout=QVBoxLayout()24 25 btn=QPushButton('Greet')26 btn.clicked.connect(greeting)# Connect clicked to greeting()27 28 layout.addWidget(btn)29 msg=QLabel('')30 layout.addWidget(msg)31 window.setLayout(layout)32 window.show()33 sys.exit(app.exec_())In line 13, you create greeting(), which you’ll use as a slot. Then in line 26, you connect the button’s clicked signal to greeting(). This way, whenever the user clicks on the button, greeting() is called and msg will alternate between the message Hello World! and an empty string:
When you click on Greet, the Hello World! message will appear and disappear on your screen.
Note: Every widget has its own set of predefined signals. You can check them out on the widget’s documentation page.
If your slot function needs to receive extra arguments, then you can pass them in by using functools.partial. For example, you can modify greeting() as follows:
defgreeting(who):"""Slot function."""ifmsg.text():msg.setText('')else:msg.setText(f'Hello {who}')Now, greeting() needs to receive an argument called who. If you want to connect this new version of greeting() to the btn.clicked signal, then you can do something like this:
btn.clicked.connect(functools.partial(greeting,'World!'))For this code to work, you need to import functools first. The call to functools.partial() returns an object that behaves similarly to calling greeting() with who='World!'. Now, when the user clicks on the button, the message 'Hello World!' will be shown in the label as well as before.
Note: You can also use lambda to connect a signal to a slot that requires extra arguments. For a practice exercise, try to code the above example using lambda instead of functools.partial().
The signals and slots mechanism is what you’ll use to give life to your PyQt5 GUI applications. This mechanism will allow you to turn user events into concrete actions. You can dive deeper into the signals and slots mechanism by taking a look at the PyQt5 documentation.
Now you’ve finished covering the most important concepts of PyQt5. With this knowledge and the library’s documentation at hand, you’re ready to start developing your own GUI applications. In the next section, you’ll build your first fully-functional GUI application.
Let’s go for it!
Creating a Calculator With Python and PyQt
In this section, you’re going to develop a calculator using the Model-View-Controller (MVC) design pattern. This pattern has three layers of code, each with different roles:
The model takes care of your app’s business logic. It contains the core functionality and data. For your calculator, the model will handle the calculations.
The view implements your app’s GUI. It hosts all the widgets the end-user would need to interact with the application. The view also receives user actions and events. For your calculator, the view will be the window you’ll see on your screen.
The controller connects the model and the view to make the application work. User events (or requests) are sent to the controller, which puts the model to work. When the model delivers the requested result (or data) in the right format, the controller forwards it to the view. For your calculator, the controller will receive user events from the GUI, ask the model to perform calculations, and update the GUI with the result.
Here’s a step-by-step MVC pattern for a GUI desktop application:
- The user performs an action or request (event) on the view (GUI).
- The view notifies the controller about the user’s action.
- The controller gets the user’s request and queries the model for a response.
- The model processes the controller query, performs the required operations, and returns an answer or result.
- The controller receives the model’s answer and updates the view accordingly.
- The user finally sees the requested result on the view.
You’ll use this MVC design pattern to build your calculator.
Creating the Skeleton
You’ll start by implementing a basic skeleton for your application, called pycalc.py. You can find this script and the rest of the source code at the link below:
Download Code:Click here to download the code you'll use to build a calculator in Python with PyQt in this tutorial.
If you’d prefer to code the project on your own, then go ahead and create pycalc.py in your current working directory. Then, open the file in your code editor and type the following code:
#!/usr/bin/env python3# Filename: pycalc.py"""PyCalc is a simple calculator built using Python and PyQt5."""importsys# Import QApplication and the required widgets from PyQt5.QtWidgetsfromPyQt5.QtWidgetsimportQApplicationfromPyQt5.QtWidgetsimportQMainWindowfromPyQt5.QtWidgetsimportQWidget__version__='0.1'__author__='Leodanis Pozo Ramos'# Create a subclass of QMainWindow to setup the calculator's GUIclassPyCalcUi(QMainWindow):"""PyCalc's View (GUI)."""def__init__(self):"""View initializer."""super().__init__()# Set some main window's propertiesself.setWindowTitle('PyCalc')self.setFixedSize(235,235)# Set the central widgetself._centralWidget=QWidget(self)self.setCentralWidget(self._centralWidget)# Client codedefmain():"""Main function."""# Create an instance of QApplicationpycalc=QApplication(sys.argv)# Show the calculator's GUIview=PyCalcUi()view.show()# Execute the calculator's main loopsys.exit(pycalc.exec_())if__name__=='__main__':main()This script implements all the code you’ll need to run a basic GUI application. You’ll use this skeleton to build your calculator. Here’s how it works:
Lines 10 to 12 import the required modules and classes from
PyQt5.QtWidgets.Line 18 creates the GUI with the class
PyCalcUi. Note that this class inherits fromQMainWindow.Line 24 sets the window’s title to
PyCalc.Line 25 uses
.setFixedSize()to give the window a fixed size. This ensures that the user won’t be able to resize the window.Line 27 creates a
QWidgetobject to play the role of a central widget. Remember that since your GUI class inherits fromQMainWindow, you need a central widget. This object will be theparentfor the rest of the GUI component.Line 31 defines your calculator’s main function, which is considered a best practice. This function will be the entry point to the application. Inside
main(), your program does the following:- Line 34 creates a
QApplicationobjectpycalc. - Line 37 shows the GUI with
view.show(). - Line 39 runs the application’s event loop with
pycalc.exec_().
- Line 34 creates a
When you run the script, the following window will appear on your screen:
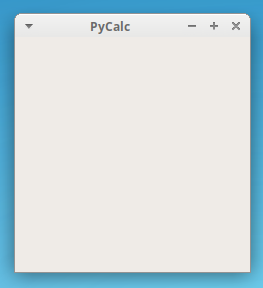
This is your GUI application skeleton.
Completing the View
The GUI you have at this point doesn’t really look like a calculator. Let’s finish the GUI by adding the display and buttons for the numbers. You’ll also add buttons for basic math operations and for clearing the display.
First, you’ll need to add the following imports to the top of your file:
fromPyQt5.QtCoreimportQtfromPyQt5.QtWidgetsimportQGridLayoutfromPyQt5.QtWidgetsimportQLineEditfromPyQt5.QtWidgetsimportQPushButtonfromPyQt5.QtWidgetsimportQVBoxLayoutYou’re going to use a QVBoxLayout for the calculator’s general layout. You’ll also use a QGridLayout object to arrange the buttons. Finally, you import QLineEdit for the display and QPushButton for the buttons. There should now be eight import statements at the top of your file.
Now you can update the initializer for PyCalcUi:
# Create a subclass of QMainWindow to setup the calculator's GUIclassPyCalcUi(QMainWindow):"""PyCalc's View (GUI)."""def__init__(self):"""View initializer."""super().__init__()# Set some main window's propertiesself.setWindowTitle('PyCalc')self.setFixedSize(235,235)# Set the central widget and the general layoutself.generalLayout=QVBoxLayout()self._centralWidget=QWidget(self)self.setCentralWidget(self._centralWidget)self._centralWidget.setLayout(self.generalLayout)# Create the display and the buttonsself._createDisplay()self._createButtons()Here, you’ve added the highlighted lines of code. You’ll use a QVBoxLayout to place the display at the top and the buttons in a grid layout at the bottom.
The calls to ._createDisplay() and ._createButtons() won’t work, because you haven’t yet implemented those methods. Let’s fix that by coding ._createDisplay():
classPyCalcUi(QMainWindow):# Snipdef_createDisplay(self):"""Create the display."""# Create the display widgetself.display=QLineEdit()# Set some display's propertiesself.display.setFixedHeight(35)self.display.setAlignment(Qt.AlignRight)self.display.setReadOnly(True)# Add the display to the general layoutself.generalLayout.addWidget(self.display)To create the display widget, you use a QLineEdit object. Then you set the following display properties:
- The display has a fixed height of 35 pixels.
- The display shows the text as left-aligned.
- The display is set to read-only to avoid direct editing.
The last line adds the display to the calculator’s general layout with generalLayout.addWidget().
Next, you’ll implement ._createButtons() to create buttons for your calculator. You’ll use a dictionary to hold each button’s text and position on the grid. You’ll also use QGridLayout to arrange the buttons on the calculator’s window. The final code will look like this:
classPyCalcUi(QMainWindow):# Snipdef_createButtons(self):"""Create the buttons."""self.buttons={}buttonsLayout=QGridLayout()# Button text | position on the QGridLayoutbuttons={'7':(0,0),'8':(0,1),'9':(0,2),'/':(0,3),'C':(0,4),'4':(1,0),'5':(1,1),'6':(1,2),'*':(1,3),'(':(1,4),'1':(2,0),'2':(2,1),'3':(2,2),'-':(2,3),')':(2,4),'0':(3,0),'00':(3,1),'.':(3,2),'+':(3,3),'=':(3,4),}# Create the buttons and add them to the grid layoutforbtnText,posinbuttons.items():self.buttons[btnText]=QPushButton(btnText)self.buttons[btnText].setFixedSize(40,40)buttonsLayout.addWidget(self.buttons[btnText],pos[0],pos[1])# Add buttonsLayout to the general layoutself.generalLayout.addLayout(buttonsLayout)You first create an empty dictionary self.buttons to hold the calculator buttons. Then, you create a temporary dictionary to store their labels and relative positions on the grid layout (buttonsLayout). Inside the for loop, you create the buttons and add them to both self.buttons and buttonsLayout. Every button will have a fixed size of 40x40 pixels, which you set with .setFixedSize(40, 40).
Note: When it comes to widget size, you’ll rarely find measurement units in the PyQt documentation. It’s assumed that the measurement unit is pixels (except for QPrinter, which uses points).
Now, the calculator’s GUI (or view) can show the display and the buttons. But there’s still no way to update the information shown in the display. You can fix this by adding a few extra methods:
.setDisplayText()to set and update the display’s text.displayText()to get the current display’s text.clearDisplay()to clear the display’s text
These methods will form the GUI public interface and complete the view class for your Python calculator. Here’s a possible implementation:
classPyCalcUi(QMainWindow):# SnipdefsetDisplayText(self,text):"""Set display's text."""self.display.setText(text)self.display.setFocus()defdisplayText(self):"""Get display's text."""returnself.display.text()defclearDisplay(self):"""Clear the display."""self.setDisplayText('')Here’s what each function does:
.setDisplayText()uses.setText()to set and update the display’s text, and.setFocus()to set the cursor’s focus on the display..displayText()is a getter method that returns the display’s current text. When the user clicks on the equals sign (=), the program will use the return value of.displayText()as the math expression to be evaluated..clearDisplay()sets the display’s text to an empty string ('') so the user can introduce a new math expression.
Now your calculator’s GUI is ready! When you run the application, you’ll see a window like this one:
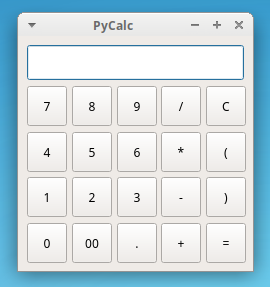
You’ve completed the calculator’s GUI interface. However, if you try to do some calculations, then you’ll notice that the calculator doesn’t do anything just yet. That’s because you haven’t implemented the model or the controller. Next, you’ll add a basic controller class to start giving life to your calculator.
Creating a Basic Controller
In this section, you’re going to code the calculator’s controller class. This class will connect the view to the model. You’ll use the controller class to make the calculator perform actions in response to user events. You’ll start with the following import:
fromfunctoolsimportpartialAt the top of pycalc.py, you import partial() to connect signals with methods that need to take extra arguments.
Your controller class needs to perform three main tasks:
- Access the GUI’s public interface
- Handle the creation of math expressions
- Connect button
clickedsignals with the appropriate slots
This will ensure that your calculator is working correctly. Here’s how you code the controller class:
# Create a Controller class to connect the GUI and the modelclassPyCalcCtrl:"""PyCalc Controller class."""def__init__(self,view):"""Controller initializer."""self._view=view# Connect signals and slotsself._connectSignals()def_buildExpression(self,sub_exp):"""Build expression."""expression=self._view.displayText()+sub_expself._view.setDisplayText(expression)def_connectSignals(self):"""Connect signals and slots."""forbtnText,btninself._view.buttons.items():ifbtnTextnotin{'=','C'}:btn.clicked.connect(partial(self._buildExpression,btnText))self._view.buttons['C'].clicked.connect(self._view.clearDisplay)The first thing you do is give PyCalcCtrl an instance of the view PyCalcUi. You’ll use this instance to gain full access to the view’s public interface. Next, you create ._buildExpression() to handle the creation of math expressions. This method also updates the calculator’s display in response to user input.
Finally, you use ._connectSignals() to connect the printable buttons with ._buildExpression(). This allows your users to create math expressions by clicking on the calculator’s buttons. In the last line, you connect the clear button (C) to ._view.clearDisplay(). This method will clear up the text on the display.
For this new controller class to work, you need to update main():
# Client codedefmain():"""Main function."""# Create an instance of QApplicationpycalc=QApplication(sys.argv)# Show the calculator's GUIview=PyCalcUi()view.show()# Create instances of the model and the controllerPyCalcCtrl(view=view)# Execute calculator's main loopsys.exit(pycalc.exec_())This code creates an instance of PyCalcCtrl(view=view) with the view passed in as an argument. This will initialize the controller and connect the signals and slots to give your calculator some functionality.
If you run the application, then you’ll see something like the following:

As you can see, the calculator already has some useful functionalities! Now, you can build math expressions by clicking on the buttons. Notice that the equals sign (=) doesn’t work yet. To fix this, you need to implement the calculator’s model.
Implementing the Model
The model is the layer of code that takes care of the business logic. In this case, the business logic is all about basic math calculations. Your model will evaluate the math expressions introduced by your users. Since the model needs to handle errors, you’re going to define the following global constant:
ERROR_MSG='ERROR'This is the message the user will see if they introduce an invalid math expression.
Your model will be a single function:
# Create a Model to handle the calculator's operationdefevaluateExpression(expression):"""Evaluate an expression."""try:result=str(eval(expression,{},{}))exceptException:result=ERROR_MSGreturnresultHere, you use eval() to evaluate a string as an expression. If this is successful, then you’ll return the result. Otherwise, you’ll return the error message. Note that this function isn’t perfect. It has a couple of important issues:
- The
try...exceptblock doesn’t catch any specific exception, which is not a best practice in Python. - The function is based on the use of
eval(), which can lead to some serious security issues. The general advice is to only useeval()on trusted input.
You’re free to rework the function to make it more reliable and secure. For this tutorial, you’ll use the function as-is.
Completing the Controller
Once you’ve completed the calculator’s model, you can finish the controller. The final version of PyCalcCtrl will include logic to process the calculations and to make sure the equals sign (=) works correctly:
# Create a Controller class to connect the GUI and the modelclassPyCalcCtrl:"""PyCalc's Controller."""def__init__(self,model,view):"""Controller initializer."""self._evaluate=modelself._view=view# Connect signals and slotsself._connectSignals()def_calculateResult(self):"""Evaluate expressions."""result=self._evaluate(expression=self._view.displayText())self._view.setDisplayText(result)def_buildExpression(self,sub_exp):"""Build expression."""ifself._view.displayText()==ERROR_MSG:self._view.clearDisplay()expression=self._view.displayText()+sub_expself._view.setDisplayText(expression)def_connectSignals(self):"""Connect signals and slots."""forbtnText,btninself._view.buttons.items():ifbtnTextnotin{'=','C'}:btn.clicked.connect(partial(self._buildExpression,btnText))self._view.buttons['='].clicked.connect(self._calculateResult)self._view.display.returnPressed.connect(self._calculateResult)self._view.buttons['C'].clicked.connect(self._view.clearDisplay)The new lines of code are highlighted. First, you add a new parameter to the init function. Now the class receives instances from both the model and the view. Then in ._calculateResult(), you take the display’s content, evaluate it as a math expression, and finally show the result in the display.
You also add an if statement to ._buildExpression() to check if an error has occurred. If so, then you clear the display and start over with a new expression. Finally, you add two more connections inside ._connectSignals(). The first enables the equals sign (=). The second ensures that when the user hits Enter, the calculator will process the expression as expected.
For all this code to work, you need to update main():
# Client codedefmain():"""Main function."""# Create an instance of `QApplication`pycalc=QApplication(sys.argv)# Show the calculator's GUIview=PyCalcUi()view.show()# Create instances of the model and the controllermodel=evaluateExpressionPyCalcCtrl(model=model,view=view)# Execute calculator's main loopsys.exit(pycalc.exec_())Here, your model holds a reference to evaluateExpression(). In addition, PyCalcCtrl() now receives two arguments: the model and the view.
Running the Calculator
Now that you’ve finished the code, it’s time for a test! If you run the application, then you’ll see something like this:
To use PyCalc, enter a valid math expression with your mouse. Then, press Enter or click on the equals sign (=) to see the result on the calculator’s display.
Congrats! You’ve developed your first fully-functional GUI desktop application with Python and PyQt!
Additional Tools
PyQt5 offers quite a useful set of additional tools to help you build solid, modern, and full-featured GUI applications. Here are some of the most remarkable tools you can use:
- The Qt Designer
- The set of internationalization tools
- The PyQt5 resource system
Qt Designer is the Qt tool for designing and building graphical user interfaces. You can use it to design widgets, dialogs, or complete main windows by using on-screen forms and a drag-and-drop mechanism. The following figure shows some of the Qt Designer’s features:
Qt Designer uses XML .ui files to store your GUI designs. You can load them with QUiLoader. PyQt includes a module called uic to help with this. You can also convert the .ui file content into Python code with a command-line tool called pyuic5.
PyQt5 also provides a comprehensive set of tools for the internationalization of apps into local languages. pylupdate5 creates and updates translation (.ts) files. Then, Qt Linguist updates the generated .ts files with translations of the strings. It also releases the .ts files as .qm files. These .qm files are compact binary equivalents that can be used directly by the application.
Finally, you can use the PyQt5 resource system, which is a facility for embedding resources such as icons and translation files. To use this tool, you need to generate a .qrc file. This is an XML file that’s used to specify which resource files are to be embedded. Once you have this file ready, you can use pyrcc5 to generate a Python module that contains the embedded resources.
Conclusion
Graphical User Interface (GUI) desktop applications still hold a substantial share of the software development market. Python offers a handful of frameworks and libraries that can help you develop modern and robust GUI applications.
In this tutorial, you learned how to use PyQt, which is arguably one of the most popular and solid libraries for GUI desktop application development in Python. Now you know how to effectively use both Python and PyQt to build modern GUI desktop applications.
You’re now able to:
- Create Graphical User Interfaces with Python and PyQt
- Connect user events to concrete actions in your application
- Create fully-functional GUI desktop applications to solve real-world problems
Now you can use Python and PyQt to give life to your desktop GUI applications! You can get the source code for the calculator project and all code examples at the link below:
Download Code:Click here to download the code you'll use to build a calculator in Python with PyQt in this tutorial.
Further Reading
If you want to dive deeper into PyQt and its related tools, then you can take a look at some of these resources:
- PyQt5 Documentation
- PyQt4 Documentation
- Qt v5 Documentation
- PyQt Wiki
- Rapid GUI Programming with Python and Qt
- Qt Designer Manual
- Qt for Python (
PySide2) documentation
Although the PyQt5 Documentation is the first resource listed here, some important parts are still missing or incomplete. Fortunately, you can use the PyQt4 Documentation to fill in the blanks. The Class Reference is particularly useful for gaining a complete understanding of widgets and classes.
If you’re using the PyQt4 documentation as a reference for PyQt5 classes, then bear in mind that the classes will be slightly different and may behave differently, too. Another option would be to use the original Qt v5 Documentation and its Class Reference instead. In this case, you may need some background in C++ to properly understand the code samples.
[ Improve Your Python With 🐍 Python Tricks 💌 – Get a short & sweet Python Trick delivered to your inbox every couple of days. >> Click here to learn more and see examples ]
↧
Mike Driscoll: A Brief Intro to PySimpleGUI
Creating graphical user interfaces (GUI) can be difficult. There are many different Python GUI toolkits to choose from. The top three that you are likely to see mentioned the most often are Tkinter, wxPython and PyQt (or PySide2). However there is a newer toolkit called PySimpleGUI that aims to make creating GUIs easier.
The way that PySimpleGUI gets its power is by being an abstraction layer on top of Tkinter, wxPython and PyQt. You can kind of think of PySimpleGUI as a wrapper. The developers behind PySimpleGUI have also recently added a 4th wrapper around Remi, which is a “GUI library for Python applications which transpiles an application’s interface into HTML to be rendered in a web browser”.
One of PySimpleGUI’s claims to fame is that you don’t need to use classes to create your user interfaces. This is an interesting way of doing things, but may turn off some users of the library.
Installing PySimpleGUI
Installing PySimpleGUI is a snap if you know how to use pip. Here’s the command you should run:
pip install pysimplegui
Note that this will install PySimpleGUI to your system Python. You may want to install it to a Virtual Python environment instead. You can use Python’s venv module to do that. Check it out!
Hello PySimpleGUI
When it comes to working with GUIs, it’s always easier to see how you might put one together yourself. Let’s write little form that takes a string and has two buttons: an OK button and an Cancel button.
This example is based on one from the PySimpleGUI User’s Manual:
import PySimpleGUI as sg

# Create some widgets
text = sg.Text("What's your name?")
text_entry = sg.InputText()
ok_btn = sg.Button('OK')
cancel_btn = sg.Button('Cancel')
layout = [[text, text_entry],
          [ok_btn, cancel_btn]]
# Create the Window
window = sg.Window('Hello PySimpleGUI', layout)
# Create the event loopwhileTrue:
    event, values = window.read()if event in(None, 'Cancel'):
        # User closed the Window or hit the Cancel buttonbreakprint(f'Event: {event}')print(str(values))
window.close()
Here you import PySimpleGUI and then you create a series of widgets: Text, InputText and two Buttons. To layout the widgets in rows, you can add them to lists. So for the first row of widgets, you create a list that contains the Text widget followed by the InputText widget. The widgets are added from left-to-right horizontally. To add a second row, you add a second list of widgets, which contains the two buttons.
After you have all your widgets in a nested set of lists, you can create the Window. This is the parent widget that contains all the other widgets. It has a title and accepts your nested list of widgets.
Finally you create an while loop and call the Window’s read() method to extract the events and values that the user has set. If the user presses the Cancel button or closes the Window, you catch that and break out of the loop. Otherwise you print out the event and any value the user has entered.
This is what the GUI should look like when you run your code:

Let’s say you enter the string “mike” in the text entry widget and then hit the OK button. You should see the following output in your terminal:
Event: OK

{0: 'mike'}
Wouldn’t it be nice if you could redirect stdout to a debug window in your GUI though? PySimpleGUI actually has an easy way to do that. All you need to do is update your print statement in the code above to the following:
sg.Print(f'Event: {event}')
sg.Print(str(values))
Now when you run the code and enter a string and press OK, you should see the following debug window:

PySimpleGUI Widgets
There isn’t enough time to go over every widget that PySimpleGUI supports. However you can see which widgets are supported by going to this part of the documentation. There is a note in the documentation that mentions that Table widget currently has issues. It is implied that the Tree widget is also problematic, but doesn’t really talk about why.
This should get better if the developers behind PySimpleGUI can finish wrapping wxPython’s widgets or Qt’s as they both have robust table and tree widgets.
Creating Multiple Windows
One thing that I see a lot of new programmers struggle with is opening multiple windows in their GUI toolkit of choice. Fortunately, PySimpleGUI has directions of how to do this clearly labeled. They actually have two different “design patterns” for doing this sort of thing.
For brevity, I’ll only show how to do two active windows:
import PySimpleGUI as sg

# Create some widgets
ok_btn = sg.Button('Open Second Window')
cancel_btn = sg.Button('Cancel')
layout = [[ok_btn, cancel_btn]]
# Create the first Window
window = sg.Window('Window 1', layout)
win2_active = False
# Create the event loopwhileTrue:
    event1, values1 = window.read(timeout=100)
    if event1 in(None, 'Cancel'):
        # User closed the Window or hit the Cancel buttonbreak
    ifnot win2_active and event1 == 'Open Second Window':
        win2_active = True
        layout2 = [[sg.Text('Window 2')],
                   [sg.Button('Exit')]]
        window2 = sg.Window('Window 2', layout2)
    if win2_active:
        events2, values2 = window2.Read(timeout=100)if events2 isNoneor events2 == 'Exit':
            win2_active  = False
            window2.close()
window.close()
The first few lines are pretty similar to the first example in this article. This time around you will create the main application with only two buttons. One of the buttons is used for opening a second window while the other button is used for closing the program.
Next you set a flag, win2_active, to False and then start your “event loop”. Inside of the event loop, you check if to see if the user has pressed the “Open Second Window” button. If they have, then you open the second window and watch for its events too.
Personally I find this kind of clunky to work with. I think a lot of this could be improved by using some classes for the Windows and abstracting the main loop. I wouldn’t want to have to deal with creating a lot of windows using this kind of pattern as it looks like it would get very complex very quickly to me. But I haven’t used this package enough to know if there are already good workarounds for this.
Wrapping Up
PySimpleGUI is a neat library and I like that it tries to be a bit more “Pythonic” than wxPython and PyQt tend to be. Of course, if you are looking for a GUI that uses a more Pythonic approach versus a C++ approach, you might want to check out Toga or Kivy.
Anyway, I think PySimpleGUI looks like it has a lot of interesting features. The widget set seems a bit small out of the box, but as they wrap other toolkits more this will be less of an issue. Frankly, they have a lot of cool demo applications on their Github as well as a demo application for the project itself. They also have information on turning your application into an executable on Windows and Mac using PyInstaller, which is something you don’t normally see in the documentation for a GUI toolkit.
If you are looking for a simple GUI toolkit, PySimpleGUI might be right up your alley.
The post A Brief Intro to PySimpleGUI appeared first on The Mouse Vs. The Python.
↧
Dataquest: Python if else Tutorial: Control the Flow of Your Code
When programming, controlling the flow of what code is run under what circumstance is extremely important. The Python if else commands act like a digital traffic cop, letting you define blocks of code that run when certain conditions are met. The if else syntax is one of the most important pieces of Python syntax that […]
The post Python if else Tutorial: Control the Flow of Your Code appeared first on Dataquest.
↧
↧
Samuel Sutch: Python Crash Course, 2nd Edition: A Hands-On, Project-Based Introduction to Programming
Price: $27.68
(as of Oct 23,2019 18:31:45 UTC – Details)

Recommended reading for a “shining tech career” by Techradar India
Python Crash Course was selected as one of the best books for learning Python by Real Python
“It has been interesting to see, over the last few years, No Starch Press, which produces this book, growing and producing future classics that should be alongside the more traditional O’Reilly Press programming books. Python Crash Course is one of those books.”
—Greg Laden, ScienceBlogs
“All of these projects are well thought out and presented in such a way that learning the subject matter and implementing it is much more an enjoyable pastime rather than an onerous task that must be completed. Eric took the time to deal with some rather complex projects and lay them out in a consistent, logical and pleasant manner that draws the reader into the subject willingly, which unfortunately, many authors fail to do.”
—Full Circle Magazine
“The book is well presented with good explanations of the code snippets. It works with you, one small step at a time, building more complex code, explaining what’s going on all the way.”
—FlickThrough Reviews
“Learning Python with Python Crash Course was an extremely positive experience! A great choice if you’re new to Python.”
—Mikke Goes Coding
↧
Continuum Analytics Blog: Introducing Remote Content Caching with FSSpec
Fsspec is a library which acts as a common pythonic interface to many file system-like storage backends, such as remote (e.g., SSH, HDFS) and cloud (e.g., GCS, S3) services. In this article, we will present…
The post Introducing Remote Content Caching with FSSpec appeared first on Anaconda.
↧
Roberto Alsina: Episodio 14: Tests & Bananas
Una intro rapidita a unit tests. ¿Por qué? ¿Es muy difícil? ¿Vale la pena? ¿Aún si uno está haciendo un programita así nomás?
↧
Talk Python to Me: #235 Python in your Browser with Skulpt
Do you dream of a day when you can write Python in the browser rather than JavaScript? This is no pipe dream! There are several ways to write Python that runs in the browser already.
↧
↧
Kushal Das: Python function to generate Tor v3 onion service authentication keys
Here is a small Python function using the amazing Python Cryptography module to generate the Tor v3 Onion service authentication services.
from cryptography.hazmat.primitives import serialization
from cryptography.hazmat.primitives.asymmetric import x25519
import base64

def generate_tor_v3_keys():
    "Generates public, private keypair"
    private_key = x25519.X25519PrivateKey.generate()
    private_bytes = private_key.private_bytes(
        encoding=serialization.Encoding.Raw	,
        format=serialization.PrivateFormat.Raw,
        encryption_algorithm=serialization.NoEncryption())
    public_key = private_key.public_key()
    public_bytes = public_key.public_bytes(
        encoding=serialization.Encoding.Raw,
        format=serialization.PublicFormat.Raw)
    public = base64.b32encode(public_bytes).replace(b'=', b'') \
                       .decode("utf-8")
    private = base64.b32encode(private_bytes).replace(b'=', b'') \
                        .decode("utf-8")
    return public, private
You can follow my previous blog post to setup an authenticated Onion service.
↧
Samuel Sutch: Programming: 3 Manuscripts: Python Crash Course, Python Machine Learning and Python Data Science for Beginners
Price: $24.99
(as of Oct 24,2019 06:53:33 UTC – Details)
↧
Matt Layman: Deploying WhiteNoise - Building SaaS #35
In this episode, we updated Continuous Integration, Nginx, and the Ansible deployment tasks to use WhiteNoise. With all the changes in place, we tested things out to verify that WhiteNoise served up the CSS, JS, and image files.
We started with Circle CI. First, I fixed the JS assets cache because the cache key never changed and Circle did not save fresh assets each build.
After completing the assets cache, I created a new cache that stored all the static files after running collectstatic.
↧
Python Software Foundation: Chris Angelico: 2019 Q2 Community Service Award Winner
The Python language is used around the world, and therefore so much surrounding it happens online. Python users turn to wikis, mailing lists, and forums to get their questions answered and concerns addressed. Python core developers use mailing lists to decide on critical additions and timelines. All this requires trusted and experienced contributors and administrators to ensure these wikis and mailing lists are focused on the Python language. Chris Angelico is one of these individuals and for this work, the PSF is pleased to present him with the Q2 2019 Community Service Award:
Since 2012, Chris has been an active contributor to the python-dev and python-ideas mailing lists, which are a large part of how the Python language gets developed. python-dev is used by core developers to discuss release dates and plans that could involve breaking changes to Python. On python-ideas, topics surround proposals that haven't matured enough to discuss on python-dev, and contributors can either reject ideas or help to refine them until they can be seriously proposed. “Both lists have a lot of incredibly smart people, but also very opinionated people, so it's pretty awesome to hang out and discuss,” says Chris. “They are significant parts of the funnel that brings proposals to fruition. Many changes start out with a discussion on python-ideas, then perhaps a PEP [Python Enhancement Proposal] is written, and it's discussed at length before migrating to python-dev for detailed discussion, and then finally code gets written and merged in.”
“Over the years I've known him, he's helped many people with technical questions.” recalls fellow python-ideas contributor Steve D’Aprano, “he's also been granted write permissions for the PEP repo, so Chris is the guy to go to for technical help with writing PEPs and pushing them into the repo.”
In 2015, a dominant topic on python-ideas was the f-string, a briefer string format than was previously available. Those against it said it was not Pythonic, and those for it said it was more readable than existing options. “The discussion went back and forth on that one, with many people supporting it intensely, and many others fighting just as intensely against it,” recalls Chris. F-strings were added to the Python core library in version 3.6, and you can read the discussion on python-ideas here.
A user-maintained repository of all things Python, the Python Wiki holds everything from user guides to advanced topics in the Python ecosystem. Since 2012 Chris has been an administrator, making sure contributors are actual humans with honest intent. “If it weren't for Chris I doubt the wiki would be anywhere near as popular as it is,” notes Steve Holden, PSF Director (2004-2013) and creator of the Community Service Award. “His efforts on python-dev help to keep Python moving forward and I'm happy that Chris' efforts for the community are being publicly recognised in this way.” More on how to become a contributor to the Python wiki can be found here.
Chris can even thank his work on Python lists for his current job teaching Python and JavaScript to adult learners at Thinkful. “The company head-hunted me based on the mailing list posts they saw.” Chris recalls, “So if you, too, enjoy coding and talking about code, hang out, you never know who'll notice you!”
In his free time, he can be found playing and modding video games. He’s a big fan of Alice in Wonderland, which he frequently uses as an avatar.
![]()
![]()
![]()
![]()
![]()
RESOLVED, that the Python Software Foundation award the Q2 2019 Community Service Award to Chris Angelico for his work towards fostering the online Python community by helping maintain the pydotorg-www mailing list, helping community members get edit access to the public-facing Python wiki, and also for being an active contributor to python-ideas mailing list and the python-dev mailing list.Chris had a very noble reason to start programming: his older brother was doing it so he had to follow suit! This, along with getting into the family business of importing and exporting educational materials, led to a lifelong love of learning and technology. By the 1990’s Chris was working as a developer and first used Python when he needed to embed a scripting language in a C++ project. “Python offered a simple, clean, boilerplate-free scripting language that still had all the power that I needed for that initial project,” he says. Though the project ended up going in a different direction, Chris was already hanging out on Python mailing lists and was there to stay.
Since 2012, Chris has been an active contributor to the python-dev and python-ideas mailing lists, which are a large part of how the Python language gets developed. python-dev is used by core developers to discuss release dates and plans that could involve breaking changes to Python. On python-ideas, topics surround proposals that haven't matured enough to discuss on python-dev, and contributors can either reject ideas or help to refine them until they can be seriously proposed. “Both lists have a lot of incredibly smart people, but also very opinionated people, so it's pretty awesome to hang out and discuss,” says Chris. “They are significant parts of the funnel that brings proposals to fruition. Many changes start out with a discussion on python-ideas, then perhaps a PEP [Python Enhancement Proposal] is written, and it's discussed at length before migrating to python-dev for detailed discussion, and then finally code gets written and merged in.”
“Over the years I've known him, he's helped many people with technical questions.” recalls fellow python-ideas contributor Steve D’Aprano, “he's also been granted write permissions for the PEP repo, so Chris is the guy to go to for technical help with writing PEPs and pushing them into the repo.”
In 2015, a dominant topic on python-ideas was the f-string, a briefer string format than was previously available. Those against it said it was not Pythonic, and those for it said it was more readable than existing options. “The discussion went back and forth on that one, with many people supporting it intensely, and many others fighting just as intensely against it,” recalls Chris. F-strings were added to the Python core library in version 3.6, and you can read the discussion on python-ideas here.
A user-maintained repository of all things Python, the Python Wiki holds everything from user guides to advanced topics in the Python ecosystem. Since 2012 Chris has been an administrator, making sure contributors are actual humans with honest intent. “If it weren't for Chris I doubt the wiki would be anywhere near as popular as it is,” notes Steve Holden, PSF Director (2004-2013) and creator of the Community Service Award. “His efforts on python-dev help to keep Python moving forward and I'm happy that Chris' efforts for the community are being publicly recognised in this way.” More on how to become a contributor to the Python wiki can be found here.
Chris can even thank his work on Python lists for his current job teaching Python and JavaScript to adult learners at Thinkful. “The company head-hunted me based on the mailing list posts they saw.” Chris recalls, “So if you, too, enjoy coding and talking about code, hang out, you never know who'll notice you!”
In his free time, he can be found playing and modding video games. He’s a big fan of Alice in Wonderland, which he frequently uses as an avatar.
↧
↧
Samuel Sutch: Automate the Boring Stuff with Python: Practical Programming for Total Beginners
Price: $21.00
(as of Oct 24,2019 13:00:43 UTC – Details)
“I’m having a lot of fun breaking things and then putting them back together, and just remembering the joy of turning a set of instructions into something useful and fun, like I did when I was a kid.” —Wil Wheaton
“Do you need Automate the Boring Stuff with Python? Yes, if you want to enhance your workflow by using automation, this is an excellent place to start. Highly recommended.”—Network World
↧
Dataquest: Python Range Tutorial: Learn to Use This Helpful Built-In Function
Python's range function is a great way to quickly generate a count of numbers within a range. Master this simple but powerful function in this tutorial.
The post Python Range Tutorial: Learn to Use This Helpful Built-In Function appeared first on Dataquest.
↧
Django Weblog: 2020 DSF Board Nominations
It is that time of year again to think about next year’s Django Software Foundation’s Board of Directors!
As you know, the Board guides the direction of the marketing, governance and outreach activities of the Django community. We provide funding, resources, and guidance to Django events on a global level. Further we provide support to the Django community with an established Code of Conduct and make decisions and enforcement recommendations for violations. We work closely with our corporate and individual members to raise funds to help support our great community.
In order for our community to continue to grow and advance the Django Web framework, we need your help. The Board of Directors consists of volunteers who are elected to one year terms. This is an excellent opportunity to help advance Django. We can’t do it without volunteers, such as yourself. For the most part, the time commitment is a few hours per month. There has been some confusion on this in the past, but anyone including current Board members, DSF Members, or the public at large can apply to the Board. It is open to all.
If you are interested in helping to support the development of Django we’d enjoy receiving your application for the Board of Directors. Please fill out the application form by Friday, November 22nd, 2019 to be considered. If it is still the 22nd of November somewhere in the world, applications will remain open.
If you have any questions about applying, the work, or the process in general please don’t hesitate to reach out via email to foundation@djangoproject.com and one of us will get back with you shortly.
Thank you for your time and we look forward to working with you in 2020.
The 2019 DSF Board of Directors
↧
DaPythonista: Sending Emails in Python – Tutorial with Code Examples
What do you need to send an email with Python? Some basic programming and web knowledge along with the elementary Python skills. We assume you’ve already had a web app built with this language and now you need to extend its functionality with notifications or other emails sending. This tutorial will guide you through the most essential steps of sending emails via an SMTP server.
- Configuring a server for testing (do you know why it’s important?)
- Local SMTP server
- Mailtrap test SMTP server
- Different types of emails: HTML, with images, and attachments
- Sending multiple personalized emails (Python is just invaluable for email automation)
- Some popular email sending options like Gmail and transactional email services
Served with numerous code examples!
Note: written and tested on Python 3.7.2.
Sending an email using an SMTP
The first good news about Python is that it has a built-in module for sending emails via SMTP in its standard library. No extra installations or tricks are required. You can import the module using the following statement:
import smtplibTo make sure that the module has been imported properly and get the full description of its classes and arguments, type in an interactive Python session:
help(smtplib)At our next step, we will talk a bit about servers: choosing the right option and configuring it.
An SMTP server for testing emails in Python
When creating a new app or adding any functionality, especially when doing it for the first time, it’s essential to experiment on a test server. Here is a brief list of reasons:
- You won’t hit your friends’ and customers’ inboxes. This is vital when you test bulk email sending or work with an email database.
- You won’t flood your own inbox with testing emails.
- Your domain won’t be blacklisted for spam.
Local SMTP server
If you prefer working in the local environment, the local SMTP debugging server might be an option. For this purpose, Python offers an smtpd module. It has a DebuggingServer feature, which will discard messages you are sending out and will print them to stdout. It is compatible with all operations systems.
Set your SMTP server to localhost:1025
python -m smtpd -n -c DebuggingServer localhost:1025In order to run SMTP server on port 25, you’ll need root permissions:
sudo python -m smtpd -n -c DebuggingServer localhost:25It will help you verify whether your code is working and point out the possible problems if there are any. However, it won’t give you the opportunity to check how your HTML email template is rendered.
Fake SMTP server
Fake SMTP server imitates the work of a real 3rd party web server. In further examples in this post, we will use Mailtrap. Beyond testing email sending, it will let us check how the email will be rendered and displayed, review the message raw data as well as will provide us with a spam report. Mailtrap is very easy to set up: you will need just copy the credentials generated by the app and paste them into your code.

Here is how it looks in practice:
import smtplib

port = 2525
smtp_server = "smtp.mailtrap.io"
login = "1a2b3c4d5e6f7g" # your login generated by Mailtrap
password = "1a2b3c4d5e6f7g" # your password generated by Mailtrap
Mailtrap makes things even easier. Go to the Integrations section in the SMTP settings tab and get the ready-to-use template of the simple message, with your Mailtrap credentials in it. It is the most basic option of instructing your Python script on who sends what to who is the sendmail() instance method:

The code looks pretty straightforward, right? Let’s take a closer look at it and add some error handling (see the #explanations in between). To catch errors, we use the “try” and “except” blocks.
# the first step is always the same: import all necessary components:
import smtplib
from socket import gaierror
# now you can play with your code. Let’s define the SMTP server separately here:
port = 2525
smtp_server = "smtp.mailtrap.io"
login = "1a2b3c4d5e6f7g" # paste your login generated by Mailtrap
password = "1a2b3c4d5e6f7g" # paste your password generated by Mailtrap
# specify the sender’s and receiver’s email addresses
sender = "from@example.com"
receiver = "mailtrap@example.com"


# type your message: use two newlines (\n) to separate the subject from the message body
# and use 'f' to  automatically insert variables in the text
message = f"""\
Subject: Hi Mailtrap
To: {receiver}
From: {sender}
This is my first message with Python."""


try:
    #send your message with credentials specified above
    with smtplib.SMTP(smtp_server, port) as server:
        server.login(login, password)
        server.sendmail(sender, receiver, message)

    # tell the script to report if your message was sent or which errors need to be fixed
    print('Sent')
except (gaierror, ConnectionRefusedError):
    print('Failed to connect to the server. Bad connection settings?')
except smtplib.SMTPServerDisconnected:
    print('Failed to connect to the server. Wrong user/password?')
except smtplib.SMTPException as e:
    print('SMTP error occurred: ' + str(e))
Once you get the Sent result in Shell, you should see your message in your Mailtrap inbox:

Sending emails with HTML content
In most cases, you need to add some formatting, links, or images to your email notifications. We can simply put all of these with the HTML content. For this purpose, Python has an email package.
We will deal with the MIME message type, which is able to combine HTML and plain text. In Python, it is handled by the email.mime module.
It is better to write a text version and an HTML version separately, and then merge them with the MIMEMultipart(“alternative”) instance. It means that such a message has two rendering options accordingly. In case an HTML isn’t be rendered successfully for some reason, a text version will still be available.
Input:
import smtplib
from email.mime.text import MIMEText
from email.mime.multipart import MIMEMultipart

port = 2525
smtp_server = "smtp.mailtrap.io"
login = "1a2b3c4d5e6f7g" # paste your login generated by Mailtrap
password = "1a2b3c4d5e6f7g" # paste your password generated by Mailtrap
sender_email = "mailtrap@example.com"
receiver_email = "new@example.com"

message = MIMEMultipart("alternative")
message["Subject"] = "multipart test"
message["From"] = sender_email
message["To"] = receiver_email

# write the plain text part text = """\ Hi, Check out the new post on
# the Mailtrap blog: SMTP Server for Testing: Cloud-based or Local?
#https://blog.mailtrap.io/2018/09/27/cloud-or-local-smtp-server/ Feel
#free to let us know what content would be useful for you!"""

# write the HTML part html = """\ <html><body><p>Hi,<br> Check out
# the new post on the Mailtrap blog:</p><p><a
#href="https://blog.mailtrap.io/2018/09/27/
cloud-or-local-smtp-#server">SMTP Server for Testing: Cloud-based or Local?</a></p><p>
#Feel free to <strong>let us</strong> know what content would be
#useful for you!</p></body></html>"""

# convert both parts to MIMEText objects and add them to the MIMEMultipart message
part1 = MIMEText(text, "plain")
part2 = MIMEText(html, "html")
message.attach(part1)
message.attach(part2)

# send your email with smtplib.SMTP("smtp.mailtrap.io", 2525)
# as server: server.login(login, password)
server.sendmail( sender_email, receiver_email, message.as_string() )
print('Sent')
Output:

Sending Emails with Attachments in Python
The next step in mastering sending emails with Python is attaching files. Attachments are still the MIME objects but we need to encode them with the base64 module. A couple of important points about the attachments:
- Python lets you attach text files, images, audio files, and even applications. You just need to use the appropriate email class like email.mime.audio.MIMEAudio or email.mime.image.MIMEImage. For the full information, refer to this section of the Python documentation.
- Remember about the file size: sending files over 20MB is a bad practice.
In transactional emails, the PDF files are the most frequently used: we usually get receipts, tickets, boarding passes, order confirmations, etc. So let’s review how to send a boarding pass as a PDF file.
Input:
import smtplib

# import the corresponding modules
from email import encoders
from email.mime.base import MIMEBase
from email.mime.multipart import MIMEMultipart
from email.mime.text import MIMEText


port = 2525
smtp_server = "smtp.mailtrap.io"
login = "1a2b3c4d5e6f7g" # paste your login generated by Mailtrap
password = "1a2b3c4d5e6f7g" # paste your password generated by Mailtrap

subject = "An example of boarding pass"
sender_email = "mailtrap@example.com"
receiver_email = "new@example.com"


message = MIMEMultipart()
message["From"] = sender_email
message["To"] = receiver_email
message["Subject"] = subject


# Add body to email
body = "This is an example of how you can send a boarding pass in attachment with Python"
message.attach(MIMEText(body, "plain"))

filename = "yourBP.pdf"

# Open PDF file in binary mode

# We assume that the file is in the directory where you run your Python script from
with open(filename, "rb") as attachment:

# The content type "application/octet-stream" means that a MIME attachment is a binary file
    part = MIMEBase("application", "octet-stream")
    part.set_payload(attachment.read())


# Encode to base64
encoders.encode_base64(part)


# Add header
part.add_header(
    "Content-Disposition",
    f"attachment; filename= {filename}",
)


# Add attachment to your message and convert it to string
message.attach(part)
text = message.as_string()


# send your email
with smtplib.SMTP("smtp.mailtrap.io", 2525) as server:
    server.login(login, password)
    server.sendmail(
        sender_email, receiver_email, text
    )
Output:

To attach several files, you can call the message.attach() method several times.
How to send an email with image attachment
Images, even if they are a part of the message body, are attachments as well. There are three types of them: CID attachments (embedded as a MIME object), base64 images (inline embedding), and linked images.
Let’s jump to examples.
For adding a CID attachment, we will create a MIME multipart message with MIMEImage component:
# import all necessary components
import smtplib
from email.mime.text import MIMEText
from email.mime.image import MIMEImage
from email.mime.multipart import MIMEMultipart


port = 2525
smtp_server = "smtp.mailtrap.io"
login = "1a2b3c4d5e6f7g" # paste your login generated by Mailtrap
password = "1a2b3c4d5e6f7g" # paste your password generated by Mailtrap


sender_email = "mailtrap@example.com"
receiver_email = "new@example.com"
message = MIMEMultipart("alternative")
message["Subject"] = "CID image test"
message["From"] = sender_email
message["To"] = receiver_email


# write the HTML part
html = """\
<html> <body>   <img src="cid:Mailtrapimage"> </body></html>"""

part = MIMEText(html, "html")
message.attach(part)


# We assume that the image file is in the same directory that you run your Python script from
FP = open('mailtrap.jpg', 'rb')
image = MIMEImage(fp.read())
fp.close()


# Specify the  ID according to the img src in the HTML part
image.add_header('Content-ID', '<Mailtrapimage>')
message.attach(image)


# send your email
with smtplib.SMTP("smtp.mailtrap.io", 2525) as server:
   server.login(login, password)
   server.sendmail(
       sender_email, receiver_email, message.as_string()
   )
print('Sent')
Output:

The CID image is shown both as a part of the HTML message and as an attachment. Messages with this image type are often considered spam: check the Analytics tab in Mailtrap to see the spam rate and recommendations on its improvement. Many email clients – Gmail in particular – don’t display CID images in most cases. So let’s review how to embed a base64 encoded image.
Here we will use base64 module and experiment with the same image file:
# import all necessary components
import smtplib
from email.mime.text import MIMEText
from email.mime.image import MIMEImage
from email.mime.multipart import MIMEMultipart


port = 2525
smtp_server = "smtp.mailtrap.io"
login = "1a2b3c4d5e6f7g" # paste your login generated by Mailtrap
password = "1a2b3c4d5e6f7g" # paste your password generated by Mailtrap

sender_email = "mailtrap@example.com"
receiver_email = "new@example.com"

message = MIMEMultipart("alternative")
message["Subject"] = "CID image test"
message["From"] = sender_email
message["To"] = receiver_email


# write the HTML part
html = """\
<html> <body>   <img src="cid:Mailtrapimage"> </body></html>"""

part = MIMEText(html, "html")
message.attach(part)


# We assume that the image file is in the same directory that you run your Python script from
FP = open('mailtrap.jpg', 'rb')
image = MIMEImage(fp.read())
fp.close()


# Specify the  ID according to the img src in the HTML part
image.add_header('Content-ID', '<Mailtrapimage>')
message.attach(image)


# send your email
with smtplib.SMTP("smtp.mailtrap.io", 2525) as server:
   server.login(login, password)
   server.sendmail(
       sender_email, receiver_email, message.as_string()
   )
print('Sent')
Output:

Now the image is embedded into the HTML message and is not available as an attached file. Python has encoded our jpg image, and if we go to the HTML Source tab, we will see the long image data string in the img src.
How to Send Multiple Emails
Sending multiple emails to different recipients and making them personal is the special thing about emails in Python.
To add several more recipients, you can just type their addresses in separated by a comma, add CC and BCC. But if you work with a bulk email sending, Python will save you with loops.
One of the options is to create a database in a .csv format (we assume it is saved to the same folder as your Python script).
We often see our names in transactional or even promotional examples. Here is how we can make it with Python.
Let’s organize the list in a simple table with just two columns: name and email address. It should look like the following example:
# name,email
John Johnson,john@johnson.com
Peter Peterson,peter@peterson.com
The code below will open the file and loop over its rows line by line, replacing the {name} with the value from the “name” column.
Input:
import csv, smtplib


port = 2525
smtp_server = "smtp.mailtrap.io"
login = "1a2b3c4d5e6f7g" # paste your login generated by Mailtrap
password = "1a2b3c4d5e6f7g" # paste your password generated by Mailtrap


message = """Subject: Order confirmation
To: {recipient}
From: {sender}

Hi {name}, thanks for your order! We are processing it now and will contact you soon"""
sender = "new@example.com"


with smtplib.SMTP("smtp.mailtrap.io", 2525) as server:
    server.login(login, password)
    with open("contacts.csv") as file:
        reader = csv.reader(file)
        next(reader)  # it skips the header row
        for name, email in reader:
            server.sendmail(
               sender,
                email,
                message.format(name=name, recipient=email, sender=sender)
            )
            print(f'Sent to {name}')
After running the script, we get the following response:
Sent to John Johnson
Sent to Peter Peterson
Output
In our Mailtrap inbox, we see two messages: one for John Johnson and another for Peter Peterson, delivered simultaneously:

Sending emails with Python via Gmail
When you are ready for sending emails to real recipients, you can configure your production server. It also depends on your needs, goals, and preferences: your localhost or any external SMTP.
One of the most popular options is Gmail so let’s take a closer look at it.
We can often see titles like “How to set up a Gmail account for development”. In fact, it means that you will create a new Gmail account and will use it for a particular purpose.
To be able to send emails via your Gmail account, you need to provide access to it for your application. You can Allow less secure apps or take advantage of the OAuth2 authorization protocol. It’s a way more difficult but recommended due to security reasons.
Further, to use a Gmail server, you need to know:
- the server name = smtp.gmail.com
- port = 465 for SSL/TLS connection (preferred)
- or port = 587 for STARTTLS connection.
- username = your Gmail email address
- password = your password.
import smtplib, ssl

port = 465
password = input("your password")

context = ssl.create_default_context()

with smtplib.SMTP_SSL("smtp.gmail.com", port, context=context) as server:
    server.login("my@gmail.com", password)
If you tend to simplicity, then you can use Yagmail, the dedicated Gmail/SMTP. It makes email sending really easy. Just compare the above examples with these several lines of code:
import yagmail

yag = yagmail.SMTP()

contents = [
    "This is the body, and here is just text http://somedomain/image.png",
    "You can find an audio file attached.", '/local/path/to/song.mp3'
]
yag.send('to@someone.com', 'subject', contents)
Next steps with Python
We have demonstrated just basic options of sending emails with Python, to describe the logic and a range of its capabilities. To get great results, we recommend reviewing the Python documentation and just experimenting with your own code!
There are a bunch of various Python frameworks and libraries, which make creating apps more elegant and dedicated. In particular, some of them can help improve your experience with building emails sending functionality:
The most popular frameworks are:
- Flask, which offers a simple interface for email sending— Flask Mail.
- Django, which can be a great option for building HTML templates.
- Zope comes in handy for a website development.
- Marrow Mailer is a dedicated mail delivery framework adding various helpful configurations.
- Plotly and its Dash can help with mailing graphs and reports
Also, here is a handy list of Python resources sorted by their functionality.
Good luck and don’t forget to stay on the safe side when sending your emails!
This article was originally published at Mailtrap’s blog: Sending emails with Python
The post Sending Emails in Python – Tutorial with Code Examples appeared first on DaPythonista.
↧
↧
PyCharm: 2019.3 EAP 6
The latest Early Access Program (EAP) version for PyCharm 2019.3 is now available! Try it now by downloading it from our website.
New for this version
Improved visualization of information about variables
The variables view got some improvements to show better and organized information about variables. Now, while using the console, debugger, or the Jupyter Notebook variables tab, you will notice changes on the way data for a variable is represented such as: display of shape and improved visual representation for scientific arrays (pandas: DataFrames, Series; numpy: ndarray), display of length information for objects with __len__ attribute, removal of duplicated type information, ids are no longer showcased for dictionary keys and set elements, and protected attributes that now are grouped, collapsed and placed at the bottom of the list of values.
This is how the variables view was showing information before:

And this is how it’s been shown now:

Support for code completion at runtime for Jupyter Notebooks
Runtime completion for code can now be used for Jupyter Notebooks cells. You can now expect the information from Jupyter kernel cell execution to be available on code completion suggestions.

Interactive widgets integration for Jupyter Notebooks
Support for Jupyter widgets was added to PyCharm. Use capabilities such as building GUI’s for your notebooks and synchronizing stateful and stateless information between Python and Javascript right from PyCharm.

Option to display int values in hexadecimal and binary format from the variables view
Are you debugging network scripts or interfacing with hardware devices that require you to be aware of values in a non decimal format? Worry not as PyCharm now has integrated conversion of format for decimal values to hexadecimal or binary format straight from the console or debugger through the variables view.

TypedDict support for Python 3.8
Python 3.8 is already here and we continue our efforts to support its latests features. This time we added support for PEP-0589. With this, expect PyCharm now to comply against typed dictionaries definitions and let you know through type hints whether or not you’re implementing a dictionary properly against its typed keys.

File path completion suggestions in string literals
Need to use a file and want some assistance looking for it on your project file structure? PyCharm now supports file path completion from string literals by showing suggestions of the possible paths you want to use.

Live synchronization of Jupyter Notebook source code from external updates
PyCharm is now aware of any external change made on Jupyter Notebook files. In the past, changes were not reflected immediately making cases like running a Jupyter server and modifying files on that running instance via the browser, for example, not to be synchronized with the PyCharm project files. That’s no longer an issue with this release. Feel free to modify files externally and expect PyCharm to have the latest updates.
Further improvements
- Code inspection for Python 3.8 was improved in the specific case of parenthesis usage in
returnandyieldstatements where is no longer necessary to use them. - The kernel specification on Jupyter Notebook now registers interpreters based on module information rather than on the project one.
- Support was added for Windows Subsystem for Linux 2 (WSL 2) by Microsoft.
- And much more, see the release notes
Interested?
Download this EAP from our website. Alternatively, you can use the JetBrains Toolbox App to stay up to date throughout the entire EAP.
If you’re on Ubuntu 16.04 or later, you can use snap to get PyCharm EAP, and stay up to date. You can find the installation instructions on our website.
EAP Program Key Facts
- The EAP version of PyCharm Professional Version is free to use
- EAP build will expire after 30 days
- This is pre-release software, you may face stability issues and other rough edges
- You can install the EAP version alongside a stable version of PyCharm
- EAP versions of PyCharm report statistics by default, you can opt out by changing the settings in Preferences | Appearance & Behavior | System Settings | Data Sharing
- There’s an EAP version of the documentation as well
↧
Mike Driscoll: Netflix Releases Polynote – A Polyglot Jupyter Notebook Variant
Netflix announced that they are releasing a new piece of open source software that they are calling Polynote. Polynote is an IDE-inspired polyglot notebook that includes first-class Scala support, Python and SQL. Looking at the website, it appears to be built on top of Jupyter Notebook.
Their top goals for the project are reproducibility and visibility. You can read the full announcement with examples on Medium.
This looks like an interesting project and I am curious to see how it impacts Project Jupyter. My personal hope is that Netflix’s work will be useful to the Python community and perhaps enhance Jupyter Notebook and JupyterLab.
I like that it this notebook allows each cell to run a different language out of the box. You can do that with Jupyter Notebook, but doing so is a bit clunky and nowhere near as user-friendly as using a drop-down control like the one that Polynote is using.
It is also interesting that Polynote stores its configuration and dependencies in the notebook’s code itself.
Polynote also supports robust data visualization using Vega and Matplotlib.
Check out Polynote here.
The post Netflix Releases Polynote – A Polyglot Jupyter Notebook Variant appeared first on The Mouse Vs. The Python.
↧
Red Hat Developers: Python 2 support is going away soon: Make the move to Python 3
Seeing this tweet from Guido van Rossum the other day prompted me to write this “OMG, Python 2 is going away SOON” article. You have definitely heard it before, but seriously, folks, the Python upstream community is ending support for Python 2 at the end of the year!
Let’s stop saying “2020” because that sounds far away when, in fact, we are talking about January 1, 2020, which is two and half months from now. In this article, I’ll provide some quick links and basic information to help you make the move to Python 3.
Moving to Python 3
I hope that you have already been convinced about why you should move to Python 3 but, if not, you should definitely check out Nick Coghlan’s Python 3 Q&A and Brett Cannon’s Why Python 3 exists (as recommended by the Python porting page). Speaking from my own experience, I find Python 3 to be much more consistent in language constructs and way more in line with the “batteries included” philosophy.
Personally, my hesitation would be directly related to how much of the ecosystem is already on Python 3. In other words, language adoption is often more about the ecosystem than it is about the language itself.
The ecosystem is ready
Let me assure you; the ecosystem is ready. According to the Python Porting DB nearly 90% of Fedora Python Libraries support Python 3. Perhaps more concerning for those of you who are still on Python 2, 80% of the libraries only support Python 3. If you have any doubts about the particular libraries you need, you can use the caniusepython3 tool to be sure.
If you are worried about how much work it will be to move to Python 3, well, the Python Community has also gone to great lengths to make it as easy as possible. Specifically, check out tools like Futurize (which passes Python 2 code through appropriate fixers and turns it into valid Python 3 code) and Modernize (which makes Python 2 code more modern for porting to Python 3). The community has also provided a linter that will prove to you that you have cleaned everything up.
However, all that said, there is always the problem of testing. No one at Red Hat or in the Python community can help you create tests that don’t exist. If you don’t have great test coverage, maybe this can be an opportunity to add tests. Then, the next time you want to do a refactor or introduce a new feature, you don’t have to be so frightened :).
Heed the call
All in all, now’s the time to heed Guido’s call to action. Everything is ready for you to move. And, you really shouldn’t have to do this again for a good long time, because Python 3 will be supported until the end of the Red Hat Enterprise Linux 8 lifecycle. If you can’t commit quite yet, we still have your back for a couple more years with our expected retirement of Python27 in 2024.
Other resources
- Red Hat Software Collections
- What, no Python in Red Hat Enterprise Linux 8?
- How to install Python 3 on Red Hat Enterprise Linux
- Develop with Django 2 and Python 3 in a container with Red Hat Enterprise Linux

The post Python 2 support is going away soon: Make the move to Python 3 appeared first on Red Hat Developer.
↧