Quantcast
Channel: Planet Python
Viewing all 22856 articles
Browse latest View live

Anarcat: Theory: average bus factor = 1

$
0
0

Twoarticles recently made me realize that all my free software projects basically have a bus factor of one. I am the sole maintainer of every piece of software I have ever written that I still maintain. There are projects that I have been the maintainer of which have other maintainers now (most notably AlternC, Aegir and Linkchecker), but I am not the original author of any of those projects.

Now that I have a full time job, I feel the pain. Projects like Gameclock, Monkeysign, Stressant, and (to a lesser extent) Wallabako all need urgent work: the first three need to be ported to Python 3, the first two to GTK 3, and the latter will probably die because I am getting a new e-reader. (For the record, more recent projects like undertime and feed2exec are doing okay, mostly because they were written in Python 3 from the start, and the latter has extensive unit tests. But they do suffer from the occasional bitrot (the latter in particular) and need constant upkeep.)

Now that I barely have time to keep up with just the upkeep, I can't help but think all of my projects will just die if I stop working on them. I have the same feeling about the packages I maintain in Debian.

What does that mean? Does that mean those packages are useless? That no one cares enough to get involved? That I'm not doing a good job at including contributors?

I don't think so. I think I'm a friendly person online, and I try my best at doing good documentation and followup on my projects. What I have come to understand is even more depressing and scary that this being a personal failure: that is the situation with everyone, everywhere. The LWN article is not talking about silly things like a chess clock or a feed reader: we're talking about the Linux input drivers. A very deep, core component of the vast majority of computers running on the planet, that depend on that single maintainer. And I'm not talking about whether those people are paid or not, that's related, but not directly the question here. The same realization occured with OpenSSL and NTP, GnuPG is in a similar situation, the list just goes on and on.

A single guy maintains those projects! Is that a fluke? A statistical anomaly? Everything I feel, and read, and know in my decades of experience with free software show me a reality that I've been trying to deny for all that time: it's the average.

My theory is this: our average bus factor is one. I don't have any hard evidence to back this up, no hard research to rely on. I'd love to be proven wrong. I'd love for this to change.

But unless economics of technology production change significantly in the coming decades, this problem will remain, and probably worsen, as we keep on scaffolding an entire civilization on shoulders of hobbyists that are barely aware their work is being used to power phones, cars, airplanes and hospitals. A lothasbeenwritten on this, but nothing seems to be moving.

And if that doesn't scare you, it damn well should. As a user, one thing you can do is, instead of wondering if you should buy a bit of proprietary software, consider using free software and donating that money to free software projects instead. Lobby governments and research institutions to sponsor only free software projects. Otherwise this civilization will collapse in a crash of spaghetti code before it even has time to get flooded over.


Full Stack Python: Basic Data Types in Python 3: Strings

$
0
0

There is a lot to learn on your Python journey when you are new to the programming language. Once you are comfortable writing and executing code, your first stop becomes understanding how to represent data in your code. No matter the language, there are a few basic data types you'll use all the time - strings, numbers, booleans, lists, and dictionaries.

Those data types, and how to use them in Python 3, are the topic of this blog post series. Today, we're starting with strings.

If you're learning Python, you might also want to check out TwilioQuest 3. You'll learn about basic data types and much more about Python programming.

Ready to learn how to use strings in Python 3? Let's get started!

Strings in Python 3

One of the most common data types in any programming language is a string. A string represents a series of characters, which you would use to represent usernames, blog posts, tweets, or any text content in your code. You can create a string and assign it to a variable like this.

my_name="Jonathan Joestar"

Strings are "immutable"

In Python, strings are considered immutable - once you create them, they can't be changed. You can, however, use a variety of methods to create new strings from existing strings. This type of work in programming is called string manipulation. Some web developers joke that at the end of the day, their job is just mashing strings together - and this isn't far from the truth!

Here are some common tasks you might undertake when using strings in your code.

Common task - combining strings together

Combining strings together - concatenating them - is a very common task. In Python 3, you can use the + operator for this purpose. You can use the + operator multiple times to concatenate multiple strings.

first_name="Jonathan"last_name="Joestar"full_name=first_name+" "+last_name

Common task - inserting data into strings

Another common task with strings is inserting data into a specific place within a string. In programming, we call this string interpolation. Python 3 provides a handy tool for doing this called "f" strings. The "f" in "f strings" stands for format - you can insert other data from your program into a string when you define it rather than doing complex string concatenation as demonstrated previously.

Here is an example of creating a formatted string - note the letter f is included just before the first double quote when defining the message variable. When you want to insert data from your program into the string, you can include it between two "curly braces" - the { and } characters.

first_name="Jonathan"last_name="Joestar"age=24message=f"My name is {first_name} {last_name}, and I am {age} years old."print(message)

Common task - using built-in string methods to manipulate strings

String objects have a number of methods to perform common tasks, like changing the case of strings or trimming their content. Below, you'll find a few examples. In two of these examples, we are creating a string variable, and then assigning the same variable a new value, which is the result of calling a method on a string object.

Example 1: Convert a string to all caps using the upper method.

example_string="am I stoked enough yet?"example_string=example_string.upper()print(example_string)# prints "AM I STOKED ENOUGH YET?"

Example 2: Replace all instances of the word kale with tacos.

example_string="We're having kale for dinner! Yay kale!"example_string=example_string.replace("kale","tacos")print(example_string)# prints "We're having tacos for dinner! Yay tacos!"

Example 3: Split a comma-delimited string into a list of strings.

example_string="Apples,Oranges,Pears"groceries=example_string.split(',')# Code below prints:# Apples# Oranges# Pearsforitemingroceries:print(item)

Check our more strings can do in the Python 3 docs!

Type casting

Frequently, you will want to convert data from one type into another. In programming, we call this process type casting. There are a number of functions built in to Python which allow us to do these type conversions on basic data types.

Example 1: Convert a number into a string using the str function.

example_number=42converted=str(example_number)message="The meaning of life is "+converted

Example 2: Convert a string into a whole number (integer) using int.

example_string="2"converted=int(example_string)message=f"Two plus two equals { converted + 2 }"

Wrapping up

Strings of text are one of the most common pieces of data you will work with in programming. Hopefully, you've learned a bit about how to work with strings in Python 3! Stay tuned for more blog posts in this series to learn more about basic data types like strings, numbers, booleans, lists, and dictionaries.

Also, be sure to download and play TwilioQuest 3 to learn even more about Python!

Programiz: Python IDEs and Code Editors

$
0
0
In this guide, you will learn about various Python IDEs and code editors for beginners and professionals.

Janusworx: Multiple Slugs for Multiple Webpages in Nikola

$
0
0

Here’s a delightful little thing I discovered, using Nikola today.

As part of a little housecleaning, I wanted to have a single page have two web urls.
As in Books I’ve Read and Books in 2020.
Don’t ask why, my nerdy brain just wants it that way.

And I was thinking of Nginx redirects and other things I could try.
Until I looked up and saw the slug section in the metadata section of my post (the section that I normally turn a blind eye to).
This is what I assume, Nikola uses to generate links.
And I thought hmm, what if?
And at the same time I remembered what Roberto Alsina, the original author of Nikola had encouraged me to do, when I had just started using it to blog.
That he wrote Nikola, so that it would mostly do the logical thing; that I wouldn’t really need to use the documentation (excellent as it is)

So that is what I did then. I put in two slugs each with the unique url I wanted, and sure enough, Nikola generated two web pages from that single source file.

It’s the little things like this, that make me so happy, I use Nikola for my writing.


Roberto Alsina: Episodio 12: Buen Gusto

$
0
0

Enfrentado a un problema, uno de los criterios para buscar la solución es el misterioso "que sea pitónico". ¿Qué es eso? ¿Vale la pena usar algo más lindo pero 12 veces más lento? ¿Y cómo sé eso? ¿Puedo mejorarlo? ¿Y si es 2 veces más lento nomás?

Abhijeet Pal: Creating Comments System With Django

$
0
0

In this tutorial, we will build a basic commenting system for a Django 2.X app, which lets readers add comments on posts.

Here is a preview of what we are going to build by the end of this tutorial.

creating comment system with django

Pre-Requirements

Before diving into the tutorial I am assuming that you already have a blog or some similar Django 2.X project up and running. I am using Bootstrap 4 for the styling part you can ignore it if you are using any other framework.

I am gonna use my previous blog project you can grab the repo from here, https://github.com/TheAbhijeet/Django_blog/releases/tag/1

Since Python 3 is the current version in active development and addressed as the future of Python, Django rolled out a significant update, and now all the releases after Django 2.0 are only compatible with Python 3.x. Therefore this tutorial is strictly for Python 3.x.

Roadmap To Build A Comment System

1. Create a model to save the comments.
2. Create a form to submit comments and validate the input data.
3. Add a view that processes the form and saves the new comment to the database.
4. Edit the post detail template to display the list of comments and the form to add a new comment.

Building Comment Model

Open The models.py file of blog application and below the Post model create the Comment model.

class Comment(models.Model):
    post = models.ForeignKey(Post,on_delete=models.CASCADE,related_name='comments')
    name = models.CharField(max_length=80)
    email = models.EmailField()
    body = models.TextField()
    created_on = models.DateTimeField(auto_now_add=True)
    active = models.BooleanField(default=False)

    class Meta:
        ordering = ['created_on']

    def __str__(self):
        return 'Comment {} by {}'.format(self.body, self.name)

In this comment model first, we have a Foreign key relation that establishes a many-to-one relationship with the Post model, since every comment will be made on a post and each post will have multiple comments.

The related_name attribute allows us to name the attribute that we use for the relation from the related object back to this one. After defining this, we can retrieve the post of a comment object using comment.post and retrieve all comments of a post using post.comments.all() . If you don’t define the related_name attribute, Django will use the name of the model in lowercase, followed by _set (that is, comment_set ) to name the manager of the related object back to this one.

As a traditional comment system, we are accepting the commenter’s name, email and comment body as inputs. Then we have an active boolean field that is set to False to prevent spam we will manually allow all the comments posted.

The Meta class inside the model contains metadata. We tell Django to sort results in the created_on field in descending order by default when we query the database. We specify descending order using the negative prefix. By doing so, comments made recently will appear first.

The __str__() method is the default human-readable representation of the object. Django will use it in many places, such as the administration site.

Next, we need to synchronize this comment model into the database by running migrations to reflects the changes in the database.

(django) $ python manage.py makemigrations 
(django) $ python manage.py migrate

We are done with the models, now let’s include the Comment model in our Admin dashboard.

Adding Comments Model To The Administration Site

Open admins.py file and write the following code.

from django.contrib import admin
from .models import Post, Comment
class CommentAdmin(admin.ModelAdmin):
    list_display = ('name', 'body', 'post', 'created_on', 'active')
    list_filter = ('active', 'created_on')
    search_fields = ('name', 'email', 'body')
    actions = ['approve_comments']

    def approve_comments(self, request, queryset):
        queryset.update(active=True)

Going over the code @admin.register(Comment) registers the comment into the Admin area. Below the CommentAdmin class to customizes the representation of data on the screen.

The list_display attribute does what its name suggests display the properties mentioned in the tuple in the comments list for each comment.

The list_filter method will filter the comments based on the creation date and their active status and search_fields will simply search the database for the parameters provided in the tuple.

Finally, we have the actions method this will help us for approving many comment objects at once, the approve_comments method is a simple function that takes a queryset and updates the active boolean field to True.

Now create a superuser if you haven’t already and log in to the dashboard you should see the comment model there.

django comment admin dashboard

Now click on comments and create your comments.

In case you struck an error like no such table: blog_comment you might wanna delete the SQLite file and run migrations again for a quick fix.

Creating forms from models

Django offers a very rich and secure API to handle forms. Since the form input will be saved in the database models we are gonna use the Django’s ModelForm.

A common practice is to create a forms.py file inside your app directory for all the forms of an app. So create a forms.py file in your app and write the following code.

from .models import Comment
from django import forms


class CommentForm(forms.ModelForm):
    class Meta:
        model = Comment
        fields = ('name', 'email', 'body')

In the model form, we just need to provide the model name in the Meta class of the form Django will handle the form processing and validation on the basis of fields of the model.

By default, Django will generate a form dynamically from all fields of the model but we can explicitly define the fields we want the forms to have, that is what fields attribute is doing here.

Building Views

We will modify the post detail view for form processing using function based view.

from .models import Post
from .forms import CommentForm
from django.shortcuts import render, get_object_or_404

def post_detail(request, slug):
    template_name = 'post_detail.html'
    post = get_object_or_404(Post, slug=slug)
    comments = post.comments.filter(active=True)
    new_comment = None
    # Comment posted
    if request.method == 'POST':
        comment_form = CommentForm(data=request.POST)
        if comment_form.is_valid():

            # Create Comment object but don't save to database yet
            new_comment = comment_form.save(commit=False)
            # Assign the current post to the comment
            new_comment.post = post
            # Save the comment to the database
            new_comment.save()
    else:
        comment_form = CommentForm()

    return render(request, template_name, {'post': post,
                                           'comments': comments,
                                           'new_comment': new_comment,
                                           'comment_form': comment_form})

This post detail view will show the post and all its comments, let’s break it down to see what’s happening.

First, we assigned the HTML template to a variable name template_name for future reference and we are assigning the Post object inside the post variable.

This comments = post.comments.filter(active=True) queryset retrieves all the approved comments from the database.

Since this is the same page where users will create new comments we initialized the new_comment variable by setting it to none.

Next, we have a conditional statement if a POST request is made, the comment_form variable will hold the data of user input next Django will validate the data using the is_valid() method.

If the form is valid the following actions take place.

  1. We create a new Comment object by calling the form’s save() method and assign it to the new_comment variable, but with commit=Flase which will prevent it from saving into the database right away because we still have to link it the post object
  2. We assigned the comment object to the current post
  3. Finally, save the object into the database

Else if it is a GET request we initialize the form object and pass it to the template.

Adding URL patterns for Views

Open the urls.py file of your app and map the view.

path('/', views.post_detail, name='post_detail')

Creating Templates For The Views

Let’s see what we will do in the templates.

   {% for comment in comments %}
        <div class="comments" style="padding: 10px;">
          <p class="font-weight-bold">
            {{ comment.name }}
            <span class=" text-muted font-weight-normal">
              {{ comment.created_on }}
            </span>
          </p>
          {{ comment.body | linebreaks }}
        </div>
        {% endfor %}

Here we are using Django’s {% for %} template tag for looping over comments, then for each comment object, we are displaying the user’s name,creation date and the comment body.

<div class="card-body">
        {% if new_comment %}
        <div class="alert alert-success" role="alert">
          Your comment is awaiting moderation
        </div>
        {% else %}
        <h3>Leave a comment</h3>
        <form method="post" style="margin-top: 1.3em;">
          {{ comment_form.as_p }}
          {% csrf_token %}
          <button type="submit" class="btn btn-primary  btn-lg">Submit</button>
        </form>
        {% endif %}
      </div>

When a user makes a new comment we show them a message saying, “Your comment is awaiting moderation” else we render the form.

So putting the entire template all together we have this,

{% extends 'base.html' %} {% block content %}

<div class="container">
  <div class="row">
    <div class="col-md-8 card mb-4  mt-3 left  top">
      <div class="card-body">
        <h1>{% block title %} {{ post.title }} {% endblock title %}</h1>
        <p class=" text-muted">{{ post.author }} | {{ post.created_on }}</p>
        <p class="card-text ">{{ post.content | safe }}</p>
      </div>
    </div>
    {% block sidebar %} {% include 'sidebar.html' %} {% endblock sidebar %}

    <div class="col-md-8 card mb-4  mt-3 ">
      <div class="card-body">
        <!-- comments -->
        <h2>{{ comments.count }} comments</h2>

        {% for comment in comments %}
        <div class="comments" style="padding: 10px;">
          <p class="font-weight-bold">
            {{ comment.name }}
            <span class=" text-muted font-weight-normal">
              {{ comment.created_on }}
            </span>
          </p>
          {{ comment.body | linebreaks }}
        </div>
        {% endfor %}
      </div>
    </div>
    <div class="col-md-8 card mb-4  mt-3 ">
      <div class="card-body">
        {% if new_comment %}
        <div class="alert alert-success" role="alert">
          Your comment is awaiting moderation
        </div>
        {% else %}
        <h3>Leave a comment</h3>
        <form method="post" style="margin-top: 1.3em;">
          {{ comment_form.as_p }}
          {% csrf_token %}
          <button type="submit" class="btn btn-primary  btn-lg">Submit</button>
        </form>
        {% endif %}
      </div>
    </div>
  </div>
</div>
{% endblock content %}

If you are working on a completely different project with some other CSS framework then ignore the styling.

Testing The Comment System

Save all the files and run the server and visit http://127.0.0.1:8000/ and visit a post detail page.

Django comment model form

Now create your comment and hit the submit button you should see the message. Now login to the Admin dashboard and approve the comment.

Django comment moderation system

Making Comment Form Crispy

Although our form works as expected, yet we can make the form look better without much changing the template using the Django crispy form library. It’s a very popular library for form managing you can check it out here – https://github.com/django-crispy-forms/django-crispy-forms

Install it using

pip install django-crispy-forms

Add it to the installed apps list.

INSTALLED_APPS = [
    ...

    'crispy_forms',
]

If you using Bootstrap 4 for styling add this in settings.py file.

CRISPY_TEMPLATE_PACK = 'bootstrap4'

Now in your template, you just need to load the crispy tag and use the crispy tag beside the form, as follows.

{% load crispy_forms_tags %}
...
<form method="post" style="margin-top: 1.3em;">
          {{ comment_form | crispy }}
          {% csrf_token %}
          <button type="submit" class="btn btn-primary  btn-lg">Submit</button>
 </form>

Save the files and run the server. Django comment system

If you are stuck at any step, refer to this GitHub repo

The post Creating Comments System With Django appeared first on Django Central.

Abhijeet Pal: Creating A Super User In Django

$
0
0

Django’s prominent feature is the admin interface, which makes it stand out from the competition. It is a built-in app that automatically generates a user interface to add and modify a site’s content.

The built-in administration interface that is very useful for editing content. The Django admin site is built dynamically by reading your model metadata and providing a production-ready interface for editing content. You can use it out of the box, configuring how you want your models to be displayed in it.

In order to use the Django’s admin app which is already included in django.contrib.admin inside INSTALLED_APPS setting, first we have to create a superuser.

Creating A Super User In Django

In the directory where manage.py script exists, execute the following command.

python manage.py createsuperuser

Now Django will prompt you to enter the details, enter your desired details and hit enter.

Username (leave blank to use 'admin'): admin
Email address: admin@xyz.com
Password: ********
Password (again): ********
Superuser created successfully.

Now that the superuser is created, run the development server.

python manange.py runserver

Open the browser and navigate to http://127.0.0.1:8000/admin/ You should see a login page, enter the details you provided for the superuser.

Django Admin login

After you log in you should see  the Django’s admin panel with Groups and Users models which come from Django authentication framework located in django.contrib.auth.

Django admin dashboard

The post Creating A Super User In Django appeared first on Django Central.

Abhijeet Pal: Using PostgreSQL with Django

$
0
0

Django is a high level full-stack open-source web framework written in Python, that encourages rapid development and clean, pragmatic design.

Django, in its ‘out-of-the-box’ state, is set up to communicate with SQLite – a lightweight relational database included with the Python distribution. So by default, Django automatically creates an SQLite database for your project.

In addition to SQLite, Django also has support for other popular databases that include PostgreSQL, MySQL, and Oracle.

However, PostgreSQL has a number of features that are not shared by the other databases Django supports, which makes it an idle choice for a Django app in production.

In this article, we will go through the integration of PostgreSQL with a Django Application.

Pre-Requirements

We are assuming you already have Django installed on your machine and one Django project up and running, if not then read the following article – Starting A Django Project

Installing PostgreSQL

Windows and macOS X users can download PostgreSQL from the official site https://www.postgresql.org/download/ and simply install it.

Linux User

sudo apt-get install postgresql postgresql-contrib

Also, Linux users need to install some dependencies for PostgreSQL to work with Python.

sudo apt-get install libpq-dev python-dev

Install psycopg2

Next, we need to install the PostgreSQL database adapter to communicate to the database with Python to install it run the following command in the shell.

pip install psycopg2

Create A PostgreSQL User and Database

As the default configuration of Postgres is, a user called Postgres is made on, and the user Postgres has full super admin access to entire PostgreSQL instance running on your OS.

sudo -u postgres psql

Now the terminal should be prefixed with postgres=# , The above command gets you the psql command-line interface in full admin mode.

Now let’s create a user and database.

Creating Database

 CREATE DATABASE mydb;

This will create a database named mydb, note that every SQL statement must end with a semicolon.

Creating User

 CREATE USER myuser WITH ENCRYPTED PASSWORD 'mypass';

Here we are creating a user named myuser with password mypass. You can use any username and password you wish.

Modifying Connection Parameters

 ALTER ROLE myuser SET client_encoding TO 'utf8';
 ALTER ROLE myuser SET default_transaction_isolation TO 'read committed';
 ALTER ROLE myuser SET timezone TO 'UTC';

We are setting the default encoding to UTF-8, which Django expects.

We are also setting the default transaction isolation scheme to “read committed”, which blocks reads from uncommitted transactions.

Lastly, we are setting the timezone by default, our Django projects will be set to use UTC.These are essential parameters recommended by the official Django team.

Granting Permission To The User

 GRANT ALL PRIVILEGES ON DATABASE mydb TO myuser;

Now our user has administrative access to the database.

Now exit the SQL prompt.

\q

Integrating PostgreSQL With Django

Open the settings.py file of your project and scroll straight to the database section, which should look like this.

DATABASES = {
    'default': {
        'ENGINE': 'django.db.backends.sqlite3',
        'NAME': os.path.join(BASE_DIR, 'db.sqlite3'),
    }
}

We need to update these settings to integrate our PostgreSQL with the project.

DATABASES = {
    'default': {
        'ENGINE': 'django.db.backends.postgresql_psycopg2',
        'NAME': 'mydb',
        'USER': 'myuser',
        'PASSWORD': 'mypass',
        'HOST': 'localhost',
        'PORT': '',
    }
}

Let’s quickly go over the settings,

DATABASES– This constant is a dictionary of database connection information and is required by Django. You can have multiple connections to different databases, but most of the time, you will just need an entry called default.

default– This is the default database connection configuration. You should always have a default set of connections settings.

'ENGINE': 'django.db.backends.postgresql_psycopg2'– This tells Django to use the Postgres backend. This, in turn uses psycopg2, Python’s Postgres library which we installed earlier.

'NAME': 'mydb'– The name of the database you want to connect to.

'USER': 'myuser'– The User with access to the database.

'PASSWORD': 'mypass'– The password for your database user.

'HOST': 'localhost'– The address of the database server you want to connect to.

'PORT': '' – The port you want to connect to, which by default is ‘5432’

Test The Database Connection

After updating the database configurations, it’s time to test the connection. The Django database migration process ensures all Django project logic associated with a database is reflected in the database itself.

During the first migration against the database, there are a series of migrations Django requires that create tables to keep track of administrators and sessions.

In the directory where manage.py script exists, run the following command.

python manage.py migrate

If everything went right you should see an output like this.

Operations to perform:
  Apply all migrations: admin, auth, contenttypes, sessions
Running migrations:
  Applying contenttypes.0001_initial... OK
  Applying auth.0001_initial... OK
  Applying admin.0001_initial... OK
  Applying admin.0002_logentry_remove_auto_add... OK
  Applying admin.0003_logentry_add_action_flag_choices... OK
  Applying contenttypes.0002_remove_content_type_name... OK
  Applying auth.0002_alter_permission_name_max_length... OK
  Applying auth.0003_alter_user_email_max_length... OK
  Applying auth.0004_alter_user_username_opts... OK
  Applying auth.0005_alter_user_last_login_null... OK
  Applying auth.0006_require_contenttypes_0002... OK
  Applying auth.0007_alter_validators_add_error_messages... OK
  Applying auth.0008_alter_user_username_max_length... OK
  Applying auth.0009_alter_user_last_name_max_length... OK
  Applying auth.0010_alter_group_name_max_length... OK
  Applying auth.0011_update_proxy_permissions... OK
  Applying sessions.0001_initial... OK

Furthermore, you can now create a superuser and login to the admin dashboard.

The post Using PostgreSQL with Django appeared first on Django Central.


Wingware Blog: Using Matplotlib with Wing 7

$
0
0

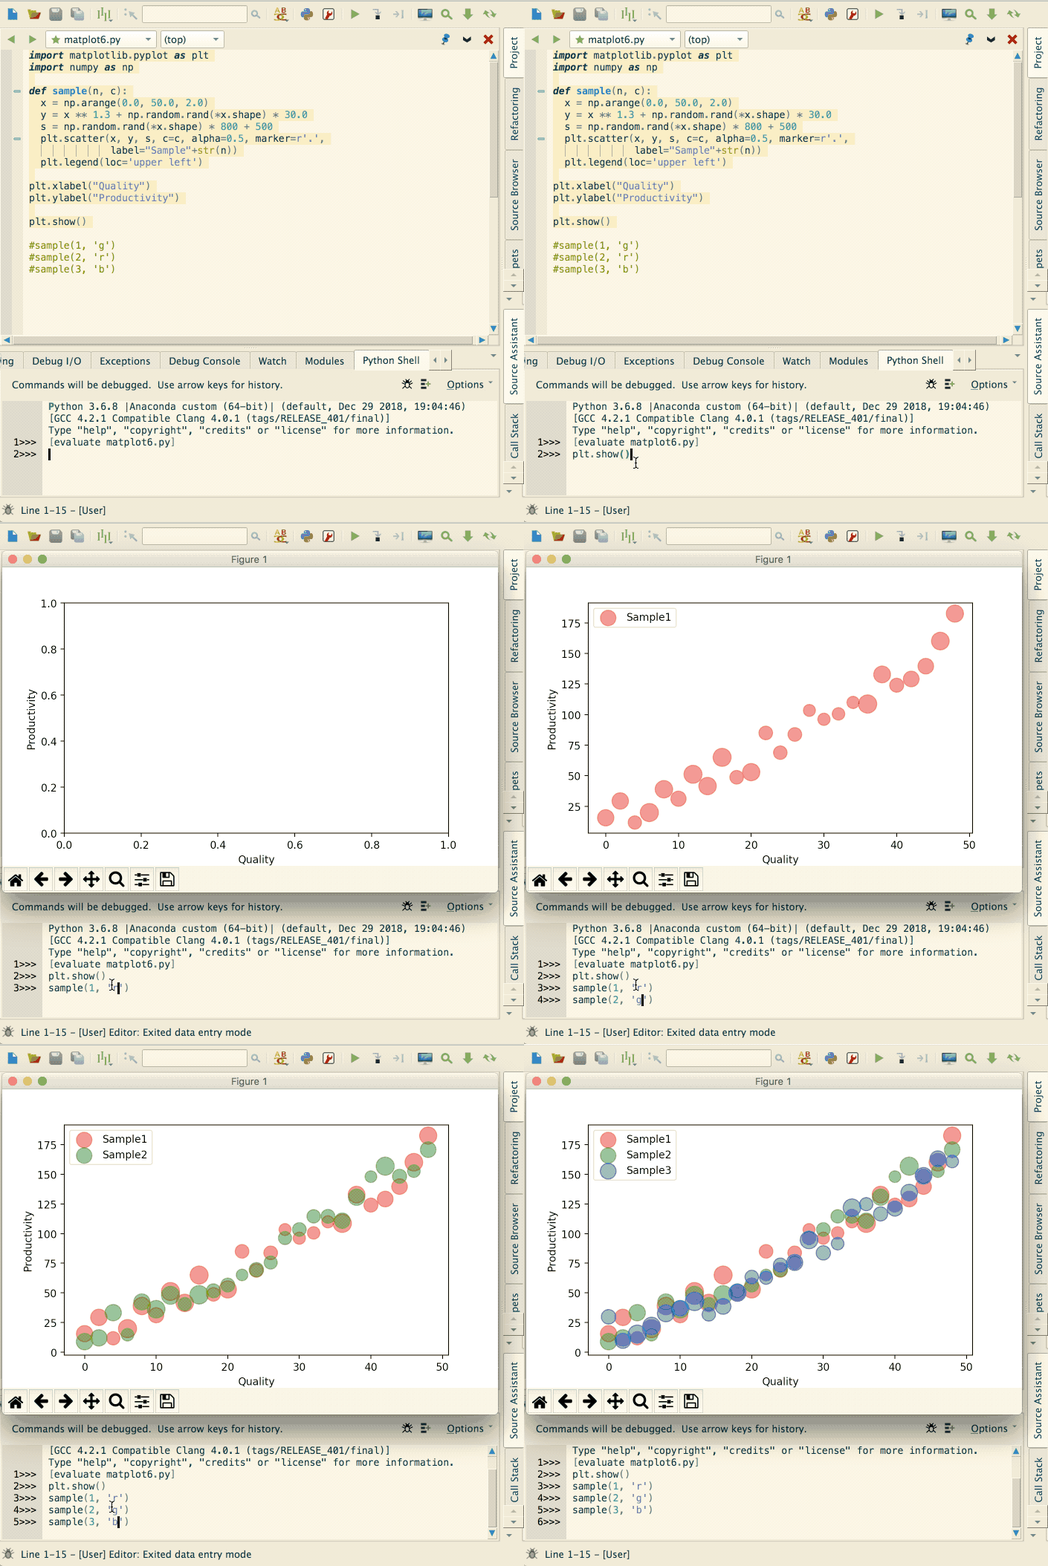
Wing supports interactive development and debugging of Python code designed for the Matplotlib numerical and scientific plotting library, so plots can be shown and updated from the command line. For example, two plots could be shown in succession by typing the following into Wing's PythonShell, one line at a time:

frommatplotlib.pyplotimportplot,showx=range(10)plot(x)show()y=[2,8,3,9,4]*2plot(y)

Wing sets up the environment so that show() runs to completion and immediately returns you to the prompt, rather than waiting until the plot is closed. In addition, Wing calls Matplotlib's main loop to keep plots windows interactive and updating while you are at the prompt. This allows plots to be added or changed without restarting a process or interrupting your work flow:

/images/blog/matplotlib/interactive-shell.gif

Working interactively with Matplotlib from Wing's Python Shell

Evaluating Files and Selections

Code from the editor can be executed in the PythonShell with the Evaluate...inPythonShell items in the Source menu and in the editor's right-click context menu. By default the PythonShell restarts automatically before evaluating a whole file, but this can be disabled in its Options menu.

Active Ranges

Wing also allows you to set a selected range of lines in the editor as the "active range" for the PythonShell by clicking the setactive icon in the top right of the PythonShell tool:

/images/blog/matplotlib/active-range.png

Wing highlights and maintains the active range as you edit it in the editor, and it can be re-evaluated easily with the runactive icon that appears in the top right of the PythonShell once an active range has been set into it.

Use the clearactive icon to clear the active range from the editor and shell.

Supported Backends

Interactive development is supported for the TkAgg, GTKAgg, GtkCairo, WXAgg (for wxPython 2.5+), Qt5Agg, Qt4Agg, MacOSX, and WebAgg backends. It will not work with other backends.

Debugging

Code can be debugged either by launching a file with startdebug in the toolbar (or Start/Continue the Debug menu) or by enabling debug in the integrated PythonShell and working from there. In either case, Wing can be used to reach breakpoints or exceptions, step through code, and view the program's data. For general information on using Wing's debugger see the Debugger Quick Start.

When executing code that includes show() in the debugger, Wing will block within the show() call just as Python would if launched on the same file. This is by design, since the debugger seeks to replicate as closely as possible how Python normally runs.

However, interactive development from a breakpoint or exception is still possible, as described below. This capability can be used to load setup code before interacting with Matplotlib, or to try out a fix when an exception has been reached.

Interactive Debugging from the Debug Console (Wing Pro only)

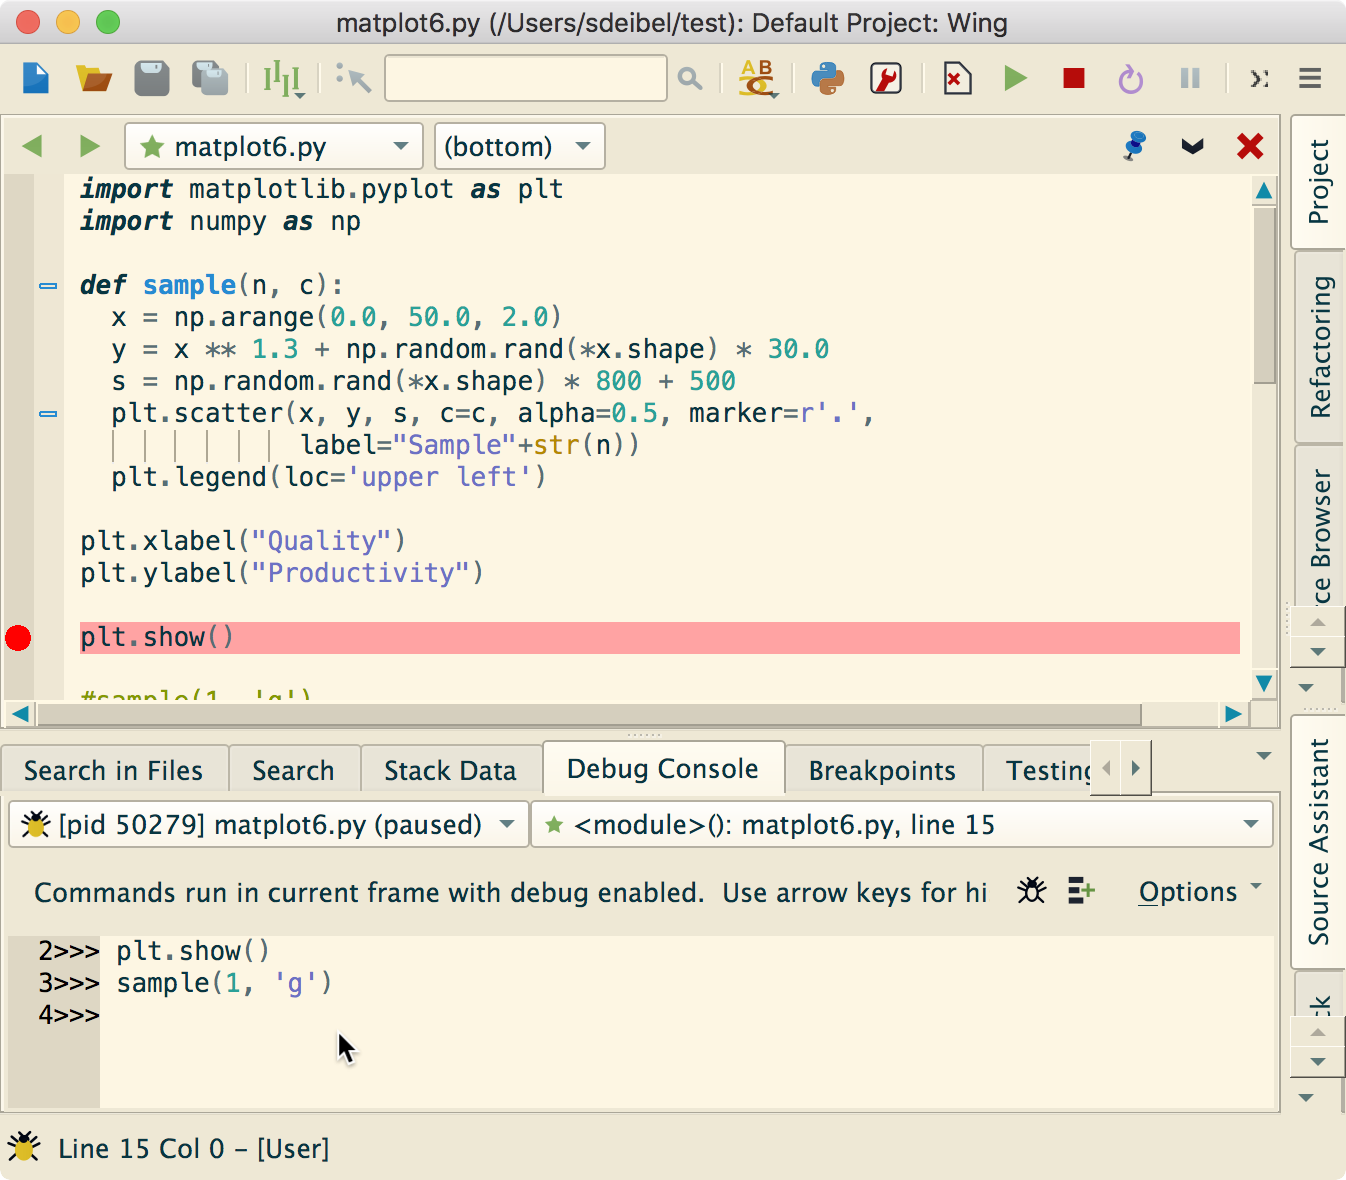
Whenever the debugger is stopped at a breakpoint or exception, Wing Pro's DebugConsole provides a command prompt that may be used to inspect and interact with the paused debug process. Commands entered here run in the context of the currently selected debug stack frame:

/images/blog/matplotlib/debug-console.png

The tool implements the same support for interactive development provided by the PythonShell, so plots may be shown and modified interactively whenever Wing's debugger is paused. Once the debug process is continued, Wing switches off interactive mode and returns to behaving in the same way that Python would when running the code outside of the debugger.

Interactive development from the DebugConsole requires that you have already imported matplotlib in the code that you are debugging or in a previous command entered in the console. Otherwise show() may block and plots won't be updated.

Interactive Debugging from the Python Shell

Another way to combine the debugger with interactive development is to turn on both EnableDebugging and EnableRecursivePrompt in the PythonShell's Options menu:

/images/blog/matplotlib/shell-options.png

This causes Wing to add a breakpoint margin to the PythonShell and to stop in the debugger if an exception or breakpoint is reached, either in code in the editor or code that was entered into the PythonShell.

The option EnableRecursivePrompt causes Wing to show a new recursive prompt in the PythonShell whenever the debugger is paused, rather than waiting for completion of the original command before showing another prompt. Showing or updating plots from recursive prompts works interactively in the same way as described earlier.

If another exception or breakpoint is reached, Wing stops at those as well, recursively to any depth. Continuing the debug process from a recursive prompt completes the innermost invocation and returns to the previous recursive prompt, unless another exception or breakpoint is reached first.

Trouble-shooting

If show() blocks when typed into the PythonShell, if plots fail to update, or if you run into other event loop problems while working with Matplotlib, then the following may help solve the problem:

(1) When working in the DebugConsole, evaluate the imports that set up Matplotlib first, so that Wing can initialize its event loop support before show() is called. Evaluating a whole file at once in the DebugConsole (but not the PythonShell) will cause show() to block if Matplotlib was not previously imported.

(2) In case there is a problem with the specific Matplotlib backend that you are using, try the following as a way to switch to another backend before issuing any other commands:

importmatplotlibmatplotlib.use('TkAgg')

Instead of TkAgg you may also try other supported backends, including Qt5Agg (which requires that Qt5 is installed) or WebAgg (which uses a web browser for plot display).

As always, please email support@wingware.com if you run into problems that you cannot resolve.


That's it for now! We'll be back soon with more Wing Tips for Wing Python IDE.

py.CheckIO: TOP 5 Software Failures of 2018–2019 (#5 is pretty alarming)

PyCharm: Webinar Recording: “React+TypeScript+TDD in PyCharm”

$
0
0

Yesterday we had our webinar on React, TypeScript, and Test-Driven Development (TDD.) And…we had a special guest! Ekaterina Prigara, PMM for WebStorm, co-hosted and fielded most of the questions. Which was lucky for us: she really-really-really knows not just our IDE’s web development story, but all of these crazy technologies in the world of JavaScript.

The recording is now available. As a programming note, I’m giving this webinar next week for IntelliJ IDEA and in November for Rider. But I also plan to do a second part for PyCharm next month, as we only covered half of the tutorial material.

What We Covered

This session was particularly enjoyable with its focus on staying in “the flow”, using both TDD and type information to “fail faster”, and letting the IDE do your janitorial work for you.

  • 5m10s: Project Setup
  • 11m56s: Project Cleanup
  • 24m16s: Testing
  • 35m24s: Debugging During Testing
  • 53m26s: Debugging with Chrome
  • 55m23s: TSX and ES6

Feedback Solicited!

This is a departure from our normal format: all material published in advance (including narrated videos), repeating the same webinar topic across multiple topics, and splitting into two parts. It’s also less a survey-oriented webinar and more of a deep-dive tutorial-is webinar, from both the aspect of focusing on technologies and driving the IDE for those technologies.

Let us know what you think! Would you like more of these? Shorter and in more parts?

I say this because I’m wrapping up a similar multi-part “Visual Testing with pytest” tutorial and I’d like some kind of multi-webinar approach, if it’s considered valuable.

Moshe Zadka: An introduction to zope.interface

$
0
0

This has previously been published on opensource.com.

The Zen of Python is loose enough and contradicts itself enough that you can prove anything from it. Let's meditate upon one of its most famous principles: "Explicit is better than implicit."

One thing that traditionally has been implicit in Python is the expected interface. Functions have been documented to expect a "file-like object" or a "sequence." But what is a file-like object? Does it support .writelines? What about .seek? What is a "sequence"? Does it support step-slicing, such as a[1:10:2]?

Originally, Python's answer was the so-called "duck-typing," taken from the phrase "if it walks like a duck and quacks like a duck, it's probably a duck." In other words, "try it and see," which is possibly the most implicit you could possibly get.

In order to make those things explicit, you need a way to express expected interfaces. One of the first big systems written in Python was the Zope web framework, and it needed those things desperately to make it obvious what rendering code, for example, expected from a "user-like object."

Enter zope.interface, which was part of Zope but published as a separate Python package. The zope.interface package helps declare what interfaces exist, which objects provide them, and how to query for that information.

Imagine writing a simple 2D game that needs various things to support a "sprite" interface; e.g., indicate a bounding box, but also indicate when the object intersects with a box. Unlike some other languages, in Python, attribute access as part of the public interface is a common practice, instead of implementing getters and setters. The bounding box should be an attribute, not a method.

A method that renders the list of sprites might look like:

def render_sprites(render_surface, sprites):
    """
    sprites should be a list of objects complying with the Sprite interface:
    * An attribute "bounding_box", containing the bounding box.
    * A method called "intersects", that accepts a box and returns
      True or False
    """
    pass # some code that would actually render

The game will have many functions that deal with sprites. In each of them, you would have to specify the expected contract in a docstring.

Additionally, some functions might expect a more sophisticated sprite object, maybe one that has a Z-order. We would have to keep track of which methods expect a Sprite object, and which expect a SpriteWithZ object.

Wouldn't it be nice to be able to make what a sprite is explicit and obvious so that methods could declare "I need a sprite" and have that interface strictly defined? Enter zope.interface.

from zope import interface

class ISprite(interface.Interface):

    bounding_box = interface.Attribute(
        "The bounding box"
    )

    def intersects(box):
        "Does this intersect with a box"

This code looks a bit strange at first glance. The methods do not include a self, which is a common practice, and it has an Attribute thing. This is the way to declare interfaces in zope.interface. It looks strange because most people are not used to strictly declaring interfaces.

The reason for this practice is that the interface shows how the method will be called, not how it is defined. Because interfaces are not superclasses, they can be used to declare data attributes.

One possible implementation of the interface can be with a circular sprite:

@implementer(ISprite)
@attr.s(auto_attribs=True)
class CircleSprite:
    x: float
    y: float
    radius: float

    @property
    def bounding_box(self):
        return (
            self.x - self.radius,
            self.y - self.radius,
            self.x + self.radius,
            self.y + self.radius,
        )

    def intersects(self, box):
        # A box intersects a circle if and only if
        # at least one corner is inside the circle.
        top_left, bottom_right = box[:2], box[2:]
        for choose_x_from (top_left, bottom_right):
            for choose_y_from (top_left, bottom_right):
                x = choose_x_from[0]
                y = choose_y_from[1]
                if (((x - self.x) ** 2 + (y - self.y) ** 2) <=
                    self.radius ** 2):
                     return True
        return False

This explicitly declares that the CircleSprite class implements the interface. It even enables us to verify that the class implements it properly:

from zope.interface import verify

def test_implementation():
    sprite = CircleSprite(x=0, y=0, radius=1)
    verify.verifyObject(ISprite, sprite)

This is something that can be run by pytest, nose, or another test runner, and it will verify that the sprite created complies with the interface. The test is often partial: it will not test anything only mentioned in the documentation, and it will not even test that the methods can be called without exceptions! However, it does check that the right methods and attributes exist. This is a nice addition to the unit test suite and -- at a minimum -- prevents simple misspellings from passing the tests.

If you have some implicit interfaces in your code, why not document them clearly with zope.interface?

IslandT: Find the first non-consecutive number with Python

$
0
0

Your task is to find the first element of an array that is not consecutive.

E.g. If we have an array [1,2,3,4,6,7,8] then 1 then 2 then 3 then 4 are all consecutive but 6 is not, so that’s the first non-consecutive number.

If the whole array is consecutive then return None.

The array will always have at least 2 elements1 and all elements will be numbered. The numbers will also all be unique and in ascending order. The numbers could be positive or negative and the first non-consecutive could be either too!

Solution :

Take out the first number in the array, then continue to add one to that number, if one of the summation outcomes is not the same as the next number in the array then the program will return that next number or else the program will return None if no non-consecutive number has been found.

def first_non_consecutive(arr):
    seed = arr.pop(0)
    for num in arr:
        seed += 1
        if num != seed:
            return num

    return None

Any thoughts about the above solution? Please comment below.

If you like any post on this website, please share on social media to help this site gets more readers!

Paolo Amoroso: Hello, Planet Python!

$
0
0
Planet Python is now syndicating the posts about Python of my blog. Thanks to the project maintainer Bruno Rocha for letting me join.

You may think of Planet Python as the all-you-can-eat source of Python content.


It’s an aggregator of dozens of blogs, podcasts, and other resources on the Python programming language. It syndicates posts that cover Python or are of interest to the Python community. Planet Python is a terrific resource for learning the language and keeping up with what’s going on in its ecosystem. I highly recommend that you subscribe to the RSS feed of Planet Python.

If you’re reading this on Planet Python, hi there!

About me

I’m Paolo Amoroso, an Italian astronomy and space popularizer, a Google expert, and a podcaster. I’m a Python beginner as I started learning the language in December 2018. But I have been a hobby programmer since the home computer revolution of the early 1980s. And I have always had a soft spot for programming languages, paradigms, and compilers.

My programming background

After reading extensively about and experimenting with as many languages as I could, in the 1990s I settled with the ones of the Lisp family, particularly Common Lisp, Scheme, and Emacs Lisp. I was also a Computer Science student (but didn't graduate) and contributed to a few open source Lisp projects.

Although I first got in touch with Python in the early 1990s, I started learning it in some depth only in December 2018. My main motivation was to leverage its massive “batteries included” ecosystem of libraries, tools, and resources for my hobby and personal projects. And, of course, to have fun.

What I post about

In the Python posts of my blog, the ones you’ll get via Planet Python, I will cover my experiences with learning and using the language, the books I read, the tools I use, and the projects I do. But, if you’re curious, feel free to look around to see what else I post about on my blog.

I plan to use Python for coding projects related to my interests, especially astronomy and space, or to make simple personal tools and apps.

Thanks again for having me here!

Stories in My Pocket: PyCon 2019: The People of PyCon

$
0
0

There have been a few thoughts about PyCon US 2019 that have been bouncing around my head, wanting to come out. Today, I want to talk about the opportunity to meet your Python heros, and why you should start planning on attending next year.


Read more...

Dataquest: Python Projects for Beginners: The Best Way to Learn

$
0
0

Learning Python can be difficult. You can spend time reading a textbook or watching videos, but then struggle to actually put what you've learned into practice. Or you might spend a ton of time learning syntax and get bored or lose motivation. How can you increase your chances of success? By building Python projects. That way […]

The post Python Projects for Beginners: The Best Way to Learn appeared first on Dataquest.

Roberto Alsina: Episodio 13: Python 3.8

$
0
0

¿Qué trae de nuevo Python 3.8? Un montón de cosas, pero hay 2 en particular que afectan / mejoran / resuelven temas que me molestan desde hace ¡Más de 10 años!

TechBeamers Python: Python Add Lists

$
0
0

This tutorial covers the following topic – Python Add lists. It describes various ways to join/concatenate/add lists in Python. For example – simply appending elements of one list to the tail of the other in a for loop, or using +/* operators, list comprehension, extend(), and itertools.chain() methods. Most of these techniques use built-in constructs in Python. However, the one, itertools.chain() is a method defined in the itertools module. You must also see which of these ways is more suitable in your scenario. After going through this post, you can evaluate their performance in case of large lists. By the

The post Python Add Lists appeared first on Learn Programming and Software Testing.

Weekly Python StackOverflow Report: (cxcix) stackoverflow python report

$
0
0

Python Insider: Python 2.7.17 released

Viewing all 22856 articles
Browse latest View live


<script src="https://jsc.adskeeper.com/r/s/rssing.com.1596347.js" async> </script>