DEV is a great community for developer content. If you have articles that you don’t want live all at once, how can you publish on a schedule automatically? In this article, let’s use GitHub Actions to get your content online on your timeline.
GitHub Actions is a way to run code on GitHub’s servers. The service is effectively a Continuous Integration (CI) service from GitHub. To use GitHub Actions, we create a workflow in a Git repository.
↧
Matt Layman: Publish to DEV automatically with GitHub Actions
↧
S. Lott: Apple's Numbers and the All-in-One CSV export
Author F. L. Stevens has a hellishly complex (and irregular) spreadsheet with agents, agencies, and query status. (This is how fiction gets marketed: querying agents.) The spreadsheet has become unmanageably complex, with multiple pages. Each page has multiple tables. Buried in this are three "interesting" tables with agent query information.
Can we talk about drama? There is the dark night of the soul for anyone interested in regular, normalized data.
We have some fundamental choices for working with this mess:
The prefix is a line with "Sheet: Table" Yes. There's a ": " (colon space) separator. The suffix is a simple blank line, essentially indistinguishable from a blank line within a table.
If the table was originally in strict first normal form (1NF) each row would have the same number of commas. If cells are merged, however, the number of commas can be fewer. This makes it potentially difficult to distinguish blank rows in a table from blank lines between tables.
It's generally easiest to ignore the blank lines entirely. We can distinguish table headers because they're a single cell with a sheet: table format. We are left hoping there aren't any tables that have values that have this format.
We have two ways to walk through the values:
Clearly, this is craziness.
Flattening is much nicer.
This provides a relatively simple way to find the relevant tables and sheets. We can use something as simple as the following to locate the relevant data.
This lets us write pleasant functions that handle exactly one row from the source table. We'll have one of these for each target table. In the above example, we've only shown two, you get the idea. Each new source table, with its unique headers can be accommodated.
Can we talk about drama? There is the dark night of the soul for anyone interested in regular, normalized data.
We have some fundamental choices for working with this mess:
- Export each relevant table to separate files. Lots of manual pointy-clicky and opportunities for making mistakes.
- Export the whole thing to separate files. Less pointy-clicky.
- Export the whole thing to one file. About the same pointy-clicky and error vulnerability as #2. But. Simpler still because there's one file to take care of. Something a fiction author should be able to handle.
The prefix is a line with "Sheet: Table" Yes. There's a ": " (colon space) separator. The suffix is a simple blank line, essentially indistinguishable from a blank line within a table.
If the table was originally in strict first normal form (1NF) each row would have the same number of commas. If cells are merged, however, the number of commas can be fewer. This makes it potentially difficult to distinguish blank rows in a table from blank lines between tables.
It's generally easiest to ignore the blank lines entirely. We can distinguish table headers because they're a single cell with a sheet: table format. We are left hoping there aren't any tables that have values that have this format.
We have two ways to walk through the values:
- Preserving the Sheet, Table, Row hierarchy. We can think of this as the for s in sheet: for t in table: for r in rows structure. The sheet iterator is Iterator[Tuple[str, Table_Iterator]]. The Table_Iterator is similar: Iterator[Tuple[str, Row_Iterator]]. The Row_Iterator, is the most granular Iterator[Dict[str, Any]].
- Flattening this into a sequence of "(Sheet name, Table Name, Row)" triples. Since a sheet and table have no other attributes beyond a name, this seems advantageous to me.
The hierarchical form requires a number of generator functions for Sheet-from-CSV, Table-from-CSV, and Row-from-CSV. Each of these works with a single underlying iterator over the source file and a fairly complex hand-off of state. If we only use the sheet iterator, the tables and rows are skipped. If we use the table within a sheet, the first table name comes from the header that started a sheet; the table names come from distinct headers until the sheet name changes.
The table-within-sheet iteration is very tricky. The first table is a simple yield of information gathered by the sheet iterator. Any subsequent tables, however, may be based one one of two conditions: either no rows have been consumed, in which case the table iterator consumes (and ignores) rows; or, all the rows of the table have been consumed and the current row is another "sheet: table" header.
The code sample below involves a fair amount of repetition. It's not appealing to refactor this because it's ungainly in its complexity, and doesn't create any tangible value. (I haven't even tried to get the type hints right.)
class SheetTable:
    def __init__(self, source_path: Path) -> None:
        self.path: Path = source_path
        self.csv_source = None
        self.rdr = None
        self.header = None
        self.row = None

    def __enter__(self) -> None:
        self.csv_source = self.path.open()
        self.rdr = csv.reader(self.csv_source)
        self.header = None
        self.row = next(self.rdr)
        return self

    def __exit__(self, *args) -> None:
        self.csv_source.close()

    def _sheet_header(self) -> bool:
        return len(self.row) == 1 and ': ' in self.row[0]

    def sheet_iter(self):
        while True:
            while not (self._sheet_header()):
                try:
                    self.row = next(self.rdr)
                except StopIteration:
                    return
            self.sheet, _, self.table = self.row[0].partition(": ")
            self.header = next(self.rdr)
            self.row = next(self.rdr)
            yield self.sheet, self.table_iter()

    def table_iter(self):
        yield self.table, self.row_iter()
        while not (self._sheet_header()):
            try:
                self.row = next(self.rdr)
            except StopIteration:
                return
        next_sheet, _, next_table = self.row[0].partition(": ")
        while next_sheet == self.sheet:
            self.table = next_table
            self.header = next(self.rdr)
            self.row = next(self.rdr)
            yield self.table, self.row_iter()
            while not (self._sheet_header()):
                try:
                    self.row = next(self.rdr)
                except StopIteration:
                    return
            next_sheet, _, next_table = self.row[0].partition(": ")

    def row_iter(self):
        while not self._sheet_header():
            yield dict(zip(self.header, self.row))
            try:
                self.row = next(self.rdr)
            except StopIteration:
                return
Flattening is much nicer.
def sheet_table_iter(source_path: Path) -> Iterator[Tuple[str, str, Dict[str, Any]]]:
    with source_path.open() as csv_source:
        rdr = csv.reader(csv_source)
        header = None
        for row in rdr:
            if len(row) == 0:
                continue
            elif len(row) == 1 and ": " in row[0]:
                sheet, table = row[0].split(": ", maxsplit=1)
                header = next(rdr)
                continue
            else:
                # Inject headers to create dict from row
                yield sheet, table, dict(zip(header, row))
This provides a relatively simple way to find the relevant tables and sheets. We can use something as simple as the following to locate the relevant data.
    for sheet, table, row in sheet_table_iter(source_path):
        if sheet == 'AgentQuery' and table == 'agent_query':
            agent = agent_query_row(database, row)
        elif sheet == 'AAR-2019-03' and table == 'Table 1':
            agent = aar_2019_row(database, row)
This lets us write pleasant functions that handle exactly one row from the source table. We'll have one of these for each target table. In the above example, we've only shown two, you get the idea. Each new source table, with its unique headers can be accommodated.
↧
↧
Stack Abuse: Uploading Files to AWS S3 with Python and Django
Introduction
In the quest to build more interactive websites, we don't only relay information to users but also allow them to upload data of their own. This opens up more opportunities and more ways that our websites can serve the end-users.
By allowing users to upload files, we can allow them to share photographs, videos, or music with others or back them up for safekeeping. We can also provide the functionality to manage files and convert them into other formats through websites instead of installing native apps.
The rise of social media globally can be attributed to the ability of users to upload their files, mostly in the form of images and videos for other users to see and also as a means of communication. By enabling users to upload files to websites and platforms, means of communication have been enhanced and information can now be spread in very many different formats.
In this post, we will explore how Django handles file uploading and how we can tap into and extend this functionality with cloud storage to suit our needs.
How Django Handles File Storage
Django not only allows us to turn concepts into web applications but also provides functionality for us to handle files and allow users to upload files to our web applications for further interaction. Through forms, users can attach files to their requests and have their files uploaded and stored in our backend servers.
Before a file is saved, it is temporarily stored somewhere before being processed and stored in the intended final location. For instance, if the uploaded file is less than 2.5MB, the contents of that file will be stored in memory, then written to disk once all the operations are completed while processing it.
This makes the process fast for small files. For files larger than 2.5MB, they are first written to a temporary location as the data is being received, then once processing is complete, the file is moved to its final destination.
File behavior in Django can be customized through various settings, such as FILE_UPLOAD_MAX_MEMORY_SIZE, which allows us to modify the 2.5MB upload limit size for the files that are written to memory first and not to a temporary location. We can also configure the default permissions for the uploaded files through the FILE_UPLOAD_PERMISSIONS.
Other settings can be found in this section of the official Django documentation.
Where can we store our files?
In a Django-powered web application, we can store the uploaded files in various different locations. We can store them on our own servers where the Django code is deployed, or we can send them over to other servers which may have set up elsewhere for storage purposes.
In a bid to cut server maintenance costs and enhance performance, we can also choose not to store the uploaded files on our own servers. In this case, we can hand them over to other hosted storage providers such as AWS, Azure, or OneDrive, among others.
There are several packages that allow us to interact with the APIs provided by the various service providers that we have mentioned. They include:
- Django-Storages enables us to store our uploaded files to AWS Simple Storage Service (S3), Dropbox, OneDrive, Azure and Digital Ocean.
- Django-S3-Storage through which we can upload files directly to Amazon S3
- Django-Cumulus, which allows us to interact with Rackspace for our storage need
- Others include Django-Dropbox, Django-Storage-Swift, and Django-Cloudinary-Storage. More can be found here
For this post, we will use the Django-s3direct package to store our files on AWS's S3.
Our Application - Django Drive
We will use Django to build a web application in which we will upload content for end-users to view. This will be achieved by using the Django administration interface, which comes with the framework.
Our site will be used to sell cars and on it, we will display details and add images or videos of the cars on sale.
The images or videos of the cars on sale will be stored on S3. We will not implement user registration or login at this time for brevity.
Setup
We will use Pipenv to set up and manage our isolated environment in which we will build our Django application by running the following command to set it up using Python3:
$ pipenv install --three
With the environment set up, we can now install Django and Django-s3direct to handle our file uploads to S3:
$ pipenv install django django-s3direct
Django provides a set of commands to bootstrap our project before we start implementing the core functionality of our application. Our Django drive project will have a single application that will be the focus of this post. To achieve this, we run the following commands:
$ django-admin startproject django_drive && cd django_drive
$ django-admin startapp django_drive_app
The django-admin startproject ... command creates the project, and the django-admin startapp ... command creates the application.
The last step of our setup is to create database tables by running the migrate command:
$ python manage.py migrate
When we start our project by running the command python manage.py runserver, we are welcomed by the following page, which confirms that our setup was successful:

Since we will be uploading our files to AWS S3, we will need to set up a free-tier AWS account for demo purposes. After setting up, we can navigate to the S3 dashboard and create a new bucket that will contain our uploads.
For Django-s3direct to interact with our AWS setup, we need to provide the following credentials AWS_ACCESS_KEY_ID, AWS_SECRET_ACCESS_KEY, and the AWS_STORAGE_BUCKET_NAME.
Next, we will add the following to our django_drive/settings.py file:
AWS_ACCESS_KEY_ID = 'aws-access-key-id'
AWS_SECRET_ACCESS_KEY = 'secret-access-key'
AWS_STORAGE_BUCKET_NAME = 'name-of-the-bucket'
AWS_S3_REGION_NAME = 'name-of-the-region'
AWS_S3_ENDPOINT_URL = 'https://s3.amazonaws.com'

S3DIRECT_DESTINATIONS = {
    'primary_destination': {
        'key': 'uploads/',
        'allowed': ['image/jpg', 'image/jpeg', 'image/png', 'video/mp4'],
    },
}
Django-s3direct allows us to specify more than one destination for our uploads, this way we can direct different files to separate S3 buckets. For this project, we will put all the uploads in one bucket. Another nifty feature is that we can also limit the file types that can be uploaded to our website. In our case, we have limited it to MP4 videos, JPEG, and PNG images only.
Note: More details about setting up Django-s3direct, such as CORS and Access Setup, can be found here.
We also need to add the following entries in the django_drive/urls.py file:
from django.urls import path, include

urlpatterns = [
    ...
    path('', include('django_drive_app.urls')),
    path('s3direct/', include('s3direct.urls')),
    ...
]
Implementation
We will start by creating the model for our car data, which will be displayed to the end-users. This model will also define the information we will input in our admin dashboard when adding cars to our platform. The car model will be as follows:
from django.db import models
from s3direct.fields import S3DirectField

class Car(models.Model):
    name = models.CharField(max_length=255, blank=False, null=False)
    year_of_manufacture = models.CharField(max_length=255, blank=False, null=False)
    price = models.CharField(max_length=255, blank=False, null=False)
    image = S3DirectField(dest='primary_destination', blank=True)
    video = S3DirectField(dest='primary_destination', blank=True)

    def __str__(self):
        return f"{self.name} ({self.year_of_manufacture}) - {self.price}"
For each car, we will store its name, year of manufacture, price, and an image or video. After creating the model, let us make migrations to create the table in the database that will hold our data by running:
$ python manage.py makemigrations
$ python manage.py migrate
Since we will be using the Django admin dashboard to manage the cars on our platform, we need to register our model in the django_drive_app/admin.py:
from django.contrib import admin
from.models import Car

admin.site.register(Car)
Then we need to create the superuser who will be in charge of adding the cars by running the following command and following the prompts:
$ python manage.py createsuperuser
$ python manage.py runserver
The python manage.py runserver command simply restarts our application.
After restarting our server, we can now navigate to the administration dashboard at http://127.0.0.1:8000/admin and log in with the credentials we specified earlier. Under site administration, we can see our DJANGO_DRIVE_APP with the option to add or change existing cars.
This is the form we use to add a car and its details:

Once we save our car, we can find the image we have uploaded in our S3 bucket on the AWS console. This means that our file has been uploaded to AWS.
Now we will create a view to display the cars and their data to the end-users of our website and also display the images or videos associated with each car. We will start by creating a view in the django_drive_app/views.py:
from django.shortcuts import render
from django.views.generic import TemplateView
from .models import Car

class CarView(TemplateView):
    template_name = 'django_drive_app/cars.html'

    def get_context_data(self, **kwargs):
        context = super().get_context_data(**kwargs)
        context['cars'] = Car.objects.all()
        return context
In this view, we use a class-based Django view to render the HTML file to display our cars. In our view, we run a query to fetch all the cars as stored in our database.
Next, let us create django_drive_app/templates/django_drive_app/cars.html to render our cars:
<!DOCTYPE html>
<html>
  <head>
    <title>Django Drive</title>
  </head>
  <body>
    <h3>Welcome to Django Drive. </h3>
    <p>Here are the current cars available for sale: </p>
    <div class="cars-container">
      {% for car in cars %}
        <div class="car">
          <p>
            <b> {{ car.name }} ({{ car.year_of_manufacture }}) </b> <br>
            Price: {{ car.price }}
          </p>
          <!-- if the car has an image attached -->
          {% if car.image %}
          <img src="{{ car.image }}" height="200" width="400"/>
          {% endif %}
          <!-- If the car has a video -->
          {% if car.video %}
            <video width="320" height="240" controls>
                <source src="{{ car.video }}" type="video/mp4">
              Your browser does not support the video tag.
            </video>
          {% endif %}
        </div>
        <hr>
      {% endfor %}
    </div>
  </body>
</html>
With the view and the template in place, let us add the endpoint that will be used to display the list of cars to the end-users by creating the django_drive_app/urls.py:
from django.conf.urls import url
from .views import CarView

urlpatterns = [
  url(r'^cars/$', CarView.as_view(), name="cars"),
]
We import our view and add a URL entry to map the endpoint to the view that will render the cars. When we restart our server and navigate to 127.0.0.1:8000/cars/, we encounter the following:

As we can see, we created cars with attached images and videos and had them uploaded to AWS's S3 service. The same images and videos have been rendered in our web application after being fetched from AWS.
Conclusion
In this article, we have created a simple Django application that allows administrators to upload files to AWS S3 through the Django administration dashboard. We rendered the uploaded files as hosted on S3 on our landing page, including videos and images of the cars that users would wish to purchase or view.
We used Django-s3direct library to handle the interaction between our Django application and AWS S3 where our files are stored. Through the Django administration application, we were able to upload files that were eventually rendered to the end users on our landing page. We were able to upload and render both images and videos.
The source code for this project is available here on GitHub.
↧
Real Python: The Python range() Function
Python’s built-in range function is handy when you need to perform an action a specific number of times. As an experienced Pythonista, you’ve most likely used it before. But what does it do?
By the end of this course, you’ll:
- Understand how the Python
rangefunction works - Know how the implementations differ in Python 2 and Python 3
- Have seen a number of hands-on
range()examples - Be equipped to work around some of its limitations
Let’s get cracking!
[ Improve Your Python With 🐍 Python Tricks 💌 – Get a short & sweet Python Trick delivered to your inbox every couple of days. >> Click here to learn more and see examples ]
↧
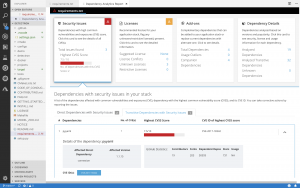
Red Hat Developers: What’s new in Red Hat Dependency Analytics
We are excited to announce a new release of Red Hat Dependency Analytics, a solution that enables developers to create better applications by evaluating and adding high-quality open source components, directly from their IDE.
Red Hat Dependency Analytics helps your development team avoid security and licensing issues when building your applications. It plugs into the developer’s IDE, automatically analyzes your software composition, and provides recommendations to address security holes and licensing problems that your team may be missing.
Without further ado, let’s jump into the new capabilities offered in this release. This release includes a new version of the IDE plugin and the server-side analysis service hosted by Red Hat.
Support for Python applications
Along with Java (maven) and JavaScript (npm), Dependency Analytics now offers its full set of capabilities for Python (PyPI) applications. From your IDE, you can perform the vulnerability and license analysis of the “requirements.txt” file of your Python application, incorporate the recommended fixes, and generate the stack analysis report for more details.
Software composition analysis based on current vulnerability data
An estimated 15,000 open source packages get updated every day. On average, three new vulnerabilities get posted every day across JavaScript (npm) and Python (PyPi) packages. With this new release, the server-side analysis service hosted by Red Hat automatically processes the daily updates to open source packages that it is tracking. The hosted service also automatically ingests new vulnerability data posted to National Vulnerability Database (NVD) for JavaScript and Python packages. This allows the IDE plugin and API calls to provide source code analysis based on current vulnerability and release data.
Analyze transitive dependencies
In addition to the direct dependencies included in your application, Dependency Analytics now leverages the package managers to discover and add the dependencies of those dependencies, called “transitive” dependencies, to the dependency graph of your application. Analysis of your application is performed across the whole graph model and recommendations for fixes are provided across the entire set of dependencies.
Recommendations about complementary open source libraries
With this release, Dependency Analytics looks to recommend high-quality open source libraries that are complementary to the dependencies included in your application. The machine learning technology of the hosted service collects and analyzes various statistics on GitHub to curate a list of high-quality open source libraries that can be added to the current set of dependencies to augment your application. You can provide your feedback about the add-on libraries by clicking on the “thumbs-up” or “thumbs-down” icons shown for each recommendation. Your feedback is automatically processed to improve the quality of the recommendations.

IDE plugin support
The Dependency Analytics IDE plugin is now available for VS Code, Eclipse Che, and any JetBrains IDE, including IntelliJ and PyCharm.
We will continuously release new updates to our Dependency Analytics solution so you can minimize the delays in delivery of your applications due to last-minute security and licensing related issues.
Stay tuned for further updates; we look forward to your feedback about Dependency Analytics.

The post What’s new in Red Hat Dependency Analytics appeared first on Red Hat Developer.
↧
↧
Continuum Analytics Blog: Announcing Anaconda Distribution 2019.10
We are pleased to announce the release of Anaconda Distribution 2019.10! As there were some significant changes in the previous Anaconda Distribution 2019.07 installers, this release focuses on polishing up rough edges in that release…
The post Announcing Anaconda Distribution 2019.10 appeared first on Anaconda.
↧
Catalin George Festila: Python 3.7.4 : Testing python source code with streamlit tool.
The official webpage for this python package can be found at streamlit.io.
Let's install it with pip3 tool:
[mythcat@desk proiecte_github]$ mkdir streamlit_examples
[mythcat@desk proiecte_github]$ cd streamlit_examples/
[mythcat@desk streamlit_examples]$ pip3 install streamlit --user
Let's try some examples.
Create a file named 001.py
This simple example will show a map with randoms spots:
import
↧
PyCoder’s Weekly: Issue #390 (Oct. 15, 2019)
#390 – OCTOBER 15, 2019
View in Browser »
CPython 3.8.0 Released
Assignment expressions, positional-only arguments, = specifier in f-strings, and more. Click the link for the full changelog and download links.
PYTHON.ORG
Cool New Features in Python 3.8
What does Python 3.8 bring to the table? Learn about some of the biggest changes and see you how you can best make use of them.
REAL PYTHON
Join the Slack Team at the Spec Annual Developer Conference
Hear the latest product and tooling enhancements for builders of Slack apps. Learn best practices and apply them in hands-on workshops. Troubleshoot with Slack engineers, ask questions and give feedback to our product team. Enjoy or share 50% off registration with the code S19_ADMIN →
SLACKsponsor
Thousands of Scientific Papers May Be Invalid Due to Misunderstanding Python
Developers assumed that glob.glob() returns a sorted list of files, but it doesn’t. And this led to a number of statistical errors and data discrepancies in several published scientific papers.
MIKE DRISCOLL
The Python range() Function
In this step-by-step course, you’ll master the Python range() function, learn how its implementation differs in Python 3 vs 2, and see how you can use it to write faster and more Pythonic code.
REAL PYTHONvideo
Meta-Programming in Python
“Meta-programming is an act of building functions and classes who can manipulate code by modifying, wrapping existing code or generating code.”
SAURABH KUKADE
Django 3.0 Beta 1 Released
See the release notes for a list of changes and new features.
DJANGOPROJECT.COM
PyPy V7.2 Released
ARM aarch64 support, new JSON decoder, sandboxing makes a return, …
MOREPYPY.BLOGSPOT.COM
Discussions
Python Jobs
Full Stack Developer (Toronto, ON, Canada)
Backend Developer (Kfar Saba, Israel)
Articles & Tutorials
Binning Data With Pandas qcut And cut
Pandas qcut and cut are both used to bin continuous values into discrete buckets or bins. This article explains the differences between the two commands and how to use each.
CHRIS MOFFITT
Emacs: The Best Python Editor?
Learn about using Emacs for Python development. You’ll install and configure Emacs on your selected platform, then write Python code to explore its capabilities. Finally, you’ll run, test, and debug Python code in the Emacs environment.
REAL PYTHON
Python Developers Are in Demand on Vettery
Vettery is an online hiring marketplace that’s changing the way people hire and get hired. Ready for a bold career move? Make a free profile, name your salary, and connect with hiring managers from top employers today →
VETTERYsponsor
How to Read SAS Files in Python With Pandas
Learn how to read SAS (.sas7bdat) files in Python, and how to write a SAS file to CSV using Pandas and pyreadstat.
ERIK MARSJA
Python Is Not a Great Programming Language
Related discussion/rebuttal on Hacker News.
GITHUB.COM/ROBERTAKAROBINopinion
Projects & Code
Events
PyCode Conference 2019
October 14 to October 17, 2019
PYCODE-CONFERENCE.ORG
PyData Bristol Meetup
October 17, 2019
MEETUP.COM
Python Northwest
October 17, 2019
PYNW.ORG.UK
PyLadies Dublin
October 17, 2019
PYLADIES.COM
PyCon China 2019 Beijing Branch
October 19 to October 20, 2019
PYCON.ORG
Python Brasil 2019
October 23 to October 29, 2019
PYTHONBRASIL.ORG.BR
Happy Pythoning!
This was PyCoder’s Weekly Issue #390.
View in Browser »
[ Subscribe to 🐍 PyCoder’s Weekly 💌 – Get the best Python news, articles, and tutorials delivered to your inbox once a week >> Click here to learn more ]
↧
tryexceptpass: Painless Status Reporting in GitHub Pull Requests - Designing CI/CD Systems
Continuing the build service discussion from the Designing CI/CD Systems series, we’re now at a good point to look at reporting status as code passes through the system.
At the very minimum, you want to communicate build results to our users, but it’s worth examining other steps in the process that also provide useful information.
The code for reporting status isn’t a major feat. However, using it to enforce build workflows can get complicated when implemented from scratch.
↧
↧
Python Bytes: #152 You have 35 million lines of Python 2, now what?
↧
Talk Python to Me: #234 Awesome Python Applications
Have you heard of awesome lists? They are well, pretty awesome! Gathering up the most loved libraries and packages for a given topic.
↧
Catalin George Festila: Python 3.8.0 : New release of python development.
Good news from the python development area with the new release of python development:
Python 3.7.5 Oct. 15, 2019 and Python 3.8.0 Oct. 14, 2019
Now you can use the new python version 3.8.0 from the official webpage.
Major new features of the 3.8 series, compared to 3.7 - release Date: Oct. 14, 2019:
PEP 572, Assignment expressions
PEP 570, Positional-only arguments
PEP 587, Python
↧
Python Insider: Python 3.7.5 is now available
Python 3.7.5 is now available, the next maintenance release of Python 3.7. You can find the release files, a link to the changelog, and more information here:
Note that the next feature release of Python 3, Python 3.8.0, is also now available. Python 3.8 contains many new features and optimizations. You should consider upgrading to it. We plan to continue regular bugfix releases of Python 3.7.x through mid-year 2020 and provide security fixes for it until mid-year 2023. More details are available in PEP 537, the Python 3.7 Release Schedule (https://www.python.org/dev/peps/pep-0537/).
Thanks to all of the many volunteers who help make Python Development and these releases possible! Please consider supporting our efforts by volunteering yourself or through organization contributions to the Python Software Foundation.
↧
↧
Test and Code: 91: Python 3.8 - what's new
Python 3.8.0 final is live and ready to download.
On todays episode, we're going to run through what's new, picking out the bits that I think are the most interesting and affect the most people, including
- new language features
- standard library changes
- optimizations in 3.8
- porting to 3.8
I'm excited about Python 3.8. And really, this episode is to my way to try to get you excited about it too.
Sponsored By:
- PyCharm Professional: Try PyCharm Pro before Oct 29 with a 4 month free trial. Promo Code: TESTNCODE2019
Support Test & Code - Python, Testing, and Software Engineering
Links:
<p>Python 3.8.0 final is live and ready to download.</p> <p>On todays episode, we're going to run through what's new, picking out the bits that I think are the most interesting and affect the most people, including</p> <ul> <li>new language features</li> <li>standard library changes</li> <li>optimizations in 3.8</li> <li>porting to 3.8</li> </ul> <p>I'm excited about Python 3.8. And really, this episode is to my way to try to get you excited about it too.</p><p>Sponsored By:</p><ul><li><a href="https://testandcode.com/pycharm" rel="nofollow">PyCharm Professional</a>: <a href="https://testandcode.com/pycharm" rel="nofollow">Try PyCharm Pro before Oct 29 with a 4 month free trial. </a> Promo Code: TESTNCODE2019</li></ul><p><a href="https://www.patreon.com/testpodcast" rel="payment">Support Test & Code - Python, Testing, and Software Engineering</a></p><p>Links:</p><ul><li><a href="https://docs.python.org/3.8/whatsnew/3.8.html" title="What’s New In Python 3.8 - at docs.python.org" rel="nofollow">What’s New In Python 3.8 - at docs.python.org</a></li><li><a href="https://www.python.org/downloads/" title="Download Python 3.8 at Python.org" rel="nofollow">Download Python 3.8 at Python.org</a></li></ul>↧
Hynek Schlawack: Sharing Your Labor of Love: PyPI Quick and Dirty
A completely incomplete guide to packaging a Python module and sharing it with the world on PyPI.
↧
Continuum Analytics Blog: What Can AI Teach Us about Bias and Fairness?
By: Peter Wang & Natalie Parra-Novosad As researchers, journalists, and many others have discovered, machine learning algorithms can deliver biased results. One notorious example is ProPublica’s discovery of bias in a software called COMPAS used…
The post What Can AI Teach Us about Bias and Fairness? appeared first on Anaconda.
↧
Real Python: Python sleep(): How to Add Time Delays to Your Code
Have you ever needed to make your Python program wait for something? Most of the time, you’d want your code to execute as quickly as possible. But there are times when letting your code sleep for a while is actually in your best interest.
For example, you might use a Python sleep() call to simulate a delay in your program. Perhaps you need to wait for a file to upload or download, or for a graphic to load or be drawn to the screen. You might even need to pause between calls to a web API, or between queries to a database. Adding Python sleep() calls to your program can help in each of these cases, and many more!
In this tutorial, you’ll learn how to add Python sleep() calls with:
time.sleep()- Decorators
- Threads
- Async IO
- Graphical User Interfaces
This article is intended for intermediate developers who are looking to grow their knowledge of Python. If that sounds like you, then let’s get started!
Free Bonus:Get our free "The Power of Python Decorators" guide that shows you 3 advanced decorator patterns and techniques you can use to write to cleaner and more Pythonic programs.
Adding a Python sleep() Call With time.sleep()
Python has built-in support for putting your program to sleep. The time module has a function sleep() that you can use to suspend execution of the calling thread for however many seconds you specify.
Here’s an example of how to use time.sleep():
>>>
>>> importtime>>> time.sleep(3)# Sleep for 3 seconds
If you run this code in your console, then you should experience a delay before you can enter a new statement in the REPL.
Note: In Python 3.5, the core developers changed the behavior of time.sleep() slightly. The new Python sleep() system call will last at least the number of seconds you’ve specified, even if the sleep is interrupted by a signal. This does not apply if the signal itself raises an exception, however.
You can test how long the sleep lasts by using Python’s timeit module:
$ python3 -m timeit -n 3"import time; time.sleep(3)"3 loops, best of 3: 3 sec per loopHere, you run the timeit module with the -n parameter, which tells timeit how many times to run the statement that follows. You can see that timeit ran the statement 3 times and that the best run time was 3 seconds, which is what was expected.
The default number of times that timeit will run your code is one million. If you were to run the above code with the default -n, then at 3 seconds per iteration, your terminal would hang for approximately 34 days! The timeit module has several other command line options that you can check out in its documentation.
Let’s create something a bit more realistic. A system administrator needs to know when one of their websites goes down. You want to be able to check the website’s status code regularly, but you can’t query the web server constantly or it will affect performance. One way to do this check is to use a Python sleep() system call:
importtimeimporturllib.requestimporturllib.errordefuptime_bot(url):whileTrue:try:conn=urllib.request.urlopen(url)excepturllib.error.HTTPErrorase:# Email admin / logprint(f'HTTPError: {e.code} for {url}')excepturllib.error.URLErrorase:# Email admin / logprint(f'URLError: {e.code} for {url}')else:# Website is upprint(f'{url} is up')time.sleep(60)if__name__=='__main__':url='http://www.google.com/py'uptime_bot(url)Here you create uptime_bot(), which takes a URL as its argument. The function then attempts to open that URL with urllib. If there’s an HTTPError or URLError, then the program catches it and prints out the error. (In a live environment, you would log the error and probably send out an email to the webmaster or system administrator.)
If no errors occur, then your code prints out that all is well. Regardless of what happens, your program will sleep for 60 seconds. This means that you only access the website once every minute. The URL used in this example is bad, so it will output the following to your console once every minute:
HTTPError: 404 for http://www.google.com/pyGo ahead and update the code to use a known good URL, like http://www.google.com. Then you can re-run it to see it work successfully. You can also try to update the code to send an email or log the errors. For more information on how to do this, check out Sending Emails With Python and Logging in Python.
Adding a Python sleep() Call With Decorators
There are times when you need to retry a function that has failed. One popular use case for this is when you need to retry a file download because the server was busy. You usually won’t want to make a request to the server too often, so adding a Python sleep() call between each request is desirable.
Another use case that I’ve personally experienced is where I need to check the state of a user interface during an automated test. The user interface might load faster or slower than usual, depending on the computer I’m running the test on. This can change what’s on the screen at the moment my program is verifying something.
In this case, I can tell the program to sleep for a moment and then recheck things a second or two later. This can mean the difference between a passing and failing test.
You can use a decorator to add a Python sleep() system call in either of these cases. If you’re not familiar with decorators, or if you’d like to brush up on them, then check out Primer on Python Decorators. Let’s look at an example:
importtimeimporturllib.requestimporturllib.errordefsleep(timeout,retry=3):defthe_real_decorator(function):defwrapper(*args,**kwargs):retries=0whileretries<retry:try:value=function(*args,**kwargs)ifvalueisNone:returnexcept:print(f'Sleeping for {timeout} seconds')time.sleep(timeout)retries+=1returnwrapperreturnthe_real_decoratorsleep() is your decorator. It accepts a timeout value and the number of times it should retry, which defaults to 3. Inside sleep() is another function, the_real_decorator(), which accepts the decorated function.
Finally, the innermost function wrapper() accepts the arguments and keyword arguments that you pass to the decorated function. This is where the magic happens! You use a while loop to retry calling the function. If there’s an exception, then you call time.sleep(), increment the retries counter, and try running the function again.
Now rewrite uptime_bot() to use your new decorator:
@sleep(3)defuptime_bot(url):try:conn=urllib.request.urlopen(url)excepturllib.error.HTTPErrorase:# Email admin / logprint(f'HTTPError: {e.code} for {url}')# Re-raise the exception for the decoratorraiseurllib.error.HTTPErrorexcepturllib.error.URLErrorase:# Email admin / logprint(f'URLError: {e.code} for {url}')# Re-raise the exception for the decoratorraiseurllib.error.URLErrorelse:# Website is upprint(f'{url} is up')if__name__=='__main__':url='http://www.google.com/py'uptime_bot(url)Here, you decorate uptime_bot() with a sleep() of 3 seconds. You’ve also removed the original while loop, as well as the old call to sleep(60). The decorator now takes care of this.
One other change you’ve made is to add a raise inside of the exception handling blocks. This is so that the decorator will work properly. You could write the decorator to handle these errors, but since these exceptions only apply to urllib, you might be better off keeping the decorator the way it is. That way, it will work with a wider variety of functions.
Note: If you’d like to brush up on exception handling in Python, then check out Python Exceptions: An Introduction.
There are a few improvements that you could make to your decorator. If it runs out of retries and still fails, then you could have it re-raise the last error. The decorator will also wait 3 seconds after the last failure, which might be something you don’t want to happen. Feel free to try these out as an exercise!
Adding a Python sleep() Call With Threads
There are also times when you might want to add a Python sleep() call to a thread. Perhaps you’re running a migration script against a database with millions of records in production. You don’t want to cause any downtime, but you also don’t want to wait longer than necessary to finish the migration, so you decide to use threads.
Note: Threads are a method of doing concurrency in Python. You can run multiple threads at once to increase your application’s throughput. If you’re not familiar with threads in Python, then check out An Intro to Threading in Python.
To prevent customers from noticing any kind of slowdown, each thread needs to run for a short period and then sleep. There are two ways to do this:
- Use
time.sleep()as before. - Use
Event.wait()from thethreadingmodule.
Let’s start by looking at time.sleep().
Using time.sleep()
The Python Logging Cookbook shows a nice example that uses time.sleep(). Python’s logging module is thread-safe, so it’s a bit more useful than print() statements for this exercise. The following code is based on this example:
importloggingimportthreadingimporttimedefworker(arg):whilenotarg["stop"]:logging.debug("worker thread checking in")time.sleep(1)defmain():logging.basicConfig(level=logging.DEBUG,format="%(relativeCreated)6d%(threadName)s%(message)s")info={"stop":False}thread=threading.Thread(target=worker,args=(info,))thread_two=threading.Thread(target=worker,args=(info,))thread.start()thread_two.start()whileTrue:try:logging.debug("Checking in from main thread")time.sleep(0.75)exceptKeyboardInterrupt:info["stop"]=Truelogging.debug('Stopping')breakthread.join()thread_two.join()if__name__=="__main__":main()Here, you use Python’s threading module to create two threads. You also create a logging object that will log the threadName to stdout. Next, you start both threads and initiate a loop to log from the main thread every so often. You use KeyboardInterrupt to catch the user pressing Ctrl+C.
Try running the code above in your terminal. You should see output similar to the following:
0 Thread-1 worker thread checking in 1 Thread-2 worker thread checking in 1 MainThread Checking in from main thread752 MainThread Checking in from main thread1001 Thread-1 worker thread checking in1001 Thread-2 worker thread checking in1502 MainThread Checking in from main thread2003 Thread-1 worker thread checking in2003 Thread-2 worker thread checking in2253 MainThread Checking in from main thread3005 Thread-1 worker thread checking in3005 MainThread Checking in from main thread3005 Thread-2 worker thread checking inAs each thread runs and then sleeps, the logging output is printed to the console. Now that you’ve tried an example, you’ll be able to use these concepts in your own code.
Using Event.wait()
The threading module provides an Event() that you can use like time.sleep(). However, Event() has the added benefit of being more responsive. The reason for this is that when the event is set, the program will break out of the loop immediately. With time.sleep(), your code will need to wait for the Python sleep() call to finish before the thread can exit.
The reason you’d want to use wait() here is because wait() is non-blocking, whereas time.sleep() is blocking. What this means is that when you use time.sleep(), you’ll block the main thread from continuing to run while it waits for the sleep() call to end. wait() solves this problem. You can read more about how all this works in Python’s threading documentation.
Here’s how you add a Python sleep() call with Event.wait():
importloggingimportthreadingdefworker(event):whilenotevent.isSet():logging.debug("worker thread checking in")event.wait(1)defmain():logging.basicConfig(level=logging.DEBUG,format="%(relativeCreated)6d%(threadName)s%(message)s")event=threading.Event()thread=threading.Thread(target=worker,args=(event,))thread_two=threading.Thread(target=worker,args=(event,))thread.start()thread_two.start()whilenotevent.isSet():try:logging.debug("Checking in from main thread")event.wait(0.75)exceptKeyboardInterrupt:event.set()breakif__name__=="__main__":main()In this example, you create threading.Event() and pass it to worker(). (Recall that in the previous example, you instead passed a dictionary.) Next, you set up your loops to check whether or not event is set. If it’s not, then your code prints a message and waits a bit before checking again. To set the event, you can press Ctrl+C. Once the event is set, worker() will return and the loop will break, ending the program.
Note: If you’d like to learn more about dictionaries, then check out Dictionaries in Python.
Take a closer look at the code block above. How would you pass in a different sleep time to each worker thread? Can you figure it out? Feel free to tackle this exercise on your own!
Adding a Python sleep() Call With Async IO
Asynchronous capabilities were added to Python in the 3.4 release, and this feature set has been aggressively expanding ever since. Asynchronous programming is a type of parallel programming that allows you to run multiple tasks at once. When a task finishes, it will notify the main thread.
asyncio is a module that lets you add a Python sleep() call asynchronously. If you’re unfamiliar with Python’s implementation of asynchronous programming, then check out Async IO in Python: A Complete Walkthrough and Python Concurrency & Parallel Programming.
Here’s an example from Python’s own documentation:
importasyncioasyncdefmain():print('Hello ...')awaitasyncio.sleep(1)print('... World!')# Python 3.7+asyncio.run(main())In this example, you run main() and have it sleep for one second between two print() calls.
Here’s a more compelling example from the Coroutines and Tasks portion of the asyncio documentation:
importasyncioimporttimeasyncdefoutput(sleep,text):awaitasyncio.sleep(sleep)print(text)asyncdefmain():print(f"Started: {time.strftime('%X')}")awaitoutput(1,'First')awaitoutput(2,'Second')awaitoutput(3,'Third')print(f"Ended: {time.strftime('%X')}")# Python 3.7+asyncio.run(main())In this code, you create a worker called output() that takes in the number of seconds to sleep and the text to print out. Then, you use Python’s await keyword to wait for the output() code to run. await is required here because output() has been marked as an async function, so you can’t call it like you would a normal function.
When you run this code, your program will execute await 3 times. The code will wait for 1, 2, and 3 seconds, for a total wait time of 6 seconds. You can also rewrite the code so that the tasks run in parallel:
importasyncioimporttimeasyncdefoutput(text,sleep):whilesleep>0:awaitasyncio.sleep(1)print(f'{text} counter: {sleep} seconds')sleep-=1asyncdefmain():task_1=asyncio.create_task(output('First',1))task_2=asyncio.create_task(output('Second',2))task_3=asyncio.create_task(output('Third',3))print(f"Started: {time.strftime('%X')}")awaittask_1awaittask_2awaittask_3print(f"Ended: {time.strftime('%X')}")if__name__=='__main__':asyncio.run(main())Now you’re using the concept of tasks, which you can make with create_task(). When you use tasks in asyncio, Python will run the tasks asynchronously. So, when you run the code above, it should finish in 3 seconds total instead of 6.
Adding a Python sleep() Call With GUIs
Command-line applications aren’t the only place where you might need to add Python sleep() calls. When you create a Graphical User Interface (GUI), you’ll occasionally need to add delays. For example, you might create an FTP application to download millions of files, but you need to add a sleep() call between batches so you don’t bog down the server.
GUI code will run all its processing and drawing in a main thread called the event loop. If you use time.sleep() inside of GUI code, then you’ll block its event loop. From the user’s perspective, the application could appear to freeze. The user won’t be able to interact with your application while it’s sleeping with this method. (On Windows, you might even get an alert about how your application is now unresponsive.)
Fortunately, there are other methods you can use besides time.sleep(). In the next few sections, you’ll learn how to add Python sleep() calls in both Tkinter and wxPython.
Sleeping in Tkinter
tkinter is a part of the Python standard library. It may not be available to you if you’re using a pre-installed version of Python on Linux or Mac. If you get an ImportError, then you’ll need to look into how to add it to your system. But if you install Python yourself, then tkinter should already be available.
You’ll start by looking at an example that uses time.sleep(). Run this code to see what happens when you add a Python sleep() call the wrong way:
importtkinterimporttimeclassMyApp:def__init__(self,parent):self.root=parentself.root.geometry("400x400")self.frame=tkinter.Frame(parent)self.frame.pack()b=tkinter.Button(text="click me",command=self.delayed)b.pack()defdelayed(self):time.sleep(3)if__name__=="__main__":root=tkinter.Tk()app=MyApp(root)root.mainloop()Once you’ve run the code, press the button in your GUI. The button will stick down for three seconds as it waits for sleep() to finish. If the application had other buttons, then you wouldn’t be able to click them. You can’t close the application while it’s sleeping, either, since it can’t respond to the close event.
To get tkinter to sleep properly, you’ll need to use after():
importtkinterclassMyApp:def__init__(self,parent):self.root=parentself.root.geometry("400x400")self.frame=tkinter.Frame(parent)self.frame.pack()self.root.after(3000,self.delayed)defdelayed(self):print('I was delayed')if__name__=="__main__":root=tkinter.Tk()app=MyApp(root)root.mainloop()Here you create an application that is 400 pixels wide by 400 pixels tall. It has no widgets on it. All it will do is show a frame. Then, you call self.root.after() where self.root is a reference to the Tk() object. after() takes two arguments:
- The number of milliseconds to sleep
- The method to call when the sleep is finished
In this case, your application will print a string to stdout after 3 seconds. You can think of after() as the tkinter version of time.sleep(), but it also adds the ability to call a function after the sleep has finished.
You could use this functionality to improve user experience. By adding a Python sleep() call, you can make the application appear to load faster and then start some longer-running process after it’s up. That way, the user won’t have to wait for the application to open.
Sleeping in wxPython
There are two major differences between wxPython and Tkinter:
- wxPython has many more widgets.
- wxPython aims to look and feel native on all platforms.
The wxPython framework is not included with Python, so you’ll need to install it yourself. If you’re not familiar with wxPython, then check out How to Build a Python GUI Application With wxPython.
In wxPython, you can use wx.CallLater() to add a Python sleep() call:
importwxclassMyFrame(wx.Frame):def__init__(self):super().__init__(parent=None,title='Hello World')wx.CallLater(4000,self.delayed)self.Show()defdelayed(self):print('I was delayed')if__name__=='__main__':app=wx.App()frame=MyFrame()app.MainLoop()Here, you subclass wx.Frame directly and then call wx.CallLater(). This function takes the same parameters as Tkinter’s after():
- The number of milliseconds to sleep
- The method to call when the sleep is finished
When you run this code, you should see a small blank window appear without any widgets. After 4 seconds, you’ll see the string 'I was delayed' printed to stdout.
One of the benefits of using wx.CallLater() is that it’s thread-safe. You can use this method from within a thread to call a function that’s in the main wxPython application.
Conclusion
With this tutorial, you’ve gained a valuable new technique to add to your Python toolbox! You know how to add delays to pace your applications and prevent them from using up system resources. You can even use Python sleep() calls to help your GUI code redraw more effectively. This will make the user experience much better for your customers!
To recap, you’ve learned how to add Python sleep() calls with the following tools:
time.sleep()- Decorators
- Threads
asyncio- Tkinter
- wxPython
Now you can take what you’ve learned and start putting your code to sleep!
[ Improve Your Python With 🐍 Python Tricks 💌 – Get a short & sweet Python Trick delivered to your inbox every couple of days. >> Click here to learn more and see examples ]
↧
↧
Stories in My Pocket: PyCon 2019: Open Spaces
There have been a few thoughts about PyCon US 2019 that have been bouncing around my head, wanting to come out. Today, I want to talk about PyCon's Open Spaces, and why you should start planning on attending next year.
Read more...
↧
Roberto Alsina: Episodio 11: Type Hints
¿Qué son los Type Hints en Python? ¿Para qué sirven? ¿Cómo se usan?
↧
Catalin George Festila: Python 3.7.4 : Test the DHCP handshakes.
First, the DHCP is based on the earlier BOOTP protocol which uses well-known port numbers for both server and client instead of an ephemeral port. The server and the client communicate via broadcast and the server broadcasts the offered IP address to the client on UDP port 68.
This python example has a learning purpose and does not harm anyone.
import subprocess as sub
import re
def find_word(w
↧