(Cross-posted from my blog on Medium)
Working in a tech startup is akin to fighting a series of fires that crop up every now and then (faster, if you're iterating at breakneck speeds). Each time...
↧
Codementor: Django Optimization: Or how we avoided memory mishaps
↧
Real Python: Lists and Tuples in Python
In this course, you’ll learn about working with lists and tuples. Lists and tuples are arguably Python’s most versatile, useful data types. You’ll find them in virtually every non-trivial Python program.
Here’s what you’ll learn in this tutorial: You’ll cover the important characteristics of lists and tuples. You’ll learn how to define them and how to manipulate them. When you’re finished, you’ll have a good feel for when and how to use these object types in a Python program.
Take the Quiz: Test your knowledge with our interactive “Python Lists and Tuples” quiz. Upon completion you will receive a score so you can track your learning progress over time:
[ Improve Your Python With 🐍 Python Tricks 💌 – Get a short & sweet Python Trick delivered to your inbox every couple of days. >> Click here to learn more and see examples ]
↧
↧
Red Hat Developers: Using the STOMP Protocol with Apache ActiveMQ Artemis Broker
In this article, we will use a Python-based messaging client to connect and subscribe to a topic with a durable subscription in the Apache ActiveMQ Artemis broker. We will use the text-based STOMP protocol to connect and subscribe to the broker. STOMP clients can communicate with any STOMP message broker to provide messaging interoperability among many languages, platforms, and brokers.
If you need to brush up on the difference between persistence and durability in messaging, check Mary Cochran’s article on developers.redhat.com/blog.
A similar process can be used with Red Hat AMQ 7. The broker in Red Hat AMQ 7 is based on the Apache ActiveMQ Artemis project. See the overview on developers.redhat.com for more information.
Setting Up the Project
In the following example, we are using one client, both to publish and subscribe to a topic. You can find the code at my personal GitHub repo. We have two receiver_queue.py and receiver_topic.py Python messaging clients. While receiver_queue.py is a Python client based on the STOMP protocol for point-to-point (queue) connection to the broker, receiver_topic.py is a Python client based on the STOMP protocol for durable subscription against a topic to the broker.
Here is the code:
import time
import sys

import stomp

class MyListener(stomp.ConnectionListener):
 def on_error(self, headers, message):
 print('received an error "%s"' % message)
 def on_message(self, headers, message):
 print('received a message "%s"' % message)
hosts = [('localhost', 61616)]

conn = stomp.Connection(host_and_ports=hosts)
conn.set_listener('', MyListener())
conn.start()
conn.connect('admin', 'admin', wait=True,headers = {'client-id': 'clientname'} )
conn.subscribe(destination='A.B.C.D', id=1, ack='auto',headers = {'subscription-type': 'MULTICAST','durable-subscription-name':'someValue'})

conn.send(body=' '.join(sys.argv[1:]), destination='A.B.C.D')

time.sleep(2)
conn.disconnect()
The following are tasks performed by this code:
- To receive messages from the messaging system, we need to set up a listener on a connection, and then later subscribe to the destination.
- We are establishing a connection to the broker available locally on port 61616. The first parameter to a
Connectionishost_and_ports. This contains an IP address and the port where the message broker is listening for STOMP connections. - The
startmethod creates a socket connection to the broker. - Then we use the
connectmethod with credentials to access the broker and we use theheadersclient-idto ensure that the subscription that is created is durable. - Once a connection is established to the broker with
subscribemethod, we are subscribing to destinationA.B.C.Dusing acknowledgment modeauto. Also, we must provide theheaderssubscription-type asMULTICASTanddurable-subscription-nameas some text value. - To create a durable subscription, the
client-idheader must be set on theCONNECTframe and thedurable-subscription-namemust be set on theSUBSCRIBEframe. The combination of these two headers will form the identity of the durable subscription. - After a connection is established to the broker, we can use the
sendmethod to send/produce messages to the destination A.B.C.D. Here the first argument is to accept the text/string value from the command line, and the second argument is destination name or topic name.
How to Execute the Python Client
- Make sure the Apache ActiveMQ Artemis broker is configured to support the STOMP protocol. By default, port 61616 is configured to support almost all messaging protocols.
<acceptor name="artemis">tcp://0.0.0.0:61616?tcpSendBufferSize=1048576;tcpReceiveBufferSize=1048576;protocols=CORE,AMQP,STOMP,HORNETQ,MQTT,OPENWIRE;useEpoll=true;amqpCredits=1000;amqpLowCredits=300</acceptor>
- To run the client using the STOMP protocol, we first need the
stompmodule so that components of the STOMP API, such asconnect,start,send,subscribe, anddisconnect, are available. So install thestompmodule first.
pip install stomp.py
- Once the
stompmodule is installed, we can easily run the client in the following way:
[cpandey@vm254-231 python_stomp_example]$ python receiver_topic.py "Hello World"
received a message "Hello World"
[cpandey@vm254-231 python_stomp_example]$
- We can check the results using the following commands from the Apache ActiveMQ Artemis broker:
[cpandey@vm254-231 bin]$ ./artemis address show

A.B.C.D
DLQ

[cpandey@vm254-231 bin]$ ./artemis queue stat --user admin --password admin --url tcp://localhost:61616
OpenJDK 64-Bit Server VM warning: If the number of processors is expected to increase from one, then you should configure the number of parallel GC threads appropriately using -XX:ParallelGCThreads=N
|NAME |ADDRESS |CONSUMER_COUNT |MESSAGE_COUNT |MESSAGES_ADDED |DELIVERING_COUNT |MESSAGES_ACKED |
|DLQ |DLQ |0 |0 |0 |0 |0 |
|ExpiryQueue |ExpiryQueue |0 |0 |0 |0 |0 |
|clientname.someValue |A.B.C.D |0 |0 |1 |0 |1 |
[cpandey@vm254-231 bin]$
Note: A.B.C.D is the Address created and the durable subscription is created as queue clientname.someValue.
- If we read the network dumps using Wireshark, the following is the complete stream:
STOMP
accept-version:1.1
client-id:clientname
login:admin
passcode:admin

.CONNECTED
version:1.1
session:4c98c896
server:ActiveMQ-Artemis/2.4.0.amq-711002-redhat-1 ActiveMQ Artemis Messaging Engine

.
SUBSCRIBE
ack:auto
destination:A.B.C.D
durable-subscription-name:someValue
id:1
subscription-type:MULTICAST

.SEND
content-length:4
destination:A.B.C.D

abcd.MESSAGE
subscription:1
content-length:4
message-id:30
destination:A.B.C.D
expires:0
redelivered:false
priority:4
persistent:false
timestamp:1528858440363

abcd.
DISCONNECT
receipt:6a8bc1fd-0c8b-4e13-871f-fbc9c8c4df9d

.RECEIPT
receipt-id:6a8bc1fd-0c8b-4e13-871f-fbc9c8c4df9d
That’s it. I hope this helps you to have a basic understanding of using the STOMP protocol with the Apache ActiveMQ Artemis or Red Hat AMQ 7.

The post Using the STOMP Protocol with Apache ActiveMQ Artemis Broker appeared first on Red Hat Developer.
↧
Red Hat Developers: Use the Kubernetes Python client from your running Red Hat OpenShift pods
Red Hat OpenShift is part of the Cloud Native Computing Foundation (CNCF) Certified Program, ensuring portability and interoperability for your container workloads. This also allows you to use Kubernetes tools to interact with an OpenShift cluster, like kubectl, and you can rest assured that all the APIs you know and love are right there at your fingertips.
The Kubernetes Python client is another great tool for interacting with an OpenShift cluster, allowing you to perform actions on Kubernetes resources with Python code. It also has applications within a cluster. We can configure a Python application running on OpenShift to consume the OpenShift API, and list and create resources. We could then create containerized batch jobs from the running application, or a custom service monitor, for example. It sounds a bit like “OpenShift inception,” using the OpenShift API from services created using the OpenShift API.
In this article, we’ll create a Flask application running on OpenShift. This application will use the Kubernetes Python client to interact with the OpenShift API, list other pods in the project, and display them back to the user.
You’ll need a couple of things to follow along:
- An OpenShift cluster
- A working knowledge of Python
Let’s get started!
Setup
I’ve created a template to alleviate a lot of the boilerplate, so let’s clone it down:
git clone https://github.com/shaneboulden/openshift-client-demo
cd openshift-client-demo
You can create a new app on your OpenShift cluster using the provided template and see the application running:
oc new-app openshift_deploy/ocd.yaml
If you do an oc get routes, you’ll be able to see the route that’s been created. For now, if you select the Pods menu item you’ll just get some placeholder text. We’ll fix this shortly 

Configure the Kubernetes Python client
Listing pods is trivial once we have our client configured, and, fortunately, we can use a little Kubernetes Python client magic to configure this easily with the correct service account token.
Usually, we’d configure a Kubernetes client using a kubeconfig file, which has the required token and hostname to create API requests. The Kubernetes Python client also provides a method load_incluster_config(), which replaces the kubeconfig file in a running pod, instead using the available environment variables and mount points to find the service account token and build API URLs from the information available within the pod.
There’s another huge benefit to using load_incluster_config()—our code is now portable. We can take this same application to any Kubernetes cluster, assume nothing about hostnames or network addresses, and easily construct API requests using this awesome little method.
Let’s configure our application to use the load_incluster_config() method. First, we need to import the client and config objects, you can verify this in the ocd.py file:
from kubernetes import client, config
We can now use that magic method to configure the client:
config.load_incluster_config()
v1 = client.CoreV1Api()
That’s it! This is all of the code we need to be able to interact with the OpenShift API from running pods.
Use the Kubernetes Downward API
I’m going to introduce something new here, and yes, it’s another “OpenShift-inception” concept. We’re going to use the list_namespaced_pod method to list pod details; you can find all of the methods available in the documentation. To use this method, we need to pass the current namespace (project) to the Kubernetes client object. But wait, how do we get the namespace for our pod, from inside the running pod?
This is where another awesome Kubernetes API comes into play. It’s called the Downward API and allows us to access metadata about our pod from inside the running pod. To expose information from the Downward API to our pod, we can use environment variables. If you look at the template, you’ll see the following in the ‘env’ section:
- name: POD_NAMESPACE
  valueFrom:
    fieldRef:
      apiVersion: v1
      fieldPath: metadata.namespace
Bring it all together
Now let’s get back to our /pods route in the ocd.py file. The last thing we need to do is to pass the namespace of the app to the Kubernetes client. We have our environment variable configured to use the downward API already, so let’s pass it in:
pods = v1.list_namespaced_pod(namespace=os.environ["POD_NAMESPACE"])
Ensure you’re in the top-level project directory (i.e., you can see the README) and start a build from the local directory:
oc start-build openshift-client-demo --from-dir=.
When you next visit the route and select the Pods menu, you’ll be able to see all of the pods for the current namespace:

I hope you’ve enjoyed this short introduction to the Kubernetes Python client. If you want to explore a little deeper, you can look at creating resources. There’s an example here that looks at creating containerized batch jobs from API POSTs.
The post Use the Kubernetes Python client from your running Red Hat OpenShift pods appeared first on Red Hat Developer.
↧
Red Hat Developers: Controlling Red Hat OpenShift from an OpenShift pod
This article explains how to configure a Python application running within an OpenShift pod to communicate with the Red Hat OpenShift cluster via openshift-restclient-python, the OpenShift Python client.
tl;dr
The code sample below is a sample application running within a pod, which connects to an OpenShift cluster and prints a list of projects:
import os
import sys
import yaml
from kubernetes import client, config
from openshift.dynamic import DynamicClient

config.load_incluster_config()
k8s_config = client.Configuration()
k8s_client = client.api_client.ApiClient(configuration=k8s_config)
dyn_client = DynamicClient(k8s_client)

v1_projects = dyn_client.resources.get(api_version="project.openshift.io/v1", kind="Project")

print(v1_projects.get())
Running locally
Using openshift-restclient-python from your laptop is relatively easy. This OpenShift dynamic client extends the standard Kubernetes Python client. The first step is to install openshift-restclient-python, which will pull in the kubernetes dependency:
$ pip install openshift
Next, we load a Kube configuration. The Kubernetes function new_client_from_config() searches for the file ~/.kube/config. The new_client_from_config() function is similar to the load_kube_config() function, but also returns an ApiClient to be used with any API object. This task allows the caller to concurrently talk with multiple clusters.
The code example below uses the OpenShift dynamic client to list every project the user can access:
#!/usr/bin/env python3

from kubernetes import client, config
from openshift.dynamic import DynamicClient

k8s_client = config.new_client_from_config()
dyn_client = DynamicClient(k8s_client)

v1_projects = dyn_client.resources.get(api_version='project.openshift.io/v1', kind='Project')

project_list = v1_projects.get()

for project in project_list.items:
    print(project.metadata.name)
Running locally after logging into OpenShift works as expected:
oc login -u user https://ocp.lab.example.com

./cmdlineclient.py
ProjectA
ProjectB
Running within Red Hat OpenShift
However, running the same code with an OpenShift pod will result in a TypeError, as shown below:
oc rsh api-gateway-dfs3
cd /opt/app-root/src/
./cmdlineclient.py

Traceback (most recent call last):
  File "./cmdlineclient.py", line 6, in <module>
    k8s_client = config.new_client_from_config()
  File "/opt/app-root/lib/python3.6/site-packages/kubernetes/config/kube_config.py", line 667, in new_client_from_config
    persist_config=persist_config)
  File "/opt/app-root/lib/python3.6/site-packages/kubernetes/config/kube_config.py", line 645, in load_kube_config
    persist_config=persist_config)
  File "/opt/app-root/lib/python3.6/site-packages/kubernetes/config/kube_config.py", line 613, in _get_kube_config_loader_for_yaml_file
    **kwargs)
  File "/opt/app-root/lib/python3.6/site-packages/kubernetes/config/kube_config.py", line 153, in __init__
    self.set_active_context(active_context)
  File "/opt/app-root/lib/python3.6/site-packages/kubernetes/config/kube_config.py", line 173, in set_active_context
    context_name = self._config['current-context']
  File "/opt/app-root/lib/python3.6/site-packages/kubernetes/config/kube_config.py", line 495, in __getitem__
    v = self.safe_get(key)
  File "/opt/app-root/lib/python3.6/site-packages/kubernetes/config/kube_config.py", line 491, in safe_get
    key in self.value):
TypeError: argument of type 'NoneType' is not iterable
Unfortunately, the current documentation provided by openshift-restclient-python is lacking. It does not explain how to connect to OpenShift or Kubernetes from within a pod.
After much searching, I found a section within the Kubernetes documentation which states that when accessing the Kube API from a pod, locating and authenticating the API server are somewhat different. They recommend using one of the official client libraries, which I was already doing. These libraries should automatically discover the API server and authenticate.
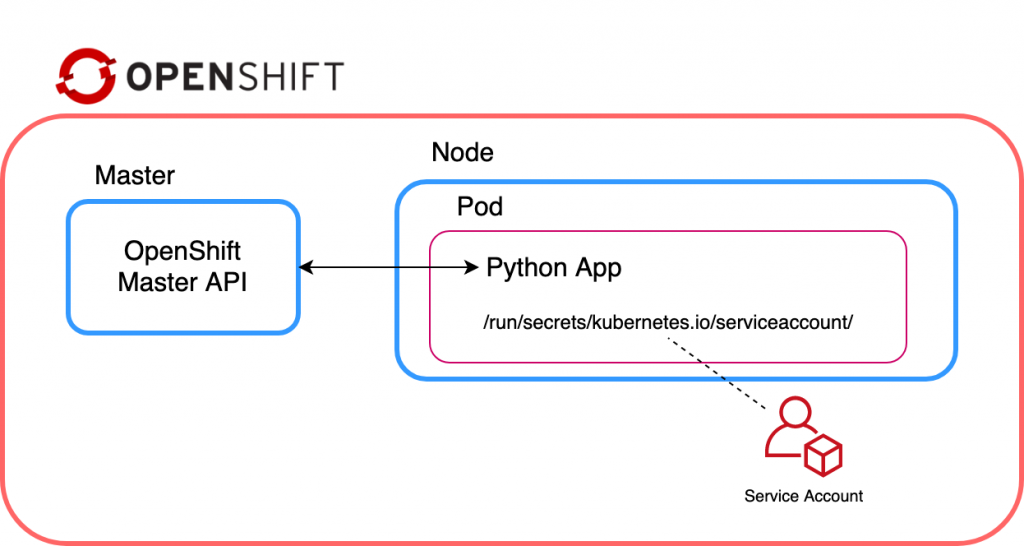
The Kubernetes config library also has the function load_incluster_config(). This function uses a combination of environment variables and a token to authenticate the API server. The recommended way to do this is to associate a pod with a service account. When the pod is started, a token for the service account is placed into the filesystem tree of each container in that pod, at /var/run/secrets/kubernetes.io/serviceaccount/token.
That all sounds simple enough. But, before updating the cmdlineclient, we need to create a service account, assign it a role, and then associate it with a pod (via a deployment config). The following instructions outline how to use the oc client to achieve this:
oc create serviceaccount robot

oc policy add-role-to-user admin -z robot

oc patch dc/api-gw --patch '{"spec":{"template":{"spec":{"serviceAccountName": "robot"}}}}'

oc rsh api-gw-9-kzrhn
(app-root) sh-4.2$ ls -al /var/run/secrets/kubernetes.io/serviceaccount/token
lrwxrwxrwx. 1 root root 12 Jul 14 06:13 /var/run/secrets/kubernetes.io/serviceaccount/token -> ..data/token
Now that we confirmed that a token is being injected within the pod, we need to update our function to use load_incluster_config(). However, remember that new_client_from_config() returns an ApiClient. We need to ensure we do this update before passing the ApiClient to the OpenShift dynamic client. Another undocumented step relates to the OpenShift dynamic client requiring a client.configuration object within the Kubernetes ApiClient object.
Lastly, we should also ensure that our code will work both within OpenShift and on our laptop. The updated cmdlineclientv2.py (below) determines if the client is running within OpenShift before calling the load_incluster_config(). It will also fall back to reading ~/.kube/config, which enables the program to run locally:
#!/usr/bin/env python3

import os
import sys

import yaml
from kubernetes import client, config
from openshift.dynamic import DynamicClient

# Check if code is running in OpenShift
if "OPENSHIFT_BUILD_NAME" in os.environ:
    config.load_incluster_config()
    file_namespace = open(
        "/run/secrets/kubernetes.io/serviceaccount/namespace", "r"
    )
    if file_namespace.mode == "r":
        namespace = file_namespace.read()
        print("namespace: %s\n" %(namespace))
else:
    config.load_kube_config()

# Create a client config
k8s_config = client.Configuration()

k8s_client = client.api_client.ApiClient(configuration=k8s_config)
dyn_client = DynamicClient(k8s_client)

v1_projects = dyn_client.resources.get(api_version="project.openshift.io/v1", kind="Project")

project_list = v1_projects.get()

for project in project_list.items:
    print("Project Name: %s" % (project.metadata.name))
When running cmdlineclientv2, notice that although we have assigned the admin role to the service account, it is only admin within the ProjectA namespace:
./cmdlineclientv2.py
namespace: ProjectA

Project Name: ProjectA
I hope you found this post helpful. Comments and questions are welcome.
The post Controlling Red Hat OpenShift from an OpenShift pod appeared first on Red Hat Developer.
↧
↧
PyCoder’s Weekly: Issue #384 (Sept. 3, 2019)
#384 – SEPTEMBER 3, 2019
View in Browser »
CPython Release 3.8.0b4
This is the last beta before 3.8 RC1.
PYTHON.ORG
Natural Language Processing With spaCy in Python
In this step-by-step tutorial, you’ll learn how to use spaCy. This free and open-source library for Natural Language Processing (NLP) in Python has a lot of built-in capabilities and is becoming increasingly popular for processing and analyzing data in NLP.
REAL PYTHON
Become a Python Guru With PyCharm
PyCharm is the Python IDE for Professional Developers by JetBrains providing a complete set of tools for productive Python, Web and scientific development. Be more productive and save time while PyCharm takes care of the routine →
JETBRAINSsponsor
An Empirical Analysis of the Python Package Index (PDF)
“In this research, we provide a comprehensive empirical summary of the Python Package Repository, PyPI, including both package metadata and source code covering 178,592 packages, 1,745,744 releases, 76,997 contributors, and 156,816,750 import statements.”
ARXIV.ORG• Shared by Python Bytes FM
Teaching an Old Pythonista New Gopher Tricks (Go vs Python)
“So in conclusion, Python may not be a Gopher Snake but for this task it does rather eat Go for breakfast.”
ED CREWEopinion
Discussions
Python Rounds Float Values by Converting Them to String and Then Back
Interesting CPython tidbit—apparently this really is a good way to implement floating point rounding in practice.
YCOMBINATOR.COM
Python Jobs
Python Web Developer (Remote)
Senior Backend Software Engineer (Remote)
Senior Python Developer (Austin, TX)
Backend and DataScience Engineers (London, Relocation & Visa Possible)
Senior Software Developer (Edmonton, Canada)
Articles & Tutorials
Lists and Tuples in Python
Cover the important characteristics of lists and tuples in Python 3. You’ll learn how to define them and how to manipulate them. When you’re finished, you’ll have a good feel for when and how to use these data structures in a Python program.
REAL PYTHONvideo
Python for NLP: Working With Facebook FastText Library
“In this article, we are going to study FastText which is another extremely useful module for word embedding and text classification. FastText has been developed by Facebook and has shown excellent results on many NLP problems, such as semantic similarity detection and text classification.”
USMAN MALIK
Eliminate Python Package Management
Tired of dealing with package dependency conflicts? Sign up for a free ActiveState Platform account to download ActivePython pre-bundled with top packages, or customize your own Python build with automated dependency resolution.
ACTIVESTATEsponsor
Understanding SAT by Implementing a Simple SAT Solver in Python
SAT is often described as the “mother of all NP-complete problems.” This post goes over what SAT is and why it is considered to be so important. A simple SAT solver is implemented using Python in the process.
SAHAND SABA
2019 Pandas User Survey
“Pandas recently contucted a user survey to help guide future development. Thanks to everyone who participated! This post presents the high-level results.”
PANDAS.IO• Shared by Python Bytes FM
Searching for Awesome TED Talks With Django + Elasticsearch
Learn the basics of Elasticsearch: what it is, how to run it, how to communicate with it, and how to integrate it into a simple Django application.
DENIS OREHOVSKY• Shared by Denis Orehovsky
Build a Simple ChatBot With Python and Google Search
Build a simple, full-stack ChatBot using Google Search as the AI. Python is our language of choice and we build a web page to access the API.
LELAND ZACH
Designing Continuous Build Systems: Docker Swarm Orchestration
How to orchestrate continuous integration builds and test execution in a Docker Swarm using Python and the docker module.
TRYEXCEPTPASS.ORG• Shared by Cristian Medina
Python Decorator With Arguments
A simple example which explains how to create a decorator function that accepts and uses arguments.
J-O ERIKSSON
Build a Chat App With Python, Django, and React
Learn how to integrate a rich chat experience into your app with this in-depth Python, Django, and React tutorial.
STREAMsponsor
Projects & Code
Feature-Engine: Feature Engineering for Machine Learning
FEATURE-ENGINE.READTHEDOCS.IO• Shared by Soledad Galli
Events
EuroSciPy 2019
September 2 to September 7, 2019
EUROSCIPY.ORG
Reunión Python Valencia
September 5, 2019
GOOGLE.COM
Canberra Python Meetup
September 5, 2019
MEETUP.COM
Sydney Python User Group (SyPy)
September 5, 2019
SYPY.ORG
Edmonton Python User Group
September 9, 2019
EDMONTONPY.COM
PiterPy Meetup
September 10, 2019
PITERPY.COM
Leipzig Python User Group Meeting
September 10, 2019
PYTHON-ACADEMY.COM
IndyPy Mixer
September 10, 2019
MEETUP.COM
Happy Pythoning!
This was PyCoder’s Weekly Issue #384.
View in Browser »
[ Subscribe to 🐍 PyCoder’s Weekly 💌 – Get the best Python news, articles, and tutorials delivered to your inbox once a week >> Click here to learn more ]
↧
Roberto Alsina: Complicame la vida!
Como estoy medio corto de ideas de charlas para la PyconAr de este año, les pido una mano!
Hice un sitio rapidito para que puedan proponerme temas y/o votar temas que proponga otro: Complicale la vida a Ralsina
Prometo dedicarle 4(cuatro) días a intentar aprender/hacer lo que sea que gane, e intentar dar una charla sobre eso.
Si me sale, será una charla sobre la cosa maravillosa que hice.
Si no sale, será una charla sobre la experiencia de querer hacer esa cosa.
Creo que en cualquier caso va a ser divertido.
↧
Codementor: Using Python to Build a Web Scrawler Step by Step
Start writing here...The need for extracting data from websites is increasing. When we are conducting data related projects such as price monitoring, business analytics or news aggregator, we would...
↧
PyBites: How I Followed my Heart, Conquered Fear and Became a Public Speaker
In this guest post Mridu shares with us how she got into public speaking, conquering fear and imposter syndrome. What did she learn? And what does she recommend for people starting out? Let's hear from Mridu!
I am everyday thankful for having crossed paths with individuals who are passionate to share their experience with others. Inspiration came from a teacher who loves to teach with energy and enthusiasm, making sure the student actually learned. Oftentimes I felt our teacher's enthusiasm was more than the collective enthusiasm of our batch of 200 students.
How it started
In one of the first community workshops, I crossed paths with another person who loves to teach probably every skill he has.
His positive influence helped me figure out a list of traits I wanted to possess. Traits, which neither a book, nor a podcast or school would ever be able to teach me. They could only be learned by practice and experience. Hence I needed to learn from him!
He shared a video on what might be holding you back. It's actually always our own thoughts that do, self-made stories of what we can do, and (above all) what we cannot do. I learned an important lesson that day!
Follow your heart. Have no apprehensions, leap
This was a quote that was shared as well. It was on me though to actually do something with it! It was August 2018 when I truly felt I should give back to the community by becoming a speaker at community events. I could do that by putting small amounts of efforts in to bridge the gap between academics and the corporate world. I could contribute to something I had seen my professor doing. Feeling like doing something is one thing, doing it though is a totally different ball game. We all have our fears. Even imagining being on the other side talking about tech was nothing less than a big leap!
Imposter Syndrome?
I am no different. The haunting feeling that every other person around me knows more than me, new tech concepts being overwhelming, stupid self-made stories, the list goes on and on. It's good to accept this, talk about it with someone you trust. Listen to a different perspective. To make sure fear was not going to hold me back, I repeated the same statement over and over again: "Have no apprehensions, leap." ... "Have no apprehensions, leap."
Talk Proposal
Just for a moment, leaving all "what if" questions aside, exploring the communities around me, I sent a talk proposal titled "Introduction to APIs" to one of them. Little did I know about how to write a proposal so I just jotted down the ideas I had. While doing so again this feeling nagged me: "This topic seems vast, what should I talk about?". I procrastinated.
A couple of weeks before the deadline I was opening a talk issue on GitHub for the PyData Delhi Meetup, I did a write-up on Virtual Environment in Python. I was fortunate that a colleague reached out to me that I must also include virtualenvwrapper, and a cousin recommended I'd cover Pipenv. With Introduction to APIs left unfinished, I opened a new issue for this topic. The talk got scheduled, so now the challenge was to come up with the full presentation on the subject!
A part of the initial write-up would be part of the presentation together with the ideas I received from my readers. Things were still not very intuitive though. All I knew was, when stuck, ask. So, I reached out to the person I met at a community workshop, sharing my ideas. I took his inputs and finished preparing the presentation. He reviewed the flow and gave me tips on how I needed to practice.
My first tech talk
The day came, December 2018, my first tech talk at a community meetup! Luckily positive influence won over the feeble voice deep inside of me which said I should fear the stage. I knew this would be the opportunity to pay it forward. This talk would teach me the traits I always wanted to have. This knowledge was thousand times more powerful than letting fear hold me back. My energy, enthusiasm and happiness during the event was different than usual. I had fun and from then on I started volunteering as a speaker every weekend, grabbing almost every opportunity I could.
8-9 months of weekend community meetups in, I submitted my first proposal to a technical conference (PyData Delhi 2019). And I got selected. It was not my goal from the start to deliver a talk at such a big conference. It happened the way it did though.
Why is it worth getting over the fear and just get started?
Climbing our own imaginary mountains is a never ending pursuit. Bringing others along is what makes the journey beautiful. Being able to help others even in a very small way makes you feel good about yourself.
Befriend the imposter syndrome. No one knows it all, I managed to learn and accept that. I can share my learning with others and learn from others.
You will be valued for your contribution. Out of the blue you will get some random messages of goodwill.
40 minutes are all yours to experiment. Talk about something you would love to share. Expect smiling faces after your session, thank you’s and happiness overall.
You cannot make an impact on everyone in the classroom. This wisdom somebody I look up to shared with me. Can you make an impact on at least one person who actually needs it? This alone brings great satisfaction.
Feedback always helps improving yourself, and make you prepare better for your next presentation.
When you make an attempt in explaining a concept to the rest you end up simplifying it in every possible manner so that it is easier to understand. And in that process you will actually learn a lot yourself.
Questions are all about visualising one concept from different angles. They make you understand the knowledge gaps you have. This is something that is often overlooked when working in isolation.
Answers to questions that might hold you back
What if someone asks me a question and I don’t know the answer?
- Accept it. No one knows it all.
How will I manage the ones who have come to attend?
- Here is the truth. One question that I am often asked is: "Are you really able to manage the class?". The answer is, there is nothing I actually need to manage. Unlike the traditional learning environments, meetups are places where only the ones enthusiastic to learn hang out.
I have never spoken before. What if I am unable to do it?
- "For everything there is a first time. But you need to get started!" - PyBites' founders Bob and Julian told me this the first time I was hesitant to write my first guest post for them. I have followed this piece of advice ever since. If a full-blown 40 minutes presentation seems intimidating, maybe a lightning talk of 10-15 minutes may be a better place to start. Remember, the community will be supportive, no one is perfect, and everyone is there to learn!
What if the topic of my talk is too obvious, something everyone already knows?
- I read somewhere "What might be obvious to you, might be alien to someone else". So, don’t decide on your own, get feedback from others and then decide.
I have no friends, or a group to go to a conference/meetup with? Will going alone be awkward?
- Your interest and your friend’s interest might be in sync, or not. Each one of us has different priorities. Go and meet like-minded people.
Conclusion
Looking back, all I can say is that my journey so far is the result of guidance, encouragement and different perspectives I received throughout the process.
I have been blessed to be surrounded by people who loved to teach. Try to listen to these kind of people, then practice, learn and teach!
Moving forward, I will be working on the feedback I get, perform more speaking engagements, and help organizing Pyladies Delhi and DjangoGirls Indore. I hope to bring smiles on a couple of more faces and of course to learn more tech. :o)
Keep Calm and Code in Python!
-- Mridu
↧
↧
Catalin George Festila: Python 3.7.4 : Create an Stand Alone Executable on Fedora distro.
In this tutorial I will show you how to create an Stand Alone Executable with Python version 3.7.4 and Fedora 30 distro.
First you need to install using the dnf tool the python3 package.
You can test it easy with this command:
[mythcat@desk dist]$ python3
Python 3.7.4 (default, Jul 9 2019, 16:32:37)
[GCC 9.1.1 20190503 (Red Hat 9.1.1-1)] on linux
Type "help", "copyright", "credits" or "license"
↧
Reuven Lerner: “Python Workout” is today’s Manning “Deal of the day”

Want to improve your Python fluency? There’s no better way than doing exercises, practicing your Python skills and ensuring you understand how to solve problems in the best possible way.
My book, “Python Workout,” not only contains 50 of my favorite exercises from my Python training business (at some of the world’s best-known companies), but is on sale today as Manning’s “Deal of the Day,” together with two other Python related books.
Don’t miss this opportunity to improve your Python skills at a discount! Go to https://www.manning.com/dotd to take advantage of the sale price.
The post “Python Workout” is today’s Manning “Deal of the day” appeared first on Reuven Lerner.
↧
NumFOCUS: QuantumBlack joins NumFOCUS Corporate Sponsors
The post QuantumBlack joins NumFOCUS Corporate Sponsors appeared first on NumFOCUS.
↧
Obey the Testing Goat: New Book Excerpt: On Coupling and Abstractions
At MADE.com i’ve been working on a new book with the chief architect, Bob Gregory, in which we talk about application architecture and design. What follows is an excerpt, a standalone chapter in which we talk about abstractions, testability, and coupling.
Have you ever struggled with writing tests for a bit of code that has a lot of dependencies? Someting involving I/O, interacting with 3rd parties, things like that? Wondering whether end-to-end/integration tests are the only way, and/or struggling with mocks that make tests hard to understand and evolve over time?
Most of the other chapters are about specific architectural patterns, but this one kind of stands on its own. When Bob and I first talked about choosing the right abstraction in order to enable testing, it was a real lightbulb moment for me, so I’m really interested in what people think — does it help you?
You can follow the progress on the new book at https://github.com/python-leap/book/, and you can read the Early Release edition on Oreilly Safari (sign up for a free account if you need one) (and apologies for the title, we’re working hard to convince O’Reilly to change it)
Allow us a brief digression on the subject of abstractions, dear reader. We’ve talked about abstractions quite a lot. The Repository is an abstraction over permanent storage for example. But what makes a good abstraction? What do we want from them? And how do they relate to testing?
Encapsulation and Abstraction, in General
Take a look at the following two snippets of Python code, [urllib_example] and [requests_example]:
Example 1. Do a search with urllib
importjsonfromurllib.requestimporturlopenfromurllib.parseimporturlencodeparams=dict(q='Sausages',format='json')handle=urlopen('http://api.duckduckgo.com'+'?'+urlencode(params))raw_text=handle.read().decode('utf8')parsed=json.loads(raw_text)results=parsed['RelatedTopics']forrinresults:if'Text'inr:print(r['FirstURL']+' - '+r['Text'])Example 2. Do a search with requests
importrequestsparams=dict(q='Sausages',format='json')parsed=requests.get('http://api.duckduckgo.com/',params=params).json()results=parsed['RelatedTopics']forrinresults:if'Text'inr:print(r['FirstURL']+' - '+r['Text'])Both of these code listings do the same thing: they submit form-encoded values to a URL in order to use a search engine API. But the second is simpler to read and understand because it operates at a higher level of abstraction.
We can take this one step further still by identifying and naming the task we want the code to perform for us, and use an even higher-level abstraction to make it explicit:
Example 3. Do a search with the duckduckgo module
importduckduckgoforrinduckduckgo.query('Sausages').results:print(r.url+' - '+r.text)Encapsulating behavior using abstractions is a powerful tool for making our code more expressive and easier to maintain.
Note | This approach is inspired by the OO practice of responsibility-driven design. which would use the words roles and responsibilities rather than tasks. The main point is to think about code in terms of behavior, rather than in terms of data or algorithms. If you’ve come across CRC cards, they’re driving at the same thing. |
(In a traditional OO language you might use an abstract base class or an interface to define an abstraction. In Python you can (and we sometimes do) use ABCs, but you can also rely on duck typing. The abstraction can just mean, "the public API of the thing you’re using"; a function name plus some arguments, for example.)
So far, so not-very-earth-shaking, you’re probably thinking. Abstraction and encapsulation are nice, we all knew that. So what?
Abstractions as a Way of Reducing Excessive Coupling
When we’re writing code for fun, or in a kata, we get to play with ideas freely, hammering things out and refactoring aggressively. In a large-scale system, though, we become constrained by the decisions made elsewhere in the system.
When we’re unable to change component A for fear of breaking component B, we say that the components have become coupled. Locally, coupling is a good thing: it’s a sign that our code is working together, each component supporting the others, fitting in place like the gears of a watch. In jargon, we say this works when there is high cohesion between the coupled elements.
Globally, coupling is a nuisance: it increases the risk and the cost of changing our code, sometimes to the point where we feel unable to make some changes at all. This is the problem with the ball of mud pattern: as the application grows, if we’re unable to prevent coupling between elements that have no cohesion, that coupling increases superlinearly until we are no longer able to effectively change our systems.
We can reduce the degree of coupling within a system ([coupling_illustration1]) by abstracting away the details ([coupling_illustration2]):
Lots of coupling
+--------+      +--------+
| System | ---> | System |
|   A    | ---> |   B    |
|        | ---> |        |
|        | ---> |        |
|        | ---> |        |
+--------+      +--------+
Less coupling
+--------+                           +--------+
| System |      /-------------\      | System |
|   A    |      |             | ---> |   B    |
|        | ---> | Abstraction | ---> |        |
|        |      |             | ---> |        |
|        |      \-------------/      |        |
+--------+                           +--------+
In both diagrams, we have a pair of subsystems, with the one dependent on the other. In the first diagram, there is a high degree of coupling between the two because of reasons. If we need to change system B, there’s a good chance that the change will ripple through to system A.
In the second, though, we have reduced the degree of coupling by inserting a new, simpler, abstraction. This abstraction serves to protect us from change by hiding away the complex details of whatever system B does.
But how do we pick the right abstraction? And what does this all have to do with testing?
Abstracting State Aids Testability
Time to get into the nitty-gritty. Let’s see an example. Imagine we want to write some code for synchronising two file directories which we’ll call the source and the destination.
If a file exists in the source, but not the destination, copy the file over.
If a file exists in the source, but has a different name than in the destination, rename the destination file to match.
If a file exists in the destination but not the source, remove it.
Our first and third requirements are simple enough, we can just compare two lists of paths. Our second is trickier, though. In order to detect renames, we’ll have to inspect the content of files. For this we can use a hashing function like md5 or SHA. The code to generate a SHA hash from a file is simple enough.
Example 4. Hashing a file (sync.py)
BLOCKSIZE=65536defhash_file(path):hasher=hashlib.sha1()withpath.open("rb")asfile:buf=file.read(BLOCKSIZE)whilebuf:hasher.update(buf)buf=file.read(BLOCKSIZE)returnhasher.hexdigest()Now we need to write the bit that makes decisions about what to do. When we have to tackle a problem from first principles, we usually try to write a simple implementation, and then refactor towards better design. We’ll use this approach throughout the book, because it’s how we write code in the real world: start with a solution to the smallest part of the problem, and then iteratively make the solution richer and better designed.
Our first hackish approach looks something like this:
Example 5. Basic sync algorithm (sync.py)
importhashlibimportosimportshutilfrompathlibimportPathdefsync(source,dest):# Walk the source folder and build a dict of filenames and their hashessource_hashes={}forfolder,_,filesinos.walk(source):forfninfiles:source_hashes[hash_file(Path(folder)/fn)]=fnseen=set()# Keep track of the files we've found in the target# Walk the target folder and get the filenames and hashesforfolder,_,filesinos.walk(dest):forfninfiles:dest_path=Path(folder)/fndest_hash=hash_file(dest_path)seen.add(dest_hash)# if there's a file in target that's not in source, delete itifdest_hashnotinsource_hashes:dest_path.remove()# if there's a file in target that has a different path in source,# move it to the correct pathelifdest_hashinsource_hashesandfn!=source_hashes[dest_hash]:shutil.move(dest_path,Path(folder)/source_hashes[dest_hash])# for every file that appears in source but not target, copy the file to# the targetforsrc_hash,fninsource_hashes.items():ifsrc_hashnotinseen:shutil.copy(Path(source)/fn,Path(dest)/fn)Fantastic! We have some code and it looks okay, but before we run it on our hard drive, maybe we should test it? How do we go about testing this sort of thing?
Example 6. Some end-to-end tests (test_sync.py)
deftest_when_a_file_exists_in_the_source_but_not_the_destination():try:source=tempfile.mkdtemp()dest=tempfile.mkdtemp()content="I am a very useful file"(Path(source)/'my-file').write_text(content)sync(source,dest)expected_path=Path(dest)/'my-file'assertexpected_path.exists()assertexpected_path.read_text()==contentfinally:shutil.rmtree(source)shutil.rmtree(dest)deftest_when_a_file_has_been_renamed_in_the_source():try:source=tempfile.mkdtemp()dest=tempfile.mkdtemp()content="I am a file that was renamed"source_path=Path(source)/'source-filename'old_dest_path=Path(dest)/'dest-filename'expected_dest_path=Path(dest)/'source-filename'source_path.write_text(content)old_dest_path.write_text(content)sync(source,dest)assertold_dest_path.exists()isFalseassertexpected_dest_path.read_text()==contentfinally:shutil.rmtree(source)shutil.rmtree(dest)Wowsers, that’s a lot of setup for two very simple cases! The problem is that our domain logic, "figure out the difference between two directories," is tightly coupled to the IO code. We can’t run our difference algorithm without calling the pathlib, shutil, and hashlib modules.
Our high-level code is coupled to low-level details, and it’s making life hard. As the scenarios we consider get more complex, our tests will get more unwieldy. We can definitely refactor these tests (some of the cleanup could go into pytest fixtures for example) but as long as we’re doing filesystem operations, they’re going to stay slow and hard to read and write.
Choosing the right abstraction(s)
What could we do to rewrite our code to make it more testable?
Firstly we need to think about what our code needs from the filesystem. Reading through the code, there are really three distinct things happening. We can think of these as three distinct responsibilities that the code has.
We interrogate the filesystem using
os.walkand determine hashes for a series of paths. This is actually very similar in both the source and the destination cases.We decide a file is new, renamed, or redundant.
We copy, move, or delete, files to match the source.
Remember that we want to find simplifying abstractions for each of these responsibilities. That will let us hide the messy details so that we can focus on the interesting logic.
Note | In this chapter we’re refactoring some gnarly code into a more testable
structure by identifying the separate tasks that need to be done and giving
each task to a clearly defined actor, along similar lines to the duckduckgo
example from the introduction. |
For (1) and (2), we’ve already intuitively started using an abstraction, a dictionary of hashes to paths, and you may already have been thinking, "why not use build up a dictionary for the destination folder as well as the source, then we just compare two dicts?" That seems like a very nice way to abstract the current state of the filesystem.
source_files = {'hash1': 'path1', 'hash2': 'path2'}
dest_files = {'hash1': 'path1', 'hash2': 'pathX'}
What about moving from step (2) to step (3)? How can we abstract out the actual move/copy/delete filesystem interaction?
We’re going to apply a trick here that we’ll employ on a grand scale later in the book. We’re going to separate what we want to do from how to do it. We’re going to make our program output a list of commands that look like this:
("COPY", "sourcepath", "destpath"),
("MOVE", "old", "new"),
Now we could write tests that just use 2 filesystem dicts as inputs, and expect lists of tuples of strings representing actions as outputs.
Instead of saying "given this actual filesystem, when I run my function, check what actions have happened?" we say, "given this abstraction of a filesystem, what abstraction of filesystem actions will happen?"
Example 7. Simplified inputs and outputs in our tests (test_sync.py)
deftest_when_a_file_exists_in_the_source_but_not_the_destination():src_hashes={'hash1':'fn1'}dst_hashes={}expected_actions=[('COPY','/src/fn1','/dst/fn1')]...deftest_when_a_file_has_been_renamed_in_the_source():src_hashes={'hash1':'fn1'}dst_hashes={'hash1':'fn2'}expected_actions==[('MOVE','/dst/fn2','/dst/fn1')]...Implementing our chosen abstractions
That’s all very well, but how do we actually write those new tests, and how do we change our implementation to make it all work?
Our goal is to isolate the clever part of our system, and to be able to test it thoroughly without needing to set up a real filesystem. We’ll create a "core" of code that has no dependencies on external state, and then see how it responds when we give it input from the outside world.
Let’s start off by splitting the code up to separate the stateful parts from the logic.
Example 8. Split our code into three (sync.py)
defsync(source,dest):#<3># imperative shell step 1, gather inputssource_hashes=read_paths_and_hashes(source)dest_hashes=read_paths_and_hashes(dest)# step 2: call functional coreactions=determine_actions(source_hashes,dest_hashes,source,dest)# imperative shell step 3, apply outputsforaction,*pathsinactions:ifaction=='copy':shutil.copyfile(*paths)ifaction=='move':shutil.move(*paths)ifaction=='delete':os.remove(paths[0])...defread_paths_and_hashes(root):#<1>hashes={}forfolder,_,filesinos.walk(root):forfninfiles:hashes[hash_file(Path(folder)/fn)]=fnreturnhashesdefdetermine_actions(src_hashes,dst_hashes,src_folder,dst_folder):#<2>forsha,filenameinsrc_hashes.items():ifshanotindst_hashes:sourcepath=Path(src_folder)/filenamedestpath=Path(dst_folder)/filenameyield'copy',sourcepath,destpathelifdst_hashes[sha]!=filename:olddestpath=Path(dst_folder)/dst_hashes[sha]newdestpath=Path(dst_folder)/filenameyield'move',olddestpath,newdestpathforsha,filenameindst_hashes.items():ifshanotinsrc_hashes:yield'delete',dst_folder/filenameThe code to build up the dictionary of paths and hashes is now trivially easy to write.
The core of our "business logic," which says, "given these two sets of hashes and filenames, what should we copy/move/delete?" takes simple data structures and returns simple data structures.
And our top-level module now contains almost no logic whatseover, it’s just an imperative series of steps: gather inputs, call our logic, apply outputs.
Our tests now act directly on the determine_actions() function:
Example 9. Nicer looking tests (test_sync.py)
@staticmethoddeftest_when_a_file_exists_in_the_source_but_not_the_destination():src_hashes={'hash1':'fn1'}dst_hashes={}actions=list(determine_actions(src_hashes,dst_hashes,Path('/src'),Path('/dst')))assertactions==[('copy',Path('/src/fn1'),Path('/dst/fn1'))]@staticmethoddeftest_when_a_file_has_been_renamed_in_the_source():src_hashes={'hash1':'fn1'}dst_hashes={'hash1':'fn2'}actions=list(determine_actions(src_hashes,dst_hashes,Path('/src'),Path('/dst')))assertactions==[('move',Path('/dst/fn2'),Path('/dst/fn1'))]Because we’ve disentangled the logic of our program - the code for identifying changes - from the low-level details of IO, we can easily test the core of our code.
Testing Edge-to-Edge with Fakes
When we start writing a new system, we often focus on the core logic first, driving it with direct unit tests. At some point, though, we want to test bigger chunks of the system together.
We could return to our end-to-end tests, but those are still as tricky to write and maintain as before. Instead, we often write tests that invoke a whole system together, but fake the IO, sort of edge-to-edge.
Example 10. Explicit dependencies (sync.py)
defsynchronise_dirs(reader,filesystem,source_root,dest_root):#<1>source_hashes=reader(source_root)#<2>dest_hashes=reader(dest_root)forsha,filenameinsrc_hashes.items():ifshanotindst_hashes:sourcepath=source_root/filenamedestpath=dest_root/filenamefilesystem.copy(destpath,sourcepath)#<3>elifdst_hashes[sha]!=filename:olddestpath=dest_root/dst_hashes[sha]newdestpath=dest_root/filenamefilesystem.move(oldestpath,newdestpath)forsha,filenameindst_hashes.items():ifshanotinsrc_hashes:filesystem.del(dest_root/filename)Our top-level function now exposes two new dependencies, a
readerand afilesystemWe invoke the
readerto produce our files dict.And we invoke the
filesystemto apply the changes we detect.
Tip | Notice that, although we’re using dependency injection, there was no need to define an abstract base class or any kind of explicit interface. In the book we often show ABCs because we hope they help to understand what the abstraction is, but they’re not necessary. Python’s dynamic nature means we can always rely on duck typing. |
Example 11. Tests using DI
classFakeFileSystem(list):#<1>defcopy(self,src,dest):#<2>self.append(('COPY',src,dest))defmove(self,src,dest):self.append(('MOVE',src,dest))defdelete(self,dest):self.append(('DELETE',src,dest))deftest_when_a_file_exists_in_the_source_but_not_the_destination():source={"sha1":"my-file"}dest={}filesystem=FakeFileSystem()reader={"/source":source,"/dest":dest}synchronise_dirs(reader.pop,filesystem,"/source","/dest")assertfilesystem==[("COPY","/source/my-file","/dest/my-file")]deftest_when_a_file_has_been_renamed_in_the_source():source={"sha1":"renamed-file"}dest={"sha1":"original-file"}filesystem=FakeFileSystem()reader={"/source":source,"/dest":dest}synchronise_dirs(reader.pop,filesystem,"/source","/dest")assertfilesystem==[("MOVE","/dest/original-file","/dest/renamed-file")]Bob loves using lists to build simple test doubles, even though his co-workers get mad. It means we can write tests like
assert foo not in databaseEach method in our
FakeFileSystemjust appends something to the list so we can inspect it later. This is an example of a Spy Object.
The advantage of this approach is that your tests act on the exact same function that’s used by your production code. The disadvantage is that we have to make our stateful components explicit and we have to pass them around. DHH famously described this as "test damage".
In either case, we can now work on fixing all the bugs in our implementation; enumerating tests for all the edge cases is now much easier.
Why Not Just Patch It Out?
At this point some of our readers will be scratching their heads and thinking
"Why don’t you just use mock.patch and save yourself the effort?
We avoid using mocks in this book, and in our production code, too. We’re not going to enter into a Holy War, but our instinct is that mocking frameworks are a code smell.
Instead, we like to clearly identify the responsibilities in our codebase, and to separate those responsibilities out into small, focused objects that are easy to replace with a test double.
There’s a few, closely related reasons for that:
Patching out the dependency you’re using makes it possible to unit test the code, but it does nothing to improve the design. Using mock.patch won’t let your code work with a
--dry-runflag, nor will it help you run against an ftp server. For that, you’ll need to introduce abstractions.Designing for testability really means designing for extensibility. We trade off a little more complexity for a cleaner design that admits novel use-cases.
Tests that use mocks tend to be more coupled to the implementation details of the codebase. That’s because mock tests verify the interactions between things: did I call
shutil.copywith the right arguments? This coupling between code and test tends to make tests more brittle in our experience.Martin Fowler wrote about this in his 2007 blog post Mocks Aren’t Stubs
Over-use of mocks leads to complicated test suites that fail to explain the code.
We view TDD as a design practice first, and a testing practice second. The tests act as a record of our design choices, and serve to explain the system to us when we return to the code after a long absence.
Tests that use too many mocks get overwhelmed with setup code that hides the story we care about.
Steve Freeman has a great example of over-mocked tests in his talk Test Driven Development: That’s Not What We Meant
Wrap-up: "Depend on Abstractions."
We’ll see this idea come up again and again in the book: we can make our systems easier to test and maintain by simplifying the interface between our business logic and messy IO. Finding the right abstraction is tricky, but here’s a few heuristics and questions to ask yourself:
Can I choose a familiar Python datastructure to represent the state of the messy system, and try to imagine a single function that can return that state?
Where can I draw a line between my systems, where can I carve out a seam, to stick that abstraction in?
What are the dependencies and what is the core "business" logic?
Practice makes less-imperfect!
And now back to our regular programming…
↧
↧
EuroPython: EuroPython 2019 - Videos for Wednesday available
We are pleased to announce the first batch of cut videos from EuroPython 2019 in Basel, Switzerland.

EuroPython 2019 YouTube Channel
In this batch, we have included all videos for Wednesday, July 10 2019, the first conference day.
In the coming two weeks we will publish videos for the next two conference days. In total, we will have more than 130 videos available for you to watch.
All EuroPython videos, including the ones from previous conferences, are available on our EuroPython YouTube Channel.
Enjoy,
–
EuroPython 2019 Team
https://ep2019.europython.eu/
https://www.europython-society.org/
↧
Real Python: Python args and kwargs: Demystified
Sometimes, when you look at a function definition in Python, you might see that it takes two strange arguments: *args and **kwargs. If you’ve ever wondered what these peculiar variables are, or why your IDE defines them in main(), then this article is for you. You’ll learn how to use args and kwargs in Python to add more flexibility to your functions.
By the end of the article, you’ll know:
- What
*argsand**kwargsactually mean - How to use
*argsand**kwargsin function definitions - How to use a single asterisk (
*) to unpack iterables - How to use two asterisks (
**) to unpack dictionaries
This article assumes that you already know how to define Python functions and work with lists and dictionaries.
Free Bonus:Click here to get a Python Cheat Sheet and learn the basics of Python 3, like working with data types, dictionaries, lists, and Python functions.
Passing Multiple Arguments to a Function
*args and **kwargs allow you to pass multiple arguments or keyword arguments to a function. Consider the following example. This is a simple function that takes two arguments and returns their sum:
defmy_sum(a,b):returna+bThis function works fine, but it’s limited to only two arguments. What if you need to sum a varying number of arguments, where the specific number of arguments passed is only determined at runtime? Wouldn’t it be great to create a function that could sum all the integers passed to it, no matter how many there are?
Using the Python args Variable in Function Definitions
There are a few ways you can pass a varying number of arguments to a function. The first way is often the most intuitive for people that have experience with collections. You simply pass a list or a set of all the arguments to your function. So for my_sum(), you could pass a list of all the integers you need to add:
# sum_integers_list.pydefmy_sum(my_integers):result=0forxinmy_integers:result+=xreturnresultlist_of_integers=[1,2,3]print(my_sum(list_of_integers))This implementation works, but whenever you call this function you’ll also need to create a list of arguments to pass to it. This can be inconvenient, especially if you don’t know up front all the values that should go into the list.
This is where *args can be really useful, because it allows you to pass a varying number of positional arguments. Take the following example:
# sum_integers_args.pydefmy_sum(*args):result=0# Iterating over the Python args tupleforxinargs:result+=xreturnresultprint(my_sum(1,2,3))In this example, you’re no longer passing a list to my_sum(). Instead, you’re passing three different positional arguments. my_sum() takes all the parameters that are provided in the input and packs them all into a single iterable object named args.
Note that args is just a name. You’re not required to use the name args. You can choose any name that you prefer, such as integers:
# sum_integers_args_2.pydefmy_sum(*integers):result=0forxinintegers:result+=xreturnresultprint(my_sum(1,2,3))The function still works, even if you pass the iterable object as integers instead of args. All that matters here is that you use the unpacking operator (*).
Bear in mind that the iterable object you’ll get using the unpacking operator * is not a list but a tuple. A tuple is similar to a list in that they both support slicing and iteration. However, tuples are very different in at least one aspect: lists are mutable, while tuples are not. To test this, run the following code. This script tries to change a value of a list:
# change_list.pymy_list=[1,2,3]my_list[0]=9print(my_list)The value located at the very first index of the list should be updated to 9. If you execute this script, you will see that the list indeed gets modified:
$ python change_list.py
[9, 2, 3]
The first value is no longer 0, but the updated value 9. Now, try to do the same with a tuple:
# change_tuple.pymy_tuple=(1,2,3)my_tuple[0]=9print(my_tuple)Here, you see the same values, except they’re held together as a tuple. If you try to execute this script, you will see that the Python interpreter returns an error:
$ python change_tuple.py
Traceback (most recent call last):  File "change_tuple.py", line 3, in <module>    my_tuple[0] = 9TypeError: 'tuple' object does not support item assignment
This is because a tuple is an immutable object, and its values cannot be changed after assignment. Keep this in mind when you’re working with tuples and *args.
Using the Python kwargs Variable in Function Definitions
Okay, now you’ve understood what *args is for, but what about **kwargs? **kwargs works just like *args, but instead of accepting positional arguments it accepts keyword (or named) arguments. Take the following example:
# concatenate.pydefconcatenate(**kwargs):result=""# Iterating over the Python kwargs dictionaryforarginkwargs.values():result+=argreturnresultprint(concatenate(a="Real",b="Python",c="Is",d="Great",e="!"))When you execute the script above, concatenate() will iterate through the Python kwargs dictionary and concatenate all the values it finds:
$ python concatenate.py
RealPythonIsGreat!
Like args, kwargs is just a name that can be changed to whatever you want. Again, what is important here is the use of the unpacking operator (**).
So, the previous example could be written like this:
# concatenate_2.pydefconcatenate(**words):result=""forarginwords.values():result+=argreturnresultprint(concatenate(a="Real",b="Python",c="Is",d="Great",e="!"))Note that in the example above the iterable object is a standard dict. If you iterate over the dictionary and want to return its values, like in the example shown, then you must use .values().
In fact, if you forget to use this method, you will find yourself iterating through the keys of your Python kwargs dictionary instead, like in the following example:
# concatenate_keys.pydefconcatenate(**kwargs):result=""# Iterating over the keys of the Python kwargs dictionaryforarginkwargs:result+=argreturnresultprint(concatenate(a="Real",b="Python",c="Is",d="Great",e="!"))Now, if you try to execute this example, you’ll notice the following output:
$ python concatenate_keys.py
abcde
As you can see, if you don’t specify .values(), your function will iterate over the keys of your Python kwargs dictionary, returning the wrong result.
Ordering Arguments in a Function
Now that you have learned what *args and **kwargs are for, you are ready to start writing functions that take a varying number of input arguments. But what if you want to create a function that takes a changeable number of both positional and named arguments?
In this case, you have to bear in mind that order counts. Just as non-default arguments have to precede default arguments, so *args must come before **kwargs.
To recap, the correct order for your parameters is:
- Standard arguments
*argsarguments**kwargsarguments
For example, this function definition is correct:
# correct_function_definition.pydefmy_function(a,b,*args,**kwargs):passThe *args variable is appropriately listed before **kwargs. But what if you try to modify the order of the arguments? For example, consider the following function:
# wrong_function_definition.pydefmy_function(a,b,**kwargs,*args):passNow, **kwargs comes before *args in the function definition. If you try to run this example, you’ll receive an error from the interpreter:
$ python wrong_function_definition.py
  File "wrong_function_definition.py", line 2    def my_function(a, b, **kwargs, *args):                                    ^SyntaxError: invalid syntax
In this case, since *args comes after **kwargs, the Python interpreter throws a SyntaxError.
Unpacking With the Asterisk Operators: *& **
You are now able to use *args and **kwargs to define Python functions that take a varying number of input arguments. Let’s go a little deeper to understand something more about the unpacking operators.
The single and double asterisk unpacking operators were introduced in Python 2. As of the 3.5 release, they have become even more powerful, thanks to PEP 448. In short, the unpacking operators are operators that unpack the values from iterable objects in Python. The single asterisk operator * can be used on any iterable that Python provides, while the double asterisk operator ** can only be used on dictionaries.
Let’s start with an example:
# print_list.pymy_list=[1,2,3]print(my_list)This code defines a list and then prints it to the standard output:
$ python print_list.py
[1, 2, 3]
Note how the list is printed, along with the corresponding brackets and commas.
Now, try to prepend the unpacking operator * to the name of your list:
# print_unpacked_list.pymy_list=[1,2,3]print(*my_list)Here, the * operator tells print() to unpack the list first.
In this case, the output is no longer the list itself, but rather the content of the list:
$ python print_unpacked_list.py
1 2 3
Can you see the difference between this execution and the one from print_list.py? Instead of a list, print() has taken three separate arguments as the input.
Another thing you’ll notice is that in print_unpacked_list.py, you used the unpacking operator * to call a function, instead of in a function definition. In this case, print() takes all the items of a list as though they were single arguments.
You can also use this method to call your own functions, but if your function requires a specific number of arguments, then the iterable you unpack must have the same number of arguments.
To test this behavior, consider this script:
# unpacking_call.pydefmy_sum(a,b,c):print(a+b+c)my_list=[1,2,3]my_sum(*my_list)Here, my_sum() explicitly states that a, b, and c are required arguments.
If you run this script, you’ll get the sum of the three numbers in my_list:
$ python unpacking_call.py
6
The 3 elements in my_list match up perfectly with the required arguments in my_sum().
Now look at the following script, where my_list has 4 arguments instead of 3:
# wrong_unpacking_call.pydefmy_sum(a,b,c):print(a+b+c)my_list=[1,2,3,4]my_sum(*my_list)In this example, my_sum() still expects just three arguments, but the * operator gets 4 items from the list. If you try to execute this script, you’ll see that the Python interpreter is unable to run it:
$ python wrong_unpacking_call.py
Traceback (most recent call last):  File "wrong_unpacking_call.py", line 6, in <module>    my_sum(*my_list)TypeError: my_sum() takes 3 positional arguments but 4 were given
When you use the * operator to unpack a list and pass arguments to a function, it’s exactly as though you’re passing every single argument alone. This means that you can use multiple unpacking operators to get values from several lists and pass them all to a single function.
To test this behavior, consider the following example:
# sum_integers_args_3.pydefmy_sum(*args):result=0forxinargs:result+=xreturnresultlist1=[1,2,3]list2=[4,5]list3=[6,7,8,9]print(my_sum(*list1,*list2,*list3))If you run this example, all three lists are unpacked. Each individual item is passed to my_sum(), resulting in the following output:
$ python sum_integers_args_3.py
45
There are other convenient uses of the unpacking operator. For example, say you need to split a list into three different parts. The output should show the first value, the last value, and all the values in between. With the unpacking operator, you can do this in just one line of code:
# extract_list_body.pymy_list=[1,2,3,4,5,6]a,*b,c=my_listprint(a)print(b)print(c)In this example, my_list contains 6 items. The first variable is assigned to a, the last to c, and all other values are packed into a new list b. If you run the script, print() will show you that your three variables have the values you would expect:
$ python extract_list_body.py
1[2, 3, 4, 5]6
Another interesting thing you can do with the unpacking operator * is to split the items of any iterable object. This could be very useful if you need to merge two lists, for instance:
# merging_lists.pymy_first_list=[1,2,3]my_second_list=[4,5,6]my_merged_list=[*my_first_list,*my_second_list]print(my_merged_list)The unpacking operator * is prepended to both my_first_list and my_second_list.
If you run this script, you’ll see that the result is a merged list:
$ python merging_lists.py
[1, 2, 3, 4, 5, 6]
You can even merge two different dictionaries by using the unpacking operator **:
# merging_dicts.pymy_first_dict={"A":1,"B":2}my_second_dict={"C":3,"D":4}my_merged_dict={**my_first_dict,**my_second_dict}print(my_merged_dict)Here, the iterables to merge are my_first_dict and my_second_dict.
Executing this code outputs a merged dictionary:
$ python merging_dicts.py
{'A': 1, 'B': 2, 'C': 3, 'D': 4}
Remember that the * operator works on any iterable object. It can also be used to unpack a string:
# string_to_list.pya=[*"RealPython"]print(a)In Python, strings are iterable objects, so * will unpack it and place all individual values in a list a:
$ python string_to_list.py
['R', 'e', 'a', 'l', 'P', 'y', 't', 'h', 'o', 'n']
The previous example seems great, but when you work with these operators it’s important to keep in mind the seventh rule of The Zen of Python by Tim Peters: Readability counts.
To see why, consider the following example:
# mysterious_statement.py*a,="RealPython"print(a)There’s the unpacking operator *, followed by a variable, a comma, and an assignment. That’s a lot packed into one line! In fact, this code is no different from the previous example. It just takes the string RealPython and assigns all the items to the new list a, thanks to the unpacking operator *.
The comma after the a does the trick. When you use the unpacking operator with variable assignment, Python requires that your resulting variable is either a list or a tuple. With the trailing comma, you have actually defined a tuple with just one named variable a.
While this is a neat trick, many Pythonistas would not consider this code to be very readable. As such, it’s best to use these kinds of constructions sparingly.
Conclusion
You are now able to use *args and **kwargs to accept a changeable number of arguments in your functions. You have also learned something more about the unpacking operators.
You’ve learned:
- What
*argsand**kwargsactually mean - How to use
*argsand**kwargsin function definitions - How to use a single asterisk (
*) to unpack iterables - How to use two asterisks (
**) to unpack dictionaries
If you still have questions, don’t hesitate to reach out in the comments section below! To learn more about the use of the asterisks in Python, have a look at Trey Hunner’s article on the subject.
[ Improve Your Python With 🐍 Python Tricks 💌 – Get a short & sweet Python Trick delivered to your inbox every couple of days. >> Click here to learn more and see examples ]
↧
Mike Driscoll: Lucid Programming Podcast – Writing Books About Python
I was recently interviewed on the Lucid Programming Podcast by Vincent Russo about writing books about Python.
You can listen to the audio here:
If you’d like to know more about how I write books, you might enjoy this article I wrote on the topic. I also wrote an article on the Pros and Cons of Indy Publishing.
Last week, I was honored to be on the Profitable Python podcast.
Related Podcasts
Other podcasts I have been on:
- Last week, I was honored to be on the Profitable Python podcast.
- Talk Python Episode #156: Python History and Perspectives
- Podcast.__init__ – Mike Driscoll And His Career In Python – Episode 169
The post Lucid Programming Podcast – Writing Books About Python appeared first on The Mouse Vs. The Python.
↧
Python Engineering at Microsoft: Python in Visual Studio Code – September 2019 Release
We are pleased to announce that the September 2019 release of the Python Extension for Visual Studio Code is now available. You can download the Python extension from the Marketplace, or install it directly from the extension gallery in Visual Studio Code. If you already have the Python extension installed, you can also get the latest update by restarting Visual Studio Code. You can learn more about Python support in Visual Studio Code in the documentation.
This was a short release where we closed 35 issues, including improvements to the Python Language Server and to Jupyter Notebook cell debugging, as well as detection of virtual environment creation. The full list of enhancements is listed in our changelog.
Improvements to Python Language Server
The Python Language Server now has linting capabilities, and its latest release includes new linting messages and a variety of additional general improvements, which are listed in the section “Other changes and enhancements” below.
The linting messages provided by the Python Language Server include detecting unresolved imports, undefined variables, too many arguments in a function call, unknown keyword arguments and inheriting from something that is not a class. To see the full detailed list of linting messages, you can check the documentation in the Language Server GitHub repo or the settings reference page within the Python for Visual Studio Code docs.

We’ve also added general #noqa support, so linting messages can be disabled on a case by case basis. Lines with a #noqa comment will have their diagnostic output suppressed. For more information, you can check the documentation.

Improvements to Jupyter Notebook cell debugging
In the August release, we added the ability to debug Jupyter notebook cells where you can step into user code. In this release, this feature is enhanced with the option to also step into non-user code if needed. To enable, open the settings page (File > Preferences > Settings), search for “Data Science: Debug Just My Code” and uncheck the option.

Once the setting is disabled, you’ll be able to step into function calls and, for example, inspect the non-user code behavior and how variables change when it’s being executed.

Detection of virtual environment creation
The Python interpreter displayed on the status bar indicates which environment the Python extension is using for running Python code (using the Python: Run Python File in Terminal command, for example), and to provide language services such as auto-completion, syntax checking, linting, formatting, etc:

In this release, when a new virtual environment is created, a prompt will be displayed asking if you’d like to select its interpreter for the workspace:

This will add the path to the Python interpreter from the new virtual environment to your workspace settings, and therefore that environment will be used when installing packages and running code through the Python extension.
Other Changes and Enhancements
We have also added small enhancements and fixed issues requested by users that should improve your experience working with Python in Visual Studio Code. Some notable changes include:
- Update Jedi to 0.15.1 and parso to 0.5.1. (#6294)
- Bump version of PTVSD to 4.3.2.
- Added a setting to allow Python code to be executed when the interactive window is loading. (#6842)
- Add debug command code lenses when in debug mode. (#6672)
- General Improvements for the Python Language Server:
- Improved handling of generic classes in inheritance chains (#1278)
- Added support for TypeVar bound and generic self (#1242)
- Added support for forward references in type strings (#1186)
- Added goto definition for members in class bases (#1356, #1443)
- Improved assignment handling (#1457, #1494, #411, #1382)
We are continuing to A/B test new features. If you see something different that was not announced by the team, you may be part of an experiment! To see if you are part of an experiment, you can check the first lines in the Python extension output channel. If you wish to opt-out from A/B testing, disable telemetry in Visual Studio Code.
Be sure to download the Python extension for Visual Studio Code now to try out the above improvements. If you run into any problems, please file an issue on the Python VS Code GitHub page.
The post Python in Visual Studio Code – September 2019 Release appeared first on Python.
↧
↧
Talk Python to Me: #228 Hunting bugs and tech startups with Python
What's it's like building a startup with Python and going through a tech accelerator? You're about to find out. On this episode, you'll meet Elissa Shevinsky from Faster Than Light. They are building a static code analysis as a service business for Python and other code bases. We touch on a bunch of fun topics including static code analysis, entrepreneurship, and tech accelerators.
↧
Stack Abuse: Object Detection with ImageAI in Python
Introduction
Object detection is a technology that falls under the broader domain of Computer Vision. It deals with identifying and tracking objects present in images and videos. Object detection has multiple applications such as face detection, vehicle detection, pedestrian counting, self-driving cars, security systems, etc.
The two major objectives of object detection include:
- To identify all objects present in an image
- Filter out the object of attention
In this article, you will see how to perform object detection in Python with the help of the ImageAI library.
Deep Learning for Object Detection
Deep learning techniques have been proven state of the art for various object detection problems. The following are some of the commonly used deep learning approaches for object detection:
In the rest of this article, we will see what exactly ImageAI is and how to use it to perform object detection.
ImageAI
ImageAI is a Python library built to empower developers to build applications and systems with self-contained deep learning and Computer Vision capabilities using a few lines of straight forward code. ImageAI contains a Python implementation of almost all of the state-of-the-art deep learning algorithms like RetinaNet, YOLOv3, and TinyYOLOv3.
ImageAI makes use of several APIs that work offline - it has object detection, video detection, and object tracking APIs that can be called without internet access. ImageAI makes use of a pre-trained model and can easily be customized.
The ObjectDetection class of the ImageAI library contains functions to perform object detection on any image or set of images, using pre-trained models. With ImageAI, you can detect and recognize 80 different kinds of common, everyday objects.
Setting up your Environment
In this part of the tutorial, we will work through the installation of ImageAI.
To use ImageAI you need to install a few dependencies. The first step is to have Python installed on your computer. Download and install Python 3 from the official Python website.
Once you have Python installed on your computer, install the following dependencies using pip:
TensorFlow
$ pip install tensorflow
OpenCV
$ pip install opencv-python
Keras
$ pip install keras
ImageAI
$ pip install imageAI
Now download the TinyYOLOv3 model file that contains the classification model that will be used for object detection.
Performing Object Detection with ImageAI
Now let's see how to actually use the ImageAI library. I'll explain step by step how you can build your first object detection model with ImageAI.
Step 1
Our first task here is to create the necessary folders. For this tutorial we need the following folders:
- Object detection: root folder
- models: stores pre-trained model
- input: stores image file on which we want to perform object detection
- output: stores image file with detected objects
After you have created your folders, your Object detection folder should have the following sub-folders:
├── input
├── models
└── output

3 directories, 0 files
Step 2
Open your preferred text editor for writing Python code and create a new file detector.py.
Step 3
Import ObjectDetection class from the ImageAI library.
from imageai.Detection import ObjectDetection
Step 4
Now that you have imported imageAI library and the ObjectDetection class , the next thing is to create an instance of the class ObjectDetection, as shown here:
detector = ObjectDetection()
Step 5
Let's specify the path from our input image, output image, and model.
model_path = "./models/yolo-tiny.h5"
input_path = "./input/test45.jpg"
output_path = "./output/newimage.jpg"
Step 6
After instantiating the ObjectDetection class we can now call various functions from the class. The class contains the following functions to call pre-trained models: setModelTypeAsRetinaNet(), setModelTypeAsYOLOv3(), and setModelTypeAsTinyYOLOv3().
For the purpose of this tutorial, I'll be using the pre-trained TinyYOLOv3 model, and hence we will use the setModelTypeAsTinyYOLOv3() function to load our model.
detector.setModelTypeAsTinyYOLOv3()
Step 7
Next, we are going to call the function setModelPath(). This function accepts a string which contains the path to the pre-trained model:
detector.setModelPath(model_path)
Step 8
This step calls the function loadModel() from the detector instance. It loads the model from the path specified above using the setModelPath() class method.
detector.loadModel()
Step 9
To detect objects in the image, we need to call the detectObjectsFromImage function using the detector object that we created in the previous section.
This function requires two arguments: input_image and output_image_path. input_image is the path where the image we are detecting is located, while the output_image_path parameter is the path to store the image with detected objects. This function returns a dictionary which contains the names and percentage probabilities of all the objects detected in the image.
detection = detector.detectObjectsFromImage(input_image=input_path, output_image_path=output_path)
Step 10
The dictionary items can be accessed by traversing through each item in the dictionary.
for eachItem in detection:
    print(eachItem["name"] , " : ", eachItem["percentage_probability"])
Complete Code for Object Detection
Here is the complete code for the image detection:
from imageai.Detection import ObjectDetection

detector = ObjectDetection()

model_path = "./models/yolo-tiny.h5"
input_path = "./input/test45.jpg"
output_path = "./output/newimage.jpg"

detector.setModelTypeAsTinyYOLOv3()
detector.setModelPath(model_path)
detector.loadModel()
detection = detector.detectObjectsFromImage(input_image=input_path, output_image_path=output_path)

for eachItem in detection:
    print(eachItem["name"] , " : ", eachItem["percentage_probability"])
In the output, you can see the name of each detected object along with its percentage probability as shown below:
Output
car  :  54.72719073295593
car  :  58.94589424133301
car  :  62.59384751319885
car  :  74.07448291778564
car  :  91.10507369041443
car  :  97.26507663726807
car  :  97.55765795707703
person  :  53.6459743976593
person  :  56.59831762313843
person  :  72.28181958198547
Original image:
The original image, i.e. "test45", looked like this:

Image with Object Detection:
After the object detection, the resulting image looks like this:

You can see that ImageAI has successfully identified cars and persons in the image.
Conclusion
Object detection is one of the most common computer vision tasks. This article explains how to perform object detection in Python using the ImageAI library with the help of an example.
References
↧
ListenData: A Complete Guide to Python DateTime Functions
In this tutorial, we will cover python datetime module and how it is used to handle date, time and datetime formatted columns (variables). It includes various practical examples which would help you to gain confidence in dealing dates and times with python functions. In general, Date types columns are not easy to manipulate as it comes with a lot of challenges like dealing with leap years, different number of days in a month, different date and time formats or if date values are stored in string (character) format etc.
![datetime python with examples]()
READ MORE »
Table of Contents
Introduction : datetime module
It is a python module which provides several functions for dealing with dates and time. It has four classes as follows which are explained in the latter part of this article how these classes work.- datetime
- date
- time
- timedelta

People who have no experience of working with real-world datasets might have not encountered date columns. They might be under impression that working with dates is rarely used and not so important. To enlighten them, I have listed down real-world examples wherein using datetime module can be beneficial.
- Selecting all the saving account holders who were active on 30th June, 2018 and checking their status whether they are still active
- Identifying insureds who filed more than 20 claims in the last 3 months
- Identifying customers who made multiple transactions in the last 6 months
- Extracting dates from timestamp values
Import datetime module
You can import or load datetime module by using the command below - import datetimeYou don't need to install this module as it comes bundled with the installation of python software.
Dates
Here we are usingdatetime.date class which is used to represent calendar date values. today() method is used to fetch current date. datetime.date.today()In order to display it like a proper calendar date, we can wrap it within
Output
datetime.date(2019, 7, 19)
print( ) command.
print(datetime.date.today())

Output
2019-07-19
↧