I've just published a Jupyter Notebook I used to present an introduction to the excellent Python attrs package at the November 2018 Christchurch Python meetup.
You can find it on Github.
I've just published a Jupyter Notebook I used to present an introduction to the excellent Python attrs package at the November 2018 Christchurch Python meetup.
You can find it on Github.
Another alpha of Coverage.py 5.0 is available: 5.0a4. This fixes a few problems with the new SQLite-based storage. Please give it a try, especially to experiment with dynamic contexts.
The challenge with this release was something that started as a seemingly simple fix. Coverage.py tries to emulate how Python runs programs, including how the first element of sys.path is set. A few people run coverage with sys.path fully configured, and coverage’s setting of sys.path[0] was breaking their stuff.
The proposal was simple: delete the one line of code that set sys.path[0]. I tried that, and it seemed to work. Fixed!
Not so fast: the Windows builds failed. This started a multi-week adventure of debugging and refactoring. The Windows builds were failing not because of Windows itself, but because on Windows, I don’t use pytest-xdist, which parallelizes tests into worker processes. With xdist, the tests were all passing. Without xdist, a few sys.path-related tests were failing.
It turns out that xdist manipulates sys.path itself, which was masking the fact that I had removed an important step from coverage.py. First thing to do was to adjust my test code so that even with xdist, my tests didn’t get xdist’s path changes.
Then I had to re-think how to adjust sys.path. That required refactoring how I ran the user’s Python code, so that I could apply the path changes a little earlier than I used to. That made me look at how I was testing that layer of code with mocks, and I changed it from explicit dependency injection to implicit mock patching.
A few more little fixes were needed here and there along the way. All told, the “one line” fix ended up being 14 files changed, 587 insertions, 427 deletions.
Digital books are convenient and useful ways to have easy access to large volumes of information. Unfortunately, keeping track of them all can be difficult as you gain more books from different sources. Keeping your reading device synchronized with the material that you want to read is also challenging. In this episode Kovid Goyal explains how he created the Calibre digital library manager to solve these problems for himself, how it grew to be the most popular application for organizing ebooks, and how it works under the covers. Calibre is an incredibly useful piece of software with a lot of hidden complexity and a great story behind it.
The intro and outro music is from Requiem for a Fish The Freak Fandango Orchestra / CC BY-SA
Paul talks about the beginning years of Python.
Talking about Python's beginnings is also talking about the Python community beginnings.
Yes, it's reminiscing, but it's fun.
Special Guest: Paul Everitt.
Sponsored By:
Links:
<p>Paul talks about the beginning years of Python.<br> Talking about Python's beginnings is also talking about the Python community beginnings.<br> Yes, it's reminiscing, but it's fun.</p><p>Special Guest: Paul Everitt.</p><p>Sponsored By:</p><ul><li><a rel="nofollow" href="https://do.co/testandcode">DigitalOcean</a>: <a rel="nofollow" href="https://do.co/testandcode">Get started with a free $100 credit toward your first project on DigitalOcean and experience everything the platform has to offer, such as: cloud firewalls, real-time monitoring and alerts, global datacenters, object storage, and the best support anywhere. Claim your credit today at: do.co/testandcode</a></li></ul><p><a rel="payment" href="https://www.patreon.com/testpodcast">Support Test and Code</a></p><p>Links:</p><ul><li><a title="Python 1994 Panel Discussion PyCon 2017" rel="nofollow" href="https://www.youtube.com/watch?v=iOUrf7WSSLc">Python 1994 Panel Discussion PyCon 2017</a></li><li><a title=""Python 1994", PyBay2017" rel="nofollow" href="https://www.youtube.com/watch?v=7NrPCsH0mBU">"Python 1994", PyBay2017</a></li><li><a title="Spam, Spam, Spam, ..." rel="nofollow" href="https://www.youtube.com/watch?v=anwy2MPT5RE">Spam, Spam, Spam, ...</a></li></ul>This week we welcome Reimar Bauer (@ReimarBauer) as our PyDev of the Week! Reimar is a core developer of the popular Python wiki package, MoinMoin. He has spoken at PyCON DE, FOSDEM and EuroPython about Python. Let’s take a few minutes to get to know him better!
Can you tell us a little about yourself (hobbies, education, etc):
I am a programmer from Jülich, Germany. That‘s a small town between Aachen and Cologne.
I work at the Forschungszentrum Jülich GmbH. Employees research in the fields of energy and the environment, information and brain research with the aim of providing society with options for action facilitating sustainable development.
My work is related to atmospheric science.
I wrote a few books in the past years about data structures and about IDL, one of my first science related programming languages, developed by Ray Sterner in Boulder, Colorado.
In 2012 I was elected to the board of the German Python Software Verband. I helped to organize several Python Events in Germany, several PyConDE and the famous EuroPython in Berlin. I stepped down from this position and I left in 2017 because I needed and wanted to spend more time with my family.
I have been a fellow of the Python Software Foundation since 2013.
I used to play trombone in a Big Band, but had to take a break because I just couldn’t find the time this hobby needs. I enjoy sightseeing, hiking, sociocracy3.0, meeting a lot of different people. And sometimes I play an augmented reality game named ingress.
In 2019 the 10th PythonCamp Cologne Germany, a classic barcamp, will be the next community project Reimar Bauer is involved in.
Why did you start using Python?
It was because of the MoinMoin Software. I had an idea. I wanted to have a Gantt chart view in MoinMoin.
I got all help needed doing that, and learned to use IRC ;), too, and had a start into the Python Open Source World. In 2003 I used 1.5.2 . Later I wrote many plugins for MoinMoin and a description with examples about the API.
What other programming languages do you know and which is your favorite?
I have only one favorite, and that‘s Python. It also plays a role what my colleagues need for their work. I still maintain a large IDL library, but since development froze about 2013, we moved on to Python. I also know Fortran, but stopped using it.
What projects are you working on now?
Since 2016 I have been maintaining and developing the Mission Support System. This project is completely open source, Apache 2.0 licenses. This software is used to interactively plan aircraft missions for atmospheric science.
Because of the project I also have become a maintainer for an amount of conda-forge feed-stocks. And because of my love for pyfilesystem2, I started a qt5 file picker.
Which Python libraries are your favorite (core or 3rd party)?
Pyfilesystem2:
Work with files and directories in archives, memory, the cloud etc. as easily as your local drive. Write code now, decide later where the data will be stored; unit test without writing real files; upload files to the cloud without learning a new API; sandbox your file writing code; etc.
https://pyfilesystem2.readthedocs.io/en/latest/
requests: http for humans
http://docs.python-requests.org/en/master/
netcdf4:
NetCDF is a set of software libraries and self-describing, machine-independent data formats that support the creation, access, and sharing of array-oriented scientific data.
http://unidata.github.io/netcdf4-python/
borgbackup:
Borgbackup is a de-duplicating backup program. Optionally, it supports compression and authenticated encryption.
http://borgbackup.readthedocs.io/en/stable/
Which Python communities do you want to mention?
The German Python Software Verband, which is focused on the PyConDE and the EuroSciPy conference series but also supports a lot of smaller communities similar to the PSF.
The Euro Python Society, which is focused on the EuroPython conference
The Python Software Foundation– the organisation which over years tied everything together. Organizes the Pycon US and also helps smaller communities with grants.
Thanks to all of you for your time, and for doing such a great job!
What made you decide to work on the MoinMoin project?
The community: Helpful, warm and welcoming folks. I continued working on it because we were able to use MoinMoin as project wiki on any of our measurement campaigns for our institute. There we have to show model forecast data, manage pages with different access rules, provide a lot information to participants. Another use case is to create sphinx latex documents from reST formatted wiki pages.
Can you tell us some of the things you learned as a dev on MoinMoin?
I learned about a lot of tools, how to write proper unit tests, web server options; I learned from bugs, too. I also enjoyed new contacts to communities. Also the time as mentor for students during google summer of code was a great time. We were at the bleeding edge and solved a lot browser based issues or at least found a way to bypass them.
Would you do anything differently if you were able to start over from scratch?
We started with moin-2. But got stuck. A reason may be the unique selling point of wiki itselfs is wide spread meanwhile. Also many comparable tools exist, and many developers who just want to stabilize some project are not that interested in this kind of software mechanism. There are just too many options for this nowadays. As we have already spent much time replacing a lot of our self made model and views in moin-2, I would prefer to finish this.
We currently reunite devs and also build a new core team.
If you like to join us, feel free to get in contact https://mail.python.org/mailman/listinfo/moin-devel
Thanks for doing the interview, Reimar!
For the last couple of months, the SecureDrop team is working on a new set of applications + system for the journalists, which are based on Qubes OS, and desktop application written particularly for Qubes. A major portion of the work is on the Qubes OS part, where we are setting up the right templateVMs and AppVMs on top of those templateVMs, setting up the qrexec services and right configuration to allow/deny services as required.
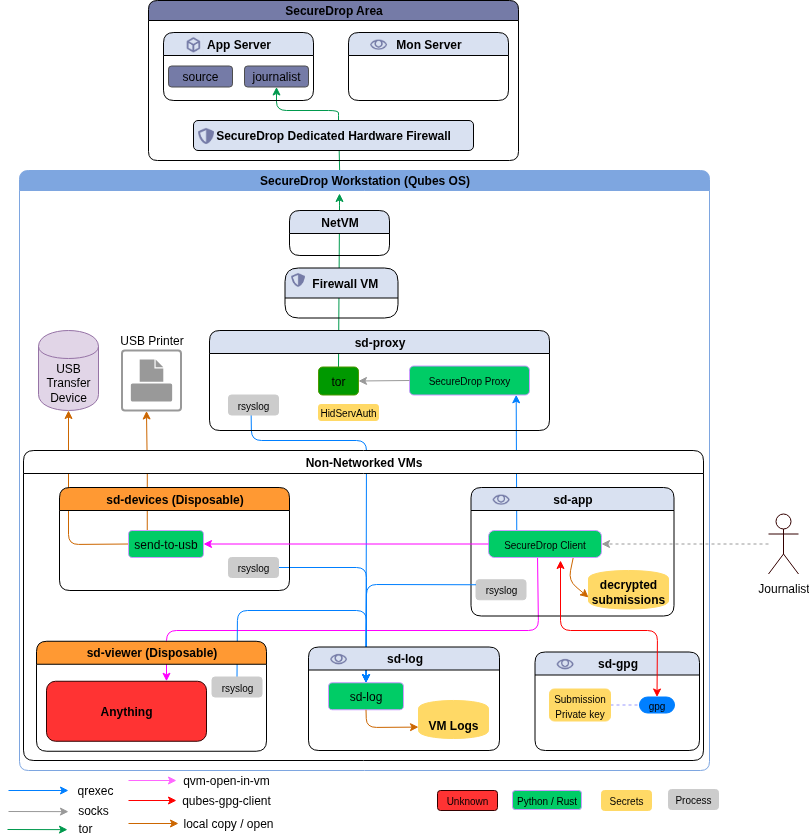
The other major work was to develop a proxy service (on top of Qubes qrexec service) which will allow our desktop application (written in PyQt) to talk to a SecureDrop server. This part finally gets into two different Debian packages.
The legacy way of building SecureDrop server side has many steps and also installs wheels into the main Python site-packages. Which is something we plan to remove in future. While discussing about this during PyCon this year, Donald Stufft suggested to use dh-virtualenv. It allows to package a virtualenv for the application along with the actual application code into a Debian pacakge.
We use pipenv for the development of the projects. pipenv lock -r can create
a requirements.txt, but, it does not content any sha256sums. We also wanted to
make sure that doing these steps become much easier. We have added a makefile
target
in our new packaging repo, which will first create the standard
requirements.txt and then it will try to find the corresponding binary wheel
sha256sums from a list of
wheels+sha256sums,
and before anything else, it
verifies
the list (signed with developers’ gpg keys).
PKG_DIR=~/code/securedrop-proxy make requirements
If it finds any missing wheels (say new dependency or updated package version),
it informs the developer, the developer then can use another makefile target
to build the new wheels, the new wheels+sources do get synced to our simple
index hosted on s3. The hashes of the wheels+sources also get signed and
committed into the repository. Then, the developer retries to create the
requirements.txt for the project.
We also have makefile targets to build the Debian package.
It
actually creates a directory structure (only in parts) like rpmbuild does in home directory,
and then copies over the source tarball, untars, copies the debian directory
from the packaging repository, and then reverifies each hashes in the project
requirements file with the current signed (and also verified) list of hashes. If
everything looks good, then it goes to build the final Debian package. This happens by the
following environment variable exported in the above mention script.
DH_PIP_EXTRA_ARGS="--no-cache-dir --require-hashes"
Our debian/rules files make sure that we use our own packaging index for building the Debian package.
#!/usr/bin/make -f

%:
	dh $@ --with python-virtualenv --python /usr/bin/python3.5 --setuptools --index-url https://dev-bin.ops.securedrop.org/simple
For example, the following command will build the package securedrop-proxy version 0.0.1.
PKG_PATH=~/code/securedrop-proxy/dist/securedrop-proxy-0.0.1.tar.gz PKG_VERSION=0.0.1 make securedrop-proxy
The following image describes the whole process.
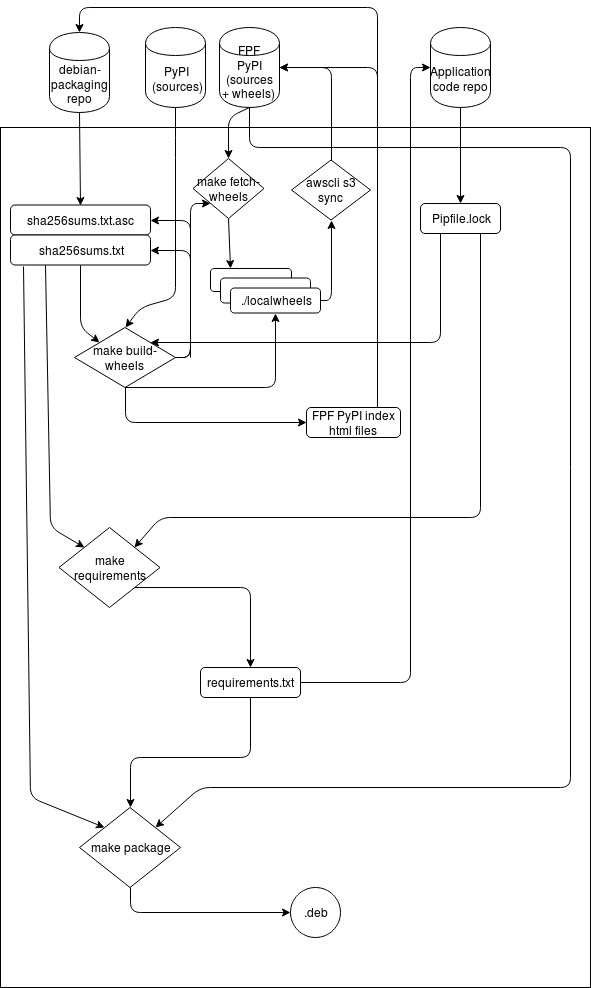
We would love to get your feedback and any suggestions to improve the whole process. Feel free to comment in this post, or by creating issues in the corresponding Github project.
In this article we will create an explosion manager as well as an explosion class to manage the on scene explosions but first of all lets watch the raw video below which shows the explosions on the game scene. http://gamingdirectional.com/wp-content/uploads/2018/11/2018-11-26-at-14-49-02.mp4 Before we create the above classes, we will create one single explosion sprite sheet which contains many...
Mu is not a solo effort. Many folks have contributed to Mu, and I will be eternally grateful for their work. With the spirit of recognising the voluntary contributions of others in mind, I’m going to write about some of our most prodigious programmers. First up is Zander Brown.

Zander, like Top Gear’s the Stig, is a bit of a mystery.
Until recently, nobody had ever met him in real life, and all interactions with Zander were via copious GitHub comments, pull requests and bug fixes.
Some said he was an alien being from another dimension, others claimed him to be a rogue artificial intellegince running rampant in random Git repositories, yet more people whispered in hushed tones that he was merely a pseudonym for Bill Gates, coming out of retirement to contribute to free software projects.
All I can say is that I’m thankful for his considerable contributions to Mu’s code base, eagle-eyed code reviews and seemingly limitless Pythonic knowledge.
Actually, when I met Zander for the first time in July, it turned out he’s a 17 year-old studying for his A-levels (the exams teenagers sit in the UK to help them to get into university). He’s doing A-levels in Maths, Physics and Computer Science. He’s third from the left in the picture below:

I want to bring your attention to how wonderful this is ~ we have several related things going on:
I recently asked Zander how he got into Mu. His reply was interesting in that he typed “micro:bit Python” into a search engine after his school had some of the early versions of the device delivered to teachers.
The head of department got the blue one, the other CS teacher had the green, leaving the yellow spare and the rest, as they say, is history…
He started coding with MSWLogo but has, more recently discovered Python and started making contributions to various open source projects:
It’s nice to work on things that help others be that the developer (fix this, add that) or the users (CS teachers!)
Recently I’ve been contributing the GNOME which has the ‘coolness’ that you are in country A working with person in country B to make something that’ll be used in A, B, C & D but also being a tad ‘meta’ when you’re fixing a bug older than you.
Right now, I feel very very old. :-)
How does he find working on Mu?
Great fun, first & only time i’ve met in person with others working on a project and the T-shirt isn’t bad either :-)
Been nice to play on a range of things within the same project from fighting QSS to walking the python syntax tree whilst knowing people are using it in the real world (TAA just switched form GCSE Java to Python so Mu is now used with the lower years)
(When we released Mu 1.0 I made sure all of the major contributors and friends of Mu got t-shirts to celebrate. Thanks to my hugely talented friend Steve Hawkes, Zander got a t-shirt with the “Stig” avatar shown at the top of this post.)
Zander, thank you for your continued contributions and best of luck with your studies (he wants to go on to study Computer Science at university). I have no doubt that wherever you end up studying will soon learn how fortunate they are to have such a talented student as you.
:-)
 Today (Monday) is the last day to benefit from my weekend sale, with 40% off of my books and courses! Just enter the coupon code “BF2018” for any product , and take 40% off.
This offer includes my new “Intro Python: Fundamentals” course, containing the 1st day of the 4-day training I give to experienced developers around the world.
Here are the courses I’m currently offering:
Any questions? Just e-mail me at reuven@lerner.co.il. But don’t delay; today’s the last day to take advantage of this sale!
The post Last chance to save 40% on Python and Git courses appeared first on Lerner Consulting Blog.

One of the contracts I’ve been working on recently is working with Gurock building a test automation system for a PHP application, their test management app TestRail. As well as building the instrastructure for the application testing and the API testing I’ve once again been involved in the nitty-gritty of testing a web application with Selenium and all the fun that involved.
And actually it has been fun. We’ve had a bunch of issues to overcome and despite the usual pain and trauma and running round in circles we seem to have overcome most of them and have a test suite that is robust against the three different platforms we’re testing against.
For those who don’t know Selenium WebDriver interface allows you to connect your Python tests, or just about any language you care to choose, and test you web application as a “black box” - interacting with it in the same way as your users do. These are “functional tests”, as opposed to unit tests”, that tests the whole application as a whole meets its specifications and rquirements. As will all testing you can’t guarantee that it makes your applcation bug-free, but you can eleminiate whole classes of bugs and gurarantee a minimum level of application quality.
This application is written in PHP, but we’re using Python, py.test and Selenium to automate the tests and the front end is built with jQuery. There are various fun aspects of testing this app that we’ve encountered. A couple of these stem from the fact that like any modern any web application much of the UI updates are done from AJAX calls. This means that there’s no global page state ready event to wait for to know that load has finished and the page is ready to interact with.
One of the plugins in use is the BlockUI plugin. This puts a semi-opaque overlay over the user interface in the browser whilst asynchronous AJAX requests are being made, to prevent other elements of the user interface being interacted with. As the request is an asynchronous one the browser isn’t blocked so our Selenium tests don’t know that the user interface is blocked and it should wait before attempting any more interactions. This causes tests to fail with the dreaded error:
Exception in thread "main" org.openqa.selenium.WebDriverException: unknown error: Element <input type="button" class="btn btn-default" data-toggle="modal" data-target="#adduser" data-localize="adduser" value="Add user"> is not clickable at point (1397, 97). Other element would receive the click: <div class="blockUI blockOverlay" style="z-index: 1000; border: none; margin: 0px; padding: 0px; width: 100%; height: 100%; top: 0px; left: 0px; background-color: rgb(0, 0, 0); cursor: wait; position: absolute; opacity: 0.304712;"></div>
The dreaded part is specifically is not clickable at point (1397, 97). Other element would receive the click: <div class="blockUI blockOverlay".
The “blockUI” element is intercepting the click because the AJAX request is not completed, or more to the point ablockUI element is intercepting it. The normal way round this would be to find the “blockU” element and wait for it to no longer be displayed. Unfortunately there’s more than one of them! So this is the code we came up with to wait until none of them are displayed:
fromselenium.common.exceptionsimportStaleElementReferenceExceptionfromselenium.webdriver.common.byimportByclassGeneralLocators:blockUI=(By.CLASS_NAME,"blockUI")busy=(By.CLASS_NAME,"busy")defany_elements_displayed(elements):forelementinelements:try:ifelement.is_displayed():returnTrueexceptStaleElementReferenceException:passreturnFalseclassBasePageElement(object):defwait_for_blockui_to_close(self,seconds=5):self.driver.implicitly_wait(0)try:stop=time.time()+secondswhiletime.time()<stop:blockUIs=self.driver.find_elements(*GeneralLocators.blockUI)ifnotany_elements_displayed(blockUIs):returntime.sleep(0.1)raiseTimeoutException("Timed out waiting for blockUI to go away")finally:self.driver.implicitly_wait(10)We have a similar problem with AJAX elements that don’t block the page, but take several seconds to update, showing a busy indiciator whilst they’re updating. Again, we need to wait for the busy indicators to complete before we ineract with any of the elements. Thanksfully that is similarly easy. Note that we set the global implicitly_wait timeout to zero whilst we’re checking.
defwait_until_not_busy(self,seconds=5):self.driver.implicitly_wait(0)try:stop=time.time()+secondswhiletime.time()<stop:busy=self.driver.find_elements(*GeneralLocators.busy)ifnotany_elements_displayed(busy):returntime.sleep(0.1)raiseTimeoutException("Timed out waiting to not be busy")finally:self.driver.implicitly_wait(10)It’s well worth noting that with the selenium library in Python, the implicitly_wait value is a global. Setting it anywhere sets it for the rest of the session.
We put all the element locators into classes, like GeneralLocators so that as locators change (inevitable in an evolving user interface) there is only one place to change the locators rather than having them scattered through out our code.
Here’s a few more tricks and trips we’ve discovered along the way. Whilst text boxes have a nice and straightforward .clear() method to clear existing text in them, this dioesn’;t work with a textarea (which confusingly enough has a .clear() method which apppears to do nothing. The right way to clear to a text box is to send a CTRL-A followed by a backspace:
# CTRL-A plus BACKSPACE are needed for selenium to clear the textarea as .clear() doesn't work.self.send_keys_to_element(CustomizationsLocators.add_custom_field_description,Keys.CONTROL+"a")self.send_keys_to_element(CustomizationsLocators.add_custom_field_description,Keys.BACKSPACE)If you want to provide a command line option to run the tests with a headless browser, this little function (firefox only) will do the trick. You could further customize is to switch between browers:
importpytestfromseleniumimportwebdriverfromselenium.webdriver.firefox.optionsimportOptionsdefget_driver():options=Options()ifpytest.config.getoption('headless'):options.headless=Truereturnwebdriver.Firefox(options=options)And these final two are interesting. Uploading files with Selenium. Because the file upload dialog is a native dialog it’s very hard to interact with Selenium (impossible I thin.). However it does come along with a hidden input field that you can enter file paths directly to. So for a normal file dialog this works fine:
    from selenium.webdriver.common.by import By
    file_inputs = driver.find_elements(By.CSS_SELECTOR, 'input.dz-hidden-input')
    input_element = file_inputs[input_index]
    driver.execute_script('arguments[0].style = ""; arguments[0].style.display = "block"; arguments[0].style.visibility = "visible";', input_element)
    time.sleep(0.1)
    input_element.send_keys(filename)
So long as you know, or work out by trial and error, which file input dialog to send the input to it will work fine. The useful thing is that it exposes all the hidden file inputs in the user interace so you can see what you’re interacting with.
This still unfortunately doesn’t work for file uploads by dropzone, some kind of javascript extension. For this you need to base64 encode the file yourself and attach it to the dropzone. Made all the more interesting by the fact that the driver.execute_script api will only take a single line of input. Still, it works!! As horrible as it is, this works!! It takes the base64 encoded version of the file and attaches it to the dropzone element as sa blob, with the filename attached as metadata.
defadd_dropzone_attachment(self,locator,attachment_path):filename=os.path.basename(attachment_path)withopen(attachment_path,'rb')asf:content=f.read()content=base64.b64encode(content).decode('ascii')script=("var myZone, blob, base64Image; myZone = Dropzone.forElement('{}');""base64content = '{}';""function base64toBlob(r,e,n)var c=new Blob(a,);return c}}""blob = base64toBlob(base64content, 'image/png');""blob.name = '{}';""myZone.addFile(blob);").format(locator,content,filename)self.driver.execute_script(script)The locator is the locator of the dropzone area itself, usually something like #attachmentDropzone.
Hopefully all this painfully won information proves useful to someone!
When writing code on your own, the only priority is making it work. However, working in a team of professional software developers brings a plethora of challenges. One of those challenges is coordinating many people working on the same code.
How do professional teams make dozens of changes per day while making sure everyone is coordinated and nothing is broken? Enter continuous integration!
In this tutorial you’ll:
Free Bonus:5 Thoughts On Python Mastery, a free course for Python developers that shows you the roadmap and the mindset you'll need to take your Python skills to the next level.
Continuous integration (CI) is the practice of frequently building and testing each change done to your code automatically and as early as possible. Prolific developer and author Martin Fowler defines CI as follows:
“Continuous Integration is a software development practice where members of a team integrate their work frequently, usually each person integrates at least daily - leading to multiple integrations per day. Each integration is verified by an automated build (including test) to detect integration errors as quickly as possible.” (Source)
Let’s unpack this.
Programming is iterative. The source code lives in a repository that is shared by all members of the team. If you want to work on that product, you must obtain a copy. You will make changes, test them, and integrate them back into the main repo. Rinse and repeat.
Not so long ago, these integrations were big and weeks (or months) apart, causing headaches, wasting time, and losing money. Armed with experience, developers started making minor changes and integrating them more frequently. This reduces the chances of introducing conflicts that you need to resolve later.
After every integration, you need to build the source code. Building means transforming your high-level code into a format your computer knows how to run. Finally, the result is systematically tested to ensure your changes did not introduce errors.
On a personal level, continuous integration is really about how you and your colleagues spend your time.
Using CI, you’ll spend less time:
Conversely, you’ll spend more time:
How does that sound?
On a team level, it allows for a better engineering culture, where you deliver value early and often. Collaboration is encouraged, and bugs are caught much sooner. Continuous integration will:
There are several key ideas and practices that you need to understand to work effectively with continuous integration. Also, there might be some words and phrases you aren’t familiar with but are used often when you’re talking about CI. This chapter will introduce you to these concepts and the jargon that comes with them.
If you are collaborating with others on a single code base, it’s typical to have a shared repository of source code. Every developer working on the project creates a local copy and makes changes. Once they are satisfied with the changes, they merge them back into the central repository.
It has become a standard to use version control systems (VCS) like Git to handle this workflow for you. Teams typically use an external service to host their source code and handle all the moving parts. The most popular are GitHub, BitBucket, and GitLab.
Git allows you to create multiple branches of a repository. Each branch is an independent copy of the source code and can be modified without affecting other branches. This is an essential feature, and most teams have a mainline branch (often called a master branch) that represents the current state of the project.
If you want to add or modify code, you should create a copy of the main branch and work in your new, development branch. Once you are done, merge those changes back into the master branch.
Version control holds more than just code. Documentation and test scripts are usually stored along with the source code. Some programs look for external files used to configure their parameters and initial settings. Other applications need a database schema. All these files should go into your repository.
If you have never used Git or need a refresher, check out our Introduction to Git and GitHub for Python Developers.
As previously mentioned, building your code means taking the raw source code, and everything necessary for its execution, and translating it into a format that computers can run directly. Python is an interpreted language, so its “build” mainly revolves around test execution rather than compilation.
Running those steps manually after every small change is tedious and takes valuable time and attention from the actual problem-solving you’re trying to do. A big part of continuous integration is automating that process and moving it out of sight (and out of mind).
What does that mean for Python? Think about a more complicated piece of code you have written. If you used a library, package, or framework that doesn’t come with the Python standard library (think anything you needed to install with pip or conda), Python needs to know about that, so the program knows where to look when it finds commands that it doesn’t recognize.
You store a list of those packages in requirements.txt or a Pipfile. These are the dependencies of your code and are necessary for a successful build.
You will often hear the phrase “breaking the build.” When you break the build, it means you introduced a change that rendered the final product unusable. Don’t worry. It happens to everyone, even battle-hardened senior developers. You want to avoid this primarily because it will block everyone else from working.
The whole point of CI is to have everyone working on a known stable base. If they clone a repository that is breaking the build, they will work with a broken version of the code and won’t be able to introduce or test their changes. When you break the build, the top priority is fixing it so everyone can resume work.
When the build is automated, you are encouraged to commit frequently, usually multiple times per day. It allows people to quickly find out about changes and notice if there’s a conflict between two developers. If there are numerous small changes instead of a few massive updates, it’s much easier to locate where the error originated. It will also encourage you to break your work down into smaller chunks, which is easier to track and test.
Since everyone is committing changes multiple times per day, it’s important to know that your change didn’t break anything else in the code or introduce bugs. In many companies, testing is now a responsibility of every developer. If you write code, you should write tests. At a bare minimum, you should cover every new function with a unit test.
Running tests automatically, with every change committed, is a great way to catch bugs. A failing test automatically causes the build to fail. It will draw your attention to the problems revealed by testing, and the failed build will make you fix the bug you introduced. Tests don’t guarantee that your code is free of bugs, but it does guard against a lot of careless changes.
Automating test execution gives you some peace of mind because you know the server will test your code every time you commit, even if you forgot to do it locally.
If something works on your computer, will it work on every computer? Probably not. It’s a cliché excuse and a sort of inside joke among developers to say, “Well, it worked on my machine!” Making the code work locally is not the end of your responsibility.
To tackle this problem, most companies use an external service to handle integration, much like using GitHub for hosting your source code repository. External services have servers where they build code and run tests. They act as monitors for your repository and stop anyone from merging to the master branch if their changes break the build.
There are many such services out there, with various features and pricing. Most have a free tier so that you can experiment with one of your repositories. You will use a service called CircleCI in an example later in the tutorial.
A production environment is where your software will ultimately run. Even after successfully building and testing your application, you can’t be sure that your code will work on the target computer. That’s why teams deploy the final product in an environment that mimics the production environment. Once you are sure everything works, the application is deployed in the production environment.
Note: This step is more relevant to application code than library code. Any Python libraries you write still need to be tested on a build server, to ensure they work in environments different from your local computer.
You will hear people talking about this clone of the production environment using terms like development environment, staging environment, or testing environment. It’s common to use abbreviations like DEV for the development environment and PROD for the production environment.
The development environment should replicate production conditions as closely as possible. This setup is often called DEV/PROD parity. Keep the environment on your local computer as similar as possible to the DEV and PROD environments to minimize anomalies when deploying applications.
We mention this to introduce you to the vocabulary, but continuously deploying software to DEV and PROD is a whole other topic. The process is called, unsurprisingly, continuous deployment (CD). You can find more resources about it in the Next Steps section of this article.
The best way to learn is by doing. You now understand all the essential practices of continuous integration, so it’s time to get your hands dirty and create the whole chain of steps necessary to use CI. This chain is often called a CI pipeline.
This is a hands-on tutorial, so fire up your editor and get ready to work through these steps as you read!
We assume that you know the basics of Python and Git. We will use Github as our hosting service and CircleCI as our external continuous integration service. If you don’t have accounts with these services, go ahead and register. Both of these have free tiers!
Remember, your focus here is adding a new tool to your utility belt, continuous integration. For this example, the Python code itself will be straightforward. You want to spend the bulk of your time internalizing the steps of building a pipeline, instead of writing complicated code.
Imagine your team is working on a simple calculator app. Your task is to write a library of basic mathematical functions: addition, subtraction, multiplication, and division. You don’t care about the actual application, because that’s what your peers will be developing, using functions from your library.
Log in to your GitHub account, create a new repository and call it CalculatorLibrary. Add a README and .gitignore, then clone the repository to your local machine. If you need more help with this process, have a look at GitHub’s walkthrough on creating a new repository.
For others (and the CI server) to replicate your working conditions, you need to set up an environment. Create a virtual environment somewhere outside your repo and activate it:
$# Create virtual environment$ python3 -m venv calculator

$# Activate virtual environment (Mac and Linux)$ . calculator/bin/activate
The previous commands work on macOS and Linux. If you are a Windows user, check the Platforms table in the official documentation. This will create a directory that contains a Python installation and tell the interpreter to use it. Now we can install packages knowing that it will not influence your system’s default Python installation.
Create a new file called calculator.py in the top-level directory of your repository, and copy the following code:
"""Calculator library containing basic math operations."""defadd(first_term,second_term):returnfirst_term+second_termdefsubtract(first_term,second_term):returnfirst_term-second_termThis is a bare-bones example containing two of the four functions we will be writing. Once we have our CI pipeline up and running, you will add the remaining two functions.
Go ahead and commit those changes:
$# Make sure you are in the correct directory$cd CalculatorLibrary
$ git add calculator.py
$ git commit -m "Add functions for addition and subtraction"
Your CalculatorLibrary folder should have the following files right now:
CalculatorLibrary/
|
├── .git
├── .gitignore
├── README.md
└── calculator.py
Great, you have completed one part of the required functionality. The next step is adding tests to make sure your code works the way it’s supposed to.
You will test your code in two steps.
The first step involves linting—running a program, called a linter, to analyze code for potential errors. flake8 is commonly used to check if your code conforms to the standard Python coding style. Linting makes sure your code is easy to read for the rest of the Python community.
The second step is unit testing. A unit test is designed to check a single function, or unit, of code. Python comes with a standard unit testing library, but other libraries exist and are very popular. This example uses pytest.
A standard practice that goes hand in hand with testing is calculating code coverage. Code coverage is the percentage of source code that is “covered” by your tests. pytest has an extension, pytest-cov, that helps you understand your code coverage.
These are external dependencies, and you need to install them:
$ pip install flake8 pytest pytest-cov
These are the only external packages you will use. Make sure to store those dependencies in a requirements.txt file so others can replicate your environment:
$ pip freeze > requirements.txt
To run your linter, execute the following:
$ flake8 --statistics
./calculator.py:3:1: E302 expected 2 blank lines, found 1./calculator.py:6:1: E302 expected 2 blank lines, found 12     E302 expected 2 blank lines, found 1
The --statistics option gives you an overview of how many times a particular error happened. Here we have two PEP 8 violations, because flake8 expects two blank lines before a function definition instead of one. Go ahead and add an empty line before each functions definition. Run flake8 again to check that the error messages no longer appear.
Now it’s time to write the tests. Create a file called test_calculator.py in the top-level directory of your repository and copy the following code:
"""Unit tests for the calculator library"""importcalculatorclassTestCalculator:deftest_addition(self):assert4==calculator.add(2,2)deftest_subtraction(self):assert2==calculator.subtract(4,2)These tests make sure that our code works as expected. It is far from extensive because you haven’t tested for potential misuse of your code, but keep it simple for now.
The following command runs your test:
$ pytest -v --cov
collected 2 itemstest_calculator.py::TestCalculator::test_addition PASSED [50%]test_calculator.py::TestCalculator::test_subtraction PASSED [100%]---------- coverage: platform darwin, python 3.6.6-final-0 -----------Name                                              Stmts   Miss  Cover---------------------------------------------------------------------calculator.py                                         4      0   100%test_calculator.py                                    6      0   100%/Users/kristijan.ivancic/code/learn/__init__.py       0      0   100%---------------------------------------------------------------------TOTAL                                                10      0   100%
pytest is excellent at test discovery. Because you have a file with the prefix test, pytest knows it will contain unit tests for it to run. The same principles apply to the class and method names inside the file.
The -v flag gives you a nicer output, telling you which tests passed and which failed. In our case, both tests passed. The --cov flag makes sure pytest-cov runs and gives you a code coverage report for calculator.py.
You have completed the preparations. Commit the test file and push all those changes to the master branch:
$ git add test_calculator.py
$ git commit -m "Add unit tests for calculator"$ git push
At the end of this section, your CalculatorLibrary folder should have the following files:
CalculatorLibrary/
|
├── .git
├── .gitignore
├── README.md
├── calculator.py
├── requirements.txt
└── test_calculator.py
Excellent, both your functions are tested and work correctly.
At last, you are ready to set up your continuous integration pipeline!
CircleCI needs to know how to run your build and expects that information to be supplied in a particular format. It requires a .circleci folder within your repo and a configuration file inside it. A configuration file contains instructions for all the steps that the build server needs to execute. CircleCI expects this file to be called config.yml.
A .yml file uses a data serialization language, YAML, and it has its own specification. The goal of YAML is to be human readable and to work well with modern programming languages for common, everyday tasks.
In a YAML file, there are three basic ways to represent data:
It is very simple to read:
Create the .circleci folder in your repo and a config.yml file with the following content:
# Python CircleCI 2.0 configuration fileversion:2jobs:build:docker:-image:circleci/python:3.7working_directory:~/reposteps:# Step 1: obtain repo from GitHub-checkout# Step 2: create virtual env and install dependencies-run:name:install dependenciescommand:|python3 -m venv venv. venv/bin/activatepip install -r requirements.txt# Step 3: run linter and tests-run:name:run testscommand:|. venv/bin/activateflake8 --exclude=venv* --statisticspytest -v --cov=calculatorSome of these words and concepts might be unfamiliar to you. For example, what is Docker, and what are images? Let’s go back in time a bit.
Remember the problem programmers face when something works on their laptop but nowhere else? Before, developers used to create a program that isolates a part of the computer’s physical resources (memory, hard drive, and so on) and turns them into a virtual machine.
A virtual machine pretends to be a whole computer on its own. It would even have its own operating system. On that operating system, you deploy your application or install your library and test it.
Virtual machines take up a lot of resources, which sparked the invention of containers. The idea is analogous to shipping containers. Before shipping containers were invented, manufacturers had to ship goods in a wide variety of sizes, packaging, and modes (trucks, trains, ships).
By standardizing the shipping container, these goods could be transferred between different shipping methods without any modification. The same idea applies to software containers.
Containers are a lightweight unit of code and its runtime dependencies, packaged in a standardized way, so they can quickly be plugged in and run on the Linux OS. You don’t need to create a whole virtual operating system, as you would with a virtual machine.
Containers only replicate parts of the operating system they need in order to work. This reduces their size and gives them a big performance boost.
Docker is currently the leading container platform, and it’s even able to run Linux containers on Windows and macOS. To create a Docker container, you need a Docker image. Images provide blueprints for containers much like classes provide blueprints for objects. You can read more about Docker in their Get Started guide.
CircleCI maintains pre-built Docker images for several programming languages. In the above configuration file, you have specified a Linux image that has Python already installed. That image will create a container in which everything else happens.
Let’s look at each line of the configuration file in turn:
version: Every config.yml starts with the CircleCI version number, used to issue warnings about breaking changes.
jobs: Jobs represent a single execution of the build and are defined by a collection of steps. If you have only one job, it must be called build.
build: As mentioned before, build is the name of your job. You can have multiple jobs, in which case they need to have unique names.
docker: The steps of a job occur in an environment called an executor. The common executor in CircleCI is a Docker container. It is a cloud-hosted execution environment but other options exist, like a macOS environment.
image: A Docker image is a file used to create a running Docker container. We are using an image that has Python 3.7 preinstalled.
working_directory: Your repository has to be checked out somewhere on the build server. The working directory represents the file path where the repository will be stored.
steps: This key marks the start of a list of steps to be performed by the build server.
checkout: The first step the server needs to do is check the source code out to the working directory. This is performed by a special step called checkout.
run: Executing command-line programs or commands is done inside the command key. The actual shell commands will be nested within.
name: The CircleCI user interface shows you every build step in the form of an expandable section. The title of the section is taken from the value associated with the name key.
command: This key represents the command to run via the shell. The | symbol specifices that what follows is a literal set of commands, one per line, exactly like you’d see in a shell/bash script.
You can read the CircleCI configuration reference document for more information.
Our pipeline is very simple and consists of 3 steps:
We now have everything we need to start our pipeline. Log in to your CircleCI account and click on Add Projects. Find your CalculatorLibrary repo and click Set Up Project. Select Python as your language. Since we already have a config.yml, we can skip the next steps and click Start building.
CircleCI will take you to the execution dashboard for your job. If you followed all the steps correctly, you should see your job succeed.
The final version of your CalculatorLibrary folder should look like this:
CalculatorRepository/
|
├── .circleci
├── .git
├── .gitignore
├── README.md
├── calculator.py
├── requirements.txt
└── test_calculator.py
Congratulations! You have created your first continuous integration pipeline. Now, every time you push to the master branch, a job will be triggered. You can see a list of your current and past jobs by clicking on Jobs in the CircleCI sidebar.
Time to add multiplication to our calculator library.
This time, we will first add a unit test without writing the function. Without the code, the test will fail, which will also fail the CircleCI job. Add the following code to the end of your test_calculator.py:
deftest_multiplication(self):assert100==calculator.multiply(10,10)Push the code to the master branch and see the job fail in CircleCI. This shows that continuous integration works and watches your back if you make a mistake.
Now add the code to calculator.py that will make the test pass:
defmultiply(first_term,second_term):returnfirst_term*second_termMake sure there are two empty spaces between the multiplication function and the previous one, or else your code will fail the linter check.
The job should be successful this time. This workflow of writing a failing test first and then adding the code to pass the test is called test driven development (TDD). It’s a great way to work because it makes you think about your code structure in advance.
Now try it on your own. Add a test for the division function, see it fail, and write the function to make the test pass.
When working on big applications that have a lot of moving parts, it can take a while for the continuous integration job to run. Most teams set up a notification procedure to let them know if one of their jobs fail. They can continue working while waiting for the job to run.
The most popular options are:
By default, CircleCI should send you an email when a job fails.
You have understood the basics of continuous integration and practiced setting up a pipeline for a simple Python program. This is a big step forward in your journey as a developer. You might be asking yourself, “What now?”
To keep things simple, this tutorial skimmed over some big topics. You can grow your skill set immensely by spending some time going more in-depth into each subject. Here are some topics you can look into further.
There is much more to Git than what you used here. Each developer team has a workflow tailored to their specific needs. Most of them include branching strategies and something called peer review. They make changes on branches separate from the master branch. When you want to merge those changes with master, other developers must first look at your changes and approve them before you’re allowed to merge.
Note: If you want to learn more about different workflows teams use, have a look at the tutorials on GitHub and BitBucket.
If you want to sharpen your Git skills, we have an article called Advanced Git Tips for Python Developers.
Apart from virtualenv, there are other popular package and environment managers. Some of them deal with just virtual environments, while some handle both package installation and environment management. One of them is Conda:
“Conda is an open source package management system and environment management system that runs on Windows, macOS, and Linux. Conda quickly installs, runs and updates packages and their dependencies. Conda easily creates, saves, loads and switches between environments on your local computer. It was designed for Python programs, but it can package and distribute software for any language.” (Source)
Another option is Pipenv, a younger contender that is rising in popularity among application developers. Pipenv brings together pip and virtualenv into a single tool and uses a Pipfile instead of requirements.txt. Pipfiles offer deterministic environments and more security. This introduction doesn’t do it justice, so check out Pipenv: A Guide to the New Python Packaging Tool.
Simple unit tests with pytest are only the tip of the iceberg. There’s a whole world out there to explore! Software can be tested on many levels, including integration testing, acceptance testing, regression testing, and so forth. To take your knowledge of testing Python code to the next level, head over to Getting Started With Testing in Python.
In this tutorial, you started to build a library of functions for other developers to use in their project. You need to package that library into a format that is easy to distribute and install using, for example pip.
Creating an installable package requires a different layout and some additional files like __init__.py and setup.py. Read Python Application Layouts: A Reference for more information on structuring your code.
To learn how to turn your repository into an installable Python package, read Packaging Python Projects by the Python Packaging Authority.
You covered all the basics of CI in this tutorial, using a simple example of Python code. It’s common for the final step of a CI pipeline to create a deployable artifact. An artifact represents a finished, packaged unit of work that is ready to be deployed to users or included in complex products.
For example, to turn your calculator library into a deployable artifact, you would organize it into an installable package. Finally, you would add a step in CircleCI to package the library and store that artifact where other processes can pick it up.
For more complex applications, you can create a workflow to schedule and connect multiple CI jobs into a single execution. Feel free to explore the CircleCI documentation.
You can think of continuous deployment as an extension of CI. Once your code is tested and built into a deployable artifact, it is deployed to production, meaning the live application is updated with your changes. One of the goals is to minimize lead time, the time elapsed between writing a new line of code and putting it in front of users.
Note: To add a bit of confusion to the mix, the acronym CD is not unique. It can also mean Continuous Delivery, which is almost the same as continuous deployment but has a manual verification step between integration and deployment. You can integrate your code at any time but have to push a button to release it to the live application.
Most companies use CI/CD in tandem, so it’s worth your time to learn more about Continuous Delivery/Deployment.
You have used CircleCI, one of the most popular continuous integration services. However, this is a big market with a lot of strong contenders. CI products fall into two basic categories: remote and self-hosted services.
Jenkins is the most popular self-hosted solution. It is open-source and flexible, and the community has developed a lot of extensions.
In terms of remote services, there are many popular options like TravisCI, CodeShip, and Semaphore. Big enterprises often have their custom solutions, and they sell them as a service, such as AWS CodePipeline, Microsoft Team Foundation Server, and Oracle’s Hudson.
Which option you choose depends on the platform and features you and your team need. For a more detailed breakdown, have a look at Best CI Software by G2Crowd.
With the knowledge from this tutorial under your belt, you can now answer the following questions:
You have acquired a programming superpower! Understanding the philosophy and practice of continuous integration will make you a valuable member of any team. Awesome work!
[ Improve Your Python With 🐍 Python Tricks 💌 – Get a short & sweet Python Trick delivered to your inbox every couple of days. >> Click here to learn more and see examples ]
A couple weeks ago I gave a talk about usernames at North Bay Python. The content came mostly from things I’ve learned in roughly 12 years of maintaining django-registration, which has taught me more than I ever wanted to know about how complex even “simple” things can be.
I mentioned toward the beginning of the talk, though, that it wasn’t going to be one of those “falsehoods programmers believe about X” things. If you’re not ...
In this tutorial we will learn how to work with comma separated (CSV) files in Python and Pandas. We will get an overview of how to use Pandas to load CSV to dataframes and how to write dataframes to CSV.
In the first section, we will go through, with examples, how to read a CSV file, how to read specific columns from a CSV, how to read multiple CSV files and combine them to one dataframe, and, finally, how to convert data according to specific datatypes (e.g., using Pandas read_csv dtypes). In the last section we will continue by learning how to write CSV files. That is, we will learn how to export dataframes to CSV files.
In the first example of this Pandas read CSV tutorial we will just use read_csv to load CSV to dataframe that is in the same directory as the script. If we have the file in another directory we have to remember to add the full path to the file. Here’s the first, very simple, Pandas read_csv example:
df = pd.read_csv('amis.csv')
df.head()
Dataframe
The data can be downloaded here but in the following examples we are going to use Pandas read_csv to load data from a URL.
In the next read_csv example we are going to read the same data from a URL. It’s very simple we just put the URL in as the first parameter in the read_csv method:
url_csv = 'https://vincentarelbundock.github.io/Rdatasets/csv/boot/amis.csv'
df = pd.read_csv(url_csv)
As can be seen in the image above we get a column named ‘Unamed: 0’. We can also see that it contains numbers. Thus, we can use this column as index column. In the next code example we are going to use Pandas read_csv and the index_col parameter. This parameter can take an integer or a sequence. In our case we are going to use the integer 0 and we will get a way nicer dataframe:
df = pd.read_csv(url_csv, index_col=0)
df.head()

The index_col parameter also can take a string as input and we will now use a different datafile. In the next example we will read a CSV into a Pandas dataframe and use the idNum column as index.
csv_url = 'http://vincentarelbundock.github.io/Rdatasets/csv/carData/MplsStops.csv'
df = pd.read_csv(csv_url, index_col='idNum')
df.iloc[:, 0:6].head()

Note, to get the above output we used Pandas iloc to select the first 7 rows. This was done to get an output that could be easier illustrated. That said, we are now continuing to the next section where we are going to read certain columns to a dataframe from a CSV file.
In some cases we don’t want to parse every column in the csv file. To only read certain columns we can use the parameter usecols. Note, if we want the first column to be index column and we want to parse the three first columns we need to have a list with 4 elements (compare my read_excel usecols example here):
cols = [0, 1, 2, 3]
df = pd.read_csv(url_csv,
                   index_col=0, usecols=cols)
df.head()
read_csv usecols
Of course, using read_csv usecols make more sense if we had a CSV file with more columns. We can use Pandas read_csv usecols with a list of strings, as well. In the next example we return to the larger file we used previously:
csv_url = 'http://vincentarelbundock.github.io/Rdatasets/csv/carData/MplsStops.csv'
df = pd.read_csv(csv_url, index_col='idNum',
                   usecols=['idNum', 'date', 'problem', 'MDC'])
df.head()
In some of the previous read_csv example we get an unnamed column. We have solved this by setting this column as index or used usecols to select specific columns from the CSV file. However, we may not want to do that for any reason. Here’s one example on how to use Pandas read_csv to get rid of the column “Unnamed:0”:
csv_url = 'http://vincentarelbundock.github.io/Rdatasets/csv/carData/MplsStops.csv'
cols = pd.read_csv(csv_url, nrows=1).columns
df = pd.read_csv(csv_url, usecols=cols[1:])
df.iloc[:, 0:6].head()

It’s of course also possible to remove the unnamed columns after we have loaded the CSV to a dataframe. To remove the unnamed columns we can use two different methods; loc and drop, together with other Pandas dataframe methods. When using the drop method we can use the inplace parameter and get a dataframe without unnamed columns.
df.drop(df.columns[df.columns.str.contains('unnamed', case=False)],
          axis=1, inplace=True)

# The following line will give us the same result as the line above
# df = df.loc[:, ~df.columns.str.contains('unnamed', case=False)]

df.iloc[:, 0:7].head()
To explain the code example above; we select the columns without columns that containing the string ‘unnamed’. Furthermore, we used the case parameter so that the contains method is not case-sensitive. Thus, we will get columns named “Unnamed” and “unnamed”. In the first row, using Pandas drop, we are also using the inplace parameter so that it changes our dataframe. The axis parameter, however, is used to drop columns instead of indices (i.e., rows).
If we have missing data in our CSV file and it’s coded in a way that make it impossible for Pandas to find them we can use the parameter na_values. In the example below the amis.csv file have been changed and there are some cells with the string “Not Available”.
That is, we are going to change “Not Available” to something that we easily can remove when carrying out data analysis later.
df = pd.read_csv('Simdata/MissingData.csv', index_col=0,
                   na_values="Not Available")
df.head()
What if our data file(s) contain information on the first x rows? For instance, how can we skip the first three rows in a file looking like this:

We will now learn how to use Pandas read_csv and skip x amount of row. Luckily, it’s very simple we just use the skiprows parameter. In the following example we are using read_csv and skiprows=3 to skip the first 3 rows.
df = pd.read_csv('Simdata/skiprow.csv', index_col=0, skiprows=3)
df.head()
Note we can obtain the same result as above using the header parameter (i.e., data = pd.read_csv(‘Simdata/skiprow.csv’, header=3)).
If we don’t want to read every row in the CSV file we ca use the parameter nrows. In the next example below we read the first 8 rows of a CSV file.
df = pd.read_csv(url_csv, nrows=8)
df
If we want to select random rows we can load the complete CSV file and use Pandas sample to randomly select rows (learn more about this by reading the Pandas Sample tutorial).
We can also set the data types for the columns. Although, in the amis dataset all columns contain integers we can set some of them to string data type. This is exactly what we will do in the next Pandas read_csv pandas example. We will use the Pandas read_csv dtype parameter and put in a dictionary:
url_csv = 'https://vincentarelbundock.github.io/Rdatasets/csv/boot/amis.csv'
df = pd.read_csv(url_csv, dtype={'speed':int, 'period':str, 'warning':str, 'pair':int})
df.info()
It’s ,of course, possible to force other datatypes such as integer and float. All we have to do is change str to float, for instance (given that we have decimal numbers in that column, of course).
If we have data from many sources such as experiment participants we may have them in multiple CSV files. If the data, from the different CSV files, are going to be analyzed together we may want to load them all into one dataframe. In the next examples we are going to use Pandas read_csv to read multiple files.
First, we are going to use Python os and fnmatch to list all files with the word “Day” of the file type CSV in the directory “SimData”. Next, we are using Python list comprehension to load the CSV files into dataframes (stored in a list, see the type(dfs) output).
import os, fnmatch

csv_files = fnmatch.filter(os.listdir('./SimData'), '*Day*.csv')
dfs = [pd.read_csv('SimData/' + os.sep + csv_file)
       for csv_file in csv_files]

type(dfs)
# Output: list
Finally, we use the method concat to concatenate the dataframes in our list. In the example files there is a column called ‘Day’ so that each day (i.e., CSV file) is unique.
df = pd.concat(dfs, sort=False)
df.Day.unique()

The second method we are going to use is a bit simpler; using Python glob. If we compare the two methods (os + fnmatch vs. glob) we can see that in the list comprehension we don’t have to put the path. This is because glob will have the full path to our files. Handy!
import glob

csv_files = glob.glob('SimData/*Day*.csv')
dfs = [pd.read_csv(csv_file) for csv_file in csv_files]

df = pd.concat(dfs, sort=False)
If we don’t have a column, in each CSV file, identifying which dataset it is (e.g., data from different days) we could apply the filename in a new column of each dataframe:
import glob

csv_files = glob.glob('SimData/*Day*.csv')
dfs = []

for csv_file in csv_files:
    temp_df = pd.read_csv(csv_file)
    temp_df['DataF'] = csv_file.split('\\')[1]
dfs.append(temp_df)In this section we will learn how to export dataframes to CSV files. We will start by creating a dataframe with some variables but first we start by importing the modules Pandas:
import pandas as pd
The next step is to create a dataframe. We will create the dataframe using a dictionary. The keys will be the column names and the values will be lists containing our data:
df = pd.DataFrame({'Names':['Andreas', 'George', 'Steve',
                           'Sarah', 'Joanna', 'Hanna'],
                  'Age':[21, 22, 20, 19, 18, 23]})
df.head()
Then we write the dataframe to CSV file using Pandas to_csv method. In the example below we don’t use any parameters but the path_or_buf which is, in our case, the file name.
df.to_csv('NamesAndAges.csv')Here’s how the exported dataframe look like:

As can be seen in the image above we get a new column when we are not using any parameters. This column is the index column from our Pandas dataframe. We can use the parameter index and set it to False to get rid of this column.
df.to_csv('NamesAndAges.csv', index=False)If we have many dataframes and we want to export them all to the same CSV file it is, of course, possible. In the Pandas to_csv example below we have 3 dataframes. We are going to use Pandas concat with the parameters keys and names.
This is done to create two new columns, named Group and Row Num. The important part is Group which will identify the different dataframes. In the last row of the code example we use Pandas to_csv to write the dataframes to CSV.
df1 = pd.DataFrame({'Names': ['Andreas', 'George', 'Steve',
                           'Sarah', 'Joanna', 'Hanna'],
                   'Age':[21, 22, 20, 19, 18, 23]})
df2 = pd.DataFrame({'Names': ['Pete', 'Jordan', 'Gustaf',
                           'Sophie', 'Sally', 'Simone'],
                   'Age':[22, 21, 19, 19, 29, 21]})
df3 = pd.DataFrame({'Names': ['Ulrich', 'Donald', 'Jon',
                           'Jessica', 'Elisabeth', 'Diana'],
                   'Age':[21, 21, 20, 19, 19, 22]})


df = pd.concat([df1, df2, df3], keys =['Group1', 'Group2', 'Group3'],
               names=['Group', 'Row Num']).reset_index()

df.to_csv('MultipleDfs.csv', index=False)
In the CSV file we get 4 columns. The keys parameter with the list ([‘Group1’, ‘Group2’, ‘Group3’]) will enable identification of the different dataframes we wrote. We also get the column “Row Num” which will contain the row numbers for each dataframe:
In this tutorial we have learned about importing CSV files into Pandas dataframe. More Specifically, we have learned how to:
The post Pandas Read CSV Tutorial appeared first on Erik Marsja.
I’m running a sale that ends in 24 hours, but I’m not the only one. This post is a compilation of the different Cyber Monday deals I’ve found related to Python and Python learning.
This is my weekly Python skill-building service. I’m offering 52 weeks of Python Morsels for 50% off.
You can find more details on this sale here.
Michael Kennedy of Talk Python is offering a 4 course bundle for a number of Python courses.
Reuven Lerner is also offering a 40% off sale on his courses. Reuven has courses on Python, Git, and regular expressions.
Bob and Julian of PyBites are offering a 50% off sale on their Code Challenges. These are a different variety of code challenges than Python Morsels. You could sign up for both and Python Morsels if you wanted extra learning every week.
A number of Python book publishers, such as No Starch, are running big sales on their books. I took a look at their sale, but haven’t gone searching for more of them.
If you have questions about the Python Morsels sale, email me.
The Python Morsels sale and likely all the other sales above will end in the next 24 hours, probably sooner depending on when you’re reading this.
So go check them out!
Did I miss a deal that you know about? Link to it in the comments!
 |
| (Demonstrating the app for a pygame presentation at an Open Source diversity event in Berlin) |
 |
| Music making and performance app for pygame 2, looping and mixing sounds recorded in the microphone. |
I recently visited the UK Meteorology Office, a moderately large organization that serves the weather and climate forecasting needs of the UK (and several other nations). I was there with other open source colleagues including Joe Hamman and Ryan May from open source projects like Dask, Xarray, JupyterHub, MetPy, Cartopy, and the broader Pangeo community.
This visit was like many other visits I’ve had over the years that are centered around showing open source tooling to large institutions, so I thought I’d write about it in hopes that it helps other people in this situation in the future.
My goals for these visits are the following:
We were invited by early adopters within the institution, both within the UK Met Office’s Informatics Lab a research / incubation group within the broader organization, and the Analysis, Visualization, and Data group (AVD) who serve 500 analysts at the Met Office with their suite of open source tooling.
Both of these groups are forward thinking, already use and appreciate the tools that we were talking about, and hope to leverage our presence evangelize what they’ve already been saying throughout the company. They need outside experts to provide external validation within the company; that’s our job.
The goals for the early adopters are the following:
So our visit was split between meeting a variety of groups within the institution (analysts, IT, …) and talking shop.
One of our first visits was a discussion with a cross-department team of people architecting a variety of data processing systems throughout the company. Joe Hamman and I gave a quick talk about Dask, XArray, and the Pangeo community. Because this was more of an IT-focused group I went first, answered the standard onslaught of IT-related questions about Dask, and established credibility. Then Joe took over and demonstrated the practical relevance of the approach from their users’ perspective.
We’ve done this tag-team approach a number of times and its always effective. Having a technical person speak to technical concerns while also having a scientist demonstrating organizational value seems to establish credibility across a wide range of people.
However it’s still important to tailor the message to the group at hand. IT-focused groups like this one are usually quite conservative about adding new technology, and they have a constant pressure of users asking them for things that will generally cause problems. We chose to start with low-level technical details because it lets them engage with the problem at a level that they can meaningfully test and assess the situation.
Our early-adopter allies had also arranged a tech-talk with a wider audience across the office. This was part of a normal lecture series, so we had a large crowd, along with a video recording within the institution for future viewers. The audience this time was a combination of analysts (users of our software), some IT, and an executive or two.
Joe and I gave essentially the same talk, but this time we reversed the order, focusing first on the scientific objectives, and then following up with a more brief summary on how the software accomplishes this. A pretty constant message in this talk was …
other institutions like yours already do this and are seeing transformative change
We provided social proof by showing that lots of other popular projects and developer communities integrate with these tools, and that many large government organizations (peers to the UK Met Office) are already adopting these tools and seeing efficiency gains.
Our goals for this section are the following:
Encourage the users within the audience to apply pressure to their management/IT to make it easier for them to integrate these tools to their everyday workflow
Convince management that this is a good approach.
This means two things for them:
After we gave the talk to the larger audience we met with many smaller groups. These were groups that managed the HPC systems, were in charge of storing data on the cloud, ran periodic data processing pipelines, etc.. Doing this after the major talk is useful, because people arrive with a pretty good sense of what the software does, and how it might help them. Conversations then become more specific quickly.
During this process I had the good fortune to work with Peter Killick and Bill Little who had done a bit of work on Dask in the past and were interested in doing more. Before coming to the Met Office we found a bug that was of relevance to them, but also involved learning some more Dask skills. We worked on it off and on during the visit and it was great to get to know them better and hopefully they’re more likely to fix issues that arise in the future with more familiarity.
Between the visitors and our hosts we had several core developers present on related projects (XArray, Iris, Dask, Cartopy, Metpy, …). This was a good time not just for evangelism and growing the community, but also for making long-term plans about existing projects, identifying structural issues in the ecosystem, and identifying new projects to fix those issues.
There was good conversation around the future relationship between Xarray and Iris two similar packages that could play better together. We discussed current JupyterHub deployments both within the UK Met office, and without. Developers for the popular Cartopy library got together. A couple of us prototyped a very early stage unstructured mesh data structure.
These visits are one of the few times when a mostly distributed community gets together and can make in-person plans. Sitting down with a blank sheet of paper is a useful exercise that is still remarkably difficult to replicate remotely.
It turns out that the Southwest corner of England is full of fine pubs, and even better walking. I’m thankful to Phil Elson and Jo Camp for hosting me over the weekend where we succeeded in chatting about things other than work.


In this article we will create a score manager class to render the player score on the scene for our pygame project. At the moment we will only increase the score of the player each time the player’s missile hits the enemy ship and deduct the player score each time the player gets hit by the enemy missile, in the future we will introduce more features into the score manager class but for now...
This article is the second part of a series on using Python for developing asynchronous web applications. The first part provides a more in-depth coverage of concurrency in Python and asyncio, as well as aiohttp.
If you'd like to read more about Asynchronous Python for Web Development, we've got it covered.
Due to the non-blocking nature of asynchronous libraries like aiohttp we would hope to be able to make and handle more requests in a given amount of time compared to analogous synchronous code. This is due to the fact that asynchronous code can rapidly switch between contexts in order to minimize time spent waiting for I/O.
Testing client-side performance of an asynchronous library like aiohttp is relatively straightforward. We choose some website as reference, and then make a certain number of requests, timing how long it takes our code to complete them. We'll be looking at the relative performance of aiohttp and requests when making requests to https://example.com.
Testing server-side performance is a little more tricky. Libraries like aiohttp come with built-in development servers, which are fine for testing routes on a local network. However, these development servers are not suited to deploying applications on the public web, as they cannot handle the load expected of a publicly available website, and they are not good at serving up static assets, like Javascript, CSS, and image files.
In order to get a better idea of the relative performance of aiohttp and an analogous synchronous web framework, we're going to re-implement our web app using Flask and then we'll compare development and production servers for both implementations.
For the production server, we're going to be using gunicorn.
For a traditional, synchronous approach, we just use a simple for loop. Though, before you run the code, make sure to install the requests module:
$ pip install --user requests
With that out of the way, let's go ahead and implement it in a more traditional manner:
# multiple_sync_requests.py
import requests
def main():
    n_requests = 100
    url = "https://example.com"
    session = requests.Session()
    for i in range(n_requests):
        print(f"making request {i} to {url}")
        resp = session.get(url)
        if resp.status_code == 200:
            pass

main()
Analogous asynchronous code is a little more complicated though. Making multiple requests with aiohttp leverages the asyncio.gather method to make requests concurrently:
# multiple_async_requests.py
import asyncio
import aiohttp

async def make_request(session, req_n):
    url = "https://example.com"
    print(f"making request {req_n} to {url}")
    async with session.get(url) as resp:
        if resp.status == 200:
            await resp.text()

async def main():
    n_requests = 100
    async with aiohttp.ClientSession() as session:
        await asyncio.gather(
            *[make_request(session, i) for i in range(n_requests)]
        )

loop = asyncio.get_event_loop()
loop.run_until_complete(main())
Running both synchronous and asynchronous code with the bash time utility:
me@local:~$ time python multiple_sync_requests.py
real    0m13.112s
user    0m1.212s
sys     0m0.053s
me@local:~$ time python multiple_async_requests.py
real    0m1.277s
user    0m0.695s
sys     0m0.054s
The concurrent/asynchronous code is far faster. But what happens if we multi-thread the synchronous code? Could it match the speed of concurrent code?
# multiple_sync_request_threaded.py
import threading
import argparse
import requests

def create_parser():
    parser = argparse.ArgumentParser(
        description="Specify the number of threads to use"
    )

    parser.add_argument("-nt", "--n_threads", default=1, type=int)

    return parser

def make_requests(session, n, url, name=""):
    for i in range(n):
        print(f"{name}: making request {i} to {url}")
        resp = session.get(url)
        if resp.status_code == 200:
            pass

def main():
    parsed = create_parser().parse_args()

    n_requests = 100
    n_requests_per_thread = n_requests // parsed.n_threads

    url = "https://example.com"
    session = requests.Session()

    threads = [
        threading.Thread(
            target=make_requests,
            args=(session, n_requests_per_thread, url, f"thread_{i}")
        ) for i in range(parsed.n_threads)
    ]
    for t in threads:
        t.start()
    for t in threads:
        t.join()

main()
Running this rather verbose piece of code will yield:
me@local:~$ time python multiple_sync_request_threaded.py -nt 10
real    0m2.170s
user    0m0.942s
sys     0m0.104s
And we can increase performance by using more threads, but returns diminish rapidly:
me@local:~$ time python multiple_sync_request_threaded.py -nt 20
real    0m1.714s
user    0m1.126s
sys     0m0.119s
By introducing threading, we can come close to matching the performance of the asynchronous code, at the cost of increased code complexity.
While it does offer a similar response time, it's not worth it for the price of complicating code that could be simple - The quality of code isn't increased by the complexity or the number of lines we use.
We'll use the Apache Benchmark (ab) tool to test the performance of different servers.
With ab we can specify the total number of requests to make, in addition to the number of concurrent requests to make.
Before we can start testing, we have to reimplement our planet tracker app (from the previous article) using a synchronous framework. We'll use Flask, as the API is similar to aiohttp (in reality the aiohttp routing API is based off of Flask):
# flask_app.py
from flask import Flask, jsonify, render_template, request

from planet_tracker import PlanetTracker

__all__ = ["app"]

app = Flask(__name__, static_url_path="",
            static_folder="./client",
            template_folder="./client")

@app.route("/planets/<planet_name>", methods=["GET"])
def get_planet_ephmeris(planet_name):
    data = request.args
    try:
        geo_location_data = {
            "lon": str(data["lon"]),
            "lat": str(data["lat"]),
            "elevation": float(data["elevation"])
        }
    except KeyError as err:
        # default to Greenwich observatory
        geo_location_data = {
            "lon": "-0.0005",
            "lat": "51.4769",
            "elevation": 0.0,
        }
    print(f"get_planet_ephmeris: {planet_name}, {geo_location_data}")
    tracker = PlanetTracker()
    tracker.lon = geo_location_data["lon"]
    tracker.lat = geo_location_data["lat"]
    tracker.elevation = geo_location_data["elevation"]
    planet_data = tracker.calc_planet(planet_name)
    return jsonify(planet_data)

@app.route('/')
def hello():
    return render_template("index.html")

if __name__ == "__main__":
    app.run(
        host="localhost",
        port=8000,
        threaded=True
    )
If you're jumping in without reading the previous article, we have to set up our project a little before testing. I've put all the Python server code in a directory planettracker, itself a sub-directory of my home folder.
me@local:~/planettracker$ ls
planet_tracker.py
flask_app.py
aiohttp_app.py
I strongly suggest that you visit the previous article and get familiar with the application we've already built before proceeding.
Let's see how long it takes our servers to handle 1000 requests, made 20 at a time.
First, I'll open two terminal windows. In the first, I run the server:
# terminal window 1
me@local:~/planettracker$ pipenv run python aiohttp_app.py
In the second, let's run ab:
# terminal window 2
me@local:~/planettracker$ ab -k -c 20 -n 1000 "localhost:8000/planets/mars?lon=145.051&lat=-39.754&elevation=0"
...
Concurrency Level:      20
Time taken for tests:   0.494 seconds
Complete requests:      1000
Failed requests:        0
Keep-Alive requests:    1000
Total transferred:      322000 bytes
HTML transferred:       140000 bytes
Requests per second:    2023.08 [\#/sec] (mean)
Time per request:       9.886 [ms] (mean)
Time per request:       0.494 [ms] (mean, across all concurrent requests)
Transfer rate:          636.16 [Kbytes/sec] received
...
ab outputs a lot of information, and I've only displayed the most relevant bit. Of this the number to which we should pay most attention is the "Requests per second" field.
Now, exiting out of the server in the first window, lets fire up our Flask app:
# terminal window 1
me@local:~/planettracker$ pipenv run python flask_app.py
Running the test script again:
# terminal window 2
me@local:~/planettracker$ ab -k -c 20 -n 1000 "localhost:8000/planets/mars?lon=145.051&lat=-39.754&elevation=0"
...
Concurrency Level:      20
Time taken for tests:   1.385 seconds
Complete requests:      1000
Failed requests:        0
Keep-Alive requests:    0
Total transferred:      210000 bytes
HTML transferred:       64000 bytes
Requests per second:    721.92 [\#/sec] (mean)
Time per request:       27.704 [ms] (mean)
Time per request:       1.385 [ms] (mean, across all concurrent requests)
Transfer rate:          148.05 [Kbytes/sec] received
...
It looks like the aiohttp app is 2.5x to 3x faster than the Flask when using each library's respective development server.
What happens if we use gunicorn to serve up our apps?
Before we can test our apps in production mode, we have to first install gunicorn and figure out how to run our apps using an appropriate gunicorn worker class. In order to test the Flask app we can use the standard gunicorn worker, but for aiohttp we have to use the gunicorn worker bundled with aiohttp. We can install gunicorn with pipenv:
me@local~/planettracker$ pipenv install gunicorn
We can run the aiohttp app with the appropriate gunicorn worker:
# terminal window 1
me@local:~/planettracker$ pipenv run gunicorn aiohttp_app:app --worker-class aiohttp.GunicornWebWorker
Moving forward, when displaying ab test results I'm only going to show the "Requests per second" field for the sake of brevity:
# terminal window 2
me@local:~/planettracker$ ab -k -c 20 -n 1000 "localhost:8000/planets/mars?lon=145.051&lat=-39.754&elevation=0"
...
Requests per second:    2396.24 [\#/sec] (mean)
...
Now let's see how the Flask app fares:
# terminal window 1
me@local:~/planettracker$ pipenv run gunicorn flask_app:app
Testing with ab:
# terminal window 2
me@local:~/planettracker$ ab -k -c 20 -n 1000 "localhost:8000/planets/mars?lon=145.051&lat=-39.754&elevation=0"
...
Requests per second:    1041.30 [\#/sec] (mean)
...
Using gunicorn definitely resulting in increased performance for both the aiohttp and Flask apps. The aiohttp app still performs better, although not by as much of a margin as with the development server.
gunicorn allows us to use multiple workers to serve up our apps. We can use the -w command line argument to tell gunicorn to spawn more worker processes. Using 4 workers results in a significant performance bump for our apps:
# terminal window 1
me@local:~/planettracker$ pipenv run gunicorn aiohttp_app:app -w 4
Testing with ab:
# terminal window 2
me@local:~/planettracker$ ab -k -c 20 -n 1000 "localhost:8000/planets/mars?lon=145.051&lat=-39.754&elevation=0"
...
Requests per second:    2541.97 [\#/sec] (mean)
...
Moving on the the Flask version:
# terminal window 1
me@local:~/planettracker$ pipenv run gunicorn flask_app:app -w 4
Testing with ab:
# terminal window 2
me@local:~/planettracker$ ab -k -c 20 -n 1000 "localhost:8000/planets/mars?lon=145.051&lat=-39.754&elevation=0"
...
Requests per second:    1729.17 [\#/sec] (mean)
...
The Flask app saw a more significant boost in performance when using multiple workers!
Let's take a step back and look at the results of testing development and production servers for both aiohttp and Flask implementations of our planet tracker app in a table:
| aiohttp | Flask | % difference | |
|---|---|---|---|
| Development server (Requests/sec) | 2023.08 | 721.92 | 180.24 |
| gunicorn (Requests/sec) | 2396.24 | 1041.30 | 130.12 |
| % increase over development server | 18.45 | 44.24 | |
| gunicorn -w 4 (Requests/sec) | 2541.97 | 1729.17 | 47.01 |
| % increase over development server | 25.65 | 139.52 |
In this article, we've compared the performance of an asynchronous web application compared to its synchronous counterpart and used several tools to do so.
I have been maintaining my blog. It is a self hosted Ghost blog, where I have my theme as Casper, the Ghost default. In the recent past, September 2018, Ghost has updated its version to 2.0. Now it is my time to update mine.
It is always advisable to test it before running it into production server. I maintain a stage instance for the same. I test any and all the changes there before touching the production server. I did the same thing here also.
I have exported Ghost data into a Json file. For the ease to read I have prettified the file. I removed the old database and started the container for the new Ghost. I reimported the data into the new Ghost using the json file.
I had another problem to solve, the theme. I used to have Casper as my theme. But the new look of it, is something I do not like for my blog, which is predominantly a text blog. I was unable to fix the same theme for the new Ghost. Therefore I chose to use Attila as my theme. I did some modifications, uploaded and enabled it for my blog. A huge gratitude to the Ghost community and the developers, it was a real smooth job.
 copyright: Forschungszentrum Jülich GmbH


 usecols with list of strings
 CSV file
