Quantcast
Channel: Planet Python
Viewing all 22860 articles
Browse latest View live

Glyph Lefkowitz: A Few Bad Apples

$
0
0

I’m a little annoyed at my Apple devices right now.

Time to complain.

“Trust us!” says Apple.

“We’re not like the big, bad Google! We don’t just want to advertise to you all the time! We’re not like Amazon, just trying to sell you stuff! We care about your experience. Magical. Revolutionary. Courageous!”

But I can’t hear them over the sound of my freshly-updated Apple TV — the appliance which exists solely to play Daniel Tiger for our toddler — playing the John Wick 3 trailer at full volume automatically as soon as it turns on.

For the aforementioned toddler.

I should mention that it is playing this trailer while specifically logged in to a profile that knows their birth date1 and also their play history2.


I’m aware of the preferences which control autoplay on the home screen; it’s disabled now. I’m aware that I can put an app other than “TV” in the default spot, so that I can see ads for other stuff, instead of the stuff “TV” shows me ads for.

But the whole point of all this video-on-demand junk was supposed to be that I can watch what I want, when I want — and buying stuff on the iTunes store included the implicit promise of no advertisements.

At least Google lets me search the web without any full-screen magazine-style ads popping up.

Launch the app store to check for new versions?

apple arcade ad

I can’t install my software updates without accidentally seeing HUGE ads for new apps.

Launch iTunes to play my own music?

apple music ad

I can’t play my own, purchased music without accidentally seeing ads for other music — and also Apple’s increasingly thirsty, desperate plea for me to remember that they have a streaming service now. I don’t want it! I know where Spotify is if I wanted such a thing, the whole reason I’m launching iTunes is that I want to buy and own the music!

On my iPhone, I can’t even launch the Settings app to turn off my WiFi without seeing an ad for AppleCare+, right there at the top of the UI, above everything but my iCloud account. I already have AppleCare+; I bought it with the phone! Worse, at some point the ad glitched itself out, and now it’s blank, and when I tap the blank spot where the ad used to be, it just shows me this:

undefined is not an insurance plan

I just want to use my device, I don’t need ad detritus littering every blank pixel of screen real estate.

Knock it off, Apple.


  1. less than 3 years ago 

  2. Daniel Tiger, Doctor McStuffins, Word World; none of which have super significant audience overlap with the John Wick franchise 


Weekly Python StackOverflow Report: (cxcvii) stackoverflow python report

$
0
0

Catalin George Festila: Python Qt5 - the drag and drop feature.

$
0
0
Today I tested drag and drop feature with PyQt5. Python 3.7.4 (default, Jul 9 2019, 16:32:37) [GCC 9.1.1 20190503 (Red Hat 9.1.1-1)] on linuxThis is a simple example using setAcceptDrops and setDragEnabled: import sys from PyQt5.QtWidgets import QApplication, QWidget, QListWidget, QHBoxLayout,QListWidgetItem from PyQt5.QtGui import QIcon class Window(QWidget): def __init__(self):

Python Bytes: #150 Winning the Python software interview

Anarcat: Calibre replacement considerations

$
0
0

Summary

TL;DR: I'm considering replacing those various Calibre compnents with...

See below why and a deeper discussion on all the features.

Problems with Calibre

Calibre is an amazing software: it allows users to manage ebooks on your desktop and a multitude of ebook readers. It's used by Linux geeks as well as Windows power-users and vastly surpasses any native app shipped by ebook manufacturers. I know almost exactly zero people that have an ebook reader that do not use Calibre.

However, it has had many problems over the years:

The latest issue (lack of Python 3) is the last straw, for me. While Calibe is an awesome piece of software, I can't help but think it's doing too much, and the wrong way. It's one of those tools that looks amazing on the surface, but when you look underneath, it's a monster that is impossible to maintain, a liability that is just bound to cause more problems in the future.

What does Calibre do anyways

So let's say I wanted to get rid of Calibre, what would that mean exactly? What do I actually use Calibre for anyways?

Calibre is...

  • an ebook viewer: Calibre ships with the ebook-viewer command, which allows one to browse a vast variety of ebook formats. I rarely use this feature, since I read my ebooks on a e-reader, on purpose. There is, besides, a good variety of ebook-readers, on different platforms, that can replace Calibre here:

    • Atril, MATE's version of Evince, supports ePUBs (Evince doesn't)
    • MuPDF also reads ePUBs without problems and is really fast
    • fbreader also supports ePUBs, but is much slower than all those others
    • Emacs (of course) supports ebooks through nov.el
    • Okular apparently supports ePUBs, but I must be missing a library because it doesn't actually work here
    • coolreader is another alternative, not yet in Debian (#715470)
    • lucidor also looks interesting, but is not packaged in Debian either (although upstream provides a .deb)
    • koreader and plato are good alternatives for the Kobo reader (although koreader also now has builds for Debian)
  • an ebook editor: Calibre also ships with an ebook-edit command, which allows you to do all sorts of nasty things to your ebooks. I have rarely used this tool, having found it hard to use and not giving me the results I needed, in my use case (which was to reformat ePUBs before publication). For this purpose, Sigil is a much better option, now packaged in Debian. There are also various tools that render to ePUB: I often use the Sphinx documentation system for that purpose, and have been able to produce ePUBs from LaTeX for some projects.

  • a file converter: Calibre can convert between many ebook formats, to accomodate the various readers. In my experience, this doesn't work very well: the layout is often broken and I have found it's much better to find pristine copies of ePUB books than fight with the converter. There are, however, very few alternatives to this functionality, unfortunately.

  • a collection browser: this is the main functionality I would miss from Calibre. I am constantly adding books to my library, and Calibre does have this incredibly nice functionality of just hitting "add book" and Just Do The Right Thing™ after that. Specifically, what I like is that it:

    • sort, view, and search books in folders, per author, date, editor, etc
    • quick search is especially powerful
    • allows downloading and editing metadata (like covers) easily
    • track read/unread status (although that's a custom field I had to add)

    Calibre is, as far as I know, the only tool that goes so deep in solving that problem. The Liber web server, however, does provide similar search and metadata functionality. It also supports migrating from an existing Calibre database as it can read the Calibre metadata stores.

    This also connects with the more general "book inventory" problem I have which involves an inventory physical books and directory of online articles. See also firefox (Zotero section) and ?bookmarks for a longer discussion of that problem.

  • a device synchronization tool : I mostly use Calibre to synchronize books with an ebook-reader. It can also automatically update the database on the ebook with relevant metadata (e.g. collection or "shelves"), although I do not really use that feature. I do like to use Calibre to quickly search and prune books from by ebook reader, however. I might be able to use git-annex for this, however, given that I already use it to synchronize and backup my ebook collection in the first place...

  • an RSS reader: I used this for a while to read RSS feeds on my ebook-reader, but it was pretty clunky. Calibre would be continously generating new ebooks based on those feeds and I would never read them, because I would never find the time to transfer them to my ebook viewer in the first place. Instead, I use a regular RSS feed reader. I ended up writing my own, feed2exec) and when I find an article I like, I add it to Wallabag which gets sync'd to my reader using wallabako, another tool I wrote.

  • an ebook web server : Calibre can also act as a web server, presenting your entire ebook collection as a website. It also supports acting as an OPDS directory, which is kind of neat. There are, as far as I know, no alternative for such a system although there are servers to share and store ebooks, like Trantor or Liber.

Note that I might have forgotten functionality in Calibre in the above list: I'm only listing the things I have used or am using on a regular basis. For example, you can have a USB stick with Calibre on it to carry the actual software, along with the book library, around on different computers, but I never used that feature.

So there you go. It's a colossal task! And while it's great that Calibre does all those things, I can't help but think that it would be better if Calibre was split up in multiple components, each maintained separately. I would love to use only the document converter, for example. It's possible to do that on the commandline, but it still means I have the entire Calibre package installed.

Maybe a simple solution, from Debian's point of view, would be to split the package into multiple components, with the GUI and web servers packaged separately from the commandline converter. This way I would be able to install only the parts of Calibre I need and have limited exposure to other security issues. It would also make it easier to run Calibre headless, in a virtual machine or remote server for extra isoluation, for example.

Full Stack Python: How to Add Maps to Django Web App Projects with Mapbox

$
0
0

Building interactive maps into a Django web application can seem daunting if you do not know where to begin, but it is easier than you think if you use a developer tool such as Mapbox.

In this post we will build a simple Django project with a single app and add an interactive map like the one you see below to the webpage that Django renders with the Mapbox MapsAPI.

Our Tools

Python 3 is strongly recommended for this tutorial because Python 2 will no longer be supported starting January 1, 2020. Python 3.6.5 to was used to build this tutorial. We will also use the following application dependencies to build our application:

If you need help getting your development environment configured before running this code, take a look at this guide for setting up Python 3 and Django on Ubuntu 16.04 LTS.

This blog post's code is also available on GitHub within the maps-django-mapbox directory of the blog-code-examples repository. Take the code and use it for your own purposes because it is all provided under the MIT open source license.

Installing Dependencies

Start the Django project by creating a new virtual environment using the following command. I recommend using a separate directory such as ~/venvs/ (the tilde is a shortcut for your user's home directory) so that you always know where all your virtualenvs are located.

python3 -m venv djangomaps

Activate the virtualenv with the activate shell script:

source djangomaps/bin/activate

The command prompt will change after activating the virtualenv:

Activate your djangomaps virtualenv.

Remember that you have to activate your virtualenv in every new terminal window where you want to use dependencies in the virtualenv.

We can now install the Django package into the activated but otherwise empty virtualenv.

pip install django==2.0.5

Look for the following output to confirm Django installed correctly from PyPI.

  Downloading https://files.pythonhosted.org/packages/23/91/2245462e57798e9251de87c88b2b8f996d10ddcb68206a8a020561ef7bd3/Django-2.0.5-py3-none-any.whl (7.1MB)
      100% |████████████████████████████████| 7.1MB 231kB/s 
      Collecting pytz (from django==2.0.5)
        Using cached https://files.pythonhosted.org/packages/dc/83/15f7833b70d3e067ca91467ca245bae0f6fe56ddc7451aa0dc5606b120f2/pytz-2018.4-py2.py3-none-any.whl
        Installing collected packages: pytz, django
        Successfully installed django-2.0.5 pytz-2018.4

The Django dependency is ready to go so now we can create our project and add some awesome maps to the application.

Building Our Django Project

We can use the Djangodjango-admin.py tool to create the boilerplate code structure to get our project started. Change into the directory where you develop your applications. For example, I typically use /Users/matt/devel/py/. Then run the following command to start a Django project named djmaps:

django-admin.py startproject djmaps

The django-admin.py command will create a directory named djmaps along with several subdirectories that you should be familiar with if you have previously worked with Django.

Change directories into the new project.

cd djmaps

Create a new Django app within djmaps.

python manage.py startapp maps

Django will generate a new folder named maps for the project. We should update the URLs so the app is accessible before we write our views.py code.

Open djmaps/djmaps/urls.py. Add the highlighted lines so that URLs will check the maps app for appropriate URL matching.

""" (comments)"""~~fromdjango.conf.urlsimportincludefromdjango.contribimportadminfromdjango.urlsimportpathurlpatterns=[~~path('',include('maps.urls')),path('admin/',admin.site.urls),]

Save djmaps/djmaps/urls.py and open djmaps/djmaps/settings.py. Add the maps app to settings.py by inserting the highlighted line:

# Application definitionINSTALLED_APPS=['django.contrib.admin','django.contrib.auth','django.contrib.contenttypes','django.contrib.sessions','django.contrib.messages','django.contrib.staticfiles',~~'maps',]

Make sure you change the default DEBUG and SECRET_KEY values in settings.py before you deploy any code to production. Secure your app properly with the information from the Django production deployment checklist so that you do not add your project to the list of hacked applications on the web.

Save and close settings.py.

Next change into the djmaps/maps directory. Create a new file named urls.py to contain routes for the maps app.

Add these lines to the empty djmaps/maps/urls.py file.

fromdjango.conf.urlsimporturlfrom.importviewsurlpatterns=[url(r'',views.default_map,name="default"),]

Save djmaps/maps/urls.py and open djmaps/maps/views.py add the following two highlighted lines. You can keep the boilerplate comment or delete it.

fromdjango.shortcutsimportrender~~defdefault_map(request):~~returnrender(request,'default.html',{})

Next, create a directory for your template files named templates under the djmaps/maps app directory.

mkdir templates

Create a new file named default.html within djmaps/maps/templates that contains the following Django template markup.

<!DOCTYPE html><html><head><title>Interactive maps for Django web apps</title></head><body><h1>Map time!</h1></body></html>

We can test out this static page to make sure all of our code is correct, then we'll use Mapbox to embed a customizable map within the page. Change into the base directory of your Django project where the manage.py file is located. Execute the development server with the following command:

python manage.py runserver

The Django development server will start up with no issues other than an unapplied migrations warning.

Performing system checks...

System check identified no issues (0 silenced).

You have 14 unapplied migration(s). Your project may not work properly until you apply the migrations for app(s): admin, auth, contenttypes, sessions.
Run 'python manage.py migrate' to apply them.

May 21, 2018 - 12:47:54
Django version 2.0.5, using settings 'djmaps.settings'
Starting development server at http://127.0.0.1:8000/
Quit the server with CONTROL-C.

Open a web browser and go to localhost:8000.

Plain old HTML page.

Our code works, but boy is that a plain-looking HTML page. Let's make the magic happen by adding JavaScript to the template to generate maps.

Adding Maps with Mapbox

Head to mapbox.com in your web browser to access the Mapbox homepage.

Mapbox homepage.

Click on "Get Started" or "Get Started for free" (the text depends on whether or not you already have a Mapbox account).

Sign up for a Mapbox account.

Sign up for a new free developer account or sign in to your existing account.

Add Mapbox to your application.

Click the "JS Web" option.

Choose the method of installation.

Choose "Use the Mapbox CDN" for the installation method. The next two screens show some code that you should add to your djmaps/maps/templates/default.html template file. The code will look like the following but you will need to replace the mapboxgl.accessToken line with your own access token.

<!DOCTYPE html><html><head><title>Interactive maps for Django web apps</title>
~~    <scriptsrc='https://api.mapbox.com/mapbox-gl-js/v0.44.2/mapbox-gl.js'></script>
~~    <linkhref='https://api.mapbox.com/mapbox-gl-js/v0.44.2/mapbox-gl.css'rel='stylesheet'/></head><body><h1>Map time!</h1>
~~   <divid='map'width="100%"style='height:400px'></div>
~~   <script>~~mapboxgl.accessToken={{mapbox_access_token}};~~varmap=newmapboxgl.Map({~~container:'map',~~style:'mapbox://styles/mapbox/streets-v10'~~});~~</script></body></html>

Re-open djmaps/maps/views.py to update the parameters passed into the Django template.

fromdjango.shortcutsimportrenderdefdefault_map(request):~~# TODO: move this token to Django settings from an environment variable~~# found in the Mapbox account settings and getting started instructions~~# see https://www.mapbox.com/account/ under the "Access tokens" section~~mapbox_access_token='pk.my_mapbox_access_token'~~returnrender(request,'default.html',~~{'mapbox_access_token':mapbox_access_token})

The Mapbox access token should really be stored in the Django settings file, so we left a "TODO" note to handle that as a future step.

Now we can try our webpage again. Refresh localhost:8000 in your web browser.

Screenshot of the Mapbox map showing up in our Django front end.

Sweet, we've got a live, interactive map! It's kind of weird thought how it is zoomed out to view the entire world. Time to customize the map using a few JavaScript parameters.

Customizing the Map

We can modify the map by changing parameters for the style, zoom level, location and many other attributes.

We'll start by changing the location that the initial map centers in on as well as the zoom level.

Re-open djmaps/maps/templates/default.html and modify the first highlighted lines so it ends with a commas and add the two new highlighted lines shown below.

<!DOCTYPE html><html><head><title>Interactive maps for Django web apps</title><scriptsrc='https://api.mapbox.com/mapbox-gl-js/v0.44.2/mapbox-gl.js'></script><linkhref='https://api.mapbox.com/mapbox-gl-js/v0.44.2/mapbox-gl.css'rel='stylesheet'/></head><body><h1>Map time!</h1><divid='map'width="100%"style='height:400px'></div><script>mapboxgl.accessToken={{mapbox_access_token}};varmap=newmapboxgl.Map({container:'map',~~style:'mapbox://styles/mapbox/streets-v10',~~center:[-77.03,38.91],~~zoom:9});</script></body></html>

The first number, -77.03, for the center array is the longitude and the second number, 38.91, is the latitude. Zoom level 9 is much closer to the city than the default which was the entire world at level 0. All of the customization values are listed in the Mapbox GL JS API documentation.

Now refresh the page at localhost:8000 to reload our map.

Updated map centered and zoomed in on Washington, D.C.

Awesome, now we are zoomed in on Washington, D.C. and can still move around to see more of the map. Let's make a couple other changes to our map before wrapping up.

Again back in djmaps/maps/templates/default.html change the highlighted line for the style key to the mapbox://styles/mapbox/satellite-streets-v10 value. That will change the look from an abstract map style to satellite image data. Update zoom: 9 so that it has a comma at the end of the line and add bearing: 180 as the last key-value pair in the configuration.

<!DOCTYPE html><html><head><title>Interactive maps for Django web apps</title><scriptsrc='https://api.mapbox.com/mapbox-gl-js/v0.44.2/mapbox-gl.js'></script><linkhref='https://api.mapbox.com/mapbox-gl-js/v0.44.2/mapbox-gl.css'rel='stylesheet'/></head><body><h1>Map time!</h1><divid='map'width="100%"style='height:400px'></div><script>mapboxgl.accessToken={{mapbox_access_token}};varmap=newmapboxgl.Map({container:'map',~~style:'mapbox://styles/mapbox/satellite-streets-v10',~~center:[-77.03,38.91],~~zoom:9,~~bearing:180});</script></body></html>

Save the template and refresh localhost:8000.

Updated map with satellite imagery and street map overlay.

The map now provides a satellite view with streets overlay but it is also... "upside down"! At least the map is upside down compared to how most maps are drawn, due to the bearing: 180 value, which modified this map's rotation.

Not bad for a few lines of JavaScript in our Django application. Remember to check the Mapbox GL JS API documentation for the exhaustive list of parameters that you can adjust.

What's Next?

We just learned how to add interactive JavaScript-based maps to our Django web applications, as well as modify the look and feel of the maps. Next try out some of the other APIs Mapbox provides including:

Questions? Let me know via a GitHub issue ticket on the Full Stack Python repository, on Twitter @fullstackpython or @mattmakai.

Do you see a typo, syntax issue or wording that's confusing in this blog post? Fork this page's source on GitHub and submit a pull request with a fix or file an issue ticket on GitHub.

Calvin Spealman: Announcing Feet, a Python Runner

$
0
0

I've been working on a problem that's bugged me for about as long as I've used Python and I want to announce my stab at a solution, finally!

I've been working on the problem of "How do i get this little thing I made to my friend so they can try it out?" Python is great. Python is especially a great language to get started in, when you
don't know a lot about software development, and probably don't even know a lot about computers in general.

Yes, Python has a lot of options for tackling some of these distribution problems for games and apps. Py2EXE was an early option, PyInstaller is very popular now, and PyOxide is an interesting recent entry. These can be great options, but they didn't fit the kind of use case and experience that made sense to me. I'd never really been about to put my finger on it, until earlier this year:

Python needs LÖVE.

LÖVE, also known as "Love 2D", is a game engine that makes it super easy to build small Lua games and share them. Before being a game engine, a graphics library, or anything else: LÖVE is a portable runtime that's perfect for distribution these games.

The trick is skipping the build process entirely. We've tackled the distribution problems in Python over the years with many tricks to build self-contained executables of our Python projects. These work, but they add extra steps and infrastructure to projects. They add another set of new, unfamiliar things to learn for newcomers getting in between their excitement over having built their first thing
to show off and their actually being able to share it with anyone.

Learning to make your first Pygame game and then immediately having no idea how to get in someone else's hands can be a really demoralizing barrier. So, I set out to replicate the LÖVE model in Python.

However, I didn't want to build a game engine. I didn't want to reinvent wheels and Python already has many of them. I wanted to combine the Python language with the workflow of LÖVE projects and built on top of the huge ecosystem of Python tooling and libraries, like wxWindows and Pyglet and Numpy. I just wanted a way to make Python projects run.

So I built Feet, a Python Runner.

Feet is different than executable generators like PyInstaller. There is no build step. You don't even need to install Python. Feet is a complete Python runtime that sits inside your project and provides an obvious EXE for users to double-click. It runs a main.py file in your project and runs it, but it also lets you manage packages from the Python ecosystem. That's the real magic sauce. If you distribute a requirements.txt with your project, it'll install the dependencies for your user, locally to the project, and run everything out of the box, or you can package the whole thing up (dependencies included) and hand your users a single Zip or EXE file.

There will be a lot of work ahead to make Feet everything it can be for the Python community. I hope to talk more about why I've wanted to solve this problem for nearly twenty years now and also share technical details about what I'm doing with Feet.

For now, please go try it out. Download the EXE release into a Pygame or other Python project and try using Feet to run it on Windows without having to install Python or package anything. Give me feedback, complain in bug tickets, contribute back if you see improvements, or just please let me know what you think!

Amjith Ramanujam: Examples are Awesome

$
0
0

There are two things I look for whenever I check out an Opensource project or library that I want to use.

1. Screenshots (A picture is worth a thousand words).

2. Examples (Don't tell me what to do, show me how to do it).

Having a fully working example (or many examples) helps me shape my thought process.

Here are a few projects that are excellent examples of this.

1. https://github.com/prompt-toolkit/python-prompt-toolkit

A CLI framework for building rich command line interfaces. The project comes with a collection of small self-sufficient examples that showcase every feature available in the framework and a nice little tutorial.

2. https://github.com/coleifer/peewee

A small ORM for Python that ships with multiple web projects to showcase how to use the ORM effectively. I'm always overwhelmed by SqlAlchemy's documentation site. PeeWee is a breath of fresh air with a clear purpose and succinct documentation.

3. https://github.com/coleifer/huey

An asynchronous task queue for Python that is simpler than Celery and more featureful than RQ. This project also ships with an awesome set of examples that show how to integrate the task queue with Django, Flask or standalone use case.

The beauty of these examples is that they're self-documenting and show us how the different pieces in the library work with each other as well as external code outside of their library such as Flask, Django, Asyncio etc.

Examples save the users hours of sifting through documentation to piece together how to use a library.

Please include examples in your project.


Mike Driscoll: PyDev of the Week: Paul Ivanov

$
0
0

This week we welcome Paul Ivanov (@ivanov) as our PyDev of the Week! Paul is a core developer of IPython and Jupyter. He is also an instructor at Software Carpentry. You can learn more about Paul on his website. You can also see what he’s been up to in open source by visiting his Github profile. Let’s take some time to get to know Paul!

Paul Ivanov (courtesy of Robert Sexton)

Can you tell us a little about yourself (hobbies, education, etc):

I grew up in Moscow and moved to the United States with my family when I was 10. I have lived in Northern California ever since. I earned a degree in Computer Science at UC Davis. After that, I worked on a Ph.D. in Vision Science at UC Berkeley.

I really enjoy a lot of different aspects of computing, be it tinkering with hardware (especially microcontrollers) and trying out different operating systems and programming languages. Outside of things involving a keyboard, my main hobby is endurance cycling. I have a touring bike with a front basket that I’ve ridden on for a dozen 200km, two 300km, two 400km and one 600km rides. I also write in my journal (the pen and paper kind), which sometimes turns into poetry, some of which I have posted on my website.

Why did you start using Python?

In college, my roommate, Philip Neustrom, and my brother, Mike Ivanov, started DavisWiki, which started off based on MoinMoin, Wiki software implemented in Python.. I remember pitching in with some minor patches and being able to make some progress despite not knowing the language. It was so intuitive and self-explanatory.

At the time, I was studying Computer Science, so I was used to “priesthood” languages that required a compile cycle, like C++, C, and Java. I had also been exposed to Perl through a Bioinformatics class I took, but there was a bunch of mysterious syntax in it that you couldn’t comprehend unless someone explained it to you. Python was so simple by comparison.

That was my first exposure to it, around 2004-2005, but I didn’t start using it regularly until grad school. I finished college early with two quarters of the academic year left and applied to a few grad schools which I’d only hear back from months later. In the interim, as a backup plan, I got a job at a Java shop.

While waiting for the big monolithic Java2EE project I was working on to start-up or reload (three to eight minutes spent grinding all those enterprise beans), I started playing with Ruby on Rails. Its interactive experience was so refreshing in comparison to a compiled language. Again, it was simple to use, though it had a little too much magic. For example, setting up a model for a “Person” created a table called “People”?!

I started grad school at UC Berkeley in 2006. My first lab rotation in Jack Gallant’s Neuroscience lab was my first real exposure to Matlab, far beyond the backslash solving I learned in an introductory linear algebra class. Again, it was a similar feeling of being able to whip up code and experiment interactively, particularly with matrices. But it was (and still is) quite a step backwards for interacting with the file system, trying to build a GUI, or interacting with a database — things like that. I was also frustrated with the out-of-memory errors that surprisingly cropped up, and its license requirement was a no-go.

I wanted to have skills that would transcend academia. Matlab licenses were cheap for students. I could get one through a campus deal at the time, but I knew that it would be a different story in industry. This was right when the first dual-core laptops started to come out, and I certainly wanted to take advantage of that. But for Matlab, I’d need a license per processor!

Someone in the Gallant lab had a PDF of Travis Oliphant’s “Guide to NumPy,” so I started using Python in my next rotation in the Redwood Center for Theoretical Neuroscience, where I ended up joining Bruno Olshausen’s lab. Luckily, there were a few other people embracing Python in the lab, and in the Brain Imaging Center, which we shared offices with for a while.

What other programming languages do you know and which is your favorite?

I’ve written serious code in C, C++, Java, Go, JavaScript, TypeScript, Elm, Idris, and Haskell. The ones that make me feel particularly giddy when I write code for fun are Elm, Go, and Idris.

I really enjoy Elm for finally providing a path into using functional languages regularly, as well as simplifying front-end code. The Elm Architecture has since been popularized by React with Redux. It’s a pattern I’ve used subsequently for developing personal user interface-based projects in Go, Idris, and Haskell. It’s also a deliberately slower-moving language. I view JavaScript, and now TypeScript, as “treadmill” languages – you have to stay on them and keep running forward just to keep up with current practices or you will fall off and get left behind. I appreciate being able to come back to Elm after six to eight months and not have the whole world shift under me in the meantime. It helps that it’s a smaller community, but I like that it feels quieter.

The Go language embraces simplicity and frowns upon clever solutions. The tooling that comes with it is fantastic – from formatting to fixing code to account for API changes, to being able to cross-compile binaries for multiple architectures *AND* operating systems by just changing some environment variables. There’s nothing else like it. Someone fond of JVM languages like Java (or Clojure or Scala) might pipe up with an objection because the same executable JAR compiled once can usually run anywhere using the Java runtime. However, the same is true for vanilla Python code – it will run anywhere there’s a Python interpreter. With Go, what you get as a result of running `GOOS=openbsd GOARCH=386 go build` will be an executable of your program that will run on OpenBSD on old 32-bit hardware. Period. It does not matter if you run that command on Debian, Windows, or macOS. And it doesn’t matter if your underlying architecture is 386, AMD64, ARM, or one of the other supported ones. This works because the binary doesn’t link against any C libraries; it just makes system calls directly to the kernel. So, what you get are true stand-alone binaries!

Idris is the most different. Writing code there is a dialogue between you and the computer. You get helpful feedback and boilerplate generation that is fractal: by writing down the type signatures, you can get the compiler to fill in a big picture sketch, zoom in on a chunk and ask the compiler to fill in more of the skeleton there as well. Dependent types gave me a new way to think about programming. It’s where I want the future of programming to go. But, in some ways, Idris is the least mature and most academic of the languages I know. Compile times can be slow (though the situation is apparently much improved with the work-in-progress Idris 2). And the community is fairly small, so there aren’t a ton of ready-to-use interfacing libraries.

So, for me, Idris can simultaneously be the most fun, yet the least productive way to code. But, there’s a good parallel here with my proclivity for cycling. There are many ways of traveling between points A and B. You can drive, you can take public transportation (be it by bus or train), or you can take your bike and get some exercise and hear the birds chirping with the wind blowing in your hair.

Apologies for the United States-centric nature of this travel analogy (and setting aside both the environmental footprint and the reality of traffic jams), but for me, in many ways, Python is like driving my own car. Frequently, it is the most practical choice for me to get from point A to point B. It will be fast, and I can go pretty far at a predictable speed. But, practical can get kind of boring. It certainly wasn’t at first. I got my driver’s license when I was 18, and I still remember how much fun it was to drive. The destinations were secondary to the journey.

What projects are you working on now?

With the help of my colleagues at Bloomberg, I’ve been organizing and hosting two-day events in our San Francisco Engineering Office every three months for the past year to encourage and facilitate experimentation in the Jupyter ecosystem. We’ve called them “Open Studio Days.” The current Wikipedia summary for ‘Open studio’ captures the spirit we want to make more prominent in the tech community: “A studio or workroom which is made accessible to all-comers, where artistic or creative work can be viewed and created collaboratively. An Open Studio is intended to foster creativity and encourage experimentation in an atmosphere of cultural exchange, conversation, encouragement, and freedom of expression.” Unlike a sprint or hackathon, where the goal is to produce something specific at the end, the point of our effort is to emphasize that sometimes we simply need to explore and participate by teaching one another, by having a discussion, or just by sharing some feelings and thoughts that we might have.

I’m also helping organize the NumFOCUS Summit this year. This is a chance for folks from the open source projects that are fiscally sponsored by the organization to get together to catch up and teach each other what we’ve been up to and figure out how we can grow our projects and our communities.

I’ve also had a commit bit for Matplotlib for a while. Though I haven’t been as active there lately, I did help Tom Caswell with a pair of releases earlier this year (2.2.4 and 3.0.3), and made my first solo release over the summer (3.1.1). Prior to that, Tom had been doing those releases single-handed for the past several years. The plan is for me to continue handling these, and I am the release manager for Matplotlib 3.2.0 which should be ready in September.

I also have a half-dozen personal projects that I haven’t released which I push forward on in the background. I say this not to tease or withhold them, but to let newer developers know that it’s okay, and even desirable, to have side projects that you don’t share with others. I consider it a public service that I haven’t released a bunch of my half-baked code over the years, though some did trickle out.

What non-Python open source projects do you enjoy using?

There are too many to name, but I suppose I have to start somewhere. Regardless of the operating system I’m on, I prefer the Vim text editor — though plain vi is fine in a pinch. I use Debian, OpenBSD, and FreeBSD operating systems, GIMP and Inkscape for creating graphics, and write code in Go, Idris, Elm, and Haskell.

How did you get involved in the Jupyter and Matplotlib communities?

A dozen years ago, using the tools in the Scientific Python (SciPy) ecosystem was definitely a counter-culture thing to do. Some of the edges were sharp, so “bleeding edge” would definitely have been an apt description at the time.

I mentioned how I started grad school in 2006 and started using Python in 2007. A year later, Fernando Perez, the creator of IPython, showed up on campus. By that point, the Redwood Center had moved to a different building on campus, so we no longer shared space with some of the other Scientific Python users on campus. One major benefit of this move was that we now had access to a premium, hard-to-come-by commodity: our own conference room. So, we started gathering together every week as a py4science group. We would teach each other how to write C extensions, different submodules of NumPy and SciPy, Matplotlib, SWIG, and Weave.

Before GitHub, Stack Overflow, and Discourse, mailing lists were where the majority of the community’s activity took place. For a while, I was very active on the Matplotlib mailing list. One time, someone had a question about whether it was possible to use the Matplotlib event handling code to support interactivity in multiple backends. I wrote a clone of Pong to illustrate that it is indeed possible — it’s crazy that pipong.py is now more than 10 years old!

Is there anything else you’d like to say?

Going back to my “Python is like driving a car” analogy, I hope I’m not dissuading anyone from learning Python or continuing to use it. By all means, please do, and I will continue as well. It’s just that I hope folks are reminded that there are other modes of transportation to leverage: you can steer a ship, pilot an airplane, fly a rocket, or just go for a walk. They all have value.

Thanks for doing the interview Paul!

The post PyDev of the Week: Paul Ivanov appeared first on The Mouse Vs. The Python.

Glyph Lefkowitz: The Numbers, They Lie

$
0
0

It’s October, and we’re all getting ready for Halloween, so allow me to me tell you a horror story, in Python:

1
2
>>>0.1+0.2-0.35.551115123125783e-17

some scary branches

Some of you might already be familiar with this chilling tale, but for those who might not have experienced it directly, let me briefly recap.

In Python, the default representation of a number with a decimal point in it is something called an “IEEE 754 double precision binary floating-point number”. This standard achieves a generally useful trade-off between performance, correctness, and is widely implemented in hardware, making it a popular choice for numbers in many programming language.

However, as our spooky story above indicates, it’s not perfect. 0.1 + 0.2 is very slightly less than 0.3 in this representation, because it is a floating-point representation in base 2.

If you’ve worked professionally with software that manipulates money1, you typically learn this lesson early; it’s quite easy to smash head-first into the problem with binary floating-point the first time you have an item that costs 30 cents and for some reason three dimes doesn’t suffice to cover it.

There are a few different approaches to the problem; one is using integers for everything, and denominating your transactions in cents rather than dollars. A strategy which requires less weird unit-conversion2, is to use the built-in decimal module, which provides a floating-point base 10 representation, rather than the standard base-2, which doesn’t have any of these weird glitches surrounding numbers like 0.1.

This is often where a working programmer’s numerical education ends; don’t use floats, they’re bad, use decimals, they’re good. Indeed, this advice will work well up to a pretty high degree of application complexity. But the story doesn’t end there. Once division gets involved, things can still get weird really fast:

1
2
3
>>>fromdecimalimportDecimal>>>(Decimal("1")/7)*14Decimal('2.000000000000000000000000001')

The problem is the same: before, we were working with 1/10, a value that doesn’t have a finite (non-repeating) representation in base 2; now we’re working with 1/7, which has the same problem in base 10.

Any time you have a representation of a number which uses digits and a decimal point, no matter the base, you’re going to run in to some rational values which do not have an exact representation with a finite number of digits; thus, you’ll drop some digits off the (necessarily finite) end, and end up with a slightly inaccurate representation.

But Python does have a way to maintain symbolic accuracy for arbitrary rational numbers -- the fractions module!

1
2
3
4
5
>>>fromfractionsimportFraction>>>Fraction(1)/3+Fraction(2)/3==1True>>>(Fraction(1)/7)*14==2True

You can multiply and divide and add and subtract to your heart’s content, and still compare against zero and it’ll always work exactly, giving you the right answers.

So if Python has a “correct” representation, which doesn’t screw up our results under a basic arithmetic operation such as division, why isn’t it the default? We don’t care all that much about performance, right? Python certainly trades off correctness and safety in plenty of other areas.

First of all, while Python’s willing to trade off some storage or CPU efficiency for correctness, precise fractions rapidly consume huge amounts of storage even under very basic algorithms, like consuming gigabytes while just trying to maintain a simple running average over a stream of incoming numbers.

But even more importantly, you’ll notice that I said we could maintain symbolic accuracy for arbitrary rational numbers; but, as it turns out, a whole lot of interesting math you might want to do with a computer involves numbers which are irrational: like π. If you want to use a computer to do it, pretty much all trigonometry3 involves a slightly inaccurate approximation unless you have a literally infinite amount of storage.

As Morpheus put it, “welcome to the desert of the ”.


  1. or any proxy for it, like video-game virtual currency 

  2. and less time saying weird words like “nanodollars” to your co-workers 

  3. or, for that matter, geometry, or anything involving a square root 

Julien Danjou: Python and fast HTTP clients

$
0
0
Python and fast HTTP clients

Nowadays, it is more than likely that you will have to write an HTTP client for your application that will have to talk to another HTTP server. The ubiquity of REST API makes HTTP a first class citizen. That's why knowing optimization patterns are a prerequisite.

There are many HTTP clients in Python; the most widely used and easy to
work with is requests. It is the de-factor standard nowadays.

Persistent Connections

The first optimization to take into account is the use of a persistent connection to the Web server. Persistent connections are a standard since HTTP 1.1 though many applications do not leverage them. This lack of optimization is simple to explain if you know that when using requests in its simple mode (e.g. with the get function) the connection is closed on return. To avoid that, an application needs to use a Session object that allows reusing an already opened connection.

import requests

session = requests.Session()
session.get("http://example.com")
# Connection is re-used
session.get("http://example.com")
Using Session with requests

Each connection is stored in a pool of connections (10 by default), the size of
which is also configurable:

import requests


session = requests.Session()
adapter = requests.adapters.HTTPAdapter(
    pool_connections=100,
    pool_maxsize=100)
session.mount('http://', adapter)
response = session.get("http://example.org")
Changing pool size

Reusing the TCP connection to send out several HTTP requests offers a number of performance advantages:

  • Lower CPU and memory usage (fewer connections opened simultaneously).
  • Reduced latency in subsequent requests (no TCP handshaking).
  • Exceptions can be raised without the penalty of closing the TCP connection.

The HTTP protocol also provides pipelining, which allows sending several requests on the same connection without waiting for the replies to come (think batch). Unfortunately, this is not supported by the requests library. However, pipelining requests may not be as fast as sending them in parallel. Indeed, the HTTP 1.1 protocol forces the replies to be sent in the same order as the requests were sent – first-in first-out.

Parallelism

requests also has one major drawback: it is synchronous. Calling requests.get("http://example.org") blocks the program until the HTTP server replies completely. Having the application waiting and doing nothing can be a drawback here. It is possible that the program could do something else rather than sitting idle.

A smart application can mitigate this problem by using a pool of threads like the ones provided by concurrent.futures. It allows parallelizing the HTTP requests in a very rapid way.

from concurrent import futures

import requests


with futures.ThreadPoolExecutor(max_workers=4) as executor:
    futures = [
        executor.submit(
            lambda: requests.get("http://example.org"))
        for _ in range(8)
    ]

results = [
    f.result().status_code
    for f in futures
]

print("Results: %s" % results)
Using futures with requests

This pattern being quite useful, it has been packaged into a library named requests-futures. The usage of Session objects is made transparent to the developer:

from requests_futures import sessions


session = sessions.FuturesSession()

futures = [
    session.get("http://example.org")
    for _ in range(8)
]

results = [
    f.result().status_code
    for f in futures
]

print("Results: %s" % results)
Using futures with requests

By default a worker with two threads is created, but a program can easily customize this value by passing the max_workers argument or even its own executor to the FuturSession object – for example like this: FuturesSession(executor=ThreadPoolExecutor(max_workers=10)).

Asynchronicity

As explained earlier, requests is entirely synchronous. That blocks the application while waiting for the server to reply, slowing down the program. Making HTTP requests in threads is one solution, but threads do have their own overhead and this implies parallelism, which is not something everyone is always glad to see in a program.

Starting with version 3.5, Python offers asynchronicity as its core using asyncio. The aiohttp library provides an asynchronous HTTP client built on top of asyncio. This library allows sending requests in series but without waiting for the first reply to come back before sending the new one. In contrast to HTTP pipelining, aiohttp sends the requests over multiple connections in parallel, avoiding the ordering issue explained earlier.

import aiohttp
import asyncio


async def get(url):
    async with aiohttp.ClientSession() as session:
        async with session.get(url) as response:
            return response


loop = asyncio.get_event_loop()

coroutines = [get("http://example.com") for _ in range(8)]

results = loop.run_until_complete(asyncio.gather(*coroutines))

print("Results: %s" % results)
Using aiohttp

All those solutions (using Session, threads, futures or asyncio) offer different approaches to making HTTP clients faster.

Performances

The snippet below is an HTTP client sending requests to httpbin.org, an HTTP API that provides (among other things) an endpoint simulating a long request (a second here). This example implements all the techniques listed above and times them.

import contextlib
import time

import aiohttp
import asyncio
import requests
from requests_futures import sessions

URL = "http://httpbin.org/delay/1"
TRIES = 10


@contextlib.contextmanager
def report_time(test):
    t0 = time.time()
    yield
    print("Time needed for `%s' called: %.2fs"
          % (test, time.time() - t0))


with report_time("serialized"):
    for i in range(TRIES):
        requests.get(URL)


session = requests.Session()
with report_time("Session"):
    for i in range(TRIES):
        session.get(URL)


session = sessions.FuturesSession(max_workers=2)
with report_time("FuturesSession w/ 2 workers"):
    futures = [session.get(URL)
               for i in range(TRIES)]
    for f in futures:
        f.result()


session = sessions.FuturesSession(max_workers=TRIES)
with report_time("FuturesSession w/ max workers"):
    futures = [session.get(URL)
               for i in range(TRIES)]
    for f in futures:
        f.result()


async def get(url):
    async with aiohttp.ClientSession() as session:
        async with session.get(url) as response:
            await response.read()

loop = asyncio.get_event_loop()
with report_time("aiohttp"):
    loop.run_until_complete(
        asyncio.gather(*[get(URL)
                         for i in range(TRIES)]))
Program to compare the performances of different requests usage

Running this program gives the following output:

Time needed for `serialized' called: 12.12s
Time needed for `Session' called: 11.22s
Time needed for `FuturesSession w/ 2 workers' called: 5.65s
Time needed for `FuturesSession w/ max workers' called: 1.25s
Time needed for `aiohttp' called: 1.19s
Python and fast HTTP clients

Without any surprise, the slower result comes with the dumb serialized version, since all the requests are made one after another without reusing the connection — 12 seconds to make 10 requests.

Using a Session object and therefore reusing the connection means saving 8% in terms of time, which is already a big and easy win. Minimally, you should always use a session.

If your system and program allow the usage of threads, it is a good call to use them to parallelize the requests. However threads have some overhead, and they are not weight-less. They need to be created, started and then joined.

Unless you are still using old versions of Python, without a doubt using aiohttp should be the way to go nowadays if you want to write a fast and asynchronous HTTP client. It is the fastest and the most scalable solution as it can handle hundreds of parallel requests. The alternative, managing hundreds of threads in parallel is not a great option.

Streaming

Another speed optimization that can be efficient is streaming the requests. When making a request, by default the body of the response is downloaded immediately. The stream parameter provided by the requests library or the content attribute for aiohttp both provide a way to not load the full content in memory as soon as the request is executed.

import requests


# Use `with` to make sure the response stream is closed and the connection can
# be returned back to the pool.
with requests.get('http://example.org', stream=True) as r:
    print(list(r.iter_content()))
Streaming with requests
import aiohttp
import asyncio


async def get(url):
    async with aiohttp.ClientSession() as session:
        async with session.get(url) as response:
            return await response.content.read()

loop = asyncio.get_event_loop()
tasks = [asyncio.ensure_future(get("http://example.com"))]
loop.run_until_complete(asyncio.wait(tasks))
print("Results: %s" % [task.result() for task in tasks])
Streaming with aiohttp

Not loading the full content is extremely important in order to avoid allocating potentially hundred of megabytes of memory for nothing. If your program does not need to access the entire content as a whole but can work on chunks, it is probably better to just use those methods. For example, if you're going to save and write the content to a file, reading only a chunk and writing it at the same time is going to be much more memory efficient than reading the whole HTTP body, allocating a giant pile of memory, and then writing it to disk.

I hope that'll make it easier for you to write proper HTTP clients and requests. If you know any other useful technic or method, feel free to write it down in the comment section below!

Ned Batchelder: Sponsor me on GitHub?

$
0
0

tl;dr: You can sponsor me on GitHub, but I’m not sure why you would.

In May, GitHub launched GitHub Sponsors, a feature on their site for people to support each other financially. It’s still in beta, but now I’m in the program, so you can sponsor me if you want.

I’m very interested in the question of how the creators of open source software can benefit more from what they create, considering how much value others get from it.

To be honest, I’m not sure GitHub Sponsors is going to make a big difference. It’s another form of what I’ve called an internet tip jar: it focuses on one person giving another person money. Don’t get me wrong: I’m all for enabling interpersonal connections of all sorts. But I don’t think that will scale to improve the situation meaningfully.

I think a significant shift will only come with a change in how businesses give back to open source, since they are the major beneficiaries. See my post about Tidelift and “Corporations and open source, why and how” for more about this.

I’m participating in GitHub Sponsors because I want to try every possible avenue. Since it’s on GitHub, it will get more attention than most tip jars, so maybe it will work out differently. Participating is a good way for me to understand it.

GitHub lets me define tiers of sponsorship, with different incentives, similar to Kickstarter. I don’t know what will motivate people, and I don’t have existing incentives at my fingertips to offer, so I’ve just created three generic tiers ($3, $10, $30 per month). If GitHub Sponsors appeals to you, let me know what I could do with a tier that might attract other people.

The question mark in the title is not because I’m making a request of you. It’s because I’m uncertain whether and why people will become sponsors through GitHub Sponsors. We’ll see what happens.

Real Python: Building a Python C Extension Module

$
0
0

There are several ways in which you can extend the functionality of Python. One of these is to write your Python module in C or C++. This process can lead to improved performance and better access to C library functions and system calls. In this tutorial, you’ll discover how to use the Python API to write Python C extension modules.

You’ll learn how to:

  • Invoke C functions from within Python
  • Pass arguments from Python to C and parse them accordingly
  • Raise exceptions from C code and create custom Python exceptions in C
  • Define global constants in C and make them accessible in Python
  • Test, package, and distribute your Python C extension module

Free Bonus:Click here to get access to a chapter from Python Tricks: The Book that shows you Python's best practices with simple examples you can apply instantly to write more beautiful + Pythonic code.

Extending Your Python Program

One of the lesser-known yet incredibly powerful features of Python is its ability to call functions and libraries defined in compiled languages such as C or C++. This allows you to extend the capabilities of your program beyond what Python’s built-in features have to offer.

There are many languages you could choose from to extend the functionality of Python. So, why should you use C? Here are a few reasons why you might decide to build a Python C extension module:

  1. To implement new built-in object types: It’s possible to write a Python class in C, and then instantiate and extend that class from Python itself. There can be many reasons for doing this, but more often than not, performance is primarily what drives developers to turn to C. Such a situation is rare, but it’s good to know the extent to which Python can be extended.

  2. To call C library functions and system calls: Many programming languages provide interfaces to the most commonly used system calls. Still, there may be other lesser-used system calls that are only accessible through C. The os module in Python is one example.

This is not an exhaustive list, but it gives you the gist of what can be done when extending Python using C or any other language.

To write Python modules in C, you’ll need to use the Python API, which defines the various functions, macros, and variables that allow the Python interpreter to call your C code. All of these tools and more are collectively bundled in the Python.h header file.

Writing a Python Interface in C

In this tutorial, you’ll write a small wrapper for a C library function, which you’ll then invoke from within Python. Implementing a wrapper yourself will give you a better idea about when and how to use C to extend your Python module.

Understanding fputs()

fputs() is the C library function that you’ll be wrapping:

intfputs(constchar*,FILE*)

This function takes two arguments:

  1. const char * is an array of characters.
  2. FILE * is a file stream pointer.

fputs() writes the character array to the file specified by the file stream and returns a non-negative value. If the operation is successful, then this value will denote the number of bytes written to the file. If there’s an error, then it returns EOF. You can read more about this C library function and its other variants in the manual page entry.

Writing the C Function for fputs()

This is a basic C program that uses fputs() to write a string to a file stream:

#include<stdio.h>#include<stdlib.h>#include<unistd.h>intmain(){FILE*fp=fopen("write.txt","w");fputs("Real Python!",fp);fclose(fp);return1;}

This snippet of code can be summarized as follows:

  1. Open the file write.txt.
  2. Write the string "Real Python!" to the file.

Note: The C code in this article should build on most systems. It has been tested on GCC without using any special flags.

In the following section, you’ll write a wrapper for this C function.

Wrapping fputs()

It might seem a little weird to see the full code before an explanation of how it works. However, taking a moment to inspect the final product will supplement your understanding in the following sections. The code block below shows the final wrapped version of your C code:

 1 staticPyObject*method_fputs(PyObject*self,PyObject*args){ 2 char*str,*filename=NULL; 3 intbytes_copied=-1; 4  5 /* Parse arguments */ 6 if(!PyArg_ParseTuple(args,"ss",&str,&filename)){ 7 returnNULL; 8 } 9 10 FILE*fp=fopen(filename,"w");11 bytes_copied=fputs(str,fp);12 fclose(fp);13 14 returnPyLong_FromLong(bytes_copied);15 }

This code snippet references three object structures:

  1. PyObject
  2. PyArg_ParseTuple()
  3. PyLong_FromLong()

These are used for data type definition for the Python language. You’ll go through each of them now.

PyObject

PyObject is an object structure that you use to define object types for Python. All Python objects share a small number of fields that are defined using the PyObject structure. All other object types are extensions of this type.

PyObject tells the Python interpreter to treat a pointer to an object as an object. For instance, setting the return type of the above function as PyObject defines the common fields that are required by the Python interpreter in order to recognize this as a valid Python type.

Take another look at the first few lines of your C code:

 1 staticPyObject*method_fputs(PyObject*self,PyObject*args){ 2 char*str,*filename=NULL; 3 intbytes_copied=-1; 4  5 /* Snip */

In line 2, you declare the argument types you wish to receive from your Python code:

  1. char *str is the string you want to write to the file stream.
  2. char *filename is the name of the file to write to.

PyArg_ParseTuple()

PyArg_ParseTuple() parses the arguments you’ll receive from your Python program into local variables:

 1 staticPyObject*method_fputs(PyObject*self,PyObject*args){ 2 char*str,*filename=NULL; 3 intbytes_copied=-1; 4  5 /* Parse arguments */ 6 if(!PyArg_ParseTuple(args,"ss",&str,&filename)){ 7 returnNULL; 8 } 9 10 /* Snip */

If you look at line 6, then you’ll see that PyArg_ParseTuple() takes the following arguments:

  • args are of type PyObject.

  • "ss" is the format specifier that specifies the data type of the arguments to parse. (You can check out the official documentation for a complete reference.)

  • &str and &filename are pointers to local variables to which the parsed values will be assigned.

PyArg_ParseTuple() evaluates to false on failure. If it fails, then the function will return NULL and not proceed any further.

fputs()

As you’ve seen before, fputs() takes two arguments, one of which is the FILE * object. Since you can’t parse a Python textIOwrapper object using the Python API in C, you’ll have to use a workaround:

 1 staticPyObject*method_fputs(PyObject*self,PyObject*args){ 2 char*str,*filename=NULL; 3 intbytes_copied=-1; 4  5 /* Parse arguments */ 6 if(!PyArg_ParseTuple(args,"ss",&str,&filename)){ 7 returnNULL; 8 } 9 10 FILE*fp=fopen(filename,"w");11 bytes_copied=fputs(str,fp);12 fclose(fp);13 14 returnPyLong_FromLong(bytes_copied);15 }

Here’s a breakdown of what this code does:

  • In line 10, you’re passing the name of the file that you’ll use to create a FILE * object and pass it on to the function.
  • In line 11, you call fputs() with the following arguments:
    • str is the string you want to write to the file.
    • fp is the FILE * object you defined in line 10.

You then store the return value of fputs() in bytes_copied. This integer variable will be returned to the fputs() invocation within the Python interpreter.

PyLong_FromLong(bytes_copied)

PyLong_FromLong() returns a PyLongObject, which represents an integer object in Python. You can find it at the very end of your C code:

 1 staticPyObject*method_fputs(PyObject*self,PyObject*args){ 2 char*str,*filename=NULL; 3 intbytes_copied=-1; 4  5 /* Parse arguments */ 6 if(!PyArg_ParseTuple(args,"ss",&str,&filename)){ 7 returnNULL; 8 } 9 10 FILE*fp=fopen(filename,"w");11 bytes_copied=fputs(str,fp);12 fclose(fp);13 14 returnPyLong_FromLong(bytes_copied);15 }

Line 14 generates a PyLongObject for bytes_copied, the variable to be returned when the function is invoked in Python. You must return a PyObject* from your Python C extension module back to the Python interpreter.

Writing the Init Function

You’ve written the code that makes up the core functionality of your Python C extension module. However, there are still a few extra functions that are necessary to get your module up and running. You’ll need to write definitions of your module and the methods it contains, like so:

staticPyMethodDefFputsMethods[]={{"fputs",method_fputs,METH_VARARGS,"Python interface for fputs C library function"},{NULL,NULL,0,NULL}};staticstructPyModuleDeffputsmodule={PyModuleDef_HEAD_INIT,"fputs","Python interface for the fputs C library function",-1,FputsMethods};

These functions include meta information about your module that will be used by the Python interpreter. Let’s go through each of the structs above to see how they work.

PyMethodDef

In order to call the methods defined in your module, you’ll need to tell the Python interpreter about them first. To do this, you can use PyMethodDef. This is a structure with 4 members representing a single method in your module.

Ideally, there will be more than one method in your Python C extension module that you want to be callable from the Python interpreter. This is why you need to define an array of PyMethodDef structs:

staticPyMethodDefFputsMethods[]={{"fputs",method_fputs,METH_VARARGS,"Python interface for fputs C library function"},{NULL,NULL,0,NULL}};

Each individual member of the struct holds the following info:

  • "fputs" is the name the user would write to invoke this particular function.

  • method_fputs is the name of the C function to invoke.

  • METH_VARARGS is a flag that tells the interpreter that the function will accept two arguments of type PyObject*:

    1. self is the module object.
    2. args is a tuple containing the actual arguments to your function. As explained previously, these arguments are unpacked using PyArg_ParseTuple().

  • The final string is a value to represent the method docstring.

PyModuleDef

Just as PyMethodDef holds information about the methods in your Python C extension module, the PyModuleDef struct holds information about your module itself. It is not an array of structures, but rather a single structure that’s used for module definition:

staticstructPyModuleDeffputsmodule={PyModuleDef_HEAD_INIT,"fputs","Python interface for the fputs C library function",-1,FputsMethods};

There are a total of 9 members in this struct, but not all of them are required. In the code block above, you initialize the following five:

  1. PyModuleDef_HEAD_INIT is a member of type PyModuleDef_Base, which is advised to have just this one value.

  2. "fputs" is the name of your Python C extension module.

  3. The string is the value that represents your module docstring. You can use NULL to have no docstring, or you can specify a docstring by passing a const char * as shown in the snippet above. It is of type Py_ssize_t. You can also use PyDoc_STRVAR() to define a docstring for your module.

  4. -1 is the amount of memory needed to store your program state. It’s helpful when your module is used in multiple sub-interpreters, and it can have the following values:

    • A negative value indicates that this module doesn’t have support for sub-interpreters.
    • A non-negative value enables the re-initialization of your module. It also specifies the memory requirement of your module to be allocated on each sub-interpreter session.

  5. FputsMethods is the reference to your method table. This is the array of PyMethodDef structs you defined earlier.

For more information, check out the official Python documentation on PyModuleDef.

PyMODINIT_FUNC

Now that you’ve defined your Python C extension module and method structures, it’s time to put them to use. When a Python program imports your module for the first time, it will call PyInit_fputs():

PyMODINIT_FUNCPyInit_fputs(void){returnPyModule_Create(&fputsmodule);}

PyMODINIT_FUNC does 3 things implicitly when stated as the function return type:

  1. It implicitly sets the return type of the function as PyObject*.
  2. It declares any special linkages.
  3. It declares the function as extern “C.” In case you’re using C++, it tells the C++ compiler not to do name-mangling on the symbols.

PyModule_Create() will return a new module object of type PyObject *. For the argument, you’ll pass the address of the method structure that you’ve already defined previously, fputsmodule.

Note: In Python 3, your init function must return a PyObject * type. However, if you’re using Python 2, then PyMODINIT_FUNC declares the function return type as void.

Putting It All Together

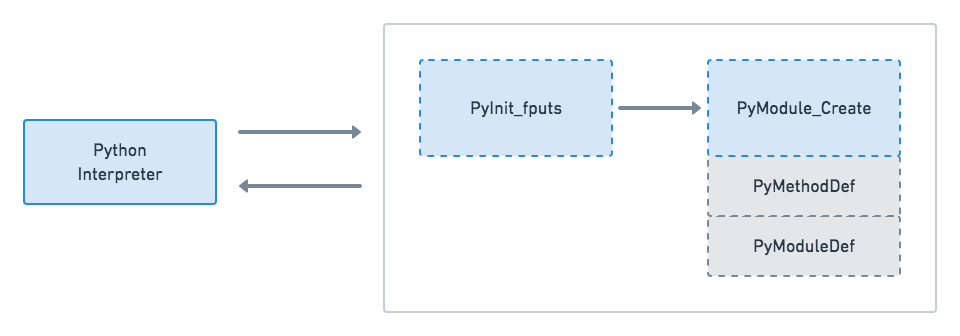
Now that you’ve written the necessary parts of your Python C extension module, let’s take a step back to see how it all fits together. The following diagram shows the components of your module and how they interact with the Python interpreter:

Python C API Communication

When you import your Python C extension module, PyInit_fputs() is the first method to be invoked. However, before a reference is returned to the Python interpreter, the function makes a subsequent call to PyModule_Create(). This will initialize the structures PyModuleDef and PyMethodDef, which hold meta information about your module. It makes sense to have them ready since you’ll make use of them in your init function.

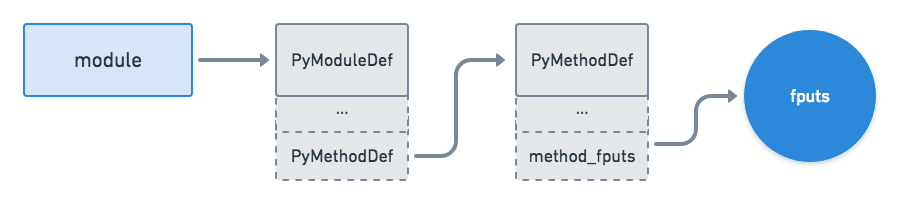
Once this is complete, a reference to the module object is finally returned to the Python interpreter. The following diagram shows the internal flow of your module:

Python C API Module API

The module object returned by PyModule_Create() has a reference to the module structure PyModuleDef, which in turn has a reference to the method table PyMethodDef. When you call a method defined in your Python C extension module, the Python interpreter uses the module object and all of the references it carries to execute the specific method. (While this isn’t exactly how the Python interpreter handles things under the hood, it’ll give you an idea of how it works.)

Similarly, you can access various other methods and properties of your module, such as the module docstring or the method docstring. These are defined inside their respective structures.

Now you have an idea of what happens when you call fputs() from the Python interpreter. The interpreter uses your module object as well as the module and method references to invoke the method. Finally, let’s take a look at how the interpreter handles the actual execution of your Python C extension module:

Python C API <code>fputs</code> Function Flowfputs Function Flow" />fputs Function Flow" />fputs Function Flow"/>

Once method_fputs() is invoked, the program executes the following steps:

  1. Parse the arguments you passed from the Python interpreter with PyArg_ParseTuple()
  2. Pass these arguments to fputs(), the C library function that forms the crux of your module
  3. Use PyLong_FromLong to return the value from fputs()

To see these same steps in code, take a look at method_fputs() again:

 1 staticPyObject*method_fputs(PyObject*self,PyObject*args){ 2 char*str,*filename=NULL; 3 intbytes_copied=-1; 4  5 /* Parse arguments */ 6 if(!PyArg_ParseTuple(args,"ss",&str,&filename)){ 7 returnNULL; 8 } 9 10 FILE*fp=fopen(filename,"w");11 bytes_copied=fputs(str,fp);12 fclose(fp);13 14 returnPyLong_FromLong(bytes_copied);15 }

To recap, your method will parse the arguments passed to your module, send them on to fputs(), and return the results.

Packaging Your Python C Extension Module

Before you can import your new module, you first need to build it. You can do this by using the Python package distutils.

You’ll need a file called setup.py to install your application. For this tutorial, you’ll be focusing on the part specific to the Python C extension module. For a full primer, check out How to Publish an Open-Source Python Package to PyPI.

A minimal setup.py file for your module should look like this:

fromdistutils.coreimportsetup,Extensiondefmain():setup(name="fputs",version="1.0.0",description="Python interface for the fputs C library function",author="<your name>",author_email="your_email@gmail.com",ext_modules=[Extension("fputs",["fputsmodule.c"])])if__name__=="__main__":main()

The code block above shows the standard arguments that are passed to setup(). Take a closer look at the last positional argument, ext_modules. This takes a list of objects of the Extensions class. An object of the Extensions class describes a single C or C++ extension module in a setup script. Here, you pass two keyword arguments to its constructor, namely:

  • name is the name of the module.
  • [filename] is a list of paths to files with the source code, relative to the setup script.

Building Your Module

Now that you have your setup.py file, you can use it to build your Python C extension module. It’s strongly advised that you use a virtual environment to avoid conflicts with your Python environment.

Navigate to the directory containing setup.py and run the following command:

$ python3 setup.py install

This command will compile and install your Python C extension module in the current directory. If there are any errors or warnings, then your program will throw them now. Make sure you fix these before you try to import your module.

By default, the Python interpreter uses clang for compiling the C code. If you want to use gcc or any other C compiler for the job, then you need to set the CC environment variable accordingly, either inside the setup script or directly on the command line. For instance, you can tell the Python interpreter to use gcc to compile and build your module this way:

$CC=gcc python3 setup.py install

However, the Python interpreter will automatically fall back to gcc if clang is not available.

Running Your Module

Now that everything is in place, it’s time to see your module in action! Once it’s successfully built, fire up the interpreter to test run your Python C extension module:

>>>
>>> importfputs>>> fputs.__doc__'Python interface for the fputs C library function'>>> fputs.__name__'fputs'>>> # Write to an empty file named `write.txt`>>> fputs.fputs("Real Python!","write.txt")13>>> withopen("write.txt","r")asf:>>> print(f.read())'Real Python!'

Your function performs as expected! You pass a string "Real Python!" and a file to write this string to, write.txt. The call to fputs() returns the number of bytes written to the file. You can verify this by printing the contents of the file.

Also recall how you passed certain arguments to the PyModuleDef and PyMethodDef structures. You can see from this output that Python has used these structures to assign things like the function name and docstring.

With that, you have a basic version of your module ready, but there’s a lot more that you can do! You can improve your module by adding things like custom exceptions and constants.

Raising Exceptions

Python exceptions are very different from C++ exceptions. If you want to raise Python exceptions from your C extension module, then you can use the Python API to do so. Some of the functions provided by the Python API for exception raising are as follows:

FunctionDescription
PyErr_SetString(PyObject *type,
     const char *message)
Takes two arguments: a PyObject * type argument specifying the type of exception, and a custom message to display to the user
PyErr_Format(PyObject *type,
     const char *format)
Takes two arguments: a PyObject * type argument specifying the type of exception, and a formatted custom message to display to the user
PyErr_SetObject(PyObject *type,
     PyObject *value)
Takes two arguments, both of type PyObject *: the first specifies the type of exception, and the second sets an arbitrary Python object as the exception value

You can use any of these to raise an exception. However, which to use and when depends entirely on your requirements. The Python API has all the standard exceptions pre-defined as PyObject types.

Raising Exceptions From C Code

While you can’t raise exceptions in C, the Python API will allow you to raise exceptions from your Python C extension module. Let’s test this functionality by adding PyErr_SetString() to your code. This will raise an exception whenever the length of the string to be written is less than 10 characters:

 1 staticPyObject*method_fputs(PyObject*self,PyObject*args){ 2 char*str,*filename=NULL; 3 intbytes_copied=-1; 4  5 /* Parse arguments */ 6 if(!PyArg_ParseTuple(args,"ss",&str,&fd)){ 7 returnNULL; 8 } 9 10 if(strlen(str)<10){11 PyErr_SetString(PyExc_ValueError,"String length must be greater than 10");12 returnNULL;13 }14 15 fp=fopen(filename,"w");16 bytes_copied=fputs(str,fp);17 fclose(fp);18 19 returnPyLong_FromLong(bytes_copied);20 }

Here, you check the length of the input string immediately after you parse the arguments and before you call fputs(). If the string passed by the user is shorter than 10 characters, then your program will raise a ValueError with a custom message. The program execution stops as soon as the exception occurs.

Note how method_fputs() returns NULL after raising the exception. This is because whenever you raise an exception using PyErr_*(), it automatically sets an internal entry in the exception table and returns it. The calling function is not required to subsequently set the entry again. For this reason, the calling function returns a value that indicates failure, usually NULL or -1. (This should also explain why there was a need to return NULL when you parse arguments in method_fputs() using PyArg_ParseTuple().)

Raising Custom Exceptions

You can also raise custom exceptions in your Python C extension module. However, things are a bit different. Previously, in PyMODINIT_FUNC, you were simply returning the instance returned by PyModule_Create and calling it a day. But for your custom exception to be accessible by the user of your module, you need to add your custom exception to your module instance before you return it:

staticPyObject*StringTooShortError=NULL;PyMODINIT_FUNCPyInit_fputs(void){/* Assign module value */PyObject*module=PyModule_Create(&fputsmodule);/* Initialize new exception object */StringTooShortError=PyErr_NewException("fputs.StringTooShortError",NULL,NULL);/* Add exception object to your module */PyModule_AddObject(module,"StringTooShortError",StringTooShortError);returnmodule;}

As before, you start off by creating a module object. Then you create a new exception object using PyErr_NewException. This takes a string of the form module.classname as the name of the exception class that you wish to create. Choose something descriptive to make it easier for the user to interpret what has actually gone wrong.

Next, you add this to your module object using PyModule_AddObject. This takes your module object, the name of the new object being added, and the custom exception object itself as arguments. Finally, you return your module object.

Now that you’ve defined a custom exception for your module to raise, you need to update method_fputs() so that it raises the appropriate exception:

 1 staticPyObject*method_fputs(PyObject*self,PyObject*args){ 2 char*str,*filename=NULL; 3 intbytes_copied=-1; 4  5 /* Parse arguments */ 6 if(!PyArg_ParseTuple(args,"ss",&str,&fd)){ 7 returnNULL; 8 } 9 10 if(strlen(str)<10){11 /* Passing custom exception */12 PyErr_SetString(StringTooShortError,"String length must be greater than 10");13 returnNULL;14 }15 16 fp=fopen(filename,"w");17 bytes_copied=fputs(str,fp);18 fclose(fp);19 20 returnPyLong_FromLong(bytes_copied);21 }

After building the module with the new changes, you can test that your custom exception is working as expected by trying to write a string that is less than 10 characters in length:

>>>
>>> importfputs>>> # Custom exception>>> fputs.fputs("RP!",fp.fileno())Traceback (most recent call last):
  File "<stdin>", line 1, in <module>fputs.StringTooShortError: String length must be greater than 10

When you try to write a string with fewer than 10 characters, your custom exception is raised with a message explaining what went wrong.

Defining Constants

There are cases where you’ll want to use or define constants in your Python C extension module. This is quite similar to how you defined custom exceptions in the previous section. You can define a new constant and add it to your module instance using PyModule_AddIntConstant():

PyMODINIT_FUNCPyInit_fputs(void){/* Assign module value */PyObject*module=PyModule_Create(&fputsmodule);/* Add int constant by name */PyModule_AddIntConstant(module,"FPUTS_FLAG",64);/* Define int macro */#define FPUTS_MACRO 256/* Add macro to module */PyModule_AddIntMacro(module,FPUTS_MACRO);returnmodule;}

This Python API function takes the following arguments:

  • The instance of your module
  • The name of the constant
  • The value of the constant

You can do the same for macros using PyModule_AddIntMacro():

PyMODINIT_FUNCPyInit_fputs(void){/* Assign module value */PyObject*module=PyModule_Create(&fputsmodule);/* Add int constant by name */PyModule_AddIntConstant(module,"FPUTS_FLAG",64);/* Define int macro */#define FPUTS_MACRO 256/* Add macro to module */PyModule_AddIntMacro(module,FPUTS_MACRO);returnmodule;}

This function takes the following arguments:

  • The instance of your module
  • The name of the macro that has already been defined

Note: If you want to add string constants or macros to your module, then you can use PyModule_AddStringConstant() and PyModule_AddStringMacro(), respectively.

Open up the Python interpreter to see if your constants and macros are working as expected:

>>>
>>> importfputs>>> # Constants>>> fputs.FPUTS_FLAG64>>> fputs.FPUTS_MACRO256

Here, you can see that the constants are accessible from within the Python interpreter.

Testing Your Module

You can test your Python C extension module just as you would any other Python module. This can be demonstrated by writing a small test function for pytest:

importfputsdeftest_copy_data():content_to_copy="Real Python!"bytes_copied=fputs.fputs(content_to_copy,'test_write.txt')withopen('test_write.txt','r')asf:content_copied=f.read()assertcontent_copied==content_to_copy

In the test script above, you use fputs.fputs() to write the string "Real Python!" to an empty file named test_write.txt. Then, you read in the contents of this file and use an assert statement to compare it to what you had originally written.

You can run this test suite to make sure your module is working as expected:

$ pytest -q
test_fputs.py                                                 [100%]1 passed in 0.03 seconds

For a more in-depth introduction, check out Getting Started With Testing in Python.

Considering Alternatives

In this tutorial, you’ve built an interface for a C library function to understand how to write Python C extension modules. However, there are times when all you need to do is invoke some system calls or a few C library functions, and you want to avoid the overhead of writing two different languages. In these cases, you can use Python libraries such as ctypes or cffi.

These are Foreign Function libraries for Python that provide access to C library functions and data types. Though the community itself is divided as to which library is best, both have their benefits and drawbacks. In other words, either would make a good choice for any given project, but there are a few things to keep in mind when you need to decide between the two:

  • The ctypes library comes included in the Python standard library. This is very important if you want to avoid external dependencies. It allows you to write wrappers for other languages in Python.

  • The cffi library is not yet included in the standard library. This might be a dealbreaker for your particular project. In general, it’s more Pythonic in nature, but it doesn’t handle preprocessing for you.

For more information on these libraries, check out Extending Python With C Libraries and the “ctypes” Module and Interfacing Python and C: The CFFI Module.

Note: Apart from ctypes and cffi, there are various other tools available. For instance, you can also use swig and boost::Py.

Conclusion

In this tutorial, you’ve learned how to write a Python interface in the C programming language using the Python API. You wrote a Python wrapper for the fputs() C library function. You also added custom exceptions and constants to your module before building and testing it.

The Python API provides a host of features for writing complex Python interfaces in the C programming language. At the same time, libraries such as cffi or ctypes can lower the amount of overhead involved in writing Python C extension modules. Make sure you weigh all the factors before making a decision!


[ Improve Your Python With 🐍 Python Tricks 💌 – Get a short & sweet Python Trick delivered to your inbox every couple of days. >> Click here to learn more and see examples ]

Codementor: Choosing Python for Web Development: Top 16 Pros and Cons

$
0
0
Did you know that Python was named after Monty Python? One of the world’s most popular coding languages (https://stackoverflow.blog/2017/09/06/incredible-growth-python/), Python was first...

Quansight Labs Blog: Quansight Labs Work Update for September, 2019

$
0
0

As of November, 2018, I have been working at Quansight. Quansight is a new startup founded by the same people who started Anaconda, which aims to connect companies and open source communities, and offers consulting, training, support and mentoring services. I work under the heading of Quansight Labs. Quansight Labs is a public-benefit division of Quansight. It provides a home for a "PyData Core Team" which consists of developers, community managers, designers, and documentation writers who build open-source technology and grow open-source communities around all aspects of the AI and Data Science workflow.

My work at Quansight is split between doing open source consulting for various companies, and working on SymPy. SymPy, for those who do not know, is a symbolic mathematics library written in pure Python. I am the lead maintainer of SymPy.

In this post, I will detail some of the open source work that I have done recently, both as part of my open source consulting, and as part of my work on SymPy for Quansight Labs.

Bounds Checking in Numba

As part of work on a client project, I have been working on contributing code to the numba project. Numba is a just-in-time compiler for Python. It lets you write native Python code and with the use of a simple @jit decorator, the code will be automatically sped up using LLVM. This can result in code that is up to 1000x faster in some cases:

Read more… (7 min remaining to read)


Catalin George Festila: Python 3.7.4 : Example with subprocess - part 001.

$
0
0
This is a simple example with the python 3 subprocess package. The source code is simple to understand. The execute_proceess_with_communicate let run the ls command with the sudo user permissions: import os import sys import string import subprocess import codecs inp = '' cmd = 'ls' password = '' def execute_proceess_with_communicate(inp): """Return a list of hops from traceroute command.""

Dataquest: Tutorial: Getting Music Data with the Last.fm API using Python

$
0
0

APIs allow us to make requests from servers to retrieve data. APIs are useful for many things, but one is to be able to create a unique dataset for a data science project. In this tutorial, we’re going to learn some advanced techniques for working with the Last.fm API. In our beginner Python API tutorial, […]

The post Tutorial: Getting Music Data with the Last.fm API using Python appeared first on Dataquest.

Podcast.__init__: Network Automation At Enterprise Scale With Python

$
0
0
Designing and maintaining enterprise networks and the associated hardware is a complex and time consuming task. Network automation tools allow network engineers to codify their workflows and make them repeatable. In this episode Antoine Fourmy describes his work on eNMS and how it can be used to automate enterprise grade networks. He explains how his background in telecom networking led him to build an open source platform for network engineers, how it is architected, and how you can use it for creating your own workflows. This is definitely worth listening to as a way to gain some appreciation for all of the work that goes on behind the scenes to make the internet possible.

Summary

Designing and maintaining enterprise networks and the associated hardware is a complex and time consuming task. Network automation tools allow network engineers to codify their workflows and make them repeatable. In this episode Antoine Fourmy describes his work on eNMS and how it can be used to automate enterprise grade networks. He explains how his background in telecom networking led him to build an open source platform for network engineers, how it is architected, and how you can use it for creating your own workflows. This is definitely worth listening to as a way to gain some appreciation for all of the work that goes on behind the scenes to make the internet possible.

Announcements

  • Hello and welcome to Podcast.__init__, the podcast about Python and the people who make it great.
  • When you’re ready to launch your next app or want to try a project you hear about on the show, you’ll need somewhere to deploy it, so take a look at our friends over at Linode. With 200 Gbit/s private networking, scalable shared block storage, node balancers, and a 40 Gbit/s public network, all controlled by a brand new API you’ve got everything you need to scale up. And for your tasks that need fast computation, such as training machine learning models, they just launched dedicated CPU instances. Go to pythonpodcast.com/linode to get a $20 credit and launch a new server in under a minute. And don’t forget to thank them for their continued support of this show!
  • You listen to this show to learn and stay up to date with the ways that Python is being used, including the latest in machine learning and data analysis. For even more opportunities to meet, listen, and learn from your peers you don’t want to miss out on this year’s conference season. We have partnered with organizations such as O’Reilly Media, Dataversity, Corinium Global Intelligence, Alluxio, and Data Council. Upcoming events include the combined events of the Data Architecture Summit and Graphorum, the Data Orchestration Summit, and Data Council in NYC. Go to pythonpodcast.com/conferences to learn more about these and other events, and take advantage of our partner discounts to save money when you register today.
  • Your host as usual is Tobias Macey and today I’m interviewing Antoine Fourmy about eNMS, an enterprise-grade vendor-agnostic network automation platform.

Interview

  • Introductions
  • How did you get introduced to Python?
  • Can you start by explaining what eNMS is
  • What was your motivation for creating it?
  • Who are the target users of eNMS and how much background knowledge of network management is required to be effective with it?
  • What are some of the alternative tools that exist in this space and why might a network operator choose to use eNMS in their place?
  • What are some of the most challenging aspects of network creation and maintenance and how does eNMS assist with them?
  • What are some of the mundane and/or error-prone tasks that can be replaced or automated with eNMS?
  • What are some of the additional features that come into play for more complex networking tasks?
  • Can you describe the system architecture of eNMS and how it has evolved since you first began working on it?
  • eNMS is an impressive project that looks to have a substantial amount of polish. How large is the overall community of users and contributors?
    • For someone who wants to get involved in contributing to eNMS what are some of the types of skills and background that would be helpful?
  • What are some of the most innovative/unexpected ways that you have seen eNMS used?
  • When is eNMS the wrong choice?
  • What do you have planned for the future of the project?

Keep In Touch

Picks

Closing Announcements

  • Thank you for listening! Don’t forget to check out our other show, the Data Engineering Podcast for the latest on modern data management.
  • Visit the site to subscribe to the show, sign up for the mailing list, and read the show notes.
  • If you’ve learned something or tried out a project from the show then tell us about it! Email hosts@podcastinit.com) with your story.
  • To help other people find the show please leave a review on iTunes and tell your friends and co-workers
  • Join the community in the new Zulip chat workspace at pythonpodcast.com/chat

Links

The intro and outro music is from Requiem for a Fish The Freak Fandango Orchestra / CC BY-SA

Brad Lucas: Book Squire Is Ten Years Old

$
0
0

While releasing a new version of Book Squire the other day I realized that Book Squire is ten years old. What first started as a quickly developed application to solve a personal need has grown into one of my longest running applications.

Back in 2009 I was frustrated with the online access to our Library. It was tedious to enter the card number and pin then navigate to the page to see the status of my account. In addition, I was checking on accounts for family members and with four Library cards in hand was finding my patience tested.

I figured why couldn't a program do this. Maybe, do it everyday and at some point send me a note if there was something important to know about.

That was the plan which resulted in Book Squire.

Platforms

I choose Python for the first version. I got the logging in, navigating of the Library site and the scraping of account data working as a script. Then decided to built it into an application running under the then new Google App Engine platform. That worked for a while just fine. Over time I added a database to store user information and an email notifications feature with nightly reports delivered when accounts had notable events worth mentioning.

After working on a few Django applications I decided to move Book Squire to Django and host it on a VPS. Here it stayed for many years working well except for the random updates made to the Library site which broke the parsing of the pages.

Eventually, the Library upgraded there system in a significant way. Actually made it somewhat user friendly. Still it didn't support multiple cards and you had to click around a bit so Book Squire was reworked and it continued on.

For my latest update to Book Squire I've rewritten it in Clojure. The latest version is much cleaner internally and suspect the maintenance going forward will be easier. The old Python code did suffer overtime as refactoring was never justified enough because it just worked.

If you live in Westcheter County New York and have a Library card you can use Book Squire. All of the 30-plus Libraries in the county share the same central system, the Westchester Library System and so you can use Book Squire to check on your accounts.

The address to try Book Squire is:

S. Lott: Spreadsheet Regrets

$
0
0
I can't emphasize this enough.

Some people, when confronted with a problem, think
“I know, I'll use a spreadsheet.”   Now they have two problems.

(This was originally about regular expressions. And AWK. See http://regex.info/blog/2006-09-15/247)

Fiction writer F. L. Stevens got a list of literary agents from AAR Online. This became a spreadsheet driving queries for representation. After a bunch of rejections, another query against AAR Online provided a second list of agents.

Apple's Numbers product will readily translate the AAR Online HTML table into a usable spreadsheet table. But after initial success the spreadsheet as tool of choice collapses into a pile of rubble. The spreadsheet data model is hopelessly ineffective for the problem domain.

What is the problem domain?

There are two user stories:
  1. Author needs to deduplicate agents and agencies. It's considered poor form to badger agents with repeated queries for the same title. It's also bad form to query two agents at the same agency. You have to get rejected by one before contacting the other. 
  2. Author needs to track activities at the Agent and Agency level to optimize querying. This mostly involves sending queries and tracking rejections. Ideally, an agent acceptance should lead to notification to other agents that the manuscript is being withdrawn. This is so rare as to not require much automation.
Agents come and go. Periodically, an agent will be closed to queries for some period of time, and then reopen. Their interests vary with the whims of the marketplace they're trying to serve. Traditional fiction publishing is quite complex; agents are the gatekeepers.

To an extent, we can decompose the processing like this. 

1. Sourcing. There are several sources: AAR Online and Agent Query are two big sources. These sites have usable query engines and the HTML can be scraped to get a list of currently active agents with a uniform representation. This is elegant Python and Beautiful Soup. 

2. Deduplication. Agency and Agent deduplication is central. Query results may involve state changes to an agent (open to queries, interested in new genres.) Query results may involve simple duplicates, which have to be discarded to avoid repeated queries. It's a huge pain when attempted with a spreadsheet. The simplistic string equality test for name matching is defeated by whitespace variations, for example. This is elegant Python, however. 

3. Agent web site checks. These have to be done manually. Agency web pages are often art projects, larded up with javascript that produces elegant rolling animations of books, authors, agents, background art, and text. These sites aren't really set up to help authors. It's impossible to automate a check to confirm the source query results. This has to be done manually: F. L. is required to click and update status. 

4. State Changes. Queries and Rejections are the important state changes. Open and Closed to queries is also part of the state that needs to be tracked. Additionally, there's a multiple agent per agency check that makes this more complex. The state changes are painful to track in a simple spreadsheet-like data structure: a rejection by one agent can free up another agent at the same agency. This multi-row state change is simply horrible to deal with.

Bonus confusion! Time-to-Live rules: a query over 60 days old is more-or-less a de facto rejection. This means that periodic scans of the data are required to close a query to one agent in an agency, freeing up subsequent agents in the same agency.

Manuscript Wish Lists (MSWLs) are a source for agents actively searching for manuscripts. This is more-or-less a Twitter query. Using the various aggregating web sites seems slightly easier than using Twitter directly. However, additional Twitter lookups are required to locate agent details, so this is interesting web-scraping.

Of course F. L. Stevens has a legacy spreadsheet with at least four "similar" (but not really identical) tabs filled with agencies, agents, and query status.

I don't have an implementation to share -- yet. I'm working on it slowly.

I think it will be an interesting tutorial in cleaning up semi-structured data.

Viewing all 22860 articles
Browse latest View live


<script src="https://jsc.adskeeper.com/r/s/rssing.com.1596347.js" async> </script>