In this article, you’ll explore inheritance and composition in Python. Inheritance and composition are two important concepts in object oriented programming that model the relationship between two classes. They are the building blocks of object oriented design, and they help programmers to write reusable code.
By the end of this article, you’ll know how to:
- Use inheritance in Python
- Model class hierarchies using inheritance
- Use multiple inheritance in Python and understand its drawbacks
- Use composition to create complex objects
- Reuse existing code by applying composition
- Change application behavior at run-time through composition
What Are Inheritance and Composition?
Inheritance and composition are two major concepts in object oriented programming that model the relationship between two classes. They drive the design of an application and determine how the application should evolve as new features are added or requirements change.
Both of them enable code reuse, but they do it in different ways.
What’s Inheritance?
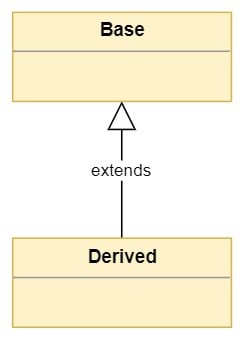
Inheritance models what is called an is a relationship. This means that when you have a Derived class that inherits from a Base class, you created a relationship where Derivedis a specialized version of Base.
Inheritance is represented using the Unified Modeling Language or UML in the following way:
![Basic inheritance between Base and Derived classes]()
Classes are represented as boxes with the class name on top. The inheritance relationship is represented by an arrow from the derived class pointing to the base class. The word extends is usually added to the arrow.
Note: In an inheritance relationship:
- Classes that inherit from another are called derived classes, subclasses, or subtypes.
- Classes from which other classes are derived are called base classes or super classes.
- A derived class is said to derive, inherit, or extend a base class.
Let’s say you have a base class Animal and you derive from it to create a Horse class. The inheritance relationship states that a Horseis anAnimal. This means that Horse inherits the interface and implementation of Animal, and Horse objects can be used to replace Animal objects in the application.
This is known as the Liskov substitution principle. The principle states that “in a computer program, if S is a subtype of T, then objects of type T may be replaced with objects of type S without altering any of the desired properties of the program”.
You’ll see in this article why you should always follow the Liskov substitution principle when creating your class hierarchies, and the problems you’ll run into if you don’t.
What’s Composition?
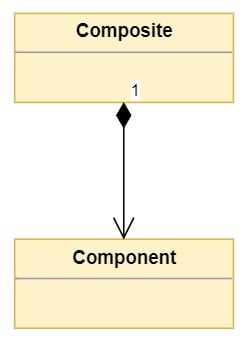
Composition is a concept that models a has a relationship. It enables creating complex types by combining objects of other types. This means that a class Composite can contain an object of another class Component. This relationship means that a Compositehas aComponent.
UML represents composition as follows:
![Basic composition between Composite and Component classes]()
Composition is represented through a line with a diamond at the composite class pointing to the component class. The composite side can express the cardinality of the relationship. The cardinality indicates the number or valid range of Composite instances the Component class will contain.
In the diagram above, the 1 represents that the Composite class contains one object of type Component. Cardinality can be expressed in the following ways:
- A number indicates the number of
Component instances that are contained in the Composite. - The * symbol indicates that the
Composite class can contain a variable number of Component instances. - A range 1..4 indicates that the
Composite class can contain a range of Component instances. The range is indicated with the minimum and maximum number of instances, or minimum and many instances like in 1..*.
Note: Classes that contain objects of other classes are usually referred to as composites, where classes that are used to create more complex types are referred to as components.
For example, your Horse class can be composed by another object of type Tail. Composition allows you to express that relationship by saying a Horsehas aTail.
Composition enables you to reuse code by adding objects to other objects, as opposed to inheriting the interface and implementation of other classes. Both Horse and Dog classes can leverage the functionality of Tail through composition without deriving one class from the other.
An Overview of Inheritance in Python
Everything in Python is an object. Modules are objects, class definitions and functions are objects, and of course, objects created from classes are objects too.
Inheritance is a required feature of every object oriented programming language. This means that Python supports inheritance, and as you’ll see later, it’s one of the few languages that supports multiple inheritance.
When you write Python code using classes, you are using inheritance even if you don’t know you’re using it. Let’s take a look at what that means.
The Object Super Class
The easiest way to see inheritance in Python is to jump into the Python interactive shell and write a little bit of code. You’ll start by writing the simplest class possible:
>>>>>> classMyClass:... pass...
You declared a class MyClass that doesn’t do much, but it will illustrate the most basic inheritance concepts. Now that you have the class declared, you can use the dir() function to list its members:
>>>>>> c=MyClass()>>> dir(c)['__class__', '__delattr__', '__dict__', '__dir__', '__doc__', '__eq__','__format__', '__ge__', '__getattribute__', '__gt__', '__hash__', '__init__','__init_subclass__', '__le__', '__lt__', '__module__', '__ne__', '__new__','__reduce__', '__reduce_ex__', '__repr__', '__setattr__', '__sizeof__','__str__', '__subclasshook__', '__weakref__']
dir() returns a list of all the members in the specified object. You have not declared any members in MyClass, so where is the list coming from? You can find out using the interactive interpreter:
>>>>>> o=object()>>> dir(o)['__class__', '__delattr__', '__dir__', '__doc__', '__eq__', '__format__','__ge__', '__getattribute__', '__gt__', '__hash__', '__init__','__init_subclass__', '__le__', '__lt__', '__ne__', '__new__', '__reduce__','__reduce_ex__', '__repr__', '__setattr__', '__sizeof__', '__str__','__subclasshook__']
As you can see, the two lists are nearly identical. There are some additional members in MyClass like __dict__ and __weakref__, but every single member of the object class is also present in MyClass.
This is because every class you create in Python implicitly derives from object. You could be more explicit and write class MyClass(object):, but it’s redundant and unnecessary.
Note: In Python 2, you have to explicitly derive from object for reasons beyond the scope of this article, but you can read about it in the New-style and classic classes section of the Python 2 documentation.
Exceptions Are an Exception
Every class that you create in Python will implicitly derive from object. The exception to this rule are classes used to indicate errors by raising an exception.
You can see the problem using the Python interactive interpreter:
>>>>>> classMyError:... pass...>>> raiseMyError()Traceback (most recent call last):
File "<stdin>", line 1, in <module>TypeError: exceptions must derive from BaseException
You created a new class to indicate a type of error. Then you tried to use it to raise an exception. An exception is raised but the output states that the exception is of type TypeError not MyError and that all exceptions must derive from BaseException.
BaseException is a base class provided for all error types. To create a new error type, you must derive your class from BaseException or one of its derived classes. The convention in Python is to derive your custom error types from Exception, which in turn derives from BaseException.
The correct way to define your error type is the following:
>>>>>> classMyError(Exception):... pass...>>> raiseMyError()Traceback (most recent call last):
File "<stdin>", line 1, in <module>__main__.MyError
As you can see, when you raise MyError, the output correctly states the type of error raised.
Creating Class Hierarchies
Inheritance is the mechanism you’ll use to create hierarchies of related classes. These related classes will share a common interface that will be defined in the base classes. Derived classes can specialize the interface by providing a particular implementation where applies.
In this section, you’ll start modeling an HR system. The example will demonstrate the use of inheritance and how derived classes can provide a concrete implementation of the base class interface.
The HR system needs to process payroll for the company’s employees, but there are different types of employees depending on how their payroll is calculated.
You start by implementing a PayrollSystem class that processes payroll:
# In hr.pyclassPayrollSystem:defcalculate_payroll(self,employees):print('Calculating Payroll')print('===================')foremployeeinemployees:print(f'Payroll for: {employee.id} - {employee.name}')print(f'- Check amount: {employee.calculate_payroll()}')print('')The PayrollSystem implements a .calculate_payroll() method that takes a collection of employees and prints their id, name, and check amount using the .calculate_payroll() method exposed on each employee object.
Now, you implement a base class Employee that handles the common interface for every employee type:
# In hr.pyclassEmployee:def__init__(self,id,name):self.id=idself.name=name
Employee is the base class for all employee types. It is constructed with an id and a name. What you are saying is that every Employee must have an id assigned as well as a name.
The HR system requires that every Employee processed must provide a .calculate_payroll() interface that returns the weekly salary for the employee. The implementation of that interface differs depending on the type of Employee.
For example, administrative workers have a fixed salary, so every week they get paid the same amount:
# In hr.pyclassSalaryEmployee(Employee):def__init__(self,id,name,weekly_salary):super().__init__(id,name)self.weekly_salary=weekly_salarydefcalculate_payroll(self):returnself.weekly_salary
You create a derived class SalaryEmployee that inherits Employee. The class is initialized with the id and name required by the base class, and you use super() to initialize the members of the base class. You can read all about super() in Supercharge Your Classes With Python super().
SalaryEmployee also requires a weekly_salary initialization parameter that represents the amount the employee makes per week.
The class provides the required .calculate_payroll() method used by the HR system. The implementation just returns the amount stored in weekly_salary.
The company also employs manufacturing workers that are paid by the hour, so you add an HourlyEmployee to the HR system:
# In hr.pyclassHourlyEmployee(Employee):def__init__(self,id,name,hours_worked,hour_rate):super().__init__(id,name)self.hours_worked=hours_workedself.hour_rate=hour_ratedefcalculate_payroll(self):returnself.hours_worked*self.hour_rate
The HourlyEmployee class is initialized with id and name, like the base class, plus the hours_worked and the hour_rate required to calculate the payroll. The .calculate_payroll() method is implemented by returning the hours worked times the hour rate.
Finally, the company employs sales associates that are paid through a fixed salary plus a commission based on their sales, so you create a CommissionEmployee class:
# In hr.pyclassCommissionEmployee(SalaryEmployee):def__init__(self,id,name,weekly_salary,commission):super().__init__(id,name,weekly_salary)self.commission=commissiondefcalculate_payroll(self):fixed=super().calculate_payroll()returnfixed+self.commission
You derive CommissionEmployee from SalaryEmployee because both classes have a weekly_salary to consider. At the same time, CommissionEmployee is initialized with a commission value that is based on the sales for the employee.
.calculate_payroll() leverages the implementation of the base class to retrieve the fixed salary and adds the commission value.
Since CommissionEmployee derives from SalaryEmployee, you have access to the weekly_salary property directly, and you could’ve implemented .calculate_payroll() using the value of that property.
The problem with accessing the property directly is that if the implementation of SalaryEmployee.calculate_payroll() changes, then you’ll have to also change the implementation of CommissionEmployee.calculate_payroll(). It’s better to rely on the already implemented method in the base class and extend the functionality as needed.
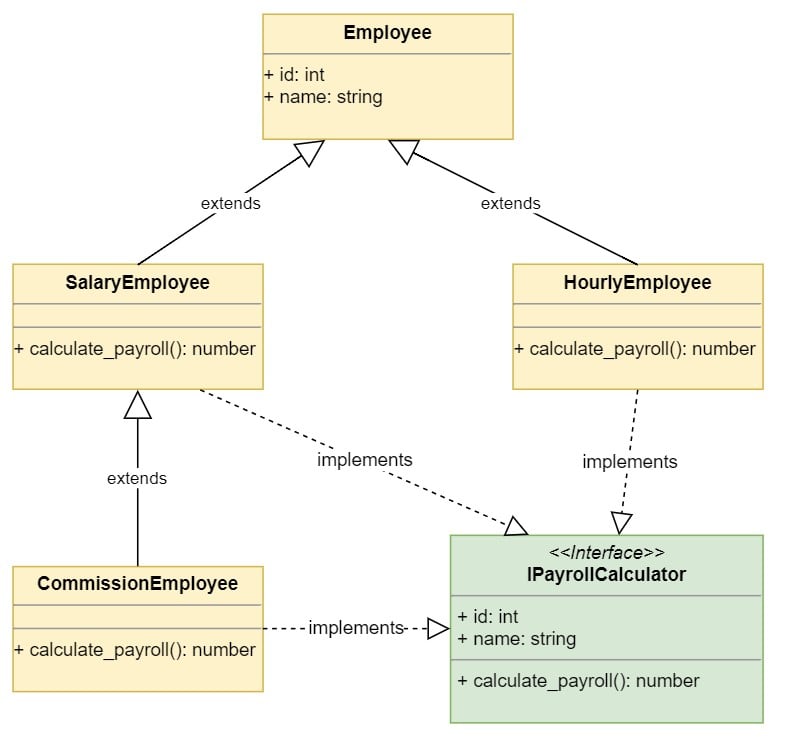
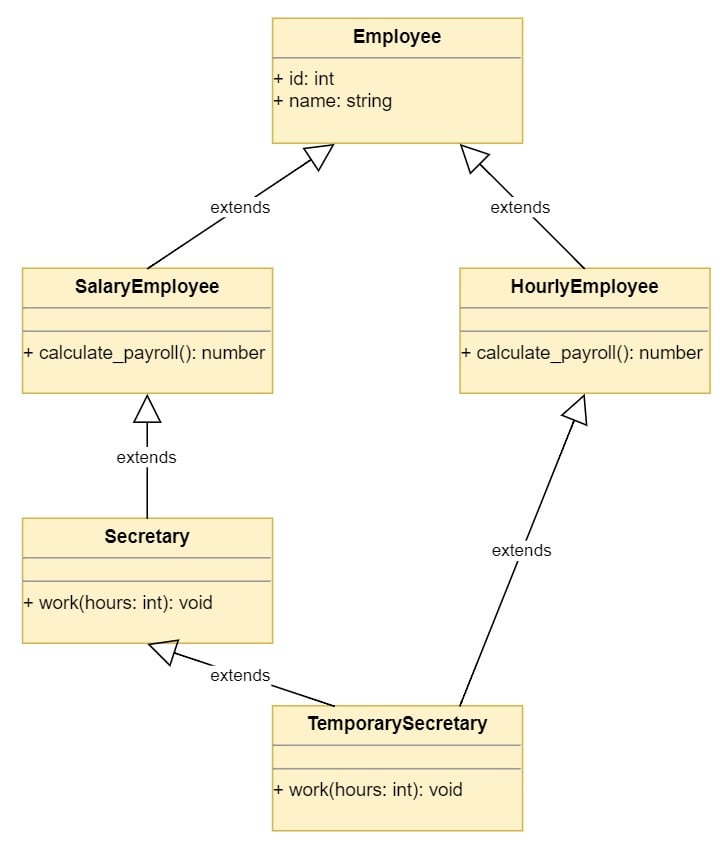
You created your first class hierarchy for the system. The UML diagram of the classes looks like this:
![Inheritance example with multiple Employee derived classes]()
The diagram shows the inheritance hierarchy of the classes. The derived classes implement the IPayrollCalculator interface, which is required by the PayrollSystem. The PayrollSystem.calculate_payroll() implementation requires that the employee objects passed contain an id, name, and calculate_payroll() implementation.
Interfaces are represented similarly to classes with the word interface above the interface name. Interface names are usually prefixed with a capital I.
The application creates its employees and passes them to the payroll system to process payroll:
# In program.pyimporthrsalary_employee=hr.SalaryEmployee(1,'John Smith',1500)hourly_employee=hr.HourlyEmployee(2,'Jane Doe',40,15)commission_employee=hr.CommissionEmployee(3,'Kevin Bacon',1000,250)payroll_system=hr.PayrollSystem()payroll_system.calculate_payroll([salary_employee,hourly_employee,commission_employee])
You can run the program in the command line and see the results:
$ python program.py

Calculating Payroll===================Payroll for: 1 - John Smith- Check amount: 1500Payroll for: 2 - Jane Doe- Check amount: 600Payroll for: 3 - Kevin Bacon- Check amount: 1250
The program creates three employee objects, one for each of the derived classes. Then, it creates the payroll system and passes a list of the employees to its .calculate_payroll() method, which calculates the payroll for each employee and prints the results.
Notice how the Employee base class doesn’t define a .calculate_payroll() method. This means that if you were to create a plain Employee object and pass it to the PayrollSystem, then you’d get an error. You can try it in the Python interactive interpreter:
>>>>>> importhr>>> employee=hr.Employee(1,'Invalid')>>> payroll_system=hr.PayrollSystem()>>> payroll_system.calculate_payroll([employee])Payroll for: 1 - InvalidTraceback (most recent call last):
File "<stdin>", line 1, in <module>
File "/hr.py", line 39, in calculate_payrollprint(f'- Check amount: {employee.calculate_payroll()}')AttributeError: 'Employee' object has no attribute 'calculate_payroll' While you can instantiate an Employee object, the object can’t be used by the PayrollSystem. Why? Because it can’t .calculate_payroll() for an Employee. To meet the requirements of PayrollSystem, you’ll want to convert the Employee class, which is currently a concrete class, to an abstract class. That way, no employee is ever just an Employee, but one that implements .calculate_payroll().
Abstract Base Classes in Python
The Employee class in the example above is what is called an abstract base class. Abstract base classes exist to be inherited, but never instantiated. Python provides the abc module to define abstract base classes.
You can use leading underscores in your class name to communicate that objects of that class should not be created. Underscores provide a friendly way to prevent misuse of your code, but they don’t prevent eager users from creating instances of that class.
The abc module in the Python standard library provides functionality to prevent creating objects from abstract base classes.
You can modify the implementation of the Employee class to ensure that it can’t be instantiated:
# In hr.pyfromabcimportABC,abstractmethodclassEmployee(ABC):def__init__(self,id,name):self.id=idself.name=name@abstractmethoddefcalculate_payroll(self):pass
You derive Employee from ABC, making it an abstract base class. Then, you decorate the .calculate_payroll() method with the @abstractmethoddecorator.
This change has two nice side-effects:
- You’re telling users of the module that objects of type
Employee can’t be created. - You’re telling other developers working on the
hr module that if they derive from Employee, then they must override the .calculate_payroll() abstract method.
You can see that objects of type Employee can’t be created using the interactive interpreter:
>>>>>> importhr>>> employee=hr.Employee(1,'abstract')Traceback (most recent call last):
File "<stdin>", line 1, in <module>TypeError: Can't instantiate abstract class Employee with abstract methods calculate_payroll
The output shows that the class cannot be instantiated because it contains an abstract method calculate_payroll(). Derived classes must override the method to allow creating objects of their type.
Implementation Inheritance vs Interface Inheritance
When you derive one class from another, the derived class inherits both:
The base class interface: The derived class inherits all the methods, properties, and attributes of the base class.
The base class implementation: The derived class inherits the code that implements the class interface.
Most of the time, you’ll want to inherit the implementation of a class, but you will want to implement multiple interfaces, so your objects can be used in different situations.
Modern programming languages are designed with this basic concept in mind. They allow you to inherit from a single class, but you can implement multiple interfaces.
In Python, you don’t have to explicitly declare an interface. Any object that implements the desired interface can be used in place of another object. This is known as duck typing. Duck typing is usually explained as “if it behaves like a duck, then it’s a duck.”
To illustrate this, you will now add a DisgruntledEmployee class to the example above which doesn’t derive from Employee:
# In disgruntled.pyclassDisgruntledEmployee:def__init__(self,id,name):self.id=idself.name=namedefcalculate_payroll(self):return1000000
The DisgruntledEmployee class doesn’t derive from Employee, but it exposes the same interface required by the PayrollSystem. The PayrollSystem.calculate_payroll() requires a list of objects that implement the following interface:
- An
id property or attribute that returns the employee’s id - A
name property or attribute that represents the employee’s name - A
.calculate_payroll() method that doesn’t take any parameters and returns the payroll amount to process
All these requirements are met by the DisgruntledEmployee class, so the PayrollSystem can still calculate its payroll.
You can modify the program to use the DisgruntledEmployee class:
# In program.pyimporthrimportdisgruntledsalary_employee=hr.SalaryEmployee(1,'John Smith',1500)hourly_employee=hr.HourlyEmployee(2,'Jane Doe',40,15)commission_employee=hr.CommissionEmployee(3,'Kevin Bacon',1000,250)disgruntled_employee=disgruntled.DisgruntledEmployee(20000,'Anonymous')payroll_system=hr.PayrollSystem()payroll_system.calculate_payroll([salary_employee,hourly_employee,commission_employee,disgruntled_employee])
The program creates a DisgruntledEmployee object and adds it to the list processed by the PayrollSystem. You can now run the program and see its output:
$ python program.py

Calculating Payroll===================Payroll for: 1 - John Smith- Check amount: 1500Payroll for: 2 - Jane Doe- Check amount: 600Payroll for: 3 - Kevin Bacon- Check amount: 1250Payroll for: 20000 - Anonymous- Check amount: 1000000
As you can see, the PayrollSystem can still process the new object because it meets the desired interface.
Since you don’t have to derive from a specific class for your objects to be reusable by the program, you may be asking why you should use inheritance instead of just implementing the desired interface. The following rules may help you:
Use inheritance to reuse an implementation: Your derived classes should leverage most of their base class implementation. They must also model an is a relationship. A Customer class might also have an id and a name, but a Customer is not an Employee, so you should not use inheritance.
Implement an interface to be reused: When you want your class to be reused by a specific part of your application, you implement the required interface in your class, but you don’t need to provide a base class, or inherit from another class.
You can now clean up the example above to move onto the next topic. You can delete the disgruntled.py file and then modify the hr module to its original state:
# In hr.pyclassPayrollSystem:defcalculate_payroll(self,employees):print('Calculating Payroll')print('===================')foremployeeinemployees:print(f'Payroll for: {employee.id} - {employee.name}')print(f'- Check amount: {employee.calculate_payroll()}')print('')classEmployee:def__init__(self,id,name):self.id=idself.name=nameclassSalaryEmployee(Employee):def__init__(self,id,name,weekly_salary):super().__init__(id,name)self.weekly_salary=weekly_salarydefcalculate_payroll(self):returnself.weekly_salaryclassHourlyEmployee(Employee):def__init__(self,id,name,hours_worked,hour_rate):super().__init__(id,name)self.hours_worked=hours_workedself.hour_rate=hour_ratedefcalculate_payroll(self):returnself.hours_worked*self.hour_rateclassCommissionEmployee(SalaryEmployee):def__init__(self,id,name,weekly_salary,commission):super().__init__(id,name,weekly_salary)self.commission=commissiondefcalculate_payroll(self):fixed=super().calculate_payroll()returnfixed+self.commissionYou removed the import of the abc module since the Employee class doesn’t need to be abstract. You also removed the abstract calculate_payroll() method from it since it doesn’t provide any implementation.
Basically, you are inheriting the implementation of the id and name attributes of the Employee class in your derived classes. Since .calculate_payroll() is just an interface to the PayrollSystem.calculate_payroll() method, you don’t need to implement it in the Employee base class.
Notice how the CommissionEmployee class derives from SalaryEmployee. This means that CommissionEmployee inherits the implementation and interface of SalaryEmployee. You can see how the CommissionEmployee.calculate_payroll() method leverages the base class implementation because it relies on the result from super().calculate_payroll() to implement its own version.
The Class Explosion Problem
If you are not careful, inheritance can lead you to a huge hierarchical structure of classes that is hard to understand and maintain. This is known as the class explosion problem.
You started building a class hierarchy of Employee types used by the PayrollSystem to calculate payroll. Now, you need to add some functionality to those classes, so they can be used with the new ProductivitySystem.
The ProductivitySystem tracks productivity based on employee roles. There are different employee roles:
- Managers: They walk around yelling at people telling them what to do. They are salaried employees and make more money.
- Secretaries: They do all the paper work for managers and ensure that everything gets billed and payed on time. They are also salaried employees but make less money.
- Sales employees: They make a lot of phone calls to sell products. They have a salary, but they also get commissions for sales.
- Factory workers: They manufacture the products for the company. They are paid by the hour.
With those requirements, you start to see that Employee and its derived classes might belong somewhere other than the hr module because now they’re also used by the ProductivitySystem.
You create an employees module and move the classes there:
# In employees.pyclassEmployee:def__init__(self,id,name):self.id=idself.name=nameclassSalaryEmployee(Employee):def__init__(self,id,name,weekly_salary):super().__init__(id,name)self.weekly_salary=weekly_salarydefcalculate_payroll(self):returnself.weekly_salaryclassHourlyEmployee(Employee):def__init__(self,id,name,hours_worked,hour_rate):super().__init__(id,name)self.hours_worked=hours_workedself.hour_rate=hour_ratedefcalculate_payroll(self):returnself.hours_worked*self.hour_rateclassCommissionEmployee(SalaryEmployee):def__init__(self,id,name,weekly_salary,commission):super().__init__(id,name,weekly_salary)self.commission=commissiondefcalculate_payroll(self):fixed=super().calculate_payroll()returnfixed+self.commission
The implementation remains the same, but you move the classes to the employee module. Now, you change your program to support the change:
# In program.pyimporthrimportemployeessalary_employee=employees.SalaryEmployee(1,'John Smith',1500)hourly_employee=employees.HourlyEmployee(2,'Jane Doe',40,15)commission_employee=employees.CommissionEmployee(3,'Kevin Bacon',1000,250)payroll_system=hr.PayrollSystem()payroll_system.calculate_payroll([salary_employee,hourly_employee,commission_employee])
You run the program and verify that it still works:
$ python program.py

Calculating Payroll===================Payroll for: 1 - John Smith- Check amount: 1500Payroll for: 2 - Jane Doe- Check amount: 600Payroll for: 3 - Kevin Bacon- Check amount: 1250
With everything in place, you start adding the new classes:
# In employees.pyclassManager(SalaryEmployee):defwork(self,hours):print(f'{self.name} screams and yells for {hours} hours.')classSecretary(SalaryEmployee):defwork(self,hours):print(f'{self.name} expends {hours} hours doing office paperwork.')classSalesPerson(CommissionEmployee):defwork(self,hours):print(f'{self.name} expends {hours} hours on the phone.')classFactoryWorker(HourlyEmployee):defwork(self,hours):print(f'{self.name} manufactures gadgets for {hours} hours.')First, you add a Manager class that derives from SalaryEmployee. The class exposes a method work() that will be used by the productivity system. The method takes the hours the employee worked.
Then you add Secretary, SalesPerson, and FactoryWorker and then implement the work() interface, so they can be used by the productivity system.
Now, you can add the ProductivitySytem class:
# In productivity.pyclassProductivitySystem:deftrack(self,employees,hours):print('Tracking Employee Productivity')print('==============================')foremployeeinemployees:employee.work(hours)print('')The class tracks employees in the track() method that takes a list of employees and the number of hours to track. You can now add the productivity system to your program:
# In program.pyimporthrimportemployeesimportproductivitymanager=employees.Manager(1,'Mary Poppins',3000)secretary=employees.Secretary(2,'John Smith',1500)sales_guy=employees.SalesPerson(3,'Kevin Bacon',1000,250)factory_worker=employees.FactoryWorker(2,'Jane Doe',40,15)employees=[manager,secretary,sales_guy,factory_worker,]productivity_system=productivity.ProductivitySystem()productivity_system.track(employees,40)payroll_system=hr.PayrollSystem()payroll_system.calculate_payroll(employees)
The program creates a list of employees of different types. The employee list is sent to the productivity system to track their work for 40 hours. Then the same list of employees is sent to the payroll system to calculate their payroll.
You can run the program to see the output:
$ python program.py

Tracking Employee Productivity==============================Mary Poppins screams and yells for 40 hours.John Smith expends 40 hours doing office paperwork.Kevin Bacon expends 40 hours on the phone.Jane Doe manufactures gadgets for 40 hours.Calculating Payroll===================Payroll for: 1 - Mary Poppins- Check amount: 3000Payroll for: 2 - John Smith- Check amount: 1500Payroll for: 3 - Kevin Bacon- Check amount: 1250Payroll for: 4 - Jane Doe- Check amount: 600
The program shows the employees working for 40 hours through the productivity system. Then it calculates and displays the payroll for each of the employees.
The program works as expected, but you had to add four new classes to support the changes. As new requirements come, your class hierarchy will inevitably grow, leading to the class explosion problem where your hierarchies will become so big that they’ll be hard to understand and maintain.
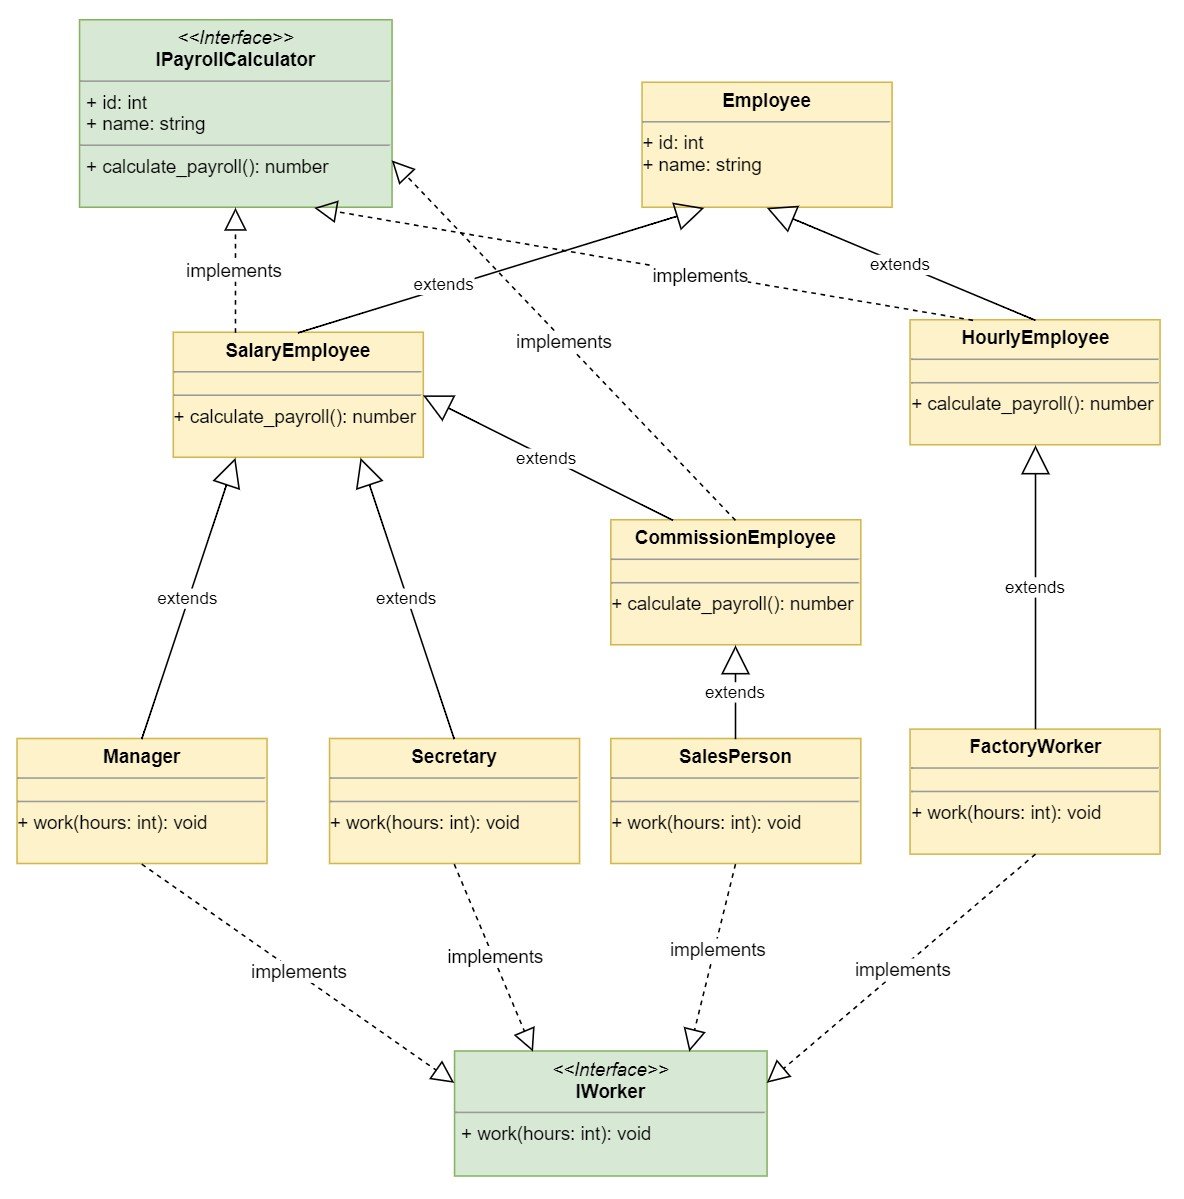
The following diagram shows the new class hierarchy:
![Class design explosion by inheritance]()
The diagram shows how the class hierarchy is growing. Additional requirements might have an exponential effect in the number of classes with this design.
Inheriting Multiple Classes
Python is one of the few modern programming languages that supports multiple inheritance. Multiple inheritance is the ability to derive a class from multiple base classes at the same time.
Multiple inheritance has a bad reputation to the extent that most modern programming languages don’t support it. Instead, modern programming languages support the concept of interfaces. In those languages, you inherit from a single base class and then implement multiple interfaces, so your class can be re-used in different situations.
This approach puts some constraints in your designs. You can only inherit the implementation of one class by directly deriving from it. You can implement multiple interfaces, but you can’t inherit the implementation of multiple classes.
This constraint is good for software design because it forces you to design your classes with fewer dependencies on each other. You will see later in this article that you can leverage multiple implementations through composition, which makes software more flexible. This section, however, is about multiple inheritance, so let’s take a look at how it works.
It turns out that sometimes temporary secretaries are hired when there is too much paperwork to do. The TemporarySecretary class performs the role of a Secretary in the context of the ProductivitySystem, but for payroll purposes, it is an HourlyEmployee.
You look at your class design. It has grown a little bit, but you can still understand how it works. It seems you have two options:
Derive from Secretary: You can derive from Secretary to inherit the .work() method for the role, and then override the .calculate_payroll() method to implement it as an HourlyEmployee.
Derive from HourlyEmployee: You can derive from HourlyEmployee to inherit the .calculate_payroll() method, and then override the .work() method to implement it as a Secretary.
Then, you remember that Python supports multiple inheritance, so you decide to derive from both Secretary and HourlyEmployee:
# In employees.pyclassTemporarySecretary(Secretary,HourlyEmployee):pass
Python allows you to inherit from two different classes by specifying them between parenthesis in the class declaration.
Now, you modify your program to add the new temporary secretary employee:
importhrimportemployeesimportproductivitymanager=employees.Manager(1,'Mary Poppins',3000)secretary=employees.Secretary(2,'John Smith',1500)sales_guy=employees.SalesPerson(3,'Kevin Bacon',1000,250)factory_worker=employees.FactoryWorker(4,'Jane Doe',40,15)temporary_secretary=employees.TemporarySecretary(5,'Robin Williams',40,9)company_employees=[manager,secretary,sales_guy,factory_worker,temporary_secretary,]productivity_system=productivity.ProductivitySystem()productivity_system.track(company_employees,40)payroll_system=hr.PayrollSystem()payroll_system.calculate_payroll(company_employees)
You run the program to test it:
$ python program.py

Traceback (most recent call last): File ".\program.py", line 9, in <module>  temporary_secretary = employee.TemporarySecretary(5, 'Robin Williams', 40, 9)TypeError: __init__() takes 4 positional arguments but 5 were given
You get a TypeError exception saying that 4 positional arguments where expected, but 5 were given.
This is because you derived TemporarySecretary first from Secretary and then from HourlyEmployee, so the interpreter is trying to use Secretary.__init__() to initialize the object.
Okay, let’s reverse it:
classTemporarySecretary(HourlyEmployee,Secretary):pass
Now, run the program again and see what happens:
$ python program.py

Traceback (most recent call last): File ".\program.py", line 9, in <module>  temporary_secretary = employee.TemporarySecretary(5, 'Robin Williams', 40, 9) File "employee.py", line 16, in __init__  super().__init__(id, name)TypeError: __init__() missing 1 required positional argument: 'weekly_salary'
Now it seems you are missing a weekly_salary parameter, which is necessary to initialize Secretary, but that parameter doesn’t make sense in the context of a TemporarySecretary because it’s an HourlyEmployee.
Maybe implementing TemporarySecretary.__init__() will help:
# In employees.pyclassTemporarySecretary(HourlyEmployee,Secretary):def__init__(self,id,name,hours_worked,hour_rate):super().__init__(id,name,hours_worked,hour_rate)
Try it:
$ python program.py

Traceback (most recent call last): File ".\program.py", line 9, in <module>  temporary_secretary = employee.TemporarySecretary(5, 'Robin Williams', 40, 9) File "employee.py", line 54, in __init__  super().__init__(id, name, hours_worked, hour_rate) File "employee.py", line 16, in __init__  super().__init__(id, name)TypeError: __init__() missing 1 required positional argument: 'weekly_salary'
That didn’t work either. Okay, it’s time for you to dive into Python’s method resolution order (MRO) to see what’s going on.
When a method or attribute of a class is accessed, Python uses the class MRO to find it. The MRO is also used by super() to determine which method or attribute to invoke. You can learn more about super() in Supercharge Your Classes With Python super().
You can evaluate the TemporarySecretary class MRO using the interactive interpreter:
>>>>>> fromemployeesimportTemporarySecretary>>> TemporarySecretary.__mro__(<class 'employees.TemporarySecretary'>,<class 'employees.HourlyEmployee'>,<class 'employees.Secretary'>,<class 'employees.SalaryEmployee'>,<class 'employees.Employee'>,<class 'object'>)
The MRO shows the order in which Python is going to look for a matching attribute or method. In the example, this is what happens when we create the TemporarySecretary object:
The TemporarySecretary.__init__(self, id, name, hours_worked, hour_rate) method is called.
The super().__init__(id, name, hours_worked, hour_rate) call matches HourlyEmployee.__init__(self, id, name, hour_worked, hour_rate).
HourlyEmployee calls super().__init__(id, name), which the MRO is going to match to Secretary.__init__(), which is inherited from SalaryEmployee.__init__(self, id, name, weekly_salary).
Because the parameters don’t match, a TypeError exception is raised.
You can bypass the MRO by reversing the inheritance order and directly calling HourlyEmployee.__init__() as follows:
classTemporarySecretary(Secretary,HourlyEmployee):def__init__(self,id,name,hours_worked,hour_rate):HourlyEmployee.__init__(self,id,name,hours_worked,hour_rate)
That solves the problem of creating the object, but you will run into a similar problem when trying to calculate payroll. You can run the program to see the problem:
$ python program.py

Tracking Employee Productivity==============================Mary Poppins screams and yells for 40 hours.John Smith expends 40 hours doing office paperwork.Kevin Bacon expends 40 hours on the phone.Jane Doe manufactures gadgets for 40 hours.Robin Williams expends 40 hours doing office paperwork.Calculating Payroll===================Payroll for: 1 - Mary Poppins- Check amount: 3000Payroll for: 2 - John Smith- Check amount: 1500Payroll for: 3 - Kevin Bacon- Check amount: 1250Payroll for: 4 - Jane Doe- Check amount: 600Payroll for: 5 - Robin WilliamsTraceback (most recent call last):  File ".\program.py", line 20, in <module>    payroll_system.calculate_payroll(employees)  File "hr.py", line 7, in calculate_payroll    print(f'- Check amount: {employee.calculate_payroll()}')  File "employee.py", line 12, in calculate_payroll    return self.weekly_salaryAttributeError: 'TemporarySecretary' object has no attribute 'weekly_salary'
The problem now is that because you reversed the inheritance order, the MRO is finding the .calculate_payroll() method of SalariedEmployee before the one in HourlyEmployee. You need to override .calculate_payroll() in TemporarySecretary and invoke the right implementation from it:
classTemporarySecretary(Secretary,HourlyEmployee):def__init__(self,id,name,hours_worked,hour_rate):HourlyEmployee.__init__(self,id,name,hours_worked,hour_rate)defcalculate_payroll(self):returnHourlyEmployee.calculate_payroll(self)
The calculate_payroll() method directly invokes HourlyEmployee.calculate_payroll() to ensure that you get the correct result. You can run the program again to see it working:
$ python program.py

Tracking Employee Productivity==============================Mary Poppins screams and yells for 40 hours.John Smith expends 40 hours doing office paperwork.Kevin Bacon expends 40 hours on the phone.Jane Doe manufactures gadgets for 40 hours.Robin Williams expends 40 hours doing office paperwork.Calculating Payroll===================Payroll for: 1 - Mary Poppins- Check amount: 3000Payroll for: 2 - John Smith- Check amount: 1500Payroll for: 3 - Kevin Bacon- Check amount: 1250Payroll for: 4 - Jane Doe- Check amount: 600Payroll for: 5 - Robin Williams- Check amount: 360
The program now works as expected because you’re forcing the method resolution order by explicitly telling the interpreter which method we want to use.
As you can see, multiple inheritance can be confusing, especially when you run into the diamond problem.
The following diagram shows the diamond problem in your class hierarchy:
![Diamond problem caused by multiple inheritance]()
The diagram shows the diamond problem with the current class design. TemporarySecretary uses multiple inheritance to derive from two classes that ultimately also derive from Employee. This causes two paths to reach the Employee base class, which is something you want to avoid in your designs.
The diamond problem appears when you’re using multiple inheritance and deriving from two classes that have a common base class. This can cause the wrong version of a method to be called.
As you’ve seen, Python provides a way to force the right method to be invoked, and analyzing the MRO can help you understand the problem.
Still, when you run into the diamond problem, it’s better to re-think the design. You will now make some changes to leverage multiple inheritance, avoiding the diamond problem.
The Employee derived classes are used by two different systems:
The productivity system that tracks employee productivity.
The payroll system that calculates the employee payroll.
This means that everything related to productivity should be together in one module and everything related to payroll should be together in another. You can start making changes to the productivity module:
# In productivity.pyclassProductivitySystem:deftrack(self,employees,hours):print('Tracking Employee Productivity')print('==============================')foremployeeinemployees:result=employee.work(hours)print(f'{employee.name}: {result}')print('')classManagerRole:defwork(self,hours):returnf'screams and yells for {hours} hours.'classSecretaryRole:defwork(self,hours):returnf'expends {hours} hours doing office paperwork.'classSalesRole:defwork(self,hours):returnf'expends {hours} hours on the phone.'classFactoryRole:defwork(self,hours):returnf'manufactures gadgets for {hours} hours.'The productivity module implements the ProductivitySystem class, as well as the related roles it supports. The classes implement the work() interface required by the system, but they don’t derived from Employee.
You can do the same with the hr module:
# In hr.pyclassPayrollSystem:defcalculate_payroll(self,employees):print('Calculating Payroll')print('===================')foremployeeinemployees:print(f'Payroll for: {employee.id} - {employee.name}')print(f'- Check amount: {employee.calculate_payroll()}')print('')classSalaryPolicy:def__init__(self,weekly_salary):self.weekly_salary=weekly_salarydefcalculate_payroll(self):returnself.weekly_salaryclassHourlyPolicy:def__init__(self,hours_worked,hour_rate):self.hours_worked=hours_workedself.hour_rate=hour_ratedefcalculate_payroll(self):returnself.hours_worked*self.hour_rateclassCommissionPolicy(SalaryPolicy):def__init__(self,weekly_salary,commission):super().__init__(weekly_salary)self.commission=commissiondefcalculate_payroll(self):fixed=super().calculate_payroll()returnfixed+self.commissionThe hr module implements the PayrollSystem, which calculates payroll for the employees. It also implements the policy classes for payroll. As you can see, the policy classes don’t derive from Employee anymore.
You can now add the necessary classes to the employee module:
# In employees.pyfromhrimport(SalaryPolicy,CommissionPolicy,HourlyPolicy)fromproductivityimport(ManagerRole,SecretaryRole,SalesRole,FactoryRole)classEmployee:def__init__(self,id,name):self.id=idself.name=nameclassManager(Employee,ManagerRole,SalaryPolicy):def__init__(self,id,name,weekly_salary):SalaryPolicy.__init__(self,weekly_salary)super().__init__(id,name)classSecretary(Employee,SecretaryRole,SalaryPolicy):def__init__(self,id,name,weekly_salary):SalaryPolicy.__init__(self,weekly_salary)super().__init__(id,name)classSalesPerson(Employee,SalesRole,CommissionPolicy):def__init__(self,id,name,weekly_salary,commission):CommissionPolicy.__init__(self,weekly_salary,commission)super().__init__(id,name)classFactoryWorker(Employee,FactoryRole,HourlyPolicy):def__init__(self,id,name,hours_worked,hour_rate):HourlyPolicy.__init__(self,hours_worked,hour_rate)super().__init__(id,name)classTemporarySecretary(Employee,SecretaryRole,HourlyPolicy):def__init__(self,id,name,hours_worked,hour_rate):HourlyPolicy.__init__(self,hours_worked,hour_rate)super().__init__(id,name)
The employees module imports policies and roles from the other modules and implements the different Employee types. You are still using multiple inheritance to inherit the implementation of the salary policy classes and the productivity roles, but the implementation of each class only needs to deal with initialization.
Notice that you still need to explicitly initialize the salary policies in the constructors. You probably saw that the initializations of Manager and Secretary are identical. Also, the initializations of FactoryWorker and TemporarySecretary are the same.
You will not want to have this kind of code duplication in more complex designs, so you have to be careful when designing class hierarchies.
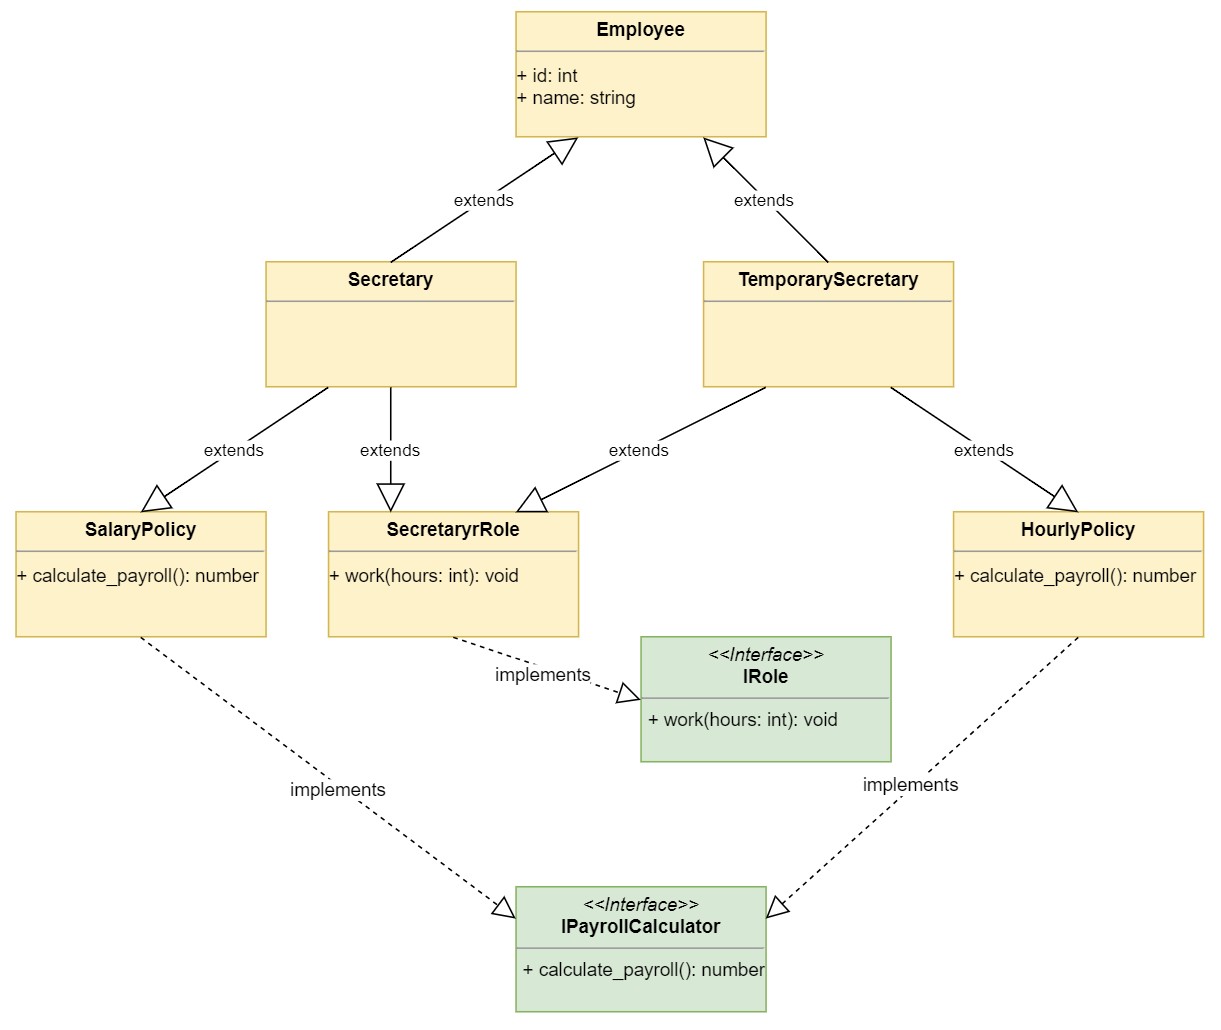
Here’s the UML diagram for the new design:
![Policy based design using multiple inheritance]()
The diagram shows the relationships to define the Secretary and TemporarySecretary using multiple inheritance, but avoiding the diamond problem.
You can run the program and see how it works:
$ python program.py

Tracking Employee Productivity==============================Mary Poppins: screams and yells for 40 hours.John Smith: expends 40 hours doing office paperwork.Kevin Bacon: expends 40 hours on the phone.Jane Doe: manufactures gadgets for 40 hours.Robin Williams: expends 40 hours doing office paperwork.Calculating Payroll===================Payroll for: 1 - Mary Poppins- Check amount: 3000Payroll for: 2 - John Smith- Check amount: 1500Payroll for: 3 - Kevin Bacon- Check amount: 1250Payroll for: 4 - Jane Doe- Check amount: 600Payroll for: 5 - Robin Williams- Check amount: 360
You’ve seen how inheritance and multiple inheritance work in Python. You can now explore the topic of composition.
Composition in Python
Composition is an object oriented design concept that models a has a relationship. In composition, a class known as composite contains an object of another class known to as component. In other words, a composite class has a component of another class.
Composition allows composite classes to reuse the implementation of the components it contains. The composite class doesn’t inherit the component class interface, but it can leverage its implementation.
The composition relation between two classes is considered loosely coupled. That means that changes to the component class rarely affect the composite class, and changes to the composite class never affect the component class.
This provides better adaptability to change and allows applications to introduce new requirements without affecting existing code.
When looking at two competing software designs, one based on inheritance and another based on composition, the composition solution usually is the most flexible. You can now look at how composition works.
You’ve already used composition in our examples. If you look at the Employee class, you’ll see that it contains two attributes:
id to identify an employee.name to contain the name of the employee.
These two attributes are objects that the Employee class has. Therefore, you can say that an Employeehas anid and has a name.
Another attribute for an Employee might be an Address:
# In contacts.pyclassAddress:def__init__(self,street,city,state,zipcode,street2=''):self.street=streetself.street2=street2self.city=cityself.state=stateself.zipcode=zipcodedef__str__(self):lines=[self.street]ifself.street2:lines.append(self.street2)lines.append(f'{self.city}, {self.state}{self.zipcode}')return'\n'.join(lines)You implemented a basic address class that contains the usual components for an address. You made the street2 attribute optional because not all addresses will have that component.
You implemented __str__() to provide a pretty representation of an Address. You can see this implementation in the interactive interpreter:
>>>>>> fromcontactsimportAddress>>> address=Address('55 Main St.','Concord','NH','03301')>>> print(address)55 Main St.Concord, NH 03301 When you print() the address variable, the special method __str__() is invoked. Since you overloaded the method to return a string formatted as an address, you get a nice, readable representation. Operator and Function Overloading in Custom Python Classes gives a good overview of the special methods available in classes that can be implemented to customize the behavior of your objects.
You can now add the Address to the Employee class through composition:
# In employees.pyclassEmployee:def__init__(self,id,name):self.id=idself.name=nameself.address=None
You initialize the address attribute to None for now to make it optional, but by doing that, you can now assign an Address to an Employee. Also notice that there is no reference in the employee module to the contacts module.
Composition is a loosely coupled relationship that often doesn’t require the composite class to have knowledge of the component.
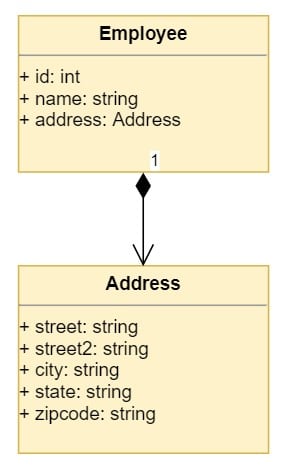
The UML diagram representing the relationship between Employee and Address looks like this:
![Composition example with Employee containing Address]()
The diagram shows the basic composition relationship between Employee and Address.
You can now modify the PayrollSystem class to leverage the address attribute in Employee:
# In hr.pyclassPayrollSystem:defcalculate_payroll(self,employees):print('Calculating Payroll')print('===================')foremployeeinemployees:print(f'Payroll for: {employee.id} - {employee.name}')print(f'- Check amount: {employee.calculate_payroll()}')ifemployee.address:print('- Sent to:')print(employee.address)print('')You check to see if the employee object has an address, and if it does, you print it. You can now modify the program to assign some addresses to the employees:
# In program.pyimporthrimportemployeesimportproductivityimportcontactsmanager=employees.Manager(1,'Mary Poppins',3000)manager.address=contacts.Address('121 Admin Rd','Concord','NH','03301')secretary=employees.Secretary(2,'John Smith',1500)secretary.address=contacts.Address('67 Paperwork Ave.','Manchester','NH','03101')sales_guy=employees.SalesPerson(3,'Kevin Bacon',1000,250)factory_worker=employees.FactoryWorker(4,'Jane Doe',40,15)temporary_secretary=employees.TemporarySecretary(5,'Robin Williams',40,9)employees=[manager,secretary,sales_guy,factory_worker,temporary_secretary,]productivity_system=productivity.ProductivitySystem()productivity_system.track(employees,40)payroll_system=hr.PayrollSystem()payroll_system.calculate_payroll(employees)You added a couple of addresses to the manager and secretary objects. When you run the program, you will see the addresses printed:
$ python program.py

Tracking Employee Productivity==============================Mary Poppins: screams and yells for {hours} hours.John Smith: expends {hours} hours doing office paperwork.Kevin Bacon: expends {hours} hours on the phone.Jane Doe: manufactures gadgets for {hours} hours.Robin Williams: expends {hours} hours doing office paperwork.Calculating Payroll===================Payroll for: 1 - Mary Poppins- Check amount: 3000- Sent to:121 Admin RdConcord, NH 03301Payroll for: 2 - John Smith- Check amount: 1500- Sent to:67 Paperwork Ave.Manchester, NH 03101Payroll for: 3 - Kevin Bacon- Check amount: 1250Payroll for: 4 - Jane Doe- Check amount: 600Payroll for: 5 - Robin Williams- Check amount: 360
Notice how the payroll output for the manager and secretary objects show the addresses where the checks were sent.
The Employee class leverages the implementation of the Address class without any knowledge of what an Address object is or how it’s represented. This type of design is so flexible that you can change the Address class without any impact to the Employee class.
Flexible Designs With Composition
Composition is more flexible than inheritance because it models a loosely coupled relationship. Changes to a component class have minimal or no effects on the composite class. Designs based on composition are more suitable to change.
You change behavior by providing new components that implement those behaviors instead of adding new classes to your hierarchy.
Take a look at the multiple inheritance example above. Imagine how new payroll policies will affect the design. Try to picture what the class hierarchy will look like if new roles are needed. As you saw before, relying too heavily on inheritance can lead to class explosion.
The biggest problem is not so much the number of classes in your design, but how tightly coupled the relationships between those classes are. Tightly coupled classes affect each other when changes are introduced.
In this section, you are going to use composition to implement a better design that still fits the requirements of the PayrollSystem and the ProductivitySystem.
You can start by implementing the functionality of the ProductivitySystem:
# In productivity.pyclassProductivitySystem:def__init__(self):self._roles={'manager':ManagerRole,'secretary':SecretaryRole,'sales':SalesRole,'factory':FactoryRole,}defget_role(self,role_id):role_type=self._roles.get(role_id)ifnotrole_type:raiseValueError('role_id')returnrole_type()deftrack(self,employees,hours):print('Tracking Employee Productivity')print('==============================')foremployeeinemployees:employee.work(hours)print('')The ProductivitySystem class defines some roles using a string identifier mapped to a role class that implements the role. It exposes a .get_role() method that, given a role identifier, returns the role type object. If the role is not found, then a ValueError exception is raised.
It also exposes the previous functionality in the .track() method, where given a list of employees it tracks the productivity of those employees.
You can now implement the different role classes:
# In productivity.pyclassManagerRole:defperform_duties(self,hours):returnf'screams and yells for {hours} hours.'classSecretaryRole:defperform_duties(self,hours):returnf'does paperwork for {hours} hours.'classSalesRole:defperform_duties(self,hours):returnf'expends {hours} hours on the phone.'classFactoryRole:defperform_duties(self,hours):returnf'manufactures gadgets for {hours} hours.'Each of the roles you implemented expose a .perform_duties() that takes the number of hours worked. The methods return a string representing the duties.
The role classes are independent of each other, but they expose the same interface, so they are interchangeable. You’ll see later how they are used in the application.
Now, you can implement the PayrollSystem for the application:
# In hr.pyclassPayrollSystem:def__init__(self):self._employee_policies={1:SalaryPolicy(3000),2:SalaryPolicy(1500),3:CommissionPolicy(1000,100),4:HourlyPolicy(15),5:HourlyPolicy(9)}defget_policy(self,employee_id):policy=self._employee_policies.get(employee_id)ifnotpolicy:returnValueError(employee_id)returnpolicydefcalculate_payroll(self,employees):print('Calculating Payroll')print('===================')foremployeeinemployees:print(f'Payroll for: {employee.id} - {employee.name}')print(f'- Check amount: {employee.calculate_payroll()}')ifemployee.address:print('- Sent to:')print(employee.address)print('')The PayrollSystem keeps an internal database of payroll policies for each employee. It exposes a .get_policy() that, given an employee id, returns its payroll policy. If a specified id doesn’t exist in the system, then the method raises a ValueError exception.
The implementation of .calculate_payroll() works the same as before. It takes a list of employees, calculates the payroll, and prints the results.
You can now implement the payroll policy classes:
# In hr.pyclassPayrollPolicy:def__init__(self):self.hours_worked=0deftrack_work(self,hours):self.hours_worked+=hoursclassSalaryPolicy(PayrollPolicy):def__init__(self,weekly_salary):super().__init__()self.weekly_salary=weekly_salarydefcalculate_payroll(self):returnself.weekly_salaryclassHourlyPolicy(PayrollPolicy):def__init__(self,hour_rate):super().__init__()self.hour_rate=hour_ratedefcalculate_payroll(self):returnself.hours_worked*self.hour_rateclassCommissionPolicy(SalaryPolicy):def__init__(self,weekly_salary,commission_per_sale):super().__init__(weekly_salary)self.commission_per_sale=commission_per_sale@propertydefcommission(self):sales=self.hours_worked/5returnsales*self.commission_per_saledefcalculate_payroll(self):fixed=super().calculate_payroll()returnfixed+self.commission
You first implement a PayrollPolicy class that serves as a base class for all the payroll policies. This class tracks the hours_worked, which is common to all payroll policies.
The other policy classes derive from PayrollPolicy. We use inheritance here because we want to leverage the implementation of PayrollPolicy. Also, SalaryPolicy, HourlyPolicy, and CommissionPolicyare aPayrollPolicy.
SalaryPolicy is initialized with a weekly_salary value that is then used in .calculate_payroll(). HourlyPolicy is initialized with the hour_rate, and implements .calculate_payroll() by leveraging the base class hours_worked.
The CommissionPolicy class derives from SalaryPolicy because it wants to inherit its implementation. It is initialized with the weekly_salary parameters, but it also requires a commission_per_sale parameter.
The commission_per_sale is used to calculate the .commission, which is implemented as a property so it gets calculated when requested. In the example, we are assuming that a sale happens every 5 hours worked, and the .commission is the number of sales times the commission_per_sale value.
CommissionPolicy implements the .calculate_payroll() method by first leveraging the implementation in SalaryPolicy and then adding the calculated commission.
You can now add an AddressBook class to manage employee addresses:
# In contacts.pyclassAddressBook:def__init__(self):self._employee_addresses={1:Address('121 Admin Rd.','Concord','NH','03301'),2:Address('67 Paperwork Ave','Manchester','NH','03101'),3:Address('15 Rose St','Concord','NH','03301','Apt. B-1'),4:Address('39 Sole St.','Concord','NH','03301'),5:Address('99 Mountain Rd.','Concord','NH','03301'),}defget_employee_address(self,employee_id):address=self._employee_addresses.get(employee_id)ifnotaddress:raiseValueError(employee_id)returnaddressThe AddressBook class keeps an internal database of Address objects for each employee. It exposes a get_employee_address() method that returns the address of the specified employee id. If the employee id doesn’t exist, then it raises a ValueError.
The Address class implementation remains the same as before:
# In contacts.pyclassAddress:def__init__(self,street,city,state,zipcode,street2=''):self.street=streetself.street2=street2self.city=cityself.state=stateself.zipcode=zipcodedef__str__(self):lines=[self.street]ifself.street2:lines.append(self.street2)lines.append(f'{self.city}, {self.state}{self.zipcode}')return'\n'.join(lines)The class manages the address components and provides a pretty representation of an address.
So far, the new classes have been extended to support more functionality, but there are no significant changes to the previous design. This is going to change with the design of the employees module and its classes.
You can start by implementing an EmployeeDatabase class:
# In employees.pyfromproductivityimportProductivitySystemfromhrimportPayrollSystemfromcontactsimportAddressBookclassEmployeeDatabase:def__init__(self):self._employees=[{'id':1,'name':'Mary Poppins','role':'manager'},{'id':2,'name':'John Smith','role':'secretary'},{'id':3,'name':'Kevin Bacon','role':'sales'},{'id':4,'name':'Jane Doe','role':'factory'},{'id':5,'name':'Robin Williams','role':'secretary'},]self.productivity=ProductivitySystem()self.payroll=PayrollSystem()self.employee_addresses=AddressBook()@propertydefemployees(self):return[self._create_employee(**data)fordatainself._employees]def_create_employee(self,id,name,role):address=self.employee_addresses.get_employee_address(id)employee_role=self.productivity.get_role(role)payroll_policy=self.payroll.get_policy(id)returnEmployee(id,name,address,employee_role,payroll_policy)The EmployeeDatabase keeps track of all the employees in the company. For each employee, it tracks the id, name, and role. It has an instance of the ProductivitySystem, the PayrollSystem, and the AddressBook. These instances are used to create employees.
It exposes an .employees property that returns the list of employees. The Employee objects are created in an internal method ._create_employee(). Notice that you don’t have different types of Employee classes. You just need to implement a single Employee class:
# In employees.pyclassEmployee:def__init__(self,id,name,address,role,payroll):self.id=idself.name=nameself.address=addressself.role=roleself.payroll=payrolldefwork(self,hours):duties=self.role.perform_duties(hours)print(f'Employee {self.id} - {self.name}:')print(f'- {duties}')print('')self.payroll.track_work(hours)defcalculate_payroll(self):returnself.payroll.calculate_payroll()The Employee class is initialized with the id, name, and address attributes. It also requires the productivity role for the employee and the payroll policy.
The class exposes a .work() method that takes the hours worked. This method first retrieves the duties from the role. In other words, it delegates to the role object to perform its duties.
In the same way, it delegates to the payroll object to track the work hours. The payroll, as you saw, uses those hours to calculate the payroll if needed.
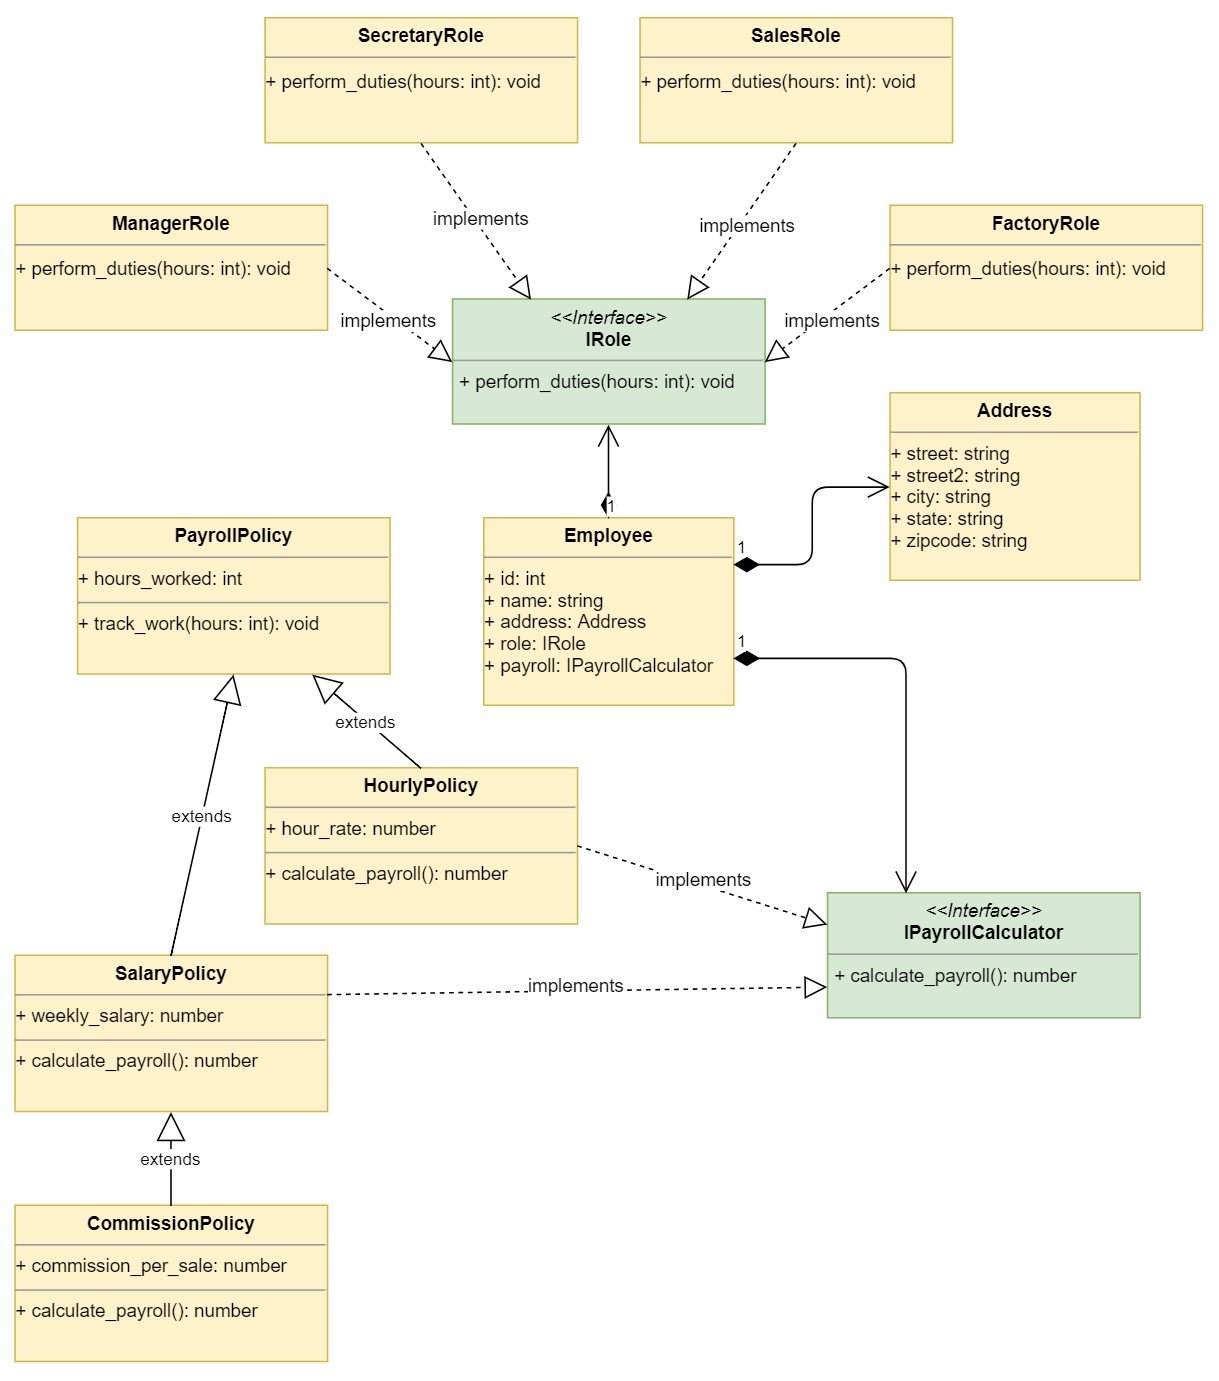
The following diagram shows the composition design used:
![Policy based design using composition]()
The diagram shows the design of composition based policies. There is a single Employee that is composed of other data objects like Address and depends on the IRole and IPayrollCalculator interfaces to delegate the work. There are multiple implementations of these interfaces.
You can now use this design in your program:
# In program.pyfromhrimportPayrollSystemfromproductivityimportProductivitySystemfromemployeesimportEmployeeDatabaseproductivity_system=ProductivitySystem()payroll_system=PayrollSystem()employee_database=EmployeeDatabase()employees=employee_database.employeesproductivity_system.track(employees,40)payroll_system.calculate_payroll(employees)
You can run the program to see its output:
$ python program.py

Tracking Employee Productivity==============================Employee 1 - Mary Poppins:- screams and yells for 40 hours.Employee 2 - John Smith:- does paperwork for 40 hours.Employee 3 - Kevin Bacon:- expends 40 hours on the phone.Employee 4 - Jane Doe:- manufactures gadgets for 40 hours.Employee 5 - Robin Williams:- does paperwork for 40 hours.Calculating Payroll===================Payroll for: 1 - Mary Poppins- Check amount: 3000- Sent to:121 Admin Rd.Concord, NH 03301Payroll for: 2 - John Smith- Check amount: 1500- Sent to:67 Paperwork AveManchester, NH 03101Payroll for: 3 - Kevin Bacon- Check amount: 1800.0- Sent to:15 Rose StApt. B-1Concord, NH 03301Payroll for: 4 - Jane Doe- Check amount: 600- Sent to:39 Sole St.Concord, NH 03301Payroll for: 5 - Robin Williams- Check amount: 360- Sent to:99 Mountain Rd.Concord, NH 03301
This design is what is called policy-based design, where classes are composed of policies, and they delegate to those policies to do the work.
Policy-based design was introduced in the book Modern C++ Design, and it uses template metaprogramming in C++ to achieve the results.
Python does not support templates, but you can achieve similar results using composition, as you saw in the example above.
This type of design gives you all the flexibility you’ll need as requirements change. Imagine you need to change the way payroll is calculated for an object at run-time.
Customizing Behavior With Composition
If your design relies on inheritance, you need to find a way to change the type of an object to change its behavior. With composition, you just need to change the policy the object uses.
Imagine that our manager all of a sudden becomes a temporary employee that gets paid by the hour. You can modify the object during the execution of the program in the following way:
# In program.pyfromhrimportPayrollSystem,HourlyPolicyfromproductivityimportProductivitySystemfromemployeesimportEmployeeDatabaseproductivity_system=ProductivitySystem()payroll_system=PayrollSystem()employee_database=EmployeeDatabase()employees=employee_database.employeesmanager=employees[0]manager.payroll=HourlyPolicy(55)productivity_system.track(employees,40)payroll_system.calculate_payroll(employees)
The program gets the employee list from the EmployeeDatabase and retrieves the first employee, which is the manager we want. Then it creates a new HourlyPolicy initialized at $55 per hour and assigns it to the manager object.
The new policy is now used by the PayrollSystem modifying the existing behavior. You can run the program again to see the result:
$ python program.py

Tracking Employee Productivity==============================Employee 1 - Mary Poppins:- screams and yells for 40 hours.Employee 2 - John Smith:- does paperwork for 40 hours.Employee 3 - Kevin Bacon:- expends 40 hours on the phone.Employee 4 - Jane Doe:- manufactures gadgets for 40 hours.Employee 5 - Robin Williams:- does paperwork for 40 hours.Calculating Payroll===================Payroll for: 1 - Mary Poppins- Check amount: 2200- Sent to:121 Admin Rd.Concord, NH 03301Payroll for: 2 - John Smith- Check amount: 1500- Sent to:67 Paperwork AveManchester, NH 03101Payroll for: 3 - Kevin Bacon- Check amount: 1800.0- Sent to:15 Rose StApt. B-1Concord, NH 03301Payroll for: 4 - Jane Doe- Check amount: 600- Sent to:39 Sole St.Concord, NH 03301Payroll for: 5 - Robin Williams- Check amount: 360- Sent to:99 Mountain Rd.Concord, NH 03301
The check for Mary Poppins, our manager, is now for $2200 instead of the fixed salary of $3000 that she had per week.
Notice how we added that business rule to the program without changing any of the existing classes. Consider what type of changes would’ve been required with an inheritance design.
You would’ve had to create a new class and change the type of the manager employee. There is no chance you could’ve changed the policy at run-time.
Choosing Between Inheritance and Composition in Python
So far, you’ve seen how inheritance and composition work in Python. You’ve seen that derived classes inherit the interface and implementation of their base classes. You’ve also seen that composition allows you to reuse the implementation of another class.
You’ve implemented two solutions to the same problem. The first solution used multiple inheritance, and the second one used composition.
You’ve also seen that Python’s duck typing allows you to reuse objects with existing parts of a program by implementing the desired interface. In Python, it isn’t necessary to derive from a base class for your classes to be reused.
At this point, you might be asking when to use inheritance vs composition in Python. They both enable code reuse. Inheritance and composition can tackle similar problems in your Python programs.
The general advice is to use the relationship that creates fewer dependencies between two classes. This relation is composition. Still, there will be times where inheritance will make more sense.
The following sections provide some guidelines to help you make the right choice between inheritance and composition in Python.
Inheritance to Model “Is A” Relationship
Inheritance should only be used to model an is a relationship. Liskov’s substitution principle says that an object of type Derived, which inherits from Base, can replace an object of type Base without altering the desirable properties of a program.
Liskov’s substitution principle is the most important guideline to determine if inheritance is the appropriate design solution. Still, the answer might not be straightforward in all situations. Fortunately, there is a simple test you can use to determine if your design follows Liskov’s substitution principle.
Let’s say you have a class A that provides an implementation and interface you want to reuse in another class B. Your initial thought is that you can derive B from A and inherit both the interface and implementation. To be sure this is the right design, you follow theses steps:
Evaluate B is an A: Think about this relationship and justify it. Does it make sense?
Evaluate A is a B: Reverse the relationship and justify it. Does it also make sense?
If you can justify both relationships, then you should never inherit those classes from one another. Let’s look at a more concrete example.
You have a class Rectangle which exposes an .area property. You need a class Square, which also has an .area. It seems that a Square is a special type of Rectangle, so maybe you can derive from it and leverage both the interface and implementation.
Before you jump into the implementation, you use Liskov’s substitution principle to evaluate the relationship.
A Squareis aRectangle because its area is calculated from the product of its height times its length. The constraint is that Square.height and Square.length must be equal.
It makes sense. You can justify the relationship and explain why a Squareis aRectangle. Let’s reverse the relationship to see if it makes sense.
A Rectangleis aSquare because its area is calculated from the product of its height times its length. The difference is that Rectangle.height and Rectangle.width can change independently.
It also makes sense. You can justify the relationship and describe the special constraints for each class. This is a good sign that these two classes should never derive from each other.
You might have seen other examples that derive Square from Rectangle to explain inheritance. You might be skeptical with the little test you just did. Fair enough. Let’s write a program that illustrates the problem with deriving Square from Rectangle.
First, you implement Rectangle. You’re even going to encapsulate the attributes to ensure that all the constraints are met:
# In rectangle_square_demo.pyclassRectangle:def__init__(self,length,height):self._length=lengthself._height=height@propertydefarea(self):returnself._length*self._height
The Rectangle class is initialized with a length and a height, and it provides an .area property that returns the area. The length and height are encapsulated to avoid changing them directly.
Now, you derive Square from Rectangle and override the necessary interface to meet the constraints of a Square:
# In rectangle_square_demo.pyclassSquare(Rectangle):def__init__(self,side_size):super().__init__(side_size,side_size)
The Square class is initialized with a side_size, which is used to initialize both components of the base class. Now, you write a small program to test the behavior:
# In rectangle_square_demo.pyrectangle=Rectangle(2,4)assertrectangle.area==8square=Square(2)assertsquare.area==4print('OK!')The program creates a Rectangle and a Square and asserts that their .area is calculated correctly. You can run the program and see that everything is OK so far:
$ python rectangle_square_demo.py

OK!
The program executes correctly, so it seems that Square is just a special case of a Rectangle.
Later on, you need to support resizing Rectangle objects, so you make the appropriate changes to the class:
# In rectangle_square_demo.pyclassRectangle:def__init__(self,length,height):self._length=lengthself._height=height@propertydefarea(self):returnself._length*self._heightdefresize(self,new_length,new_height):self._length=new_lengthself._height=new_height
.resize() takes the new_length and new_width for the object. You can add the following code to the program to verify that it works correctly:
# In rectangle_square_demo.pyrectangle.resize(3,5)assertrectangle.area==15print('OK!')You resize the rectangle object and assert that the new area is correct. You can run the program to verify the behavior:
$ python rectangle_square_demo.py

OK!
The assertion passes, and you see that the program runs correctly.
So, what happens if you resize a square? Modify the program, and try to modify the square object:
# In rectangle_square_demo.pysquare.resize(3,5)print(f'Square area: {square.area}')You pass the same parameters to square.resize() that you used with rectangle, and print the area. When you run the program you see:
$ python rectangle_square_demo.py

Square area: 15OK!
The program shows that the new area is 15 like the rectangle object. The problem now is that the square object no longer meets the Square class constraint that the length and height must be equal.
How can you fix that problem? You can try several approaches, but all of them will be awkward. You can override .resize() in square and ignore the height parameter, but that will be confusing for people looking at other parts of the program where rectangles are being resized and some of them are not getting the expected areas because they are really squares.
In a small program like this one, it might be easy to spot the causes of the weird behavior, but in a more complex program, the problem will be harder to find.
The reality is that if you’re able to justify an inheritance relationship between two classes both ways, you should not derive one class from another.
In the example, it doesn’t make sense that Square inherits the interface and implementation of .resize() from Rectangle. That doesn’t mean that Square objects can’t be resized. It means that the interface is different because it only needs a side_size parameter.
This difference in interface justifies not deriving Square from Rectangle like the test above advised.
Mixing Features With Mixin Classes
One of the uses of multiple inheritance in Python is to extend a class features through mixins. A mixin is a class that provides methods to other classes but are not considered a base class.
A mixin allows other classes to reuse its interface and implementation without becoming a super class. They implement a unique behavior that can be aggregated to other unrelated classes. They are similar to composition but they create a stronger relationship.
Let’s say you want to convert objects of certain types in your application to a dictionary representation of the object. You could provide a .to_dict() method in every class that you want to support this feature, but the implementation of .to_dict() seems to be very similar.
This could be a good candidate for a mixin. You start by slightly modifying the Employee class from the composition example:
# In employees.pyclassEmployee:def__init__(self,id,name,address,role,payroll):self.id=idself.name=nameself.address=addressself._role=roleself._payroll=payrolldefwork(self,hours):duties=self._role.perform_duties(hours)print(f'Employee {self.id} - {self.name}:')print(f'- {duties}')print('')self._payroll.track_work(hours)defcalculate_payroll(self):returnself._payroll.calculate_payroll()The change is very small. You just changed the role and payroll attributes to be internal by adding a leading underscore to their name. You will see soon why you are making that change.
Now, you add the AsDictionaryMixin class:
# In representations.pyclassAsDictionaryMixin:defto_dict(self):return{prop:self._represent(value)forprop,valueinself.__dict__.items()ifnotself._is_internal(prop)}def_represent(self,value):ifisinstance(value,object):ifhasattr(value,'to_dict'):returnvalue.to_dict()else:returnstr(value)else:returnvaluedef_is_internal(self,prop):returnprop.startswith('_')The AsDictionaryMixin class exposes a .to_dict() method that returns the representation of itself as a dictionary. The method is implemented as a dict comprehension that says, “Create a dictionary mapping prop to value for each item in self.__dict__.items() if the prop is not internal.”
Note: This is why we made the role and payroll attributes internal in the Employee class, because we don’t want to represent them in the dictionary.
As you saw at the beginning, creating a class inherits some members from object, and one of those members is __dict__, which is basically a mapping of all the attributes in an object to their value.
You iterate through all the items in __dict__ and filter out the ones that have a name that starts with an underscore using ._is_internal().
._represent() checks the specified value. If the value is anobject, then it looks to see if it also has a .to_dict() member and uses it to represent the object. Otherwise, it returns a string representation. If the value is not an object, then it simply returns the value.
You can modify the Employee class to support this mixin:
# In employees.pyfromrepresentationsimportAsDictionaryMixinclassEmployee(AsDictionaryMixin):def__init__(self,id,name,address,role,payroll):self.id=idself.name=nameself.address=addressself._role=roleself._payroll=payrolldefwork(self,hours):duties=self._role.perform_duties(hours)print(f'Employee {self.id} - {self.name}:')print(f'- {duties}')print('')self._payroll.track_work(hours)defcalculate_payroll(self):returnself._payroll.calculate_payroll()All you have to do is inherit the AsDictionaryMixin to support the functionality. It will be nice to support the same functionality in the Address class, so the Employee.address attribute is represented in the same way:
# In contacts.pyfromrepresentationsimportAsDictionaryMixinclassAddress(AsDictionaryMixin):def__init__(self,street,city,state,zipcode,street2=''):self.street=streetself.street2=street2self.city=cityself.state=stateself.zipcode=zipcodedef__str__(self):lines=[self.street]ifself.street2:lines.append(self.street2)lines.append(f'{self.city}, {self.state}{self.zipcode}')return'\n'.join(lines)You apply the mixin to the Address class to support the feature. Now, you can write a small program to test it:
# In program.pyimportjsonfromemployeesimportEmployeeDatabasedefprint_dict(d):print(json.dumps(d,indent=2))foremployeeinEmployeeDatabase().employees:print_dict(employee.to_dict())
The program implements a print_dict() that converts the dictionary to a JSON string using indentation so the output looks better.
Then, it iterates through all the employees, printing the dictionary representation provided by .to_dict(). You can run the program to see its output:
 $ python program.py

 {"id": "1","name": "Mary Poppins","address": {"street": "121 Admin Rd.","street2": "","city": "Concord","state": "NH","zipcode": "03301"  }}{"id": "2","name": "John Smith","address": {"street": "67 Paperwork Ave","street2": "","city": "Manchester","state": "NH","zipcode": "03101"  }}{"id": "3","name": "Kevin Bacon","address": {"street": "15 Rose St","street2": "Apt. B-1","city": "Concord","state": "NH","zipcode": "03301"  }}{"id": "4","name": "Jane Doe","address": {"street": "39 Sole St.","street2": "","city": "Concord","state": "NH","zipcode": "03301"  }}{"id": "5","name": "Robin Williams","address": {"street": "99 Mountain Rd.","street2": "","city": "Concord","state": "NH","zipcode": "03301"  }}
You leveraged the implementation of AsDictionaryMixin in both Employee and Address classes even when they are not related. Because AsDictionaryMixin only provides behavior, it is easy to reuse with other classes without causing problems.
Composition to Model “Has A” Relationship
Composition models a has a relationship. With composition, a class Compositehas an instance of class Component and can leverage its implementation. The Component class can be reused in other classes completely unrelated to the Composite.
In the composition example above, the Employee class has anAddress object. Address implements all the functionality to handle addresses, and it can be reused by other classes.
Other classes like Customer or Vendor can reuse Address without being related to Employee. They can leverage the same implementation ensuring that addresses are handled consistently across the application.
A problem you may run into when using composition is that some of your classes may start growing by using multiple components. Your classes may require multiple parameters in the constructor just to pass in the components they are made of. This can make your classes hard to use.
A way to avoid the problem is by using the Factory Method to construct your objects. You did that with the composition example.
If you look at the implementation of the EmployeeDatabase class, you’ll notice that it uses ._create_employee() to construct an Employee object with the right parameters.
This design will work, but ideally, you should be able to construct an Employee object just by specifying an id, for example employee = Employee(1).
The following changes might improve your design. You can start with the productivity module:
# In productivity.pyclass_ProductivitySystem:def__init__(self):self._roles={'manager':ManagerRole,'secretary':SecretaryRole,'sales':SalesRole,'factory':FactoryRole,}defget_role(self,role_id):role_type=self._roles.get(role_id)ifnotrole_type:raiseValueError('role_id')returnrole_type()deftrack(self,employees,hours):print('Tracking Employee Productivity')print('==============================')foremployeeinemployees:employee.work(hours)print('')# Role classes implementation omitted_productivity_system=_ProductivitySystem()defget_role(role_id):return_productivity_system.get_role(role_id)deftrack(employees,hours):_productivity_system.track(employees,hours)First, you make the _ProductivitySystem class internal, and then provide a _productivity_system internal variable to the module. You are communicating to other developers that they should not create or use the _ProductivitySystem directly. Instead, you provide two functions, get_role() and track(), as the public interface to the module. This is what other modules should use.
What you are saying is that the _ProductivitySystem is a Singleton, and there should only be one object created from it.
Now, you can do the same with the hr module:
# In hr.pyclass_PayrollSystem:def__init__(self):self._employee_policies={1:SalaryPolicy(3000),2:SalaryPolicy(1500),3:CommissionPolicy(1000,100),4:HourlyPolicy(15),5:HourlyPolicy(9)}defget_policy(self,employee_id):policy=self._employee_policies.get(employee_id)ifnotpolicy:returnValueError(employee_id)returnpolicydefcalculate_payroll(self,employees):print('Calculating Payroll')print('===================')foremployeeinemployees:print(f'Payroll for: {employee.id} - {employee.name}')print(f'- Check amount: {employee.calculate_payroll()}')ifemployee.address:print('- Sent to:')print(employee.address)print('')# Policy classes implementation omitted_payroll_system=_PayrollSystem()defget_policy(employee_id):return_payroll_system.get_policy(employee_id)defcalculate_payroll(employees):_payroll_system.calculate_payroll(employees)Again, you make the _PayrollSystem internal and provide a public interface to it. The application will use the public interface to get policies and calculate payroll.
You will now do the same with the contacts module:
# In contacts.pyclass_AddressBook:def__init__(self):self._employee_addresses={1:Address('121 Admin Rd.','Concord','NH','03301'),2:Address('67 Paperwork Ave','Manchester','NH','03101'),3:Address('15 Rose St','Concord','NH','03301','Apt. B-1'),4:Address('39 Sole St.','Concord','NH','03301'),5:Address('99 Mountain Rd.','Concord','NH','03301'),}defget_employee_address(self,employee_id):address=self._employee_addresses.get(employee_id)ifnotaddress:raiseValueError(employee_id)returnaddress# Implementation of Address class omitted_address_book=_AddressBook()defget_employee_address(employee_id):return_address_book.get_employee_address(employee_id)You are basically saying that there should only be one _AddressBook, one _PayrollSystem, and one _ProductivitySystem. Again, this design pattern is called the Singleton design pattern, which comes in handy for classes from which there should only be one, single instance.
Now, you can work on the employees module. You will also make a Singleton out of the _EmployeeDatabase, but you will make some additional changes:
# In employees.pyfromproductivityimportget_rolefromhrimportget_policyfromcontactsimportget_employee_addressfromrepresentationsimportAsDictionaryMixinclass_EmployeeDatabase:def__init__(self):self._employees={1:{'name':'Mary Poppins','role':'manager'},2:{'name':'John Smith','role':'secretary'},3:{'name':'Kevin Bacon','role':'sales'},4:{'name':'Jane Doe','role':'factory'},5:{'name':'Robin Williams','role':'secretary'}}@propertydefemployees(self):return[Employee(id_)forid_insorted(self._employees)]defget_employee_info(self,employee_id):info=self._employees.get(employee_id)ifnotinfo:raiseValueError(employee_id)returninfoclassEmployee(AsDictionaryMixin):def__init__(self,id):self.id=idinfo=employee_database.get_employee_info(self.id)self.name=info.get('name')self.address=get_employee_address(self.id)self._role=get_role(info.get('role'))self._payroll=get_policy(self.id)defwork(self,hours):duties=self._role.perform_duties(hours)print(f'Employee {self.id} - {self.name}:')print(f'- {duties}')print('')self._payroll.track_work(hours)defcalculate_payroll(self):returnself._payroll.calculate_payroll()employee_database=_EmployeeDatabase()You first import the relevant functions and classes from other modules. The _EmployeeDatabase is made internal, and at the bottom, you create a single instance. This instance is public and part of the interface because you will want to use it in the application.
You changed the _EmployeeDatabase._employees attribute to be a dictionary where the key is the employee id and the value is the employee information. You also exposed a .get_employee_info() method to return the information for the specified employee employee_id.
The _EmployeeDatabase.employees property now sorts the keys to return the employees sorted by their id. You replaced the method that constructed the Employee objects with calls to the Employee initializer directly.
The Employee class now is initialized with the id and uses the public functions exposed in the other modules to initialize its attributes.
You can now change the program to test the changes:
# In program.pyimportjsonfromhrimportcalculate_payrollfromproductivityimporttrackfromemployeesimportemployee_database,Employeedefprint_dict(d):print(json.dumps(d,indent=2))employees=employee_database.employeestrack(employees,40)calculate_payroll(employees)temp_secretary=Employee(5)print('Temporary Secretary:')print_dict(temp_secretary.to_dict())You import the relevant functions from the hr and productivity modules, as well as the employee_database and Employee class. The program is cleaner because you exposed the required interface and encapsulated how objects are accessed.
Notice that you can now create an Employee object directly just using its id. You can run the program to see its output:
$ python program.py

Tracking Employee Productivity==============================Employee 1 - Mary Poppins:- screams and yells for 40 hours.Employee 2 - John Smith:- does paperwork for 40 hours.Employee 3 - Kevin Bacon:- expends 40 hours on the phone.Employee 4 - Jane Doe:- manufactures gadgets for 40 hours.Employee 5 - Robin Williams:- does paperwork for 40 hours.Calculating Payroll===================Payroll for: 1 - Mary Poppins- Check amount: 3000- Sent to:121 Admin Rd.Concord, NH 03301Payroll for: 2 - John Smith- Check amount: 1500- Sent to:67 Paperwork AveManchester, NH 03101Payroll for: 3 - Kevin Bacon- Check amount: 1800.0- Sent to:15 Rose StApt. B-1Concord, NH 03301Payroll for: 4 - Jane Doe- Check amount: 600- Sent to:39 Sole St.Concord, NH 03301Payroll for: 5 - Robin Williams- Check amount: 360- Sent to:99 Mountain Rd.Concord, NH 03301Temporary Secretary:{"id": "5","name": "Robin Williams","address": {"street": "99 Mountain Rd.","street2": "","city": "Concord","state": "NH","zipcode": "03301"  }}
The program works the same as before, but now you can see that a single Employee object can be created from its id and display its dictionary representation.
Take a closer look at the Employee class:
# In employees.pyclassEmployee(AsDictionaryMixin):def__init__(self,id):self.id=idinfo=employee_database.get_employee_info(self.id)self.name=info.get('name')self.address=get_employee_address(self.id)self._role=get_role(info.get('role'))self._payroll=get_policy(self.id)defwork(self,hours):duties=self._role.perform_duties(hours)print(f'Employee {self.id} - {self.name}:')print(f'- {duties}')print('')self._payroll.track_work(hours)defcalculate_payroll(self):returnself._payroll.calculate_payroll()The Employee class is a composite that contains multiple objects providing different functionality. It contains an Address that implements all the functionality related to where the employee lives.
Employee also contains a productivity role provided by the productivity module, and a payroll policy provided by the hr module. These two objects provide implementations that are leveraged by the Employee class to track work in the .work() method and to calculate the payroll in the .calculate_payroll() method.
You are using composition in two different ways. The Address class provides additional data to Employee where the role and payroll objects provide additional behavior.
Still, the relationship between Employee and those objects is loosely coupled, which provides some interesting capabilities that you’ll see in the next section.
Composition to Change Run-Time Behavior
Inheritance, as opposed to composition, is a tightly couple relationship. With inheritance, there is only one way to change and customize behavior. Method overriding is the only way to customize the behavior of a base class. This creates rigid designs that are difficult to change.
Composition, on the other hand, provides a loosely coupled relationship that enables flexible designs and can be used to change behavior at run-time.
Imagine you need to support a long-term disability (LTD) policy when calculating payroll. The policy states that an employee on LTD should be paid 60% of their weekly salary assuming 40 hours of work.
With an inheritance design, this can be a very difficult requirement to support. Adding it to the composition example is a lot easier. Let’s start by adding the policy class:
# In hr.pyclassLTDPolicy:def__init__(self):self._base_policy=Nonedeftrack_work(self,hours):self._check_base_policy()returnself._base_policy.track_work(hours)defcalculate_payroll(self):self._check_base_policy()base_salary=self._base_policy.calculate_payroll()returnbase_salary*0.6defapply_to_policy(self,base_policy):self._base_policy=base_policydef_check_base_policy(self):ifnotself._base_policy:raiseRuntimeError('Base policy missing')Notice that LTDPolicy doesn’t inherit PayrollPolicy, but implements the same interface. This is because the implementation is completely different, so we don’t want to inherit any of the PayrollPolicy implementation.
The LTDPolicy initializes _base_policy to None, and provides an internal ._check_base_policy() method that raises an exception if the ._base_policy has not been applied. Then, it provides a .apply_to_policy() method to assign the _base_policy.
The public interface first checks that the _base_policy has been applied, and then implements the functionality in terms of that base policy. The .track_work() method just delegates to the base policy, and .calculate_payroll() uses it to calculate the base_salary and then return the 60%.
You can now make a small change to the Employee class:
# In employees.pyclassEmployee(AsDictionaryMixin):def__init__(self,id):self.id=idinfo=employee_database.get_employee_info(self.id)self.name=info.get('name')self.address=get_employee_address(self.id)self._role=get_role(info.get('role'))self._payroll=get_policy(self.id)defwork(self,hours):duties=self._role.perform_duties(hours)print(f'Employee {self.id} - {self.name}:')print(f'- {duties}')print('')self._payroll.track_work(hours)defcalculate_payroll(self):returnself._payroll.calculate_payroll()defapply_payroll_policy(self,new_policy):new_policy.apply_to_policy(self._payroll)self._payroll=new_policyYou added an .apply_payroll_policy() method that applies the existing payroll policy to the new policy and then substitutes it. You can now modify the program to apply the policy to an Employee object:
# In program.pyfromhrimportcalculate_payroll,LTDPolicyfromproductivityimporttrackfromemployeesimportemployee_databaseemployees=employee_database.employeessales_employee=employees[2]ltd_policy=LTDPolicy()sales_employee.apply_payroll_policy(ltd_policy)track(employees,40)calculate_payroll(employees)
The program accesses sales_employee, which is located at index 2, creates the LTDPolicy object, and applies the policy to the employee. When .calculate_payroll() is called, the change is reflected. You can run the program to evaluate the output:
$ python program.py

Tracking Employee Productivity==============================Employee 1 - Mary Poppins:- screams and yells for 40 hours.Employee 2 - John Smith:- Does paperwork for 40 hours.Employee 3 - Kevin Bacon:- Expends 40 hours on the phone.Employee 4 - Jane Doe:- Manufactures gadgets for 40 hours.Employee 5 - Robin Williams:- Does paperwork for 40 hours.Calculating Payroll===================Payroll for: 1 - Mary Poppins- Check amount: 3000- Sent to:121 Admin Rd.Concord, NH 03301Payroll for: 2 - John Smith- Check amount: 1500- Sent to:67 Paperwork AveManchester, NH 03101Payroll for: 3 - Kevin Bacon- Check amount: 1080.0- Sent to:15 Rose StApt. B-1Concord, NH 03301Payroll for: 4 - Jane Doe- Check amount: 600- Sent to:39 Sole St.Concord, NH 03301Payroll for: 5 - Robin Williams- Check amount: 360- Sent to:99 Mountain Rd.Concord, NH 03301
The check amount for employee Kevin Bacon, who is the sales employee, is now for $1080 instead of $1800. That’s because the LTDPolicy has been applied to the salary.
As you can see, you were able to support the changes just by adding a new policy and modifying a couple interfaces. This is the kind of flexibility that policy design based on composition gives you.
Choosing Between Inheritance and Composition in Python
Python, as an object oriented programming language, supports both inheritance and composition. You saw that inheritance is best used to model an is a relationship, whereas composition models a has a relationship.
Sometimes, it’s hard to see what the relationship between two classes should be, but you can follow these guidelines:
Use inheritance over composition in Python to model a clear is a relationship. First, justify the relationship between the derived class and its base. Then, reverse the relationship and try to justify it. If you can justify the relationship in both directions, then you should not use inheritance between them.
Use inheritance over composition in Python to leverage both the interface and implementation of the base class.
Use inheritance over composition in Python to provide mixin features to several unrelated classes when there is only one implementation of that feature.
Use composition over inheritance in Python to model a has a relationship that leverages the implementation of the component class.
Use composition over inheritance in Python to create components that can be reused by multiple classes in your Python applications.
Use composition over inheritance in Python to implement groups of behaviors and policies that can be applied interchangeably to other classes to customize their behavior.
Use composition over inheritance in Python to enable run-time behavior changes without affecting existing classes.
Conclusion
You explored inheritance and composition in Python. You learned about the type of relationships that inheritance and composition create. You also went through a series of exercises to understand how inheritance and composition are implemented in Python.
In this article, you learned how to:
- Use inheritance to express an is a relationship between two classes
- Evaluate if inheritance is the right relationship
- Use multiple inheritance in Python and evaluate Python’s MRO to troubleshoot multiple inheritance problems
- Extend classes with mixins and reuse their implementation
- Use composition to express a has a relationship between two classes
- Provide flexible designs using composition
- Reuse existing code through policy design based on composition
Recommended Reading
Here are some books and articles that further explore object oriented design and can be useful to help you understand the correct use of inheritance and composition in Python or other languages:
[ Improve Your Python With 🐍 Python Tricks 💌 – Get a short & sweet Python Trick delivered to your inbox every couple of days. >> Click here to learn more and see examples ]
 '
'