Quantcast
Channel: Planet Python
Viewing all 24375 articles
Browse latest View live

PyCoder’s Weekly: Issue #345 (Dec. 4, 2018)

$
0
0

#345 – DECEMBER 4, 2018
View in Browser »

The PyCoder’s Weekly Logo


What Is a Data Frame? (In Python, R, and SQL)

Great little post that introduces the concepts behind Data Frames, and then shows how they work by solving the same problem in multiple ways: without DFs, with DFs, and in plain SQL.
OILSHELL.ORG

Five Myths About Pipenv

We’ve recently seen some articles to the tune of “Pipenv makes pip and venv obsolete”—but is that really true? Chad’s article discusses five Pipenv myths that you may have encountered in one form or another. Recommended reading.
CHAD SMITHopinion

Online Machine Learning Bootcamp With Job Guarantee

alt

Springboard’s AI/Machine Learning Career Track is a new online, self-paced bootcamp that offers personalized mentorship from machine learning experts, career coaching and a job guarantee. Get a job or get your tuition back. Applications for the first cohort close soon: don’t wait to apply.
SPRINGBOARDsponsor

Developing a Single Page App With Flask and Vue.js

A step-by-step walkthrough of how to set up a basic CRUD app with Vue and Flask. It starts with scaffolding a new Vue application, using the Vue CLI, and then move on to performing the basic CRUD operations through a back-end RESTful API powered by Python and Flask.
MICHAEL HERMAN• Shared by Ricky White

Advanced Form Rendering with Django Crispy Forms

I’m impressed by Django Crispy Forms. In this tutorial Vitor explores some of the Django Crispy Forms features to handle advanced/custom forms rendering.
VITOR FREITAS

wtfpython: Surprising Python Snippets and Lesser-Known Features

A fun project that collects tricky & counter-intuitive examples and lesser-known features in Python, attempting to discuss what exactly is happening under the hood.
GITHUB.COM/SATWIKKANSAL

Advent of Code 2018

Advent of Code is an Advent calendar of small programming puzzles for a variety of skill sets and skill levels that can be solved in any programming language you like.
ADVENTOFCODE.COM

The Best Python Books

Find the right books to help you get started with Python or take your coding to the next level with this detailed review guide put together by the Real Python tutorial team.
REAL PYTHON

Discussions

How Much Code Do You Put in One Statement?

Raymond’s recommendation: “Statements should correspond to one complete thought expressible in a single sentence in plain English.”
RAYMOND HETTINGER

When Developing, Set PYTHONWARNINGS

Many Python libraries emit warning messages when you use them incorrectly or not optimally—think deprecation warnings and things like that. You can use the PYTHONWARNINGS flag to control which warnings are shown and this discussion goes into more detail.
REDDIT

What’s the Deal With Python 3.0–3.3?

“Everywhere I look, I see requirements for Python 2.7, 3.4+.”
REDDIT

Python Jobs

Software Engineer (Munich, Germany)

Stylight GmbH

Senior Software Engineer (Munich, Germany)

Stylight GmbH

Lead Engineer (Munich, Germany)

Stylight GmbH

Backend Software Engineer (Vancouver, BC)

Gasket Games Corp

Head of Engineering (Remote)

FindKeep.Love

Cybersecurity Firm Seeks Backend Lead (NY or LA)

Aon Cyber Solutions

Senior Software Engineer (Los Angeles, CA)

GoodRx

Senior Developer (Chicago, IL)

Panopta

More Python Jobs >>>

Articles & Tutorials

Python Interview Questions (Part 1: Junior Devs)

A series of posts about the author’s own base of Python-specific interviewing questions. Of course, no list like that is going to be perfect and this got quite a bit of grief in the Hacker News comments section. I think this is still helpful if you’re prepping for a Python coding interview, so go check it out.
LUMINOUSMEN.COM

Python Sets and Set Theory

Learn about Python sets: what they are, how to create them, when to use them, built-in functions, and their relationship to set theory operations.
MICHAEL GALARNYK• Shared by Michael Galarnyk

Top 50 Matplotlib Visualizations

A compilation of 50 matplotlib plots most useful in data analysis and visualization. Useful for choosing what visualization to show for what type of problem using Python’s matplotlib and seaborn libraries.
MACHINELEARNINGPLUS.COM

Python Tricks: A Buffet of Awesome Python Features

alt

Discover Python’s best practices with simple examples and start writing even more beautiful + Pythonic code. “Python Tricks: The Book” shows you exactly how. You’ll master intermediate and advanced-level features in Python with practical examples and a clear narrative. Get the book + video bundle 33% off →
DAN BADERsponsor

Best Practices for Using Functional Programming in Python

A short & sweet overview and some practical recommendations for applying a functional mindset to make code more predictable and easier to follow, while maintaining simplicity and keeping it Pythonic.
AMANDINE LEE

When 100% Test Coverage Just Isn’t Enough

Brian Okken interviews Mahmoud Hashemi (the author of glom) about test coverage, versioning schemes, and more.
TESTANDCODE.COMpodcast

Building Serverless Python Apps Using AWS Chalice

Chalice, a Python Serverless Microframework developed by AWS, enables you to quickly spin up and deploy a working serverless app that scales up and down on its own as required using AWS Lambda.
REAL PYTHON

A Multi-Value Syntax Tree Filtering in Python

A tutorial that teaches you how to write an evaluation engine for small, dynamic filter rules like Filter({"eq": 3})(4). This post is a follow-up that expands the rules engine to accept more complex rules involving binary operators.
JULIEN DANJOU

Keeping Up With the Python Community for Fun and Profit

I’m a guest on Tobias Macey’s Podcast.__init__ this week, talking about Real Python, PyCoder’s Weekly, and how to serve the Python community with content curation. Thanks for inviting me, Tobias!
PODCASTINIT.COMpodcast

You Can’t Impress Developers. So Don’t Try. (2013)

“Developers can’t impress other developers. So don’t try. Instead focus on impressing your users.”
CHRIS BAUSopinion

Projects & Code

Dataset: Databases for Lazy People

A simple abstraction layer removes most direct SQL statements without the necessity for a full ORM model—essentially, databases can be used like a JSON file or NoSQL store.
FRIEDRICH LINDENBERG

mne-python: MEG + EEG Analysis & Visualization

A package for exploring, visualizing, and analyzing human neurophysiological data such as Magnetoencephalography (MEG), Electroencephalography (EEG), sEEG, ECoG, and more.
GITHUB.COM/MNE-TOOLS

MinaOTP-Shell: TOTP Authenticator CLI

A two-factor authentication tool that runs in a terminal as a command-line tool.
GITHUB.COM/MINAOTP

The Xonsh Shell

Want some more Python in your life? Xonsh is a shell language and command prompt based on a superset of Python 3.4+ with additional shell primitives that you are used to from Bash and IPython. It works on all major systems including Linux, macOS, and Windows.
XONSH.ORG

EarSketch

A web-based application to teach coding skills through music. Interesting approach!
GATECH.EDU

asciify: Convert Any Image Into ASCII Art

The main script is less than 100 lines of Python.
GITHUB.COM/RAMESHADITYA

PyObfx: Python Obfuscator & Packer

Obfuscation is the deliberate act of creating source or machine code that is difficult for humans to understand. This tool obfuscates Python code.
GITHUB.COM/PYOBFX

GeoPandas: Spatial Operations for Pandas

GeoPandas is an open source project to make working with geospatial data in Python easier. It extends the datatypes used by Pandas to allow spatial operations on geometric types.
GEOPANDAS.ORG

Events

GeoPython 2019

June 24–26 in Basel, Switzerland
GEOPYTHON.NET

PyCascades 2019

February 23–24, 2019 in Seattle, WA
PYCASCADES.COM

PyCon SK 2019

March 22–24 in Bratislava, Slovakia
PYCON.SK


Happy Pythoning!
This was PyCoder’s Weekly Issue #345.
View in Browser »


[ Subscribe to 🐍 PyCoder’s Weekly 💌 – Get the best Python news, articles, and tutorials delivered to your inbox once a week >> Click here to learn more ]


Continuum Analytics Blog: Using Pip in a Conda Environment

$
0
0

Unfortunately, issues can arise when conda and pip are used together to create an environment, especially when the tools are used back-to-back multiple times, establishing a state that can be hard to reproduce. Most of these issues stem from that fact that conda, like other package managers, has limited abilities to control packages it did …
Read more →

The post Using Pip in a Conda Environment appeared first on Anaconda.

Philip Semanchuk: Happy Birthday, sysv_ipc

$
0
0

Ten years ago today, I released the first version of sysv_ipc (a Python wrapper around System V IPC primitives). Happy 10th birthday! 🎂

You can find it on GitHub and PyPI.

Techiediaries - Django: Django Form Example—Bootstrap 4 UI via django-crispy-forms

$
0
0

In this practical tutorial, you will build a simple example Django application with a form styled with Bootstrap 4.

In this tutorial, you'll be using django-crispy-forms, a popular package that makes it easy for Django developers to create beautiful forms easily and without re-inventing the wheel.

In this tutorial, you'll also be using Bootstrap 4—the latest version of the most popular CSS and HTML framework for building HTML interfaces—to style the form.

The django-crispy-forms enables you to quickly add and render Bootstrap 4 styled forms with a few lines of code.

Prerequisites

You need to have these requirements if you want to create the example in this tutorial, step by step in your machine:

  • A recent version of Python 3 (3.7 is the latest),
  • A basic knowledge of Python,
  • A working knowledge of Django.

Creating a Virtual Environment & Installing Django

First, begin by creating a virtual environment for your project using the venv module:

$ python -m venv env

Next, activate your environment using source:

$ source env/bin/activate

Next, install django in your virtual environment using pip:

$ python -m pip install django

Creating a Django Project & Application

After installing Django, you need to create a project using django-admin.py;

$ django-admin.py startproject demoproject

Next, create an application using manage.py, you can name it accounts:

$ cd demoproject
 $ python manage.py startapp accounts

Next, you need to add accounts in the INSTALLED_APPS array inside the settings.py file of your project.

Installing & Setting up django-crispy-forms

Before adding anything else, let's install the django-crispy-forms application in your virtual environment using pip:

$ pip install django-crispy-forms

Next, as always, you need to add django-crispy-forms into the INSTALLED_APPS array in the setting.py file:

INSTALLED_APPS=[# [...]'crispy_forms']

Since django-crispy-forms supports multiple styles, you also need to specify the CSS framework you want to use in your forms.

You can do that by using the CRISPY_TEMPLATE_PACK setting in the settings.py file:

CRISPY_TEMPLATE_PACK='bootstrap4'

That's all what you need for installing and setting up django-crispy-forms.

Adding Bootstrap 4 to your Project

Installing the django-crispy-forms application, doesn't add Bootstrap 4 to your Django project.

Adding Bootstrap 4 is quite easy, you can either head over to its official website at getbootstrap.com and download the files in your project's folder or you can also use Bootstrap 4 from a CDN. See the docs for more information.

Create a templates/accounts/base.html template inside the accounts application and add the following code:

<!doctype html><htmllang="en"><head><linkrel="stylesheet"href="https://maxcdn.bootstrapcdn.com/bootstrap/4.0.0/css/bootstrap.min.css"integrity="sha384-Gn5384xqQ1aoWXA+058RXPxPg6fy4IWvTNh0E263XmFcJlSAwiGgFAW/dAiS6JXm"crossorigin="anonymous"><title>Django Form Example with Bootstrap 4</title></head><body><divclass="container d-flex h-100"><divclass="row justify-content-center"><divclass="col-10"><h1> Django Form Example with Bootstrap 4 </h1>
          {% block main %}
          {% endblock %}
        </div></div></div></body></html>

You can also add the JavaScript file for Bootstrap 4 if you intend to use the features that require JavaScript.

We use the container, row, col-x and justify-content-center classes to create a simple layout with a one row and one column.

Creating the User Model(s)

Let's now create a User model. Open the accounts/models.py file and add the following code:

fromdjango.dbimportmodelsclassUser(models.Model):name=models.CharField(max_length=100)email=models.EmailField(blank=True)password=models.CharField(max_length=50)

Next, open the accounts/views.py file and add a view to display the form. We'll be using the CreateView class-based view to quickly create a view that displays and processes a form:

fromdjango.views.genericimportCreateViewfrom.modelsimportPersonclassUserCreateView(CreateView):model=Usertemplate_name='accounts/login.html'fields=('name','email','password')

If you don't specify the template name, Django will assume you are using a accounts/user_form.html template.

Next, create an templates/accounts/login.html template inside the accounts application that extends the base.html template and add the following code:

{% extends 'accounts/base.html' %}

{% block main %}
  <formmethod="post">
    {% csrf_token %}
    {{ form }}
    <buttontype="submit"class="btn btn-success">Login</button></form>
{% endblock %}

To be able to see our login page, we need to add a login URL. Open the urls.py file and add:

fromdjango.contribimportadminfromdjango.urlsimportpathfromaccounts.viewsimportUserCreateViewurlpatterns=[path('admin/',admin.site.urls),path('login',UserCreateView.as_view())]

At this point, this is how our login page looks like:

Django Example Form

In order to apply Bootstrap 4 to your form, you simply need to add the following code:

{% extends 'accounts/base.html' %}
{% load crispy_forms_tags %}

{% block main %}
<formmethod="post">
    {% csrf_token %}
    {{ form|crispy }}
    <buttontype="submit"class="btn btn-success">Login</button></form>
{% endblock %}

This is how our form looks like now:

Django Bootstrap 4 Form

You can also use the as_crispy_field template filter on individual fields.

Conclusion

That's the end for this tutorial which showed you how to use Bootstrap 4 with Django Forms via the django-crispy-forms application.

You can also visit the official docs for more information.

codingdirectional: Search for any duplicate file with python

$
0
0

Welcome to the new chapter of this remove duplicate file project. After creating a thread class, open a file and open a folder in the previous few chapters, we can now start to move toward our main objective which is to search for a duplicate file in another folder.

What we will do in this chapter is to write a program to select a file and select a folder which we want to look for the file with the same filename as the one which we have just selected earlier. If the file with the same name does exists in another folder then we will print the file found statement on the application’s label or else we will print out no file with the same name found statement on that same application’s label.

Lets get started. First of all we will edit the main program file to select a file and the folder, the open folder dialog will only open if and only if a file has been selected.

from tkinter import *
from tkinter import filedialog
from Remove import Remove

win = Tk() # 1 Create instance
win.title("Multitas") # 2 Add a title
win.resizable(0, 0) # 3 Disable resizing the GUI
win.configure(background='black') # 4 change background color

# 5 Create a label
aLabel = Label(win, text="Remove duplicate file", anchor="center")
aLabel.grid(column=0, row=1)
aLabel.configure(foreground="white")
aLabel.configure(background="black")

# 6 Create a selectFile function to be used by button
def selectFile():

    filename = filedialog.askopenfilename(initialdir="/", title="Select file")
    if(filename != ''):
        filename = filename.split('/')[-1] # this is for the windows separator only
        folder = filedialog.askdirectory() # 7 open a folder then create and start a new thread to print those filenames from the selected folder
        remove = Remove(folder, aLabel, filename)
        remove.start()

# 8 Adding a Button
action = Button(win, text="Open Folder", command=selectFile)
action.grid(column=0, row=0) # 9 Position the button
action.configure(background='brown')
action.configure(foreground='white')

win.mainloop()  # 10 start GUI

Now we will modify our Remove thread class to search for a file inside another folder.

import threading
import os

class Remove(threading.Thread):

   def __init__(self, massage, aLabel, filename):

      threading.Thread.__init__(self)
      self.massage = massage
      self.label = aLabel
      self.filename = filename

   def run(self):
      text_filename = 'There is no duplicate item'
      filepaths = os.listdir(self.massage)
      for filepath in filepaths:
         if(filepath == self.filename):
            text_filename = 'Found duplicate item'
      self.label.config(text=text_filename)
      return

If you run the above program you will see this statement appears if the duplicate file has been found!

Found the duplicate itemFound the duplicate item

In the next chapter we will start to remove the duplicate file from another folder!

gamingdirectional: Lets move on to the next game level!

$
0
0

Welcome back, in this article we will create the next level setup scene for our pygame project. Yesterday I had a deep thought about the method which we should use to do the game objects setup for each game level and had finally decided to leave the game object managers to do their own game object setups. The reasons why I have selected to let game object managers to manage their own game object...

Source

Bhishan Bhandari: Going serverless with Chalice and AWS lambda

$
0
0

The intentions of this post is to host a simple example of chalice from AWS that allows serverless API creation with the use of AWS lambda. You also get auto-generation of IAM policy making it faster to deploy web applications. Chalice expects to pick the AWS credentials from ~/.aws/config Prerequisites for chalice[AWS Credentials] If you’ve […]

The post Going serverless with Chalice and AWS lambda appeared first on The Tara Nights.

Real Python: Sending Emails With Python

$
0
0

You probably found this tutorial because you want to send emails using Python. Perhaps you want to receive email reminders from your code, send a confirmation email to users when they create an account, or send emails to members of your organization to remind them to pay their dues. Sending emails manually is a time-consuming and error-prone task, but it’s easy to automate with Python.

In this tutorial you’ll learn how to:

  • Set up a secure connection using SMTP_SSL() and .starttls()

  • Use Python’s built-in smtplib library to send basic emails

  • Send emails with HTML content and attachments using the email package

  • Send multiple personalized emails using a CSV file with contact data

  • Use the Yagmail package to send email through your Gmail account using only a few lines of code

You’ll find a few transactional email services at the end of this tutorial, which will come in useful when you want to send a large number of emails.

Free Bonus:Click here to get access to a chapter from Python Tricks: The Book that shows you Python's best practices with simple examples you can apply instantly to write more beautiful + Pythonic code.

Getting Started

Python comes with the built-in smtplib module for sending emails using the Simple Mail Transfer Protocol (SMTP). smtplib uses the RFC 821 protocol for SMTP. The examples in this tutorial will use the Gmail SMTP server to send emails, but the same principles apply to other email services. Although the majority of email providers use the same connection ports as the ones in this tutorial, you can run a quick Google search to confirm yours.

To get started with this tutorial, set up a Gmail account for development, or set up an SMTP debugging server that discards emails you send and prints them to the command prompt instead. Both options are laid out for you below. A local SMTP debugging server can be useful for fixing any issues with email functionality and ensuring your email functions are bug-free before sending out any emails.

Option 1: Setting up a Gmail Account for Development

If you decide to use a Gmail account to send your emails, I highly recommend setting up a throwaway account for the development of your code. This is because you’ll have to adjust your Gmail account’s security settings to allow access from your Python code, and because there’s a chance you might accidentally expose your login details. Also, I found that the inbox of my testing account rapidly filled up with test emails, which is reason enough to set up a new Gmail account for development.

A nice feature of Gmail is that you can use the + sign to add any modifiers to your email address, right before the @ sign. For example, mail sent to my+person1@gmail.com and my+person2@gmail.com will both arrive at my@gmail.com. When testing email functionality, you can use this to emulate multiple addresses that all point to the same inbox.

To set up a Gmail address for testing your code, do the following:

If you don’t want to lower the security settings of your Gmail account, check out Google’s documentation on how to gain access credentials for your Python script, using the OAuth2 authorization framework.

Option 2: Setting up a Local SMTP Server

You can test email functionality by running a local SMTP debugging server, using the smptd module that comes pre-installed with Python. Rather than sending emails to the specified address, it discards them and prints their content to the console. Running a local debugging server means it’s not necessary to deal with encryption of messages or use credentials to log in to an email server.

You can start a local SMTP debugging server by typing the following in Command Prompt:

$ python -m smtpd -c DebuggingServer -n localhost:1025

On Linux, use the same command preceded by sudo.

Any emails sent through this server will be discarded and shown in the terminal window as a bytes object for each line:

---------- MESSAGE FOLLOWS ----------b'X-Peer: ::1'b''b'From: my@address.com'b'To: your@address.com'b'Subject: a local test mail'b''b'Hello there, here is a test email'------------ END MESSAGE ------------

For the rest of the tutorial, I’ll assume you’re using a Gmail account, but if you’re using a local debugging server, just make sure to use localhost as your SMTP server and use port 1025 rather than port 465 or 587. Besides this, you won’t need to use login() or encrypt the communication using SSL/TLS.

Sending a Plain-Text Email

Before we dive into sending emails with HTML content and attachments, you’ll learn to send plain-text emails using Python. These are emails that you could write up in a simple text editor. There’s no fancy stuff like text formatting or hyperlinks. You’ll learn that a bit later.

Starting a Secure SMTP Connection

When you send emails through Python, you should make sure that your SMTP connection is encrypted, so that your message and login credentials are not easily accessed by others. SSL (Secure Sockets Layer) and TLS (Transport Layer Security) are two protocols that can be used to encrypt an SMTP connection. It’s not necessary to use either of these when using a local debugging server.

There are two ways to start a secure connection with your email server:

  • Start an SMTP connection that is secured from the beginning using SMTP_SSL().
  • Start an unsecured SMTP connection that can then be encrypted using .starttls().

In both instances, Gmail will encrypt emails using TLS, as this is the more secure successor of SSL. As per Python’s Security considerations, it is highly recommended that you use create_default_context() from the ssl module. This will load the system’s trusted CA certificates, enable host name checking and certificate validation, and try to choose reasonably secure protocol and cipher settings.

If you want to check the encryption for an email in your Gmail inbox, go to MoreShow original to see the encryption type listed under the Received header.

smtplib is Python’s built-in module for sending emails to any Internet machine with an SMTP or ESMTP listener daemon.

I’ll show you how to use SMTP_SSL() first, as it instantiates a connection that is secure from the outset and is slightly more concise than the .starttls() alternative. Keep in mind that Gmail requires that you connect to port 465 if using SMTP_SSL(), and to port 587 when using .starttls().

Option 1: Using SMTP_SSL()

The code example below creates a secure connection with Gmail’s SMTP server, using the SMTP_SSL() of smtplib to initiate a TLS-encrypted connection. The default context of ssl validates the host name and its certificates and optimizes the security of the connection. Make sure to fill in your own email address instead of my@gmail.com:

importsmtplib,sslport=465# For SSLpassword=input("Type your password and press enter: ")# Create a secure SSL contextcontext=ssl.create_default_context()withsmtplib.SMTP_SSL("smtp.gmail.com",port,context=context)asserver:server.login("my@gmail.com",password)# TODO: Send email here

Using with smtplib.SMTP_SSL() as server: makes sure that the connection is automatically closed at the end of the indented code block. If port is zero, or not specified, .SMTP_SSL() will use the standard port for SMTP over SSL (port 465).

It’s not safe practice to store your email password in your code, especially if you intend to share it with others. Instead, use input() to let the user type in their password when running the script, as in the example above. If you don’t want your password to show on your screen when you type it, you can import the getpass module and use .getpass() instead for blind input of your password.

Option 2: Using .starttls()

Instead of using .SMTP_SSL() to create a connection that is secure from the outset, we can create an unsecured SMTP connection and encrypt it using .starttls().

To do this, create an instance of smtplib.SMTP, which encapsulates an SMTP connection and allows you access to its methods. I recommend defining your SMTP server and port at the beginning of your script to configure them easily.

The code snippet below uses the construction server = SMTP(), rather than the format with SMTP() as server: which we used in the previous example. To make sure that your code doesn’t crash when something goes wrong, put your main code in a try block, and let an except block print any error messages to stdout:

importsmtplib,sslsmtp_server="smtp.gmail.com"port=587# For starttlssender_email="my@gmail.com"password=input("Type your password and press enter: ")# Create a secure SSL contextcontext=ssl.create_default_context()# Try to log in to server and send emailtry:server=smtplib.SMTP(smtp_server,port)server.ehlo()# Can be omittedserver.starttls(context=context)# Secure the connectionserver.ehlo()# Can be omittedserver.login(sender_email,password)# TODO: Send email hereexceptExceptionase:# Print any error messages to stdoutprint(e)finally:server.quit()

To identify yourself to the server, .helo() (SMTP) or .ehlo() (ESMTP) should be called after creating an .SMTP() object, and again after .starttls(). This function is implicitly called by .starttls() and .sendmail() if needed, so unless you want to check the SMTP service extensions of the server, it is not necessary to use .helo() or .ehlo() explicitly.

Sending Your Plain-text Email

After you initiated a secure SMTP connection using either of the above methods, you can send your email using .sendmail(), which pretty much does what it says on the tin:

server.sendmail(sender_email,receiver_email,message)

I recommend defining the email addresses and message content at the top of your script, after the imports, so you can change them easily:

sender_email="my@gmail.com"receiver_email="your@gmail.com"message="""\Subject: Hi thereThis message is sent from Python."""# Send email here

The messagestring starts with "Subject: Hi there" followed by two newlines (\n). This ensures Hi there shows up as the subject of the email, and the text following the newlines will be treated as the message body.

The code example below sends a plain-text email using SMTP_SSL():

importsmtplib,sslport=465# For SSLsmtp_server="smtp.gmail.com"sender_email="my@gmail.com"# Enter your addressreceiver_email="your@gmail.com"# Enter receiver addresspassword=input("Type your password and press enter: ")message="""\Subject: Hi thereThis message is sent from Python."""context=ssl.create_default_context()withsmtplib.SMTP_SSL(smtp_server,port,context=context)asserver:server.login(sender_email,password)server.sendmail(sender_email,receiver_email,message)

For comparison, here is a code example that sends a plain-text email over an SMTP connection secured with .starttls(). The server.ehlo() lines may be omitted, as they are called implicitly by .starttls() and .sendmail(), if required:

importsmtplib,sslport=587# For starttlssmtp_server="smtp.gmail.com"sender_email="my@gmail.com"receiver_email="your@gmail.com"password=input("Type your password and press enter:")message="""\Subject: Hi thereThis message is sent from Python."""context=ssl.create_default_context()withsmtplib.SMTP(smtp_server,port)asserver:server.ehlo()# Can be omittedserver.starttls(context=context)server.ehlo()# Can be omittedserver.login(sender_email,password)server.sendmail(sender_email,receiver_email,message)

Sending Fancy Emails

Python’s built-in email package allows you to structure more fancy emails, which can then be transferred with smptlib as you have done already. Below, you’ll learn how use the email package to send emails with HTML content and attachments.

Including HTML Content

If you want to format the text in your email (bold, italics, and so on), or if you want to add any images, hyperlinks, or responsive content, then HTML comes in very handy. Today’s most common type of email is the MIME (Multipurpose Internet Mail Extensions) Multipart email, combining HTML and plain-text. MIME messages are handled by Python’s email.mime module. For a detailed description, check the documentation.

As not all email clients display HTML content by default, and some people choose only to receive plain-text emails for security reasons, it is important to include a plain-text alternative for HTML messages. As the email client will render the last multipart attachment first, make sure to add the HTML message after the plain-text version.

In the example below, our MIMEText() objects will contain the HTML and plain-text versions of our message, and the MIMEMultipart("alternative") instance combines these into a single message with two alternative rendering options:

importsmtplib,sslfromemail.mime.textimportMIMETextfromemail.mime.multipartimportMIMEMultipartsender_email="my@gmail.com"receiver_email="your@gmail.com"password=input("Type your password and press enter:")message=MIMEMultipart("alternative")message["Subject"]="multipart test"message["From"]=sender_emailmessage["To"]=receiver_email# Create the plain-text and HTML version of your messagetext="""\Hi,How are you?Real Python has many great tutorials:www.realpython.com"""html="""\<html><body><p>Hi,<br>       How are you?<br><a href="http://www.realpython.com">Real Python</a>        has many great tutorials.</p></body></html>"""# Turn these into plain/html MIMEText objectspart1=MIMEText(text,"plain")part2=MIMEText(html,"html")# Add HTML/plain-text parts to MIMEMultipart message# The email client will try to render the last part firstmessage.attach(part1)message.attach(part2)# Create secure connection with server and send emailcontext=ssl.create_default_context()withsmtplib.SMTP_SSL("smtp.gmail.com",465,context=context)asserver:server.login(sender_email,password)server.sendmail(sender_email,receiver_email,message.as_string())

In this example, you first define the plain-text and HTML message as string literals, and then store them as plain/htmlMIMEText objects. These can then be added in this order to the MIMEMultipart("alternative") message and sent through your secure connection with the email server. Remember to add the HTML message after the plain-text alternative, as email clients will try to render the last subpart first.

Adding Attachments Using the email Package

In order to send binary files to an email server that is designed to work with textual data, they need to be encoded before transport. This is most commonly done using base64, which encodes binary data into printable ASCII characters.

The code example below shows how to send an email with a PDF file as an attachment:

importemail,smtplib,sslfromemailimportencodersfromemail.mime.baseimportMIMEBasefromemail.mime.multipartimportMIMEMultipartfromemail.mime.textimportMIMETextsubject="An email with attachment from Python"body="This is an email with attachment sent from Python"sender_email="my@gmail.com"receiver_email="your@gmail.com"password=input("Type your password and press enter:")# Create a multipart message and set headersmessage=MIMEMultipart()message["From"]=sender_emailmessage["To"]=receiver_emailmessage["Subject"]=subjectmessage["Bcc"]=receiver_email# Recommended for mass emails# Add body to emailmessage.attach(MIMEText(body,"plain"))filename="document.pdf"# In same directory as script# Open PDF file in binary modewithopen(filename,"rb")asattachment:# Add file as application/octet-stream# Email client can usually download this automatically as attachmentpart=MIMEBase("application","octet-stream")part.set_payload(attachment.read())# Encode file in ASCII characters to send by email    encoders.encode_base64(part)# Add header as key/value pair to attachment partpart.add_header("Content-Disposition",f"attachment; filename= {filename}",)# Add attachment to message and convert message to stringmessage.attach(part)text=message.as_string()# Log in to server using secure context and send emailcontext=ssl.create_default_context()withsmtplib.SMTP_SSL("smtp.gmail.com",465,context=context)asserver:server.login(sender_email,password)server.sendmail(sender_email,receiver_email,text)

The MIMEultipart() message accepts parameters in the form of RFC5233-style key/value pairs, which are stored in a dictionary and passed to the .add_header method of the Message base class.

Check out the documentation for Python’s email.mime module to learn more about using MIME classes.

Sending Multiple Personalized Emails

Imagine you want to send emails to members of your organization, to remind them to pay their contribution fees. Or maybe you want to send students in your class personalized emails with the grades for their recent assignment. These tasks are a breeze in Python.

Make a CSV File With Relevant Personal Info

An easy starting point for sending multiple personalized emails is to create a CSV (comma-separated values) file that contains all the required personal information. (Make sure not to share other people’s private information without their consent.) A CSV file can be thought of as a simple table, where the first line often contains the column headers.

Below are the contents of the file contacts_file.csv, which I saved in the same folder as my Python code. It contains the names, addresses, and grades for a set of fictional people. I used my+modifier@gmail.com constructions to make sure all emails end up in my own inbox, which in this example is my@gmail.com:

name,email,grade
Ron Obvious,my+ovious@gmail.com,B+
Killer Rabbit of Caerbannog,my+rabbit@gmail.com,A
Brian Cohen,my+brian@gmail.com,C

When creating a CSV file, make sure to separate your values by a comma, without any surrounding whitespaces.

Loop Over Rows to Send Multiple Emails

The code example below shows you how to open a CSV file and loop over its lines of content (skipping the header row). To make sure that the code works correctly before you send emails to all your contacts, I’ve printed Sending email to ... for each contact, which we can later replace with functionality that actually sends out emails:

importcsvwithopen("contacts_file.csv")asfile:reader=csv.reader(file)next(reader)# Skip header rowforname,email,gradeinreader:print(f"Sending email to {name}")# Send email here

In the example above, using with open(filename) as file:makes sure that your file closes at the end of the code block. csv.reader() makes it easy to read a CSV file line by line and extract its values. The next(reader) line skips the header row, so that the following line for name, email, grade in reader: splits subsequent rows at each comma, and stores the resulting values in the strings name, email and grade for the current contact.

If the values in your CSV file contain whitespaces on either or both sides, you can remove them using the .strip() method.

Personalized Content

You can put personalized content in a message by using str.format() to fill in curly-bracket placeholders. For example, "hi {name}, you {result} your assignment".format(name="John", result="passed") will give you "hi John, you passed your assignment".

As of Python 3.6, string formatting can be done more elegantly using f-strings, but these require the placeholders to be defined before the f-string itself. In order to define the email message at the beginning of the script, and fill in placeholders for each contact when looping over the CSV file, the older .format() method is used.

With this in mind, you can set up a general message body, with placeholders that can be tailored to individuals.

Code Example

The following code example lets you send personalized emails to multiple contacts. It loops over a CSV file with name,email,grade for each contact, as in the example above.

The general message is defined in the beginning of the script, and for each contact in the CSV file its {name} and {grade} placeholders are filled in, and a personalized email is sent out through a secure connection with the Gmail server, as you saw before:

importcsv,smtplib,sslmessage="""Subject: Your gradeHi {name}, your grade is {grade}"""from_address="my@gmail.com"password=input("Type your password and press enter: ")context=ssl.create_default_context()withsmtplib.SMTP_SSL("smtp.gmail.com",465,context=context)asserver:server.login(from_address,password)withopen("contacts_file.csv")asfile:reader=csv.reader(file)next(reader)# Skip header rowforname,email,gradeinreader:server.sendmail(from_address,email,message.format(name=name,grade=grade),)

Yagmail

There are multiple libraries designed to make sending emails easier, such as Envelopes, Flanker and Yagmail. Yagmail is designed to work specifically with Gmail, and it greatly simplifies the process of sending emails through a friendly API, as you can see in the code example below:

importyagmailreceiver="your@gmail.com"body="Hello there from Yagmail"filename="document.pdf"yag=yagmail.SMTP("my@gmail.com")yag.send(to=receiver,subject="Yagmail test with attachment",contents=[body,filename],)

This code example sends an email with a PDF attachment in a fraction of the lines needed for our example using email and smtplib.

When setting up Yagmail, you can add your Gmail validations to the keyring of your OS, as described in the documentation. If you don’t do this, Yagmail will prompt you to enter your password when required and store it in the keyring automatically.

Transactional Email Services

If you plan to send a large volume of emails, want to see email statistics, and want to ensure reliable delivery, it may be worth looking into transactional email services. Although all of the following services have paid plans for sending large volumes of emails, they also come with a free plan so you can try them out. Some of these free plans are valid indefinitely and may be sufficient for your email needs.

Below is an overview of the free plans for some of the major transactional email services. Clicking on the provider name will take you to the pricing section of their website.

ProviderFree plan
Sendgrid40,000 emails for your first 30 days, then 100/day
Sendinblue300 emails/day
MailgunFirst 10,000 emails free
Mailjet200 emails/day
Amazon SES62,000 emails/month

You can run a Google search to see which provider best fits your needs, or just try out a few of the free plans to see which API you like working with most.

Sendgrid Code Example

Here’s a code example for sending emails with Sendgrid to give you a flavor of how to use a transactional email service with Python:

importosimportsendgridfromsendgrid.helpers.mailimportContent,Email,Mailsg=sendgrid.SendGridAPIClient(apikey=os.environ.get("SENDGRID_API_KEY"))from_email=Email("my@gmail.com")to_email=Email("your@gmail.com")subject="A test email from Sendgrid"content=Content("text/plain","Here's a test email sent through Python")mail=Mail(from_email,subject,to_email,content)response=sg.client.mail.send.post(request_body=mail.get())# The statements below can be included for debugging purposesprint(response.status_code)print(response.body)print(response.headers)

To run this code, you must first:

  • Sign up for a (free) Sendgrid account
  • Request an API key for user validation
  • Add your API key by typing setx SENDGRID_API_KEY "YOUR_API_KEY" in Command Prompt (to store this API key permanently) or set SENDGRID_API_KEY YOUR_API_KEY to store it only for the current client session

More information on how to set up Sendgrid for Mac and Windows can be found in the repository’s README on Github.

Conclusion

You can now start a secure SMTP connection and send multiple personalized emails to the people in your contacts list!

You’ve learned how to send an HTML email with a plain-text alternative and attach files to your emails. The Yagmail package simplifies all these tasks when you’re using a Gmail account. If you plan to send large volumes of email, it is worth looking into transactional email services.

Enjoy sending emails with Python, and remember: no spam please!


[ Improve Your Python With 🐍 Python Tricks 💌 – Get a short & sweet Python Trick delivered to your inbox every couple of days. >> Click here to learn more and see examples ]


Stack Abuse: Sets in Python

$
0
0

Introduction

In Python, a set is a data structure that stores unordered items. The set items are also unindexed. Like a list, a set allows the addition and removal of elements. However, there are a few unique characteristics that define a set and separate it from other data structures:

  • A set does not hold duplicate items.
  • The elements of the set are immutable, that is, they cannot be changed, but the set itself is mutable, that is, it can be changed.
  • Since set items are not indexed, sets don't support any slicing or indexing operations.

In this article, we will be discussing the various operations that can be performed on sets in Python.

How to Create a Set

There are two ways through which we can create sets in Python.

We can create a set by passing all the set elements inside curly braces {} and separate the elements using commas (,). A set can hold any number of items and the items can be of different types, for example, integers, strings, tuples, etc. However, a set does not accept an element that is mutable, for example, a list, dictionary, etc.

Here is an example of how to create a set in Python:

num_set = {1, 2, 3, 4, 5, 6}  
print(num_set)  

Output

{1, 2, 3, 4, 5, 6}

We just created a set of numbers. We can also create a set of string values. For example:

string_set = {"Nicholas", "Michelle", "John", "Mercy"}  
print(string_set)  

Output

{'Michelle', 'Nicholas', 'John', 'Mercy'}

You must have noticed that the elements in the above output are not ordered in the same way we added them to the set. The reason for this is that set items are not ordered. If you run the same code again, it is possible that you will get an output with the elements arranged in a different order.

We can also create a set with elements of different types. For example:

mixed_set = {2.0, "Nicholas", (1, 2, 3)}  
print(mixed_set)  

Output

{2.0, 'Nicholas', (1, 2, 3)}

All the elements of the above set belong to different types.

We can also create a set from a list. This can be done by calling the Python's built-in set() function. For example:

num_set = set([1, 2, 3, 4, 5, 6])  
print(num_set)  

Output

{1, 2, 3, 4, 5, 6}

As stated above, sets do not hold duplicate items. Suppose our list had duplicate items, as shown below:

num_set = set([1, 2, 3, 1, 2])  
print(num_set)  

Output

{1, 2, 3}

The set has removed the duplicates and returned only one of each duplicate items. This also happens when we are creating a set from scratch. For example:

num_set = {1, 2, 3, 1, 2}  
print(num_set)  

Output

{1, 2, 3}

Again, the set has removed the duplicates and returned only one of the duplicate items.

The creation of an empty set is some-what tricky. If you use empty curly braces {} in Python, you create an empty dictionary rather than an empty set. For example:

x = {}  
print(type(x))  

Output

<class 'dict'>  

As shown in the output, the type of variable x is a dictionary.

To create an empty set in Python we must use the set() function without passing any value for the parameters, as shown below:

x = set()  
print(type(x))  

Output

<class 'set'>  

The output shows that we have created a set.

Accessing Set Items

Python does not provide us with a way of accessing an individual set item. However, we can use a for loop to iterate through all the items of a set. For example:

months = set(["Jan", "Feb", "March", "Apr", "May", "June", "July", "Aug", "Sep", "Oct", "Nov", "Dec"])

for m in months:  
    print(m)

Output

March  
Feb  
Dec  
Jan  
May  
Nov  
Oct  
Apr  
June  
Aug  
Sep  
July  

We can also check for the presence of an element in a set using the in keyword as shown below:

months = set(["Jan", "Feb", "March", "Apr", "May", "June", "July", "Aug", "Sep", "Oct", "Nov", "Dec"])

print("May" in months)  

Output

True  

The code returned "True", which means that the item was found in the set. Similarly, searching for an element that doesn't exist in the set returns "False", as shown below:

months = set(["Jan", "Feb", "March", "Apr", "May", "June", "July", "Aug", "Sep", "Oct", "Nov", "Dec"])

print("Nicholas" in months)  

Output

False  

As expected, the code returned "False".

Adding Items to a Set

Python allows us to add new items to a set via the add() function. For example:

months = set(["Jan", "March", "Apr", "May", "June", "July", "Aug", "Sep", "Oct", "Nov", "Dec"])

months.add("Feb")  
print(months)  

Output

{'Oct', 'Dec', 'Feb', 'July', 'May', 'Jan', 'June', 'March', 'Sep', 'Aug', 'Nov', 'Apr'}

The item "Feb" has been successfully added to the set. If it was a set of numbers, we would not have passed the new element within quotes as we had to do for a string. For example:

num_set = {1, 2, 3}  
num_set.add(4)  
print(num_set)  

Output

{1, 2, 3, 4}

In the next section, we will be discussing how to remove elements from sets.

Removing Items from a Set

Python allows us to remove an item from a set, but not using an index as set elements are not indexed. The items can be removed using either the discard() or remove() methods.

Keep in mind that the discard() method will not raise an error if the item is not found in the set. However, if the remove() method is used and the item is not found, an error will be raised.

Let us demonstrate how to remove an element using the discard() method:

num_set = {1, 2, 3, 4, 5, 6}  
num_set.discard(3)  
print(num_set)  

Output

{1, 2, 4, 5, 6}

The element 3 has been removed from the set.

Similarly, the remove() method can be used as follows:

num_set = {1, 2, 3, 4, 5, 6}  
num_set.remove(3)  
print(num_set)  

Output

{1, 2, 4, 5, 6}

Now, let us try to remove an element that does not exist in the set. Let's first use the discard() method:

num_set = {1, 2, 3, 4, 5, 6}  
num_set.discard(7)  
print(num_set)  

Output

{1, 2, 3, 4, 5, 6}

The above output shows that the set was not affected in any way. Now let's see what happens when we use the remove() method in the same scenario:

num_set = {1, 2, 3, 4, 5, 6}  
num_set.remove(7)  
print(num_set)  

Output

Traceback (most recent call last):  
  File "C:\Users\admin\sets.py", line 2, in <module>
    num_set.remove(7)
KeyError: 7  

The output shows that the method raised an error as we attempted to remove an element that is not in the set.

With the pop() method, we can remove and return an element. Since the elements are unordered, we cannot tell or predict the item that will be removed. For example:

num_set = {1, 2, 3, 4, 5, 6}  
print(num_set.pop())  

Output

1  

You can use the same method to remove an element and return the elements that are remaining in the set. For example:

num_set = {1, 2, 3, 4, 5, 6}  
num_set.pop()  
print(num_set)  

Output

{2, 3, 4, 5, 6}

Those are the elements remaining in the set.

The Python's clear() method helps us remove all elements from a set. For example:

num_set = {1, 2, 3, 4, 5, 6}  
num_set.clear()  
print(num_set)  

Output

set()  

The output is an empty set() with no elements in it.

Set Union

Suppose we have two sets, A and B. The union of the two sets is a set with all the elements from both sets. Such an operation is accomplished via the Python's union() function.

Here is an example:

months_a = set(["Jan", "Feb", "March", "Apr", "May", "June"])  
months_b = set(["July", "Aug", "Sep", "Oct", "Nov", "Dec"])

all_months = months_a.union(months_b)  
print(all_months)  

Output

{'Oct', 'Jan', 'Nov', 'May', 'Aug', 'Feb', 'Sep', 'March', 'Apr', 'Dec', 'June', 'July'}

A union can also be performed on more than two sets, and all their elements will be combined into a single set. For example:

x = {1, 2, 3}  
y = {4, 5, 6}  
z = {7, 8, 9}

output = x.union(y, z)

print(output)  

Output

{1, 2, 3, 4, 5, 6, 7, 8, 9}

During the union operation, duplicates are ignored, and only one of the duplicate items is shown. For example:

x = {1, 2, 3}  
y = {4, 3, 6}  
z = {7, 4, 9}

output = x.union(y, z)

print(output)  

Output

{1, 2, 3, 4, 6, 7, 9}

The | operator can also be used to find the union of two or more sets. For example:

months_a = set(["Jan","Feb", "March", "Apr", "May", "June"])  
months_b = set(["July", "Aug", "Sep", "Oct", "Nov", "Dec"])

print(months_a | months_b)  

Output

{'Feb', 'Apr', 'Sep', 'Dec', 'Nov', 'June', 'May', 'Oct', 'Jan', 'July', 'March', 'Aug'}

If you want to perform a union on more than two sets, separate the set names using the | operator. For example:

x = {1, 2, 3}  
y = {4, 3, 6}  
z = {7, 4, 9}

print(x | y | z)  

Output

{1, 2, 3, 4, 6, 7, 9}

Set Intersection

Suppose you have two sets A and B. Their intersection is a set with elements that are common in both A and B.

The intersection operation in sets can be achieved via either the & operator or the intersection() method. For example:

For example:

x = {1, 2, 3}  
y = {4, 3, 6}

print(x & y)  

Output

{3}

The two sets have 3 as the common element. The same can also be achieved with the intersection() method:

x = {1, 2, 3}  
y = {4, 3, 6}

z = x.intersection(y)  
print(z)  

Output

{3}

In the next section, we will be discussing how to determine the difference between sets.

Set Difference

Suppose you have two sets A and B. The difference of A and B (A - B) is the set with all elements that are in A but not in B. Consequently, (B - A) is the set with all the elements in B but not in A.

To determine set differences in Python, we can use either the difference() function or the - operator. For example:

set_a = {1, 2, 3, 4, 5}  
set_b = {4, 5, 6, 7, 8}  
diff_set = set_a.difference(set_b)  
print(diff_set)  

Output

{1, 2, 3}

in the script above, only the first three elements of set set_a are not available in the set set_b, hence they form our output. The minus - operator can also be used to find the difference between the two sets as shown below:

set_a = {1, 2, 3, 4, 5}  
set_b = {4, 5, 6, 7, 8}  
print(set_a - set_b)  

Output

{1, 2, 3}

The symmetric difference of sets A and B is the set with all elements that are in A and B except the elements that are common in both sets. It is determined using the Python's symmetric_difference() method or the ^ operator. For example:

set_a = {1, 2, 3, 4, 5}  
set_b = {4, 5, 6, 7, 8}  
symm_diff = set_a.symmetric_difference(set_b)  
print(symm_diff)  

Output

{1, 2, 3, 6, 7, 8}

The symmetric difference can also be found as follows:

set_a = {1, 2, 3, 4, 5}  
set_b = {4, 5, 6, 7, 8}  
print(set_a ^ set_b)  

Output

{1, 2, 3, 6, 7, 8}

Set Comparison

We can compare sets depending on the elements they have. This way, we can tell whether a set is a superset or a subset of another set. The result from such a comparison will be either True or False.

To check whether set A is a subset of set B, we can use the following operation:

A <= B  

To check whether B is a superset of A, we can use the following operation:

B >= A  

For example:

months_a = set(["Jan", "Feb", "March", "Apr", "May", "June"])  
months_b = set(["Jan", "Feb", "March", "Apr", "May", "June", "July", "Aug", "Sep", "Oct", "Nov", "Dec"])

subset_check = months_a <= months_b  
superset_check = months_b >= months_a

print(subset_check)  
print(superset_check)  

Output

True  
True  

The subset and superset can also be checked using issubset() and issuperset() methods as shown below:

months_a = set(["Jan","Feb", "March", "Apr", "May", "June"])  
months_b = set(["Jan","Feb", "March", "Apr", "May", "June", "July", "Aug", "Sep", "Oct", "Nov", "Dec"])

subset_check = months_a.issubset(months_b)  
superset_check = months_b.issuperset(months_a)

print(subset_check)  
print(superset_check)  

Output

True  
True  

In the next section, we will discuss some of the most commonly used set methods provided by Python that we have not already discussed.

Set Methods

Python comes with numerous built-in set methods, including the following:

copy()

This method returns a copy of the set in question. For example:

string_set = {"Nicholas", "Michelle", "John", "Mercy"}  
x = string_set.copy()

print(x)  

Output

{'John', 'Michelle', 'Nicholas', 'Mercy'}

The output shows that x is a copy of the set string_set.

isdisjoint()

This method checks whether the sets in question have an intersection or not. If the sets don't have common items, this method returns True, otherwise it returns False. For example:

names_a = {"Nicholas", "Michelle", "John", "Mercy"}  
names_b = {"Jeff", "Bosco", "Teddy", "Milly"}

x = names_a.isdisjoint(names_b)  
print(x)  

Output

True  

The two sets don't have common items, hence the output is True.

len()

This method returns the length of a set, which is the total number of elements in the set. For example:

names_a = {"Nicholas", "Michelle", "John", "Mercy"}

print(len(names_a))  

Output

4  

The output shows that the set has a length of 4.

Python Frozen Set

Frozenset is a class with the characteristics of a set, but once its elements have been assigned, they cannot be changed. Tuples can be seen as immutable lists, while frozensets can be seen as immutable sets.

Sets are mutable and unhashable, which means we cannot use them as dictionary keys. Frozensets are hashable and we can use them as dictionary keys.

To create frozensets, we use the frozenset() method. Let us create two frozensets, X and Y:

X = frozenset([1, 2, 3, 4, 5, 6])  
Y = frozenset([4, 5, 6, 7, 8, 9])

print(X)  
print(Y)  

Output

frozenset({1, 2, 3, 4, 5, 6})  
frozenset({4, 5, 6, 7, 8, 9})  

The frozensets support the use of Python set methods like copy(), difference(), symmetric_difference(), isdisjoint(), issubset(), intersection(), issuperset(), and union().

Conclusion

The article provides a detailed introduction to sets in Python. The mathematical definition of sets is the same as the definition of sets in Python. A set is simply a collection of items that are unordered. The set itself is mutable, but the set elements are immutable. However, we can add and remove elements from a set freely. In most data structures, elements are indexed. However, set elements are not indexed. This makes it impossible for us to perform operations that target specific set elements.

Christian Barra: How to reverse a list in Python

$
0
0
How to reverse a list using the square brackets notation with #Python? #europython pic.twitter.com/4C4i9LWv1r — Christian Barra (@christianbarra) July 25, 2018 Reversing a list in Python is really, really easy. This doesn’t apply only to list but to sequence in general (string and tuple for example). msg = "hello there" print(msg[::-1]) # ereht olleh my_tuple = (1, 2, 3) print(my_tuple[::-1]) # (3, 2, 1) The secret behind this magic?

Marc Richter: Create your own Telegram bot with Django on Heroku – Part 10 – Creating a view for your bot’s webhook

$
0
0

This article was published at Create your own Telegram bot with Django on Heroku – Part 10 – Creating a view for your bot’s webhook .
If you are reading this on any other page, which is not some “planet” or aggregator, you are reading stolen content. Please read this article at its source, which is linked before to ensure to get the best reading experience; thank you! ❤

Django_Pony

In the previous part of this series, we created another database model named 

Message
 to hold the message-data from our Telegram– bot. I also explained the process of defining a SQL schema using a Django model, what to consider during that phase and how to bring the Django’s model field reference docs to a good use during that process. Last but not least, we learned what a HerokuOne-Off Dyno” is and how it can be used to execute administrative tasks on our production site like applying outstanding migrations to a database.

This time, I will provide you with the last piece of the puzzle to make your bot available to the world. You will learn how to write and wire the Python code to actually use all that we have prepared so far. At the end of this part, your bot will be able to receive and store each message sent to it by registered users. And since it’s already more than a month since I published the previous article in this series, let’s not waste any more time and jump right in!

A few more details on what we will do today

How to link the outside world (Telegram servers) with your bot’s code and data(base) now? Actually, with Django, that’s quite easy. But if you have never done something like this, you might feel a little lost here.

By now, you have already achieved to:

  • … register a Telegram bot using “BotFather“, the official interface provided by Telegram to register bots for their service.
  • … create a Django project to start your work in.
  • … prepare your project to be easily repeatable by creating a 
    virtualenv
     and a 
    Pipenv
     file and thus prepared it to be deployed to a containerized environment.
  • … register an account at your preferred code-hosting provider (Heroku, if you followed the recommendations of this guide).
  • … register a project with your hosting provider to hold your Django project’s code, served by a Git remote and hook.
  • … register a new app for your bot in the Django project.
  • … create a database and configured your remotely deployed Django application to utilize it.
  • … design your database models to hold the data needed from Telegram messages for your bot’s purpose.
  • … applied the migrations, which are created from your models definitions, to your production code hosting database.

See? This is already a hell of a lot of complicated things! Managing to get this far is already a huge success! And since I did not receive a single question about anything from my previous articles of this series, you all did manage to achieve all of this successfully, didn’t you? 😋

Great!
So, the last missing piece we have left in front of us is somehow bringing all these efforts together by creating a view.

Linking the outside world and your bot

OK, given the fact that we did not progress for more than a month with this project in the meantime (sorry for that, seriously 😢), let’s first talk about what it is that we are trying to achieve next. Personally, when I’ve got hit by the “Developer’s block” (which happens more commonly the more time I let pass before I sit down and continue with a project), it helps me to form an easy yet explicit sentence, describing the task at hand.
For that, I’m trying not to think about what it was that I’ve done last time or the details of my initial plan or something; it helps to establish a habit of not interrupting your work in the middle of something, really since this allows you to do so and not having to re-think where you left off! Always try to establish something SCRUM evangelists would call a “potentially shippable artifact“, meaning: Something that could be added to a product already running in production without breaking anything but providing a new set of functionality or a good foundation to implement these in subsequent releases, at least.

In this project, that sentence could be something like:

Create an interface (called “Webhook“), which the Telegram bot can connect to and submit messages it received.

In the Django world, this pretty perfectly describes a view. Cited from the very first sentences of the Django views docs:

A view function, or view for short, is simply a Python function that takes a Web request and returns a Web response. This response can be the HTML contents of a Web page, or a redirect, or a 404 error, or an XML document, or an image . . . or anything, really. The view itself contains whatever arbitrary logic is necessary to return that response. This code can live anywhere you want, as long as it’s on your Python path. There’s no other requirement–no “magic”, so to speak. For the sake of putting the code somewhere, the convention is to put views in a file called views.py, placed in your project or application directory.

So, let’s fire up our preferred editor and open the file 

bot/views.py
 (since we will make all our modifications inside our “bot”-application directory).
So far, only our “Hello World“-static content-view called 
index
 is in there. Another interesting file in this context is 
bot/urls.py
 ; open that in your editor as well.
So … let’s do the most obvious things first before we are diving into the logic. Think of a name for your view and create the basic skeleton for it in your 
bot/views.py
 file. The name is absolutely irrelevant; to prove that, I’ll continue with this called “talkin_to_me_bruh“. You can come up with pretty much any name here as long as it’s unique. This won’t define the URL-path which the outside world is seeing or anything; it’s just the internal name of a function. So, my skeleton for “talkin_to_me_bruh” will look like this:

from django.http import HttpResponse

def talkin_to_me_bruh(request):
    # please insert magic here
    return HttpResponse('OK')

If we define a URLconf for this (which we will do in the next step) and navigate to this without inserting some magic at the “please insert magic here” marker, Django would nevertheless render an appropriate HTTP answer, containing the string

OK
 in its body.
… why trust me – I’m not a trustworthy person at all 😈, so let’s just do it (not sponsored by Nike)! Add this URLconf to your 
bot/urls.py
, resulting in every request being processed by our “talkin_to_me_bruh“-view:

from django.urls import path

from . import views

urlpatterns = [
    path('hello/', views.index),
    path('hook/', views.talkin_to_me_bruh),
]

Save these two changes, add and commit it to your Git repository and push that to your heroku remote:

(dtbot-hT9CNosh) ~/dtbot $ git status
On branch master
Changes not staged for commit:
  (use "git add <file>..." to update what will be committed)
  (use "git checkout -- <file>..." to discard changes in working directory)

    modified:   bot/urls.py
    modified:   bot/views.py

no changes added to commit (use "git add" and/or "git commit -a")
(dtbot-hT9CNosh) ~/dtbot $ git add bot/urls.py bot/views.py
(dtbot-hT9CNosh) ~/dtbot $ git commit -m "Added hook/ URLconf and talkin_to_me_bruh - view"
[master 5d4a55f] Added hook/ URLconf and talkin_to_me_bruh - view
 2 files changed, 6 insertions(+)
(dtbot-hT9CNosh) ~/dtbot $ git remote -v
heroku  https://git.heroku.com/dry-tundra-61874.git (fetch)
heroku  https://git.heroku.com/dry-tundra-61874.git (push)
(dtbot-hT9CNosh) ~/dtbot $ git push heroku master
Counting objects: 5, done.
Delta compression using up to 4 threads.
Compressing objects: 100% (5/5), done.
Writing objects: 100% (5/5), 614 bytes | 0 bytes/s, done.
Total 5 (delta 3), reused 0 (delta 0)
remote: Compressing source files... done.
remote: Building source:
remote: 
remote: -----> Python app detected
remote: -----> Found python-3.6.6, removing
remote: -----> Installing python-3.6.7
remote: -----> Installing pip
remote: -----> Installing dependencies with Pipenv 2018.5.18…
remote:        Installing dependencies from Pipfile.lock (ce9952)…
remote: -----> $ python manage.py collectstatic --noinput
remote:        /app/.heroku/python/lib/python3.6/site-packages/psycopg2/__init__.py:144: UserWarning: The psycopg2 wheel package will be renamed from release 2.8; in order to keep installing from binary please use "pip install psycopg2-binary" instead. For details see: <http://initd.org/psycopg/docs/install.html#binary-install-from-pypi>.
remote:          """)
remote:        119 static files copied to '/tmp/build_ad22ed4ba6e462d165694bcc89345170/staticfiles', 375 post-processed.
remote: 
remote: -----> Discovering process types
remote:        Procfile declares types -> web
remote: 
remote: -----> Compressing...
remote:        Done: 64.1M
remote: -----> Launching...
remote:        Released v13
remote:        https://dry-tundra-61874.herokuapp.com/ deployed to Heroku
remote: 
remote: Verifying deploy... done.
To https://git.heroku.com/dry-tundra-61874.git
   a4de3de..5d4a55f  master -> master
(dtbot-hT9CNosh) ~/dtbot $

Awesome! Navigating to https://dry-tundra-61874.herokuapp.com/bot/hook/ (make sure to use your individual Heroku-subdomain instead of “dry-tundra-61874” when following along!) results in a simple “OK” in the browser:

talkin_to_me_bruh Hook OK

Obviously, our browser did not submit anything which could end up in the 

request
 object, handed over to 
talkin_to_me_bruh()
 . But even if it had thrown gigabytes of data at it, since we haven’t added any logic to process that data, it would always result in the same, shallow “OK”.
But hey: We just passed another milestone! We now have a place to add our Python code and do whatever we want with the input provided! 🎊 Let’s celebrate with a whole new paragraph 🍾

Learning to interact with our models

So – in the first iteration of our logic, we want to simply write the message received by our bot to the database. But only, if the sender of that message is stored in the 

bot.User
 model / the 
bot_user
 table, as our model is ending up as in the database, finally. Let’s review that model for a moment:

class User(models.Model):
    user_id     = models.IntegerField(unique=True, primary_key=True)
    first_name  = models.CharField(max_length=64)
    last_name   = models.CharField(max_length=64)

    def __str__(self):
        return f'{self.first_name} {self.last_name}'

We have 3 columns here:

  • user_id
     , being a unique IntegerField and acting as the primary key for our model.
  • first_name
     , being a simple CharField, storing text up to a length of 64 characters.
  • last_name
     , also being a simple CharField consisting of up to 64 characters.

In part 8 of this series, we created this model. After having had a closer look at the JSON format being used for message exchange by Telegram, we found out that each Telegram user is identified by a number unique in the whole Telegram infrastructure. The logic we are about to implement here is to add YOUR Telegram user id to that table, enabling you to send messages to your bot that become stored in its database. Messages from any other user id will be discarded.
Thus, before we implement any line of code, first add that user id of yours to your 

bot_user
 table either using the Django Admin backend in your browser or by using Python code for it 🐍. Since the first variant is quite obvious and also was shown in past parts of this article series, I will now show the one using Python code.

⚠ Attention: Make sure you fill the proper database in the following steps! I recommend to first do this in your development database, which is when the following steps are not executed in your Heroku – Environment, the SQLite3 one in your Django project folder, named 

db.sqlite3
 by default.

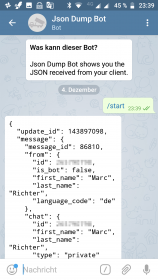
But even before that, figure out your Telegram ID. The easiest way I can imagine is to search for “jsondumpbot” in Telegram, select the (only) match from the list of results and hit “Start” at the bottom of that chat:

Telegram search for Telegram conversation with

The pixelated areas are showing your Telegram ID. Let’s assume this is 

123456789
 for now; please make sure to use your own instead in the following examples.

To fire up a full-fledged Python shell which has all our Django-requirements pre-imported, type 

python manage.py shell
 at the command line prompt of your activated virtualenv:

(dtbot-hT9CNosh) ~/dtbot $ python manage.py shell
Python 3.6.5 (default, Apr 25 2018, 12:19:38) 
[GCC 5.4.0 20160609] on linux
Type "help", "copyright", "credits" or "license" for more information.
(InteractiveConsole)
>>>

First, we need to import our 

User
 model:

>>> from bot.models import User
>>>

Now, we can do all the fancy things with it already that we will use for our logic in Django as well: The whole wide and shiny world of Django’s database API. For example: With the following, I show some cool moves to find out about existing records, like listing all records in our 

User
 model, selecting a specific one based on it’s 
first_name
 and 
last_name
 records and displaying the value from that record’s 
user_id
 :

>>> User.objects.all()
<QuerySet [<User: Marc Richter>]>
>>> u1 = User.objects.all()[0]
>>> u1
<User: Marc Richter>
>>> u1.user_id
2
>>> marc = User.objects.get(first_name="Marc", last_name="Richter")
>>> marc.user_id
2
>>> marc is u1
False
>>> marc == u1
True
>>>

… wait a minute – “2”? That’s obviously not my real Telegram user id, but one fantasy-value I did choose when playing around with the Admin backend to provide a valid integer value.
Let’s change that to my “real” user id (

123456789
).
After that, let’s add a whole new record for a user named “Alucard Țepeș“, identified by Telegram ID 
666666666
:

>>> marc = User.objects.get(user_id=2)
>>> marc.user_id
2
>>> marc.user_id = 123456789
>>> marc.save()
>>> alucard = User(first_name="Alucard", last_name="Țepeș", user_id=666666666)
>>> alucard.save()
>>> marc.user_id
123456789
>>> User.objects.all()
<QuerySet [<User: Marc Richter>, <User: Marc Richter>, <User: Alucard Țepeș>]>

There you are – all set! … wait a second! Why are there two records for “Marc Richter” now all of a sudden?? Django’s manual states clearly that records are changed this way! So, why is there one record with 

user_id
 “2” and another with “123456789” now?
The answer to this is, that since 
user_id
 is the primary key for this record and needs to stay unique, this is a bit of a special case. In the SQL – background Django is updating a row that is identified by its primary key. So, since this key itself changes, the query creates a new one instead. The same thing happens if you try to change this using the Admin backend to change the user_id field, by the way.
Better: Not change primary keys once they were stored to avoid unexpected behaviors like this! 🤓

With just these few lines of code, you managed to alter an existing record and to create a whole new one. Without having to type a single line of SQL or even using different dialects of SQL, based upon the database backend you are using. Thanks to Django’s database abstraction layer, this code is the same no matter what database backend you are using in your projects! 👍
Now, these two Telegram users are registered in our 

bot_user
 table; feel free to validate this using the Admin backend: Start a local server by executing 
python manage.py runserver
 and navigate your browser to http://127.0.0.1:8000/admin/. Log in using your superuser you created previously and navigate to your “bot > User” section; you should find the changed and created records there:

Django Admin Backend User Alucard

That’s how easy it is to deal with databases and its records in Django! So, technically this enables us to:

  • validate if a user id from a received message is in our 
    bot_user
     table
  • check if a received 
    update_id
     is already stored in the 
    bot_message
     table or not
  • add records to both of these

Basically, all that is missing is to extract the JSON structure from that 

request
 element received and we are good to go! We will cover this only quite briefly for now to not extend this article too much. If you want to dig in deeper to that topic, check out Django’s excellent docs once more on Request and response objects.
When a page is requested, Django creates an HttpRequest object that contains metadata about the request; like the scheme of the request (http or https), the path of the requested page (eg. “/music/bands/the_beatles/”) and so on. Then Django loads the appropriate view (based on the URLconf) and passes the HttpRequestas the first argument to the view function. So: This argument can be named anything you like it to be named, Django will always pass its HttpRequest object as this first parameter to your view function. Even though using a different name for this first argument is technically possible and completely valid, naming this 
request
 is a well-established convention that should not be changed without a good reason to not confuse other developers who might need to review or change your code in the future (when you need to provide code samples to the members of your favorite support forum, for example).
So, we know that we just have to expect JSON structures for this hook. Let’s first write a try…except-Block loading valid JSON structures or discarding everything else by adding these first lines into our 
# please insert magic here
 – placeholder of our 
talkin_to_me_bruh()
 view function:

from django.http import HttpResponse
import json


def talkin_to_me_bruh(request):
    # please insert magic here
    try:
        json_message = json.loads(request.body)
    except json.decoder.JSONDecodeError as err:
        return HttpResponse(str(err))
    
    return HttpResponse('OK')

Given a valid JSON data structure, we now have a standard Python object loaded to 

json_message
 ; if you have never worked with the 
json
 module before, please refer to its official docs (especially the conversion table) to learn about the data structures we might end up with here, in case you want to know something I have not covered here.

Let’s make our life a bit easier and artificially load one of the examples I provided once earlier already in part 9 into a Python session for inspection:

{"message": {"chat": {"first_name": "Marc",
                      "id": 123456789,
                      "last_name": "Richter",
                      "type": "private"},
             "date": 1533248578,
             "from": {"first_name": "Marc",
                      "id": 123456789,
                      "is_bot": false,
                      "language_code": "de",
                      "last_name": "Richter"},
             "message_id": 5,
             "text": "Test2"},
 "update_id": 941430901}

If you want to follow along, copy this JSON structure and save it to a text file in your project folder (or anywhere else, wherever you find it from your Python console). For my example, I saved it to a file called 

json_file.txt
 :

(dtbot-hT9CNosh) ~/dtbot $ python
Python 3.6.5 (default, Apr 25 2018, 12:19:38) 
[GCC 5.4.0 20160609] on linux
Type "help", "copyright", "credits" or "license" for more information.
>>> import json
>>> with open('json_file.txt', 'r') as f:
...     json_object = json.loads(f.read())
... 
>>> json_object
{'message': {'chat': {'first_name': 'Marc', 'id': 123456789, 'last_name': 'Richter', 'type': 'private'}, 'date': 1533248578, 'from': {'first_name': 'Marc', 'id': 123456789, 'is_bot': False, 'language_code': 'de', 'last_name': 'Richter'}, 'message_id': 5, 'text': 'Test2'}, 'update_id': 941430901}
>>> type(json_object)
<class 'dict'>
>>>

Alright, so a

dict
 it is. Our 
json_message
 object is containing a dictionary. That we can work with!

… do I know you?

Let’s add the code which checks if the user id we received the message from is registered in our database and call that function 

_is_user_registered
 . If yes, have it return “True”, if not, have it return “False”:

from django.http import HttpResponse
from bot.models import User
import json


def talkin_to_me_bruh(request):
    # please insert magic here
    try:
        json_message = json.loads(request.body)
    except json.decoder.JSONDecodeError as err:
        return HttpResponse(str(err))

    def _is_user_registered(user_id: int) -> bool:
        if User.objects.filter(user_id__exact=user_id).count() > 0:
            return True
        return False

    return HttpResponse('OK')

I think I’ve heard that before …

Next, let’s add a function that checks if the update id of the message is already existing in the table 

bot_message
 . Let’s call that 
_update_id_exists
 and just like 
_is_user_registered
 , it shall return “True” if it exists and “False” of not:

from django.http import HttpResponse
from bot.models import User, Message
import json


def talkin_to_me_bruh(request):
    # please insert magic here
    try:
        json_message = json.loads(request.body)
    except json.decoder.JSONDecodeError as err:
        return HttpResponse(str(err))

    def _is_user_registered(user_id: int) -> bool:
        if User.objects.filter(user_id__exact=user_id).count() > 0:
            return True
        return False

    def _update_id_exists(update_id: int) -> bool:
        if Message.objects.filter(update_id__exact=update_id).count() > 0:
            return True
        return False

    return HttpResponse('OK')

You don’t say… Let me write that one down!

Finally, let’s write a function which adds the content of the JSON structure to our 

bot_message
 table, in case these former two functions returned the expected results (
_is_user_registered
 == 
True
  and 
_update_id_exists
 == 
False
 ):

from django.http import HttpResponse, HttpResponseBadRequest
from bot.models import User, Message
from datetime import datetime
import json
from django.views.decorators.csrf import csrf_exempt


def index(request):
    return HttpResponse("Hello, world. This is the bot app.")


@csrf_exempt
def talkin_to_me_bruh(request):
    # please insert magic here
    try:
        json_message = json.loads(request.body)
    except json.decoder.JSONDecodeError as err:
        return HttpResponse(str(err))

    def _is_user_registered(user_id: int) -> bool:
        if User.objects.filter(user_id__exact=user_id).count() > 0:
            return True
        return False

    def _update_id_exists(update_id: int) -> bool:
        if Message.objects.filter(update_id__exact=update_id).count() > 0:
            return True
        return False

    def _add_message_to_db(json_dict: dict) -> (None, True):
        try:
            sender_id     = json_dict['message']['from'].get('id')
            sender_object = User.objects.filter(user_id__exact=sender_id).get()
            update_id     = json_dict.get('update_id')
            message_text  = json_dict['message'].get('text')
            message_date  = json_dict['message'].get('date')
        except KeyError:
            return None
        if None in (sender_id, update_id, message_text, message_date):
            return None

        if _update_id_exists(update_id):
            return True

        if _is_user_registered(sender_id):
            try:
                Message(
                    update_id=int(update_id),
                    text=str(message_text),
                    sender=sender_object,
                    date=datetime.fromtimestamp(int(message_date)),
                ).save()
                return True
            except (KeyError, ValueError):
                return None
        else:
            raise ValueError('Sender is rejected')

    try:
        result = _add_message_to_db(json_message)
    except ValueError as e:
        return HttpResponseBadRequest(str(e))
    if result is True:
        return HttpResponse('OK')
    else:
        return HttpResponseBadRequest('Malformed or incomplete JSON data received')

That’s quite a lot that got changed in one go! 😱 Let’s go through it, section by section.

First, we changed the imports; in case we do receive malicious JSON data or a message from an unregistered user id, we need to create an Error-Response object; that’s why we import 

HttpResponseBadRequest
 which does exactly that.
For the 
date
 parameter of the 
Message
 model, we need to generate a 
datetime
 – object; so we are importing it now.
The third change to the imports is a bit tricky … By default, Django tries to check for and verify a CSRF (Cross-Site-Request-Forgery) token for all POST requests (for an explanation of what CSRF is, please refer to Wikipedias article on it). This is a good security practice when it comes to forms and so on, but for public APIs, where we want these kinds of accesses, this is rendering our view useless. That’s what Django’s 
csrf_exempt
 decorator is for, so we import it here and add it to our 
talkin_to_me_bruh
 view function in line 12.

At the beginning of 

_add_message_to_db
 , we introduce a try…except block which tries to extract the different elements from the provided dictionary. If any of these raises a 
KeyError
 or the value is not provided, the function returns 
None
 , signaling the calling section that we could not successfully extract the values and store the message to the database. Since we know what the Telegram JSON data is formatted like we can make this assumption of “Malformed or incomplete JSON data received” if this fails.

Next, with 

_update_id_exists
  we check if the update id already exists in the database. If it is, we return 
True
 here, which is not entirely true, since we, in fact, did not end up writing to the database successfully, but the result is the same and the record is available already. So, this is supposed to be OK, I guess.

If we come to the section where 

_is_user_registered
 is called this means that we could extract all necessary data from the request’s body and that the update id was not yet found in the database. So, we are dealing with a valid update here, which potentially needs to be written to the database. But not before we validated that the sender of the message is a registered user.
This, 
_is_user_registered
 is taking care for. If this returns 
False
 , we raise an exception here, which is captured and leads to having an 
HttpResponseBadRequest
 object returned, stating “Sender is rejected“.
If 
_is_user_registered
 returns 
True
 , we are trying to create and save this new record in one go, just like we did when we played around with this in Django’s Python shell before (please note that we imported 
Message
 from  
bot.models
 as well).
With all arguments to 
Message
 , there is not much of a surprise, I think. The only thing worth mentioning is the 
date
 argument since it takes a datetime object. That’s just the way Django’s 
DateTimeField
 works. This is explicitly mentioned and explained in the DateTimeField section of the Model field reference. There’s no other chance than to look up this kind of things in the first time.
Also, it is important to note that the 
sender
 argument takes an instance of the corresponding 
User
 object. This is because 
sender
 is a foreign key in our model definition and this is how this works in Django.
If this succeeds, our function returns 
True
, signaling to have written the message to the database successfully.

With the if-statement following this function definition, we decide if we either return an 

HttpResponse
 object stating “OK” or an 
HttpResponseBadRequest
 object stating “Malformed or incomplete JSON data received“.

And – that’s basically it! Let’s give this a final test-drive before we deploy this to production.

Test-driving our changes 🏎

By now, there should be made all changes to the code which we discussed already and there should be a user registered to your 

User
 model’s tables that has the user id “123456789” assigned.

Next, we will start the build-in HTTP server of Django:

(dtbot-hT9CNosh) ~/dtbot $ python manage.py runserver
Performing system checks...

System check identified no issues (0 silenced).
December 05, 2018 - 15:35:21
Django version 2.1.2, using settings 'dtbot.settings'
Starting development server at http://127.0.0.1:8000/
Quit the server with CONTROL-C.

Remember that we saved that JSON data structure to a file called 

json_file.txt
 ? We will now use 
curl
 to send that towards our webhook to simulate the receiving of a real message from Telegram:

(dtbot-hT9CNosh) ~/dtbot $ curl --header "Content-Type: application/json" --request POST --data "$(cat json_file.txt)" http://127.0.0.1:8000/bot/hook/
OK(dtbot-hT9CNosh) ~/dtbot $ curl --header "Content-Type: application/json" --request POST --data "$(cat json_file.txt)" http://127.0.0.1:8000/bot/hook/
OK(dtbot-hT9CNosh) ~/dtbot $ 
(dtbot-hT9CNosh) ~/dtbot $

Noice that small “OK” in front of our prompt? That’s the response curl receives from our bot. Executing it a second time (sending the same message towards our hook) appears to be exactly the same for the outside world. Internally, our code noticed that a record with that update id is already there and directly returned that 

HttpResponse
 object.
Let’s validate this by looking at the database in the Admin backend:

dtbot - Django's message table containing 1 record

Indeed, just one record. Let’s edit the text of that in the Admin backend by something else and then re-run that curl command. If we are correct, our hook should still feedback success but not change that message record or add a new one.
For me, this works. So should your code.

Next, change the update id inside the 

json_file.txt
 and re-execute the curl command. This time, a second message should have been added to your Message database (validate in the Admin backend once more).
This works for me as well.

Ship it! 🛳

Congratulations! By now, you should be able to deploy your code to your production site by commiting the changes to your Git repo and push the changes to heroku remote.
Since we did not change any model this time, we do not need to make and apply migrations and your bot should be able to receive messages, immediately (remember to register your users with their proper user ids to the production bot’s database!). You just learned how to register new users by several ways and validate the functionality of your bot as well. Use the force, Luke Dude! 🤣

One last thing to make sure is to set your bot to Hook-Mode again in case you had switched that in the meantime. Please see part 4 of this series for a description how to do this.

That’s it! Apart from the fine-tuning and the fact that your bot isn’t really doing stuff besides storing messages it receives right now, your Telegram bot is more or less ready by now! You can let this stay in Hook-Mode from now on, already. In the next parts we will add a bit of functionality to the bot.

Outlook for the next part of the series

You just learned how to write a view that serves as a proper Webhook for your Telegram bot. Also, you learned how to interact with the database from within your code and the Python shell and how to find, set and update records. Finally, you enabled your project to receive and store messages. So you can send whatever text messages you’d like to store to your Telegram bot from now on.

In the next article of this series, we will add a bit more functionality to the bot. Have it answer to the messages it receives, for example. Also, since this is about to become a bot to store your cash spendings, we will add pattern recognition logic to enable the bot to sum and track your spendings.
Also, when we saw that we ended up with a doubled record in our User table, we realized that the current string representation of the records for that table is not really helpful, displaying the same lines containing “Marc Richter” twice. Having displayed the same name twice made it hard to identify the correct record for deletion. We will change that as well and by that see how to make changes like this to a database which has already records stored to it, using Django’s workflows.

If you liked or disliked this article, I’d love to read that in the comments!

🐍 Enjoy coding! ❤

Born in 1982, Marc Richter is an IT enthusiastic since 1994. He became addicted when he first put hands on their family’s pc and never stopped investigating and exploring new things since then.
He is married to Jennifer Richter and proud father of two wonderful children, Lotta and Linus.
His current professional focus is DevOps and Python development.

An exhaustive bio can be found at this blog post.

Found my articles useful? Maybe you would like to support my efforts and give me a tip then?

Marc Richter's personal site - About Linux, programming in Python and Music

PyCharm: PyCharm 2018.3.1

$
0
0

PyCharm 2018.3.1 is now available, with various bug fixes. To update, choose Help | Check for Updates in the IDE, or download it from our website.

Improved in This Version

  • A fix for the recently added WSL support in PyCharm 2018.3
  • An issue where PyCharm couldn’t correctly authenticate over SSH using a passphrase-protected private key has been resolved.
  • A few fixes for Docker and Docker Compose
  • Fixes for the embedded terminal
  • Many fixes coming from WebStorm, DataGrip and IntelliJ IDEA; see the release notes for details

Interested?

Get PyCharm now on our website

If you’re on Ubuntu 16.04 or later, you can use snap to keep your PyCharm up to date. You can find the installation instructions on our website. Snap also works for various other Linux distros.

On Windows, macOS, and Linux you can use the JetBrains Toolbox to keep all of your JetBrains IDEs up to date. Read more about the Toolbox app on our website

NumFOCUS: Highlights from the 2018 NYC DISC Sprint

Codementor: Everything you need to know about tree data structures

$
0
0
https://cdn-images-1.medium.com/max/1000/1*WeWOBZy6N7cXkq4inS7FVA.jpeg When you first learn to code, it’s common to learn arrays as the “main data structure.” Eventually, you will learn about hash...

Zato Blog: Introducing Zato public API services

$
0
0

This article offers a high-level overview of the public services that Zato offers to users wishing to manage their environments in an API-driven manner in addition to web-admin and enmasse tools.

Overview

Most users start to interact with Zato via its web-based admin console. This works very well and is a great way to get started with the platform.

In terms of automation, the next natural step is to employ enmasse which lets one move data across environments using YAML import/export files.

The third way is to use the API services - anything that can be done in web-admin or enmasse is also available via dedicated API services. Indeed, both web-admin and enmasse are clients of the same services that users can put to work in their own integration needs.

The public API is built around a REST endpoint that accepts and produces JSON. Moreover, a purpose-built Python client can access all the services whereas an OpenAPI-based specification lets one generate clients in any language or framework that supports this popular format.

Python usage examples follow in the blog post but the full documentation has more information about REST and OpenAPI too.

Prerequisites

First thing needed is to set a password for the API client that will be used, it is an HTTP Basic Auth definition whose username is pubapi. Remember, however, that there are no default secrets in Zato ever so the automatically generated password cannot be used. To change the password, navigate in web-admin to Security -> HTTP Basic Auth and click Change password for the pubapi user.

Now, we can install the Python client package from PyPI. It does not matter how it is installed, it can be done under a virtual environment or not, but for simplicity, let's install it system-wide:

$ sudo pip install zato-client

This is it as far as prerequisites go, everything is ready to invoke the public services now.

Invoking API services

For illustration purposes, let's say we would like to be able to list and create ElasticSearch connections.

The easiest way to learn how to achieve it is to let web-admin do it first - each time a page in web-admin is accessed or an action like creating a new connection is performed, one or more entries are stored in admin.log files on the server that handles the call. That is, admin.log is the file that lists all the public API services invoked along with their input/output.

For instance, when you list ElasticSearch connections, here is what is saved in admin.log:

INFO - name:`zato.search.es.get-list`, request:`{'cluster_id': 1}`
INFO - name:`zato.search.es.get-list`, response:`'
   {"zato_search_es_get_list_response": [],
   "_meta": {"next_page": null, "num_pages": 0, "prev_page": null,
   "has_prev_page": false,
   "cur_page": 1, "page_size": 50, "has_next_page": false, "total": 0}}'

It is easy to discern that:

  • The service invoked was zato.search.es.get-list
  • Its sole input was the cluster ID to return connections for
  • There were no connections returned on output which makes sense because we have not created any yet

Let's do the same in Python now:

# Where to find the clientfromzato.clientimportAPIClient# Credentialsusername='pubapi'password='<secret>'# Address to invokeaddress='http://localhost:11223'# Build the clientclient=APIClient(address,username,password)# Choose the service to invoke and its requestservice_name='zato.search.es.get-list'request={'cluster_id':1}# Invoke the API serviceresponse=client.invoke(service_name,request)# And display the responseprint(response.data)

Just like expected, the list of connections is empty:

$ python pubapi.py 
[]
$ 

Navigate to web-admin and create a new connection via Connections -> Search -> ElasticSearch, as below:

Let's re-run the Python example now to witness that the newly created connection can in fact be obtained from the service:

$ python pubapi.py 
[{
  u'name': u'My Connection',
  u'is_active': True,
  u'hosts': u'127.0.0.1:9200\r\n',
  u'opaque1': u'{}',
  u'timeout': 5,
  u'body_as': u'POST',
  u'id': 1
}]
$ 

But this is not over yet - we still need to create a new connection ourselves through an API service. If you kept admin.log opened while the connection was being created in web-admin, you noticed that the service to do it was called zato.search.es.create and that its input was saved to admin.log too so we can just modify our Python code already:

# Where to find the clientfromzato.clientimportAPIClient# Credentialsusername='pubapi'password='<secret>'# Address to invokeaddress='http://localhost:11223'# Build the clientclient=APIClient(address,username,password)# First, create a new connectionservice_name='zato.search.es.create'request={'cluster_id':1,'name':'API-created connection','hosts':'127.0.0.1:9201','timeout':10,'body_as':'POST'}client.invoke(service_name,request)# Now, get the list of connections, it should include the newly created oneservice_name='zato.search.es.get-list'request={'cluster_id':1}response=client.invoke(service_name,request)# And display the responseprint(response.data)

This is a success again because on output we now have both the connection created in web-admin as well as the one created from the API client:

$ python pubapi.py 
[{
 u'name': u'API-created connection',
 u'is_active': True,
 u'hosts': u'127.0.0.1:9201',
 u'opaque1': u'{}',
 u'timeout': 10,
 u'body_as': u'POST',
 u'id': 2
},
{
 u'name': u'My Connection',
 u'is_active': True,
 u'hosts': u'127.0.0.1:9200\r\n',
 u'opaque1': u'{}',
 u'timeout': 5,
 u'body_as': u'POST',
 u'id': 1
}]
$ 

Just to double-check it, we can also list the connections in web-admin and confirm that both are returned:

Summary

That is really it. The process is as straightforward as it can get - create a client object, choose a service to invoke, give it a dict request and a Python object is returned on output.

Note that this post covered Python only but everything applies to REST and OpenAPI-based clients too - the possibilities to interact with the public API are virtually limitless and may include deployment automation, tools to test installation procedures or custom command and control centers and administration dashboards.


codingdirectional: Delete duplicate file with python program

$
0
0

In this article we will start to explore the technique which we will use to delete a duplicate file in our computer folder. The main objective in this chapter is to select a file in one folder and then searches and deletes the file with the same filename as the one which we have selected earlier. We will use back the same program which we have created in the previous chapter to delete the duplicate file in the computer hard drive.

First of all there are not many changes in the main file, I just include another if statement to make sure that a new remove thread instance will only get created if the folder which we want to search for the duplicate file has been selected.

from tkinter import *
from tkinter import filedialog
from Remove import Remove
import os

win = Tk() # 1 Create instance
win.title("Multitas") # 2 Add a title
win.resizable(0, 0) # 3 Disable resizing the GUI
win.configure(background='black') # 4 change background color

# 5 Create a label
aLabel = Label(win, text="Remove duplicate", anchor="center")
aLabel.grid(column=0, row=1)
aLabel.configure(foreground="white")
aLabel.configure(background="black")

# 6 Create a selectFile function to be used by button
def selectFile():

    filename = filedialog.askopenfilename(initialdir="/", title="Select file")
    if(filename != ''):
        filename = filename.split('/')[-1] # this is for the windows separator only
        folder = filedialog.askdirectory() # 7 open a folder then create and start a new remove thread to delete the duplicate file
        if(folder != ''):
            remove = Remove(folder, aLabel, filename)
            remove.start()

# 8 Adding a Button
action = Button(win, text="Open Folder", command=selectFile)
action.grid(column=0, row=0) # 9 Position the button
action.configure(background='brown')
action.configure(foreground='white')

win.mainloop()  # 10 start GUI

Next we will delete the duplicate file if we found one in another folder.

import threading
import os

class Remove(threading.Thread):

   def __init__(self, massage, aLabel, filename):

      threading.Thread.__init__(self)
      self.massage = massage
      self.label = aLabel
      self.filename = filename

   def run(self):
      text_filename = 'The is no duplicate item'
      filepaths = os.listdir(self.massage)
      for filepath in list(filepaths):
         if(filepath == self.filename):
            os.chdir(self.massage)
            os.remove(filepath)
            text_filename = filepath + '  has been removed'

      self.label.config(text=text_filename)

      return

This is just the beginning of this project which we will search within folders to further look for the file with the same name in the next chapter. But we will not stop there because what we really want to achieve is to delete a file with the same content instead of with the same name because the file with the same name might contains different contents which means that it is not a duplicate file after all, but for now lets pretend it is, the most important strategy of writing program is to build up the framework first.

gamingdirectional: Create the third level for this pygame project

$
0
0

In this article we are going to create the third level for our pygame project after we have created the previous two levels, the reason I create the third game level in this chapter is because this level is different from the second level which is only using the same enemy class to generate different type of enemy ship. In this chapter we are going to create a new enemy class which will act...

Source

PyCon: PyCon 2019 proposal submission deadline is fast approaching!

$
0
0
The busy holiday season is upon us and before you know it the new year will be here. January 3rd AoE is the deadline to submit proposals. We've added a draft feature to proposals so you can begin your proposal submission now and come back to make final edits before the January 3rd deadline.

Begin by creating an account on us.pycon.org/2019/dashboard.  Details on submitting a proposal can be found here.
  • January 3, 2019: Deadline to submit a PyCon Talk proposal,Poster proposal,Education Summit proposal, andLas PyCon Charlas proposal
  • February 12, 2019: Deadline to submit applications for Financial aid
  • March 3, 2019: Financial Assistance grants awarded
  • March 30, 2019: Deadline to respond to offer of Financial Assistance
Our Early Bird tickets are going quickly. If you are hoping to purchase your Student, Individual, or Corporate ticket at our discounted rate, then your time is now — register as soon as you can!

We look forward to seeing you in Cleveland in May 2019!

   [Image Description: Winter snow scene, Rocky River Ohio]

Erik Marsja: Python Pandas Groupby Tutorial

$
0
0

In this Pandas group by we are going to learn how to organize Pandas dataframes by groups. More specifically, we are going to learn how to group by one and multiple columns. Furthermore, we are going to learn how calculate some basics summary statistics (e.g., mean, median), convert Pandas groupby to dataframe, calculate the percentage of observations in each group, and many more useful things.

First of all we are going to import pandas as pd, and read a CSV file, using the read_csv method, to a dataframe. In the example below, we use index_col=0 because the first row in the dataset is the index column.

import pandas as pd

data_url = 'http://vincentarelbundock.github.io/Rdatasets/csv/carData/Salaries.csv'
df = pd.read_csv(data_url, index_col=0)

df.head()

We used Pandas head to se the first 5 rows of our dataframe. In the image above we can see that we have, at least, three variables that we can group our data by. That is, we can group our data by “rank”, “discipline”, and “sex”. Of course, we could also group it by yrs.since.phd or yrs.service but it may be a lot of groups.  As previously mentioned we are going to use Pandas groupby to group a dataframe based on one, two, three, or more columns.

Data can be loaded from other file formats as well (e.g., Excel, HTML, JSON):

Python Pandas Groupby Example

We are starting with the simplest example; grouping by one column. In the Pandas groupby example below we are going to group by the column “rank”.

There are many different methods that we can use on Pandas groupby objects (and Pandas dataframe objects). All available methods on a Python object can be found using this code:

import IPython

# Grouping by one factor
df_rank = df.groupby('rank')

# Getting all methods from the groupby object:
meth = [method_name for method_name in dir(df_rank)
 if callable(getattr(df_rank, method_name)) & ~method_name.startswith('_')]

# Printing the result
print(IPython.utils.text.columnize(meth))


Note, that in the code example above we also import IPython to print the list in columns. In the following examples we are going to use some of these methods. First, we can print out the groups by using the groups method to get a dictionary of groups:

df_rank.groups


We can also use the groupby method get_group to filter the grouped data. In the next code example we are going to select the Assistant Professor group (i.e., “AsstProf”).

# Get group
df_rank.get_group('AsstProf').head()


Pandas Groupby Count

If we want to find out how big each group is (e.g., how many observations in each group), we can use use .size() to count the number of rows in each group:

df_rank.size()

# Output:
#
# rank
# AssocProf     64
# AsstProf      67
# Prof         266
# dtype: int64


Additionally, we can also use Pandas groupby count method to count by group(s) and get the entire dataframe. If we don’t have any missing values the number should be the same for each column and group. Thus, this is a way we can explore the dataset and see if there are any missing values in any column.

df_rank.count()


That was how to use Pandas size to count the number of rows in each group. We will return to this, later, when we are grouping by multiple columns. Now we are going to In some cases we may want to find out the number of unique values in each group. This can be done using the groupby method nunique:

df_rank.nunique()


As can be seen in the the last column (salary) there are 63 Associate Professors, 53 Assistant Proffessors, and 261 Professors in the dataset. In this example we have a complete dataset and we can see that some have the same salary (e.g., there are 261 unique values in the column salary for Professors). As we will see if we have missing values in the dataframe we would get a different result. In the next example we are using Pandas mask method together with NumPy’s random.random to insert missing values (i.e., np.NaN) in 10% of the dataframe:

df_null = df.mask(np.random.random(df.shape) < .1)
df_null.isnull().sum().reset_index(name='N Missing Values')


Note, we used the reset_index method above to get the multi-level indexed grouped dataframe to become a single indexed. In the particular example, above, we used the parameter name to name the count column (“N Missing Values”). This parameter, however, can only be used on Pandas series objects and not dataframe objects.

That said, let’s return to the example; if we run the same code as above (counting unique values by group) we can see that it will not count missing values:

df_null.groupby('rank').nunique()


That is, we don’t get the same numbers in the two tables because of the missing values. In the following examples we are going to work with Pandas groupby to calculate the mean, median, and standard deviation by one group.

Pandas Groupby Mean

If we want to calculate the mean salary grouped by one column (rank, in this case) it’s simple. We just use Pandas mean method on the grouped dataframe:

df_rank['salary'].mean().reset_index()


Having a column named salary may not be useful. For instance, if someone else are going to see the table they may not know that it’s the mean salary for each group. Luckily, we can add the rename method to the above code to rename the columns of the grouped data:

df_rank['salary'].mean().reset_index().rename(
    columns={'rank':'Rank','salary' : 'Mean Salary'})


Median Score of a Group Using the groupby Method in Pandas

Now lets group by disciplne of the academic and find the median salary in the next Pandas groupby example

df.groupby('rank')['salary'].median().reset_index().rename(
    columns={'rank':'Rank','salary' : 'MedianSalary'})


Aggregate Data by Group using Pandas Groupby

Most of the time we want to have our summary statistics in the same table. We can calculate the mean and median salary, by groups, using the agg method. In this next Pandas groupby example we are also adding the minimum and maximum salary by group (rank):

df_rank['salary'].agg(['mean', 'median', 
                                  'std', 'min', 'max']).reset_index()


A very neat thing with Pandas agg method is that we can write custom functions and pass them along. Let’s say that we wanted, instead of having one column for min salary and one column for max salary, to have a column with salary range:

def salary_range(df):
    mini = df.min()
    maxi = df.max()
    rang = '%s - %s' % (mini, maxi)
    
    return rang

df_descriptive = df_rank['salary'].agg(['mean', 'median', 'std', salary_range]).reset_index()


Here, however, the output will have the name of the methods/functions used. That is, we will have a column named ‘salary_range’ and we are going to rename this column:

# Renaming Pandas Dataframe Columns
df_descriptive.rename(columns={'rank':'Rank', 'mean':'Mean', 'median':'Median', 
                               'std':'Standard Deviation', 'salary_range':'Range'})


Furthermore, it’s possible to use methods from other Python packages such as SciPy and NumPy. For instance, if we wanted to calculate the harmonic and geometric mean we can use SciPy:

from scipy.stats.mstats import gmean, hmean

df_descriptive = df_rank['salary'].agg(['mean', 'median', hmean, gmean]).reset_index()
df_descriptive

More about doing descriptive statistics using Pyton:

Pandas Groupby Multiple Columns

In this section we are going to continue using Pandas groupby but grouping by many columns. In the first example we are going to group by two columns and the we will continue with grouping by two columns, ‘discipline’ and ‘rank’. To use Pandas groupby with multiple columns we add a list containing the column names. In the example below we also count the number of observations in each group:

df_grp = df.groupby(['rank', 'discipline'])
df_grp.size().reset_index(name='count')


Again, we can use the get_group method to select groups. However, in this case we have to input a tuple and select two groups:

# Get two groups
df_grp.get_group(('AssocProf', 'A')).head()


Pandas Groupby Count Multiple Groups

In the next groupby example we are going to calculate the number of observations in three groups (i.e., “n”). We have to start by grouping by “rank”, “discipline” and “sex” using groupby. As with the previous example (groupby one column) we use the method size to calculate the n and reset_index, with the parameter name=”n”, to get the series to a dataframe:

df_3grps = df.groupby(['rank', 'discipline', 'sex'])
df_n_per_group = df_3grps.size().reset_index(name='n')

Now we can continue and calculate the percentage of men and women in each rank and discipline. In this, and the next, Pandas groupby example we are going to use the apply method together with the lambda function.

perc = df.groupby(['rank', 'discipline', 'sex'])['salary'].size()

# Give the percentage on the level of Rank:
percbyrank = perc.groupby(level=0).apply(lambda x: 100 * x / float(x.sum()))

print(percbyrank)
print('Total percentage in group AssocProf. ',
      percbyrank.reset_index().query('rank == "AssocProf"')['salary'].sum())


Note, in the last line of code above we calculate the total of % for the group AssocProf and it’s 100, which is good. We are going to continue with calculating the percentage of men and women in each group (i.e., rank and discipline). In the next code we have to summarize the total (n=397). We can, for instance, see that there are more male professors regardless of discipline.

n = perc.reset_index()['salary'].sum()
totalperc =  perc.groupby(level=0).apply(lambda x: 100 * x / N).reset_index(name='% of total n')
totalperc.reset_index()

How to convert a Pandas groupby to Dataframe

When dealing with multiple groups and Pandas groupby we get a GroupByDataFrame object. Let’s use type to see what type a grouped object have:

df_rn = df.groupby(['rank', 'discipline']).mean()

Furthermore, if we use the index method we can see that it is MultiIndex:

df_rn.index


It’s easy to convert the Pandas groupby to dataframe; we have actually already done it. In this example, however, we are going to calculate the mean values per the three groups. Furthermore, we are going to add a suffix to each column and use reset_index to get a dataframe.

df_rn = df_rn.add_suffix('_Mean').reset_index()
type(df_rn)

# Output: pandas.core.frame.DataFrame


Pandas groupby agg with Multiple Groups

In this last section we are going use agg, again. We are not going into detail on how to use mean, median, and other methods to get summary statistics, however. This is because it’s basically the same as for grouping by n groups and it’s better to get all the summary statistics in one table.

That is, we are going to calculate mean, median, and standard deviation using the agg method. In this groupby example we are also adding the summary statistics (i.e., “mean”, “median”, and “std”) to each column. Otherwise we will get a multi-level indexed result like the image below:

If we use Pandas columns and the method ravel together with list comprehension we can add the suffixes to our column name and get another table. Note, in the example code below we only print the first 7 columns. In fact, with many columns it may be better to keep the result multi-level indexed.

df_stats = df.groupby(['rank', 'discipline', 'sex']).agg(['mean', 'median', 'std'])
df_stats.columns = ["_".join(x) for x in df_stats.columns.ravel()]

df_stats.iloc[:,0:6].reset_index()

Note, if we wanted an output as the first image we just remove the second line above (“df_stats.columns = …”). Additionally, as previous mentioned, we can also use custom functions, NumPy and SciPy methods when working with groupby agg. Just scroll back up and look at those examples, for grouping by one column, and apply them to the data grouped by multiple columns. More information of the different methods and objects used here can be found in the Pandas documentation.

Conclusion:

In this Pandas groupby tutorial we have learned how to use Pandas groupby to:

  • group one or many columns
  • count observations using the methods count and size
  • calculate simple summary statistics using:
    • groupby mean, median, std
    • groupby agg (aggregate)
    • agg with our own function
  • Calculate the percentage of observations in different groups

The post Python Pandas Groupby Tutorial appeared first on Erik Marsja.

Dataquest: An Intro to Deep Learning in Python

$
0
0
An Intro to Deep Learning in Python

Deep learning is a type of machine learning that’s growing at an almost frightening pace. Nearly every projection has the deep learning industry expanding massively over the next decade. This market research report, for example, expects deep learning to grow 71x in the US and more than that globally over the next ten years. There’s never been a better time than now to get started.

To make that start easier for you, we’ve just launched a new course: Deep Learning Fundamentals.

An Intro to Deep Learning in Python

This course is designed to give you an introduction to neural networks and deep learning. You’ll start with the theories behind these concepts, and gen familiar with representing linear and logistic regression models as graphs. Then you’ll start digging deeper into topics like nonlinear activation functions and work on improving your models by adding hidden layers of neurons, using the scikit-learn package in Python. Finally, you’ll build a deep learning model that’s capable of looking at images of handwritten numbers and identifying/classifying them correctly.

Why you should dive into deep learning

Boost your earnings

Although salaries for general data scientists are already excellent, as specialists, machine learning and deep learning engineers can command even higher rates. According to Indeed.com data from the US, for example, machine learning engineer salaries average around 13% higher than data scientist salaries.

Having some deep learning skills can also help your resume stand out from the herd when it comes to applying for data science jobs, even if you haven’t yet reached the level of deep learning specialist.

Demand for deep learning is growing

There’s no doubt that machine learning is a fast-growing field, and within it, deep learning is also growing at a breakneck pace. Specific market projections vary from firm to firm to firm, but everybody agrees on the general trend: demand for deep learning is headed through the roof.

It saves time

If you’ve messed with other forms of machine learning, you know that feature engineering - converting your input’s parameters into “features” your algorithm can read - can be a fairly difficult and time-intensive process. But the neural networks used in deep learning are designed to do that conversion automatically. So, for example, instead of having to figure out how to pull color data, histograms, and other metrics from a set of images, you can just run the raw images through your neural network and it will do the work for you!

That’s making it sound easy, of course, and it isn’t; the challenge is getting the network to the point where it’s capable of doing that work for you. But that means you’ll spend more time working with your algorithms and less time fiddling with features.

Specialize while staying flexible

Building a specialty can help you find work in any field, but it can also put you into a position where you’re doomed to be doing the same thing every day because your speciality is only appealing to a limited number of companies who are all doing the same sort of thing. Thankfully, that’s not the case with deep learning, which is in demand across a wide swath of industries and is being put to use to solve problems ranging from image recognition to translation to robotics.

It’s fun!

Career advantages aside, let’s not forget that deep learning is just plain cool. You can use it to get machines to do everything, from automatically colorizing old photos to destroying the world’s greatest chess players without actually teaching them how to do those things.

Ready to dive into the deep? The first mission of the new course is completely free so everybody can try it out, but you will need a Premium subscription to complete the course.

Viewing all 24375 articles
Browse latest View live


<script src="https://jsc.adskeeper.com/r/s/rssing.com.1596347.js" async> </script>