Quantcast
Channel: Planet Python
Viewing all 22646 articles
Browse latest View live

Real Python: Writing Comments in Python (Guide)

$
0
0

When writing code in Python, it’s important to make sure that your code can be easily understood by others. Giving variables obvious names, defining explicit functions, and organizing your code are all great ways to do this.

Another awesome and easy way to increase the readability of your code is by using comments!

In this tutorial, you’ll cover some of the basics of writing comments in Python. You’ll learn how to write comments that are clean and concise, and when you might not need to write any comments at all.

You’ll also learn:

  • Why it’s so important to comment your code
  • Best practices for writing comments in Python
  • Types of comments you might want to avoid
  • How to practice writing cleaner comments

Free Bonus:5 Thoughts On Python Mastery, a free course for Python developers that shows you the roadmap and the mindset you'll need to take your Python skills to the next level.

Why Commenting Your Code Is So Important

Comments are an integral part of any program. They can come in the form of module-level docstrings, or even inline explanations that help shed light on a complex function.

Before diving into the different types of comments, let’s take a closer look at why commenting your code is so important.

Consider the following two scenarios in which a programmer decided not to comment their code.

When Reading Your Own Code

Client A wants a last-minute deployment for their web service. You’re already on a tight deadline, so you decide to just make it work. All that “extra” stuff—documentation, proper commenting, and so forth—you’ll add that later.

The deadline comes, and you deploy the service, right on time. Whew!

You make a mental note to go back and update the comments, but before you can put it on your to-do list, your boss comes over with a new project that you need to get started on immediately. Within a few days, you’ve completely forgotten that you were supposed to go back and properly comment the code you wrote for Client A.

Fast forward six months, and Client A needs a patch built for that same service to comply with some new requirements. It’s your job to maintain it, since you were the one who built it in the first place. You open up your text editor and…

What did you even write?!

You spend hours parsing through your old code, but you’re completely lost in the mess. You were in such a rush at the time that you didn’t name your variables properly or even set your functions up in the proper control flow. Worst of all, you don’t have any comments in the script to tell you what’s what!

Developers forget what their own code does all the time, especially if it was written a long time ago or under a lot of pressure. When a deadline is fast approaching, and hours in front of the computer have led to bloodshot eyes and cramped hands, that pressure can be reflected in the form of code that is messier than usual.

Once the project is submitted, many developers are simply too tired to go back and comment their code. When it’s time to revisit it later down the line, they can spend hours trying to parse through what they wrote.

Writing comments as you go is a great way to prevent the above scenario from happening. Be nice to Future You!

When Others Are Reading Your Code

Imagine you’re the only developer working on a small Django project. You understand your own code pretty well, so you don’t tend to use comments or any other sort of documentation, and you like it that way. Comments take time to write and maintain, and you just don’t see the point.

The only problem is, by the end of the year your “small Django project” has turned into a “20,000 lines of code” project, and your supervisor is bringing on additional developers to help maintain it.

The new devs work hard to quickly get up to speed, but within the first few days of working together, you’ve realized that they’re having some trouble. You used some quirky variable names and wrote with super terse syntax. The new hires spend a lot of time stepping through your code line by line, trying to figure out how it all works. It takes a few days before they can even help you maintain it!

Using comments throughout your code can help other developers in situations like this one. Comments help other devs skim through your code and gain an understanding of how it all works very quickly. You can help ensure a smooth transition by choosing to comment your code from the outset of a project.

How to Write Comments in Python

Now that you understand why it’s so important to comment your code, let’s go over some basics so you know how to do it properly.

Python Commenting Basics

Comments are for developers. They describe parts of the code where necessary to facilitate the understanding of programmers, including yourself.

To write a comment in Python, simply put the hash mark # before your desired comment:

# This is a comment

Python ignores everything after the hash mark and up to the end of the line. You can insert them anywhere in your code, even inline with other code:

print("This will run.")# This won't run

When you run the above code, you will only see the output This will run. Everything else is ignored.

Comments should be short, sweet, and to the point. While PEP 8 advises keeping code at 79 characters or fewer per line, it suggests a max of 72 characters for inline comments and docstrings. If your comment is approaching or exceeding that length, then you’ll want to spread it out over multiple lines.

Python Multiline Comments

Unfortunately, Python doesn’t have a way to write multiline comments as you can in languages such as C, Java, and Go:

# So you can'tjustdothisinpython

In the above example, the first line will be ignored by the program, but the other lines will raise a Syntax Error.

In contrast, a language like Java will allow you to spread a comment out over multiple lines quite easily:

/* You can easilywrite multilinecomments in Java */

Everything between /* and */ is ignored by the program.

While Python doesn’t have native multiline commenting functionality, you can create multiline comments in Python. There are two simple ways to do so.

The first way is simply by pressing the return key after each line, adding a new hash mark and continuing your comment from there:

defmultiline_example():# This is a pretty good example# of how you can spread comments# over multiple lines in Python

Each line that starts with a hash mark will be ignored by the program.

Another thing you can do is use multiline strings by wrapping your comment inside a set of triple quotes:

"""If I really hate pressing `enter` andtyping all those hash marks, I couldjust do this instead"""

This is like multiline comments in Java, where everything enclosed in the triple quotes will function as a comment.

While this gives you the multiline functionality, this isn’t technically a comment. It’s a string that’s not assigned to any variable, so it’s not called or referenced by your program. Still, since it’ll be ignored at runtime and won’t appear in the bytecode, it can effectively act as a comment. (You can take a look at this article for proof that these strings won’t show up in the bytecode.)

However, be careful where you place these multiline “comments.” Depending on where they sit in your program, they could turn into docstrings, which are pieces of documentation that are associated with a function or method. If you slip one of these bad boys right after a function definition, then what you intended to be a comment will become associated with that object.

Be careful where you use these, and when in doubt, just put a hash mark on each subsequent line. If you’re interested in learning more about docstrings and how to associate them with modules, classes, and the like, check out our tutorial on Documenting Python Code.

Python Commenting Shortcuts

It can be tedious to type out all those hash marks every time you need to add a comment. So what can you do to speed things up a bit? Here are a few tricks to help you out when commenting.

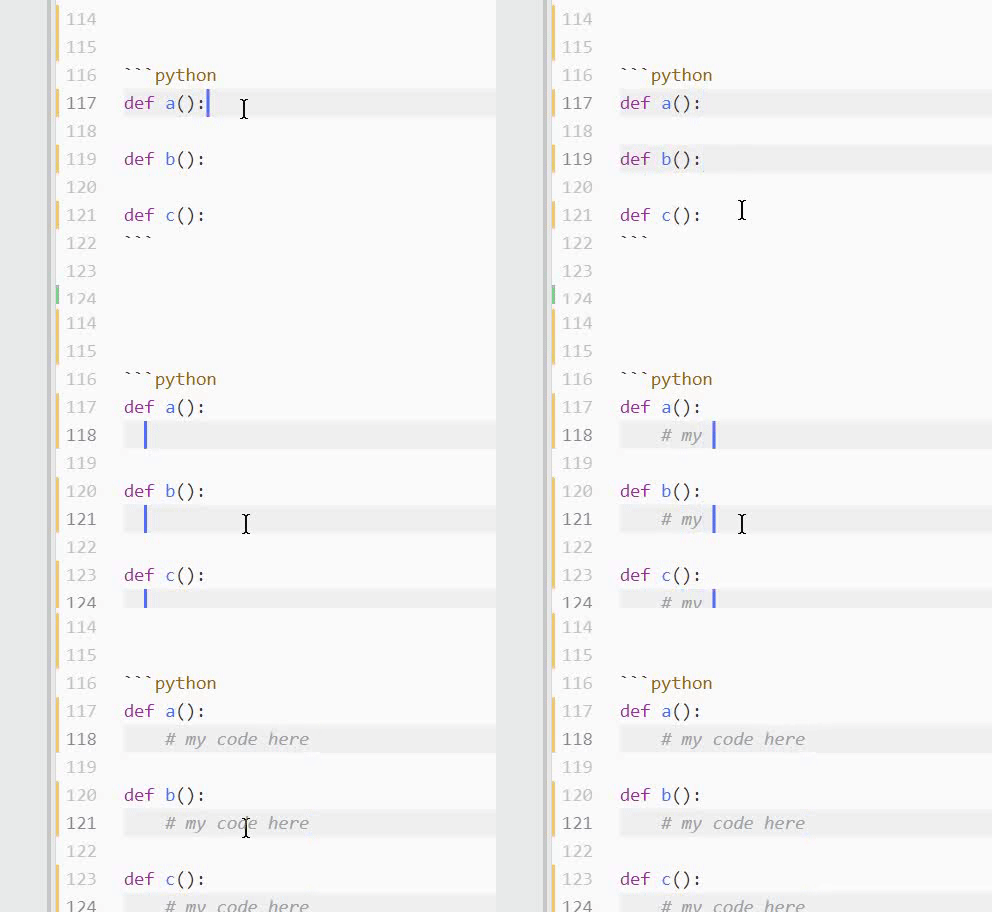
One of the first things you can do is use multiple cursors. That’s exactly what it sounds like: placing more than one cursor on your screen to accomplish a task. Simply hold down the Ctrl or Cmd key while you left-click, and you should see the blinking lines on your screen:

Python Comments Multiple Cursors

This is most effective when you need to comment the same thing in several places.

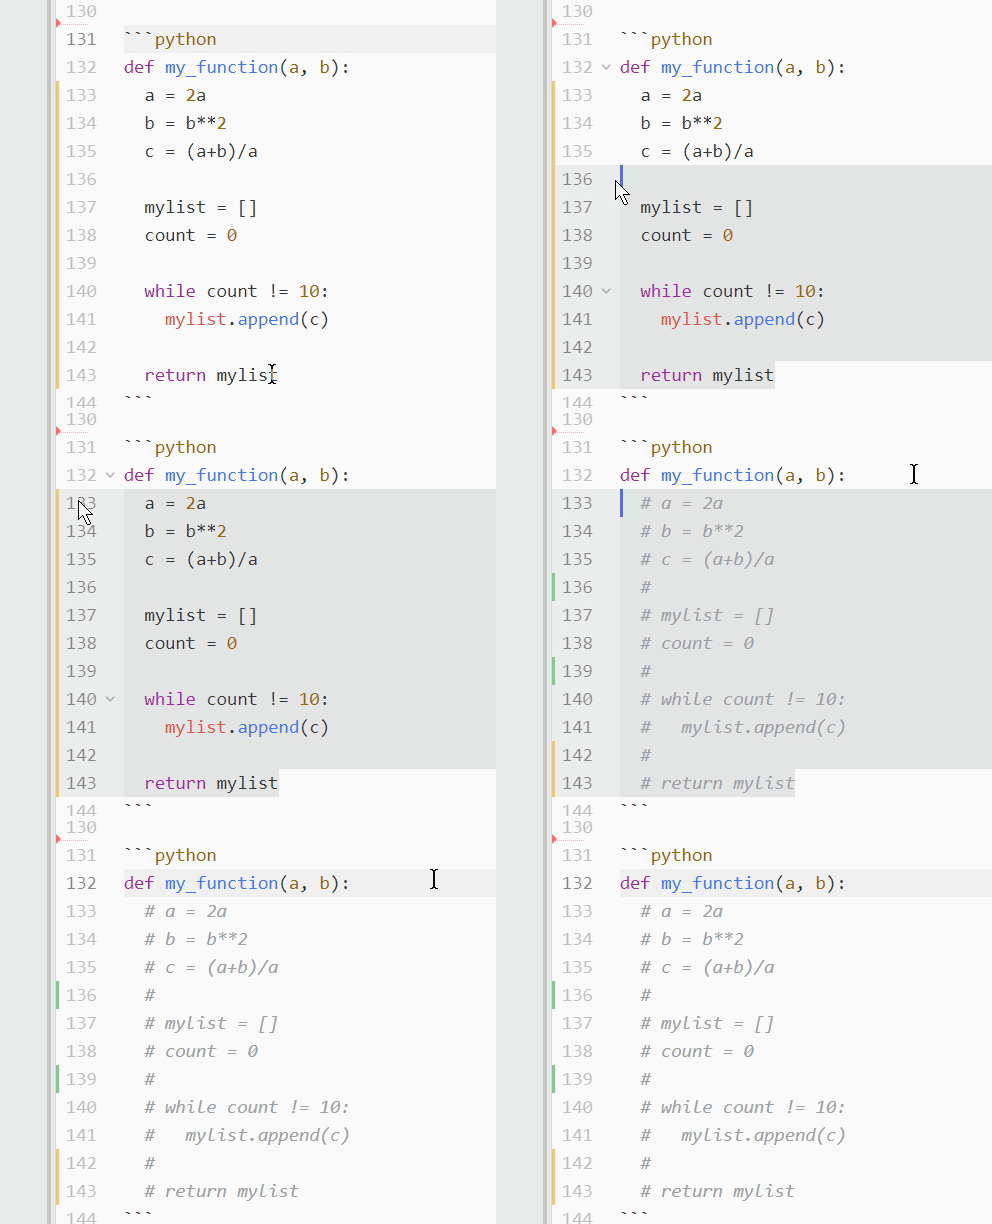
What if you’ve got a long stretch of text that needs to be commented out? Say you don’t want a defined function to run in order to check for a bug. Clicking each and every line to comment it out could take a lot of time! In these cases, you’ll want to toggle comments instead. Simply select the desired code and press Ctrl+/ on PC, or Cmd+/ on Mac:

Python Toggle Comments

All the highlighted text will be prepended with a hash mark and ignored by the program.

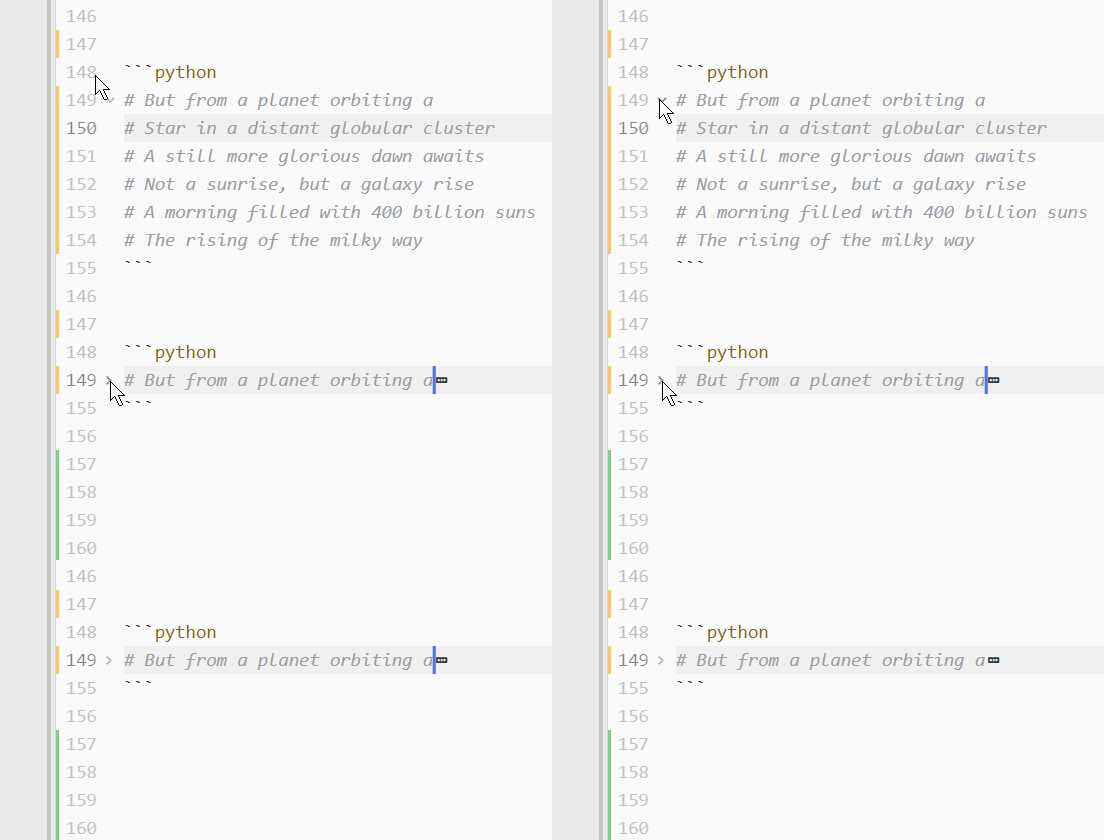
If your comments are getting too unwieldy, or the comments in a script you’re reading are really long, then your text editor may give you the option to collapse them using the small down arrow on the left-hand side:

Python Hide Comments

Simply click the arrow to hide the comments. This works best with long comments spread out over multiple lines, or docstrings that take up most of the start of a program.

Combining these tips will make commenting your code quick, easy, and painless!

Python Commenting Best Practices

While it’s good to know how to write comments in Python, it’s just as vital to make sure that your comments are readable and easy to understand.

Take a look at these tips to help you write comments that really support your code.

When Writing Code for Yourself

You can make life easier for yourself by commenting your own code properly. Even if no one else will ever see it, you’ll see it, and that’s enough reason to make it right. You’re a developer after all, so your code should be easy for you to understand as well.

One extremely useful way to use comments for yourself is as an outline for your code. If you’re not sure how your program is going to turn out, then you can use comments as a way to keep track of what’s left to do, or even as a way of tracking the high-level flow of your program. For instance, use comments to outline a function in pseudo-code:

fromcollectionsimportdefaultdictdefget_top_cities(prices):top_cities=defaultdict(int)# For each price range# Get city searches in that price# Count num times city was searched# Take top 3 cities & add to dictreturndict(top_cities)

These comments plan out get_top_cities(). Once you know exactly what you want your function to do, you can work on translating that to code.

Using comments like this can help keep everything straight in your head. As you walk through your program, you’ll know what’s left to do in order to have a fully functional script. After “translating” the comments to code, remember to remove any comments that have become redundant so that your code stays crisp and clean.

You can also use comments as part of the debugging process. Comment out the old code and see how that affects your output. If you agree with the change, then don’t leave the code commented out in your program, as it decreases readability. Delete it and use version control if you need to bring it back.

Finally, use comments to define tricky parts of your own code. If you put a project down and come back to it months or years later, you’ll spend a lot of time trying to get reacquainted with what you wrote. In case you forget what your own code does, do Future You a favor and mark it down so that it will be easier to get back up to speed later on.

When Writing Code for Others

People like to skim and jump back and forth through text, and reading code is no different. The only time you’ll probably read through code line by line is when it isn’t working and you have to figure out what’s going on.

In most other cases, you’ll take a quick glance at variables and function definitions in order to get the gist. Having comments to explain what’s happening in plain English can really assist a developer in this position.

Be nice to your fellow devs and use comments to help them skim through your code. Inline comments should be used sparingly to clear up bits of code that aren’t obvious on their own. (Of course, your first priority should be to make your code stand on its own, but inline comments can be useful in this regard.)

If you have a complicated method or function whose name isn’t easily understandable, you may want to include a short comment after the def line to shed some light:

defcomplicated_function(s):# This function does something complicated

This can help other devs who are skimming your code get a feel for what the function does.

For any public functions, you’ll want to include an associated docstring, whether it’s complicated or not:

defsparsity_ratio(x:np.array)->float:"""Return a float    Percentage of values in array that are zero or NaN"""

This string will become the .__doc__ attribute of your function and will officially be associated with that specific method. The PEP 257 docstring guidelines will help you to structure your docstring. These are a set of conventions that developers generally use when structuring docstrings.

The PEP 257 guidelines have conventions for multiline docstrings as well. These docstrings appear right at the top of a file and include a high-level overview of the entire script and what it’s supposed to do:

# -*- coding: utf-8 -*-"""A module-level docstringNotice the comment above the docstring specifying the encoding.Docstrings do appear in the bytecode, so you can access this throughthe ``__doc__`` attribute. This is also what you'll see if you callhelp() on a module or any other Python object."""

A module-level docstring like this one will contain any pertinent or need-to-know information for the developer reading it. When writing one, it’s recommended to list out all classes, exceptions, and functions as well as a one-line summary for each.

Python Commenting Worst Practices

Just as there are standards for writing Python comments, there are a few types of comments that don’t lead to Pythonic code. Here are just a few.

Avoid: W.E.T. Comments

Your comments should be D.R.Y. The acronym stands for the programming maxim “Don’t Repeat Yourself.” This means that your code should have little to no redundancy. You don’t need to comment a piece of code that sufficiently explains itself, like this one:

returna# Returns a

We can clearly see that a is returned, so there’s no need to explicitly state this in a comment. This makes comments W.E.T., meaning you “wrote everything twice.” (Or, for the more cynical out there, “wasted everyone’s time.”)

W.E.T. comments can be a simple mistake, especially if you used comments to plan out your code before writing it. But once you’ve got the code running well, be sure to go back and remove comments that have become unnecessary.

Avoid: Smelly Comments

Comments can be a sign of “code smell,” which is anything that indicates there might be a deeper problem with your code. Code smells try to mask the underlying issues of a program, and comments are one way to try and hide those problems. Comments should support your code, not try to explain it away. If your code is poorly written, no amount of commenting is going to fix it.

Let’s take this simple example:

# A dictionary of families who live in each citymydict={"Midtown":["Powell","Brantley","Young"],"Norcross":["Montgomery"],"Ackworth":[]}defa(dict):# For each cityforpindict:# If there are no families in the cityifnotmydict[p]:# Say that there are no familiesprint("None.")

This code is quite unruly. There’s a comment before every line explaining what the code does. This script could have been made simpler by assigning obvious names to variables, functions, and collections, like so:

families_by_city={"Midtown":["Powell","Brantley","Young"],"Norcross":["Montgomery"],"Ackworth":[],}defno_families(cities):forcityincities:ifnotcities[city]:print(f"No families in {city}.")

By using obvious naming conventions, we were able to remove all unnecessary comments and reduce the length of the code as well!

Your comments should rarely be longer than the code they support. If you’re spending too much time explaining what you did, then you need to go back and refactor to make your code more clear and concise.

Avoid: Rude Comments

This is something that’s likely to come up when working on a development team. When several people are all working on the same code, others are going to be going in and reviewing what you’ve written and making changes. From time to time, you might come across someone who dared to write a comment like this one:

# Put this here to fix Ryan's stupid-a** mistake

Honestly, it’s just a good idea to not do this. It’s not okay if it’s your friend’s code, and you’re sure they won’t be offended by it. You never know what might get shipped to production, and how is it going to look if you’d accidentally left that comment in there, and a client discovered it down the road? You’re a professional, and including vulgar words in your comments is not the way to show that.

How to Practice Commenting

The simplest way to start writing more Pythonic comments is just to do it!

Start writing comments for yourself in your own code. Make it a point to include simple comments from now on where necessary. Add some clarity to complex functions, and put a docstring at the top of all your scripts.

Another good way to practice is to go back and review old code that you’ve written. See where anything might not make sense, and clean up the code. If it still needs some extra support, add a quick comment to help clarify the code’s purpose.

This is an especially good idea if your code is up on GitHub and people are forking your repo. Help them get started by guiding them through what you’ve already done.

You can also give back to the community by commenting other people’s code. If you’ve downloaded something from GitHub and had trouble sifting through it, add comments as you come to understand what each piece of code does.

“Sign” your comment with your initials and the date, and then submit your changes as a pull request. If your changes are merged, you could be helping dozens if not hundreds of developers like yourself get a leg up on their next project.

Conclusion

Learning to comment well is a valuable tool. Not only will you learn how to write more clearly and concisely in general, but you’ll no doubt gain a deeper understanding of Python as well.

Knowing how to write comments in Python can make life easier for all developers, including yourself! They can help other devs get up to speed on what your code does, and help you get re-acquainted with old code of your own.

By noticing when you’re using comments to try and support poorly written code, you’ll be able to go back and modify your code to be more robust. Commenting previously written code, whether your own or another developer’s, is a great way to practice writing clean comments in Python.

As you learn more about documenting your code, you can consider moving on to the next level of documentation. Check out our tutorial on Documenting Python Code to take the next step.


[ Improve Your Python With 🐍 Python Tricks 💌 – Get a short & sweet Python Trick delivered to your inbox every couple of days. >> Click here to learn more and see examples ]
Catalin George Festila: Python Qt5 - tray icon example.

$
0
0
This tutorial is about another tray icon application type.
The base application is the same like any application with some changes with this steps:
- QSystemTrayIcon this will start to create the application like an tray icon application;
- create one menu to show if you use the right click of mouse;
- add a menu with action items;
- add the exit action to close the tray icon application;
- you can use the action item from menu to print a message
Let's see the source code:
from PyQt5.QtGui import *
from PyQt5.QtWidgets import *
# create the application
app = QApplication([])
app.setQuitOnLastWindowClosed(False)

# create the icon
icon = QIcon("icon.png")

# create the tray icon
tray = QSystemTrayIcon()
tray.setIcon(icon)
tray.setVisible(True)

# this will print a message
def print_msg():
print("This action is triggered connect!")

# create the menu for tray icon
menu = QMenu()

# add one item to menu
action = QAction("This is menu item")
menu.addAction(action)
action.triggered.connect(print_msg)

# add exit item to menu
exitAction = QAction("&Exit")
menu.addAction(exitAction)
exitAction.triggered.connect(exit)

# add the menu to the tray
tray.setContextMenu(menu)

# start application execution
app.exec_()
This is result of the running source code:

Erik Marsja: Data Manipulation with Pandas: A Brief Tutorial

$
0
0

Learn three data manipulation techniques with Pandas in this guest post by Harish Garg, a software developer and data analyst, and the author of Mastering Exploratory Analysis with pandas.

Modifying a Pandas DataFrame Using the inplace Parameter

In this section, you’ll learn how to modify a DataFrame using the inplace parameter. You’ll first read a real dataset into Pandas. You’ll then see how the inplace parameter impacts a method execution’s end result. You’ll also execute methods with and without the inplace parameter to demonstrate the effect of inplace.

Start by importing the Pandas module into your Jupyter notebook, as follows:

import pandas as pd

Then read your dataset:

top_movies = pd.read_csv('data-movies-top-grossing.csv', sep=',')

Since it’s a CSV file, you’ll have to use Pandas’ read_csv function for this. Now that you have read your dataset into a DataFrame, it’s time to take a look at a few of the records:

top_movies

Pandas DataFrame

The data you’re using is from Wikipedia; it’s the cross annex data for top movies worldwide to date. Most Pandas DataFrame methods return a new DataFrame. However, you may want to use a method to modify the original DataFrame itself.

This is where the inplace parameter is useful. Try calling a method on a DataFrame without the inplace parameter to see how it works in the code:

top_movies.set_index('Rank').head()

Using set_index

Here, you’re setting one of the columns as the index for your DataFrame. You can see that the index has been set in the memory. Now check to see if it has modified the original DataFrame or not:

top_movies.head()

First five row of the DataFrame

As you can see, there’s no change in the original DataFrame. The set_index method only created the change in a completely new DataFrame in memory, which you could have saved in a new DataFrame. Now see how it works when you pass the inplace parameter:

top_movies.set_index('Rank', inplace=True)

Pass inplace=True to the method and check the original DataFrame:

top_movies.head()

New DataFrame

As you can see, passing inplace=True did modify the original DataFrame. Not all methods require the use of the inplace parameter to modify the original DataFrame. For example, the rename(columns) method modifies the original DataFrame without the inplace parameter:

top_movies.rename(columns = {'Year': 'Release Year'}).head()

Renamed Columns Pandas DataFrame

It’s a good idea to get familiar with the methods that need inplace and the ones that don’t.

The groupby Method

In this section, you’ll learn about using the groupby method to split and aggregate data into groups. You’ll see how the groupby method works by breaking it into parts. The groupby method will be demonstrated in this section with statistical and other methods. You’ll also learn how to do interesting things with the groupby method’s ability to iterate over the group data.

Start by importing the pandas module into your Jupyter notebook, as you did in the previous section:

import pandas as pd

Then read your CSV dataset:

data = pd.read_table('data-zillow.csv', sep=',')
data.head()

Start by asking a question, and see if Pandas’ groupby method can help you get the answer. You want to get the mean Price value of every State:

grouped_data = data[['State', 'Price']].groupby('State').mean()
grouped_data.head()

Here, you used the groupby method for aggregating the data by states, and got the mean Price per State. In the background, the groupby method split the data into groups; you then applied the function on the split data, and the result was put together and displayed.

Time to break this code into individual pieces to see what happens under the rug. First, splitting into groups is done as follows:

grouped_data = data[['State', 'Price']].groupby('State')

You selected a subset of data that has only State and Price columns. You then called the groupby method on this data, and passed it in the State column, as that is the column you want the data to be grouped by. Then, you stored the data in an object. Print out this data using the list method:

list(grouped_data)

Now, you have the data groups based on date. Next, apply a function on the displayed data, and display the combined result:

grouped_data.mean().head()

You used the mean method to get the mean of the prices. After the data is split into groups, you can use Pandas methods to get some interesting information on these groups. For example, here, you get descriptive statistical information on each state separately:

grouped_data.describe()

You can also use groupby on multiple columns. For example, here, you’re grouping by the State and RegionName columns, as follows:

grouped_data = data[['State',
                     'RegionName', 
                     'Price']].groupby(['State', 'RegionName']).mean()

You can also get the number of records per State through the groupby and size methods, as follows:

grouped_data = data.groupby(['State']).size()

In all the code demonstrated in this section so far, the data has been grouped by rows. However, you can also group by columns. In the following example, this is done by passing the axis parameter set to 1:

grouped_data = data.groupby(data.dtypes, axis=1)
list(grouped_data)


You can also iterate over the split groups, and do interesting things with them, as follows:

for state, grouped_data in data.groupby('State'):
    print(state, '\n', grouped_data)

Here, you iterate over the group data by State and publish the result with State as the heading, followed by a table of all the records from that State.

Handling Missing Values in Pandas

In this section, you’ll see how to use various pandas techniques to handle the missing data in your datasets. You’ll learn how to find out how much data is missing, and from which columns. You’ll see how to drop the rows or columns where a lot of records are missing data. You’ll also learn how, instead of dropping data, you can fill in the missing records with zeros or the mean of the remaining values.

Start by importing the pandas module into your Jupyter notebook:

import pandas as pd

Then read in your CSV dataset:

data = pd.read_csv('data-titanic.csv')
data.head()

This dataset is the Titanic’s passenger survival dataset, available for download from Kaggle at https://www.kaggle.com/c/titanic/data.

Now take a look at how many records are missing first. To do this, you first need to find out the total number of records in the dataset. You can do this by calling the shape property on the DataFrame:

data.shape

You can see that the total number of records is 891 and that the total number of columns is 12.

Then it’s time to find out the number of records in each column. You can do this by calling the count method on the DataFrame:

data.count()

The difference between the total records and the count per column represents the number of records missing from that column. Out of the 12 columns, you have 3 columns where values are missing. For example, Age has only 714 values out of a total of 891 rows; Cabin has values for only 204 records; and Embarked has values for 889 records.

There are different ways of handling these missing values. One of the ways is to drop any row where a value is missing, even from a single column, as follows:

data_missing_dropped = data.dropna()
data_missing_dropped.shape

When you run this method, you assign the results back into a new DataFrame. This leaves you with just 183 records out of a total of 891. However, this may lead to losing a lot of the data, and may not be acceptable.

Another method is to drop only those rows where all the values are missing. Here’s an example:

data_all_missing_dropped = data.dropna(how="all")
data_all_missing_dropped.shape

You do this by setting the how parameter for the dropna method to all.

Instead of dropping rows, another method is to fill in the missing values with some data. You can fill in the missing values with 0, for example, as in the following screenshot:

data_filled_zeros = data.fillna(0)
data_filled_zeros.count()

Here, you’ve used the fillna method and passed the numeric value of 0 to the column you want to fill the data in. You can see that you have now filled all the missing values with 0, which is why the count for all the columns has gone up to the total number of count of records in the dataset.

Also, instead of filling in missing values with 0, you could fill them with the mean of the remaining existing values. To do so, call the fillna method on the column where you want to fill the values in and pass the mean of the column as the parameter:

data_filled_in_mean = data.copy()
data_filled_in_mean.Age.fillna(data.Age.mean(), inplace=True)
data_filled_in_mean.count()

For example, here, you filled in the missing value of Age with the mean of the existing values.

If you found this article interesting and want to learn more about data analysis, you can explore Mastering Exploratory Analysis with pandas, an end-to-end guide to exploratory analysis for budding data scientists. Filled with several hands-on examples, the book is the ideal resource for data scientists as well as Python developers looking to step into the world of exploratory analysis. 

The post Data Manipulation with Pandas: A Brief Tutorial appeared first on Erik Marsja.

Nigel Babu: Testing Ansible With Molecule

$
0
0

My colleague was recently assigned a task to create tests for an ansible role that she works on. She pinged me for help and we got started in figuring out what to do.

The first thing we attempted was to run tests inside docker using Ansible following the instructions in an Ansible.com blog post. The idea was we would run the role we wanted to test. Then run a second test playbook that would do a couple of asserts. I was stuck here for a bit for various reasons. The containers that are used in the blog post have not been updated in over a year. And we ran into some trouble trying to find a container with systemd running inside that was also public. The right way to do that would be to generate the container using a Dockerfile on the fly and run tests inside them. That was okay with me, but it added more complexity.

For two days or so, I briefly looked at the idea of doing this in VMs generated on the fly, but it added way too much overhead. Michael, my colleague, pointed me to molecule. His team has been using it regularly, though he himself hasn’t looked at it.

Molecule is an interesting project. It seems to do what I need, but there isn’t spectacular documentation on how to use it for a project that already exists. There are ascii videos, but I’m a fan of reading more than watching. Getting molecule to work on Fedora 28 was a bit of a pain. Ansible needs libselinux-python to work with Docker on a host that has selinux enabled. Now, you can’t installed libselinux-python from pip. It has to be installed from packages. I tried installing it in a virtualenv with site packages and installing molecule from packages, both of them failed in interesting ways that I’m yet to debug.

Eventually, I gave up and created a Centos 7 VM for this. A virtualenv with site packages actually worked inside my Centos 7 VM. This is great news, because this is the sort environment I expect to run molecule. The bit I really like about molecule is that it takes care of the harness and I can write asserts in Python. The tests will actually look like what Python tests look like. The bit I don’t like is that its documentation isn’t as thorough as I’d like. I plan to submit a pull request for the docs for a full flow on how to write tests with molecule. I found various blog posts on the internet that were far helpful. It took some guess work to realize that testinfra is it’s own python module and I should be looking at the module for documentation on how to write my own asserts. This is still a work in progress, but I expect a lot of our ansible pieces will end up being better tested now that we have this in place.

Test and Code: 52: pyproject.toml : the future of Python packaging - Brett Cannon

$
0
0

Brett Cannon discusses the changes afoot in Python packaging as a result of PEP 517, PEP 518, starting with "How did we get here?" and "Where are we going?"

Discussed:

  • flit
  • Poetry
  • tox
  • Continuous Integration
  • setup.py, MANIFEST.in, etc.
  • pipenv
  • what's with lock files
  • applications (doesn't go on PyPI) vs libraries (goes on PyPI)
  • workflows
  • dependency resolution
  • deployment dependencies vs development dependencies
  • will lock files be standarized
  • multiple lock files
  • requirements.txt

Special Guest: Brett Cannon.

Sponsored By:

Support Test and Code

Links:

<p>Brett Cannon discusses the changes afoot in Python packaging as a result of PEP 517, PEP 518, starting with &quot;How did we get here?&quot; and &quot;Where are we going?&quot;</p> <p>Discussed:</p> <ul> <li>flit</li> <li>Poetry</li> <li>tox</li> <li>Continuous Integration</li> <li>setup.py, MANIFEST.in, etc.</li> <li>pipenv</li> <li>what&#39;s with lock files</li> <li>applications (doesn&#39;t go on PyPI) vs libraries (goes on PyPI)</li> <li>workflows</li> <li>dependency resolution</li> <li>deployment dependencies vs development dependencies</li> <li>will lock files be standarized</li> <li>multiple lock files</li> <li>requirements.txt</li> </ul><p>Special Guest: Brett Cannon.</p><p>Sponsored By:</p><ul><li><a rel="nofollow" href="https://do.co/testandcode">DigitalOcean</a>: <a rel="nofollow" href="https://do.co/testandcode">Get started with a free $100 credit toward your first project on DigitalOcean and experience everything the platform has to offer, such as: cloud firewalls, real-time monitoring and alerts, global datacenters, object storage, and the best support anywhere. Claim your credit today at: do.co/testandcode</a></li></ul><p><a rel="payment" href="https://www.patreon.com/testpodcast">Support Test and Code</a></p><p>Links:</p><ul><li><a title="Flit" rel="nofollow" href="https://flit.readthedocs.io/en/latest/">Flit</a></li><li><a title="Poetry" rel="nofollow" href="https://poetry.eustace.io/">Poetry</a></li><li><a title="Python Bytes #100 : The big 100 with special guests " rel="nofollow" href="https://pythonbytes.fm/episodes/show/100/the-big-100-with-special-guests">Python Bytes #100 : The big 100 with special guests </a></li><li><a title="PEP 517 -- A build-system independent format for source trees | Python.org" rel="nofollow" href="https://www.python.org/dev/peps/pep-0517/">PEP 517 -- A build-system independent format for source trees | Python.org</a></li><li><a title="PEP 518 -- Specifying Minimum Build System Requirements for Python Projects | Python.org" rel="nofollow" href="https://www.python.org/dev/peps/pep-0518/">PEP 518 -- Specifying Minimum Build System Requirements for Python Projects | Python.org</a></li></ul>

Mike Driscoll: The Ultimate Programmer Super Stack Bundle

$
0
0

I recently had the opportunity to get my second book, Python 201: Intermediate Python added to a bundle of other interesting programming books.

It is called The Ultimate Programmer Super Stack and it is is a hand-curated collection of 25+ premium ecourses, bestselling ebooks, and bonus resources that will help new programmers:


  1. Learn a wide range of today’s most popular (and lucrative) languages and frameworks, including everything from Python, JavaScript, and Ruby, to HTML, CSS, and Kotlin, and more…
  2. Discover how to build APIs, websites, and iOS and Android applications from scratch
  3. Uncover the ‘Business of Software’ (how computer programs work, how computer programmers think, and how to start your very own computer programming business)
  4. Master the soft skills you need to become ‘Coder Complete’ (this stuff will have a huge impact on your career, believe me)


And much more.

Here are just a few highlights that you’ll find inside the Stack:

  1. “Python Tricks: A Buffet of Awesome Python Features” by Dan Bader (retail value: $29.00). Dan is the founder of Realpython.com, where his articles, videos, and trainings have reached over one million developers around the world. This is one of his bestselling books a great place to start whether you’re brand new to Python, or looking to master the craft and become a certified Pythonista.
  2. “Build APIs You Won’t Hate” by Phil Sturgeon (retail value: $26.99). Phil is an API designer and systems architect, currently helping WeWorK to scale their APIs to handle more traffic, be more resistant to change, and not fall like dominoes when one of them has a bad time. Phil is regarded as one of the leading experts on API’s, and this book is like a deep dive into his brain.
  3. “The Top 1% Developer – iOS Edition” by Grant Klimaytys (retail value: $197.00). Grant is the founder of Learn App Development, where he’s coached over 120,000 students worldwide on how to become professional app developers. Inside this premium course, you will learn how to code for iPhone from scratch, understand the basics of software creation (applicable to any language), and even create your own apps to start earning passive income on the App Store (winner winner, chicken dinner!)

 Check it out here

Catalin George Festila: Python Qt5 - QColorDialog example.

$
0
0
Today I will show you how to use the QColorDialog and clipboard with PyQt5.
You can read documentation from the official website.
This example used a tray icon with actions for each type of code color.
The code of color is put into clipboard area and print on the shell.
I use two ways to get the code of color:
  • parse the result of currentColor depends by type of color codel;
  • get the code of color by a special function from QColorDialog;
To select the color I want to use is need to use the QColorDialog:

Let's see the source code:
from PyQt5.QtGui import *
from PyQt5.QtWidgets import *

# create the application
app = QApplication([])
app.setQuitOnLastWindowClosed(False)

# get the icon file
icon = QIcon("icon.png")

# create clipboard
clipboard = QApplication.clipboard()
# create dialog color
dialog = QColorDialog()

# create functions to get parsing color
def get_color_hex():
if dialog.exec_():
color = dialog.currentColor()
clipboard.setText(color.name())
print(clipboard.text())

def get_color_rgb():
if dialog.exec_():
color = dialog.currentColor()
clipboard.setText("rgb(%d, %d, %d)" % (
color.red(), color.green(), color.blue()
))
print(clipboard.text())

def get_color_hsv():
if dialog.exec_():
color = dialog.currentColor()
clipboard.setText("hsv(%d, %d, %d)" % (
color.hue(), color.saturation(), color.value()
))
print(clipboard.text())
# create function to use getCmyk
def get_color_getCmyk():
if dialog.exec_():
color = dialog.currentColor()
clipboard.setText("Cmyk(%d, %d, %d, %d, %d)" % (
color.getCmyk()
))
print(clipboard.text())


# create the tray icon application
tray = QSystemTrayIcon()
tray.setIcon(icon)
tray.setVisible(True)

# create the menu and add actions
menu = QMenu()
action1 = QAction("Hex")
action1.triggered.connect(get_color_hex)
menu.addAction(action1)

action2 = QAction("RGB")
action2.triggered.connect(get_color_rgb)
menu.addAction(action2)

action3 = QAction("HSV")
action3.triggered.connect(get_color_hsv)
menu.addAction(action3)

action4 = QAction("Cmyk")
action4.triggered.connect(get_color_getCmyk)
menu.addAction(action4)

action5 =QAction("Exit")
action5.triggered.connect(exit)
menu.addAction(action5)

# add the menu to the tray icon application
tray.setContextMenu(menu)

app.exec_()

Python Celery - Weekly Celery Tutorials and How-tos: Quick Guide: Custom Celery Task Logger

$
0
0

I previously wrote about how to customise your Celery log handlers. But there is another Celery logger, the celery.task logger. The celery.task logger is a special logger set up by the Celery worker. Its goal is to add task-related information to the log messages. It exposes two new parameters:

  • task_id
  • task_name

This is useful because it helps you understand which task a log message comes from. The task logger is available via celery.utils.log.

# tasks.py
import os
from celery.utils.log import get_task_logger
from worker import app


logger = get_task_logger(__name__)


@app.task()
def add(x, y):
    result = x + y
    logger.info(f'Add: {x} + {y} = {result}')
    return result

Executing the add task with get_task_logger produces the following log output.

[2018-11-06 07:30:13,545: INFO/MainProcess] Received task: tasks.get_request[9c332222-d2fc-47d9-adc3-04cebbe145cb]
[2018-11-06 07:30:13,546: INFO/MainProcess] tasks.get_request[9c332222-d2fc-47d9-adc3-04cebbe145cb]: Add: 3 + 5 = 8
[2018-11-06 07:30:13,598: INFO/MainProcess] Task tasks.get_request[9c332222-d2fc-47d9-adc3-04cebbe145cb] succeeded in 0.052071799989789724s: None

If your Celery application processes many tasks, the celery.task logger is almost indispensable to make sense of your log output. Compare this to the log message generated by the standard logging.getLogger:

[2018-11-06 07:33:16,140: INFO/MainProcess] Received task: tasks.get_request[7d2ec1a7-0af2-4e8c-8354-02cd0975c906]
[2018-11-06 07:33:16,140: INFO/MainProcess] Add: 3 + 5 = 8
[2018-11-06 07:33:16,193: INFO/MainProcess] Task tasks.get_request[7d2ec1a7-0af2-4e8c-8354-02cd0975c906] succeeded in 0.052330999984405935s: None

How to customise the celery.task log format

How do you customise the celery.task log message format? Remember how you customise the Celery logger using the after_setup_logger signal? There is a similar signal for the celery.task logger. The after_setup_task_logger signal gets triggered as soon as Celery worker has set up the celery.task logger. This is the signal we want to connect to in order to customise the log formatter.

There is one gotcha: In order to get access to task_id and task_name, you have to use celery.app.log.TaskFormatter instead of logging.Formatter. celery.app.log.TaskFormatter is an extension of logging.Formatter and gets a reference to the current Celery task at runtime (check out the source code if you want to take a deeper dive).

# worker.py
import os
from celery import Celery
from celery.signals import after_setup_task_logger
from celery.app.log import TaskFormatter


app = Celery()


@after_setup_task_logger.connect
def setup_task_logger(logger, *args, **kwargs):
    for handler in logger.handlers:
        handler.setFormatter(TaskFormatter('%(asctime)s - %(task_id)s - %(task_name)s - %(name)s - %(levelname)s - %(message)s'))

How to get the task_id using the standard logger?

The celery.task logger works great for anything which is definitely a Celery task. But what about lower-level code? Models, for example, are usually used both in a Celery and non-Celery context. If your front-of-the-house is a Flask web application, your models can be used either in the Flask or Celery process.

# models.py
import logging

from passlib.hash import sha256_crypt
from sqlalchemy.dialects.postgresql import UUID
from sqlalchemy.orm import validates
from sqlalchemy import text
from . import db


logger = logging.getLogger(__name__)


class User(db.Model):
    __tablename__ = 'users'
    id = db.Column(UUID(as_uuid=True), primary_key=True, server_default=text("uuid_generate_v4()"))
    name = db.Column(db.String(64), unique=False, nullable=True)
    email = db.Column(db.String(256), unique=True, nullable=False)

    @validates('email')
    def validate_email(self, key, value):
        logger.info(f'Validate email address: {value}')
        if value is not None:
            assert '@' in value
            return value.lower()

Your lower-level code should not care in which context it runs. You do not want to pollute it with a Celery-specific logger implementation. What you do want is to get the Celery task id in the log message when validate_email is called from within a Celery task. And no task id when validate_email is called from within Flask.

Good news is, you can do this with a simple trick. celery.app.log.TaskFormatter does the magic that injects task_id and task_name. It does so by calling celery._state.get_current_task. If celery._state.get_current_task is executed outside a Celery task, it simply returns None. When the task is Nonecelery.app.log.TaskFormatter handles by printing ??? instead of the task_id and task_name. This means you can safely create your log handler outside Celery using _celery.app.log.TaskFormatter.

import logging
from celery.app.log import TaskFormatter

logger = logging.getLogger()
sh = logging.StreamHandler()
sh.setFormatter(TaskFormatter('%(asctime)s - %(task_id)s - %(task_name)s - %(name)s - %(levelname)s - %(message)s'))
logger.setLevel(logging.INFO)
logger.addHandler(sh)

If you don’t like the ??? defaults or the fact that you have to import from celery.app.log, write your own custom task formatter.

import logging


class TaskFormatter(logging.Formatter):

    def __init__(self, *args, **kwargs):
        super().__init__(*args, **kwargs)
        try:
            from celery._state import get_current_task
            self.get_current_task = get_current_task
        except ImportError:
            self.get_current_task = lambda: None

    
    def format(self, record):
        task = self.get_current_task()
        if task and task.request:
            record.__dict__.update(task_id=task.request.id,
                                   task_name=task.name)
        else:
            record.__dict__.setdefault('task_name', '')
            record.__dict__.setdefault('task_id', '')
        return super().format(record)

logger = logging.getLogger()
sh = logging.StreamHandler()
sh.setFormatter(TaskFormatter('%(asctime)s - %(task_id)s - %(task_name)s - %(name)s - %(levelname)s - %(message)s'))
logger.setLevel(logging.INFO)
logger.addHandler(sh)

This custom TaskFormatter works with logging.getLogger. It imports celery._state.get_current_task if celery is present, otherwise not. If it runs inside a Celery worker process, it injects the task id and the task name, otherwise not. It just works.


Stack Abuse: Applying Wrapper Methods in Python for Feature Selection

$
0
0

Introduction

In the previous article, we studied how we can use filter methods for feature selection for machine learning algorithms. Filter methods are handy when you want to select a generic set of features for all the machine learning models.

However, in some scenarios, you may want to use a specific machine learning algorithm to train your model. In such cases, features selected through filter methods may not be the most optimal set of features for that specific algorithm. There is another category of feature selection methods that select the most optimal features for the specified algorithm. Such methods are called wrapper methods.

Wrapper Methods for Feature Selection

Wrapper methods are based on greedy search algorithms as they evaluate all possible combinations of the features and select the combination that produces the best result for a specific machine learning algorithm. A downside to this approach is that testing all possible combinations of the features can be computationally very expensive, particularly if the feature set is very large.

As said earlier, wrapper methods can find the best set of features for a specific algorithm - however, a downside is that these set of features may not be optimal for every other machine learning algorithm.

Wrapper methods for feature selection can be divided into three categories: Step forward feature selection, Step backwards feature selection and Exhaustive feature selection. In this article, we will see how we can implement these feature selection approaches in Python.

Step Forward Feature Selection

In the first phase of the step forward feature selection, the performance of the classifier is evaluated with respect to each feature. The feature that performs the best is selected out of all the features.

In the second step, the first feature is tried in combination with all the other features. The combination of two features that yield the best algorithm performance is selected. The process continues until the specified number of features are selected.

Let's implement step forward feature selection in Python. We will be using the BNP Paribas Cardif Claims Management dataset for this section as we did in our previous article.

To implement step forward feature selection, we need to convert categorical feature values into numeric feature values. However, for the sake of simplicity, we will remove all the non-categorical columns from our data. We will also remove the correlated columns as we did in the previous article so that we have a small feature set to process.

Data Preprocessing

The following script imports the dataset and the required libraries, it then removes the non-numeric columns from the dataset and then divides the dataset into training and testing sets. Finally, all the columns with a correlation of greater than 0.8 are removed. Take a look at this article for the detailed explanation of this script:

import pandas as pd  
import numpy as np  
from sklearn.model_selection import train_test_split  
from sklearn.feature_selection import VarianceThreshold

paribas_data = pd.read_csv(r"E:\Datasets\paribas_data.csv", nrows=20000)  
paribas_data.shape

num_colums = ['int16', 'int32', 'int64', 'float16', 'float32', 'float64']  
numerical_columns = list(paribas_data.select_dtypes(include=num_colums).columns)  
paribas_data = paribas_data[numerical_columns]  
paribas_data.shape

train_features, test_features, train_labels, test_labels = train_test_split(  
    paribas_data.drop(labels=['target', 'ID'], axis=1),
    paribas_data['target'],
    test_size=0.2,
    random_state=41)

correlated_features = set()  
correlation_matrix = paribas_data.corr()  
for i in range(len(correlation_matrix .columns)):  
    for j in range(i):
        if abs(correlation_matrix.iloc[i, j]) > 0.8:
            colname = correlation_matrix.columns[i]
            correlated_features.add(colname)


train_features.drop(labels=correlated_features, axis=1, inplace=True)  
test_features.drop(labels=correlated_features, axis=1, inplace=True)

train_features.shape, test_features.shape  
Implementing Step Forward Feature Selection in Python

To select the most optimal features, we will be using SequentialFeatureSelector function from the mlxtend library. The library can be downloaded executing the following command at anaconda command prompt:

conda install -c conda-forge mlxtend  

We will use the Random Forest Classifier to find the most optimal parameters. The evaluation criteria used will be ROC-AUC. The following script selects the 15 features from our dataset that yields best performance for random forest classifier:

from sklearn.ensemble import RandomForestRegressor, RandomForestClassifier  
from sklearn.metrics import roc_auc_score

from mlxtend.feature_selection import SequentialFeatureSelector

feature_selector = SequentialFeatureSelector(RandomForestClassifier(n_jobs=-1),  
           k_features=15,
           forward=True,
           verbose=2,
           scoring='roc_auc',
           cv=4)

In the script above we pass the RandomForestClassifieras the estimator to the SequentialFeatureSelector function. The k_features specifies the number of features to select. You can set any number of features here. The forward parameter, if set to True, performs step forward feature selection. The verbose parameter is used for logging the progress of the feature selector, the scoring parameter defines the performance evaluation criteria and finally, cv refers to cross-validation folds.

We created our feature selector, now we need to call the fit method on our feature selector and pass it the training and test sets as shown below:

features = feature_selector.fit(np.array(train_features.fillna(0)), train_labels)  

Depending upon your system hardware, the above script can take some time to execute. Once the above script finishes executing, you can execute the following script to see the 15 selected features:

filtered_features= train_features.columns[list(features.k_feature_idx_)]  
filtered_features  

In the output, you should see the following features:

Index(['v4', 'v10', 'v14', 'v15', 'v18', 'v20', 'v23', 'v34', 'v38', 'v42',  
       'v50', 'v51', 'v69', 'v72', 'v129'],
      dtype='object')

Now to see the classification performance of the random forest algorithm using these 15 features, execute the following script:

clf = RandomForestClassifier(n_estimators=100, random_state=41, max_depth=3)  
clf.fit(train_features[filtered_features].fillna(0), train_labels)

train_pred = clf.predict_proba(train_features[filtered_features].fillna(0))  
print('Accuracy on training set: {}'.format(roc_auc_score(train_labels, train_pred[:,1])))

test_pred = clf.predict_proba(test_features[filtered_features].fillna(0))  
print('Accuracy on test set: {}'.format(roc_auc_score(test_labels, test_pred [:,1])))  

In the script above, we train our random forest algorithm on the 15 features that we selected using the step forward feature selection and then we evaluated the performance of our algorithm on the training and testing sets. In the output, you should see the following results:

Accuracy on training set: 0.7072327148174093  
Accuracy on test set: 0.7096973252804142  

You can see that the accuracy on training and test sets is pretty similar which means that our model is not overfitting.

Step Backwards Feature Selection

Step backwards feature selection, as the name suggests is the exact opposite of step forward feature selection that we studied in the last section. In the first step of the step backwards feature selection, one feature is removed in round-robin fashion from the feature set and the performance of the classifier is evaluated.

The feature set that yields the best performance is retained. In the second step, again one feature is removed in a round-robin fashion and the performance of all the combination of features except the 2 features is evaluated. This process continues until the specified number of features remain in the dataset.

Step Backwards Feature Selection in Python

In this section, we will implement the step backwards feature selection on the BNP Paribas Cardif Claims Management. The preprocessing step will remain the same as the previous section. The only change will be in the forward parameter of the SequentiaFeatureSelector class. In case of the step backwards feature selection, we will set this parameter to False. Execute the following script:

from sklearn.ensemble import RandomForestRegressor, RandomForestClassifier  
from sklearn.metrics import roc_auc_score  
from mlxtend.feature_selection import SequentialFeatureSelector

feature_selector = SequentialFeatureSelector(RandomForestClassifier(n_jobs=-1),  
           k_features=15,
           forward=False,
           verbose=2,
           scoring='roc_auc',
           cv=4)

features = feature_selector.fit(np.array(train_features.fillna(0)), train_labels)  

To see the feature selected as a result of step backwards elimination, execute the following script:

filtered_features= train_features.columns[list(features.k_feature_idx_)]  
filtered_features  

The output looks like this:

Index(['v7', 'v8', 'v10', 'v17', 'v34', 'v38', 'v45', 'v50', 'v51', 'v61',  
       'v94', 'v99', 'v119', 'v120', 'v129'],
      dtype='object')

Finally, let's evaluate the performance of our random forest classifier on the features selected as a result of step backwards feature selection. Execute the following script:

clf = RandomForestClassifier(n_estimators=100, random_state=41, max_depth=3)  
clf.fit(train_features[filtered_features].fillna(0), train_labels)

train_pred = clf.predict_proba(train_features[filtered_features].fillna(0))  
print('Accuracy on training set: {}'.format(roc_auc_score(train_labels, train_pred[:,1])))

test_pred = clf.predict_proba(test_features[filtered_features].fillna(0))  
print('Accuracy on test set: {}'.format(roc_auc_score(test_labels, test_pred [:,1])))  

The output looks likes that:

Accuracy on training set: 0.7095207938140247  
Accuracy on test set: 0.7114624676445211  

You can see that the performance achieved on the training set is similar to that achieved using step forward feature selection. However, on the test set, backward feature selection performed slightly better.

Exhaustive Feature Selection

In exhaustive feature selection, the performance of a machine learning algorithm is evaluated against all possible combinations of the features in the dataset. The feature subset that yields best performance is selected. The exhaustive search algorithm is the most greedy algorithm of all the wrapper methods since it tries all the combination of features and selects the best.

A downside to exhaustive feature selection is that it can be slower compared to step forward and step backward method since it evaluates all feature combinations.

Exhaustive Feature Selection in Python

In this section, we will implement the step backwards feature selection on the BNP Paribas Cardif Claims Management. The preprocessing step will remain the similar to that of Step forward feature selection.

To implement exhaustive feature selection, we will be using ExhaustiveFeatureSelector function from the mlxtend.feature_selection library. The class has min_featuresand max_features attributes which can be used to specify the minimum and the maximum number of features in the combination.

Execute the following script:

from mlxtend.feature_selection import ExhaustiveFeatureSelector  
from sklearn.ensemble import RandomForestRegressor, RandomForestClassifier  
from sklearn.metrics import roc_auc_score

feature_selector = ExhaustiveFeatureSelector(RandomForestClassifier(n_jobs=-1),  
           min_features=2,
           max_features=4,
           scoring='roc_auc',
           print_progress=True,
           cv=2)

We created our feature selector, now need to call the fit method on our feature selector and pass it the training and test sets as shown below:

features = feature_selector.fit(np.array(train_features.fillna(0)), train_labels)  

Note that the above script can take quite a bit of time to execute. To see the feature selected as a result of step backwards elimination, execute the following script:

filtered_features= train_features.columns[list(features.k_feature_idx_)]  
filtered_features  

Finally, to see the performance of random forest classifier on the features selected as a result of exhaustive feature selection. Execute the following script:

clf = RandomForestClassifier(n_estimators=100, random_state=41, max_depth=3)  
clf.fit(train_features[filtered_features].fillna(0), train_labels)

train_pred = clf.predict_proba(train_features[filtered_features].fillna(0))  
print('Accuracy on training set: {}'.format(roc_auc_score(train_labels, train_pred[:,1])))

test_pred = clf.predict_proba(test_features[filtered_features].fillna(0))  
print('Accuracy on test set: {}'.format(roc_auc_score(test_labels, test_pred [:,1])))  

Conclusion

Wrapper methods are some of the most important algorithms used for feature selection for a specific machine learning algorithm. In this article, we studied different types of wrapper methods along with their practical implementation. We studied step forward, step backwards and exhaustive methods for feature selection.

As a rule of thumb, if the dataset is small, exhaustive feature selection method should be the choice, however, in case of large datasets, step forward or step backward feature selection methods should be preferred.

PyCoder’s Weekly: Issue #341 (Nov. 6, 2018)

$
0
0
Come work on PyPI, the future of Python packaging, and more body,#bodyTable,#bodyCell{ height:100% !important; margin:0; padding:0; width:100% !important; } table{ border-collapse:collapse; } img,a img{ border:0; outline:none; text-decoration:none; } h1,h2,h3,h4,h5,h6{ margin:0; padding:0; } p{ margin:1em 0; padding:0; } a{ word-wrap:break-word; } .mcnPreviewText{ display:none !important; } .ReadMsgBody{ width:100%; } .ExternalClass{ width:100%; } .ExternalClass,.ExternalClass p,.ExternalClass span,.ExternalClass font,.ExternalClass td,.ExternalClass div{ line-height:100%; } table,td{ mso-table-lspace:0pt; mso-table-rspace:0pt; } #outlook a{ padding:0; } img{ -ms-interpolation-mode:bicubic; } body,table,td,p,a,li,blockquote{ -ms-text-size-adjust:100%; -webkit-text-size-adjust:100%; } #bodyCell{ padding:0; } .mcnImage,.mcnRetinaImage{ vertical-align:bottom; } .mcnTextContent img{ height:auto !important; } body,#bodyTable{ background-color:#F2F2F2; } #bodyCell{ border-top:0; } h1{ color:#555 !important; display:block; font-family:Helvetica; font-size:40px; font-style:normal; font-weight:bold; line-height:125%; letter-spacing:-1px; margin:0; text-align:left; } h2{ color:#404040 !important; display:block; font-family:Helvetica; font-size:26px; font-style:normal; font-weight:bold; line-height:125%; letter-spacing:-.75px; margin:0; text-align:left; } h3{ color:#555 !important; display:block; font-family:Helvetica; font-size:18px; font-style:normal; font-weight:bold; line-height:125%; letter-spacing:-.5px; margin:0; text-align:left; } h4{ color:#808080 !important; display:block; font-family:Helvetica; font-size:16px; font-style:normal; font-weight:bold; line-height:125%; letter-spacing:normal; margin:0; text-align:left; } #templatePreheader{ background-color:#3399cc; border-top:0; border-bottom:0; } .preheaderContainer .mcnTextContent,.preheaderContainer .mcnTextContent p{ color:#ffffff; font-family:Helvetica; font-size:11px; line-height:125%; text-align:left; } .preheaderContainer .mcnTextContent a{ color:#ffffff; font-weight:normal; text-decoration:underline; } #templateHeader{ background-color:#FFFFFF; border-top:0; border-bottom:0; } .headerContainer .mcnTextContent,.headerContainer .mcnTextContent p{ color:#555; font-family:Helvetica; font-size:15px; line-height:150%; text-align:left; } .headerContainer .mcnTextContent a{ color:#6DC6DD; font-weight:normal; text-decoration:underline; } #templateBody{ background-color:#FFFFFF; border-top:0; border-bottom:0; } .bodyContainer .mcnTextContent,.bodyContainer .mcnTextContent p{ color:#555; font-size:16px; line-height:150%; text-align:left; margin: 0 0 1em 0; } .bodyContainer .mcnTextContent a{ color:#6DC6DD; font-weight:normal; text-decoration:underline; } #templateFooter{ background-color:#F2F2F2; border-top:0; border-bottom:0; } .footerContainer .mcnTextContent,.footerContainer .mcnTextContent p{ color:#555; font-family:Helvetica; font-size:11px; line-height:125%; text-align:left; } .footerContainer .mcnTextContent a{ color:#555; font-weight:normal; text-decoration:underline; } @media only screen and (max-width: 480px){ body,table,td,p,a,li,blockquote{ -webkit-text-size-adjust:none !important; } } @media only screen and (max-width: 480px){ body{ width:100% !important; min-width:100% !important; } } @media only screen and (max-width: 480px){ .mcnRetinaImage{ max-width:100% !important; } } @media only screen and (max-width: 480px){ table[class=mcnTextContentContainer]{ width:100% !important; } } @media only screen and (max-width: 480px){ .mcnBoxedTextContentContainer{ max-width:100% !important; min-width:100% !important; width:100% !important; } } @media only screen and (max-width: 480px){ table[class=mcpreview-image-uploader]{ width:100% !important; display:none !important; } } @media only screen and (max-width: 480px){ img[class=mcnImage]{ width:100% !important; } } @media only screen and (max-width: 480px){ table[class=mcnImageGroupContentContainer]{ width:100% !important; } } @media only screen and (max-width: 480px){ td[class=mcnImageGroupContent]{ padding:9px !important; } } @media only screen and (max-width: 480px){ td[class=mcnImageGroupBlockInner]{ padding-bottom:0 !important; padding-top:0 !important; } } @media only screen and (max-width: 480px){ tbody[class=mcnImageGroupBlockOuter]{ padding-bottom:9px !important; padding-top:9px !important; } } @media only screen and (max-width: 480px){ table[class=mcnCaptionTopContent],table[class=mcnCaptionBottomContent]{ width:100% !important; } } @media only screen and (max-width: 480px){ table[class=mcnCaptionLeftTextContentContainer],table[class=mcnCaptionRightTextContentContainer],table[class=mcnCaptionLeftImageContentContainer],table[class=mcnCaptionRightImageContentContainer],table[class=mcnImageCardLeftTextContentContainer],table[class=mcnImageCardRightTextContentContainer],.mcnImageCardLeftImageContentContainer,.mcnImageCardRightImageContentContainer{ width:100% !important; } } @media only screen and (max-width: 480px){ td[class=mcnImageCardLeftImageContent],td[class=mcnImageCardRightImageContent]{ padding-right:18px !important; padding-left:18px !important; padding-bottom:0 !important; } } @media only screen and (max-width: 480px){ td[class=mcnImageCardBottomImageContent]{ padding-bottom:9px !important; } } @media only screen and (max-width: 480px){ td[class=mcnImageCardTopImageContent]{ padding-top:18px !important; } } @media only screen and (max-width: 480px){ td[class=mcnImageCardLeftImageContent],td[class=mcnImageCardRightImageContent]{ padding-right:18px !important; padding-left:18px !important; padding-bottom:0 !important; } } @media only screen and (max-width: 480px){ td[class=mcnImageCardBottomImageContent]{ padding-bottom:9px !important; } } @media only screen and (max-width: 480px){ td[class=mcnImageCardTopImageContent]{ padding-top:18px !important; } } @media only screen and (max-width: 480px){ table[class=mcnCaptionLeftContentOuter] td[class=mcnTextContent],table[class=mcnCaptionRightContentOuter] td[class=mcnTextContent]{ padding-top:9px !important; } } @media only screen and (max-width: 480px){ td[class=mcnCaptionBlockInner] table[class=mcnCaptionTopContent]:last-child td[class=mcnTextContent],.mcnImageCardTopImageContent,.mcnCaptionBottomContent:last-child .mcnCaptionBottomImageContent{ padding-top:18px !important; } } @media only screen and (max-width: 480px){ td[class=mcnBoxedTextContentColumn]{ padding-left:18px !important; padding-right:18px !important; } } @media only screen and (max-width: 480px){ td[class=mcnTextContent]{ padding-right:18px !important; padding-left:18px !important; } } @media only screen and (max-width: 480px){ table[class=templateContainer]{ max-width:600px !important; width:100% !important; } } @media only screen and (max-width: 480px){ h1{ font-size:24px !important; line-height:125% !important; } } @media only screen and (max-width: 480px){ h2{ font-size:20px !important; line-height:125% !important; } } @media only screen and (max-width: 480px){ h3{ font-size:18px !important; line-height:125% !important; } } @media only screen and (max-width: 480px){ h4{ font-size:16px !important; line-height:125% !important; } } @media only screen and (max-width: 480px){ table[class=mcnBoxedTextContentContainer] td[class=mcnTextContent],td[class=mcnBoxedTextContentContainer] td[class=mcnTextContent] p{ font-size:18px !important; line-height:125% !important; } } @media only screen and (max-width: 480px){ table[id=templatePreheader]{ display:block !important; } } @media only screen and (max-width: 480px){ td[class=preheaderContainer] td[class=mcnTextContent],td[class=preheaderContainer] td[class=mcnTextContent] p{ font-size:14px !important; line-height:115% !important; } } @media only screen and (max-width: 480px){ td[class=headerContainer] td[class=mcnTextContent],td[class=headerContainer] td[class=mcnTextContent] p{ font-size:18px !important; line-height:125% !important; } } @media only screen and (max-width: 480px){ td[class=bodyContainer] td[class=mcnTextContent],td[class=bodyContainer] td[class=mcnTextContent] p{ font-size:18px !important; line-height:125% !important; } } @media only screen and (max-width: 480px){ td[class=footerContainer] td[class=mcnTextContent],td[class=footerContainer] td[class=mcnTextContent] p{ font-size:14px !important; line-height:115% !important; } } @media only screen and (max-width: 480px){ td[class=footerContainer] a[class=utilityLink]{ display:block !important; } }
PSF: Upcoming Contract Work on PyPI
#341 – NOVEMBER 6, 2018
The PyCoder’s Weekly Logo
PSF: Upcoming Contract Work on PyPI
If you have experience with security features or localization features in Python codebases, this is an opportunity to get involved with PyPI. You can register your interest to participate as a contractor online. The project begins in January 2019.
PYTHON SOFTWARE FOUNDATION

The Best Flake8 Extensions for Your Python Project
The flake8 code linter supports plugins that can check for additional rule violations. This post goes into the author’s favorite plugins. I didn’t know flake8-import-order was a thing and I will definitely try this out in my own projects.
JULIEN DANJOU

“Deal With It” Meme GIF Generator Using Python + OpenCV
How to create animated GIFs using OpenCV, Python, and ImageMagick. Super-detailed tutorial and the results are awesome.
ADRIAN ROSEBROCK

Find a Python Job Through Vettery
Vettery specializes in developer roles and is completely free for job seekers. Interested? Submit your profile, and if accepted onto the platform, you can receive interview requests directly from top companies seeking Python developers. Get Started.
VETTERYsponsor

Python 2.7 Halloween Facepaint
Scary!
REDDIT.COM

Writing Comments in Python (Guide)
How to write Python comments that are clean, concise, and useful. Get up to speed on what the best practices are, which types of comments it’s best to avoid, and how you can practice writing cleaner comments.
REAL PYTHON

pyproject.toml: The Future of Python Packaging
Deep dive with Brett Cannon into changes to Python packaging such as pyproject.toml, PEP 517, 518, and the implications of these changes. Lots of things happening in that area and this interview is a great way to stay up to date.
TESTANDCODE.COMpodcast

Crash Reporting in Desktop Python Applications
The Dropbox desktop client is partly written in Python. This post goes into how their engineering teams do live crash-reporting in their desktop app. Also check out the related slide deck.
DROPBOX.COM


Discussions


When to Use @staticmethod vs Writing a Plain Function?
MAIL.PYTHON.ORG

Can a Non-Python-Programmer Set Up a Django Website With a Few Hours of Practice?
REDDIT.COM

Python Interview Question Post-Mortem
The question was how to merge two lists together in Python (without duplicates.) Interviewers want to see a for-loop solution, even though it’s much slower than what the applicant came up with initially. Good read on what to do/what to avoid if you have a coding interview coming up.
REDDIT.COM

I Just Got a $67k Job Before I Even Graduated, All Thanks to Python
REDDIT.COM


Python Jobs


Senior Software Engineer - Full Stack (Raleigh, North Carolina)
SUGARCRM

Head of Engineering (Remote, Work from Anywhere)
FINDKEEP.LOVE

Senior Developer (Chicago, Illinois)
PANOPTA

Senior Software Engineer (Los Angeles, California)
GOODRX

More Python Jobs >>>


Articles & Tutorials


Setting Up Python for Machine Learning on Windows
In this step-by-step tutorial, you’ll cover the basics of setting up a Python numerical computation environment for machine learning on a Windows machine using the Anaconda Python distribution.
REAL PYTHON

Diving Into Pandas Is Faster Than Reinventing It
How modern Pandas makes your life easier by making your code easier to read—and easier to write.
DEAN LANGSAM• Shared by Dean Langsam

“Ultimate Programmer Super Stack” Bundle [90% off]
Become a well-rounded developer with this book & course bundle. Includes 25+ quality resources for less than $2 each. If you’re looking to round out your reading list for the cold months of the year, this is a great deal. Available this week only.
INFOSTACK.IOsponsor

Structure of a Flask Project
Suggestions for the folder structure of a Flask project. Nice and clean!
LEPTURE.COM• Shared by Python Bytes FM

Dockerizing Django With Postgres, Gunicorn, and Nginx
How to configure Django to run on Docker along with PostgreSQL, Nginx, and Gunicorn.
MICHAEL HERMAN

Making Python Project Executables With PEX
PEX files are distributable Python environments you can use to build executables for your project. These executables can then be copied to the target host and executed there without requiring an install step. This tutorial goes into how to build a PEX file for a simple Click CLI app.
PETER DEMIN

I Was Looking for a House, So I Built a Web Scraper in Python
MEDIUM.COM/@FNEVES• Shared by Ricky White

A Gentle Visual Intro to Data Analysis in Python Using Pandas
Short & sweet intro to basic Pandas concepts. Lots of images and visualizations in there make the article an easy read.
JAY ALAMMAR

Packaging and Developing Python Projects With Nested Git-Submodules
Working with repositories that have nested Git submodules of arbitrary depth, in the context of a Python project. Personally I’m having a hard time working effectively with Git submodules, but if they’re a good fit for your use case check out this article.
KONSTANTINOS DEMARTINOS

Python vs NumPy vs Nim Performance Comparison
Also check out the related discussion on Reddit.
NARIMIRAN.GITHUB.IO

Speeding Up JSON Schema Validation in Python
PETERBE.COM

Careful With Negative Assertions
A cautionary tale about testing that things are unequal…
NED BATCHELDER

Data Manipulation With Pandas: A Brief Tutorial
Covers three basic data manipulation techniques with Pandas: Modifying a DataFrame using the inplace parameter, grouping using groupby(), and handling missing data.
ERIK MARSJA

Full-Stack Developers, Unicorns and Other Mythological Beings
What’s a “Full-Stack” developer anyway?
MEDIUM.COM/DATADRIVENINVESTOR• Shared by Ricky White

Writing Custom Celery Task Loggers
The celery.task logger is used for logging task-specific information, which is useful if you need to know which task a log message came from.
BJOERN STIEL

Generating Software Tests Automatically
An online textbook on automating software testing, specifically by generating tests automatically. Covers random fuzzing, mutation-based fuzzing, grammar-based test generation, symbolic testing, and more. Examples use Python.
FUZZINGBOOK.ORG

Custom User Models in Django
How and why to add a custom user model to your Django project.
WSVINCENT.COM• Shared by Ricky White


Projects & Code


Vespene: Python CI/CD and Automation Server Written in Django
VESPENE.IO

zulu: A Drop-In Replacement for Native Python Datetimes That Embraces UTC
A drop-in replacement for native datetime objects that always uses UTC. Makes it easy to reason about zulu objects. Also conveniently parses ISO8601 and timestamps by default without any extra arguments.
DERRICK GILLAND• Shared by Derrick Gilland

My Python Examples (Scripts)
Little scripts and tools written by someone who says they’re “not a programmer.” Maybe the code quality isn’t perfect here—but hey, if you’re looking for problems to solve with Python, why not do something similar or contribute to this project by improving the scripts?
GITHUB.COM/GEEKCOMPUTERS

termtosvg: Record Terminal Sessions as SVG Animations
A Unix terminal recorder written in Python that renders your command line sessions as standalone SVG animations.
GITHUB.COM/NBEDOS

CPython Speed Center
A performance analysis tool for CPython. It shows performance regressions and allows comparing different applications or implementations over time.
SPEED.PYTHON.ORG

ase: Atomic Simulation Environment
A Python library for working with atoms. There’s a library on PyPI for everything…
GITLAB.COM/ASE

Various Pandas Solutions and Examples
PYTHONPROGRAMMING.IN• Shared by @percy_io

pymc-learn: Probabilistic Models for Machine Learning
Uses a familiar scikit-learn syntax.
PYMC-LEARN.ORG

ReviewNB: Jupyter Notebook Diff for GitHub
HTML-rendered diffs for Jupyter Notebooks. Say goodbye to messy JSON diffs and collaborate on notebooks via review comments.
REVIEWNB.COM


Events


Python LX
14 Nov. in Lisbon, Portugal
PYTHON.ORG

PyData Bristol Meetup (Nov 13)
PYTHON.ORG

Python Miami
10 Nov. – 11 Nov. in Miami, FL.
PYTHON.ORG

Happy Pythoning!
Copyright © 2018 PyCoder’s Weekly, All rights reserved.

[ Subscribe to 🐍 PyCoder’s Weekly 💌 – Get the best Python news, articles, and tutorials delivered to your inbox once a week >> Click here to learn more ]

Erik Marsja: Pandas Excel Tutorial: How to Read and Write Excel files

$
0
0

In this tutorial we will learn how to work with Excel files and Python. It will provide an overview of how to use Pandas to load and write these spreadsheets to Excel. In the first section, we will go through, with examples, how to read an Excel file, how to read specific columns from a spreadsheet, how to read multiple spreadsheets and combine them to one dataframe, how to read many Excel files, and, finally, how to convert data according to specific datatypes (e.g., using Pandas dtypes). When we have done this, we will continue by learning how to write Excel files; how to name the sheets and how to write to multiple sheets.

How to Install Pandas

Before we continue with this read and write Excel files tutorial there is something we need to do; installing Pandas (and Python, of course, if it’s not installed). We can install Pandas using Pip, given that we have Pip installed, that is. See here how to install pip.

# Linux Users
pip install pandas

# Windows Users
python pip install pandas

Installing Anaconda Scientific Python Distribution

Another great option is to consider is to install the Anaconda Python distribution. This is really an easy and fast way to get started with computer science. No need to worry about installing the packages you need to do computer science separately.

Both of the above methods are explained in this tutorial.

How to Read Excel Files to Pandas Dataframes:

In this section we are going to learn how to read Excel files and spreadsheets to Pandas dataframe objects. All examples in this Pandas Excel tutorial use local files. Note, that read_excel also can also load Excel files from a URL to a dataframe.  As always when working with Pandas, we have to start by importing the module:

import pandas as pd

Now it’s time to learn how to use Pandas read_excel to read in data from an Excel file. The easiest way to use this method is to pass the file name as a string. If we don’t pass any other parameters, such as sheet name, it will read the first sheet in the index. In the first example we are not going to use any parameters:

df = pd.read_excel('MLBPlayerSalaries.xlsx')
df.head()

Here, Pandas read_excel method read the data from the Excel file into a Pandas dataframe object. We then stored this dataframe into a variable called df.

When using read_excel Pandas will, by default, assign a numeric index or row label to the dataframe, and as usual when int comes to Python, the index will start with zero. We may have a reason to leave the default index as it is. For instance, if your data doesn’t have a column with unique values that can serve as a better index. In case there is a column that would serve as a better index, we can override the default behavior .

This is done by setting the index_col parameter to a column. It takes a numeric value for setting a single column as index or a list of numeric values for creating a multi-index. In the example below we use the column ‘Player’ as indices. Note, these are not unique and it may, thus, not make sense to use these values as indices.

df = pd.read_excel('MLBPlayerSalaries.xlsx', sheet_names='MLBPlayerSalaries', index_col='Player')

Reading Specific Columns using read_excel

When using Pandas  read_excel we will automatically get all columns from an Excel files. If we, for some reason, don’t want to parse all columns in the Excel file, we can use the parameter usecols. Let’s say we want to create a dataframe with the columns PlayerSalary, and Position, only. We can do this by adding 1, 3, and 4 in a list:

cols = [1, 2, 3]

df = pd.read_excel('MLBPlayerSalaries.xlsx', sheet_names='MLBPlayerSalaries', usecols=cols)
df.head()

According to the read_excel documentation we should be able to put in a string. For instance, cols=’Player:Position’ should give us the same results as above.

Missing Data

If our data has missing values in some cells and these missing values are coded in some way, like “Missing” we can use the na_values parameter. 

Pandas Read Excel Example with Missing Data

In the example below we are using the parameter na_values and we ar putting in a string (i.e., “Missing’):

df = pd.read_excel('MLBPlayerSalaries_MD.xlsx', na_values="Missing", sheet_names='MLBPlayerSalaries', usecols=cols)
df.head()

In in the read excel examples above we used a dataset that can be downloaded from this page.

How to Skip Rows when Reading an Excel File

Now we will learn how to skip rows when loading an Excel file using Pandas. For this read excel example we will use data that can be downloaded here.

In this example we read the sheet ‘session1’ which contains  rows that we need to skip. These rows contains some information about the dataset:We will use the parameters sheet_name=’Session1′ to read the sheet named ‘Session1’. Note, the first sheet will be read if we don’t use the sheet_name parameter. In this example the important part is the parameter skiprow=2. We use this to skip the first two rows:

df = pd.read_excel('example_sheets1.xlsx', sheet_name='Session1', skiprows=2)
df.head()

We can obtain the same results as above using the header parameter. In the example Excel file, we use here, the third row contains the headers and we will use the parameter header=2 to tell Pandas read_excel that our headers are on the third row.

df = pd.read_excel('example_sheets1.xlsx', sheet_name='Session1', header=2)

Reading Multiple Excel Sheets to Pandas Dataframes

Our Excel file, example_sheets1.xlsx’, has two sheets: ‘Session1’, and ‘Session2.’ Each sheet has data for from an imagined experimental session. In the next example we are going to read both sheets, ‘Session1’ and ‘Session2’. Here’s how to use Pandas read_excel with multiple sheets:

df = pd.read_excel('example_sheets1.xlsx', sheet_name=['Session1', 'Session2'], skiprows=2)

By using the parameter sheet_name, and a list of names, we will get an ordered dictionary containing two dataframes:

df

Maybe we want to join the data from all sheets (in this case sessions). Merging Pandas dataframes are quite easy. We just use the concat function and loop over the keys (i.e., sheets):

df2 = pd.concat(df[frame] for frame in data.keys())

Now in the example Excel file there is a column identifying the dataset (e.g., session number). However, maybe we don’t have that kind of information in our Excel file. To merge the two dataframes and adding a column depicting which session we can use a for loop:

dfs = []
for framename in data.keys():
    temp_df = data[framename]
    temp_df['Session'] = framename
    dfs.append(temp_df)
    
df = pd.concat(dfs)

In the code above we start by creating a list and continue by looping through the keys in the list of dataframes. Finally, we create a temporary dataframe and take the sheet name and add it in the column ‘Session’.

Pandas Read Excel all Sheets

If we want to use read_excel to load all sheets from an Excel file to a dataframe it is, of ourse, possible. We can set the parameter sheet_name to None. 

all_sheets_df = pd.read_excel('example_sheets1.xlsx', sheet_name=None)

Reading Many Excel Files

In this section we will learn how to load many files into a Pandas dataframe because, in some cases, we may have a lot of Excel files containing data from, let’s say, different experiments. In Python we can use the modules os and fnmatch to read all files in a directory. Finally, we use list comprehension to use read_excel on all files we found:

import os, fnmatch
xlsx_files = fnmatch.filter(os.listdir('.'), '*concat*.xlsx')

dfs = [pd.read_excel(xlsx_file) for xlsx_file in xlsx_files]

If it makes sense we can, again, use the function concat to merge the dataframes:

df = pd.concat(dfs, sort=False)

There are other methods to reading many Excel files and merging them. We can, for instance, use the module glob:

import glob
list_of_xlsx = glob.glob('./*concat*.xlsx') 
df = pdf.concat(list_of_xlsx)

Setting the Data type for data or columns

We can also, if we like, set the data type for the columns. Let’s read the example_sheets1.xlsx again. In the Pandas read_excel example below we use the dtype parameter to set the data type of some of the columns.

df = pd.read_excel('example_sheets1.xlsx',sheet_name='Session1',
                   header=1,dtype={'Names':str,'ID':str,
                                        'Mean':int, 'Session':str})

We can use the method info to see the what data types the different columns have:

df.info()

Writing Pandas Dataframes to Excel

Excel files can, of course, be created in Python using the module Pandas. In this section of the post we will learn how to create an excel file using Pandas. We will start by creating a dataframe with some variables but first we start by importing the modules Pandas:

import pandas as pd

The next step is to create the dataframe. We will create the dataframe using a dictionary. The keys will be the column names and the values will be lists containing our data:

df = pd.DataFrame({'Names':['Andreas', 'George', 'Steve',
                           'Sarah', 'Joanna', 'Hanna'],
                  'Age':[21, 22, 20, 19, 18, 23]})

Then we write the dataframe to an Excel file using the *to_excel* method. In the Pandas to_excel example below we don’t use any parameters.

df.to_excel('NamesAndAges.xlsx')

In the output below the effect of not using any parameters is evident. If we don’t use the parameter sheet_name we get the default sheet name, ‘Sheet1’. We can also see that we get a new column in our Excel file containing numbers. These are the indices from the dataframe.

If we want our sheet to be named something else and we don’t want the index column we can do like this:

df.to_excel('NamesAndAges.xlsx', sheet_name='Names and Ages', index=False)

Writing Multiple Pandas Dataframes to an Excel File:

If we happen to have many dataframes that we want to store in one Excel file but on different sheets we can do this easily. However, we need to use ExcelWriter now:

df1 = pd.DataFrame({'Names': ['Andreas', 'George', 'Steve',
                           'Sarah', 'Joanna', 'Hanna'],
                   'Age':[21, 22, 20, 19, 18, 23]})

df2 = pd.DataFrame({'Names': ['Pete', 'Jordan', 'Gustaf',
                           'Sophie', 'Sally', 'Simone'],
                   'Age':[22, 21, 19, 19, 29, 21]})

df3 = pd.DataFrame({'Names': ['Ulrich', 'Donald', 'Jon',
                           'Jessica', 'Elisabeth', 'Diana'],
                   'Age':[21, 21, 20, 19, 19, 22]})

dfs = {'Group1':df1, 'Group2':df2, 'Group3':df3}
writer = pd.ExcelWriter('NamesAndAges.xlsx', engine='xlsxwriter')

for sheet_name in dfs.keys():
    dfs[sheet_name].to_excel(writer, sheet_name=sheet_name, index=False)
    
writer.save()

In the code above we create 3 dataframes and then we continue to put them in a dictionary. Note, the keys are the sheet names and the cell names are the dataframes. After this is done we create a writer object using the xlsxwriter engine. We then continue by looping through the keys (i.e., sheet names) and add each sheet. Finally, the file is saved. This is important as leaving this out will not give you the intended results.

Summary: How to Work Excel Files using Pandas

That was it! In this post we have learned a lot! We have, among other things, learned how to:

  • Read Excel files and Spreadsheets using read_excel
    • Load Excel files to dataframes:
      • Read Excel sheets and skip rows
      • Merging many sheets to a dataframe
      • Loading many Excel files into one dataframe
  • Write a dataframe to an Excel file
  • Taking many dataframes and writing them to one Excel file with many sheets

Leave a comment below if you have any requests or suggestions on what should be covered next! Check the post A Basic Pandas Dataframe Tutorial for Beginners to learn more about working with Pandas dataframe. That is, after you have loaded them from a file (e.g., Excel spreadsheets)

The post Pandas Excel Tutorial: How to Read and Write Excel files appeared first on Erik Marsja.

PyCharm: PyCharm 2018.2.5 RC

$
0
0

We have a couple of fixes for PyCharm 2018.2 which you can now try in the 2018.2.5 Release Candidate.

New in 2018.2.5 RC

  • An issue that causes PyCharm to crash on Ubuntu 16.04 has been resolved
  • Matplotlib 3.0.0 can now be imported in the Python Console
  • Python code now folds correctly after it’s minimized with Ctrl+Shift+Numpad – (Cmd+Shift+- on macOS)
  • And further fixes, see the release notes for more information

Interested?

Download PyCharm 2018.2.5 RC from our confluence page.

The release candidate is not an Early Access Program (EAP) release, so you’ll either need a valid license, or you’ll have a 30-day free trial.

gamingdirectional: Pygame’s Color class demo

$
0
0

Today I have paid a visit to the Pygame document page to revise all the pygame classes one by one because I have already forgotten all of them. In order to create a game with Pygame I will need to get familiar with these classes again. In this article I will write a simple python class which extends the pygame.Color class to demonstrate the use of the pygame Color class. Since most of the time our...

Source

Real Python: Python "while" Loops (Indefinite Iteration)

$
0
0

Iteration means executing the same block of code over and over, potentially many times. A programming structure that implements iteration is called a loop.

In programming, there are two types of iteration, indefinite and definite:

  • With indefinite iteration, the number of times the loop is executed isn’t specified explicitly in advance. Rather, the designated block is executed repeatedly as long as some condition is met.

  • With definite iteration, the number of times the designated block will be executed is specified explicitly at the time the loop starts.

In this tutorial, you’ll:

  • Learn about the while loop, the Python control structure used for indefinite iteration
  • See how to break out of a loop or loop iteration prematurely
  • Explore infinite loops

When you’re finished, you should have a good grasp of how to use indefinite iteration in Python.

Free Bonus:Click here to get our free Python Cheat Sheet that shows you the basics of Python 3, like working with data types, dictionaries, lists, and Python functions.

The while Loop

Let’s see how Python’s while statement is used to construct loops. We’ll start simple and embellish as we go.

The format of a rudimentary while loop is shown below:

while<expr>:<statement(s)>

<statement(s)> represents the block to be repeatedly executed, often referred to as the body of the loop. This is denoted with indentation, just as in an if statement.

Remember: All control structures in Python use indentation to define blocks. See the discussion on grouping statements in the previous tutorial to review.

The controlling expression, <expr>, typically involves one or more variables that are initialized prior to starting the loop and then modified somewhere in the loop body.

When a while loop is encountered, <expr> is first evaluated in Boolean context. If it is true, the loop body is executed. Then <expr> is checked again, and if still true, the body is executed again. This continues until <expr> becomes false, at which point program execution proceeds to the first statement beyond the loop body.

Consider this loop:

>>>
 1 >>> n=5 2 >>> whilen>0: 3 ... n-=1 4 ... print(n) 5 ... 6 4 7 3 8 2 9 110 0

Here’s what’s happening in this example:

  • n is initially 5. The expression in the while statement header on line 2 is n > 0, which is true, so the loop body executes. Inside the loop body on line 3, n is decremented by 1 to 4, and then printed.

  • When the body of the loop has finished, program execution returns to the top of the loop at line 2, and the expression is evaluated again. It is still true, so the body executes again, and 3 is printed.

  • This continues until n becomes 0. At that point, when the expression is tested, it is false, and the loop terminates. Execution would resume at the first statement following the loop body, but there isn’t one in this case.

Note that the controlling expression of the while loop is tested first, before anything else happens. If it’s false to start with, the loop body will never be executed at all:

>>>
>>> n=0>>> whilen>0:... n-=1... print(n)...

In the example above, when the loop is encountered, n is 0. The controlling expression n > 0 is already false, so the loop body never executes.

Here’s another while loop involving a list, rather than a numeric comparison:

>>>
>>> a=['foo','bar','baz']>>> whilea:... print(a.pop(-1))...bazbarfoo

When a list is evaluated in Boolean context, it is truthy if it has elements in it and falsy if it is empty. In this example, a is true as long as it has elements in it. Once all the items have been removed with the .pop() method and the list is empty, a is false, and the loop terminates.

Interruption of Loop Iteration

In each example you have seen so far, the entire body of the while loop is executed on each iteration. Python provides two keywords that terminate a loop iteration prematurely:

  • break immediately terminates a loop entirely. Program execution proceeds to the first statement following the loop body.

  • continue immediately terminates the current loop iteration. Execution jumps to the top of the loop, and the controlling expression is re-evaluated to determine whether the loop will execute again or terminate.

The distinction between break and continue is demonstrated in the following diagram:

Python while loops: break and continue statementsbreak and continue

Here’s a script file called break.py that demonstrates the break statement:

 1 n=5 2 whilen>0: 3 n-=1 4 ifn==2: 5 break 6 print(n) 7 print('Loop ended.')

Running break.py from a command-line interpreter produces the following output:

C:\Users\john\Documents>python break.py
43Loop ended.

When n becomes 2, the break statement is executed. The loop is terminated completely, and program execution jumps to the print() statement on line 7.

The next script, continue.py, is identical except for a continue statement in place of the break:

 1 n=5 2 whilen>0: 3 n-=1 4 ifn==2: 5 continue 6 print(n) 7 print('Loop ended.')

The output of continue.py looks like this:

C:\Users\john\Documents>python continue.py
4310Loop ended.

This time, when n is 2, the continue statement causes termination of that iteration. Thus, 2 isn’t printed. Execution returns to the top of the loop, the condition is re-evaluated, and it is still true. The loop resumes, terminating when n becomes 0, as previously.

The else Clause

Python allows an optional else clause at the end of a while loop. This is a unique feature of Python, not found in most other programming languages. The syntax is shown below:

while<expr>:<statement(s)>else:<additional_statement(s)>

The <additional_statement(s)> specified in the else clause will be executed when the while loop terminates.

thought balloon

About now, you may be thinking, “How is that useful?” You could accomplish the same thing by putting those statements immediately after the while loop, without the else:

while<expr>:<statement(s)><additional_statement(s)>

What’s the difference?

In the latter case, without the else clause, <additional_statement(s)> will be executed after the while loop terminates, no matter what.

When <additional_statement(s)> are placed in an else clause, they will be executed only if the loop terminates “by exhaustion”—that is, if the loop iterates until the controlling condition becomes false. If the loop is exited by a break statement, the else clause won’t be executed.

Consider the following example:

>>>
>>> n=5>>> whilen>0:... n-=1... print(n)... else:... print('Loop done.')...43210Loop done.

In this case, the loop repeated until the condition was exhausted: n became 0, so n > 0 became false. Because the loop lived out its natural life, so to speak, the else clause was executed. Now observe the difference here:

>>>
>>> n=5>>> whilen>0:... n-=1... print(n)... ifn==2:... break... else:... print('Loop done.')...432

This loop is terminated prematurely with break, so the else clause isn’t executed.

It may seem as if the meaning of the word else doesn’t quite fit the while loop as well as it does the if statement. Guido van Rossum, the creator of Python, has actually said that, if he had it to do over again, he’d leave the while loop’s else clause out of the language.

One of the following interpretations might help to make it more intuitive:

  • Think of the header of the loop (while n > 0) as an if statement (if n > 0) that gets executed over and over, with the else clause finally being executed when the condition becomes false.

  • Think of else as though it were nobreak, in that the block that follows gets executed if there wasn’t a break.

If you don’t find either of these interpretations helpful, then feel free to ignore them.

When might an else clause on a while loop be useful? One common situation is if you are searching a list for a specific item. You can use break to exit the loop if the item is found, and the else clause can contain code that is meant to be executed if the item isn’t found:

>>>
>>> a=['foo','bar','baz','qux']>>> s='corge'>>> i=0>>> whilei<len(a):... ifa[i]==s:... # Processing for item found... break... i+=1... else:... # Processing for item not found... print(s,'not found in list.')...corge not found in list.

Note: The code shown above is useful to illustrate the concept, but you’d actually be very unlikely to search a list that way.

First of all, lists are usually processed with definite iteration, not a while loop. Definite iteration is covered in the next tutorial in this series.

Secondly, Python provides built-in ways to search for an item in a list. You can use the in operator:

>>>
>>> ifsina:... print(s,'found in list.')... else:... print(s,'not found in list.')...corge not found in list.

The list.index() method would also work. This method raises a ValueError exception if the item isn’t found in the list, so you need to understand exception handling to use it. In Python, you use a try statement to handle an exception. An example is given below:

>>>
>>> try:... print(a.index('corge'))... exceptValueError:... print(s,'not found in list.')...corge not found in list.

You will learn about exception handling later in this series.

An else clause with a while loop is a bit of an oddity, not often seen. But don’t shy away from it if you find a situation in which you feel it adds clarity to your code!

Infinite Loops

Suppose you write a while loop that theoretically never ends. Sounds weird, right?

Consider this example:

>>>
>>> whileTrue:... print('foo')...foofoofoo  .  .  .foofoofooKeyboardInterruptTraceback (most recent call last):
  File "<pyshell#2>", line 2, in <module>print('foo')

This code was terminated by Ctrl+C, which generates an interrupt from the keyboard. Otherwise, it would have gone on unendingly. Many foo output lines have been removed and replaced by the vertical ellipsis in the output shown.

Clearly, True will never be false, or we’re all in very big trouble. Thus, while True: initiates an infinite loop that will theoretically run forever.

Maybe that doesn’t sound like something you’d want to do, but this pattern is actually quite common. For example, you might write code for a service that starts up and runs forever accepting service requests. “Forever” in this context means until you shut it down, or until the heat death of the universe, whichever comes first.

More prosaically, remember that loops can be broken out of with the break statement. It may be more straightforward to terminate a loop based on conditions recognized within the loop body, rather than on a condition evaluated at the top.

Here’s another variant of the loop shown above that successively removes items from a list using .pop() until it is empty:

>>>
>>> a=['foo','bar','baz']>>> whileTrue:... ifnota:... break... print(a.pop(-1))...bazbarfoo

When a becomes empty, not a becomes true, and the break statement exits the loop.

You can also specify multiple break statements in a loop:

whileTrue:if<expr1>:# One condition for loop terminationbreak...if<expr2>:# Another termination conditionbreak...if<expr3>:# Yet anotherbreak

In cases like this, where there are multiple reasons to end the loop, it is often cleaner to break out from several different locations, rather than try to specify all the termination conditions in the loop header.

Infinite loops can be very useful. Just remember that you must ensure the loop gets broken out of at some point, so it doesn’t truly become infinite.

Nested while Loops

In general, Python control structures can be nested within one another. For example, if/elif/else conditional statements can be nested:

ifage<18:ifgender=='M':print('son')else:print('daughter')elifage>=18andage<65:ifgender=='M':print('father')else:print('mother')else:ifgender=='M':print('grandfather')else:print('grandmother')

Similarly, a while loop can be contained within another while loop, as shown here:

>>>
>>> a=['foo','bar']>>> whilelen(a):... print(a.pop(0))... b=['baz','qux']... whilelen(b):... print('>',b.pop(0))...foo> baz> quxbar> baz> qux

A break or continue statement found within nested loops applies to the nearest enclosing loop:

while<expr1>:statementstatementwhile<expr2>:statementstatementbreak# Applies to while <expr2>: loopbreak# Applies to while <expr1>: loop

Additionally, while loops can be nested inside if/elif/else statements, and vice versa:

if<expr>:statementwhile<expr>:statementstatementelse:while<expr>:statementstatementstatement
while<expr>:if<expr>:statementelif<expr>:statementelse:statementif<expr>:statement

In fact, all the Python control structures can be intermingled with one another to whatever extent you need. That is as it should be. Imagine how frustrating it would be if there were unexpected restrictions like “A while loop can’t be contained within an if statement” or “while loops can only be nested inside one another at most four deep.” You’d have a very difficult time remembering them all.

Seemingly arbitrary numeric or logical limitations are considered a sign of poor program language design. Happily, you won’t find many in Python.

One-Line while Loops

As with an if statement, a while loop can be specified on one line. If there are multiple statements in the block that makes up the loop body, they can be separated by semicolons (;):

>>>
>>> n=5>>> whilen>0:n-=1;print(n)43210

This only works with simple statements though. You can’t combine two compound statements into one line. Thus, you can specify a while loop all on one line as above, and you write an if statement on one line:

>>>
>>> ifTrue:print('foo')foo

But you can’t do this:

>>>
>>> whilen>0:n-=1;ifTrue:print('foo')SyntaxError: invalid syntax

Remember that PEP 8 discourages multiple statements on one line. So you probably shouldn’t be doing any of this very often anyhow.

Conclusion

In this tutorial, you learned about indefinite iteration using the Python while loop. You’re now able to:

  • Construct basic and complex while loops
  • Interrupt loop execution with break and continue
  • Use the else clause with a while loop
  • Deal with infinite loops

You should now have a good grasp of how to execute a piece of code repetitively.

The next tutorial in this series covers definite iteration with for loops—recurrent execution where the number of repetitions is specified explicitly.


[ Improve Your Python With 🐍 Python Tricks 💌 – Get a short & sweet Python Trick delivered to your inbox every couple of days. >> Click here to learn more and see examples ]

Codementor: Deploy Private Github Python Packages on Heroku without Exposing Credentials in Code

$
0
0
Recently, we met a deployment problem in heroku python environment. In heroku python deployment, it will execute pip install requirements.txt and install packages in the file. But when you have a...

Python Anywhere: Always-on tasks

$
0
0

Always-on tasks are a new feature we rolled out in our last system update. Essentially, they're a way you can specify a program and tell us that you want us to keep it running all the time. If it exits for any reason, we'll automatically restart it -- and even in extreme circumstances, for instance if the server that it's running on has a hardware failure, it will fail over to a working machine quickly.

We already have that kind of availability for websites, of course -- always-on tasks are a way of providing the same kind of uptime for non-website scripts, so they're the right solution if you want a non-website program that runs 24/7 -- for example, a chat bot on Twitter or Discord, or something that streams data from an external source. All paid accounts get one always-on task by default, and you can customize your account to add more if you need them.

If you have a paid account and would like to try them out, we have detailed documentation here.

We added them because a lot of people want to run something all the time, and would try doing that in a console -- this works, and we keep consoles running for as long as we can, but they do need to be rebooted from time to time for system maintenance, and when that happens, your programs stop running.
Historically we'd advised people to set up a scheduled task to run their script, with some locking code to make sure that only one copy was running at a time -- but this was not ideal, as if the program crashed, it could be some time before it was restarted.

The one thing you can't do with always-on tasks right now is use them to run a server; we have plans to address that in the future, but we don't have any timelines yet. Do let us know if that's something you'd be interested in -- say, running Celery or even an async website in a task. The more people that ask for it, the higher up our priority list it goes :-)

Mike Driscoll: Python 101: Episode #32 – Static Code Analysis

$
0
0

In this episode, we learn how we can use PyLine and PyFlakes to check our code for issues. Of course since this video was made, Flake8 and Python Black have become pretty popular, so you might want to check those out as well.

You can also read the chapter this video is based on here or get the book on Leanpub

Catalin George Festila: Python Qt5 - QLCDNumber and QDial example.

$
0
0
This tutorial uses a simple example of QLCDNumber and QDial.
The steps start with create the QWidget with the QLCDNumber and QDial.
You need to set geometry for both and connect the dial with valueChanged.
Finally you need to use show to see the QWidget.
The result is show into the next screenshot:

Let see the source code:
import sys
from PyQt5.QtCore import Qt
from PyQt5.QtWidgets import (QWidget, QLCDNumber, QDial, QApplication)

class QLCDNumber_QDial(QWidget):
def __init__(self):
super().__init__()
self.initUi()

def initUi(self):
the_lcd = QLCDNumber(self)
the_dial = QDial(self)

self.setGeometry(150, 100, 220, 100)
self.setWindowTitle('QLCDNumber')

the_lcd.setGeometry(10,10,70,70)
the_dial.setGeometry(140,10,70,70)

the_dial.valueChanged.connect(the_lcd.display)

self.show()

if __name__ == '__main__':
app = QApplication(sys.argv)
run = QLCDNumber_QDial()
sys.exit(app.exec_())

Moshe Zadka: The Conference That Was Almost Called "Pythaluma"

$
0
0

As my friend Thursday said in her excellent talk (sadly, not up as of this time) naming things is important. Avoiding in-jokes is, in general, a good idea.

It is with mixed feelings, therefore, that my pun-loving heart reacted to Chris's disclosure that the most common suggestion was to call the conference "Pythaluma". However, he decided to go with the straightforward legible name, "North Bay Python".

North of the city by the bay, lies the quiet yet chic city of Petaluma, where North Bay Python takes place. In a gold-rush-city turned sleepy wine country, a historical cinema turned live show venu hosted Python enthusiasts in a single-track conference.

Mariatta opened the conference with her gut-wrenching talk about being a core Python developer. "Open source sustainability" might be abstract words, but it is easy to forget that for a language that's somewhere between the first and fifth most important (depending on a metric) there are less than a hundred people supporting its core -- and if they stop, the world breaks.

R0ml opened the second day of the conference talking about how:

  • Servers are unethical.
  • Python is the new COBOL.
  • I put a lot of pressure on him before his talk.

Talks are still being uploaded to the YouTube channel, and I have already had our engineering team at work watch Hayley'spost-mortem of Jurassic Park.

If you missed all of it, I have two pieces of advice:

  • Watch the videos. Maybe even mine.
  • Sign up to the mailing list so you will not miss next year's.

If you went there, I hope you told me hi. Either way, please say hi next year!

gamingdirectional: Pygame Music player demo

$
0
0

In this article we are going to play the background music with the help of the pygame.mixer_music module. We will first load the soundtrack then play it repeatedly. We can also play the background music with the help of pygame.mixer module which you can read the entire solution in this article but now we will use the pygame.mixer_music module to load and play the background soundtrack instead.

Source

Viewing all 22646 articles
Browse latest View live


<script src="https://jsc.adskeeper.com/r/s/rssing.com.1596347.js" async> </script>