Quantcast
Channel: Planet Python
Viewing all 22647 articles
Browse latest View live

Bill Ward / AdminTome: Easy Python Enumerate() Function Tutorial

$
0
0

In this post, I will talk about the Python Enumerate() function and give you a few examples on how to use it.

Python Enumerate is a Python built-in function that lets you iterate over a list and keep track of where you are in the list.

Python Enumerate Function

Here is a simple example.

First create a list.  Here is a list of some WoW classes in order of awesomeness:

awesomeList = ['paladin', 'rogue', 'priest', 'warrior', 'druid']

Now, lets say we want to iterate over the list.  We could do it like this:

for wowClass in awesomeList:
  print("Class: {}".format(wowClass))

Which gives us:

>>> awesomeList = ['paladin', 'rogue', 'priest', 'warrior', 'druid']
>>> for wowClass in awesomeList:
...   print("Class: {}".format(wowClass))
... 
Class: paladin
Class: rogue
Class: priest
Class: warrior
Class: druid
>>>

Which is pretty cool.  But we don’t have any idea where we are in the list if we are doing things with it

That’s where enumerate comes in.

Python Enumerate()

Next, lets change our code around to make use of Python Enumerate:

awesomeList = ['paladin', 'rogue', 'priest', 'warrior', 'druid']
for wowClass in enumerate(awesomeList):
   print("Class: {}".format(wowClass))
 

Running this we get:

>>> awesomeList = ['paladin', 'rogue', 'priest', 'warrior', 'druid']
>>> for wowClass in enumerate(awesomeList):
...    print("Class: {}".format(wowClass))
... 
Class: (0, 'paladin')
Class: (1, 'rogue')
Class: (2, 'priest')
Class: (3, 'warrior')
Class: (4, 'druid')
>>>

Going further we can extract the enumerated index from the WoW class like so:

>>> awesomeList = ['paladin', 'rogue', 'priest', 'warrior', 'druid']
>>> for idx, wowClass in enumerate(awesomeList):
...    print("Class: {}, Rank: {}".format(wowClass, idx))
... 
Class: paladin, Rank: 0
Class: rogue, Rank: 1
Class: priest, Rank: 2
Class: warrior, Rank: 3
Class: druid, Rank: 4
>>>

We can even change what number the index starts at.

>>> awesomeList = ['paladin', 'rogue', 'priest', 'warrior', 'druid']
>>> for idx, wowClass in enumerate(awesomeList, 1337):
...    print("Class: {}, Rank: {}".format(wowClass, idx))
... 
Class: paladin, Rank: 1337
Class: rogue, Rank: 1338
Class: priest, Rank: 1339
Class: warrior, Rank: 1340
Class: druid, Rank: 1341
>>> 

It’s cool we can do that, but I can’t think of a good IRL use case yet.  If you know of one please comment below.

How is this cool?

Using the Enumerate function lets us do some cool stuff.  One thing that comes to mind is going through a text file.  Checkout this StackOverflow question asking how to use Python Enumerate to Iterate a large text file.

Load the text file up and use Python Enumerate to iterate through the text file but keep track of where you are in the text file pragmatically.

Click here for more great Python articles on AdminTome Blog.

If you liked this post please share it using the buttons on the left or show some love by linking to it!

Thanks for reading.

The post Easy Python Enumerate() Function Tutorial appeared first on AdminTome Blog.


Stack Abuse: The Python Requests Module

$
0
0

Introduction

The Python Requests Module

Dealing with HTTP requests is not an easy task in any programming language. If we talk about Python, it comes with two built-in modules, urllib and urllib2, to handle HTTP related operation. Both modules come with a different set of functionalities and many times they need to be used together. The main drawback of using urllib is that it is confusing (few methods are available in both urllib, urllib2), the documentation is not clear and we need to write a lot of code to make even a simple HTTP request.

To make these things simpler, one easy-to-use third-party library, known as Requests, is available and most developers prefer to use it instead or urllib/urllib2. It is an Apache2 licensed HTTP library powered by urllib3 and httplib.

Installing the Requests Module

Installing this package, like most other Python packages, is pretty straight-forward. You can either download the Requests source code from Github and install it or use pip:

$ pip install requests

For more information regarding the installation process, refer to the official documentation.

To verify the installation, you can try to import it like below:

import requests  

If you don't receive any errors importing the module, then it was successful.

Making a GET Request

GET is by far the most used HTTP method. We can use GET request to retrieve data from any destination. Let me start with a simple example first. Suppose we want to fetch the content of the home page of our website and print out the resultin HTML data. Using the Requests module, we can do it like below:

import requests

r = requests.get('https://api.github.com/events')  
print(r.content)  

It will print the response in an encoded form. If you want to see the actual text result of the HTML page, you can read the .text property of this object. Similarly, the status_code property prints the current status code of the URL:

import requests

r = requests.get('https://api.github.com/events')  
print(r.text)  
print(r.status_code)  

requests will decode the raw content and show you the result. If you want to check what type of encoding is used by requests, you can print out this value by calling .encoding. Even the type of encoding can be changed by changing its value. Now isn't that simple?

Reading the Response

The response of an HTTP request can contain many headers that holds different information.

httpbin is a popular website to test different HTTP operation. In this article, we will use httpbin/get to analyse the response to a GET request. First of all, we need to find out the response header and how it looks. You can use any modern web-browser to find it, but for this example, we will use Google's Chrome browser.

  • In Chrome, open the URL http://httpbin.org/get, right click anywhere on the page, and select the "Inspect" option
  • This will open a new window within your browser. Refresh the page and click on the "Network" tab.
  • This "Network" tab will show you all different types of network requests made by the browser. Click on the "get" request in the "Name" column and select the "Headers" tab on right.

The Python Requests Module

The content of the "Response Headers" is our required element. You can see the key-value pairs holding various information about the resource and request. Let's try to parse these values using the requests library:

import requests

r = requests.get('http://httpbin.org/get')  
print(r.headers['Access-Control-Allow-Credentials'])  
print(r.headers['Access-Control-Allow-Origin'])  
print(r.headers['CONNECTION'])  
print(r.headers['content-length'])  
print(r.headers['Content-Type'])  
print(r.headers['Date'])  
print(r.headers['server'])  
print(r.headers['via'])  

We retrieved the header information using r.headers and we can access each header value using specific keys. Note that the key is not case-sensitive.

Similarly, let's try to access the response value. The above header shows that the response is in JSON format: (Content-type: application/json). The Requests library comes with one built-in JSON parser and we can use requests.get('url').json() to parse it as a JSON object. Then the value for each key of the response results can be parsed easily like below:

import requests

r = requests.get('http://httpbin.org/get')

response = r.json()  
print(r.json())  
print(response['args'])  
print(response['headers'])  
print(response['headers']['Accept'])  
print(response['headers']['Accept-Encoding'])  
print(response['headers']['Connection'])  
print(response['headers']['Host'])  
print(response['headers']['User-Agent'])  
print(response['origin'])  
print(response['url'])  

The above code will print the below output:

{'headers': {'Host': 'httpbin.org', 'Accept-Encoding': 'gzip, deflate', 'Connection': 'close', 'Accept': '*/*', 'User-Agent': 'python-requests/2.9.1'}, 'url': 'http://httpbin.org/get', 'args': {}, 'origin': '103.9.74.222'}
{}
{'Host': 'httpbin.org', 'Accept-Encoding': 'gzip, deflate', 'Connection': 'close', 'Accept': '*/*', 'User-Agent': 'python-requests/2.9.1'}
*/*
gzip, deflate  
close  
httpbin.org  
python-requests/2.9.1  
103.9.74.222  
http://httpbin.org/get  

Third line, i.e. r.json(), printed the JSON value of the response. We have stored the JSON value in the variable response and then printed out the value for each key. Note that unlike the previous example, the key-value is case sensitive.

Similar to JSON and text content, we can use requests to read the response content in bytes for non-text requests using the .content property. This will automatically decode gzip and deflate encoded files.

Passing Parameters in GET

In some cases, you'll need to pass parameters along with your GET requests, which take the form of query strings. To do this, we need to pass these values in the params parameter, as shown below:

import requests

payload = {'user_name': 'admin', 'password': 'password'}  
r = requests.get('http://httpbin.org/get', params=payload)

print(r.url)  
print(r.text)  

Here, we are assigning our parameter values to the payload variable, and then to the GET request via params. The above code will return the following output:

http://httpbin.org/get?password=password&user_name=admin  
{"args":{"password":"password","user_name":"admin"},"headers":{"Accept":"*/*","Accept-Encoding":"gzip, deflate","Connection":"close","Host":"httpbin.org","User-Agent":"python-requests/2.9.1"},"origin":"103.9.74.222","url":"http://httpbin.org/get?password=password&user_name=admin"}

As you can see, the Reqeusts library automatically turned our dictionary of parameters to a query string and attached it to the URL.

Note that you need to be careful what kind of data you pass via GET requests since the payload is visible in the URL, as you can see in the output above.

Making POST Requests

HTTP POST requests are opposite of the GET requests as it is meant for sending data to a server as opposed to retrieving it. Although, POST requests can also receive data within the response, just like GET requests.

Instead of using the get() method, we need to use the post() method. For passing an argument, we can pass it inside the data parameter:

import requests

payload = {'user_name': 'admin', 'password': 'password'}  
r = requests.post("http://httpbin.org/post", data=payload)  
print(r.url)  
print(r.text)  

Output:

http://httpbin.org/post  
{"args":{},"data":"","files":{},"form":{"password":"password","user_name":"admin"},"headers":{"Accept":"*/*","Accept-Encoding":"gzip, deflate","Connection":"close","Content-Length":"33","Content-Type":"application/x-www-form-urlencoded","Host":"httpbin.org","User-Agent":"python-requests/2.9.1"},"json":null,"origin":"103.9.74.222","url":"http://httpbin.org/post"}

The data will be "form-encoded" by default. You can also pass more complicated header requests like a tuple if multiple values have same key, a string instead of a dictionary, or a multipart encoded file.

Sending Files with POST

Sometimes we need to send one or more files simultaneously to the server. For example, if a user is submitting a form and the form includes different form-fields for uploading files, like user profile picture, user resume, etc. Requests can handle multiple files on a single request. This can be achieved by putting the files to a list of tuples, like below:

import requests

url = 'http://httpbin.org/post'  
file_list = [  
    ('image', ('image1.jpg', open('image1.jpg', 'rb'), 'image/png')),
    ('image', ('image2.jpg', open('image2.jpg', 'rb'), 'image/png'))
]

r = requests.post(url, files=file_list)  
print(r.text)  

The tuples containing the files' information are in the form (field_name, file_info).

Other HTTP Request Types

Similar to GET and POST, we can perform other HTTP requests like PUT, DELETE, HEAD, and OPTIONS using the requests library, like below:

import requests

requests.put('url', data={'key': 'value'})  
requests.delete('url')  
requests.head('url')  
requests.options('url')  

Handling Redirections

Redirection in HTTP means forwarding the network request to a different URL. For example, if we make a request to "http://www.github.com", it will redirect to "https://github.com" using a 301 redirect.

import requests

r = requests.post("http://www.github.com")  
print(r.url)  
print(r.history)  
print(r.status_code)  

Output:

https://github.com/  
[<Response [301]>, <Response [301]>]
200  

As you can see the redirection process is automatically handled by requests, so you don't need to deal with it yourself. The history property contains the list of all response objects created to complete the redirection. In our example, two Response objects were created with the 301 response code. HTTP 301 and 302 responses are used for permanent and temporary redirection, respectively.

If you don't want the Requests library to automatically follow redirects, then you can disable it by passing the allow_redirects=False parameter along with the request.

Handling Timeouts

Another important configuration is telling our library how to handle timeouts, or requests that take too long to return. We can configure requests to stop waiting for a network requests using the timeout parameter. By default, requests will not timeout. So, if we don't configure this property, our program may hang indefinitely, which is not the functionality you'd want in a process that keeps a user waiting.

import requests

requests.get('http://www.google.com', timeout=1)  

Here, an exception will be thrown if the server will not respond back within 1 second (which is still aggressive for a real-world application). To get this to fail more often (for the sake of an example), you need to set the timeout limit to a much smaller value, like 0.001.

The timeout can be configured for both the "connect" and "read" operations of the request using a tuple, which allows you to specify both values separately:

import requests

requests.get('http://www.google.com', timeout=(5, 14))  

Here, the "connect" timeout is 5 seconds and "read" timeout is 14 seconds. This will allow your request to fail much more quicklly if it can't connect to the resource, and if it does connect then it will give it more time to download the data.

Cookies and Custom Headers

We have seen previously how to access headers using the headers property. Similarly, we can access cookies from a response using the cookies property.

For example, the below example shows how to access a cookie with name cookie_name:

import requests

r = requests.get('http://www.examplesite.com')  
r.cookies['cookie_name']  

We can also send custom cookies to the server by providing a dictionary to the cookies parameter in our GET request.

import requests

custom_cookie = {'cookie_name': 'cookie_value'}  
r = requests.get('http://www.examplesite.com/cookies', cookies=custom_cookie)  

Cookies can also be passed in a Cookie Jar object. This allows you to provide cookies for a different path.

import requests

jar = requests.cookies.RequestsCookieJar()  
jar.set('cookie_one', 'one', domain='httpbin.org', path='/cookies')  
jar.set('cookie_two', 'two', domain='httpbin.org', path='/other')

r = requests.get('https://httpbin.org/cookies', cookies=jar)  
print(r.text)  

Output:

{"cookies":{"cookie_one":"one"}}

Similarly, we can create custom headers by assigning a dictionary to the request header using the headers parameter.

import requests

custom_header = {'user-agent': 'customUserAgent'}

r = requests.get('https://samplesite.org', headers=custom_header)  

The Session Object

The session object is mainly used to persist certain parameters, like cookies, across different HTTP requests. A session object may use a single TCP connection for handling multiple network requests and responses, which results in performance improvement.

import requests

first_session = requests.Session()  
second_session = requests.Session()

first_session.get('http://httpbin.org/cookies/set/cookieone/111')  
r = first_session.get('http://httpbin.org/cookies')  
print(r.text)

second_session.get('http://httpbin.org/cookies/set/cookietwo/222')  
r = second_session.get('http://httpbin.org/cookies')  
print(r.text)

r = first_session.get('http://httpbin.org/anything')  
print(r.text)  

Output:

{"cookies":{"cookieone":"111"}}

{"cookies":{"cookietwo":"222"}}

{"args":{},"data":"","files":{},"form":{},"headers":{"Accept":"*/*","Accept-Encoding":"gzip, deflate","Connection":"close","Cookie":"cookieone=111","Host":"httpbin.org","User-Agent":"python-requests/2.9.1"},"json":null,"method":"GET","origin":"103.9.74.222","url":"http://httpbin.org/anything"}

The httpbin path /cookies/set/{name}/{value} will set a cookie with name and value. Here, we set different cookie values for both first_session and second_session objects. You can see that the same cookie is returned in all future network requests for a specific session.

Similarly, we can use the session object to persist certain parameters for all requests.

import requests

first_session = requests.Session()

first_session.cookies.update({'default_cookie': 'default'})

r = first_session.get('http://httpbin.org/cookies', cookies={'first-cookie': '111'})  
print(r.text)

r = first_session.get('http://httpbin.org/cookies')  
print(r.text)  

Output:

{"cookies":{"default_cookie":"default","first-cookie":"111"}}

{"cookies":{"default_cookie":"default"}}

As you can see, the default_cookie is sent with each requests of the session. If we add any extra parameter to the cookie object, it appends to the default_cookie. "first-cookie": "111" is append to the default cookie "default_cookie": "default"

Using Proxies

The proxies argument is used to configure a proxy server to use in your requests.

http = "http://10.10.1.10:1080"  
https = "https://10.10.1.11:3128"  
ftp = "ftp://10.10.1.10:8080"

proxy_dict = {  
  "http": http,
  "https": https,
  "ftp": ftp
}

r = requests.get('http://sampleurl.com', proxies=proxy_dict)  

The requests library also supports SOCKS proxies. This is an optional feature and it requires the requests[socks] dependency to be installed before use. Like before, you can install it using pip:

$ pip install requests[socks]

After the installation, you can use it as shown here:

proxies = {  
  'http': 'socks5:user:pass@host:port'
  'https': 'socks5:user:pass@host:port'
}

SSL Handling

We can also use the Requests library to verify the HTTPS certificate of a website by passing verify=true with the request.

import requests

r = requests.get('https://www.github.com', verify=True)  

This will throw an error if there is any problem with the SSL of the site. If you don't want to verity, just pass False instead of True. This parameter is set to True by default.

Downloading a File

For downloading a file using requests, we can either download it by streaming the contens or directly downloading the entire thing. The stream flag is used to indicate both behaviors.

As you probably guessed, if stream is True, then requests will stream the content. If stream is False, all content will be downloaded to the memory bofore returning it to you.

For streaming content, we can iterate the content chunk by chunk using the iter_content method or iterate line by line using iter_line. Either way, it will download the file part by part.

For example:

import requests

r = requests.get('https://cdn.pixabay.com/photo/2018/07/05/02/50/sun-hat-3517443_1280.jpg', stream=True)  
downloaded_file = open("sun-hat.jpg", "wb")  
for chunk in r.iter_content(chunk_size=256):  
    if chunk:
        downloaded_file.write(chunk)

The code above will download an image from Pixabay server and save it in a local file, sun-hat.jpg.

We can also read raw data using the raw property and stream=True in the request.

import requests

r = requests.get("http://exampleurl.com", stream=True)  
r.raw  

For downloading or streaming content, iter_content() is the prefered way.

Errors and Exceptions

requests throws different types of exception and errors if there is ever a network problem. All exceptions are inherited from requests.exceptions.RequestException class.

Here is a short description of the common erros you may run in to:

  • ConnectionError exception is thrown in case of DNS failure,refused connection or any other connection related issues.
  • Timeout is raised if a request times out.
  • TooManyRedirects is raised if a request exceeds the maximum number of predefined redirections.
  • HTTPError exception is raised for invalid HTTP responses.

For a more complete list and description of the exceptions you may run in to, check out the documentation.

Conclusion

In this tutorial I explained to you many of the features of the requests library and the various ways to use it. You can use requests library not only for interacting with a REST API, but it can be used equally as well for scraping data from a website or to download files from the web.

Modify and try the above examples and drop a comment below if you have any question regarding requests.

Bill Ward / AdminTome: Python Lists of Tuples

$
0
0

In this post we will talk about creating Python Lists of Tuples and how they can be used.

Python Lists

Python lists of tuples

Lists in Python are simply an array.  Here is a basic list of my favorite WoW Classes:

awesomeList = ['paladin', 'rogue', 'priest', 'warrior', 'druid']


Lists are created using brackets []

We can add stuff to the end of our list with append()

In [6]: awesomeList.append("warlock")

In [7]: awesomeList
Out[7]: ['paladin', 'rogue', 'priest', 'warrior', 'druid', 'warlock']


Items in a list have an index starting at 0 called an offest.  So we can reference specific items in our list like this:

In [7]: awesomeList
Out[7]: ['paladin', 'rogue', 'priest', 'warrior', 'druid', 'warlock']

In [8]: awesomeList[0]
Out[8]: 'paladin'

In [9]: awesomeList[3]
Out[9]: 'warrior'


Change items by using the offset as well:

In [10]: awesomeList[3] = "monk"

In [11]: awesomeList
Out[11]: ['paladin', 'rogue', 'priest', 'monk', 'druid', 'warlock']


Lastly, you can delete items from the list by using remove()

In [12]: awesomeList.remove('monk')

In [13]: awesomeList
Out[13]: ['paladin', 'rogue', 'priest', 'druid', 'warlock']


There is more to lists but that should be enough for the purposes of this post.  You can learn more from the Python reference documentation if you wish.  Onward to tuples:

Python Tuples

Tuples are very similar to lists, but tuples are immutable.  This means after they are created you can’t change them.

Let’s create a tuple from the same list of WoW classes above.

In [14]: awesomeTuple = ('paladin', 'rogue', 'priest', 'warrior', 'druid')

In [15]: awesomeTuple
Out[15]: ('paladin', 'rogue', 'priest', 'warrior', 'druid')


With tuples we can “unpack” the values like this:

In [16]: belkas, gorkin, landril, maxilum, ferral = awesomeTuple

In [17]: belkas
Out[17]: 'paladin'

In [18]: maxilum
Out[18]: 'warrior'


You can also create a tuple from a list.

In [20]: tuple(awesomeList)
Out[20]: ('paladin', 'rogue', 'priest', 'druid', 'warlock')


Checkout the Python reference documentation for more info on tuples.

Now that we have a good intro to Python Lists and Tuples we can get to the meat of this tutorial.

Python Lists of Tuples

We can create lists of tuples.  This is great for working with stuff like log files.

Lets say we parsed in a log file and we have the status code and message from an Apache2 web log.

We could then represent this data using python lists of tuples.  Here is an overly-simplified example:

In [21]: logs = [
    ...:   ('HTTP_OK', 'GET /index.html'),
    ...:   ('HTTP_NOT_FOUND', 'GET /index.htmll')
    ...: ]


This lets us do some pretty cool operations like count the number of errors.

In [29]: errorCount = 0
    ...: for log in logs:
    ...:     status, message = log
    ...:     if status is not 'HTTP_OK':
    ...:         errorCount += 1
    ...:         

In [30]: errorCount
Out[30]: 1


Why use tuples over lists?  Tuples use less space for one.  Using the example above for parsing a log file, if the log file is big then using tuples reduces the amount of memory used.

I hope you have enjoyed this article.  If you did then please share it using the buttons on the left.

Click here for more great Python articles on AdminTome Blog.

The post Python Lists of Tuples appeared first on AdminTome Blog.

Marc Richter: Create your own Telegram bot with Django on Heroku – Part 2

$
0
0

In the previous part of this series, I introduced the overall idea about what we are trying to achieve and what’s the goal of it.

Today I will show you how to register and prepare your Bot using the Telegram app.

To follow this part, you will need to have Telegram installed and signed up for an account already. Also, you will need to have your mobile at hand where the app is installed on.

The first steps

Before we can start to write the Django and Python part, we need to register the Telegram Bot. Since there are different operation modes for bots, we can start to configure and using this bot to have messages sent to it immediately, without having a consumer of these messages prepared.

The BotFather


The BotfatherThe Botfather

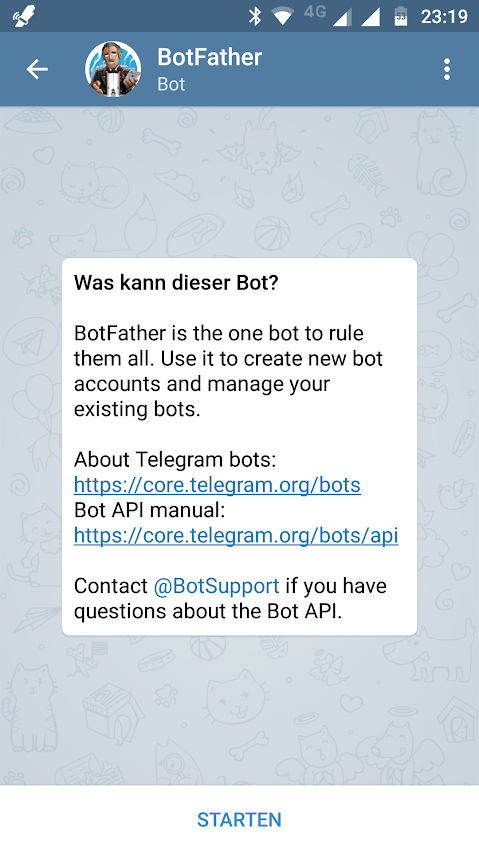
In Telegram, you are creating new bots by simply talking to another bot; called: BotFather. This bot is there to create new bots and change settings for existing ones. To start a conversation with this bot, just navigate to https://telegram.me/botfather on your mobile and a new conversation will open in Telegram.


This dialogue looks a bit different from other conversations at first, but once this conversation is started, you can talk to the bot just like with any real person; simply type your messages.
When you are redirected to Telegram after you have opened the BotFather-link, you are presented a screen which pretty much looks like this:

Telegram Conversation with BotFather - BotTelegram Conversation with BotFather – Bot

Most certainly, the German texts are in your own language, but that should be self-explanatory.
To begin a conversation, hit “START” (or whatever your locale translates this to). You will notice that this results in a text “/start” to be sent to the Bot. This is a command. Even though you can have your own Bots to react on any string, it is a convention that strings which are beginning with “/” are always considered to be commands.

Immediately after that “/start” was sent, the Bot will answer with an overview of available commands. You do not need to authenticate with it or “login” or anything; the Bot recognizes you already since your user-id is automatically known to any conversation partner on Telegram and is taken to identify you unambiguously.
Go on, play around with it; have a good talk. You can write anything you like to it. You can even send some pictures or similar; if the bot doesn’t understand you, you are just presented the initial usage overview once more. So do not be shy or afraid to break something; as long as you have never registered a Bot before, nothing can go wrong. Take your time, make yourself familiar with it a bit. Once you are done, we will continue to register our first bot.

Register your bot

To send the commands from the overview BotFather sent you, you may type them yourself or simply type on them in the BotFather’s message. If you look carefully, you might notice the command names are blue. That’s because they are some kind of clickable links, writing them when touched.

Continue creating your bot by typing or touching the command “/newbot”. The BotFather will guide you through this process and asks:

Alright, a new bot. How are we going to call it? Please choose a name for your bot.

You can choose whatever you want here; this is just a name, like “Marc Richter” is mine, not a username. This is just a “human readable” name and doesn’t need to be unique.
Simply write a name in reply to this question and send it. As you see: This is just like with any normal conversation with a human being and quite self-explanatory, since the bot guides you well.

Next, it asks you for a username:

Good. Now let’s choose a username for your bot. It must end in “bot”.
Like this for example: TetrisBot or tetris_bot.

As you can see, the trailing letters “bot” must not be all lowercase characters. But it has to be these three trailing characters. This is to unmistakeable identify bots (Yes, “BotFather” is a bad example of this).
Also, what you choose here must be unique. If you choose something too common like “mybot” or similar, chances are that BotFather replies:

Sorry, this username is already taken. Please try something different.

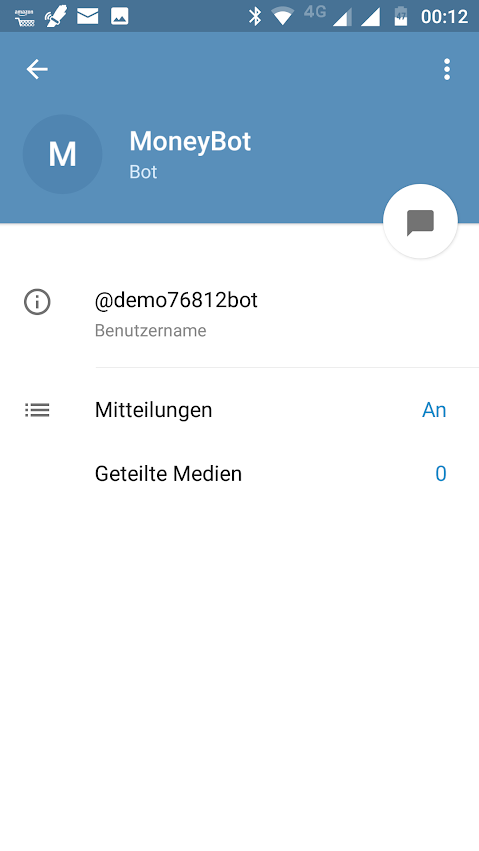
I’ve decided for “demo76812bot” to ensure, this is still available. Since you and the users of this bot might need to type this name initially, you should aim for something handier than this.
If everything worked well, you get a longer message sharing some details on your new bot:

Done! Congratulations on your new bot. You will find it at t.me/demo76812bot. You can now add a description, about section and profile picture for your bot, see /help for a list of commands. By the way, when you’ve finished creating your cool bot, ping our Bot Support if you want a better username for it. Just make sure the bot is fully operational before you do this.

Use this token to access the HTTP API:
767070664:AAGCbn….

For a description of the Bot API, see this page: https://core.telegram.org/bots/api

Profile of my demo-Telegram BotProfile of my demo-Telegram Bot

Please make sure to take a note of the token. If you lose it, you can generate a new one, using the /token command, but you will need this in the next sections of this series. Also, the token is to be considered a secret, just like a password is. Please make sure to not expose it anywhere; not in a forum, nor in anything which hit’s a Git repo or something.
You may now play around with it a bit, add a profile photo (“/setuserpic“) or a description (“/setdescription“) or whatever you like; what is necessary to proceed has been done already. To learn how to interact with your bot, please continue with this guide.

Write something to your bot

Since the BotFather has shared a link to your bot after it’s creation (t.me/demo76812bot), you can simply click on it in that message and are presented with a screen which looks quite the same as the one which was presented to you when you got in touch with BotFather.
Again, you need to hit “START” on the bottom to see an input field, but this time, you won’t receive any reply; no matter what you type here. To have some messages available for later development, you can write a few lines or send images to it already. There will be no reply, since there is nothing consuming these messages yet, but since the new bots are in a caching mode from the beginning, you will be able to pick up these messages, later (I’m not too sure for how long or what amount of messages the bots do cache; please do not write something too important, yet).
Go on – write some recognizable lines. We will grab them in the next part of this series.

Read what was received for your bot already

To get a list of “updates” (things received by your bot), you can open a web browser and open the following URL:

https://api.telegram.org/bot<token>/getUpdates

Make sure to replace “<token>”with the real token for your bot.
You should be displayed something like this:

{"ok":true,"result":[{"update_id":941430900,
"message":{"message_id":4,"from":{"id":265790798,"is_bot":false,"first_name":"Marc","last_name":"Richter","language_code":"de"},"chat":{"id":265790798,"first_name":"Marc","last_name":"Richter","type":"private"},"date":1533248344,"text":"Test"}},{"update_id":941430901,
"message":{"message_id":5,"from":{"id":265790798,"is_bot":false,"first_name":"Marc","last_name":"Richter","language_code":"de"},"chat":{"id":265790798,"first_name":"Marc","last_name":"Richter","type":"private"},"date":1533248578,"text":"Test2"}}]}

Awesome! So so far: Everything works! What you see here is a JSON reply, which is mainly the same format as Python dictionaries are represented in. And you can read it in the same way, too. But that will be the topic of the next part.

So far, you just need to understand this HTTP API is the way we will interact with the bot (not directly; we will use a module which does this for us in the background) and that this JSON is the way we will receive data from it; at least in this getUpdates – mode.
Once we have our Django interface ready, this will hit and trigger actions in our application in real-time without the need to actively poll the HTTP API for it. But this is a great way to get a feeling for how things work.

Outlook for the next part of the series

The next time, we will start to write our first demo-code in Python to interact with the bot a bit more. We will use telepot for this and do things like fetching the updates from the bot’s cache, send back a message to our mobile and so on. Also, we will learn a bit more about that JSON structure Telegram uses and what the single fields in there are doing.

I hope you enjoyed this part of the series! I’m looking forward reading any feedback on it.

Have fun!

Born in 1982, Marc Richter is an IT enthusiastic since 1994. He became addicted when he first put hands on their family’s pc and never stopped investigating and exploring new things since then.
He is married to Jennifer Richter and proud father of two wonderful children, Lotta and Linus.
His current professional focus is DevOps and Python development.

An exhaustive bio can be found at this blog post.

Found my articles useful? Maybe you would like to support my efforts and give me a tip then?

Der Beitrag Create your own Telegram bot with Django on Heroku – Part 2 erschien zuerst auf Marc Richter's personal site.

Moshe Zadka: Tests Should Fail

$
0
0

(Thanks to Avy Faingezicht and Donald Stufft for giving me encouragement and feedback. All mistakes that remain are mine.)

"eyes have they, but they see not" -- Psalms, 135:16

Eyes are expensive to maintain. They require protection from the elements, constant lubrication, behavioral adaptations to protect them and more. However, they give us a benefit. They allow us to see: to detect differences in the environment. Eyes register different signals when looking at an unripe fruit and when looking at a ripe fruit. This allows us to eat the ripe fruit, and wait for the unripe fruit to ripen: to behave differently, in a way that ultimately furthers our goals (eat yummy fruits).

If our eyes did not get different signals that influenced our behavior, they would not be cost effective. Evolution is a harsh mistress, and the eyes would be quickly gone if the signals from them were not valuable.

Writing tests is expensive. It takes time to write them, time to review them, time to modify them as code evolves. A test that never fails is like an eye that cannot see: it always sends the same signal, "eat that fruit!". In order to be valuable, a test must be able to fail, and that failure must modify our behavior.

The only way to be sure that a test can fail is to see it fail. Test-driven-development does it by writing tests that fail before modifying the code. But even when not using TDD, making sure that tests fail is important. Before checking in, break your code. Best of all is to break the code in a way that would be realistic for a maintenance programmer to do. Then run the tests. See them fail. Check it in to the branch, and watch CI fail. Make sure that this CI failure is clearly communicated: something big must be red, and merging should be impossible, or at least require using a clearly visible "override switch".

If there is no code modification that makes the test fail, of if such code modification is weird or unrealistic, it is not a good test. If a test failure does not halt the CI with a visible message, it is not a good CI. These are false gods, with eyes that do not see, and mouths that do not speak.

Real tests have failures.

Codementor: Creating and hosting a basic web application with Django and Repl.it

$
0
0
A Django tutorial showing how to build a web application using Repl.it. We look at location detection and dynamically show the current weather at visitors' physical locations.

Codementor: My Experience Tutoring Python - Nested Loops

$
0
0
A discussion of my experience tutoring an online python course at the University of South Australia. I discuss how I managed to assist students who had issues understanding nested for loops - which are fundamental concepts in algorithm design.

Codementor: JSON WEB TOKEN BASED Authentication Back-end for Django Project

$
0
0
Learn about how to create a JSON web token based authentication back-end for Django Project.

Kay Hayen: Nuitka this week #2

$
0
0

New Series Rationale

As discussed last week in TWN #1 this is a new series that I am using to highlight things that are going on, newly found issues, hotfixes, all the things Nuitka.

Python 3.7

I made the first release with official 3.7 support, huge milestone in terms of catching up. Generic classes posed a few puzzles, and need more refinements for error handling, but good code works now.

The class creation got a bit more complex, yet again, which will make it even hard to know the exact base classes to be used. But eventually we will manage to overcome this and statically optimize that.

MSI 3.7 files for Nuitka

Building the MSI files for Nuitka ran into a 3.7.0 regression of CPython failing to build them, that I reported and seems to be valid bug of theirs.

So they will be missing for some longer time. Actually I wasn't so sure if they are all that useful, or working as expected for the runners, but with the -m nuitka mode of execution, that ought to be a non-issue. so it would be nice to keep them for those who use them for deployment internally.

Planned Mode

I have a change here. This is going to be a draft post until I publish it, so I might the link, or mention it on the list, but I do not think I will wait for feedback, where there is not going to be all that much.

So I am shooting this off the web site.

Goto Generators

This is an exciting field of work, that I have been busy with this week. I will briefly describe the issue at hand.

So generators in Python are more generally called coroutines in other places, and basically that is code shaking hands, executing resuming in one, handing back a piece of data back and forth.

In Python, the way of doing this is yield and more recently yield from as a convience way for of doing it in a loop in Python3. I still recall the days when that was a statement. Then communication was one way only. Actually when I was still privately doing Nuitka based on then Python 2.5 and was then puzzled for Python 2.6, when I learned in Nuitka about it becoming an expression.

The way this is implemented in Python, is that execution of a frame is simply suspended, and another frame stack bytecode is activated. This switching is of course very fast potentially, the state is already fully preserved on the stack of the virtual machine, which is owned by the frame. For Nuitka, when it still was C++, it wasn't going to be possible to interrupt execution without preserving the stack. So what I did was very similar, and I started to use makecontext/setcontext to implement what I call fibers.

Basically that is C level stack switching, but with a huge issue. Python does not grow stacks, but can need a lot of stack space below. Therefore 1MB or even 2MB per generator was allocated, to be able to make deep function calls if needed.

So using a lot of generators on 32 bits could easily hit a 2GB limit. And now with Python3.5 coroutines people use more and more of them, and hit memory issues.

So, goto generators, now that C is possible, are an entirely new solution. With it, Nuitka will use one stack only. Generator code will become re-entrant, store values between entries on the heap, and continue execution at goto destinations dispatched by a switch according to last exit of the generator.

So I am now making changes to cleanup the way variable declarations and accesses for the C variables are being made. More on that next week though. For now I am very exited about the many cleanups that stem from it. The code generation used to have many special bells and whistles, and they were generalized into one thing now, making for cleaner and easier to understand Nuitka code.

Python3 Enumerators

On interesting thing, is that an incompatiblity related to __new__ will go away now.

The automatic staticmethod that we had to hack into it, because the Python core will do it for uncompiled functions only, had to be done while declaring the class. So it was visible and causing issues with at least the Python enum module, which wants to call your __new__ manually. Because why would it not?!

But turns out, for Python3 the staticmethod is not needed anymore. So this is now only done for Python2, where it is needed, and things work smoothly with this kind of code now too. This is currently in my factory testing and will probably become part of a hotfix if it turns out good.

Hotfixes

Immediately after the release, some rarely run test, where I compiled all the code on my machine, found 2 older bugs, obscure ones arguably, that I made into a hotfix, also because the test runner was having a regression with 3.7, which prevented some package builds. So that was 0.5.32.1 release.

And then I received a bug report about await where a self test of Nuitka fails and reports an optimization error. Very nice, the new exceptions that automatically dump involved nodes as XML made it immediately clear from the report, what is going on, even without having to reproduce anything. I bundled a 3.7 improvement for error cases in class creation with it. So that was the 0.5.32.2 release.

Plans

Finishing goto generators is my top priority, but I am also going over minor issues with the 3.7 test suite, fixing test cases there, and as with e.g. the enum issue, even known issues this now finds.

Until next week.

Bhishan Bhandari: Login to a website using Python

$
0
0

Python is often used for web automation, scraping and process automation. Through this post, I intend to host a set of example code snippets to login to a website programmatically. Often the initial step of web scraping or web process automation is to login to the source website. There are various modules in Python that […]

The post Login to a website using Python appeared first on The Tara Nights.

Marc Richter: Create your own Telegram bot with Django on Heroku – Part 3

$
0
0

In the previous part of this series, I explained how to register bots on Telegram, how to configure it and how to validate everything is working.

Today I will explain a bit more on how the HTTP API works, how the JSON data provided by the bots ist structured and I will introduce you to telepot, the Python module of my choice for interacting with Telegram bots using Python.

Requirements

By now, you should already have a bot registered and know it’s token. Also, you should have sent a few messages to your bot.
It is a good idea to re-send some messages to the bot shortly before you start pulling them from it since otherwise, chances are that they got removed from the Telegram servers in the meantime. From the Telegram API docs:

Incoming updates are stored on the server until the bot receives them either way, but they will not be kept longer than 24 hours.

We will use Python 3.6 for the next steps and I will work in a virtualenv. If you are not already familiar with virtualenv and virtualenvwrapper, please familiarize yourself with these tools first, since that is not covered in this series. But since these are so commonly used tools in the Python world, you won’t have any issues finding guides for this. My personal recommendation is “Python Virtual Environments – A Primer” by RealPython.

Creating a virtualenv

To not interfere with any Python on our system, I will prepare an empty directory on my system and create a new virtualenv for it:

telegrambot $ mkvirtualenv -p python3.6.5 telegram
Running virtualenv with interpreter 
...
(telegram) telegrambot $ pip install telepot
Collecting telepot
...
Installing collected packages: attrs, async-timeout, idna, idna-ssl, chardet, multidict, yarl, aiohttp, urllib3, telepot
Successfully installed aiohttp-3.3.2 async-timeout-3.0.0 attrs-18.1.0 chardet-3.0.4 idna-2.7 idna-ssl-1.1.0 multidict-4.3.1 telepot-12.7 urllib3-1.23 yarl-1.2.6
(telegram) telegrambot $ pip list
Package       Version
------------- -------
aiohttp       3.3.2  
async-timeout 3.0.0  
attrs         18.1.0 
chardet       3.0.4  
idna          2.7    
idna-ssl      1.1.0  
multidict     4.3.1  
pip           18.0   
pkg-resources 0.0.0  
setuptools    40.0.0 
telepot       12.7   
urllib3       1.23   
wheel         0.31.1 
yarl          1.2.6  
(telegram) telegrambot $

Now we should be ready to give this a Python test-drive!

Test-driving the bot with telepot

To start with something easy, the following code should print the messages received by the bot so far to the screen. Please note, that the code tries to extract the bot’s token from the environment variable “BOT_TOKEN”. To make this code work for you, please export your personal bot token to the environment variable “BOT_TOKEN” before launching the Python shell:

telegrambot $ export BOT_TOKEN="my_super_secret_token"

In the Python shell, we do the following to initialize the bot:

>>> import os
>>> import telepot
>>> from pprint import pprint
>>> bot = telepot.Bot(os.environ.get('BOT_TOKEN'))

As you can see, we are fetching the bot token from the previously exported environment variable “BOT_TOKEN”. This is a nice way to make sure it doesn’t get pushed to a code repository in the heat of the moment. Since this will be done like this when we are working with Heroku, it does not hurt to get used to it early.
“pprint” will come in handy in a minute, since it prints JSON like structures nicely.
The rest is pretty straightforward; you have a fully fledged bot object now called “bot”.
To control that we definitely have created this using the correct token, we can print its details:

>>> bot.getMe()
{'id': 667090674, 'is_bot': True, 'first_name': 'MoneyBot', 'username': 'demo76812bot'}
>>> pprint(bot.getMe())
{'first_name': 'MoneyBot',
 'id': 667090674,
 'is_bot': True,
 'username': 'demo76812bot'}

To show how handy “pprint” is, I have shown both variants here. It is not really hard to overlook this, but most certainly you will be happy to make it like this once you are printing multiple messages data structures, which is what we will do next: Let’s have a look at the messages the bot has received so far!

Polling the messages from the bot

The messages can be fetched from the bot while it was not switched to webhook – mode. If you haven’t done this, it should be disabled by default. To make sure, you can use “bot.deleteWebhook()”, but this is absolutely optional.

To grab all the messages from it, simply do the following:

pprint(bot.getUpdates())
[{'message': {'chat': {'first_name': 'Marc',
                       'id': REMOVED,
                       'last_name': 'Richter',
                       'type': 'private'},
              'date': 1533248344,
              'from': {'first_name': 'Marc',
                       'id': REMOVED,
                       'is_bot': False,
                       'language_code': 'de',
                       'last_name': 'Richter'},
              'message_id': 4,
              'text': 'Test'},
  'update_id': 941430900},
 {'message': {'chat': {'first_name': 'Marc',
                       'id': REMOVED,
                       'last_name': 'Richter',
                       'type': 'private'},
              'date': 1533248578,
              'from': {'first_name': 'Marc',
                       'id': REMOVED,
                       'is_bot': False,
                       'language_code': 'de',
                       'last_name': 'Richter'},
              'message_id': 5,
              'text': 'Test2'},
  'update_id': 941430901}]

I think, you already got an idea why “pprint” is a good choice here …
Anyways, let’s take a moment to analyze this JSON structure (you can also look at https://core.telegram.org/bots/api#message for details):

Each element seems to have two elements on the top level:

  • message
  • update_id

While “message” is another structure, “update_id” defines the unique id of this update; no other update has this id. Update IDs are counted up sequentially. So: Newer update IDs will always be of a higher number than older ones. This can be used to prevent a message gets processed several times; when we are in webhook-mode, it can possibly happen that an update is forwarded to our bot multiple times; keep that in mind for now.

Let’s stick to this getUpdates method a bit longer: If you now send another message to your bot and simply repeat this getUpdate code, you will notice that you receive this new update, but together with the previous ones. Normally, we do not want that, since these were processed already.
For this, you can tell getUpdate which updates you want to receive. We already learned from the JSON received before, that in our previous getUpdates call, the latest update ID received was “941430901” (align this to your bot’s IDs!). To just receive what has been sent to it after this, we simply provide this info to the parameters of getUpdates:

pprint(bot.getUpdates(offset=941430901+1))
[{'message': {'chat': {'first_name': 'Marc',
                       'id': REMOVED,
                       'last_name': 'Richter',
                       'type': 'private'},
              'date': 1533331684,
              'from': {'first_name': 'Marc',
                       'id': REMOVED,
                       'is_bot': False,
                       'language_code': 'de',
                       'last_name': 'Richter'},
              'message_id': 6,
              'photo': [{'file_id': 'AgADAgADAqkxGwtWKUtXfH8fbld5p1PJRg4ABOlI9pno9lMDktEEAAEC',
                         'file_size': 1358,
                         'height': 90,
                         'width': 67},
                        {'file_id': 'AgADAgADAqkxGwtWKUtXfH8fbld5p1PJRg4ABMf7egTc09grk9EEAAEC',
                         'file_size': 17479,
                         'height': 320,
                         'width': 240},
                        {'file_id': 'AgADAgADAqkxGwtWKUtXfH8fbld5p1PJRg4ABBz2HFGaVw65lNEEAAEC',
                         'file_size': 35988,
                         'height': 613,
                         'width': 460}]},
  'update_id': 941430902}]

As you can see, the previously received updates are not shown here, thanks to the “offset” parameter.

Working with the data received

Like I already said: These JSON structures are quite close to what Python’s dictionaries work like. You may work with them exactly like you would with a dictionary:

>>> my_dict = {'message': {'chat': {'first_name': 'Marc'}}}
>>> bots_answer = bot.getUpdates(offset=941430902+1)[0]
>>> type(my_dict)
<class 'dict'>
>>> type(bots_answer)
<class 'dict'>
>>> bots_answer['message']['from']['first_name']
'Marc'

Sending yourself a message from the bot

To show you another method, you now will send yourself a message from the bot.
You need your account id for this. You can extract this from the JSON output of the previously fetched updates: it’s in “message[‘from’][‘id’]”.

To send yourself a message, execute the following code:

pprint(bot.sendMessage('YOUR_ID', 'Hello father'))

Finally, you already have someone to talk to! Isn’t this just nice? 😉

About the telepot documentation

I do not want to dive into showing an example for each and every method or parameter telepot knows; I just wanted to show these two examples to help you get an idea and an easy-to-follow-along example. For further details, you will need to consult the official telepot documentation.

That said, I have to give you an idea of the fact that this will not reveal the expected insights in all cases. As the author writes in that docs:

For a time, I tried to list the features here like many projects do. Eventually, I gave up.
Common and straight-forward features are too trivial to worth listing.

For the major count of requests, telepot is merely a 1:1 implementation of the Telegram HTTP-based bot API. And I made the experience, that often when you want to know what something in telepot supports or how something needs to be provided, you find a 1:1 equivalent in the Telegram API docs.

For example:
If you want to know more about the “getUpdates” method of telepot, you can look it up in the reference list of telepot. But even there, the author links to the Telegram docs at https://core.telegram.org/bots/api#getupdates. And see: It explaines all telepot parameters well.

Please keep this in mind when you are searching for additional info; sometimes you will find more detailed info in the Telegram docs instead.

Outlook for the next part of the series

For this part of the series, that’s it again!

Next time, I will show you how to prepare the Django app to act as a destination of the bots messages when it got switched to webhook-mode.

I hope you enjoyed this part! Please let me know of all the things you either enjoyed or did not like that much and how I can do it better in the comments.

Born in 1982, Marc Richter is an IT enthusiastic since 1994. He became addicted when he first put hands on their family’s pc and never stopped investigating and exploring new things since then.
He is married to Jennifer Richter and proud father of two wonderful children, Lotta and Linus.
His current professional focus is DevOps and Python development.

An exhaustive bio can be found at this blog post.

Found my articles useful? Maybe you would like to support my efforts and give me a tip then?

Der Beitrag Create your own Telegram bot with Django on Heroku – Part 3 erschien zuerst auf Marc Richter's personal site.

Bill Ward / AdminTome: Big Data Python: 3 Big Data Analytics Tools

$
0
0

In this post, we will discuss 3 awesome big data Python tools to increase your big data programming skills using production data.

Introduction

In this article, I assume that you are running Python in it’s own environment using virtualenv, pyenv, or some other variant.

The examples in this article make use of IPython so make sure you have it installed to follow along if you like.

$ mkdir python-big-data
$ cd python-big-data
$ virtualenv ../venvs/python-big-data
$ source ../venvs/python-big-data/bin/activate
$ pip install ipython
$ pip install pandas
$ pip install pyspark
$ pip install scikit-learn
$ pip install scipy

Now let’s get some data to play around with.

Python Data

As we go through this article, I will be using some sample data to go through the examples.

The Python Data that we will be using are actual production logs from this website over the course of a couple days time.  This data isn’t technically big data yet because it is only about 2 Mb in size, but it will work great for our purposes.

I have to beef up my infrastructure a bit in order to get big data sized samples ( > 1Tb ).

To get the sample data you can use git to pull it down from my public GitHub repo: admintome/access-log-data

$ git clone https://github.com/admintome/access-log-data.git

The data is a simple CSV file so each line represents an individual log and the fields separated by commas:

2018-08-01 17:10,'www2','www_access','172.68.133.49 - - [01/Aug/2018:17:10:15 +0000] "GET /wp-content/uploads/2018/07/spark-mesos-job-complete-1024x634.png HTTP/1.0" 200 151587 "https://dzone.com/""Mozilla/5.0 (Macintosh; Intel Mac OS X 10_12_6) AppleWebKit/537.36 (KHTML, like Gecko) Chrome/67.0.3396.99 Safari/537.36"'

Here is the schema for a log line:

Sample Big Data Schema

Now that we have the data we are going to use lets checkout 3 big data python tools.

Because of the complexity of the many operations that can be performed on data, this article will focus on demonstrating how to load our data and get a small sample of the data.

For each tool listed, I will give links to find out more information.

Python Pandas

The first tool we will discuss is Python Pandas.  As it’s website states, Pandas is an open source Python Data Analysis Library.

Let’s fire up IPython and do some operations on our sample data.

import pandas as pd

headers = ["datetime", "source", "type", "log"]
df = pd.read_csv('access_logs_parsed.csv', quotechar="'", names=headers)

After about a second it should respond back with:

[6844 rows x 4 columns]

In [3]: 

As you can see we have about 7000 rows of data and we can see that it found four columns which matches our schema described above.

Pandas created a DataFrame object representing our CSV file automatically!  Let’s check out a sample of the data imported with the head() function.

In [11]: df.head()
Out[11]: 
           datetime source        type                                                log
0  2018-08-01 17:10   www2  www_access  172.68.133.49 - - [01/Aug/2018:17:10:15 +0000]...
1  2018-08-01 17:10   www2  www_access  162.158.255.185 - - [01/Aug/2018:17:10:15 +000...
2  2018-08-01 17:10   www2  www_access  108.162.238.234 - - [01/Aug/2018:17:10:22 +000...
3  2018-08-01 17:10   www2  www_access  172.68.47.211 - - [01/Aug/2018:17:10:50 +0000]...
4  2018-08-01 17:11   www2  www_access  141.101.96.28 - - [01/Aug/2018:17:11:11 +0000]...

There is a ton you can do with Python Pandas and Big Data.  Python alone is great for munging your data and getting it prepared.  Now with Pandas you can do data analytics in Python as well.  Data scientists typically use Python Pandas together with IPython to interactively analyze huge data sets and gain meaningful business intelligence from that data.  Checkout their website above for more information.

PySpark

The next tool we will talk about is PySpark.  This is a library from the Apache Spark project for Big Data Analytics.

PySpark gives us a lot of functionality for Analyzing Big Data in Python.  It comes with its own shell that you can run from the command line.

$ pyspark

This loads the pytspark shell.

(python-big-data) bill@admintome:~/Development/access-log-data$ pyspark
Python 3.6.5 (default, Apr  1 2018, 05:46:30) 
[GCC 7.3.0] on linux
Type "help", "copyright", "credits" or "license" for more information.
2018-08-03 18:13:38 WARN  Utils:66 - Your hostname, admintome resolves to a loopback address: 127.0.1.1; using 192.168.1.153 instead (on interface enp0s3)
2018-08-03 18:13:38 WARN  Utils:66 - Set SPARK_LOCAL_IP if you need to bind to another address
2018-08-03 18:13:39 WARN  NativeCodeLoader:62 - Unable to load native-hadoop library for your platform... using builtin-java classes where applicable
Setting default log level to "WARN".
To adjust logging level use sc.setLogLevel(newLevel). For SparkR, use setLogLevel(newLevel).
Welcome to
      ____              __
     / __/__  ___ _____/ /__
    _\ \/ _ \/ _ `/ __/  '_/
   /__ / .__/\_,_/_/ /_/\_\   version 2.3.1
      /_/

Using Python version 3.6.5 (default, Apr  1 2018 05:46:30)
SparkSession available as 'spark'.
>>> 

And when you start the shell, you also get a web GUI to see the status of you jobs simply browse to http://localhost:4040and you will get the PySpark Web GUI

PySpark - Python tool for big data

Let’s use the PySpark Shell to load our sample data.

dataframe = spark.read.format("csv").option("header","false").option("mode","DROPMALFORMED").option("quote","'").load("access_logs.csv")
dataframe.show()

PySpark will give us a sample of the DataFrame that was created.

>>> dataframe2.show()
+----------------+----+----------+--------------------+
|             _c0| _c1|       _c2|                 _c3|
+----------------+----+----------+--------------------+
|2018-08-01 17:10|www2|www_access|172.68.133.49 - -...|
|2018-08-01 17:10|www2|www_access|162.158.255.185 -...|
|2018-08-01 17:10|www2|www_access|108.162.238.234 -...|
|2018-08-01 17:10|www2|www_access|172.68.47.211 - -...|
|2018-08-01 17:11|www2|www_access|141.101.96.28 - -...|
|2018-08-01 17:11|www2|www_access|141.101.96.28 - -...|
|2018-08-01 17:11|www2|www_access|162.158.50.89 - -...|
|2018-08-01 17:12|www2|www_access|192.168.1.7 - - [...|
|2018-08-01 17:12|www2|www_access|172.68.47.151 - -...|
|2018-08-01 17:12|www2|www_access|192.168.1.7 - - [...|
|2018-08-01 17:12|www2|www_access|141.101.76.83 - -...|
|2018-08-01 17:14|www2|www_access|172.68.218.41 - -...|
|2018-08-01 17:14|www2|www_access|172.68.218.47 - -...|
|2018-08-01 17:14|www2|www_access|172.69.70.72 - - ...|
|2018-08-01 17:15|www2|www_access|172.68.63.24 - - ...|
|2018-08-01 17:18|www2|www_access|192.168.1.7 - - [...|
|2018-08-01 17:18|www2|www_access|141.101.99.138 - ...|
|2018-08-01 17:19|www2|www_access|192.168.1.7 - - [...|
|2018-08-01 17:19|www2|www_access|162.158.89.74 - -...|
|2018-08-01 17:19|www2|www_access|172.68.54.35 - - ...|
+----------------+----+----------+--------------------+
only showing top 20 rows

Again we can see that there are four columns in our DataFrame which matches our schema.  A DataFrame is simply an in-memory representation of the data and can be thought of like a database table or excel spreadsheet.

Now on to our last tool.

Python SciKit-Learn

Any discussion on big data will invariably lead to a discussion about Machine Learning.  And luckily for us Python developers we have plenty of options to make use of Machine Learning algorithms.

Without going into too much detail on Machine Learning, we need to get some data to perform learning on.  The sample data I have provided in this article doesn’t work well as-is because it is not numerical data.  We would need to manipulate the data and present it into a numerical format which is beyond the scope of this article.  For example, we could map the log entries by time to get a DataFrame with two columns: number of logs in a minute and the current minute:

+------------------+---+
| 2018-08-01 17:10 | 4 |
+------------------+---+
| 2018-08-01 17:11 | 1 |
+------------------+---+

With our data in this form we can perform Machine Learning to predict the number of visitors we are likely to get in a future time.  But like I mentioned, that is outside of the scope of this article.

Luckily for us, SciKit-Learn comes with some sample data sets!  Let’s load some sample data and see what we can do.

In [1]: from sklearn import datasets

In [2]: iris = datasets.load_iris()

In [3]: digits = datasets.load_digits()

In [4]: print(digits.data)
[[ 0.  0.  5. ...  0.  0.  0.]
 [ 0.  0.  0. ... 10.  0.  0.]
 [ 0.  0.  0. ... 16.  9.  0.]
 ...
 [ 0.  0.  1. ...  6.  0.  0.]
 [ 0.  0.  2. ... 12.  0.  0.]
 [ 0.  0. 10. ... 12.  1.  0.]]

This loads two datasets are used for classification machine learning algorithms for classifying your data.

Checkout the SciKit-Learn Basic Tutorial for information.

Conclusion

Given these three Python Big Data tools, Python is a major player in the Big Data game along with R and Scala.

I hope that you have enjoyed this article.  If you have then please share it.  Also please comment below.

If you are new to Big Data and would like to know more then be sure to register for my free Introduction to Big Data course at AdminTome Online-Training.

Also be sure to see other great Big Data articles on AdminTome Blog.

The post Big Data Python: 3 Big Data Analytics Tools appeared first on AdminTome Blog.

Ian Ozsvald: Keynote at EuroPython 2018 on “Citizen Science”

$
0
0

I’ve just had the privilege of giving my first keynote at EuroPython (and my second keynote this year), I’ve just spoken on “Citizen Science”. I gave a talk aimed at engineers showing examples of projects around healthcare and humanitarian topics using Python that make the world a better place. The main point was “gather your data, draw graphs, start to ask questions”– this is something that anyone can do.

Last day. Morning keynote by @IanOzsvald (sp.) “Citizen Science”. Really cool talk! – @bz_sara

EuroPython crowd for my keynote

In the talk I covered 4 short stories and then gave a live demo of a Jupyter Lab to graph some audience-collected data:

  • Gorjan‘s talk on Macedonian awful-air-quality from PyDataAmsterdam 2018
  • My talks on solving Sneeze Diagnosis given at PyDataLondon 2017, ODSC 2017 and elsewhere
  • Anna‘s talk on improving baby-delivery healthcare from PyDataWarsaw 2017
  • Dirk‘s talk on saving Orangutangs with Drones from PyDataAmsterdam 2017
  • Jupyter Lab demo on “guessing my dog’s weight” to crowd-source guesses which we investigate using a Lab

The goal of the live demo was to a) collect data (before and after showing photos of my dog) and b) show some interesting results that come out of graphing the results using histograms so that c) everyone realises that drawing graphs of their own data is possible and perhaps is something they too can try. Whilst having folk estimate my dog’s weight won’t change the world, getting them involved in collecting and thinking about data will, I hope, get more folk engaged outside of the conference.

The slides are here.

One of the audience members took some notes:

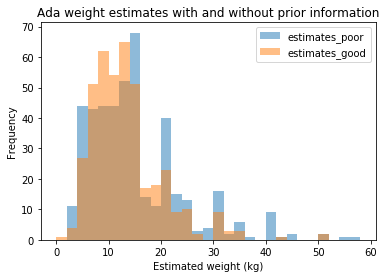
Here’s some output. Approximately 440 people participated in the two single-answer surveys. The first (poor-information estimate) is “What’s the weight of my dog in kg when you know nothing about the dog?” and the second (good-information estimate) is “The same, but now you’ve seen 8+ pictures of my dog”.

With poor information folk tended to go for the round numbers (see the spikes at 15, 20, 30, 35, 40). After the photos were shown the variance reduced (the talk used more graphs to show this), which is what I wanted to see. Ada’s actual weight is 17kg so the “wisdom of the crowds” estimate was off, but not terribly so and since this wasn’t a dog-fanciers crowd, that’s hardly surprising!

Before showing the photos the median estimate was 12.85kg (mean 14.78kg) from 448 estimates. The 5% quantile was 4kg, 95% quantile 34kg, so 90% of the estimates had a range of 30kg.

After showing the photos the median estimate was 12kg (mean 12.84kg) from 412 estimates. The 5% quantile was 5kg, 95% quantile 25kg, so 90% of the estimates had a range of 20kg.

There were only a couple of guesses above 80kg before showing the photos, none after showing the photos. A large heavy dog can weight over 100kg so a guess that high, before knowing anything about my dog, was feasible.

Around 3% of my audience decided to test my CSV parsing code during my live demo (oh, the wags) with somewhat “tricky” values including “NaN”, “None”, “Null”, “Inf”, “∞”, “-15”, “⁴4”, “1.00E+106”, “99999999999”, “Nana”, “1337” (i.e. leet!), “1-30”, “+[[]]” (???). The “show the raw values in a histogram” cell blew up with this input but the subsequent cells (using a mask to select only a valid positive range) all worked fine. Ah, live demos.

The slides conclude with two sets of links, one of which points the reader at open data sources which could be used in your own explorations.


Ian applies Data Science as an AI/Data Scientist for companies in ModelInsight and in his Mor Consulting, sign-up for Data Science tutorials in London. He also founded the image and text annotation API Annotate.io, lives in London and is a consumer of fine coffees.

The post Keynote at EuroPython 2018 on “Citizen Science” appeared first on Entrepreneurial Geekiness.

Codementor: Test Code before Development (TDD).

$
0
0
A tested code is always given preference to go out on Production than an un-tested code. And through writting unit-tests a developer can reduce it's development effort to re-work.

Weekly Python StackOverflow Report: (cxxxvii) stackoverflow python report

$
0
0

Codementor: On Using Hyperopt: Advanced Machine Learning

$
0
0
In Machine Learning one of the biggest problem faced by the practitioners in the process is choosing the correct set of hyper-parameters. And it takes a lot of time in tuning them accordingly, to...

Python Bytes: #89 A tenasious episode that won't give up

Semaphore Community: Building and Testing an API Wrapper in Python

$
0
0

This article is brought with ❤ to you by Semaphore.

Introduction

Most websites we use provide an HTTP API to enable developers to access their data from their own applications. For developers utilizing the API, this usually involves making some HTTP requests to the service, and using the responses in their applications. However, this may get tedious since you have to write HTTP requests for each API endpoint you intend to use. Furthermore, when a part of the API changes, you have to edit all the individual requests you have written.

A better approach would be to use a library in your language of choice that helps you abstract away the API's implementation details. You would access the API through calling regular methods provided by the library, rather than constructing HTTP requests from scratch. These libraries also have the advantage of returning data as familiar data structures provided by the language, hence enabling idiomatic ways to access and manipulate this data.

In this tutorial, we are going to write a Python library to help us communicate with The Movie Database's API from Python code.

By the end of this tutorial, you will learn:

  • How to create and test a custom library which communicates with a third-party API and
  • How to use the custom library in a Python script.

Prerequisites

Before we get started, ensure you have one of the following Python versions installed:

  • Python 2.7, 3.3, 3.4, or 3.5

We will also make use of the Python packages listed below:

  • requests - We will use this to make HTTP requests,
  • vcrpy - This will help us record HTTP responses during tests and test those responses, and
  • pytest - We will use this as our testing framework.

Project Setup

We will organize our project as follows:

.
├── requirements.txt
├── tests
│   ├── __init__.py
│   ├── test_tmdbwrapper.py
│   └── vcr_cassettes
└── tmdbwrapper
    └── __init__.py
    └── tv.py

This sets up a folder for our wrapper and one for holding the tests. The vcr_cassettes subdirectory inside tests will store our recorded HTTP interactions with The Movie Database's API.

Our project will be organized around the functionality we expect to provide in our wrapper. For example, methods related to TV functionality will be in the tv.py file under the tmdbwrapper directory.

We need to list our dependencies in the requirements.txt file as follows. At the time of writing, these are the latest versions. Update the version numbers if later versions have been published by the time you are reading this.

requests==2.11.1
vcrpy==1.10.3
pytest==3.0.3

Finally, let's install the requirements and get started:

pip install -r requirements.txt

Test-driven Development

Following the test-driven development practice, we will write the tests for our application first, then implement the functionality to make the tests pass.

For our first test, let's test that our module will be able to fetch a TV show's info from TMDb successfully.

# tests/test_tmdbwrapper.pyfromtmdbwrapperimportTVdeftest_tv_info():"""Tests an API call to get a TV show's info"""tv_instance=TV(1396)response=tv_instance.info()assertisinstance(response,dict)assertresponse['id']==1396,"The ID should be in the response"

In this initial test, we are demonstrating the behavior we expect our complete module to exhibit. We expect that our tmdbwrapper package will contain a TV class, which we can then instantiate with a TMDb TV ID. Once we have an instance of the class, when we call the info method, it should return a dictionary containing the TMDb TV ID we provided under the 'id' key.

To run the test, execute the py.test command from the root directory. As expected, the test will fail with an error message that should contain something similar to the following snippet:

    ImportError while importing test module '/Users/kevin/code/python/tmdbwrapper/tests/test_tmdbwrapper.py'.
    'cannot import name TV'
    Make sure your test modules/packages have valid Python names.

This is because the tmdbwrapper package is empty right now. From now on, we will write the package as we go, adding new code to fix the failing tests, adding more tests and repeating the process until we have all the functionality we need.

Implementing Functionality in Our API Wrapper

To start with, the minimal functionality we can add at this stage is creating the TV class inside our package.

Let's go ahead and create the class in the tmdbwrapper/tv.py file:

# tmdbwrapper/tv.pyclassTV(object):pass

Additionally, we need to import the TV class in the tmdbwrapper/__init__.py file, which will enable us to import it directly from the package.

# tmdbwrapper/__init__.pyfrom.tvimportTV

At this point, we should re-run the tests to see if they pass. You should now see the following error message:

>        tv_instance = TV(1396)
    E       TypeError: object() takes no parameters

We get a TypeError. This is good. We seem to be making some progress. Reading through the error, we can see that it occurs when we try to instantiate the TV class with a number. Therefore, what we need to do next is implement a constructor for the TV class that takes a number. Let's add it as follows:

# tmdbwrapper/tv.pyclassTV(object):def__init__(self,id):pass

As we just need the minimal viable functionality right now, we will leave the constructor empty, but ensure that it receives self and id as parameters. This id parameter will be the TMDb TV ID that will be passed in.

Now, let's re-run the tests and see if we made any progress. We should see the following error message now:

>       response = tv_instance.info()
E       AttributeError: 'TV' object has no attribute 'info'

This time around, the problem is that we are using the info method from the tv_instance, and this method does not exist. Let's add it.

# tmdbwrapper/tv.pyclassTV(object):def__init__(self,id):passdefinfo(self):pass

After running the tests again, you should see the following failure:

>       assert isinstance(response, dict)
    E       assert False
    E        +  where False = isinstance(None, dict)

For the first time, it's the actual test failing, and not an error in our code. To make this pass, we need to make the info method return a dictionary. Let's also pre-empt the next failure we expect. Since we know that the returned dictionary should have an id key, we can return a dictionary with an 'id' key whose value will be the TMDb TV ID provided when the class is initialized.

To do this, we have to store the ID as an instance variable, in order to access it from the info function.

# tmdbwrapper/tv.pyclassTV(object):def__init__(self,id):self.id=iddefinfo(self):return{'id':self.id}

If we run the tests again, we will see that they pass.

Writing Foolproof Tests

You may be asking yourself why the tests are passing, since we clearly have not fetched any info from the API. Our tests were not exhaustive enough. We need to actually ensure that the correct info that has been fetched from the API is returned.

If we take a look at the TMDb documentation for the TV info method, we can see that there are many additional fields returned from the TV info response, such as poster_path, popularity, name, overview, and so on.

We can add a test to check that the correct fields are returned in the response, and this would in turn help us ensure that our tests are indeed checking for a correct response object back from the info method.

For this case, we will select a handful of these properties and ensure that they are in the response. We will use pytest fixtures for setting up the list of keys we expect to be included in the response.

Our test will now look as follows:

# tests/test_tmdbwrapper.pyfrompytestimportfixturefromtmdbwrapperimportTV@fixturedeftv_keys():# Responsible only for returning the test datareturn['id','origin_country','poster_path','name','overview','popularity','backdrop_path','first_air_date','vote_count','vote_average']deftest_tv_info(tv_keys):"""Tests an API call to get a TV show's info"""tv_instance=TV(1396)response=tv_instance.info()assertisinstance(response,dict)assertresponse['id']==1396,"The ID should be in the response"assertset(tv_keys).issubset(response.keys()),"All keys should be in the response"

Pytest fixtures help us create test data that we can then use in other tests. In this case, we create the tv_keys fixture which returns a list of some of the properties we expect to see in the TV response. The fixture helps us keep our code clean, and explicitly separate the scope of the two functions.

You will notice that the test_tv_info method now takes tv_keys as a parameter. In order to use a fixture in a test, the test has to receive the fixture name as an argument. Therefore, we can make assertions using the test data. The tests now help us ensure that the keys from our fixtures are a subset of the list of keys we expect from the response.

This makes it a lot harder for us to cheat in our tests in future, as we did before.

Running our tests again should give us a constructive error message which fails because our response does not contain all the expected keys.

Fetching Data from TMDb

To make our tests pass, we will have to construct a dictionary object from the TMDb API response and return that in the info method.

Before we proceed, please ensure you have obtained an API key from TMDb by registering. All the available info provided by the API can be viewed in the API Overview page and all methods need an API key. You can request one after registering your account on TMDb.

First, we need a requests session that we will use for all HTTP interactions. Since the api_key parameter is required for all requests, we will attach it to this session object so that we don't have to specify it every time we need to make an API call. For simplicity, we will write this in the package's __init__.py file.

# tmdbwrapper/__init__.pyimportosimportrequestsTMDB_API_KEY=os.environ.get('TMDB_API_KEY',None)classAPIKeyMissingError(Exception):passifTMDB_API_KEYisNone:raiseAPIKeyMissingError("All methods require an API key. See ""https://developers.themoviedb.org/3/getting-started/introduction ""for how to retrieve an authentication token from ""The Movie Database")session=requests.Session()session.params={}session.params['api_key']=TMDB_API_KEYfrom.tvimportTV

We define a TMDB_API_KEY variable which gets the API key from the TMDB_API_KEY environment variable. Then, we go ahead and initialize a requests session and provide the API key in the params object. This means that it will be appended as a parameter to each request we make with this session object. If the API key is not provided, we will raise a custom APIKeyMissingError with a helpful error message to the user.

Next, we need to make the actual API request in the info method as follows:

# tmdbwrapper/tv.pyfrom.importsessionclassTV(object):def__init__(self,id):self.id=iddefinfo(self):path='https://api.themoviedb.org/3/tv/{}'.format(self.id)response=session.get(path)returnresponse.json()

First of all, we import the session object that we defined in the package root. We then need to send a GET request to the TV info URL that returns details about a single TV show, given its ID. The resulting response object is then returned as a dictionary by calling the .json() method on it.

There's one more thing we need to do before wrapping this up. Since we are now making actual API calls, we need to take into account some API best practices. We don't want to make the API calls to the actual TMDb API every time we run our tests, since this can get you rate limited.

A better way would be to save the HTTP response the first time a request is made, then reuse this saved response on subsequent test runs. This way, we minimize the amount of requests we need to make on the API and ensure that our tests still have access to the correct data. To accomplish this, we will use the vcr package:

# tests/test_tmdbwrapper.pyimportvcr@vcr.use_cassette('tests/vcr_cassettes/tv-info.yml')deftest_tv_info(tv_keys):"""Tests an API call to get a TV show's info"""tv_instance=TV(1396)response=tv_instance.info()assertisinstance(response,dict)assertresponse['id']==1396,"The ID should be in the response"assertset(tv_keys).issubset(response.keys()),"All keys should be in the response"

We just need to instruct vcr where to store the HTTP response for the request that will be made for any specific test. See vcr's docs on detailed usage information.

At this point, running our tests requires that we have a TMDB_API_KEY environment variable set, or else we'll get an APIKeyMissingError. One way to do this is by setting it right before running the tests, i.e. TMDB_API_KEY='your-tmdb-api-key' py.test.

Running the tests with a valid API key should have them passing.

Adding More Functions

Now that we have our tests passing, let's add some more functionality to our wrapper. Let's add the ability to return a list of the most popular TV shows on TMDb. We can add the following test:

# tests/test_tmdbwrapper.py@vcr.use_cassette('tests/vcr_cassettes/tv-popular.yml')deftest_tv_popular():"""Tests an API call to get a popular tv shows"""response=TV.popular()assertisinstance(response,dict)assertisinstance(response['results'],list)assertisinstance(response['results'][0],dict)assertset(tv_keys).issubset(response['results'][0].keys())

Note that we are instructing vcr to save the API response in a different file. Each API response needs its own file.

For the actual test, we need to check that the response is a dictionary and contains a results key, which contains a list of TV show dictionary objects. Then, we check the first item in the results list to ensure it is a valid TV info object, with a test similar to the one we used for the info method.

To make the new tests pass, we need to add the popular method to the TV class. It should make a request to the popular TV shows path, and then return the response serialized as a dictionary.
Let's add the popular method to the TV class as follows:

# tmdbwrapper/tv.py@staticmethoddefpopular():path='https://api.themoviedb.org/3/tv/popular'response=session.get(path)returnresponse.json()

Also, note that this is a staticmethod, which means it doesn't need the class to be initialized for it to be used. This is because it doesn't use any instance variables, and it's called directly from the class.

All our tests should now be passing.

Taking Our API Wrapper for a Spin

Now that we've implemented an API wrapper, let's check if it works by using it in a script. To do this, we will write a program that lists out all the popular TV shows on TMDb along with their popularity rankings. Create a file in the root folder of our project. You can name the file anything you like — ours is called testrun.py.

# example.pyfrom__future__importprint_functionfromtmdbwrapperimportTVpopular=TV.popular()fornumber,showinenumerate(popular['results'],start=1):print("{num}. {name} - {pop}".format(num=number,name=show['name'],pop=show['popularity']))

If everything is working correctly, you should see an ordered list of the current popular TV shows and their popularity rankings on The Movie Database.

Filtering Out the API Key

Since we are saving our HTTP responses to a file on a disk, there are chances we might expose our API key to other people, which is a Very Bad Idea™, since other people might use it for malicious purposes. To deal with this, we need to filter out the API key from the saved responses. To do this, we need to add a filter_query_parameters keyword argument to the vcr decorator methods as follows:

@vcr.use_cassette('tests/vcr_cassettes/tv-popular.yml',filter_query_parameters=['api_key'])

This will save the API responses, but it will leave out the API key.

Continuous Testing on Semaphore CI

Lastly, let's add continuous testing to our application using Semaphore CI.

We want to ensure that our package works on various platforms and that we don't accidentally break functionality in future versions. We do this through continuous automatic testing.

Ensure you've committed everything on Git, and push your repository to GitHub or Bitbucket, which will enable Semaphore to fetch your code. Next, sign up for a free Semaphore account, if don't have one already. Once you've confirmed your email, it's time to create a new project.

Follow these steps to add the project to Semaphore:

  1. Once you're logged into Semaphore, navigate to your list of projects and click the "Add New Project" button:

    Add New Project Screen

  2. Next, select the account where you wish to add the new project.

    Select Account Screen

  3. Select the repository that holds the code you'd like to build:

    Select Repository Screen

  4. Configure your project as shown below:

    Project Configuration Screen

Finally, wait for the first build to run.

It should fail, since as we recall, the TMDB_API_KEY environment key is required for the tests to run.

Navigate to the Project Settings page of your application and add your API key as an environment variable as shown below:

Add environment variable screen

Make sure to check the Encrypt content checkbox when adding the key to ensure the API key will not be publicly visible. Once you've added that and re-run the build, your tests should be passing again.

Conclusion

We have learned how to write a Python wrapper for an HTTP API by writing one ourselves. We have also seen how to test such a library and what are some best practices around that, such as not exposing our API keys publicly when recording HTTP responses.

Adding more methods and functionality to our API wrapper should be straightforward, since we have set up methods that should guide us if we need to add more. We encourage you to check out the API and implement one or two extra methods to practice. This should be a good starting point for writing a Python wrapper for any API out there.

Please reach out with any questions or feedback that you may have in the comments section below. You can also check out the complete code and contribute on GitHub.

This article is brought with ❤ to you by Semaphore.

PyBites: PyBites Twitter Digest - Issue 26, 2018

$
0
0

PyPI has a Twitter Account! Follow them!

Congrats to our mate Cristian Medina! Very proud!

While we're at it, check out Cristian's awesome write up on asyncio in Python 3.7

Very cool use case of OpenCV

New Talk Python course on Pyramid and SQLAlchemy!

Security vulnerability alerts for Python

Now this one looks like fun! A serverless blog!

TensorFlow supports the Raspberry Pi!

Python text mining at its best ha!

More OpenCV. I know some people who'd get a kick out of this!

Get it right from the start

Twilio studio is Generally Available! Nice!

Create a Windows Service in Python

I laughed out loud!


>>>frompybitesimportBob,JulianKeepCalmandCodeinPython!

Bhishan Bhandari: Examples of Browser Automations using Selenium in Python

$
0
0

Browser Automation is one of the coolest things to do especially when there is a major purpose to it. Through this post, I intend to host a set of examples on browser automation using selenium in Python so people can take ideas from the code snippets below to perform browser automation as per their need. […]

The post Examples of Browser Automations using Selenium in Python appeared first on The Tara Nights.

Viewing all 22647 articles
Browse latest View live