Quantcast
Channel: Planet Python
Viewing all 24369 articles
Browse latest View live

Stack Abuse: Hierarchical Clustering with Python and Scikit-Learn

$
0
0

Hierarchical clustering is a type of unsupervised machine learning algorithm used to cluster unlabeled data points. Like K-means clustering, hierarchical clustering also groups together the data points with similar characteristics. In some cases the result of hierarchical and K-Means clustering can be similar. Before implementing hierarchical clustering using Scikit-Learn, let's first understand the theory behind hierarchical clustering.

Theory of Hierarchical Clustering

There are two types of hierarchical clustering: Agglomerative and Divisive. In the former, data points are clustered using a bottom-up approach starting with individual data points, while in the latter top-down approach is followed where all the data points are treated as one big cluster and the clustering process involves dividing the one big cluster into several small clusters.

In this article we will focus on agglomerative clustering that involves the bottom-up approach.

Steps to Perform Hierarchical Clustering

Following are the steps involved in agglomerative clustering:

  1. At the start, treat each data point as one cluster. Therefore, the number of clusters at the start will be K, while K is an integer representing the number of data points.
  2. Form a cluster by joining the two closest data points resulting in K-1 clusters.
  3. Form more clusters by joining the two closest clusters resulting in K-2 clusters.
  4. Repeat the above three steps until one big cluster is formed.
  5. Once single cluster is formed, dendrograms are used to divide into multiple clusters depending upon the problem. We will study the concept of dendrogram in detail in an upcoming section.

There are different ways to find distance between the clusters. The distance itself can be Euclidean or Manhattan distance. Following are some of the options to measure distance between two clusters:

  1. Measure the distance between the closes points of two clusters.
  2. Measure the distance between the farthest points of two clusters.
  3. Measure the distance between the centroids of two clusters.
  4. Measure the distance between all possible combination of points between the two clusters and take the mean.

Role of Dendrograms for Hierarchical Clustering

In the last section, we said that once one large cluster is formed by the combination of small clusters, dendrograms of the cluster are used to actually split the cluster into multiple clusters of related data points. Let's see how it's actually done.

Suppose we have a collection of data points represented by a numpy array as follows:

import numpy as np

X = np.array([[5,3],  
    [10,15],
    [15,12],
    [24,10],
    [30,30],
    [85,70],
    [71,80],
    [60,78],
    [70,55],
    [80,91],])

Let's plot the above data points. To do so, execute the following code:

import matplotlib.pyplot as plt

labels = range(1, 11)  
plt.figure(figsize=(10, 7))  
plt.subplots_adjust(bottom=0.1)  
plt.scatter(X[:,0],X[:,1], label='True Position')

for label, x, y in zip(labels, X[:, 0], X[:, 1]):  
    plt.annotate(
        label,
        xy=(x, y), xytext=(-3, 3),
        textcoords='offset points', ha='right', va='bottom')
plt.show()  

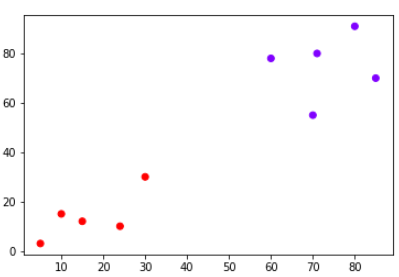
The script above draws the data points in the Xnumpy array and label data points from 1 to 10. In the image below you'll see that the plot that is generated from this code:

Data point plot

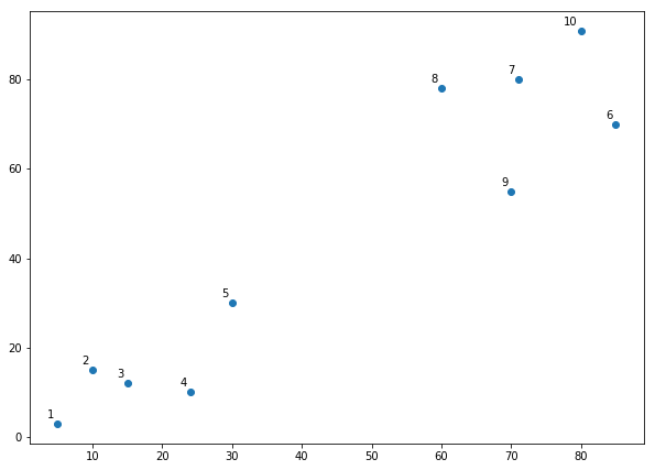
Let's name the above plot as Graph1. It can be seen from the naked eye that the data points form two clusters: first at the bottom left consisting of points 1-5 while second at the top right consisting of points 6-10.

However, in the real world, we may have thousands of data points in many more than 2 dimensions. In that case it would not be possible to spot clusters with the naked eye. This is why clustering algorithms have been developed.

Coming back to use of dendrograms in hierarchical clustering, let's draw the dendrograms for our data points. We will use the scipy library for that purpose. Execute the following script:

from scipy.cluster.hierarchy import dendrogram, linkage  
from matplotlib import pyplot as plt

linked = linkage(X, 'single')

labelList = range(1, 11)

plt.figure(figsize=(10, 7))  
dendrogram(linked,  
            orientation='top',
            labels=labelList,
            distance_sort='descending',
            show_leaf_counts=True)
plt.show()  

The output graph looks like the one below. Let's name this plot Graph2.

Dendrogram plot

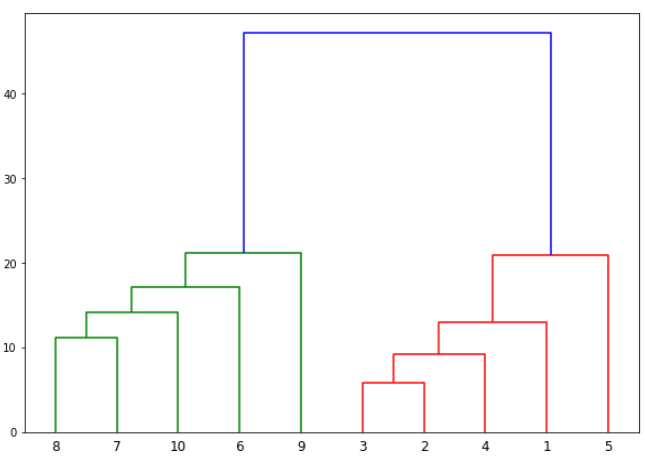
The algorithm starts by finding the two points that are closest to each other on the basis of Euclidean distance. If we look back at Graph1, we can see that points 2 and 3 are closest to each other while points 7 and 8 are closes to each other. Therefore a cluster will be formed between these two points first. In Graph2, you can see that the dendograms have been created joining points 2 with 3, and 8 with 7. The vertical height of the dendogram shows the Euclidean distances between points. From Graph2, it can be seen that Euclidean distance between points 8 and 7 is greater than the distance between point 2 and 3.

The next step is to join the cluster formed by joining two points to the next nearest cluster or point which in turn results in another cluster. If you look at Graph1, point 4 is closest to cluster of point 2 and 3, therefore in Graph2 dendrogram is generated by joining point 4 with dendrogram of point 2 and 3. This process continues until all the points are joined together to form one big cluster.

Once one big cluster is formed, the longest vertical distance without any horizontal line passing through it is selected and a horizontal line is drawn through it. The number of vertical lines this newly created horizontal line passes is equal to number of clusters. Take a look at the following plot:

Dendrogram plot with horizontal line 1

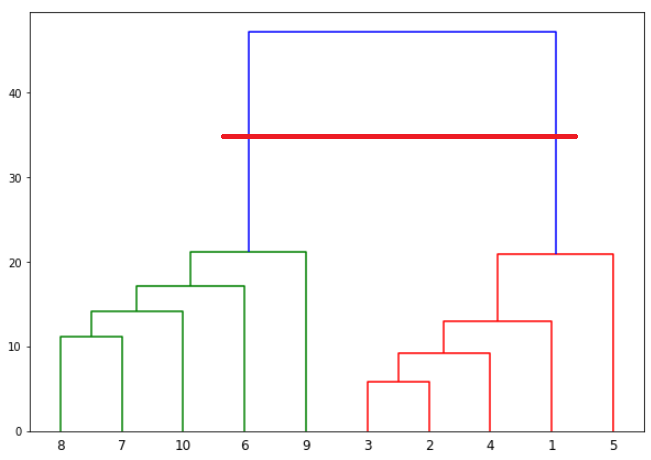
We can see that the largest vertical distance without any horizontal line passing through it is represented by blue line. So we draw a new horizontal red line that passes through the blue line. Since it crosses the blue line at two points, therefore the number of clusters will be 2.

Basically the horizontal line is a threshold, which defines the minimum distance required to be a separate cluster. If we draw a line further down, the threshold required to be a new cluster will be decreased and more clusters will be formed as see in the image below:

Dendrogram plot with horizontal line 2

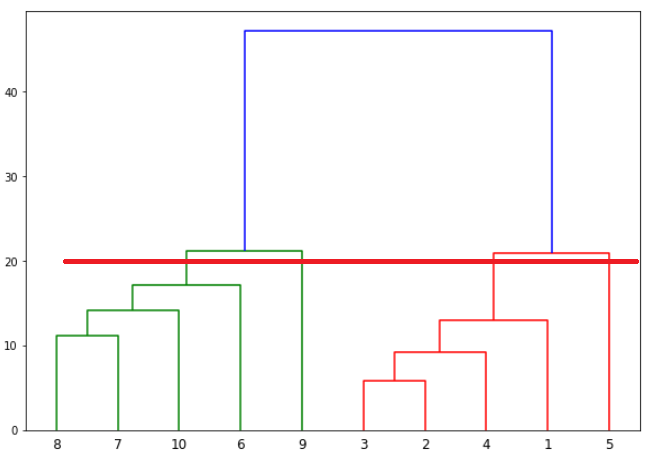
In the above plot, the horizontal line passes through four vertical lines resulting in four clusters: cluster of points 6,7,8 and 10, cluster of points 3,2,4 and points 9 and 5 will be treated as single point clusters.

Hierarchical Clustering via Scikit-Learn

Enough of the theory, now let's implement hierarchical clustering using Python's Scikit-Learn library.

Example 1

In our first example we will cluster the Xnumpy array of data points that we created in the previous section.

The process of clustering is similar to any other unsupervised machine learning algorithm. We start by importing the required libraries:

import matplotlib.pyplot as plt  
import pandas as pd  
%matplotlib inline
import numpy as np  

The next step is to import or create the dataset. In this example, we'll use the following example data:

X = np.array([[5,3],  
    [10,15],
    [15,12],
    [24,10],
    [30,30],
    [85,70],
    [71,80],
    [60,78],
    [70,55],
    [80,91],])

The next step is to import the class for clustering and call its fit_predict method to predict the clusters that each data point belongs to.

Take a look at the following script:

from sklearn.cluster import AgglomerativeClustering

cluster = AgglomerativeClustering(n_clusters=2, affinity='euclidean', linkage='ward')  
cluster.fit_predict(X)  

In the code above we import the AgglomerativeClustering class from the "sklearn.cluster" library. The number of parameters is set to 2 using the n_clusters parameter while the affinity is set to "euclidean" (distance between the datapoints). Finally linkage parameter is set to "ward", which minimizes the variant between the clusters.

Next we call the fit_predict method from the AgglomerativeClustering class variable cluster. This method returns the names of the clusters that each data point belongs to. Execute the following script to see how the data points have been clustered.

print(cluster.labels_)  

The output is a one-dimensional array of 10 elements corresponding to the clusters assigned to our 10 data points.

[1 1 1 1 1 0 0 0 0]

As expected the first five points have been clustered together while the last five points have been clustered together. It is important to mention here that these ones and zeros are merely labels assigned to the clusters and have no mathematical implications.

Finally, let's plot our clusters. To do so, execute the following code:

plt.scatter(X[:,0],X[:,1], c=cluster.labels_, cmap='rainbow')  

Colored data point plot

You can see points in two clusters where the first five points clustered together and the last five points clustered together.

Example 2

In the last section we performed hierarchical clustering on dummy data. In this example, we will perform hierarchical clustering on real-world data and see how it can be used to solve an actual problem.

The problem that we are going to solve in this section is to segment customers into different groups based on their shopping trends.

The dataset for this problem can be downloaded from the following link:

https://drive.google.com/open?id=18Dsja5_1jRY1GnWoORXFFKGTJhylk6rJ

Place the downloaded "shopping_data.csv" file into the "Datasets" folder of the "D" directory. To cluster this data into groups we will follow the same steps that we performed in the previous section.

Execute the following script to import the desired libraries:

import matplotlib.pyplot as plt  
import pandas as pd  
%matplotlib inline
import numpy as np  

Next, to import the dataset for this example, run the following code:

customer_data = pd.read_csv('D:\Datasets\customer_data.csv')  

Let's explore our dataset a bit. To check the number of records and attributes, execute the following script:

customer_data.shape  

The script above will return (200, 5) which means that the dataset contains 200 records and 5 attributes.

To eyeball the dataset, execute the head() function of the data frame. Take a look at the following script:

customer_data.head()  

The output will look like this:

CustomerIDGenreAgeAnnual Income (k$)Spending Score (1-100)
01Male191539
12Male211581
23Female20166
34Female231677
45Female311740

Our dataset has five columns: CustomerID, Genre, Age, Annual Income, and Spending Score. To view the results in two-dimensional feature space, we will retain only two of these five columns. We can remove CustomerID column, Genre, and Age column. We will retain the Annual Income (in thousands of dollars) and Spending Score (1-100) columns. The Spending Score column signifies how often a person spends money in a mall on a scale of 1 to 100 with 100 being the highest spender. Execute the following script to filter the first three columns from our dataset:

data = customer_data.iloc[:, 3:5].values  

Next, we need to know the clusters that we want our data to be split to. We will again use the scipy library to create the dendrograms for our dataset. Execute the following script to do so:

import scipy.cluster.hierarchy as shc

plt.figure(figsize=(10, 7))  
plt.title("Customer Dendograms")  
dend = shc.dendrogram(shc.linkage(data, method='ward'))  

In the script above we import the hierarchy class of the scipy.cluster library as shc. The hierarchy class has a dendrogram method which takes the value returned by the linkage method of the same class. The linkage method takes the dataset and the method to minimize distances as parameters. We use 'ward' as the method since it minimizes then variants of distances between the clusters.

The output of the script above looks like this:

Customer dendrogram plot

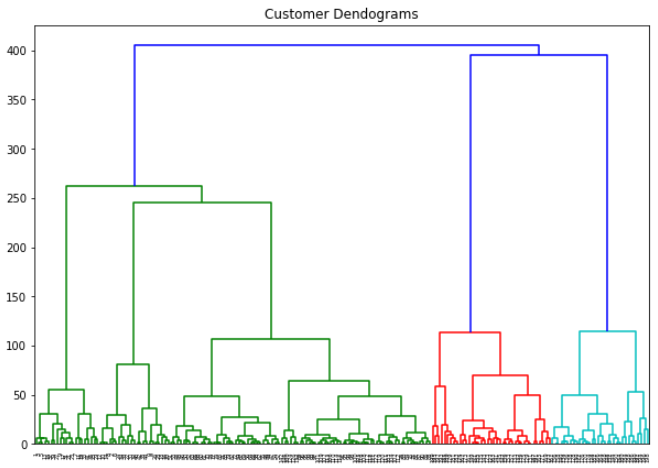
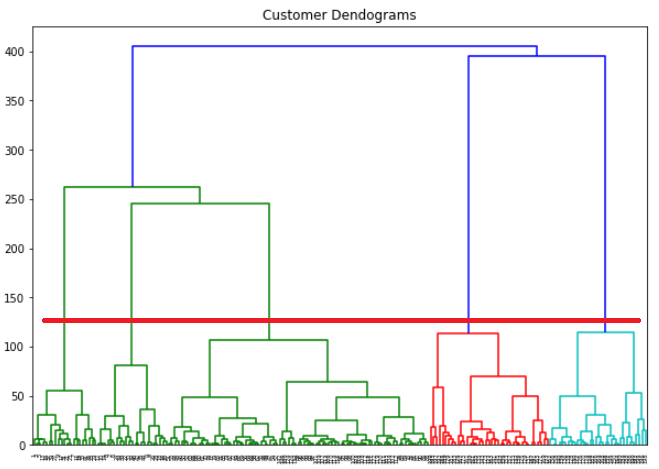
If we draw a horizontal line that passes through longest distance without a horizontal line, we get 5 clusters as shown in the following figure:

Customer dendrogram plot with horizontal line

Now we know the number of clusters for our dataset, the next step is to group the data points into these five clusters. To do so we will again use the AgglomerativeClustering class of the sklearn.cluster library. Take a look at the following script:

from sklearn.cluster import AgglomerativeClustering

cluster = AgglomerativeClustering(n_clusters=5, affinity='euclidean', linkage='ward')  
cluster.fit_predict(data)  

The output of the script above looks like this:

array([4, 3, 4, 3, 4, 3, 4, 3, 4, 3, 4, 3, 4, 3, 4, 3, 4, 3, 4, 3, 4, 3, 4,  
       3, 4, 3, 4, 3, 4, 3, 4, 3, 4, 3, 4, 3, 4, 3, 4, 3, 4, 3, 4, 1, 4, 1,
       1, 1, 1, 1, 1, 1, 1, 1, 1, 1, 1, 1, 1, 1, 1, 1, 1, 1, 1, 1, 1, 1, 1,
       1, 1, 1, 1, 1, 1, 1, 1, 1, 1, 1, 1, 1, 1, 1, 1, 1, 1, 1, 1, 1, 1, 1,
       1, 1, 1, 1, 1, 1, 1, 1, 1, 1, 1, 1, 1, 1, 1, 1, 1, 1, 1, 1, 1, 1, 1,
       1, 1, 1, 1, 1, 1, 1, 1, 2, 1, 2, 1, 2, 0, 2, 0, 2, 1, 2, 0, 2, 0, 2,
       0, 2, 0, 2, 1, 2, 0, 2, 1, 2, 0, 2, 0, 2, 0, 2, 1, 2, 0, 2, 0, 2, 1,
       2, 0, 2, 0, 2, 0, 2, 0, 2, 0, 2, 0, 2, 0, 2, 0, 2, 0, 2, 0, 2, 0, 2,
       0, 2, 0, 2, 0, 2, 0, 2, 0, 2, 0, 2, 0, 2, 0, 2], dtype=int64)

You can see the cluster labels from all of your data points. Since we had five clusters, we have five labels in the output i.e. 0 to 4.

As a final step, let's plot the clusters to see how actually our data has been clustered:

plt.figure(figsize=(10, 7))  
plt.scatter(data[:,0], data[:,1], c=cluster.labels_, cmap='rainbow')  

The output of the code above looks like this:

Clustered data points

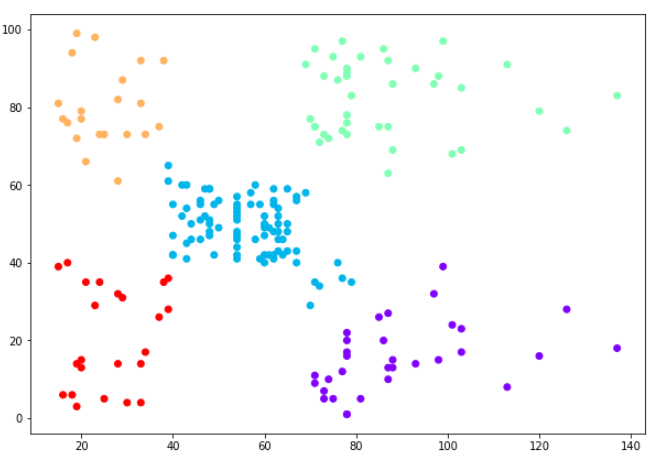
You can see the data points in the form of five clusters. The data points in the bottom right belong to the customers with high salaries but low spending. These are the customers that spend their money carefully. Similarly, the customers at top right (green data points), these are the customers with high salaries and high spending. These are the type of customers that companies target. The customers in the middle (blue data points) are the ones with average income and average salaries. The highest numbers of customers belong to this category. Companies can also target these customers given the fact that they are in huge numbers, etc.

Resources

Between all of the different Python packages (pandas, matplotlib, numpy, and sklearn) there is a lot of info in this article that might be hard to follow, and for that reason we recommend checking out some more detailed resources on doing data science tasks with Python, such as an online course:

We've found that these resources are good enough that you'll come away with a solid understanding of how to use them in your own work.

Conclusion

The clustering technique can be very handy when it comes to unlabeled data. Since most of the data in the real-world is unlabeled and annotating the data has higher costs, clustering techniques can be used to label unlabeled data.

In this article we explained hierarchical clustering with help of two examples. For more machine learning and data science articles, keep visiting this site. Happy Coding!


Wallaroo Labs: Detecting Spam as it happens: Getting Erlang and Python working together with Wallaroo

$
0
0
Suppose your social network for chinchilla owners has taken off. Your flagship app contains an embedded chat client, where community members discuss chinchilla-related topics in real-time. As your user base grows, so does its value as a target for advertising. Soon, purveyors of unsolicited advertising take notice of this fact. You now have a spam problem on your hands, and your small team of engineers has only so much time they can dedicate to this arms race.

EuroPython: EuroPython 2018: Conference App available

$
0
0

We are pleased to announce the conference app for EuroPython 2018, again hosted on the Attendify platform:

image

EuroPython 2018 Conference App

Engage with the conference and its attendees

The mobile app gives you access to the conference schedule (even offline), helps you in planing your conference experience (create your personal schedule with reminders) and provides a rich social engagement platform for all attendees.

You can create a profile within the app or link this to your existing social accounts, share messages and photos, and easily reach out to other fellow attendees - all from within the app.

Vital for all EuroPython 2018 attendees

We will again use the conference app to keep you updated by sending updates of the schedule and inform you of important announcements via push notifications, so please consider downloading it.

Many useful features

Please see our EuroPython 2018 Conference App page for more details on features and guides on how to use them.

Don’t forget to get your EuroPython ticket

If you want to join the EuroPython fun, be sure to get your tickets as soon as possible, since ticket sales have picked up a lot this and we may have to close sales prior to the event.

Enjoy,

EuroPython 2018 Team
https://ep2018.europython.eu/
https://www.europython-society.org/

Bhishan Bhandari: When the argument default value is mutable

$
0
0

Python offers us to specify that a function argument is optional by providing a default value to it. While this is widely used and one of the major features of the language, it can lead to confusions when enough thought is not given to the implementation details of the feature. Especially when the default value […]

The post When the argument default value is mutable appeared first on The Tara Nights.

Armin Ronacher: Python

$
0
0

Guido van Rossum announced that he's stepping down as BDFL. It made me think. The Python programming language has left a profound impact on my life. It's my home, it gave me many of my friendships and acquaintances. It gave me my work, supplied me with many invaluable experiences and it even made me meet my now wife.

As most readers of this blog might know at this blog might know I have a ambivalent relationship with the language as of a few years ago. I learned a lot through Python and one of the things I learned is also which mistakes one can make in language and interpreter design. Since I know Python in and out it's not hard for me to see all the things that did not go well. However nothing is perfect. The things that might be ugly in the language or implementation also have some unexpected benefits. Python has a pretty weak story on package distribution and imports, yet at the same time this has made the Python community more cautious about API breakage. The simplistic nature of the interpreter has cultivated an environment of countless C extensions that expanded the Python community in ways that few people would have expected.

Python is Guido van Rossum. While there have been many contributors over the years it's without doubt his creation. You can go back to the earliest versions of the language and it still feels similar. The interpreter design is still the same and so were the influences of the language. Python has achieved something that few languages did: it enabled absolute beginners to start with a language that is fun to pick up and it stays relevant and useful into ones professional life.

In case you are reading this Guido: I cannot express enough how much I owe to you. For all the strong disagreements I had with some of your decisions over the years please do not forget that I always appreciated it.

Mike Driscoll: Python 101 Screencast: Episode #15 – The logging module

Made With Mu: Shhh! Hunting micro:bits in a Library with Mu

$
0
0

I had a stonking time yesterday afternoon with Harvey Sharman, who runs workshops for young coders in a library close to where I live. This particular afternoon was spent in the company of a group of eager eleven-year-olds. Harvey’s learning activity? Use Mu to program “transmitter” and “detector” micro:bits so the kids could organise a treasure hunt in the library. Let joyful coding chaos ensue!

I first became aware of Harvey’s work via the following tweet:

One of my pupils inspired in Python Mu hard coding the International Space Station project to collect live data of latitude and longitude coordinates to locate the actual position of the space station using an A3 print of the global map with coordinates. @ntoll🛰️ @rebeccafdppic.twitter.com/Ke2JKzDiju

— Harvey Sharman (@BitawsBrackley) June 28, 2018

It was a stroke of luck that I live in the next village from Harvey and I just had to investigate. As a result I was invited to observe Harvey and his students in action.

The group of eleven-year-olds sped through the task of writing the code, checking it and flashing it onto the micro:bit. Then the group split in two: half were unleashed into the wider library to hide their “transmitter” micro:bits and upon their return the other half were let loose, waving around poles with their “detector” micro:bits stuck on the end. If the “detector” got close to a “transmitter” it would start to bleep and the “X” on the micro:bit’s display changed to a number to indicate the relative proximity of the devices.

Imagine, if you will, a sleepy afternoon at Brackley library: the knitting circle quietly click-clacking in one corner, a pensioner’s jigsaw club (armed with tea and biscuits) in yet another, and a hoard of enthusiastic eleven-year-olds waving around blinking and bleeping poles at anything and everything (including the afore mentioned knitting circle and jigsaw club) in an attempt to find “treasure”.

To say the kids had a huge amount of fun is an understatement (to their credit, the other library users were very patient and I was especially pleased to see maniacal grins on the faces of the librarians as the kids explored all the various sections of the library). Public libraries are such an asset to our communities since they’re the only place the pensioner’s jigsaw club could rub shoulders with eleven-year-olds from a code club. Two different parts of the same community got to see what each other were doing.

Afterwards, when the kids had left, we recorded the following video to explain how things work:


The source code is very simple and takes only minutes to type in. The detector works by checking the strength of radio signals. The stronger the signal of a received message the closer you are (and the higher the number displayed and the bleeps from the speaker). The transmitter micro:bits constantly send out signals at the lowest possible power so the signal is only detected when you’re stood close by (I’d say around 3 to 4 meters). This is beautifully simple and ingenious and could form the basis for all sorts of interesting classroom activities and learning opportunities. How might you improve the code?

# Code for the "detector" microbits. Make sure# a speaker is attached in the usual way.frommicrobitimport*importradioimportmusicradio.config(channel=10)radio.on()whileTrue:message=radio.receive_full()ifmessage:strength=message[1]+100displaystrength=int((strength/10)+1)display.show(str(displaystrength))music.pitch(strength*50,100)else:display.show(Image.NO)
# Code for the "transmitter" microbits.frommicrobitimort*importradioid="10"display.show(id)radio.config(power=0)radio.config(channel=10)radio.on()whileTrue:radio.send(id)

Harvey tells me that Mu makes Python programming easy for his young coders and my own observations during the workshop confirm this. It took moments for the kids to figure out what to do. It was also cool to see them help each other and make suggestions for using Mu. For instance, once one kid figured out how to use the autocomplete functionality to avoid typing long words, they were all at it after the inevitable, “hey, look at this!”.

I look forward to more projects, games and “hacks” from Harvey and his young charges (and I’ll keep you posted!).

Continuum Analytics Blog: Deep Learning with GPUs in Anaconda Enterprise

$
0
0

AI is a hot topic right now. While a lot of the conversation surrounding advanced AI techniques such as deep learning and machine learning can be chalked up to hype, the underlying tools have been proven to provide real value. Even better, the tools aren’t as hard to use as you might think. As Keras …
Read more →

The post Deep Learning with GPUs in Anaconda Enterprise appeared first on Anaconda.


EuroPython: EuroPython 2018: Late Bird Rates and Day Passes

$
0
0

We will be switching to the late bird rates for tickets on Monday next week (July 16), so this is your last chance to get tickets at the regular rate, which is about 30% less than the late bird rate.

image

EuroPython 2018 Tickets

Late Bird Tickets

We will have the following categories of late bird ticket prices for the conference tickets:

  • Business conference ticket: EUR 750.00 excl. VAT, EUR 900.00 incl. 20% UK VAT
    (for people using Python to make a living)
  • Personal conference ticket: EUR 500.00 incl. 20% UK VAT
    (for people enjoying Python from home)

Please note that we do not sell on-desk student tickets. Students who decide late will have to buy day passes or a personal ticket.

Day Passes

As in the past, we will also sell day passes for the conference. These allow attending the conference for a single day (Wednesday, Thursday or Friday; valid on the day you pick up the day pass):

  • Business conference day pass: EUR 375.00 excl. VAT, EUR 450.00 incl. 20% UK VAT
    (for people using Python to make a living)
  • Personal conference day pass: EUR 250.00 incl. 20% UK VAT
    (for people enjoying Python from home)
  • Student conference day pass: EUR 105.00 incl. 20% UK VAT
    (only available for pupils, students and postdoctoral researchers; please bring your student card or declaration from University, stating your affiliation, starting and end dates of your contract)

Please see the registration page for full details of what is included in the ticket price. Also note that neither late bird tickets, nor day passes are refundable.

Enjoy,

EuroPython 2018 Team
https://ep2018.europython.eu/
https://www.europython-society.org/

Python Bytes: #86 Make your NoSQL async and await-able with uMongo

Twisted Matrix Labs: Twisted 18.7.0 Released

$
0
0
On behalf of Twisted Matrix Laboratories, I am honoured to announce the release of Twisted 18.7!

The highlights of this release are:
  • better support for async/await coroutines in regards to exception and traceback handling;
  • better support for reporting tracebacks in inlineCallbacks, now showing what you would expect in synchronous-like code
  • the epoll reactor now no longer hard-locks when running out of file descriptors
  • directory rendering in t.web works on Python 2 again
  • manhole's colouriser is better at handling Unicode
  • setting the groundwork for Python 3.7 support. Note that Python 3.7 is currently not a supported platform on any operating system, and may completely fail to install, especially on Windows.
For more information, check the NEWS file (link provided below).

You can find the downloads at <https://pypi.python.org/pypi/Twisted> (or alternatively <http://twistedmatrix.com/trac/wiki/Downloads>). The NEWS file is also available at <https://github.com/twisted/twisted/blob/twisted-18.7.0/NEWS.rst>.

Many thanks to everyone who had a part in this release - the supporters of the Twisted Software Foundation, the developers who contributed code as well as documentation, and all the people building great things with Twisted!

Twisted Regards,
Amber Brown (HawkOwl)

Mike Driscoll: Guido Retires as BDFL

$
0
0

Guido van Rossum, the creator of Python, and the Benevolent Dictator for Life (BDFL) has retired as the BDFL with no successor named as of July 12, 2018. See the following email from the Python Committers list for full details.

Basically there was a lot of negativity over PEP 572 – Assignment Expressions that appears to have driven the creator of Python into early retirement. While he will still be around to help and mentor, he will no longer be taking part in the community in quite the same way.

I love Python and its community so it makes me sad that Guido would need to step down in this way. However I wish him well and will continue to use and promote Python and civility in our community.

Bhishan Bhandari: Copying mutable objects in Python

$
0
0

An assignment statement in python does not create copies of objects. It binds the name to the object. While working with mutable objects and/or collections of mutable objects, it creates inconsistencies and hence it would be of interest to us to have ways to make real copies of the objects. Essentially, we would require copies […]

The post Copying mutable objects in Python appeared first on The Tara Nights.

Talk Python to Me: #169 Becoming a Python content creator

$
0
0
Corey Schafer has been building his YouTube channel of tutorials for many years. He recently made the big shift into making this hobby project his full time job. You'll hear about how Corey made that transition, what it takes to "go pro", and even a little bit about the similarities with my work with Talk Python and his project.

Justin Mayer: Python Development Environment on macOS High Sierra

$
0
0

While installing Python and Virtualenv on macOS High Sierra can be done several ways, this tutorial will guide you through the process of configuring a stock Mac system into a solid Python development environment.

First steps

This guide assumes that you have already installed Homebrew. For details, please follow the steps in the macOS Configuration Guide.

Python

We are going to install the latest 2.7.x version of Python via Homebrew. Why bother, you ask, when Apple includes Python along with macOS? Here are some reasons:

  • When using the bundled Python, macOS updates can nuke your Python packages, forcing you to re-install them.
  • As new versions of Python are released, the Python bundled with macOS will become out-of-date. Homebrew always has the most recent version.
  • Apple has made significant changes to its bundled Python, potentially resulting in hidden bugs.
  • Homebrew’s Python includes the latest versions of Pip and Setuptools (Python package management tools)

Along the same lines, the version of OpenSSL that comes with macOS is out-of-date, so we’re going to tell Homebrew to download the latest OpenSSL and compile Python with it.

Use the following command to install Python via Homebrew:

brew install python

You’ve already modified your PATH as mentioned in the macOS Configuration Guide, right? If not, please do so now.

Since Python 2.7 is deprecated, I highly recommend that you also install Python 3:

brew install python3

This makes it easy to test your code on both Python 2.7 and Python 3. More importantly, since Python 3 is the present and future of all things Python, the examples below assume you have installed Python 3.

Pip

Let’s say you want to install a Python package, such as the fantastic Virtualenv environment isolation tool. While nearly every Python-related article for macOS tells the reader to install it via sudo pip install virtualenv, the downsides of this method include:

  1. installs with root permissions
  2. installs into the system /Library
  3. yields a less reliable environment when using Homebrew’s Python

As you might have guessed by now, we’re going to use the tools provided by Homebrew to install the Python packages that we want to be globally available. When installing via Homebrew’s Pip, packages will be installed to /usr/local/lib/python{version}/site-packages, with binaries placed in /usr/local/bin.

Homebrew recently changed the names of Python-related binaries to avoid potential confusion with those bundled with macOS. As a result, pip became pip2, et cetera. Between this change and the many new improvements in Python 3, it seems a good time to start using pip3 for all the examples that will follow below. If you don’t want to install Python 3 or would prefer your global packages to use the older, deprecated Python 2.7, you can replace the relevant invocations below with pip2 instead.

Version control (optional)

The first thing I pip-install is Mercurial, since I have Mercurial repositories that I push to both Bitbucket and GitHub. If you don’t want to install Mercurial, you can skip ahead to the next section.

The following command will install Mercurial and hg-git:

pip3 install Mercurial hg-git

At a minimum, you’ll need to add a few lines to your .hgrc file in order to use Mercurial:

vim ~/.hgrc

The following lines should get you started; just be sure to change the values to your name and email address, respectively:

[ui]username=YOUR NAME <address@example.com>

To test whether Mercurial is configured and ready for use, run the following command:

hg debuginstall

If the last line in the response is “no problems detected”, then Mercurial has been installed and configured properly.

Virtualenv

Python packages installed via the steps above are global in the sense that they are available across all of your projects. That can be convenient at times, but it can also create problems. For example, sometimes one project needs the latest version of Django, while another project needs an older Django version to retain compatibility with a critical third-party extension. This is one of many use cases that Virtualenv was designed to solve. On my systems, only a handful of general-purpose Python packages (such as Mercurial and Virtualenv are globally available — every other package is confined to virtual environments.

With that explanation behind us, let’s install Virtualenv:

pip3 install virtualenv

Create some directories to store our projects, virtual environments, and Pip configuration file, respectively:

mkdir -p ~/Projects ~/Virtualenvs ~/Library/Application\ Support/pip

We’ll then open Pip’s configuration file (which may be created if it doesn’t exist yet)…

vim ~/Library/Application\ Support/pip/pip.conf

… and add some lines to it:

[install]require-virtualenv=true[uninstall]require-virtualenv=true

Now we have Virtualenv installed and ready to create new virtual environments, which we will store in ~/Virtualenvs. New virtual environments can be created via:

cd ~/Virtualenvs
virtualenv foobar

If you have both Python 2.x and 3.x and want to create a Python 3.x virtualenv:

virtualenv -p python3 foobar-py3

… which makes it easier to switch between Python 2.x and 3.x foobar environments.

Restricting Pip to virtual environments

What happens if we think we are working in an active virtual environment, but there actually is no virtual environment active, and we install something via pip3 install foobar? Well, in that case the foobar package gets installed into our global site-packages, defeating the purpose of our virtual environment isolation.

In an effort to avoid mistakenly Pip-installing a project-specific package into my global site-packages, I previously used easy_install for global packages and the virtualenv-bundled Pip for installing packages into virtual environments. That accomplished the isolation objective, since Pip was only available from within virtual environments, making it impossible for me to pip3 install foobar into my global site-packages by mistake. But easy_install has some deficiencies, such as the inability to uninstall a package, and I found myself wanting to use Pip for both global and virtual environment packages.

Thankfully, Pip has an undocumented setting (source) that tells it to bail out if there is no active virtual environment, which is exactly what I want. In fact, we’ve already set that above, via the require-virtualenv = true directive in Pip’s configuration file. For example, let’s see what happens when we try to install a package in the absence of an activated virtual environment:

$ pip3 install markdown
Could not find an activated virtualenv (required).

Perfect! But once that option is set, how do we install or upgrade a global package? We can temporarily turn off this restriction by defining a new function in ~/.bashrc:

gpip(){PIP_REQUIRE_VIRTUALENV="0" pip3 "$@"}

(As usual, after adding the above you must run source ~/.bash_profile for the change to take effect.)

If in the future we want to upgrade our global packages, the above function enables us to do so via:

gpip install --upgrade pip setuptools wheel virtualenv

You could achieve the same effect via env PIP_REQUIRE_VIRTUALENV="0" pip3 install --upgrade foobar, but that’s much more cumbersome to type.

Creating virtual environments

Let’s create a virtual environment for Pelican, a Python-based static site generator:

cd ~/Virtualenvs
virtualenv pelican

Change to the new environment and activate it via:

cd pelican
source bin/activate

To install Pelican into the virtual environment, we’ll use pip:

pip3 install pelican markdown

For more information about virtual environments, read the Virtualenv docs.

Dotfiles

These are obviously just the basic steps to getting a Python development environment configured. Feel free to also check out my dotfiles (GitHub mirror).

If you found this article to be useful, please follow me on Twitter. Also, if you are interested in server security monitoring, be sure to sign up for early access to Monitorial!


pgcli: Release v1.10.0

$
0
0

Pgcli is a command line interface for Postgres database that does auto-completion and syntax highlighting. You can install this version using:

$ pip install -U pgcli

This release adds new special commands \ev and \ef, more table formats, and a --user alias for --username option, to be compatible with psql. Pgcli also sets application_name to identify itself within postgres. Multiple bugs were fixed.

This release was very special because we had a lot of first-time contributors, thanks to Amjith leading a sprint on pgcli during PyCon 2018! It's wonderful to see that spike of commits in mid-may:

Our huge thanks to all the new contributors!

Features:

  • Add quit commands to the completion menu. (Thanks: Jason Ribeiro)
  • Add table formats to \T completion. (Thanks: Jason Ribeiro)
  • Support \ev`, \ef (#754). (Thanks: Catherine Devlin)
  • Add application_name to help identify pgcli connection to database (issue #868) (Thanks: François Pietka)
  • Add --user option, duplicate of --username, the same cli option like psql (Thanks: Alexandr Korsak)

Internal changes:

  • Mark tests requiring a running database server as dbtest (Thanks: Dick Marinus)
  • Add an is_special command flag to MetaQuery (Thanks: Rishi Ramraj)
  • Ported Destructive Warning from mycli.
  • Refactor Destructive Warning behave tests (Thanks: Dick Marinus)

Bug Fixes:

Weekly Python StackOverflow Report: (cxxxiv) stackoverflow python report

$
0
0

Django Weblog: DjangoCon AU 2018: Tickets on sale

$
0
0

DjangoCon Australia, the cute little sibling conference to DjangoCons EU and US, is on again next month in sunny Sydney.

A one-day event packed full of content, DjangoCon AU is run as a Specialist Track – a dedicated one-day, one track “mini conference” – inside PyCon AU.

Tickets for DjangoCon AU and PyCon AU are now on sale. If you can only join us for one day, you can get a ticket for just DjangoCon AU for only AU$150. But, if you’d like to make a long weekend of it, tickets for the full event – DjangoCon AU on the Friday, and PyCon AU on the Saturday and Sunday – are available starting from AUD$440. As part of our ongoing commitment to ensuring as many people can get to PyCon AU as possible, there are generous discounts for students, and Contributor ✨ Tickets that directly help fill the financial assistance pool of funds.

The talks lists for DjangoCon AU and all of PyCon AU are already live, so take a look at what we have in store.

Buy your tickets by August 7 2018 to ensure you get the a coveted PyCon AU t-shirt. Shirts for DjangoCon AU will be revealed and details announced on the day.

We hope to see you in Sydney next month!

Katie McLaughlin, PyCon AU Conference Director, DSF Board

Bhishan Bhandari: Idiomatic Python – Use of Falsy and Truthy Concepts

$
0
0

Out of many, one reason for python’s popularity is the readability. Python has code style guidelines and idioms and these allow future readers of the code to comprehend to the intentions of it. It is highly important that the code is readable and concise. One such important tip is to use falsy and truthy concepts. […]

The post Idiomatic Python – Use of Falsy and Truthy Concepts appeared first on The Tara Nights.

EuroPython Society: Invitation to the EuroPython Society General Assembly 2018

$
0
0

We would like to invite all EuroPython attendees and EuroPython Society (EPS) members to attend this year’s EPS General Assembly (GA), which we will run as in-person meeting at the upcoming EuroPython 2018, held in Edinburgh, Scotland, UK from July 23 - 29.

We had already sent a invite to the members mailing on 2018-06-17, but would like to announce this more broadly as well and with complete agenda.

Place of the General Assembly meeting:

We will meet on Friday, July 27, at 14:15 BST in room Kilsyth of the EICC, The Exchange, Edinburgh EH3 8EE.

There will be a short talk to invite volunteers to participate in organizing EuroPython 2019 in preparation for next year’s event at 14:00 BST in the same room, right before the General Assembly. You may want to attend that talk as well. In this talk, we will present the EuroPython Workgroup Concept, we have been using successfully for the past years now.

General Assembly Agenda

The agenda contents for the assembly is defined by the EPS bylaws. We are planning to use the following structure:

  • Opening of the meeting
  • Selection of meeting chair, secretary and 2 checkers of the minutes
  • Motion establishing the timeliness of the call to the meeting
  • Presentation of the annual report and annual accounts by the board
  • Presentation of the report of the auditor
  • Discharge from liability for the board
  • Presentation of a budget by the outgoing board.
  • Acceptance of budget and decision on membership fees for the upcoming year
  • Election of members of the board
  • Election of chair of the board
  • Election of one auditor and one replacement. The auditor does not have to be certified in any way and is normally selected among the members of the society.
  • The optional election of a nomination committee for the next annual meeting of the General Assembly
  • Propositions from the board, if any
  • Motions from the members, if any
  • Closing of the meeting

In an effort to reduce the time it takes to go through this long list, which is mandated by the bylaws, we will try to send as much information to the members mailing list before the GA, so that we can limit presentations to a minimum.

Election of the members of the board

The EPS bylaws limit the number of board members to one chair and 2 - 8 directors, at most 9 directors in total. Experience has shown that the board members are the most active organizers of the EuroPython conference, so we try to get as many board members as possible to spread the work load.

All members of the EPS are free to nominate or self nominate board members. Please write to board@europython-society.org no later than Friday, July 20 2017, if you want to run for board. We will then include you in the list we’ll have in the final nomination announcement before the GA, which is scheduled for July 21.

The following people from the current board have already shown interest in running for board in the next term as well (in alphabetical order):

  • Anders Hammarquist
  • Darya Chyzhyk
  • Marc-André Lemburg

We will post more detailed information about the candidates and any new nominations we receive in a separate blog post.

Propositions from the board

  • We would like to propose to grant CPython Core Developers a lifetime free entry to EuroPython conferences in recognition for their efforts to build the foundation on what our community is built. The details are to be defined by the EPS board.

The bylaws allow for additional propositions to be announced up until 5 days before the GA, so the above list is not necessarily the final list.

Motions from the members

  • None at the moment. 

EPS members are entitled to suggest motions to be voted on at the GA. The bylaws require any such motions to be announced at least 5 days before the GA. If you would like to propose a motion, please send it to board@europython-society.org no later than Friday, July 20 2017, so we can announce the final list to everyone.

Enjoy,

EuroPython Society

Viewing all 24369 articles
Browse latest View live