↧
Python Bytes: #84 Vibora web framework: It's fast, async, and means viper
↧
Bruno Rocha: Announcing the first Flask Conference in Brazil - August 2018
Hello,
The first Flask conference will be held in São Paulo, Brazil, on August 24 and 25, 2018.
It will be a day of tutorial and a day of lectures for over 160 people.
At this moment the organization is in search of sponsorship to enable the coming of one of the core-developers to be Keynote of this event.
According to StackShare [1] more than 1.6k of companies are using Flask, large companies like Uber, Netflix, Cloudify, Lift, Red Hat and many others rely on Flask to serve web applications and APIs.
We believe it is time for Flask to have its annual conference and we are starting in São Paulo Brazil and we hope this idea will spread to other places in the world!
Please help!
We need sponsorship: Help us by sharing the link below with companies that can support the event:
https://2018.flask.python.org.br/FlaskConf2018-sponsorship-en.pdf
Submit lectures (or vote in the lectures) - * The event is in Brazil but participants from anywhere in the world are warmly welcomed! And lectures in English will also be interesting!
https://speakerfight.com/events/flaskconf-2018/
Come to Flask Conf 2018!
https://www.eventbrite.com/e/flask-conf-registration-46990838864
Flask Conf 2018 https://2018.flask.python.org.br/
↧
↧
Bill Ward / AdminTome: Kafka Python and Google Analytics
Learn how to use Kafka Python to pull Google Analytics metrics and push them to your Kafka Topic. This will allow us to analyze this data later using Spark to give us meaningful business data.
Google Analytics is a very powerful platform for monitoring your web site’s metrics including top pages, visitors, bounce rate, etc. As more and more businesses start using Big Data processes the need to compile as much data as possible becomes more advantageous. The more data you have available the more options you have to analyze that data and produce some very interesting results that can help you shape your business.
This article assumes that you already have a running Kafka cluster. If you don’t then please follow my article Kafka Tutorial for Fast Data Architecture to get a cluster up and running. You will also need to have a topic already created for publishing the Google Analytics metrics to. The aforementioned article covers this procedure as well. I created a topic called admintome-ga-pages since we will be collection Google Analytics (ga) metrics about my blog’s pages.
In this article, I will walk you though how to pull metrics data from Google Analytics for your site then take that data and push it to your Kafka Cluster. In a later article, we will cover how to take that data that is consumed in Kafka and analyze it to give us some meaningful business data.
This is just one single pipeline of data that we are going to analyze. You could include many, many more pipelines based off of the process that we will be covering so keep this post handy as you continue your journey in Big Data.
The first thing that we need to do is enable the Google Analytics API.
The Google Analytics API
The Google Analytics API is actually many APIs that let you interact with Google Analytics. There are APIs to build applications on top of the functionality of Google Analytics all the way to real-time reporting (which honestly sounds pretty awesome and might be a future article topic). In this article, we will focus on the Core Reporting API which will give us a list of pages for the last 7 days and how many people visited that page.
Enabling the Core Reporting API
The first step we need to take is enabling the API. Open up the Service Accounts page. Select Create a project and click on Continue.
Next, click on Create Service Account.
Then click on Go to credentials.
You will see the Add credentials to your project screen. We want to select Google Analytics Reporting API for ‘Which API are you using’. For ‘Where will you be calling the API from’ select Other non-UI because we are going to write a Python Daemon that will use the API to pull the metrics. Select Application Data for ‘What data will you be accessing’. Lastly, Answer No for the ‘Are you planning to use this API with App Engine or Compute Engine’ since our Python application will run on our own cluster. Click Continue to move on to the next section.
Now on to where we create the service account.
Under Service account name give your service account a meaningful name. I used kafka-intake as the name for my service account. Under the Role drop-down select Service Account then Service Account User. Next, select JSON as the key type. Finally, click on continue. The key will be downloaded to your system. Take note of the Service Account ID field. You will need this in the next step.
Add your service account to the Google Analytics account
Go to your Google Analytics page and sign in. Go to Settings and click on User Management. Click on the blue plus sign in the upper right corner to add a new user then click on Add new users. You will see the add new user dialog:
In the email address field enter the email address from above. This will look like this:
kafka-intake@PROJECT-ID.iam.gserviceaccount.com
Next give the service account the correct permissions. The only permission we need this service account to have is Read & Analyze.
When you are done click on blue Add button at the top right hand corner. You now have the Google Analytics API enabled and you are ready to securely pull metrics from it. In the next section, we will walk through writing our Python application that will pull this data and push it to Kafka.
Kafka Python Example
Now that we got through the boring part it is finally time to roll up our sleeves and start some development! If you just want the code then checkout my GitHub repository admintome/analytics-intake.
We need to create a Python environment for our application by running the following commands (may differ for Mac and Windows users).
$ mkdir analytics-intake
$ cd analytics-intake/
$ virtualenv ../venvs/analytics-intake
$ source ../venvs/analytics-intake/bin/activate
This assumes that you have a venvs directory above your application directory (analytics-intake for this example). Next we need to install some required Python modules.
$ pip install kafka-python
$ pip install --update google-api-python-client
$ pip install --upgrade oauth2client
Next freeze your requirements to a text file.
$ pip freeze > requirements.txt
Time to write our main class and get things started.
AnalyticsIntake.py
Our first file is called AnalyticsIntake.py and is our main script. The first thing we will need are our imports:
from googleapiclient.discovery import build
from oauth2client.service_account import ServiceAccountCredentials
from mykafka import MyKafka
import logging
from logging.config import dictConfig
import time
import os
from datetime import datetime, timedelta
The Google Analytics API Python Client needs to have the first two imports. Next we need to define our class and our member variables:
class AnalyticsIntake(object):
    SCOPES = ['https://www.googleapis.com/auth/analytics.readonly']
    KEY_FILE_LOCATION = None
    VIEW_ID = None
    kafka_brokers = None
    topic = None
    delay = 3600
In order to call the Google Analytics API we need several variables set. The first one is the SCOPES variable which is the API URL that our code will be calling. Next is the KEY-FILE_LOCATION variable which is a string representing the Credentials Key that was downloaded earlier when we enabled the Google Analytics API. The VIEW_ID variable can be found by using the Account Explorer for Google Analytics. The rest of the variables we will cover when we talk about the Kafka code.
Now we need to write our constructor for the AnalyticsIntake class.
    def __init__(self):
        self.init_logging()
        if 'KAFKA_BROKERS' in os.environ:
            self.kafka_brokers = os.environ['KAFKA_BROKERS'].split(',')
            self.logger.info(
                "Set KAFKA_BROKERS: {}".format(self.kafka_brokers))
        else:
            raise ValueError('KAFKA_BROKERS environment variable not set')
        if 'KEY_FILE' in os.environ:
            self.KEY_FILE_LOCATION = os.environ['KEY_FILE']
            self.logger.info("Set KEY_FILE: {}".format(self.KEY_FILE_LOCATION))
        else:
            raise ValueError('KEY_FILE environment variable not set')
        if 'VIEW_ID' in os.environ:
            self.VIEW_ID = os.environ['VIEW_ID']
            self.logger.info("Set VIEW_ID: {}".format(self.VIEW_ID))
        else:
            raise ValueError('VIEW_ID environment variable not set')
        if 'TOPIC' in os.environ:
            self.topic = os.environ['TOPIC']
            self.logger.info("Set TOPIC: {}".format(self.topic))
        else:
            raise ValueError('TOPIC environment variable not set')
        if 'DELAY' in os.environ:
            self.delay = os.environ['DELAY']
            self.logger.info("Set DELAY: {} s".format(self.delay))
        else:
            self.delay = 3600
            self.logger.info(
                "DELAY environment variable not set - Setting to default {} s".format(self.delay))
Here are pulling the values for all these variables from environment variables. This is because we eventually want to put this code into a docker container and we don’t want to put our key file in our docker container. Your key file should always be kept secret. If any of these environment variables are not set then we throw a ValueError exception and exit the application. Only one of these variables has a default and that is the delay variable. This is the amount of seconds to wait between polls to Google Analytics. The default is 3600 seconds which is equivalent to one hour.
We are going to want to use logging so lets setup a member function to initialize logging.
    def init_logging(self):
        logging_config = dict(
            version=1,
            formatters={
                'f': {'format':
                      '%(asctime)s %(name)-12s %(levelname)-8s %(message)s'}
            },
            handlers={
                'h': {'class': 'logging.StreamHandler',
                      'formatter': 'f',
                      'level': logging.INFO}
            },
            root={
                'handlers': ['h'],
                'level': logging.INFO,
            },
        )
        self.logger = logging.getLogger()
        logging.getLogger("googleapiclient").setLevel(logging.ERROR)
        dictConfig(logging_config)
Notice that we have a line at the end to set logging for the googleapiclient to ERROR. This is to prevent some warning from popping up in our output logs.
Now we will create a member function to initialize our Google Analytics Reporting.
    def init_reporting(self):
        creds = ServiceAccountCredentials.from_json_keyfile_name(
            self.KEY_FILE_LOCATION, self.SCOPES)
        analytics = build('analyticsreporting', 'v4', credentials=creds)
        return analytics
This creates a new ServiceAccountCredentials object that uses our KEY_FILE_LOCATION and SCOPES variables. We then use the googleapiclient.discovery object’s build class to setup our Analytics API passing in our credentials that we just created.
Next we will write a get_reports member function that we will use to pull the metrics that we want.
    def get_reports(self, analytics):
        return analytics.reports().batchGet(
            body={
                'reportRequests': [
                    {
                        'viewId': self.VIEW_ID,
                        'dateRanges': [{'startDate': '7daysAgo', 'endDate': 'today'}],
                        'metrics': [{'expression': 'ga:sessions'}],
                        'dimensions': [{'name': 'ga:pageTitle'}]
                    }]
            }
        ).execute()
There is a lot to this code so I will try to cover a lot of it. When you pull metrics from Google Analytics you need to specify the metrics that you want to pull. In this case we are pulling ga:sessions metrics. The ga:sessions metric gives us the total number of sessions. With every metric you pull, you need to pull at least one dimension. In this case, we are pulling the ga:pageTitle metric. This will give us all the page titles for our website. There are a literal ton of combinations of metrics and dimensions. To make it easy Google provides the Dimensions & Metrics Explorer which will let you pick the data that you need.
Next we will write a member function that will simplify pulling these metrics for us.
    def get_page_visit_data(self):
        analytics = self.init_reporting()
        response = self.get_reports(analytics)
        return response
This will return metrics to us in the form of JSON data. Here is a sample of what I got back:
response:{
   'reports':[
      {
         'columnHeader':{
            'dimensions':[
               'ga:pageTitle'
            ],
            'metricHeader':{
               'metricHeaderEntries':[
                  {
                     'name':'ga:sessions',
                     'type':'INTEGER'
                  }
               ]
            }
         },
Finally, we need to write our main member function that will run everything for us.
    def main(self):
        starttime = time.time()
        self.logger.info('Starting Google Analytics API Intake Daemon')
        while True:
            self.logger.info('Pulling site data from Google Analytics API')
            response = self.get_page_visit_data()
            self.logger.info(
                'Got back data of type: {}'.format(type(response)))
            self.logger.info(
                'Successfully pulled site data from Google Analytics API')
            now = datetime.now()
            self.logger.info('Scheduling next run at {}'.format(
                now + timedelta(seconds=self.delay)))
            time.sleep(self.delay - ((time.time() - starttime) % self.delay))


if __name__ == '__main__':
    intake = AnalyticsIntake()
    intake.main()
This is simply an infinite loop that sleeps for the duration of self.delay (defaults to 3600 seconds) and repeats itself until you break out of the execution. Save the file and exit. The next section will cover pushing our JSON metrics data to our Kafka Cluster.
Sending metrics to Kafka
Create a new file called mykafka.py and add the following contents.
from kafka import KafkaProducer
import json


class MyKafka(object):

    def __init__(self, kafka_brokers):
        self.producer = KafkaProducer(
            value_serializer=lambda v: json.dumps(v).encode('utf-8'),
            bootstrap_servers=kafka_brokers
        )

    def send_page_data(self, json_data, topic):
        result = self.producer.send(topic, json_data)
        print("kafka send result: {}".format(result.get()))
In our constructor we setup our Kafka producer. We tell it that we want to send JSON data to our topic using the value_serializer parameter. We also give it the Kafka broker list that we want to publish to. This is a list that contains the hostname and port of our brokers:
[ “mslave1.admintome.lab:31000” ]
This class only has one member function that we will utilize to publish messages to our Kafka topic. This simply uses the kafka.producer.send method to send data to our topic.
We capture the result of the send method and log out the results by using result.get(). There wasn’t much documentation on how to do this so take note. Result turns out to be of type kafka.producer.future.FutureRecordMetadata. Which I had a hell of time finding any Python information for. So when in doubt, go to the code. This showed a get() member function that I could use to get the status and sure enough that is what we get:
kafka send result: RecordMetadata(topic='admintome-ga-pages', partition=0, topic_partition=TopicPartition(topic='admintome-ga-pages', partition=0), offset=18, timestamp=1530244755191, checksum=None, serialized_key_size=-1, serialized_value_size=21583)
This was the result of me pushing to my admintome-qa-pages topic in Kafka.
Save and Exit the file.
We need to update our AnalyticsIntake.py file to make use of our MyKafka class.
Add a new member function to our AnalyticsIntake class called publish_metrics:
    def publish_metrics(self, logger, response):
        kafka_brokers = ['mslave1.admintome.lab:31000']
        logger.info(
            'Publishing site data to Kafka Broker {}'.format(kafka_brokers))
        mykafka = MyKafka(kafka_brokers)
        mykafka.send_page_data(response, self.topic)
        logger.info(
            'Successfully published site data to Kafka Broker {}'.format(kafka_brokers))
This simply instantiates our MyKafka class and calls the send_page_data member function.
Next, Update the main member function of the AnalyticsIntake class:
    def main(self):
        starttime = time.time()
        self.logger.info('Starting Google Analytics API Intake Daemon')
        while True:
            self.logger.info('Pulling site data from Google Analytics API')
            response = self.get_page_visit_data()
            self.logger.info(
                'Got back data of type: {}'.format(type(response)))
            self.logger.info(
                'Successfully pulled site data from Google Analytics API')
            self.publish_metrics(self.logger, response)
            now = datetime.now()
            self.logger.info('Scheduling next run at {}'.format(
                now + timedelta(seconds=self.delay)))
            time.sleep(self.delay - ((time.time() - starttime) % self.delay))
Save and Exit the file.
Running our Kafka Python Example
Now we have everything ready to run our application except our environment variables.
$ export KAFKA_BROKERS="broker.example.com:31000"
$ export KEY_FILE="keyfile name"
$ export VIEW_ID="00000000"
$ export TOPIC="admintome-ga-pages"
Substitute those values for the actual values from the beginning of this article.
Finally, run the application:
$ python AnalyticsIntake.py
2018-06-28 23:12:07,851 root         INFO     Set KAFKA_BROKERS: ['mslave1.admintome.lab:31000']
2018-06-28 23:12:07,851 root         INFO     Set KEY_FILE: .json
2018-06-28 23:12:07,851 root         INFO     Set VIEW_ID:
2018-06-28 23:12:07,851 root         INFO     Set TOPIC: admintome-ga-pages
2018-06-28 23:12:07,851 root         INFO     DELAY environment variable not set - Setting to default 3600 s
2018-06-28 23:12:07,851 root         INFO     Starting Google Analytics API Intake Daemon
2018-06-28 23:12:07,851 root         INFO     Pulling site data from Google Analytics API
2018-06-28 23:12:08,900 root         INFO     Successfully pulled site data from Google Analytics API
2018-06-28 23:12:08,900 root         INFO     Publishing site data to Kafka Broker ['mslave1.admintome.lab:31000']
kafka send result: RecordMetadata(topic='admintome-ga-pages', partition=0, topic_partition=TopicPartition(topic='admintome-ga-pages', partition=0), offset=19, timestamp=1530245529016, checksum=None, serialized_key_size=-1, serialized_value_size=21583)
2018-06-28 23:12:09,030 root         INFO     Successfully published site data to Kafka Broker ['mslave1.admintome.lab:31000']
2018-06-28 23:12:09,030 root         INFO     Scheduling next run at 2018-06-29 00:12:09.030824
The application will continue to run until you hit [CTRL]-[C].
Building a Docker container
We eventually want to deploy this application to Marathon. The best way to do this is to build a docker container. If you clone the admintome/analytics-intake repository you will find a Dockerfile that you can use to build a docker container and push to your docker repository.
Deploying the application to Marathon
After you have built your docker container and pushed to a docker repository (like Docker Hub) you will need to do a docker pull on all your Mesos Slaves. Then create a new Marathon application using this JSON.
{
  "id": "analytics-intake",
  "cmd": null,
  "cpus": 1,
  "mem": 128,
  "disk": 0,
  "instances": 1,
  "container": {
    "docker": {
      "image": "[docker repo username]/analytics-intake"
    },
    "type": "DOCKER"
  },
  "networks": [
    {
      "mode": "host"
    }
  ],
  "env": {
    "KAFKA_BROKERS": "mslave1.admintome.lab:31000",
    "KEY_FILE": "something.json",
    "VIEW_ID": "00000000",
    "TOPIC": "admintome-ga-pages"
  }
}
Make sure to substitute your correct values including your docker repo username in the docker:image section.
What’s Next?
You now have a Python application deployed to Marathon that can pull metrics from Google Analytics and push that data in the form of JSON to your Kafka cluster.
The next step is to take that raw data and analyze it into some meaningful and actionable data. We will do this using Apache Spark in a future article. Thanks for sticking with me through this article. If you enjoyed then please do me a solid and throw up a link to it.
The post Kafka Python and Google Analytics appeared first on AdminTome Blog.
↧
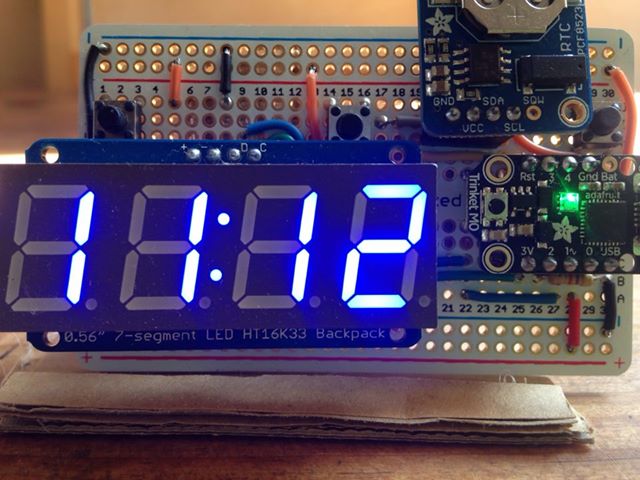
Made With Mu: Happy Homemade Horology with Trinket, CircuitPython and Mu
Leila and Emma got in touch to tell us they’ve made themselves a stylish homemade clock! Using an Adafruit M0 Trinket, a quad 7-segment display and various other components they hacked all the CircuitPython code together in Mu! Read on to learn more…
I first met Leila and Emma in 2015, when Trans*Code was first welcomed to PyCon UK. On subsequent meetings it has always been a great pleasure to hear of their homemade electronics projects and how they’ve thought up ever more creative and interesting ways to use MicroPython or CircuitPython in their work. They have been great supporters of Mu since the very earliest releases, so “thank you” both for your encouragement, feedback and support.
When the call went out for user-contributed projects for this blog, it didn’t take long for them to submit the first contribution, and what a fun project it is!
Their own digital alarm clock broke, and none of the replacements fitted their requirements, so rather than buy a new one they used it as an opportunity to learn and make their own.
What I love about this project is that it took several attempts to get it right. In the end they came up with a device that worked with a much simpler design than their original solution (that didn’t work at all!). This is a common occurrence: it takes time to work out how to solve a problem and you’re likely to encounter unforeseen problems along the way. Only after “playing around” and experimenting for a bit will a simple, elegant and (most importantly) working solution emerge.
Another aspect of the project that I really like is its Wabi-Sabi-ness. I’m a big fan of Wabi Sabi (while the linked-to Wikipedia article is interesting, I recommend this wonderful little book for those who want to learn more). Wabi-Sabi is the beauty found in impermanent, incomplete and unconventional objects. The development of, and solution for this project is a wonderful example of such beauty.
Finally, the code they created in Mu has a really cool feature to handle button presses to change modes (their clock not only tells the time, but will display the date and year!). This is another important aspect of the project: Leila and Emma are in control of their digital device and, if they feel so inclined, are free to change how it works or fix any bugs. They can hack it!
You can read Leila’s full write-up of the project, including source code and circuit designs at her blog.
Great work Leila and Emma! :-)
↧
EuroPython: EuroPython 2018: Invoices available
We have great news ! After many months of sorting the UK VAT registration issue, we have finally been registered for VAT in the UK. This is the number, we’ve all been waiting for:
We’ve now generated all the missing invoices for existing purchases and hope that this will make it easier for companies to now register their employees as well.
EuroPython 2018: Get your tickets before we sell out
Downloading Invoices
If you have already purchased tickets, you can find the invoices in your account. Simply log in, go to the profile page, select “Orders, invoices & coupons” on the right and you should find the invoice links for your orders.

The invoices are generated as PDFs, so you can print or archive them easily.
Sorry for keeping you waiting so long.
Enjoy,
–
EuroPython 2018 Team
https://ep2018.europython.eu/
https://www.europython-society.org/
↧
↧
EuroPython: EuroPython 2018: Beginners’ Day Workshop
Maybe you’ve come to EuroPython as a programmer from another language.
Or perhaps you have other tech skills or you really want to understand what it’s like to program in Python.
Then come to our Beginners’ Day at EuroPython.

What is Beginners’ Day ?
Beginners’ Day is a session we are running, just for newcomers to the Python programming language, on Tuesday, July 24th from 09:30 - 16:45, at the Edinburgh International Conference Center (EICC), the EuroPython 2018 venue, and just in time to get you ready for all the talks which follow on Wednesday, Thursday and Friday.
You will need a conference pass to attend, but otherwise, it’s free, so if you’re thinking of coming to the conference, but you’re new to Python or programming, this could be the session for you.
The workshop will be run by:
- Vincent D. Warmerdam (PyData Amsterdam)
- Christian Barra (EuroPython board member)
Sign up for Beginners’ Day
Whether
you’re totally new to programming or you already know another language -
this full day session will give you a crash-course in Python, and the ecosystem
around it. You’ll get the context you need to get the most out of the
rest of the EuroPython conference.
Bring your laptop, because this will be a hands-on session!
This
session will be presented in English (although a few of the coaches do
speak basic Spanish, French, Italian and Portuguese).
Please see the Beginners’ Day page for the full program:
https://ep2018.europython.eu/en/events/beginners-day/
If you’d like to come, please do register in advance for this session, so that we know how to plan to make it the best yet. We need to know the numbers for planing the workshop.
Call for Mentors
Already know Python ? Want to be a mentor ? Fantastic !
Especially if you can add an extra language to help non-English speakers feel comfortable asking questions, or if you’ve never mentored before and want to try to share your knowledge for the first time.
Please sign up as a mentor on our mentor registration form.
Enjoy,
–
EuroPython 2018 Team
https://ep2018.europython.eu/
https://www.europython-society.org/
↧
Python Software Foundation: Python Software Foundation Fellow Members for Q2 2018
We are happy to announce our 2018 2nd Quarter Python Software Foundation Fellow Members:
Congratulations! Thank you for your continued contributions. We have added you to our Fellow roster online.
The above members have contributed to the Python ecosystem by maintaining popular libraries, organizing Python events, hosting Python meet ups, teaching classes, contributing to CPython, and overall being great mentors in our community. Each of them continues to help make Python more accessible around the world. To learn more about the new Fellow members, check out their links above.
If you would like to nominate someone to be a PSF Fellow, please send a description of their Python accomplishments and their email address to psf-fellow at python.org. Here is the nomination review schedule for 2018:
We are looking for a few more voting members to join the Work Group to help review nominations. If you are a PSF Fellow and would like to join, please write to psf-fellow at python.org.![]()
![]()
![]()
![]()
![]()
The above members have contributed to the Python ecosystem by maintaining popular libraries, organizing Python events, hosting Python meet ups, teaching classes, contributing to CPython, and overall being great mentors in our community. Each of them continues to help make Python more accessible around the world. To learn more about the new Fellow members, check out their links above.
If you would like to nominate someone to be a PSF Fellow, please send a description of their Python accomplishments and their email address to psf-fellow at python.org. Here is the nomination review schedule for 2018:
- Q3: July to the end of September (01/07 - 30/09) Cut-off for quarter three will be August 20. New fellows will be announced before end of September.
- Q4: October to the end of December (01/10 - 31/12) Cut-off for quarter four will be November 20. New fellows will be announced before December 31.
We are looking for a few more voting members to join the Work Group to help review nominations. If you are a PSF Fellow and would like to join, please write to psf-fellow at python.org.
↧
Talk Python to Me: #167 Simplifying Python's Async with Trio
Ever since Python 3.5 was released, we've had a really powerful way to write I/O bound async code using the async and await keywords.
↧
EuroPython Society: EuroPython 2018: Invoices available
We have great news ! After many months of sorting the UK VAT registration issue, we have finally been registered for VAT in the UK. This is the number, we’ve all been waiting for:
We’ve now generated all the missing invoices for existing purchases and hope that this will make it easier for companies to now register their employees as well.
EuroPython 2018: Get your tickets before we sell out
Downloading Invoices
If you have already purchased tickets, you can find the invoices in your account. Simply log in, go to the profile page, select “Orders, invoices & coupons” on the right and you should find the invoice links for your orders.
The invoices are generated as PDFs, so you can print or archive them easily.
Sorry for keeping you waiting so long.
Enjoy,
–
EuroPython 2018 Team
https://ep2018.europython.eu/
https://www.europython-society.org/
↧
↧
Techiediaries - Django: Angular 6 Tutorial: Full-Stack Angular Example Application
Throughout this Angular 6 tutorial, by example, for beginners, we'll learn to build a full-stack example web application with Angular 6, the latest version of Angular — The most popular framework/platform for building mobile and desktop client side applications, created and used internally by Google.
Angular 6 Tutorial: Full-Stack Angular Example Application for beginners
- The Django Example Back-End
- Angular 6 Example
- Installing the Angular CLI (v6.0.0)
- Components in Angular 6|5|4
- Component-Based Architecture
- Demystifying the AppComponent (The Root Component of Angular Applications)
- Angular 6 Components by Example
- Adding Angular 6 Routing
- An Example for Consuming the REST API Using Angular 6 HttpClient
- Creating Contacts/Sending HTTP POST Request Example
- Getting Contacts/Sending HTTP GET Request Example
- Create an Angular 6 Service/Provider
- Conclusion
By the end of this Angular 6 tutorial, you'll learn by building a real world example application:
- how to install the latest version of Angular CLI,
- how to use the Angular 6 CLI to generate a new Angular 6 project,
- how to use Angular 6 to build a simple CRM application,
- what's a component and component-based architecture
- how to create Angular 6 components,
- how to add component routing and navigation,
- how to use HttpClient to consume a REST API etc.
The Django Example Back-End
We'll make use of a simple CRM API built with Django and Django REST framework. Since this is an Angular tutorial we'll not focus on building the API as this will be the subject of a separate tutorial but you can grab the source code of the back-end API from this repository
You can use the following commands to start the development server:
# Clone the project and navigate into it$ git clone https://github.com/techiediaries/django-crm
$ cd django-crm

# Create a virtual environment and install packages$ pipenv install

# Activate the virtual environment$ pipenv shell

# Create and migrate the database then run the local development server$ python manage.py migrate
$ python manage.py runserver
You server will be running from http://localhost:8000.
We are using pipenv, the officially recommended package management tool for Python so you'll need to have it installed. The process is quite simple depending on your operating system.
Angular 6 Example
The example Angular 6 application we'll be building is the front-end for a CRM RESTful API that will allow you to create accounts, leads, opportunities and contacts. It's a perfect example for a CRUD (Create, Read, Update and Delete) application built as an SPA (Single Page Application). The example application is work on progress so we'll be building it through a series of tutorials and will be updated to contain advanced features such as RxJS 6 and JWT authentication. We'll also use Bootstrap 4 and Angular 6 Material for building and styling the UI components. You either need Bootstrap 4 or Angular Material for styling so depending on your choice you can follow separate tutorials:
Installing the Angular CLI (v6.0.0)
Make sure you have Node.js installed, next run the following command in your terminal to install Angular CLI v 6.0.0.
npm -g install @angular/cli
You can check the installed version by running the following command:
ng version
This is the output I'm getting:
    / \   _ __   __ _ _   _| | __ _ _ __     / ___| |   |_ _|
   / △ \ | '_ \ / _` | | | | |/ _` | '__|   | |   | |    | |
  / ___ \| | | | (_| | |_| | | (_| | |      | |___| |___ | |
 /_/   \_\_| |_|\__, |\__,_|_|\__,_|_|       \____|_____|___|
                |___/


Angular CLI: 6.0.0
Node: 8.11.1
OS: linux x64
Angular:
...

Package                      Version
------------------------------------------------------
@angular-devkit/architect    0.6.0
@angular-devkit/core         0.6.0
@angular-devkit/schematics   0.6.0
@schematics/angular          0.6.0
@schematics/update           0.6.0
rxjs                         6.1.0
typescript                   2.7.2
Now, you're ready to create a project using Angular CLI v6. Simply run the following command in your terminal:
ng new crmapp
The CLI will automatically generate a bunch of files common to most Angular 6 projects and install the required dependencies for your project.
We will mostly be working inside the src/app folder. This is the directory structure of the project:

You can serve your application locally by running the following commands:
# Navigate inside your project's folder$ cd crmapp

# Serve your application$ ng serve
You application will be running from http://localhost:4200.
This is a screen-shot of home page of the application:

Components in Angular 6|5|4
Now what's a component?
A component is a TypeScript class with an HTML template and an optional set of CSS styles that control a part of the screen.
Components are the most important concept in Angular 6. An Angular 6 application is basically a tree of components with a root component (the famous AppComponent). The root component is the one contained in the bootstrap array in the main NgModule module app.module.ts.
One important aspect of components is re-usability. A component can be re-used throughout the application and even in other applications. Common and repeatable code that performs a certain task can be encapsulated into a re-usable component that can be called whenever we need the functionality it provides.
Each bootstrapped component is the base of its own tree of components. Inserting a bootstrapped component usually triggers a cascade of component creations that fill out that tree. source
Component-Based Architecture
An Angular application is made of several components forming a tree structure with parent and child components.
A component is an independent block of a big system (web application) that communicates with the other building blocks (components) of the system using inputs and outputs. A component has associated view, data and behavior and may have parent and child components.
Components allow maximum re-usability, easy testing, maintenance and separation of concerns.
Let's now see this practically. Head over to your Angular application project folder and open the src/app folder. You will find the following files:
app.component.css: the CSS file for the componentapp.component.html: the HTML view for the componentapp.component.spec.ts: the unit tests or spec file for the componentapp.component.ts: the component code (data and behavior)app.module.ts: the application main module
Except for the last file which contains the declaration of the application main (root) Module, all these files are used to create a component. It's the AppComponent: The root component of our application. All other components we are going to create next will be direct or un-direct children of the root component.
Demystifying the AppComponent (The Root Component of Angular Applications)
Go ahead and open the src/app/app.component.ts file and let's understand the code behind the main/root component of the application.
First, this is the code:
import{Component}from'@angular/core';@Component({selector:'app-root',templateUrl:'./app.component.html',styleUrls:['./app.component.css']})exportclassAppComponent{title='app';}We first import the Component decorator from @angular/core then we use it to decorate the TypeScript class AppComponent. The Component decorator takes an object with many parameters such as:
- selector: specifies the tag that can be used to call this component in HTML templates just like the standard HTML tags
- templateUrl: indicates the path of the HTML template that will be used to display this component (you can also use the template parameter to include the template inline as a string)
- styleUrls: specifies an array of URLs for CSS style-sheets for the component
The export keyword is used to export the component so that it can be imported from other components and modules in the application.
The title variable is a member variable that holds the string 'app'. There is nothing special about this variable and it's not a part of the canonical definition of an Angular component.
Now let's see the corresponding template for this component. If you open src/app/app.component.html this is what you'll find:
<divstyle="text-align:center"><h1>
Welcome to !
</h1><imgwidth="300"alt="Angular Logo"src="data:image/svg+xml;...."></div><h2>Here are some links to help you start: </h2><ul><li><h2><atarget="_blank"rel="noopener"href="https://angular.io/tutorial">Tour of Heroes</a></h2></li><li><h2><atarget="_blank"rel="noopener"href="https://github.com/angular/angular-cli/wiki">CLI Documentation</a></h2></li><li><h2><atarget="_blank"rel="noopener"href="https://blog.angular.io/">Angular blog</a></h2></li></ul>
The template is a normal HTML file (almost all HTML tags are valid to be used inside Angular templates except for some tags such as <script>, <html> and <body> etc.) with the exception that it can contain template variables (in this case the title variable) or expressions ({{...}}) that can be used to insert values in the DOM dynamically. This is called interpolation or data binding. You can find more information about templates from the docs.
You can also use other components directly inside Angular templates (via the selector property) just like normal HTML.
If you are familiar with the MVC (Model View Controller) pattern, the component class plays the role of the Controller and the HTML template plays the role of the View.
Angular 6 Components by Example
After getting the theory behind Angular components, let's now create the components for our simple CRM application.
Our REST API, built with Django, exposes these endpoints:
/api/accounts: create or read a paginated list of accounts/api/accounts/<id>: read, update or delete an account/api/contacts: create or read a paginated list of contacts/api/contacts/<id>: read, update or delete a contact/api/leads: create or read a paginated list of leads/api/leads/<id>: read, update or delete a lead/api/opportunities: create or read a paginated list of opportunities/api/opportunities/<id>: read, update or delete an opportunity
Before adding routing to our application we first need to create the application's components so based on the exposed REST API architecture we can initially divide our application into these components:
AccountListComponent: this component displays and controls a tabular list of accountsAccountCreateComponent: this component displays and controls a form for creating or updating accountsContactListComponent: displays a table of contactsContactCreateComponent: displays a form to create or update a contactLeadListComponent: displays a table of leadsLeadCreateComponent: displays a form to create or update a leadOpportunityListComponent: displays a table of opportunitiesOpportunityCreateComponent: displays a form to create or update an opportunity
Let's use the Angular CLI to create the components
ng generate component AccountList
ng generate component AccountCreate

ng generate component ContactList
ng generate component ContactCreate

ng generate component LeadList
ng generate component LeadCreate

ng generate component OpportunityList
ng generate component OpportunityCreate
This is the output of the first command:
CREATE src/app/account-list/account-list.component.css (0 bytes)
CREATE src/app/account-list/account-list.component.html (31 bytes)
CREATE src/app/account-list/account-list.component.spec.ts (664 bytes)
CREATE src/app/account-list/account-list.component.ts (292 bytes)
UPDATE src/app/app.module.ts (418 bytes)
You can see that the command generates all the files to define a component and also updates src/app/app.module.ts.
If you open src/app/app.module.ts after running all commands, you can see that all components are automatically added to the AppModuledeclarations array.:
import{BrowserModule}from'@angular/platform-browser';import{NgModule}from'@angular/core';import{AppComponent}from'./app.component';import{AccountListComponent}from'./account-list/account-list.component';import{AccountCreateComponent}from'./account-create/account-create.component';import{ContactListComponent}from'./contact-list/contact-list.component';import{ContactCreateComponent}from'./contact-create/contact-create.component';import{LeadListComponent}from'./lead-list/lead-list.component';import{LeadCreateComponent}from'./lead-create/lead-create.component';import{OpportunityListComponent}from'./opportunity-list/opportunity-list.component';import{OpportunityCreateComponent}from'./opportunity-create/opportunity-create.component';@NgModule({declarations:[AppComponent,AccountListComponent,AccountCreateComponent,ContactListComponent,ContactCreateComponent,LeadListComponent,LeadCreateComponent,OpportunityListComponent,OpportunityCreateComponent],imports:[BrowserModule],providers:[],bootstrap:[AppComponent]})exportclassAppModule{}If you are creating components manually, you need to make sure to include manually so they can be recognized as part of the module.
Adding Angular 6 Routing
Angular CLI provides the --routing switch (ng new crmapp --routing) that enables you to add routing automatically but we're going to add routing manually for the sake of understanding the various pieces involved in adding component routing to your Angular application.
In fact, adding routing is quite simple:
- add a separate module (which can be called
AppRoutingModule) in a fileapp-routing.module.ts, and import the module by including it in theimportsof mainAppModule, - add
<router-outlet></router-outlet>inapp.component.html(this is where the Angular Router will insert components matching the current path), - add routes (each route is an object with properties such as path and component etc.).
This is the initial content of app-routing.module.ts:
import{NgModule}from'@angular/core';import{Routes,RouterModule}from'@angular/router';constroutes:Routes=[];@NgModule({imports:[RouterModule.forRoot(routes)],exports:[RouterModule]})exportclassAppRoutingModule{}The routes will contain all the routes of the application. After creating the components we'll see how to add routes to this array.
For now, we want to redirect the visitor to the /accounts path when the home URL is visited so the first path we'll add is:
{path:'',redirectTo:'accounts',pathMatch:'full'},The pathMatch specifies the matching strategy. full means that we want to fully match the path.
Next let's add the other paths:
{path:'',redirectTo:'accounts',pathMatch:'full'},{path:'accounts',component:AccountListComponent},{path:'create-account',component:AccountCreateComponent},{path:'contacts',component:ContactListComponent},{path:'create-contact',component:ContactCreateComponent},{path:'leads',component:LeadListComponent},{path:'create-lead',component:LeadCreateComponent},{path:'opportunities',component:OpportunityListComponent},{path:'create-opportunity',component:OpportunityCreateComponent}];Now open src/app/app.module.ts and import the routing module then add it to the imports array:
import{AppRoutingModule}from'./app-routing.module';[...]@NgModule({declarations:[AppComponent,[...]],imports:[BrowserModule,AppRoutingModule],[...]})exportclassAppModule{}Finally, open src/app/app.component.html then add the navigation links and the router outlet:
<a[routerLink]="'/accounts'"> Accounts </a><a[routerLink]="'/create-account'"> Create Account </a><a[routerLink]="'/contacts'"> Contacts </a><a[routerLink]="'/create-contact'"> Create Contact </a><a[routerLink]="'/leads'"> Leads </a><a[routerLink]="'/create-lead'"> Create Lead </a><a[routerLink]="'/opportunities'"> Opportunities </a><a[routerLink]="'/create-opportunity'"> Create Opportunity </a><div><router-outlet></router-outlet></div>An Example for Consuming the REST API Using Angular 6 HttpClient
Now that we've created the different components and added routing and navigation, let's see an example of how to use the HttpClient of Angular 6 to consume the RESTful API back-end.
First, you need to add the HttpClientModule module to the imports array of the main application module
[..]import{HttpClientModule}from'@angular/common/http';@NgModule({declarations:[..],imports:[[..]HttpClientModule],providers:[],bootstrap:[AppComponent]})exportclassAppModule{}Create an Angular 6 Service/Provider
A service is a global class that can be injected in any component. It's used to encapsulate code that can be common between multiple components in one place instead of repeating it throughout various components.
Now, lets create a service that encapsulates all the code needed for interacting with the REST API. Using Angulat CLI run the following command:
ng g service api
Two files: src/app/api.service.ts and src/app/api.service.spec.ts will be generated. The first contains code for the service and the second contains tests.
Open src/app/api.service.ts then import and inject the HttpClient class.
import{Injectable}from'@angular/core';import{HttpClient}from'@angular/common/http';@Injectable({providedIn:'root'})exportclassAPIService{constructor(privatehttpClient:HttpClient){}}Angular 6 provides a way to register services/providers directly in the @Injectable() decorator by using the new providedIn attribute. This attribute accepts any module of your application or 'root' for the main app module. Now you don't have to include your service in the providers array of your module.
Getting Contacts/Sending HTTP GET Request Example
Let's start with the contacts API endpoint.
- First we'll add a method to consume this endpoint in our global API service,
- next we'll inject the API service and call the method from the corresponding component class (
ContactListComponent) - and finally we'll display the result (the list of contacts) in the component template.
Open src/app/api.service.ts and add the following method:
exportclassAPIService{API_URL='http://localhost:8000';constructor(privatehttpClient:HttpClient){}getContacts(){returnthis.httpClient.get(`${this.API_URL}/contacts`);
}
Next, open src/app/contact-list/contact-list.component.ts and inject the APIService then call the getContacts() method:
import{Component,OnInit}from'@angular/core';import{APIService}from'../api.service';@Component({selector:'app-contact-list',templateUrl:'./contact-list.component.html',styleUrls:['./contact-list.component.css']})exportclassContactListComponentimplementsOnInit{privatecontacts:Array<object>=[];constructor(privateapiService:APIService){}ngOnInit(){this.getContacts();}publicgetContacts(){this.apiService.getContacts().subscribe((data:Array<object>)=>{this.contacts=data;console.log(data);});}}Now let's display the contacts in the template. Open src/app/contact-list/contact-list.component.html and add the following code:
<h1>
My Contacts
</h1><div><tablestyle="width:100%"><tr><th>First Name</th><th>Last Name</th><th>Phone</th><th>Email</th><th>Address</th></tr><tr*ngFor="let contact of contacts"><td> { { contact.first_name } } </td><td> { { contact.last_name } } </td><td> { { contact.phone } } </td><td> { { contact.email } } </td><td> { { contact.address } } </td></tr></table></div>
This is a screen-shot of the component:

Creating Contacts/Sending HTTP POST Request Example
Now let's create a method to send HTTP Post request to create a random contact. Open the API service file and add the following method:
createContact(contact){returnthis.httpClient.post(`${this.API_URL}/contacts/`,contact);}Next let's call this method from the ContactCreateComponent to create a contact. First open src/app/contact-create/contact-create.component.ts and add the following code:
import{Component,OnInit}from'@angular/core';import{APIService}from'../api.service';@Component({selector:'app-contact-create',templateUrl:'./contact-create.component.html',styleUrls:['./contact-create.component.css']})exportclassContactCreateComponentimplementsOnInit{constructor(privateapiService:APIService){}ngOnInit(){}createContact(){varcontact={account:1,address:"Home N 333 Apartment 300",createdBy:1,description:"This is the third contact",email:"abbess@email.com",first_name:"kaya",isActive:true,last_name:"Abbes",phone:"00121212101"};this.apiService.createContact(contact).subscribe((response)=>{console.log(response);});};}}For now, we're simply hard-coding the contact info for the sake of simplicity.
Next open src/app/contact-create/contact-create.component.html and add a button to call the method to create a contact:
<h1>
Create Contact
</h1><button(click)="createContact()">
    Create Contact
</button>
Conclusion
Throught this Angular 6 tutorial for beginners, we've seen, by building a simple real world example, how to use different Angular concepts to create simple full-stack application with Angular and Django. You can find the source code in this repository.
↧
Artem Golubin: How virtual enviroment libraries work in Python
Have you ever wondered what happens when you activate a virtual environment and how it works internally? Here is a quick overview of internals behind popular virtual environments, e.g., virtualenv, virtualenvwrapper, conda, pipenv.
Initially, Python didn't have built-in support for virtual environments, and such feature was implemented as a hack. As it turns out, this hack is based on a simple concept.
When Python starts its interpreter, it searches for the site-specific directory where all packages are stored. The search starts at the parent directory of a Python executable location and continues by backtracking the path (i.e., looking at the parent directories) until it reaches the root directory. To determine if it's a site-specific directory, Python looks for the os.py module, which is a mandatory requirement by Python in order to work.
Let's suppose our Python binary is located at /usr/dev/bin/python. The search pattern will look as follows:
/usr/dev/lib/python3.7/os.py
/usr/lib/python3.7/os.py
/lib/python3.7/os.py
As you can see, Python adds a special prefix (lib/python$VERSION/os.py). When interpreter finds the first occurrence of the os module it sets the sys.prefix and sys.exec_prefix to the found location with prefix removed from the path. If there is none found, Python uses a hardcoded prefix.
...
↧
Test and Code: 42: Using Automated Tests to Help Teach Python - Trey Hunner
This interview with Trey Hunner discusses his use of automated tests to help teach programming.
Automated testing is a huge part of developing great software. But many new developers don't get exposed to testing for quite a while. But this is changing.
New ways to teach programming include automated tests from the beginning.
Trey Hunner is one of the PSF directors and a Python and Django team trainer, and he has been using automated tests to help people learn Python.
Special Guest: Trey Hunner.
Sponsored By:
- Python Bytes: Get the latest Python news with the Python Bytes Podcast.
- Talk Python to Me: Get the back story and hear about the human side of the Python things you love with the Talk Python to Me Podcast
Links:
<p>This interview with Trey Hunner discusses his use of automated tests to help teach programming.</p> <p>Automated testing is a huge part of developing great software. But many new developers don't get exposed to testing for quite a while. But this is changing.</p> <p>New ways to teach programming include automated tests from the beginning.</p> <p>Trey Hunner is one of the PSF directors and a Python and Django team trainer, and he has been using automated tests to help people learn Python.</p><p>Special Guest: Trey Hunner.</p><p>Sponsored By:</p><ul><li><a rel="nofollow" href="https://pythonbytes.fm">Python Bytes</a>: <a rel="nofollow" href="https://pythonbytes.fm">Get the latest Python news with the Python Bytes Podcast.</a></li><li><a rel="nofollow" href="https://talkpython.fm">Talk Python to Me</a>: <a rel="nofollow" href="https://talkpython.fm">Get the back story and hear about the human side of the Python things you love with the Talk Python to Me Podcast</a></li></ul><p>Links:</p><ul><li><a title="Trey Hunner" rel="nofollow" href="http://treyhunner.com/">Trey Hunner</a></li><li><a title="Python Morsels - write better Python code" rel="nofollow" href="http://try.pythonmorsels.com/">Python Morsels - write better Python code</a></li><li><a title="Trey's Weekly Python Chat" rel="nofollow" href="http://www.weeklypython.chat/">Trey's Weekly Python Chat</a></li><li><a title="Trey's Training business: Truthful Technology" rel="nofollow" href="http://truthful.technology/">Trey's Training business: Truthful Technology</a></li><li><a title="exercism.io" rel="nofollow" href="http://exercism.io/">exercism.io</a></li><li><a title="PyBites Code Challenges " rel="nofollow" href="https://codechalleng.es/">PyBites Code Challenges </a></li><li><a title="CheckiO" rel="nofollow" href="https://checkio.org/">CheckiO</a></li></ul>↧
Weekly Python StackOverflow Report: (cxxxii) stackoverflow python report
These are the ten most rated questions at Stack Overflow last week.
Between brackets: [question score / answers count]
Build date: 2018-06-30 20:45:29 GMT
Between brackets: [question score / answers count]
Build date: 2018-06-30 20:45:29 GMT
- Python 3.7: Utility of Dataclasses and SimpleNameSpace - [13/2]
- Python 3.7: dataclass does not raise `TypeError` for `eq=False` - [13/2]
- Are nested format specifications legal? - [11/1]
- Marking the entire group if condition is true for a single row - [10/3]
- Efficient Way of making a set of tuple in which the order of tuple doesn't matters - [8/3]
- Vectorized assignment in Numpy - [8/3]
- Integrating Keras model into TensorFlow - [8/2]
- python - how to implement a C-function as awaitable (coroutine) - [7/1]
- Python fold/reduce composition of multiple dictionaries - [7/1]
- Single Thread Impacts Model Accuracy and Loss with TensorFlow Keras Backend - [7/0]
↧
↧
Sandipan Dey: Detection of a Human Object with HOG Descriptor Features using SVM (Primal QuadProg implementation using CVXOPT) in Python
In this article, first how to extract the HOG descriptor from an image will be discuss. Then how a support vector machine binary classifier can be trained on a dataset containing labeled images (using the extracted HOG descriptor features) and later how the SVM model can be used (along with a sliding window) to predict … Continue reading Detection of a Human Object with HOG Descriptor Features using SVM (Primal QuadProg implementation using CVXOPT) in Python
↧
Test and Code: 42: Using Automated Tests to Help Teach Python - Trey Hunner
This interview with Trey Hunner discusses his use of automated tests to help teach programming.
Automated testing is a huge part of developing great software. But many new developers don't get exposed to testing for quite a while. But this is changing.
New ways to teach programming include automated tests from the beginning.
Trey Hunner is one of the PSF directors and a Python and Django team trainer, and he has been using automated tests to help people learn Python.
Special Guest: Trey Hunner.
Sponsored By:
- Python Bytes: Get the latest Python news with the Python Bytes Podcast.
- Talk Python to Me: Get the back story and hear about the human side of the Python things you love with the Talk Python to Me Podcast
Links:
<p>This interview with Trey Hunner discusses his use of automated tests to help teach programming.</p> <p>Automated testing is a huge part of developing great software. But many new developers don't get exposed to testing for quite a while. But this is changing.</p> <p>New ways to teach programming include automated tests from the beginning.</p> <p>Trey Hunner is one of the PSF directors and a Python and Django team trainer, and he has been using automated tests to help people learn Python.</p><p>Special Guest: Trey Hunner.</p><p>Sponsored By:</p><ul><li><a rel="nofollow" href="https://pythonbytes.fm">Python Bytes</a>: <a rel="nofollow" href="https://pythonbytes.fm">Get the latest Python news with the Python Bytes Podcast.</a></li><li><a rel="nofollow" href="https://talkpython.fm">Talk Python to Me</a>: <a rel="nofollow" href="https://talkpython.fm">Get the back story and hear about the human side of the Python things you love with the Talk Python to Me Podcast</a></li></ul><p>Links:</p><ul><li><a title="Trey Hunner" rel="nofollow" href="http://treyhunner.com/">Trey Hunner</a></li><li><a title="Python Morsels - write better Python code" rel="nofollow" href="http://try.pythonmorsels.com/">Python Morsels - write better Python code</a></li><li><a title="Trey's Weekly Python Chat" rel="nofollow" href="http://www.weeklypython.chat/">Trey's Weekly Python Chat</a></li><li><a title="Trey's Training business: Truthful Technology" rel="nofollow" href="http://truthful.technology/">Trey's Training business: Truthful Technology</a></li><li><a title="exercism.io" rel="nofollow" href="http://exercism.io/">exercism.io</a></li><li><a title="PyBites Code Challenges " rel="nofollow" href="https://codechalleng.es/">PyBites Code Challenges </a></li><li><a title="CheckiO" rel="nofollow" href="https://checkio.org/">CheckiO</a></li></ul>↧
Tryton News: Newsletter July 2018
@ced wrote:
This month, the biggest task was to migrate the full code base of Tryton to Python 3. So the next release 5.0 will be only supported by Python 3.4 or later.
Changes for the user
Don’t show search window for single result in Many2Many
When the user fill the search entry of a Many2Many for which the search result is a single record, we do not show any more the search window but add it directly. This is the same behavior as for the Many2One.
Add some margin on modal in the web client
In previous change, we made modal taking 100% of the width. But it may be confusing for the user to understand that it is a modal, so we have restored a small margin.
Shortcut reworked
Some shortcuts were in conflict with existing one from the OS or the browser. So we reworked them to minimize the overlap but keep them efficient.
Product description on subscription
Like the other documents, the subscription line does not copy the product description anymore and so reduce the duplication of data.
Removal of accounting on product
In order to have a better privilege separation between the accounting and the product manager, we removed all accounting configuration from the product and used only the accounting category to define them. So only a member of the accounting group can edit them.
This requires that prior to the migration to 5.0, all products must be setup to use an accounting category.Prevent to modify lot
If the lot has been already used for a stock move, we forbid to change the product attribute of the lot in order to keep the integrity of the data.
Allow to configure the date of depreciation move
We added two new configurations for depreciation of assets:
- The day of the month: First or Last
- The month (when depreciation is yearly)
Import the statement format AEB43
The AEB43 is a format from the Spanish Association of Banks. The new module
account_statement_aeb43allow to use the standard wizard to import AEB43 files as statements.Changes for the developer
Calendar view trigger
on_changeWhen a new record is created from a calendar view, the start date is automatically set. Now this assignation trigger a
on_changecall.Use context for windows suffix
When a tab is open from selected records, the client append automatically the name of those records to the title of the tab. The
RPCcall to get the record names uses now the context of the tab opened.Better cleaning of
ir.modelandir.model.fieldThe cleaning was run after the registration of each model but per module. So if a model was registered multiple times in the same module, the late fields were deleted before being re-create. This was an issue if they were referenced as foreign key in another table. We clean now only once after the initialization of all the modules.
Graph dependency resolution
We simplified the algorithm that resolve the graph dependency from being exponential to linear. We registered an improvement of 80% on the time for the 122 standard modules.
Compute production cost at the end
Instead of setting the theoretical cost on the produced product at the beginning, we set it at the end using the final cost which will include the cost of the actual work etc.
The domain is no more validated for
FunctionfieldWe consider that it is the responsibility of the underlying storage to ensure the validity of the data. So we do not validate the domain on
Functionfield. This reduces the time of record validation. Another side effect is to allow to set a domain onFunctionfield without the need to have asearchermethod.Sao supports the
widthattribute on tree viewThe support of
widthattribute was missing in sao, the web client. This is no more the case. Developers can now rely on it to design better views.Support
view_idinswitchclient actionThe client action
switch, which had only aview_typeargument, accepts now also aview_id. When it is set the client will switch to this exact view and it will fetch it from the server if needed.Improve client loading strategy
The strategy has been improved to take into account to eagerly load only the fields that are on the same view. This new strategy is mainly useful when multiple form views are defined.
Simplify start/end date on subscription line
We made the start date required on the line and fill it by default with the start date of the subscription.
Copy return new records in the same order
This assumption is used many times in the modules but it was not guarantee by the code nor the documentation. Now we ensure thanks to a unit test that the order of returned records follows the order of the input records. This change will be back-ported to all supported branches even if it changes the API because it fixes bugs in some modules.
Improve record rules validation
As the rules may depend on relational fields, we validate them after having written those fields. Also on write, we checked the rule before the modification but not after. So it was possible for a user to modify a record that he will no more be allowed to modify it back. Now, we check the rules also after the modification.
Add support for
(i)likeoperator for domain validationThe clients pre-validate the records by evaluating the domain. Until now
likeandilikeoperators were always evaluated as valid. But it is no more the case with the implementation of the operators as regular expressions.

Posts: 1
Participants: 1
↧
EuroPython: EuroPython 2018: Inviting European Python Conference Organizers
The EuroPython Society (EPS), who is organizing the EuroPython conference, last year extended it’s mission to also provide help for the Python community in Europe in general.
As part of this, we would like to get to know, and help create closer ties between organizers of other European Python events.
Organizers’ Lunch
We would like to invite representatives of all European Python conference to EuroPython 2018 to join us for an organizers’ lunch. We’re planing the lunch for Friday, July 27, in the organizer’s room (Soutra Suite).
Our aim is to get to know each other, exchange experience in organizing events and to find out how we, as EPS, can most effectively help other conferences going forward.
Free Tickets
To support and facilitate this, we are giving out one free conference ticket per conference team, so that each team can send a representative to the organizers’ lunch.
If your team wants to send someone to join, please write to board@europython.eu, mentioning the conference you’re organizing and some background on your team.
Enjoy,
–
EuroPython Society
https://ep2018.europython.eu/
https://www.europython-society.org/
↧
↧
EuroPython: EuroPython 2018: Community Discounts
The EuroPython Society (EPS) extended its mission last year to not only run the EuroPython conference, but also provide help for the Python community in Europe in general.
Let’s all meet at EuroPython
In addition to the Python Organizers Lunch (see previous post), which focuses on conference organizers, we are also establishing a program to support attendees of Python user groups and conferences in Europe.
We’d like to invite all of you to EuroPython 2018 this year. Of course, we cannot give out free tickets to everyone, but we can at least recognize your participation in the Python community by giving out discounts for the conference.
Discounts for EuroPython Tickets
If you are running a Python event (conference or user group) in Europe, please reach out to board@europython.eu to request a coupon code for your group, which you can then pass on to your group members or attendees.
If you are not running a user group or conference, but a regular attendee of one, please contact your organizers to have them submit a request. We can only distribute codes at the user group and conference organizer level.
The coupon codes are valid for conference tickets bought starting today and will give you a 10% discount on the ticket price (both regular and late bird prices). The codes are setup for user group sizes of between 30-50 members, but we are also extending this to organizers and attendees of larger conferences. If you need a code valid for larger groups, please mention this in your email.
Enjoy,
–
EuroPython Society
https://ep2018.europython.eu/
https://www.europython-society.org/
↧
Mike Driscoll: Python 101 Screencast: Episode #14 – The configparser module
↧
Mike Driscoll: PyDev of the Week: Ricky White
This week we welcome Ricky White (@EndlessTrax) as our PyDev of the Week. Ricky is the owner of White Lion Media. He is also the Community Manager at Real Python. If you go to his website, you will find that he has written some non-technical books, which is pretty neat. You can also check out his Github profile to see what projects he is working on. Let’s take a few minutes to get to know Ricky!

Can you tell us a little about yourself (hobbies, education, etc):
I’m originally from Leicester, England. And I moved to the U.S. in late October 2014. Prior to moving to the U.S., I was a registered nurse specializing in ICU care. When we immigrated to Virginia, my wife and I swapped roles within the household, and she went back to work as I became a stay-at-home dad to our then 3-year-old son, and 6-month-old daughter. A job I wouldn’t change for the world.
The last 3.5 years have been far from dull, and so much has happened. Not least of all, I’ve authored two books. I’ve learned how to code. And achieved a lifelong ambition of starting my own business. Apparently looking after two small children wasn’t tiring enough, and I apparently hate sleep…
When I’m not fulfilling my primary role in life, writing, or slinging some code, I’m usually residing in the dojo. I’m a passionate martial artist who holds the rank of Shodan (first-degree black belt), and I dedicate some of my time each week to teaching other students the art and helping them to grow.
I also suffer from a chronic degenerative disease called Ankylosing Spondylitis. I have been a patient advocate since I was diagnosed in 2010, and currently work as the vice-chairman of a 501c3 non-profit — which I helped co-found — that aims to raise the awareness of the disease for which 2.7 million people suffer in the U.S. (that’s more than MS and Parkinson’s combined!) The charity is called Walk AS One.
And just for fun, I play chess and have a mild-moderate bonsai addiction, of which I have a modest collection.
Why did you start using Python?
The short answer is: because everyone was talking about how great it was and I was suffering from FOMO (fear of missing out.)
The slightly longer answer is: I had tried several languages prior, and had built several small-scale apps with each, as I attempted to teach myself how to code. Part of the problem with my learning was that I had no direction. I wasn’t entirely sure what sort of products I wanted to build and/or problems I wanted to solve. So I was just moving from one tutorial to the next to see what ‘stuck.’ Eventually, I found my way to Python, and a switch was flicked. Suddenly the code I wrote actually worked as intended. But more importantly, I knew why. I just found (even basic) programming principles easier to grasp in Python than I had in other languages, and all the dots started joining up. It felt great to know I actually could build something. And nothing motivates more than success (well maybe fear, but we won’t go there.)
What other programming languages do you know and which is your favorite?
When I started to teach myself how to code I started with C++, of all places. I never really built anything in it, though, and I found it very confusing. I did, however, learn about pointers and memory management. And that’s something I’ve found is never mentioned in most tutorials, as other languages (like Python) have all the ‘fancy stuff’ like garbage collection, so people take it for granted or never really know what’s happening under the hood. And I think that’s a shame.
After that, I moved onto HTML and CSS, and eventually PHP (so I could build WordPress themes.) I didn’t like PHP at all, so I tried C# next. I built a few projects in C# and even ventured into ASP.NET. I very nearly didn’t learn Python at all, as I thought I was just procrastinating and losing focus by the switching to yet another new language. But I did learn it, and although I do have a soft spot for .NET, Python is by far my favorite language and is always my first choice whenever I want to build a new project.
What projects are you working on now?
Right now, I’m taking a stab at building my own CMS with Django for my personal website redesign. I was going to go with Pelican, the static site generator, but then I decided I might want to do direct sales of my current and future books at some point, as well as starting to blog again. So why not build my own platform and learn a ton in the process? It sounded a good idea at the time… I may regret it.
Other than that, I have some small projects I want to work on for my own benefit. Like a chess app that analyzes my previous games and tells me all kinds of useful information, like what openings have the highest win ratio for me, the average length of my games, and so on. Finding time is difficult these days, so it’s on a slow burn right now.
Which Python libraries are your favorite (core or 3rd party)?
Flask, requests, and beautiful soup are the three that are in almost everything I write. So those are my favorite. I could use others to achieve the same task, but I don’t. I always reach for what I enjoy working with.
How did you end up becoming an author of books?
The first book I wrote was a non-fiction book based on my experience as both a nurse and a chronic illness patient. Very few get to experience both sides of the desk, so I decided that there was a need for a book to help patients (with any long-term condition) to get more from their healthcare appointments. In a way, it sort of capped off my previous career as a nurse and made sure the knowledge I had gained over the previous decade was put to good use and immortalized in the written word.
The second book was my very first piece of fiction. No short story preludes, or fanfic. I dove straight in head first with a full novel. It was a lot of fun and is the first-in-series, so there will be at least two more books to follow. It started out as more of a bucket list item, but as I dug into the ‘how’ of writing fiction, I found it had so many parallels with coding (really.) I got really intrigued by storytelling and the whole process. So much so, that it started changing the way I wrote non-fiction articles, too, for the better. Oh, and unlike my previous book, I got to write this one under a pen-name. It’s fun having an alter ego! 
What are the top 3 things you have learned as an author?
I love this question because I honestly believe these points are also good advice to the budding developers out there, too.
- Perfect is the enemy of done. Just write the damn words/code already. Edit/refactor later. Get it all out and down on the page. Go back and make it pretty and refine it later. You can’t edit a blank page, nor can you compile one. So get it out no matter how ugly it is.
- Now you have something on the page/file it’s time to “kill your darlings.” Deleting whole passages of writing/code is fine. People hate doing it, they feel like they’ve somehow failed or wasted their time. It’s not true. It’d be nice to always write something the best way every time, but no one does that. It’s unrealistic. So what if you have to delete and rewrite a whole scene or class? You’ve just learned something. Learning how not to do something is often more important than learning the ‘best’ way. It’ll also help you to get a deeper understanding of why something worked or not. The delete key is your friend, learn from it.
- Maybe this should have gone first… but make a plan. Before you sit down to write a book or an app, plan it out. The more you know about what you want it to look and feel like ahead of time. The less time you’ll need to spend editing/refactoring. Write lists, sketch out the UI, whatever it takes, plan it out first.
Is there anything else you’d like to say?
Go Ravens!
Thanks for doing the interview, Ricky!
↧