We're going to discuss generator functions, generator expressions, and iterators in this chat. Let's talk about lazy looping!
↧
Weekly Python Chat: Generators!
↧
Daniel Bader: Iterator Chains as Pythonic Data Processing Pipelines
Iterator Chains as Pythonic Data Processing Pipelines
Here’s another great feature of iterators in Python: By chaining together multiple iterators you can write highly efficient data processing “pipelines.”

If you take advantage of Python’s generator functions and generator expressions, you’ll be building concise and powerful iterator chains in no time.
In this tutorial you’ll find out what this technique looks like in practice and how you can use it in your own programs.
The first time I saw this pattern in action in a PyCon presentation by David Beazley, it simply blew my mind.
But first things first—let’s do a quick recap:
Generators and generator expressions are syntactic sugar for writing iterators in Python. They abstract away much of the boilerplate code needed when writing class-based iterators.
While a regular function produces a single return value, generators produce a sequence of results. You could say they generate a stream of values over the course of their lifetime.
For example, I can define the following generator that produces the series of integer values from one to eight by keeping a running counter and yielding a new value every time next() gets called on it:
defintegers():foriinrange(1,9):yieldi
You can confirm this behaviour by running the following code in a Python REPL:
>>>chain=integers()>>>list(chain)[1,2,3,4,5,6,7,8]
So far, so not-very-interesting. But we’ll quickly change this now. You see, generators can be “connected” to each other in order to build efficient data processing algorithms that work like a pipeline.
Making Generator “Pipelines”
You can take the “stream” of values coming out of the integers() generator and feed them into another generator again. For example, one that takes each number, squares it, and then passes it on:
defsquared(seq):foriinseq:yieldi*i
This is what our “data pipeline” or “chain of generators” would do now:
>>>chain=squared(integers())>>>list(chain)[1,4,9,16,25,36,49,64]
And we can keep on adding new building blocks to this pipeline. Data flows in one direction only, and each processing step is shielded from the others via a well-defined interface.
This is similar to how pipelines work in Unix. We chain together a sequence of processes so that the output of each process feeds directly as input to the next one.
Building Longer Generator Chains
Why don’t we add another step to our pipeline that negates each value and then passes it on to the next processing step in the chain:
defnegated(seq):foriinseq:yield-i
If we rebuild our chain of generators and add negated at the end, this is the output we get now:
>>>chain=negated(squared(integers()))>>>list(chain)[-1,-4,-9,-16,-25,-36,-49,-64]
My favorite thing about chaining generators is that the data processing happens one element at a time. There’s no buffering between the processing steps in the chain:
- The
integersgenerator yields a single value, let’s say 3. - This “activates” the
squaredgenerator, which processes the value and passes it on to the next stage as 3 × 3 = 9 - The square number yielded by the
squaredgenerator gets fed immediately into thenegatedgenerator, which modifies it to -9 and yields it again.
You could keep extending this chain of generators to build out a processing pipeline with many steps. It would still perform efficiently and could easily be modified because each step in the chain is an individual generator function.
Chained Generator Expressions
Each individual generator function in this processing pipeline is quite concise. With a little trick, we can shrink down the definition of this pipeline even more, without sacrificing much readability:
integers=range(8)squared=(i*iforiinintegers)negated=(-iforiinsquared)
Notice how I’ve replaced each processing step in the chain with a generator expression built on the output of the previous step. This code is equivalent to the chain of generators we built throughout this tutorial:
>>>negated<generatorobject<genexpr>at0x1098bcb48>>>>list(negated)[0,-1,-4,-9,-16,-25,-36,-49]
The only downside to using generator expressions is that they can’t be configured with function arguments, and you can’t reuse the same generator expression multiple times in the same processing pipeline.
But of course, you could mix-and-match generator expressions and regular generators freely in building these pipelines. This will help improve readability with complex pipelines.
Chained Iterators in Python – Key Takeaways
In this tutorial you saw how chaining together multiple iterators let’s you write highly efficient data processing “pipelines.” This is another great feature of iterators in Python:
- Generators can be chained together to form highly efficient and maintainable data processing pipelines.
- Chained generators process each element going through the chain individually.
- Generator expressions can be used to write concise pipeline definitions, but this can impact readability.
↧
↧
Zaki Akhmad: Improve Programmers Skill
Recently, I attended PyCon APAC 2017 which was held in Kuala Lumpur, Malaysia. It’s always nice to meet new people and share stories.
It turned out, the most interesting talk for me was one of the session in lightning talk. It was delivered by Ivan.
Ivan shared that programmers should always upgrade their skill and it can’t be done by working on our daily routine. We should take class, do some side projects, or even try some code contest.
For example, solving a simple problem but only using the standard library. If most of the time we are requests library to make HTTP access, now try not to use requests library. Instead just use Python standard library.
I definitely want to always upgrade my skill. I just have to find the time and the method that suits me. I found reading still important, but I guess problem solving still the best way to practice.
↧
Obey the Testing Goat: Second edition is out! Reviews please!

The second edition is officially out!
Thanks to everyone involved!
If you've been reading the free online edition and feel like showing your support, then now's the time! There's not a huge amount in it for me financially (I get about a dollar off every sale) but it does add up, and O'Reilly also deserve your support, they've been great.
Reviews, please!
More importantly, I really need some reviews for the book, on Amazon and elsewhere. They make a real difference to sales, and they really help other people to make the decision over whether they will find the book useful. So if you've enjoyed the book at all, do write a review for me online. That would be very, very much appreciated.
Thanks once again, dear readers, for your kind words and encouragement throughout the process. I couldn't do it without you.
↧
DataCamp: Keras Cheat Sheet: Neural Networks in Python
Keras is an easy-to-use and powerful library for Theano and TensorFlow that provides a high-level neural networks API to develop and evaluate deep learning models.
We recently launched one of the first online interactive deep learning course using Keras 2.0, called "Deep Learning in Python.
Now, DataCamp has created a Keras cheat sheet for those who have already taken the course and that still want a handy one-page reference or for those who need an extra push to get started.
In no time, this Keras cheat sheet will make you familiar with how you can load datasets from the library itself, preprocess the data, build up a model architecture, and compile, train, and evaluate it. As there is a considerable amount of freedom in how you build up your models, you'll see that the cheat sheet uses some of the simple key code examples of the Keras library that you need to know to get started with building your own neural networks in Python.
Furthermore, you'll also see some examples of how to inspect your model, and how you can save and reload it. Lastly, you’ll also find examples of how you can predict values for test data and how you can fine tune your models by adjusting the optimization parameters and early stopping.
In short, you'll see that this cheat sheet not only presents you with the six steps that you can go through to make neural networks in Python with the Keras library.
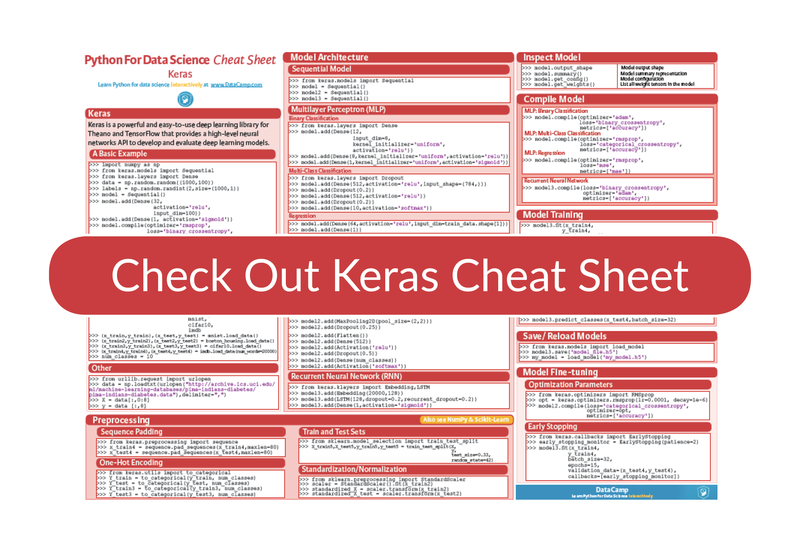
In short, this cheat sheat will boost your journey with deep learning in Python: you'll have preprocessed, created, validated and tuned your deep learning models in no time thanks to the code examples!
(Click above to download a printable version or read the online version below.)
:target:before { content:""; display:block; height:150px; margin:-150px 0 0; } h3 {font-weight:normal; } h4 { font-weight: lighter; }
Python For Data Science Cheat Sheet: Keras
Keras is a powerful and easy-to-use deep learning library for Theano and TensorFlow that provides a high-level neural networks API to develop and evaluate deep learning models.
A Basic Example
>>> import numpy as np
>>> from keras.models import Sequential
>>> from keras.layers import Dense
>>> data = np.random.random((1000,100))
>>> labels = np.random.randint(2,size=(1000,1))
>>> model = Sequential()
>>> model.add(Dense(32, activation='relu', input_dim=100))
>>> model.add(Dense(1, activation='sigmoid'))
>>> model.compile(optimizer='rmsprop', loss='binary_crossentropy', metrics=['accuracy'])
>>>  model.fit(data,labels,epochs=10,batch_size=32)
>>>  predictions = model.predict(data)
Data
Your data needs to be stored as NumPy arrays or as a list of NumPy arrays. Ideally, you split the data in training and test sets, for which you can also resort to the train_test_split module of sklearn.cross_validation.
Keras Data Sets
>>> from keras.datasets import boston_housing, mnist, cifar10, imdb
>>> (x_train,y_train),(x_test,y_test) = mnist.load_data()
>>> (x_train2,y_train2),(x_test2,y_test2) = boston_housing.load_data()
>>> (x_train3,y_train3),(x_test3,y_test3) = cifar10.load_data()
>>> (x_train4,y_train4),(x_test4,y_test4) = imdb.load_data(num_words=20000)
>>> num_classes = 10
Other
>>> from urllib.request import urlopen
>>> data = np.loadtxt(urlopen("http://archive.ics.uci.edu/ml/machine-learning-databases/pima-indians-diabetes/pima-indians-diabetes.data"),delimiter=",")
>>> X = data[:,0:8]
>>> y = data [:,8]
Preprocessing
Sequence Padding
>>> from keras.preprocessing import sequence
>>> x_train4 = sequence.pad_sequences(x_train4,maxlen=80)
>>> x_test4 = sequence.pad_sequences(x_test4,maxlen=80)
One-Hot Encoding
>>> from keras.utils import to_categorical
>>> Y_train = to_categorical(y_train, num_classes)
>>> Y_test = to_categorical(y_test, num_classes)
>>> Y_train3 = to_categorical(y_train3, num_classes)
>>> Y_test3 = to_categorical(y_test3, num_classes)
Train And Test Sets
>>> from sklearn.model_selection import train_test_split
>>> X_train5, X_test5, y_train5, y_test5 = train_test_split(X, y, test_size=0.33, random_state=42)
Standardization/Normalization
>>> from sklearn.preprocessing import StandardScaler
>>> scaler = StandardScaler().fit(x_train2)
>>> standardized_X = scaler.transform(x_train2)
>>> standardized_X_test = scaler.transform(x_test2)
Model Architecture
Sequential Model
>>> from keras.models import Sequential
>>> model = Sequential()
>>> model2 = Sequential()
>>> model3 = Sequential()
Multi-Layer Perceptron (MLP)
Binary Classification
>>> from keras.layers import Dense
>>> model.add(Dense(12, input_dim=8, kernel_initializer='uniform', activation='relu'))
>>> model.add(Dense(8, kernel_initializer='uniform', activation='relu'))
>>> model.add(Dense(1, kernel_initializer='uniform', activation='sigmoid'))
Multi-Class Classification
>>> from keras.layers import Dropout
>>> model.add(Dense(512,activation='relu',input_shape=(784,)))
>>> model.add(Dropout(0.2))
>>> model.add(Dense(512,activation='relu'))
>>> model.add(Dropout(0.2))
>>> model.add(Dense(10,activation='softmax'))
Regression
>>> model.add(Dense(64, activation='relu', input_dim=train_data.shape[1]))
>>> model.add(Dense(1))
Convolutional Neural Network (CNN)
>>> from keras.layers import Activation, Conv2D, MaxPooling2D, Flatten
>>> model2.add(Conv2D(32, (3,3), padding='same', input_shape=x_train.shape[1:]))
>>> model2.add(Activation('relu'))
>>> model2.add(Conv2D(32, (3,3)))
>>> model2.add(Activation('relu'))
>>> model2.add(MaxPooling2D(pool_size=(2,2)))
>>> model2.add(Dropout(0.25))
>>> model2.add(Conv2D(64, (3,3), padding='same'))
>>> model2.add(Activation('relu'))
>>> model2.add(Conv2D(64, (3, 3)))
>>> model2.add(Activation('relu'))
>>> model2.add(MaxPooling2D(pool_size=(2,2)))
>>> model2.add(Dropout(0.25))
>>> model2.add(Flatten())
>>> model2.add(Dense(512))
>>> model2.add(Activation('relu'))
>>> model2.add(Dropout(0.5))
>>> model2.add(Dense(num_classes))
>>> model2.add(Activation('softmax'))
Recurrent Neural Network (RNN)
>>> from keras.klayers import Embedding,LSTM
>>> model3.add(Embedding(20000,128))
>>> model3.add(LSTM(128,dropout=0.2,recurrent_dropout=0.2))
>>> model3.add(Dense(1,activation='sigmoid'))
Inspect Model
Model output shape
>>> model.output_shapeModel summary representation
>>> model.summary()Model configuration
>>> model.get_config()List all weight tensors in the model
>>> model.get_weights()Compile Model
Multi-Layer Perceptron (MLP)
MLP: Binary Classification
>>> model.compile(optimizer='adam', loss='binary_crossentropy', metrics=['accuracy'])MLP: Multi-Class Classification
>>> model.compile(optimizer='rmsprop', loss='categorical_crossentropy', metrics=['accuracy'])MLP: Regression
>>> model.compile(optimizer='rmsprop', loss='mse', metrics=['mae'])Recurrent Neural Network (RNN)
>>> model3.compile(loss='binary_crossentropy', optimizer='adam', metrics=['accuracy'])Model Training
>>> model3.fit(x_train4, y_train4, batch_size=32, epochs=15, verbose=1, validation_data=(x_test4, y_test4))Evaluate Your Model's Performance
>>> score = model3.evaluate(x_test, y_test, batch_size=32)Prediction
>>> model3.predict(x_test4, batch_size=32)
>>> model3.predict_classes(x_test4,batch_size=32)
Save/Reload Models
>>> from keras.models import load_model
>>> model3.save('model_file.h5')
>>> my_model = load_model('my_model.h5')
Model Fine-Tuning
Optimization Parameters
>>> from keras.optimizers import RMSprop
>>> opt = RMSprop(lr=0.0001, decay=1e-6)
>>> model2.compile(loss='categorical_crossentropy', optimizer=opt, metrics=['accuracy'])
Early Stopping
>>> from keras.callbacks import EarlyStopping
>>> early_stopping_monitor = EarlyStopping(patience=2)
>>> model3.fit(x_train4, y_train4, batch_size=32, epochs=15, validation_data=(x_test4, y_test4), callbacks=[early_stopping_monitor])
Going Further
Begin with our Keras tutorial for beginners, in which you'll learn in an easy, step-by-step way how to explore and preprocess the wine quality data set, build up a multi-layer perceptron for classification and regression tasks, compile, fit and evaluate the model and fine-tune the model that you have built.
Also, don't miss out on our Scikit-Learn cheat sheet, NumPy cheat sheet and Pandas cheat sheet!
↧
↧
Python Piedmont Triad User Group: PYPTUG monthly meeting: Plotly, dash and company
Come join PYPTUG at out next monthly meeting (September 19th 2017) to learn more about the Python programming language, modules and tools. Python is the ideal language to learn if you've never programmed before, and at the other end, it is also a tool that no expert would do without. Monthly meetings are in addition to our project nights.
What
Meeting will start at 6:00pm.
Main Talk: "Plotly, dash and company"
by Francois Dion
by Francois Dion
Abstract:
There are many visualization packages available out there, each best suited to specific scenarios. In the past several years, I've covered Matplotlib, Seaborn, Vincent, ggplot, 3d visualizations through matplotlib, D3.js and mpld3 and Bokeh. In this presentation we will cover plotly (for javascript, R and Python) and related packages and when it makes sense to use it.
Bio:
Francois Dion is the founder and Chief Data Scientist of Dion Research LLC, specializing in analytics, data science, IoT and visualization.
He is the author of several open source software, such as stemgraphic (www.stemgraphic.org), the founder of the Python user group for the Piedmont Triad of North Carolina (www.pyptug.org) and mentors various groups in Python, R and analytics at large. You might have run across his multiple part series on LinkedIn on data science books, including part V on Visualization.
When:
Please note, this meeting will be one week early in the month compared to our normal schedule:
Tuesday, September 19th 2017
Meeting starts at 6:00PM
Where:
room: Manchester 241
Wake Forest University, Winston-Salem, NC 27109
See also this campus map (PDF) and also the Parking Map (PDF) (Manchester hall is #20A on the parking map)
And speaking of parking: Parking after 5pm is on a first-come, first-serve basis. The official parking policy is:
"Visitors can park in any general parking lot on campus. Visitors should avoid reserved spaces, faculty/staff lots, fire lanes or other restricted area on campus. Frequent visitors should contact Parking and Transportation to register for a parking permit."
Mailing List:
Don't forget to sign up to our user group mailing list:
It is the only step required to become a PYPTUG member.
Please RSVP so we have enough food for people attending!
RSVP on meetup:
↧
Python Data: Stock market forecasting with prophet
In a previous post, I used stock market data to show how prophet detects changepoints in a signal (http://pythondata.com/forecasting-time-series-data-prophet-trend-changepoints/). After publishing that article, I’ve received a few questions asking how well (or poorly) prophet can forecast the stock market so I wanted to provide a quick write-up to look at stock market forecasting with prophet.
This article highlights using prophet for forecasting the markets. You can find a jupyter notebook with the full code used in this post here.
For this article, we’ll be using S&P 500 data from FRED. You can download this data into CSV format yourself or just grab a copy from the my github ‘examples’ directory here. let’s load our data and plot it.
market_df = pd.read_csv('../examples/SP500.csv', index_col='DATE', parse_dates=True)
market_df.plot()
S&P 500 Plot
with
Now, let’s run this data through prophet. Take a look at http://pythondata.com/forecasting-time-series-data-prophet-jupyter-notebook/ for more information on the basics of Prophet.
df = market_df.reset_index().rename(columns={'DATE':'ds', 'SP500':'y'})
df['y'] = np.log(df['y'])
model = Prophet()
model.fit(df);
future = model.make_future_dataframe(periods=365) #forecasting for 1 year from now.
forecast = model.predict(future)
And, let’s take a look at our forecast.
figure=model.plot(forecast)
 S&P 500 Forecast Plot
With the data that we have, it is hard to see how good/bad the forecast (blue line) is compared to the actual data (black dots). Let’s take a look at the last 800 data points (~2 years) of forecast vs actual without looking at the future forecast (because we are just interested in getting a visual of the error between actual vs forecast).
two_years = forecast.set_index('ds').join(market_df)
two_years = two_years[['SP500', 'yhat', 'yhat_upper', 'yhat_lower' ]].dropna().tail(800)
two_years['yhat']=np.exp(two_years.yhat)
two_years['yhat_upper']=np.exp(two_years.yhat_upper)
two_years['yhat_lower']=np.exp(two_years.yhat_lower)
two_years[['SP500', 'yhat']].plot()
S&P 500 Forecast Plot – Last two years of Actuals (orange) vs Forecast (blue – listed as yhat)
You can see from the above chart, our forecast follows the trend quite well but doesn’t seem to that great at catching the ‘volatility’ of the market. Don’t fret though…this may be a very good thing though for us if we are interested in ‘riding the trend’ rather than trying to catch peaks and dips perfectly.
Let’s take a look at a few measures of accuracy. First, we’ll look at a basic pandas dataframe describe function to see how thing slook then we’ll look at R-squared, Mean Squared Error (MSE) and Mean Absolute Error (MAE).
two_years_AE = (two_years.yhat - two_years.SP500)
print two_years_AE.describe()

count    800.000000
mean      -0.540173
std       47.568987
min     -141.265774
25%      -29.383549
50%       -1.548716
75%       25.878416
max      168.898459
dtype: float64
Those really aren’t bad numbers but they don’t really tell all of the story. Let’s take a look at a few more measures of accuracy.
Now, let’s look at R-squared using sklearn’sr2_score function:
r2_score(two_years.SP500, two_years.yhat)
We get a value of 0.91, which isn’t bad at all. I’ll take a 0.9 value in any first-go-round modeling approach.
Now, let’s look at mean squared error using sklearn’smean_squared_error function:
mean_squared_error(two_years.SP500, two_years.yhat)
We get a value of 2260.27.
And there we have it…the real pointer to this modeling technique being a bit wonky.
An MSE of 2260.28 for a model that is trying to predict the S&P500 with values between 1900 and 2500 isn’t that good (remember…for MSE, closer to zero is better) if you are trying to predict exact changes and movements up/down.
Now, let’s look at the mean absolute error (MAE) using sklearn’s mean_absolute_error function. The MAE is the measurement of absolute error between two continuous variables and can give us a much better look at error rates than the standard mean.
mean_absolute_error(two_years.SP500, two_years.yhat)
For the MAE, we get 36.18
The MAE is continuing to tell us that the forecast by prophet isn’t ideal to use this forecast in trading.
Another way to look at the usefulness of this forecast is to plot the upper and lower confidence bands of the forecast against the actuals. You can do that by plotting yhat_upper and yhat_lower.
fig, ax1 = plt.subplots()
ax1.plot(two_years.SP500)
ax1.plot(two_years.yhat)
ax1.plot(two_years.yhat_upper, color='black',  linestyle=':', alpha=0.5)
ax1.plot(two_years.yhat_lower, color='black',  linestyle=':', alpha=0.5)

ax1.set_title('Actual S&P 500 (Orange) vs S&P 500 Forecasted Upper & Lower Confidence (Black)')
ax1.set_ylabel('Price')
ax1.set_xlabel('Date')
S&P 500 Forecast with confidence bands
In the above chart, we can see the forecast (in blue) vs the actuals (in orange) with the upper and lower confidence bands in gray.
You can’t really tell anything quantifiable from this chart, but you can make a judgement on the value of the forecast. If you are trying to trade short-term (1 day to a few weeks) this forecast is almost useless but if you are investing with a timeframe of months to years, this forecast might provide some value to better understand the trend of the market and the forecasted trend.
Let’s go back and look at the actual forecast to see if it might tell us anything different than the forecast vs the actual data.
full_df = forecast.set_index('ds').join(market_df)
full_df['yhat']=np.exp(full_df['yhat'])

fig, ax1 = plt.subplots()
ax1.plot(full_df.SP500)
ax1.plot(full_df.yhat, color='black', linestyle=':')
ax1.fill_between(full_df.index, np.exp(full_df['yhat_upper']), np.exp(full_df['yhat_lower']), alpha=0.5, color='darkgray')
ax1.set_title('Actual S&P 500 (Orange) vs S&P 500 Forecasted (Black) with Confidence Bands')
ax1.set_ylabel('Price')
ax1.set_xlabel('Date')

L=ax1.legend() #get the legend
L.get_texts()[0].set_text('S&P 500 Actual') #change the legend text for 1st plot
L.get_texts()[1].set_text('S&P 5600 Forecasted') #change the legend text for 2nd plot
S&P 500 Forecast with confidence Bands
This chart is a bit easier to understand vs the default prophet chart (in my opinion at least). We can see throughout the history of the actuals vs forecast, that prophet does an OK job forecasting but has trouble with the areas when the market become very volatile.
Looking specifically at the future forecast, prophet is telling us that the market is going to continue rising and should be around 2750 at the end of the forecast period, with confidence bands stretching from 2000-ish to 4000-ish. If you show this forecast to any serious trader / investor, they’d quickly shrug it off as a terrible forecast. Anything that has a 2000 point confidence interval is worthless in the short- and long-term investing world.
That said, is there some value in prophet’s forecasting for the markets? Maybe. Perhaps a forecast looking only as a few days/weeks into the future would be much better than one that looks a year into the future. Maybe we can use the forecast on weekly or monthly data with better accuracy. Or…maybe we can use the forecast combined with other forecasts to make a better forecast. I may dig into that a bit more at some point in the future. Stay tuned.
The post Stock market forecasting with prophet appeared first on Python Data.
↧
Codementor: Django Allauth Tutorial | Social logins
A tutorial on how to build a small Django website having features of Login with Facebook Login with Google Custom User model.
↧
Python Software Foundation: PythonDay Mexico: Recap of the Inaugural PythonDay in Mexico
It has been three years since I first learned about PyCon. I watched some workshops and talks and I was amazed by how inviting, open and inclusive the community was. In fact, that was one of the key aspects that inspired me to learn Python, use it, help build the Python community here in Mexico.
Fast forward to the beginning of this year: I was contacted by the organizer of LinuxChix in Mexico, who is also member of PyLadies, with the idea of organizing a PythonDay in Mexico. This first PythonDay, she suggested, had the purpose of bringing a PyCon to Mexico. We eventually found another woman who shared the same ideal and we set about working to bring the Mexican Python community to an event that, hopefully, inspired them to be better Pythonistas the same way the first PyCon i witnessed did to me.
We first wondered how big of a community we had in Mexico. Despite being involved with Python for three years I barely knew the people or meet ups, apart from PyLadies, in Mexico devoted to the language. We figured that with Mexico being a country of 130 million there was large chance there would be a sizable population interested in Python. Along the way we discovered that the Python community in Mexico is not only vast, but also scattered across the nation. These reasons only encouraged us more to organize a PythonDay, it would be a great starting point to bring together the community.
Who came to PythonDay Mexico
We selected June 10, 2017 as the day for the first PythonDay Mexico. People from all over the country came to meet their fellow Pythonistas and listen to the amazing talks we selected for this year.

Initially we expected about 160 people, but we could not have been farther off! Over 400 people registered for the event and in its peak, approximately 300 Pythonistas were in attendance. We were glad to learn that 30% of the attendees in the event were women, which is not a high number, but in comparison to the roughly 15% of women in technology it gives hope to learn that many women are interested in programming.
Attendees traveled up to 1270 miles to attend PythonDay Mexico. In terms of geography there were attendees from Sinaloa, Jalisco, Hidalgo, Nuevo Leon, Puebla, Mexico City and Yucatan and every one of them was excited to hear the talks and workshops as well as to meet other Python lovers.
During the event we did not have any incident or complaint; everybody followed and honored the Code of Conduct lending to a greatly collaborative. Honestly we could not have asked for a better audience. But then again, Python communities all over the world are like this, awesome.

A Global Selection of Python Speakers
PythonDay Mexico had an amazingly diverse set of speakers. We had people from Paraguay, India, USA, Italy, Germany and Mexico. Even if our speakers could not be physically present, they made efforts to actually engage and interact with the audience in their remote presentations. Many of our remote speakers are a part of the Python Software Foundation Board of Directors like Naomi Ceder, Trey Hunner. Board member Lorena Mesa gave her talk in person.
Topics covered by the talks and workshops included data science, machine learning (e.g. deep learning), CPython, Python core development, Python in web development, Python extensions in other languages (Rust, Go), Testing, building bots with Python and getting Python ready for production. The range of topics permitted a bit of something for everyone.


We at PythonDay want to thank everyone that helped make this possible. The organizers spent many months talking, planning, getting funds and convincing people that Mexico is a great place for Python. The PSF was a major player in the making of this event, given that not only were they one of our major sponsors but were also a wonderful source of speakers, advice and even promotion of the event. Of course the speakers and volunteers were also a huge part of the success of this event. Finally, the event would not have been possible without the attendees, without them the event would only have been a bunch of speakers and swag.
What’s next?
Our mission after PythonDay Mexico is to bring a PyCon to Mexico and to keep connecting all the people interested in Python within Mexico with programming and events. For PyConMx we are actively seeking volunteers and organizers, if you'd like to help us or learn more you can contact us at pythonday.mx@gmail.com or mx@pyladies.com, we really hope to hear from you!
↧
↧
Kushal Das: Two days remaining for PyCon Pune 2018 CFP

The CFP for PyCon Pune 2018 will close at the end of 15th September AOE. If you are thinking about submitting a talk, this is a good time to do that. The conference will happen from 8-11th February in Pune, India. The first 2 days are the main conference, a single track event where will have around 650 people. The last two days will be devsprints.
We have already announced all the 6 keynote speakers of the conference.
Go ahead and submit your talk today.
↧
PyCon: PyCon 2018 Launches New Site, Sponsorship Search
After two great years in Portland, PyCon is shipping off to Cleveland for the 2018 and 2019 renditions of the Python community's largest gathering. PyCon 2018 will take place May 9 through 17 with two days of tutorials, three days of talks, and four days of development sprints.
For more information, check out our newly refreshed website at https://us.pycon.org/2018/ and follow us here on the blog and at @pycon on Twitter.
New Website
The new site features a design centered on the historic landmark Terminal Tower, a 52 story skyscraper that overlooks downtown Cleveland. When it opened in 1930, the tower was the fourth tallest building in the world and the tallest building outside of New York City. Though its height no longer tops the charts, the tower and surrounding Tower City area remain highly important to the city. What once was a beacon to guide ship captains to Cleveland's port and airplane pilots to its airport, the tower now includes 508 LEDs that light up for the holidays, sports teams in town, and city events. The surrounding area is filled with shopping, restaurants, a movie theater, and more.
You’ll also find details about PyCon, and up next we'll be filling out the details of our call for proposals and our registration process, as well as information about the venue. As we get closer to the event, everything we're planning will have a place on the site and you'll hear about it here on the blog. Look forward to more posts throughout the rest of this year and into 2018!
Call for Sponsors
PyCon would not be a fraction of what it is today if it weren't for the hundreds of sponsors who have pledged their support of this community and this event over the years. 2018 is no different, and Python's continued growth and global reach make yet another sellout of over 3,000 attendees inevitable.
Sponsorship has enabled us to turn PyCon from a few days of presentations to a week filled with events. Our Young Coders events introduce programming to children; the 5K Fun Run gets us to wake up early and run or walk for a good cause; and events like the PyLadies Auction have raised tens of thousands of dollars for women's outreach. There are so many more great things for PyCon attendees to be involved in that we'll be sharing in the coming months.
Sponsorship also helps us provide financial aid to attendees who would otherwise not be able to make it. The support of our community has allowed us to offer generous grants based on individual need from travel, to accommodation, to conference tickets, and helps us shape a conference that is diverse on a number of axes from technical to geographic.
As with any sponsorship, the benefits go both ways. Organizations have many options for sponsorship packages, and they all benefit from exposure to an ever growing audience of Python programmers, from those just getting started to 20 year veterans and every walk of life in between. If you're hiring, the Job Fair puts your organization literally within reach of a few thousand dedicated people who came to PyCon looking to sharpen their skills. See the full prospectus at https://us.pycon.org/2018/sponsors/prospectus/ and contact pycon-sponsors@python.org with any questions.
We look forward to sharing more news on the call for proposals, financial aid applications, registration, and more, so stay tuned!
↧
Stack Abuse: Differences Between .pyc, .pyd, and .pyo Python Files

In this article we go over the Python file types .pyc, .pyo and .pyd, and how they're used to store bytecode that will be imported by other Python programs.
You might have worked with .py files writing Python code, but you want to know what these other file types do and where they come into use. To understand these, we will look at how Python transforms code you write into instructions the machine can execute directly.
Bytecode and the Python Virtual Machine
Python ships with an interpreter that can be used as a REPL (read-eval-print-loop), interactively, on the command line. Alternatively, you can invoke Python with scripts of Python code. In both cases, the interpreter parses your input and then compiles it into bytecode (lower-level machine instructions) which is then executed by a "Pythonic representation" of the computer. This Pythonic representation is called the Python virtual machine.
However, it differs enough from other virtual machines like the Java virtual machine or the Erlang virtual machine that it deserves its own study. The virtual machine, in turn, interfaces with the operating system and actual hardware to execute native machine instructions.
The critical thing to keep in mind when you see .pyc, .pyo and .pyd file types, is that these are files created by the Python interpreter when it transforms code into compiled bytecode. Compilation of Python source into bytecode is a necessary intermediate step in the process of translating instructions from source code in human-readable language into machine instructions that your operating system can execute.
Throughout this article we'll take a look at each file type in isolation, but first we'll provide a quick background on the Python virtual machine and Python bytecode.
The .pyc File Type
We consider first the .pyc file type. Files of type .pyc are automatically generated by the interpreter when you import a module, which speeds up future importing of that module. These files are therefore only created from a .py file if it is imported by another .py file or module.
Here is an example Python module which we want to import. This module calculates factorials.
# math_helpers.py

# a function that computes the nth factorial, e.g. factorial(2)
def factorial(n):
    if n == 0:
        return 1
    else:
        return n * factorial(n - 1)

# a main function that uses our factorial function defined above
def main():
    print("I am the factorial helper")
    print("you can call factorial(number) where number is any integer")
    print("for example, calling factorial(5) gives the result:")
    print(factorial(5))

# this runs when the script is called from the command line
if __name__ == '__main__':
    main()
Now, when you just run this module from the command line, using python math_helpers.py, no .pyc files get created.
Let's now import this in another module, as shown below. We are importing the factorial function from the math_helpers.py file and using it to compute the factorial of 6.
# computations.py

# import from the math_helpers module
from math_helpers import factorial

# a function that makes use of the imported function
def main():
    print("Python can compute things easily from the REPL")
    print("for example, just write : 4 * 5")
    print("and you get: 20.")
    print("Computing things is easier when you use helpers")
    print("Here we use the factorial helper to find the factorial of 6")
    print(factorial(6))

# this runs when the script is called from the command line
if __name__ == '__main__':
    main()
We can run this script by invoking python computations.py at the terminal. Not only do we get the result of 6 factorial, i.e. 720, but we also notice that the interpreter automatically creates a math_helpers.pyc file. This happens because the computations module imports the math_helpers module. To speed up the loading of the imported module in the future, the interpreter creates a bytecode file of the module.
When the source code file is updated, the .pyc file is updated as well. This happens whenever the update time for the source code differs from that of the bytecode file and ensures that the bytecode is up to date.
Note that using .pyc files only speeds up the loading of your program, not the actual execution of it. What this means is that you can improve startup time by writing your main program in a module that gets imported by another, smaller module. To get performance improvements more generally, however, you'll need to look into techniques like algorithm optimization and algorithmic analysis.
Because .pyc files are platform independent, they can be shared across machines of different architectures. However, if developers have different clock times on their systems, checking in the .pyc files into source control can create timestamps that are effectively in the future for others' time readings. As such, updates to source code no longer trigger changes in the bytecode. This can be a nasty bug to discover. The best way to avoid it is to add .pyc files to the ignore list in your version control system.
The .pyo File Type
The .pyo file type is also created by the interpreter when a module is imported. However, the .pyo file results from running the interpreter when optimization settings are enabled.
The optimizer is enabled by adding the "-O" flag when we invoke the Python interpreter. Here is a code example to illustrate the use of optimization. First, we have a module that defines a lambda. In Python, a lambda is just like a function, but is defined more succinctly.
# lambdas.py

# a lambda that returns double whatever number we pass it
g = lambda x: x * 2
If you remember from the previous example, we will need to import this module to make use of it. In the following code listing, we import lambdas.py and make use of the g lambda.
# using_lambdas.py

# import the lambdas module
import lambdas

# a main function in which we compute the double of 7
def main():
    print(lambdas.g(7))

# this executes when the module is invoked as a script at the command line
if __name__ == '__main__':
    main()
Now we come to the critical part of this example. Instead of invoking Python normally as in the last example, we will make use of optimization here. Having the optimizer enabled creates smaller bytecode files than when not using the optimizer.
To run this example using the optimizer, invoke the command:
$ python -O using_lambdas.py
Not only do we get the correct result of doubling 7, i.e. 14, as output at the command line, but we also see that a new bytecode file is automatically created for us. This file is based on the importation of lambdas.py in the invocation of using_lambdas.py. Because we had the optimizer enabled, a .pyo bytecode file is created. In this case, it is named lambdas.pyo.
The optimizer, which doesn't do a whole lot, removes assert statements from your bytecode. The result won't be noticeable in most cases, but there may be times when you need it.
Also note that, since a .pyo bytecode file is created, it substitutes for the .pyc file that would have been created without optimization. When the source code file is updated, the .pyo file is updated whenever the update time for the source code differs from that of the bytecode file.
The .pyd File Type
The .pyd file type, in contrast to the preceding two, is platform-specific to the Windows class of operating systems. It may thus be commonly encountered on personal and enterprise editions of Windows 10, 8, 7 and others.
In the Windows ecosystem, a .pyd file is a library file containing Python code which can be called out to and used by other Python applications. In order to make this library available to other Python programs, it is packaged as a dynamic link library.
Dynamic link libraries (DLLs) are Windows code libraries that are linked to calling programs at run time. The main advantage of linking to libraries at run time like the DLLs is that it facilitates code reuse, modular architectures and faster program startup. As a result, DLLs provide a lot of functionality around the Windows operating systems.
A .pyd file is a dynamic link library that contains a Python module, or set of modules, to be called by other Python code. To create a .pyd file, you need to create a module named, for example, example.pyd. In this module, you will need to create a function named PyInit_example(). When programs call this library, they need to invoke import foo, and the PyInit_example() function will run.
For more information on creating your own Python .pyd files, check out this article.
Differences Between These File Types
While some similarities exist between these file types, there are also some big differences. For example, while the .pyc and .pyo files are similar in that they contain Python bytecode, they differ in that the .pyo files are more compact thanks to the optimizations made by the interpreter.
The third file type, the .pyd, differs from the previous two by being a dynamically-linked library to be used on the Windows operating system. The other two file types can be used on any operating system, not just Windows.
Each of these file types, however, involve code that is called and used by other Python programs.
Conclusion
In this article we described how each special file type, .pyc, .pyo, and .pyd, is used by the Python virtual machine for re-using code. Each file, as we saw, has its own special purposes and use-cases, whether it be to speed up module loading, speed up execution, or facilitate code re-use on certain operating systems.
↧
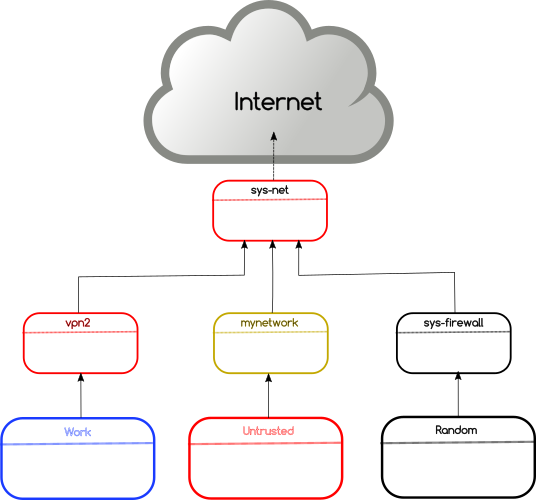
Kushal Das: Network isolation using NetVMs and VPN in Qubes
In this post, I am going to talk about the isolation of network for different domains using VPN on Qubes. The following shows the default network configuration in Qubes.
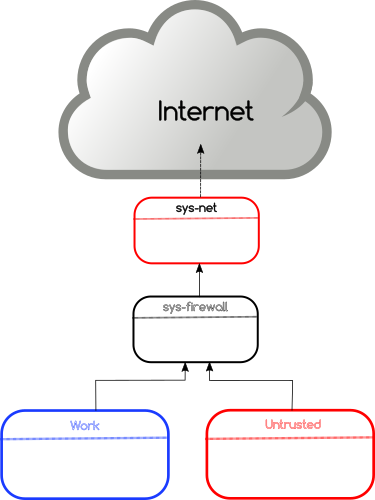
The network hardware is attached to a special domain called sys-net. This is the only domain which directly talks to the outside network. Then a domain named sys-firewall connects to sys-net and all other VMs use sys-firewall to access the outside network. These kinds of special domains are also known as NetVM as they can provide network access to other VMs.
Creating new NetVMs for VPN
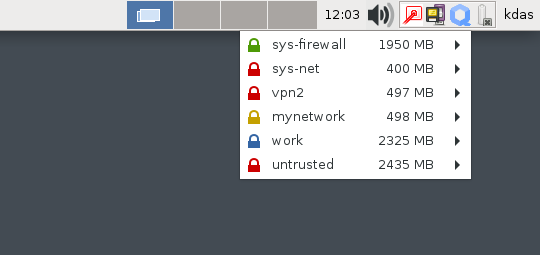
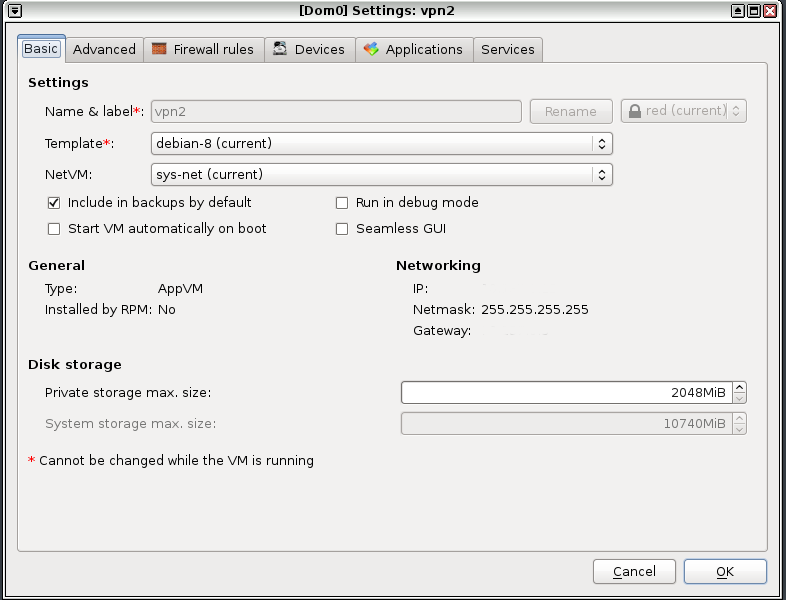
The easiest way is to close the existing sys-net domain to a new domain. In my case, I have created two different domains, mynetwork and vpn2 as new NetVMs in dom0.
$ qvm-clone sys-net mynetwork
$ qvm-clone sys-net vpn2
As the next step, I have opened the settings for these VMs and marked sys-net as the NetVM for these. I have also install openvpn package in the templateVM so that both the new NetVM can find that package.
Setting up openvpn
I am not running openvpn as proper service as I want to switch to different VPN services I have access to. That also means a bit of manual work to setup the right /etc/resolv.conf file in the NetVMs and any corresponding VMs which access the network through these.
$ sudo /usr/sbin/openvpn --config connection_service_name.ovpn
So, the final network right now looks like the following diagram. The domains (where I am doing actual work) are connected into different VPN services.
↧
↧
Python Anywhere: The PythonAnywhere newsletter, September 2017
Gosh, and we were doing so well. After managing a record seven of our "monthly" newsletters back in 2016, it's mid-September and we haven't sent a single one so far this year :-( Well, better late than never! Let's see what's been going on.
The PythonAnywhere API
Our API is now in public beta! Just go to the "API token" tab on the "Account" page to generate a token and get started.
You can do lots with it already:
- Create, reload and reconfigure websites: our very own Harry has written a neat script that allows you to create a completely new Django website, with a virtualenv, using it.
- Get links to share files from your PythonAnywhere file storage with other people
- List your consoles, and close them.
We're planning to add API support for creating, modifying and deleting scheduled tasks very soon.
Full documentation is here. We'd love your feedback and any suggestions about what we need to add to it. Just drop us a line at support@pythonanywhere.com.
Other nifty new stuff, part 1
You might have noticed something new in that description of the API calls. You might have asked yourself "what's all this about sharing files? I don't remember anything about that."
You're quite right -- it's a new thing, you can now generate a sharing link for any file from inside the PythonAnywhere editor. Send the link to someone else, and they'll get a page allowing them to copy it into their own account. Let us know if you find it useful :-)
Other nifty stuff, part 2
Of course, no Python developer worth their salt would ever consider using an old version of the language. In particular, we definitely don't have any bits of Python 2.7 lurking in our codebase. Definitely not. Nope.
Anyway, adding Python 3.6 support was super-high priority for us -- and it went live earlier on this year.
One important thing -- it's only supported in our "dangermouse" system image. If your account was created in the last year, you're already using dangermouse, so you'll already have it. But if your account is older, and you haven't switched over yet, maybe it's time? Just drop us a line.
The inside scoop from the blog and the forums
- A tutorial from Giles: building a simple Telegram bot using PythonAnywhere
- One of our loadbalancers was blocked by the Russian government due to someone hosting a naughty site on our systems. We rapidly moved everyone who was affected over to a new one, of course.
- Interested in using Dash on PythonAnywhere? Harry worked it out.
- What's better than an octupus that can predict football results? A Python that can predict tennis results!
- Running scheduled tasks in a virtualenv can be tricky. There's a simple way that will work most of the time, but if you're setting environment variables in a postactivate script, you need a slightly more complicated command.
- Web requests, how do they work? Giles knows (apparently).
- If you're writing a web scraper and want to be able to download large files, user vinasia's suggestions will be helpful.
- Scientists, especially of the data- subspecies, are becoming keen on Julia, a language focused on numerical computing. User VizenTech got it working on PythonAnywhere.
Some new help pages
A couple of new pages from our ever-expanding collection:
- Having problems with your connection to MySQL databases, especially from a website? This page is for you.
- Sometimes it can be hard to work out where all of your disk space has gone. Here are some hints and tricks.
New modules
Although you can install Python packages on PythonAnywhere yourself, we like to make sure that we have plenty of batteries included.
We haven't installed any new system modules for Python 2.7, 3.3, 3.4 or 3.5 recently -- but we have installed everything we thought might be useful as part of our Python 3.6 install :-)
New whitelisted sites
Paying PythonAnywhere customers get unrestricted Internet access, but if you're a free PythonAnywhere user, you may have hit problems when writing code that tries to access sites elsewhere on the Internet. We have to restrict you to sites on a whitelist to stop hackers from creating dummy accounts to hide their identities when breaking into other people's websites.
But we really do encourage you to suggest new sites that should be on the whitelist. Our rule is, if it's got an official public API, which means that the site's owners are encouraging automated access to their server, then we'll whitelist it. Just drop us a line with a link to the API docs.
We've added too many sites to list since our last newsletter to list them all -- but please keep them coming!
That's all for now
That's all we've got this time around. We have some big new features in the pipeline, so keep tuned! Maybe we'll even get our next newsletter out in October :-)
↧
Shopkick Tech Blog: Shopkick at PyBay 2017
This year a bunch of us devs attended the second annual PyBay conference, proudly sponsored by, you guessed it, Shopkick! From the panel to the keynote to manning our booth, the speakers, attendees, and co-sponsors made PyBay 2017 a blast.

This year, PyBay accepted two talks from shopkick engineers, and we figured we should shed some extra light on the bits of shopkick in each of them.
The Packaging Gradient
Up first, The Packaging Gradient, presented by principal engineer Mahmoud Hashemi (aka yours truly), dove deep into the interconnected matrix of technologies used for shipping software. It highlights the big differences between shipping libraries and applications, as well as the finer gradiations within each of those.
At Shopkick we have hundreds of internal libraries, and at the end of the day we ship dozens of Python server applications. The talk touches on container-based packaging and deployment systems, like the ones Shopkick has been using since 2011. The talk even describes a bit about how we ship hardware, as part of manufacturing the beacons used for presence detection inside of retailers.
For more information, check out the blog post The Packaging Gradient is based on, or shoot me an email.
Best Practices in Legacy Codebases
For our second talk, Moving Towards Best Practices in Legacy Codebases, frameworks engineering duo Kurt Rose and Moshe Zadka draw upon their combined 35+ years of Python experience to bear on a nuanced-yet-practical approach to wrangling huge codebases.
Shopkick has always been a startup, with all that entails. Years of fast-paced development and experimentation can leave quite a bit of technical debt in its wake. Now, having committed to paying off that debt, how can we successfully upgrade our codebase while minimizing business impact? This talk covers what's worked for us so far.
Conferring conclusions
All in all, this year's PyBay managed to outdo 2016 by a healthy margin. Polling the six of us who attended, reviews are unanimous: tutorials were a fantastic resource, and the mix of talks was just right. Some favorites were Sandy Ryza's talk on solving NP-hard problems, Paul Ganssle's talk on timezone complications, and of course, the lightning talks.
In a repeat of last year's conference, we're talking to a couple lead developers to hang out with Shopkick on a longer-term basis. If you're in the Bay/Toronto and are looking to step up your development game, give us a shout!

In any case, we couldn't be happier to attend such a great regional conference.


Big thanks to Grace Law, SF Python, and the whole PyBay team who made it all possible. See you next year!
↧
pgcli: Release v1.8.0
Pgcli is a command line interface for Postgres database that does auto-completion and syntax highlighting. You can install this version using:
$ pip install -U pgcli
Features:
- Add fish-style auto-suggestion from history. (Thanks: Amjith Ramanujam)
- Improved formatting of arrays in output (Thanks: Joakim Koljonen)
- Don't quote identifiers that are non-reserved keywords. (Thanks: Joakim Koljonen)
- Remove the ... in the continuation prompt and use empty space instead. (Thanks: Amjith Ramanujam)
- Add conninfo and handle more parameters with c (issue #716) (Thanks: François Pietka)
Internal changes:
- Preliminary work for a future change in outputting results that uses less memory. (Thanks: Dick Marinus)
- Remove import workaround for OrderedDict, required for python < 2.7. (Thanks: Andrew Speed)
- Use less memory when formatting results for display (Thanks: Dick Marinus).
- Port auto_vertical feature test from mycli to pgcli. (Thanks: Dick Marinus)
- Drop wcwidth dependency (Thanks: Dick Marinus)
Bug Fixes:
- Fix the way we get host when using DSN (issue #765) (Thanks: François Pietka)
- Add missing keyword COLUMN after DROP (issue #769) (Thanks: François Pietka)
- Don't include arguments in function suggestions for backslash commands (Thanks: Joakim Koljonen)
- Optionally use POSTGRES_USER, POSTGRES_HOST POSTGRES_PASSWORD from environment (Thanks: Dick Marinus)
↧
Python Bytes: #43 Python string theory, v2
<h1>Python Bytes 43</h1>
<p>This episode is brought to you by Rollbar: <a href="https://pythonbytes.fm/rollbar"><strong>pythonbytes.fm/rollbar</strong></a></p>
<p><strong>Brian #1:</strong> <a href="https://github.com/asottile/future-fstrings"><strong>future-fstrings</strong></a></p>
<ul>
<li>A backport of fstrings to python < 3.6</li>
<li>Include an encoding string the top of your file (this replaces the utf-8 line if you already have it)</li>
<li>And then write python3.6 fstring code as usual!</li>
</ul>
<pre><code> # -*- coding: future_fstrings -*-
thing = 'world'
print(f'hello {thing}')
</code></pre>
<ul>
<li>In action:</li>
</ul>
<pre><code> $ python2.7 main.py
hello world
</code></pre>
<ul>
<li>I’m still undecided if I like this sort of monkeying with the language through the encoding mechanism back door. </li>
</ul>
<p><strong>Michael #2:</strong> <a href="https://www.youtube.com/watch?v=js_0wjzuMfc"><strong>The Fun of Reinvention</strong></a></p>
<ul>
<li>Keynote from PyCon Israel</li>
<li>David Beazley rocks it again</li>
<li>Let’s take Python 3.6 features and see how far we can push them</li>
<li>Builds an aspect-oriented constraint system using just 3.6 features</li>
</ul>
<p><strong>Brian #3:</strong> <a href="https://medium.com/@almeidneto/sound-pattern-recognition-with-python-9aff69edce5d"><strong>Sound Pattern Recognition with Python</strong></a></p>
<ul>
<li>Using<code>scipy.io.wavfile.read</code> to read a .wav file.</li>
<li>Looking for peaks (knocks).</li>
<li>Using minimum values to classify peaks, and minimum distance between peaks.</li>
<li>This is an interesting start into audio measurements using Python.</li>
<li>Would be fun to extend to some basic scope measurements, like sampling with a resolution bandwidth, trigger thresholds, pre-trigger time guards, etc.</li>
</ul>
<p><strong>Michael #4:</strong> <a href="https://www.python.org/dev/peps/pep-0550/"><strong>PEP 550: Execution Context</strong></a></p>
<ul>
<li>From the guys at <a href="http://magic.io"><strong>magic.io</strong></a></li>
<li>Adds a new generic mechanism of ensuring consistent access to non-local state in the context of out-of-order execution, such as in Python generators and coroutines.</li>
<li>Thread-local storage, such as <code>threading.local()</code>, is inadequate for programs that execute concurrently in the same OS thread. This PEP proposes a solution to this problem.</li>
<li>A few examples of where Thread-local storage (TLS) is commonly relied upon:
<ul>
<li>Context managers like decimal contexts,<code>numpy.errstate</code>, and <code>warnings.catch_warnings</code>.</li>
<li>Request-related data, such as security tokens and request data in web applications, language context for<code>gettext</code> etc.</li>
<li>Profiling, tracing, and logging in large code bases.</li>
</ul></li>
<li>The motivation from <a href="https://github.com/magicstack/uvloop"><strong>uvloop</strong></a> is obviously at work here.</li>
</ul>
<p><strong>Brian #5:</strong> <a href="https://medium.com/@bfortuner/python-multithreading-vs-multiprocessing-73072ce5600b"><strong>Intro to Threads and Processes in Python</strong></a></p>
<ul>
<li>Beginner’s guide to parallel programming</li>
<li>Threads and processes are both useful for different kinds of problems.</li>
<li>This is a good quick explanation of when and where to use either. With pictures!</li>
<li>Threads
<ul>
<li>Like mini processes that live inside one process.</li>
<li>Share mem space with other threads.</li>
<li>Cannot run simultaneously in Python (there are some workarounds), due to GIL.</li>
<li>Good for tasks waiting on IO.</li>
</ul></li>
<li>Processes
<ul>
<li>Controlled by OS</li>
<li>Can run simultaneously</li>
<li>Good for CPU intensive work because you can use multiple cores.</li>
</ul></li>
</ul>
<p><strong>Michael #6:</strong> <a href="https://www.pyfilesystem.org/"><strong>Alternative filesystems for Python</strong></a></p>
<ul>
<li>PyFilesystem: Filesystem Abstraction for Python. </li>
<li>Work with files and directories in archives, memory, the cloud etc. as easily as your local drive.</li>
<li>Uses
<ul>
<li>Write code now, decide later where the data will be stored</li>
<li>unit test without writing real files</li>
<li>upload files to the cloud without learning a new API</li>
<li>sandbox your file writing code</li>
</ul></li>
<li>File system backends
<ul>
<li><a href="https://www.pyfilesystem.org/page/appfs/">AppFS</a> Filesystems for application data.</li>
<li><a href="https://www.pyfilesystem.org/page/s3fs/">S3FS</a> Amazon S3 Filesystem.</li>
<li><a href="https://www.pyfilesystem.org/page/ftpfs/">FTPFS</a> File Transfer Protocol.</li>
<li><a href="https://www.pyfilesystem.org/page/memoryfs/">MemoryFS</a> An in-memory filesystem.</li>
<li><a href="https://www.pyfilesystem.org/page/mountfs/">MountFS</a> A virtual filesystem that can <em>mount</em> other filesystems.</li>
<li><a href="https://www.pyfilesystem.org/page/multifs/">MultiFS</a> A virtual filesystem that combines other filesystems.</li>
<li><a href="https://www.pyfilesystem.org/page/osfs/">OSFS</a> OS Filesystem (hard-drive).</li>
<li><a href="https://www.pyfilesystem.org/page/tarfs/">TarFS</a> Read and write compressed Tar archives.</li>
<li><a href="https://www.pyfilesystem.org/page/tempfs/">TempFS</a> Contains temporary data.</li>
<li><a href="https://www.pyfilesystem.org/page/zipfs/">ZipFS</a> Read and write Zip files.</li>
<li>and more</li>
</ul></li>
</ul>
<h2>Our news</h2>
<p>Michael: switch statement extension to Python: <a href="https://github.com/mikeckennedy/python-switch"><strong>github.com/mikeckennedy/python-switch</strong></a></p>
↧
↧
PyCharm: PyCharm 2017.3 EAP Starts now: scientific mode, and more
At JetBrains, we believe it’s important to involve our customers at an early stage. Before releasing a new version, we test our software to make sure everything works well. However, in software development there are as many unique configurations as there are developers. Therefore we provide Early Access Preview (EAP) versions free of charge, so you can make sure all of our improvements work in your environment prior to release.
We’d like to invite you to download the first EAP version of PyCharm 2017.3 now, it’s available from our website.
Please let us know how you like it! You can submit feedback from within PyCharm, by leaving a comment on the blog, or by reaching out to us on Twitter. If you run into any issues in the EAP, please create a ticket on YouTrack.
New in this version: Scientific Mode
More and more Python developers are doing scientific development, and we’ve created a new feature especially for them. When we detect that you use a scientific package in your project (like numpy or pandas), we will suggest to enable scientific mode:

If you chose not to use scientific mode when we asked, you can always enable it later in View | Scientific Mode.
In this mode, we open several tool windows by default: the Python console (bottom left), a variable viewer (bottom right), and a documentation viewer (top right).
The new scientific mode makes exploring data a lot easier: you always have an overview of the variables in your current session, and we look up the documentation of the method you’re using as you’re typing. No longer will you need to have your browser open with 20 tabs just to find the details about Pandas methods. In other words: you can focus on your data, rather than the details of the library you’re using.
New Features
- You can now configure exception breakpoints to be conditional, or to evaluate a statement and log

- For those who want to install PyPI packages into Conda envs, we’ve added PyPI and Conda Modes for the PyCharm Package Manager. Simply click the Conda button on the right to switch between Conda and PyPI mode:

Further Fixes and Improvements
- We now correctly identify test classes, even if they have methods that don’t start with
test_ - Many inspections and autocomplete fixes, for example we’ve improved a couple of cases where we misinterpreted __all__, and we resolved some NamedTuple issues
- Bugs involving Twisted Trial
- Some improvements to editing BDD feature and step files
- Various performance improvements
To see the full list of improvements, see the release notes of PyCharm 2017.3 EAP 1
Excited to try these new features yourself? Download PyCharm 2017.3 EAP 1 now
As always, EAP versions of PyCharm Professional Edition are free of charge, and will work for 30 days from the day of the release. If you upgrade regularly during the EAP program, you will be able to use PyCharm Professional Edition for free for the entire duration.
-PyCharm Team
The Drive to Develop
↧
Enthought: Webinar: Python for MATLAB Users: What You Need To Know

What: A guided walkthrough and Q&A about how to migrate from MATLAB® to Python with Enthought Lead Instructor, Dr. Alexandre Chabot-Leclerc.
Who Should Watch:MATLAB® users who are considering migrating to Python, either partially or completely.
Python has a lot of momentum. Many high profile projects use it and more are migrating to it all the time. Why? One reason is that Python is free, but more importantly, it is because Python has a thriving ecosystem of packages that allow developers to work faster and more efficiently. They can go from prototyping to production to scale on hardware ranging from a Raspberry Pi (or maybe micro controller) to a cluster, all using the same language. A large part of Python’s growth is driven by its excellent support for work in the fields of science, engineering, machine learning, and data science.
You and your organization might be thinking about migrating from MATLAB to Python to get access to the ecosystem and increase your productivity, but you might also have some outstanding questions and concerns, such as: How do I get started? Will any of my knowledge transfer? How different are Python and MATLAB? How long will it take me to become proficient? Is it too big a of a shift? Can I transition gradually or do I have to do it all at once? These are all excellent questions.
We know people put a lot of thought into the tools they select and that changing platforms is a big deal. We created this webinar to help you make the right choice.
In this webinar, we’ll give you the key information and insight you need to quickly evaluate whether Python is the right choice for you, your team, and your organization, including:
- How to get started
- What you need in order to replicate the MATLAB experience
- Important conceptual differences between MATLAB and Python
- Important similarities between MATLAB and Python: What MATLAB knowledge will transfer
- Strategies for converting existing MATLAB code to Python
- How to accelerate your transition

Presenter: Dr. Alexandre Chabot-Leclerc, Enthought Lead Instructor
Ph.D, Electrical Engineering, Technical University of Denmark
Python for Scientists & Engineers Training: The Quick Start Approach to Turbocharging Your Work
If you are tired of running repeatable processes manually and want to (semi-) automate them to increase your throughput and decrease pilot error, or you want to spend less time debugging code and more time writing clean code in the first place, or you are simply tired of using a multitude of tools and languages for different parts of a task and want to replace them with one comprehensive language, then Enthought’s Python for Scientists and Engineers is definitely for you!
This class has been particularly appealing to people who have been using other tools like MATLAB or even Excel for their computational work and want to start applying their skills using the Python toolset. And it’s no wonder — Python has been identified as the most popular coding language for five years in a row for good reason.
One reason for its broad popularity is its efficiency and ease-of-use. Many people consider Python more fun to work in than other languages (and we agree!). Another reason for its popularity among scientists, engineers, and analysts in particular is Python’s support for rapid application development and extensive (and growing) open source library of powerful tools for preparing, visualizing, analyzing, and modeling data as well as simulation.
Python is also an extraordinarily comprehensive toolset – it supports everything from interactive analysis to automation to software engineering to web app development within a single language and plays very well with other languages like C/C++ or FORTRAN so you can continue leveraging your existing code libraries written in those other languages.
Many organizations are moving to Python so they can consolidate all of their technical work streams under a single comprehensive toolset. In the first part of this class we’ll give you the fundamentals you need to switch from another language to Python and then we cover the core tools that will enable you to do in Python what you were doing with other tools, only faster and better!
Additional Resources
| Upcoming Open Python for Scientists & Engineers Sessions: |
Washington, DC, Sept 25-29
Los Alamos, NM, Oct 2-6, 2017
Cambridge, UK, Oct 16-20, 2017
San Diego, CA, Oct 30-Nov 3, 2017
Albuquerque, NM, Nov 13-17, 2017
Los Alamos, NM, Dec 4-8, 2017
Austin, TX, Dec 11-15, 2017
Have a group interested in training? We specialize in group and corporate training. Contact us or call 512.536.1057.

Python for Scientists & Engineers: A Tour of Enthought’s Professional Technical Training Course
Python for Data Science: A Tour of Enthought’s Professional Technical Training Course
Python for Professionals: The Complete Guide to Enthought’s Technical Training Courses
An Exclusive Peek “Under the Hood” of Enthought Training and the Pandas Mastery Workshop

The post Webinar: Python for MATLAB Users: What You Need To Know appeared first on Enthought Blog.
↧
Talk Python to Me: #129 Falcon: The bare-metal Python web framework
Full featured web frameworks such as Django are great. But sometimes, living closer to the network layer is just the thing you need.
↧