Xamarin (http://www.redbytes.in/xamarin-cross-platform-development-company/) is a mobile app development framework that allows you to create simple form of native apps that can share codes across...
↧
Codementor: How to Create a Mobile App Using Xamarin
↧
Stefan Behnel: What's new in Cython 0.25?
Cython 0.25 has been released in October 2016, so here's a quick writeup of the most relevant new features in this release.
My personal favourites are the call optimisations. Victor Stinner has done a great job throughout the year to optimise and benchmark different parts of CPython, and one of the things he came up with was a faster way to process function calls internally. For this, he added a new calling convention, METH_FASTCALL, which avoids tuple creation by passing positional arguments as a C array. I've added support for this to Cython and also ported a part of the CPython implementation to speed up calls to Python functions and PyCFunction functions from Cython code.
Further optimisations speed up f-string formatting, cython.inline() and some Python long integer operations (now also in Py2.7 and not only Py3).
The next big feature, one that has been on our list essentially forever, was finally added in 0.25. If you declare a special attribute __dict__ on a cdef class (a.k.a. extension type), if will have an instance dict that allows setting arbitrary attributes on the objects. Otherwise, extension types are limited to the declared attributes and trying to access undeclared ones would result in an AttributeError.
The C++ integration has received several minor improvements, including support for calling subclass methods from C++ classes implemented in Cython code, iterating over std::string with Cython's for-loop, typedef members in class declarations, or the typeid operator.
And a final little goodie is redundant declarations for pi and e in libc.math, which makes from libc cimport math pretty much a drop-in replacement for Python's import math.
↧
↧
Stefan Behnel: What's new in Cython 0.26?
Cython 0.26 has finally been released and it comes with some big and several smaller new features, contributed by quite a number of non-core developers.
Probably the biggest addition, definitely codewise, is support for Pythran as a backend for NumPy array expressions, contributed by Adrien Guinet. Pythran understands many usage patterns for NumPy, including array expressions and some methods, and can directly be used from within Cython to compile NumPy using code by setting the directive np_pythran=True. Thus, if Pythran is available at compile time, users can avoid writing manual loops and instead often just use NumPy in the same way as they would from Python. Note that this does not currently work generically with Cython's memoryviews, so you need to declare the specific numpy.ndarray[] types in order to benefit from the translation. Also, this requires the C++ mode in Cython as Pythran generates C++ code.
The other major new feature in this release, and likely with an even wider impact, is pickling support for cdef classes (a.k.a. extension types). This is enabled by default for all classes with Python compatible attribute types, which explicitly excludes pointers and unions. Classes with struct type attributes are also excluded for practical reasons (such as a high code overhead), but can be enabled to support pickling with the class decorator @cython.auto_pickle(True). This was a long-standing feature for which users previously had to implement the pickle protocol themselves. Since Cython has all information about the extension type and its attributes, however, there was no technical reason why it can't also generate the support for pickling them, and it now does.
As always, there are several new optimisations including speed-ups for abs(complex), comparing strings and dispatching to specialised function implementations based on fused types arguments. Particularly interesting might be the faster GIL re-entry with the directive fast_gil=True. It tries to remember the current GIL lock state in the fast thread local storage and avoids costly calls into the thread and GIL handling APIs if possible, even when calling across multiple Cython modules.
A slightly controversial change now hides the C code lines from tracebacks by default. Cython exceptions used to show the failing line number of the generated C code in addition to the Cython module code line, now only the latter is shown, like in Python code. On the one hand, this removes clutter that is irrelevant for most users. On the other hand, it hides information that could help developers debug failures from bug reports. For debugging purposes, the re-inclusion of C code lines can now be enabled with a runtime setting as follows:
import cython_runtime
cython_runtime.cline_in_traceback=True
↧
Codementor: Tic Tac Toe using Socket.IO
I'll teach you how to create a real time Tic-Tac-Toe game (https://www.wikiwand.com/en/Tic-tac-toe) using socket.IO (http://socket.io).
Note: This project uses skeleton (http://getskeleton.com/),...
↧
Codementor: Understanding CNN (Part-1)
Let's start with the most basic element of Neural Network - Perceptron.
Perceptron
The elementary entity and basic form of neural network which can also learn. The development owes to a biological...
↧
↧
Codementor: Comparing the Performance between Native iOS (Swift) and React-Native
A comparative look at the hard performance between React Native and iOS.
↧
Codementor: Writing Clean and Concise React Components by Making Full Use of ES6/7 Features and the Container-Component Pattern
Make your React components smaller, simpler and more comprehensible without sacrificing a thing.
↧
Codementor: Teaching someone on Windows and thought you could use CodeKit? What to do...
Teaching someone on Windows? Their project isn't really a fit for Gulp? Prepros is a pretty good option. Here's some hints.
↧
Codementor: Managing Your Drupal Project with Composer
Drupal Commerce was started without writing any Drupal code. Our libraries set Drupal Commerce off the island before Drupal was able to support using third party library not provided by...
↧
↧
Codementor: Understanding Navigation In React Native
I'll be taking you through React Navigation. Navigation has to do with the nav bars, tab bars and side menu drawers in your mobile application.
At the end of the tutorial, you should have a pretty...
↧
Codementor: Recursion For Beginners
The article aims to teach developers the concept of recursion. Many developers don't fully understand it yet and this article breaks it down into the simplest part.
↧
Full Stack Python: How to Make Phone Calls in Python
Good old-fashioned phone calls remain one of the best forms of communication despite the slew of new smartphone apps that have popped up over the past several years. With just a few lines of Python code plus a web application programming interface we can make and receive phone calls from any application.
Our example calls will say a snippet of text and put all incoming callers into a recorded conference call. You can modify the instructions using Twilio's TwiML verbs when you perform different actions in your own application's phone calls.
Our Tools
You should have either Python 2 or 3 installed to build this application. Throughout the post we will also use:
- pip and virtualenv to handle application dependencies
- A free Twilio account to use their phone calling web API
- Twilio's Python helper library, version 5.7.0, which is available on PyPI
You can snag all the open source code for this tutorial in the python-twilio-example-apps GitHub repository under the no-framework/phone-calls directory. Use and copy the code for your own applications. Everything in that repository and in this blog post are open source under the MIT license.
Install App Dependencies
Our application will use the TwilioPython helper library
to create an HTTP POST request to Twilio's API. The Twilio helper library is
installable from PyPI into a virtual
environment. Open your terminal and use the virtualenv command to create
a new virtualenv:
virtualenv phoneapp
Invoke the activate script within the virtualenv bin/ directory to make
this virtualenv the active Python executable. Note that you will need to
perform this step in every terminal window that you want the virtualenv to
be active.
source phoneapp/bin/activate
The command prompt will change after activating the virtualenv
to something like (phoneapp) $.
Next use the pip command to install the
Twilio Python package
into the virtualenv.
pip install twilio==5.7.0
We will have the required dependency ready for project as soon as the installation script finishes. Now we can write and execute Python code to dial phone numbers.
Our Python Script
Create a new file named phone_calls.py and copy or type in the following
lines of code.
fromtwilio.restimportTwilioRestClient# Twilio phone number goes here. Grab one at https://twilio.com/try-twilio# and use the E.164 format, for example: "+12025551234"TWILIO_PHONE_NUMBER=""# list of one or more phone numbers to dial, in "+19732644210" formatDIAL_NUMBERS=["",]# URL location of TwiML instructions for how to handle the phone callTWIML_INSTRUCTIONS_URL= \
  "http://static.fullstackpython.com/phone-calls-python.xml"# replace the placeholder values with your Account SID and Auth Token# found on the Twilio Console: https://www.twilio.com/consoleclient=TwilioRestClient("ACxxxxxxxxxx","yyyyyyyyyy")defdial_numbers(numbers_list):"""Dials one or more phone numbers from a Twilio phone number."""fornumberinnumbers_list:print("Dialing "+number)# set the method to "GET" from default POST because Amazon S3 only# serves GET requests on files. Typically POST would be used for appsclient.calls.create(to=number,from_=TWILIO_PHONE_NUMBER,url=TWIML_INSTRUCTIONS_URL,method="GET")if__name__=="__main__":dial_numbers(DIAL_NUMBERS)
There are a few lines that you need to modify in this application before it
will run. First, insert one or more phone numbers you wish to dial into the
DIAL_NUMBERS list. Each one should be a string, separated by a comma. For
example, DIAL_NUMBERS = ["+12025551234", "+14155559876", "+19735551234"].
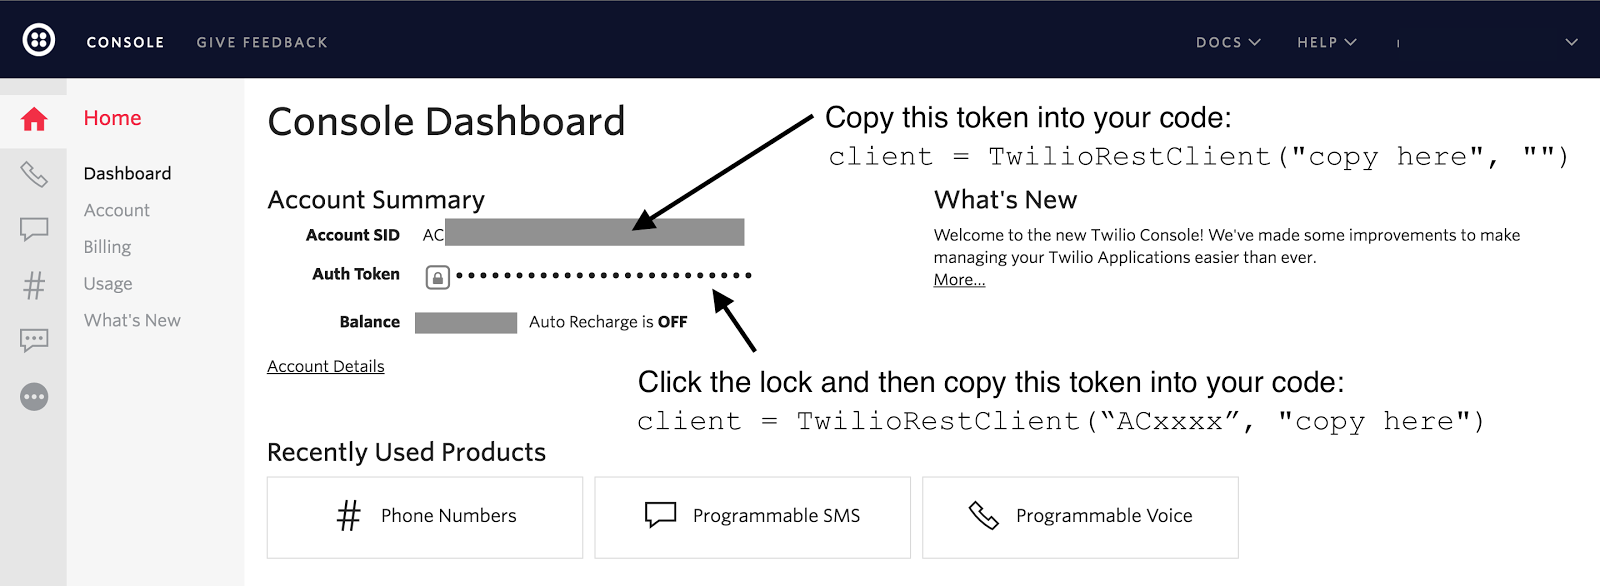
Next, TWILIO_PHONE_NUMBER and the Account SID and Authentication Token,
found on the client = TwilioRestClient("ACxxxxxxxxxx", "yyyyyyyyyy")
line, need to be set. We can get these values from the
Twilio Console.
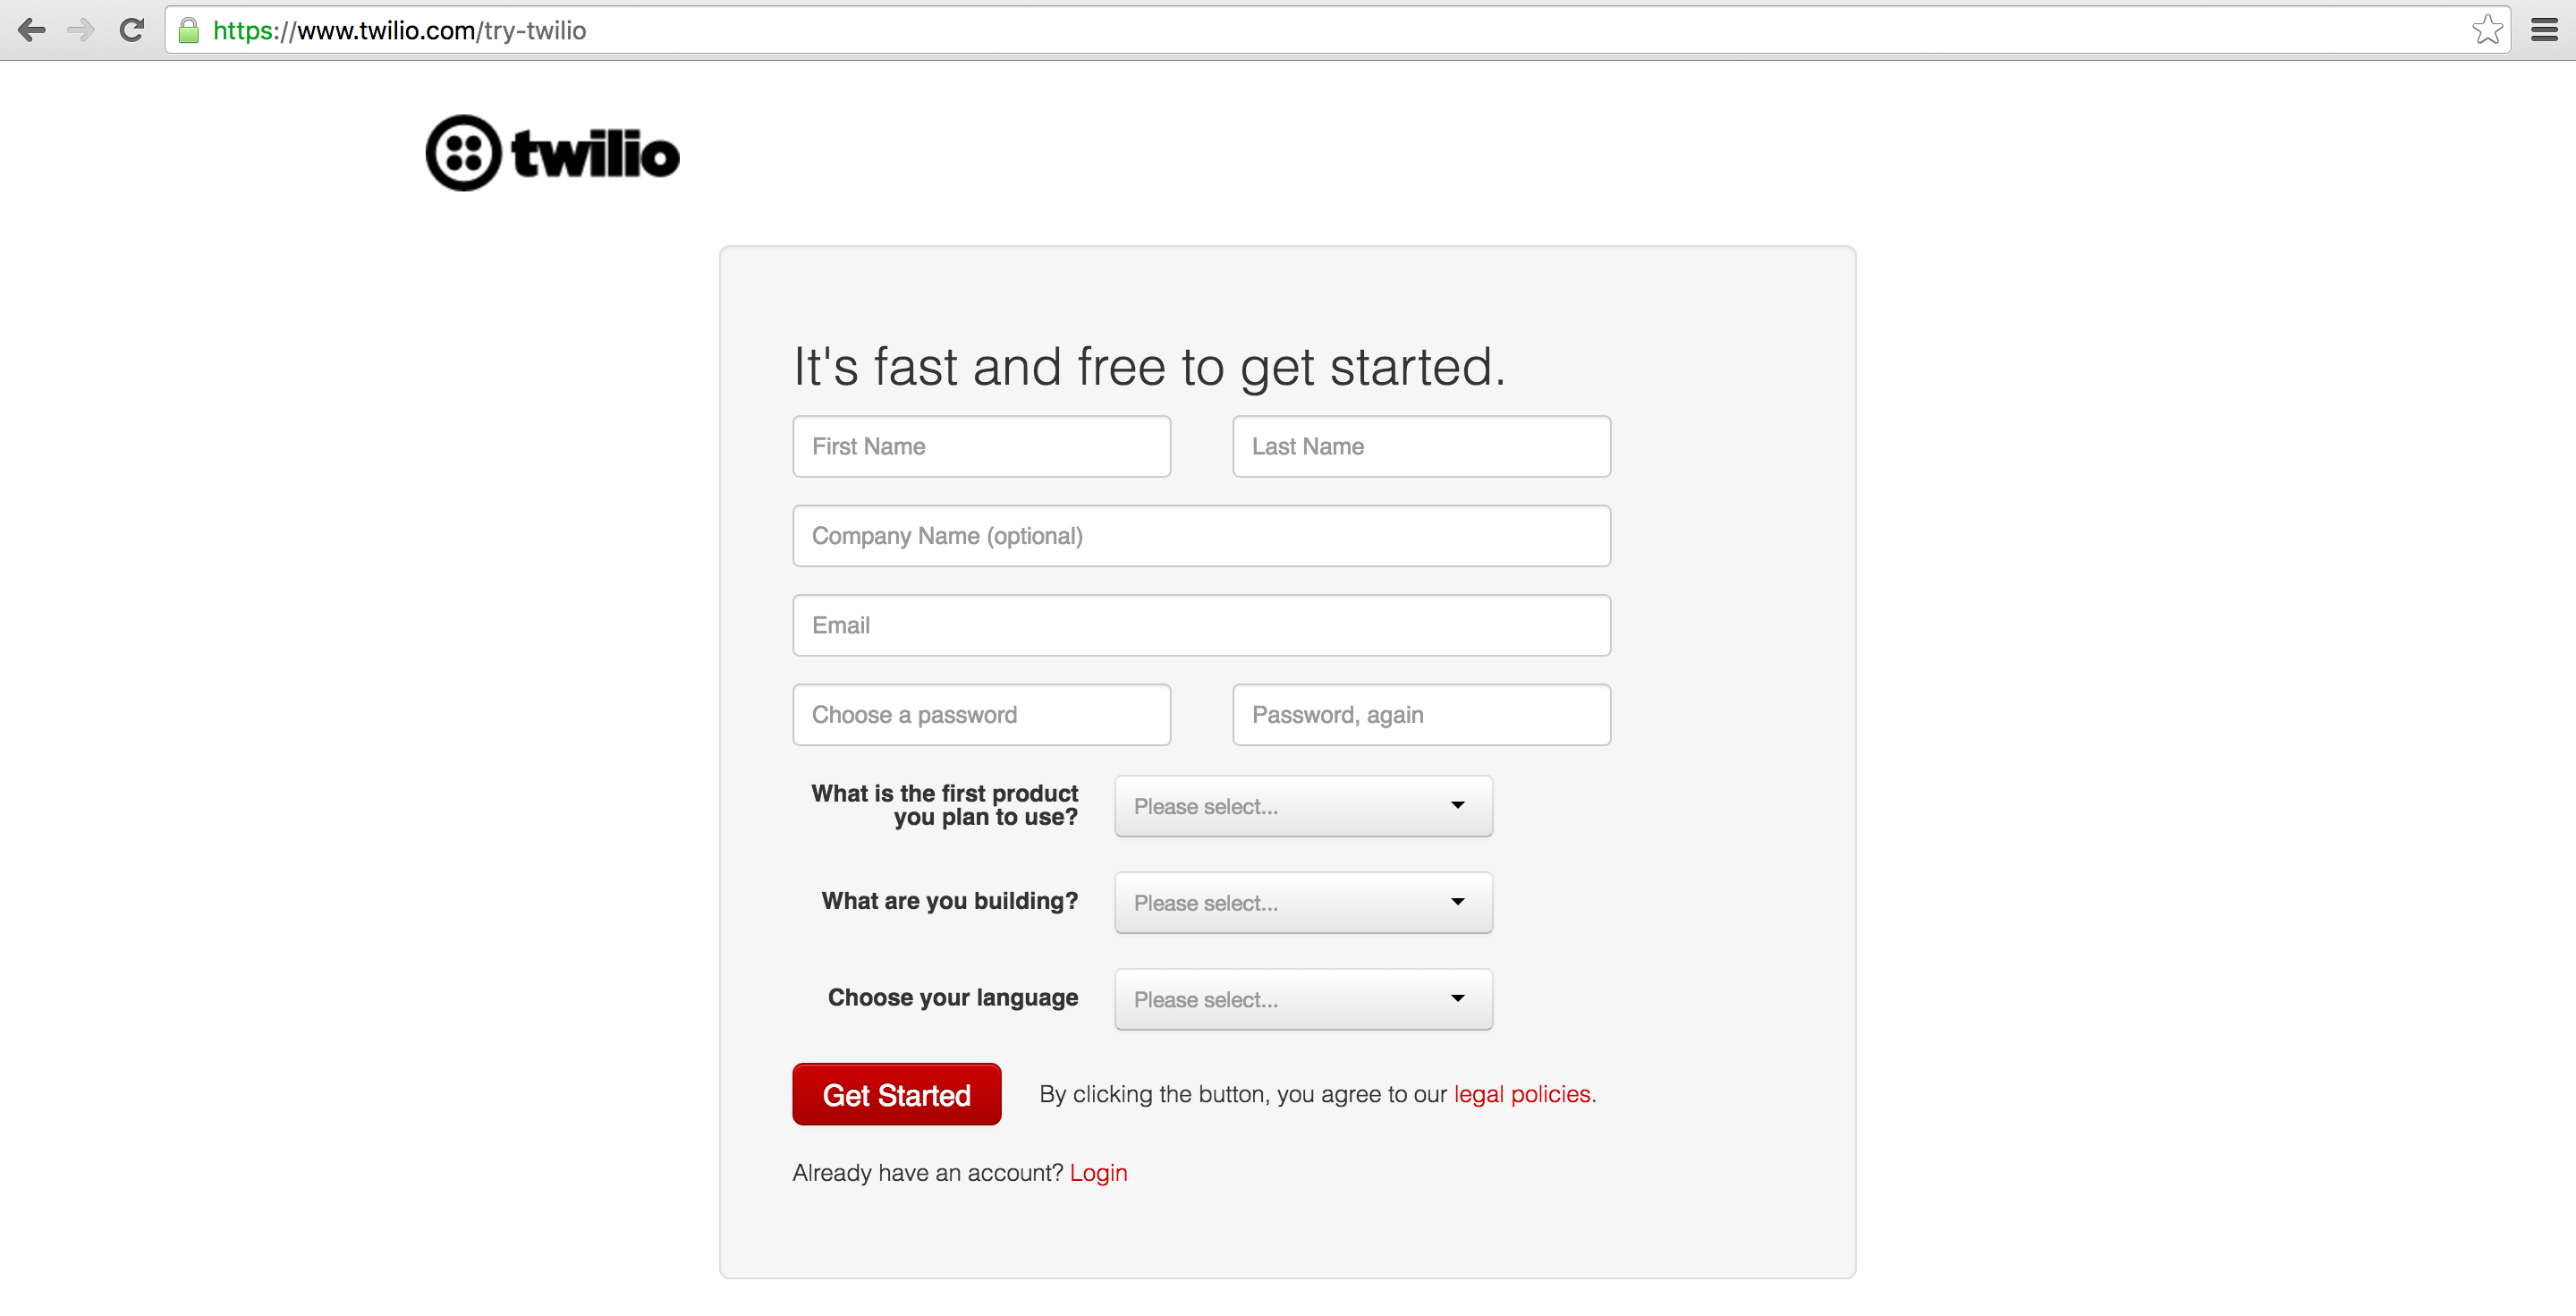
In your web browser go to the Twilio website and sign up for a free account or sign into your existing Twilio account.
Copy the Account SID and Auth Token from the Twilio Console and paste them into your application's code:
The Twilio trial account allows you to dial and receive phone calls to your own validated phone number. To handle calls from any phone number then you need to upgrade your account (hit the upgrade button on the top navigation bar).
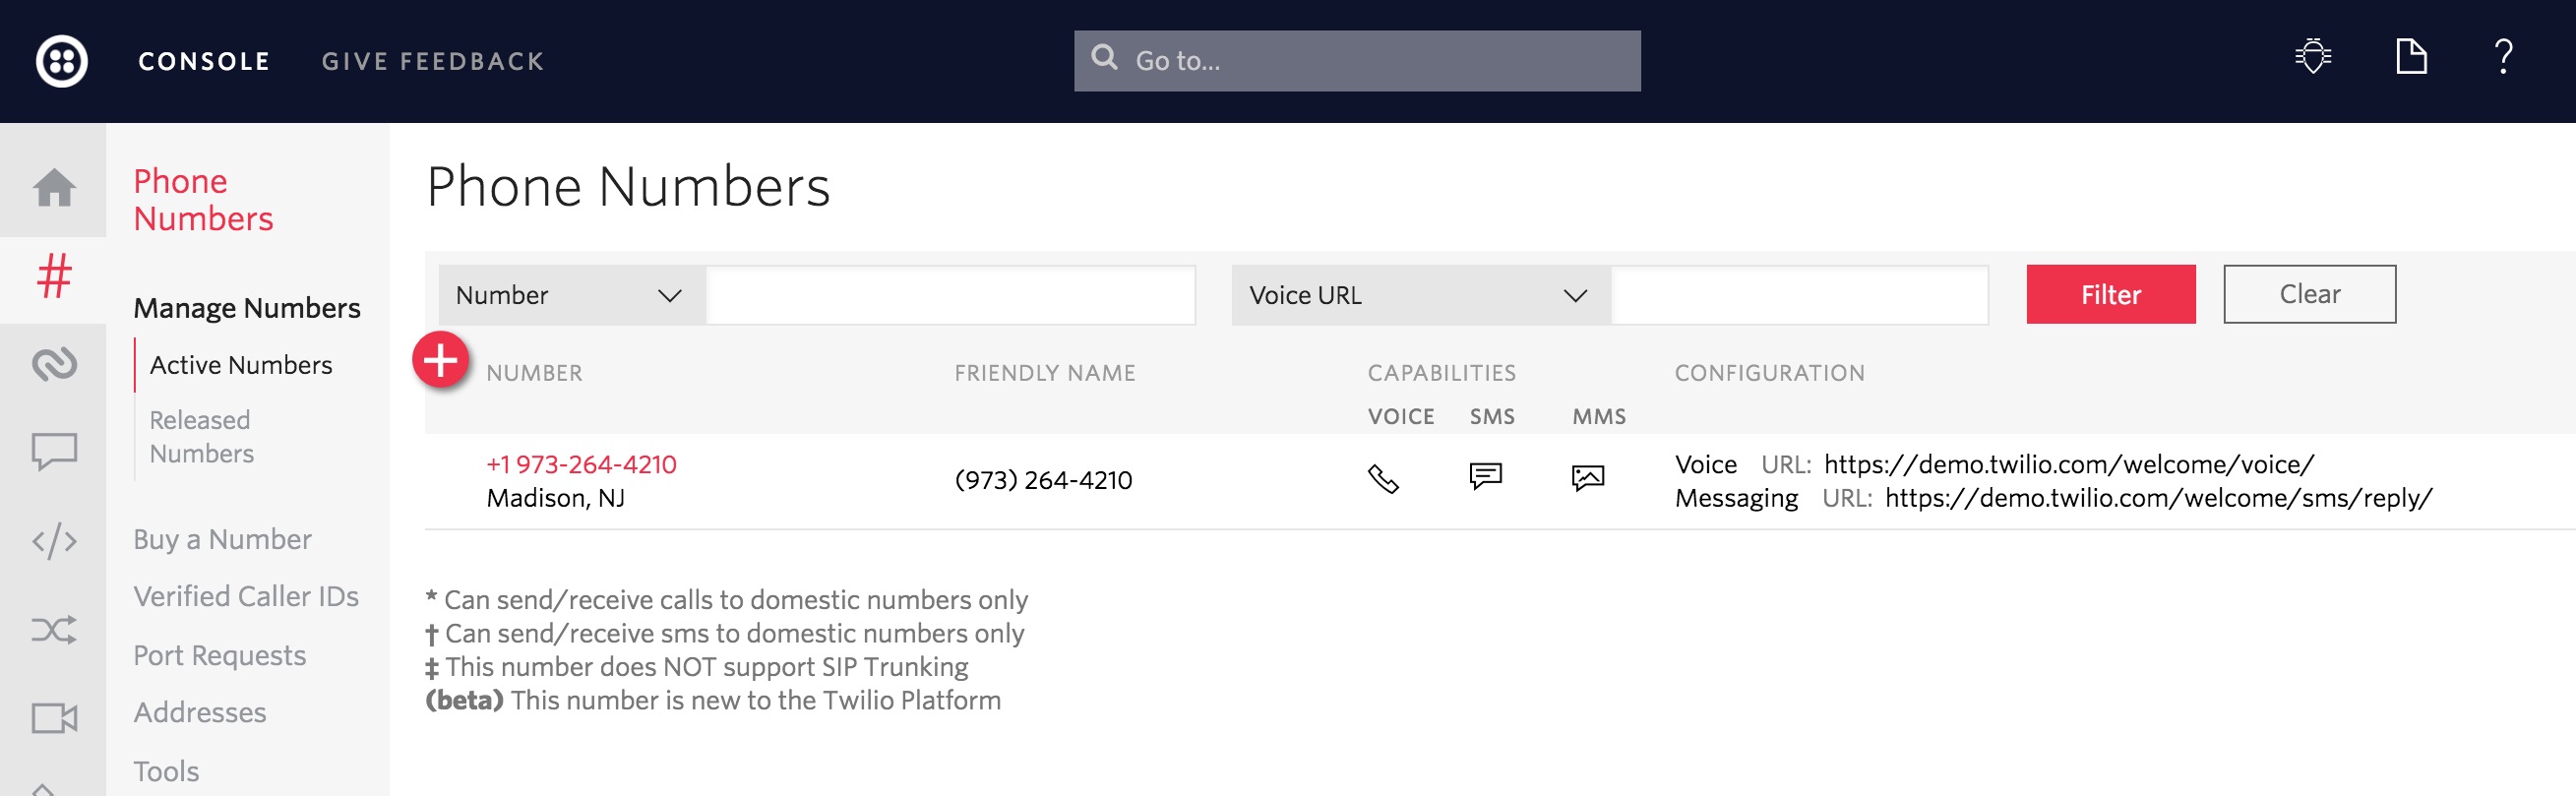
Once you are signed into your Twilio account, go to the manage phone numbers screen. On this screen you can buy one or more phone numbers or click on an existing phone number in your account to configure it.
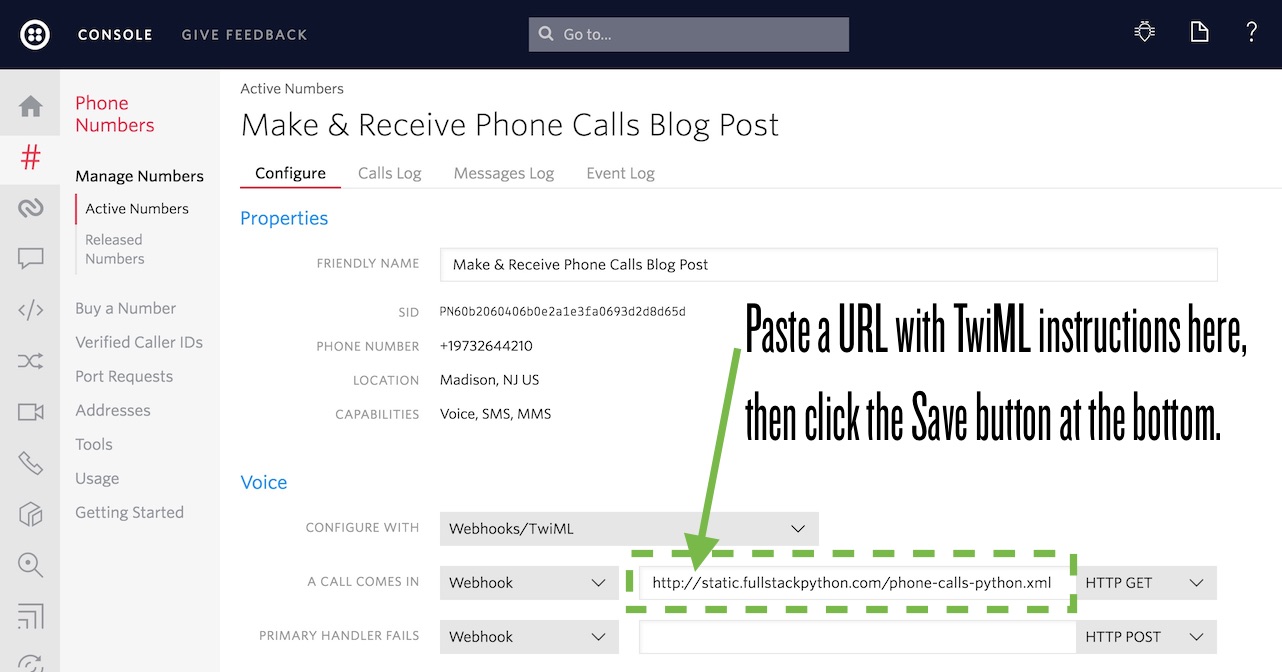
After clicking on a number you will reach the phone number configuration
screen. Paste in the URL with TwiML instructions and change the dropdown from
"HTTP POST" to "HTTP GET". In this post we'll use
http://static.fullstackpython.com/phone-calls-python.xml, but that URL
can be more than just a static XML file.
The power of Twilio really comes in when that URL is handled by your web application so it can dynamically respond with TwiML instructions based on the incoming caller number or other properties stored in your database.
Under the Voice webhook, paste in
http://static.fullstackpython.com/phone-calls-python.xml and change the
drop-down to the right from "HTTP POST" to "HTTP GET". Click the "Save"
button at the bottom of the screen.
Now try calling your phone number. You should hear the snippet of text read by the Alice voice and then you will be placed into a conference call. If no one else calls the number then hold music should be playing.
Making Phone Calls
We just handled inbound phone calls to our phone number. Now it's time to
dial outbound phone calls. Make sure your phone_calls.py file is saved
and that your virtualenv is still activated and then execute the script:
python phone_calls.py
In a moment all the phone numbers you write in the DIAL_NUMBERS list
should light up with calls. Anyone that answers will hear our message read
by the "Alice" voice and then they'll be placed together into a recorded
conference call, just like when someone dials into the number.
Here is my inbound phone call:

Not bad for just a few lines of Python code!
Next Steps
Now that we know how to make and receive phone calls from a Twilio number that follows programmatic instructions we can do a whole lot more in our applications. Next you can use one of these tutorials to do more with your phone number:
- Build a phone-calling Slack bot
- Mask phone numbers for anonymous communication
- Add call tracking to see metrics for phone calls
Questions? Contact me via Twitter @fullstackpython or @mattmakai. I'm also on GitHub as mattmakai.
See something wrong in this post? Fork this page's source on GitHub and submit a pull request.
↧
Catalin George Festila: The pyquery python module.
This tutorial is about pyquery python module and python 2.7.13 version.
First I used pip command to install it.
The development team tells us about this python module:
pyquery allows you to make jquery queries on xml documents. The API is as much as possible the similar to jquery. pyquery uses lxml for fast xml and html manipulation.
Let's try a simple example with this python module.
The base of this example is find links by html tag.
To do that, I need to read the links and put in into another array crawl_frontiers.
The frontiers array is used just for crawler process.
Also this simple example allow you to understand better the arrays.
You can read more about this python module here .
First I used pip command to install it.
C:\Python27>cd Scripts

C:\Python27\Scripts>pip install pyquery
Collecting pyquery
  Downloading pyquery-1.2.17-py2.py3-none-any.whl
Requirement already satisfied: lxml>=2.1 in c:\python27\lib\site-packages (from pyquery)
Requirement already satisfied: cssselect>0.7.9 in c:\python27\lib\site-packages (from pyquery)
Installing collected packages: pyquery
Successfully installed pyquery-1.2.17The development team tells us about this python module:
pyquery allows you to make jquery queries on xml documents. The API is as much as possible the similar to jquery. pyquery uses lxml for fast xml and html manipulation.
Let's try a simple example with this python module.
The base of this example is find links by html tag.
from pyquery import PyQuery

seeds = [
    'https://twitter.com',
    'http://google.com'
]

crawl_frontiers = []

def start_crawler():
    crawl_frontiers = crawler_seeds()

    print(crawl_frontiers)

def crawler_seeds():
    frontiers = []
    for index, seed in enumerate(seeds):
        frontier = {index: read_links(seed)}
        frontiers.append(frontier)

    return frontiers

def read_links(seed):
    crawler = PyQuery(seed)
    return [crawler(tag_a).attr("href") for tag_a in crawler("a")]

start_crawler()To do that, I need to read the links and put in into another array crawl_frontiers.
The frontiers array is used just for crawler process.
Also this simple example allow you to understand better the arrays.
You can read more about this python module here .
↧
↧
Catalin George Festila: Python Qt4 - part 001.
Today I started with PyQt4 and python version :
The name of this executable shows us: can be used with python 2.7.x versions and come with Qt4.8.7 for our 32 bit python.
I start with a default Example class to make a calculator interface with PyQt4.
This is my example:
First you need a QGridLayout - this make a matrix.
I used labels, line edit and buttons all from QtGui: QLabel, QLineEdit and QPushButton.
First into this matrix - named grid is: Title and edit area named titleEdit.
This two is added to the grid - matrix with addWidget.
The next step is to put all the buttons into one array.
This array will be add to the grid matrix with a for loop.
To make this add from array to matrix I used the zip function.
The zip function make an iterator that aggregates elements from each of the iterables.
Also I set the title to Calculator with setWindowTitle.
I have not implemented the part of the events and the calculation.
The main function will start the interface by using the QApplication.
The goal of this tutorial was the realization of the graphical interface with PyQt4.
This is the result of my example:
![]()
Python 2.7.13 (v2.7.13:a06454b1afa1, Dec 17 2016, 20:42:59) [MSC v.1500 32 bit (Intel)] on win32The name of this executable shows us: can be used with python 2.7.x versions and come with Qt4.8.7 for our 32 bit python.
I start with a default Example class to make a calculator interface with PyQt4.
This is my example:
#!/usr/bin/python
# -*- coding: utf-8 -*-

import sys
from PyQt4 import QtGui

"""
Qt.Gui calculator example
"""

class Example(QtGui.QWidget):

    def __init__(self):
        super(Example, self).__init__()

        self.initUI()

    def initUI(self):
 title = QtGui.QLabel('Title')
        titleEdit = QtGui.QLineEdit()
        grid = QtGui.QGridLayout()
 grid.setSpacing(10)

 grid.addWidget(title, 0, 0)

 grid.addWidget(titleEdit,0,1,1,4)

        self.setLayout(grid)

        names = ['Cls', 'Bck', 'OFF',
                 '/', '.', '7', '8',
                '9', '*', 'SQR', '3',
                 '4', '5', '-', '=',
                '0', '1', '2', '+']

        positions = [(i,j) for i in range(1,5) for j in range(0,5)]

        for position, name in zip(positions, names):

            if name == '':
                continue
            button = QtGui.QPushButton(name)
            grid.addWidget(button, *position)

        self.move(300, 250)
        self.setWindowTitle('Calculator')
        self.show()

def main():
    app = QtGui.QApplication(sys.argv)
    ex = Example()
    sys.exit(app.exec_())

if __name__ == '__main__':
main()First you need a QGridLayout - this make a matrix.
I used labels, line edit and buttons all from QtGui: QLabel, QLineEdit and QPushButton.
First into this matrix - named grid is: Title and edit area named titleEdit.
This two is added to the grid - matrix with addWidget.
The next step is to put all the buttons into one array.
This array will be add to the grid matrix with a for loop.
To make this add from array to matrix I used the zip function.
The zip function make an iterator that aggregates elements from each of the iterables.
Also I set the title to Calculator with setWindowTitle.
I have not implemented the part of the events and the calculation.
The main function will start the interface by using the QApplication.
The goal of this tutorial was the realization of the graphical interface with PyQt4.
This is the result of my example:

↧
Catalin George Festila: Make one executable from a python script.
The official website of this tool tells us:
PyInstaller bundles a Python application and all its dependencies into a single package. The user can run the packaged app without installing a Python interpreter or any modules. PyInstaller supports Python 2.7 and Python 3.3+, and correctly bundles the major Python packages such as numpy, PyQt, Django, wxPython, and others.
PyInstaller is tested against Windows, Mac OS X, and Linux. However, it is not a cross-compiler: to make a Windows app you run PyInstaller in Windows; to make a Linux app you run it in Linux, etc. PyInstaller has been used successfully with AIX, Solaris, and FreeBSD, but is not tested against them.
The manual of this tool can be see it here.
Let's make one test python script and then to make it executable.
I used this python script to test it:
![]()
The output file come with this icon:
![]()
Also you can make changes by using your icons or set the type of this file, according to VS_FIXEDFILEINFO structure.
You need to have the icon file and / or version.txt file for VS_FIXEDFILEINFO structure.
Let's see the version.txt file:
![]()
If you wand to change the icon then you need to add the --icon=tk_app.ico, where tk_app.ico is the new icon of the executable.
PyInstaller bundles a Python application and all its dependencies into a single package. The user can run the packaged app without installing a Python interpreter or any modules. PyInstaller supports Python 2.7 and Python 3.3+, and correctly bundles the major Python packages such as numpy, PyQt, Django, wxPython, and others.
PyInstaller is tested against Windows, Mac OS X, and Linux. However, it is not a cross-compiler: to make a Windows app you run PyInstaller in Windows; to make a Linux app you run it in Linux, etc. PyInstaller has been used successfully with AIX, Solaris, and FreeBSD, but is not tested against them.
The manual of this tool can be see it here.
C:\Python27>cd Scripts

C:\Python27\Scripts>pip install pyinstaller
Collecting pyinstaller
  Downloading PyInstaller-3.2.1.tar.bz2 (2.4MB)
    100% |################################| 2.4MB 453kB/s
....
Collecting pypiwin32 (from pyinstaller)
  Downloading pypiwin32-219-cp27-none-win32.whl (6.7MB)
    100% |################################| 6.7MB 175kB/s
...
Successfully installed pyinstaller-3.2.1 pypiwin32-219Let's make one test python script and then to make it executable.
I used this python script to test it:
from tkinter import Tk, Label, Button

class MyFirstGUI:
    def __init__(self, master):
        self.master = master
        master.title("A simple GUI")

        self.label = Label(master, text="This is our first GUI!")
        self.label.pack()

        self.greet_button = Button(master, text="Greet", command=self.greet)
        self.greet_button.pack()

        self.close_button = Button(master, text="Close", command=master.quit)
        self.close_button.pack()

    def greet(self):
        print("Greetings!")

root = Tk()
my_gui = MyFirstGUI(root)
root.mainloop()C:\Python27\Scripts>pyinstaller.exe --onefile --windowed ..\tk_app.py
92 INFO: PyInstaller: 3.2.1
92 INFO: Python: 2.7.13
93 INFO: Platform: Windows-10-10.0.14393
93 INFO: wrote C:\Python27\Scripts\tk_app.spec
95 INFO: UPX is not available.
96 INFO: Extending PYTHONPATH with paths
['C:\\Python27', 'C:\\Python27\\Scripts']
96 INFO: checking Analysis
135 INFO: checking PYZ
151 INFO: checking PKG
151 INFO: Building because toc changed
151 INFO: Building PKG (CArchive) out00-PKG.pkg
213 INFO: Redirecting Microsoft.VC90.CRT version (9, 0, 21022, 8) -> (9, 0, 30729, 9247)
2120 INFO: Building PKG (CArchive) out00-PKG.pkg completed successfully.
2251 INFO: Bootloader c:\python27\lib\site-packages\PyInstaller\bootloader\Windows-32bit\runw.exe
2251 INFO: checking EXE
2251 INFO: Rebuilding out00-EXE.toc because tk_app.exe missing
2251 INFO: Building EXE from out00-EXE.toc
2267 INFO: Appending archive to EXE C:\Python27\Scripts\dist\tk_app.exe
2267 INFO: Building EXE from out00-EXE.toc completed successfully.C:\Python27\Scripts>C:\Python27\Scripts\dist\tk_app.exe
C:\Python27\Scripts>
The output file come with this icon:

Also you can make changes by using your icons or set the type of this file, according to VS_FIXEDFILEINFO structure.
You need to have the icon file and / or version.txt file for VS_FIXEDFILEINFO structure.
Let's see the version.txt file:
# UTF-8
#
# For more details about fixed file info 'ffi' see:
# http://msdn.microsoft.com/en-us/library/ms646997.aspx
VSVersionInfo(
  ffi=FixedFileInfo(
    # filevers and prodvers should be always a tuple with four items: (1, 2, 3, 4)
    # Set not needed items to zero 0.
    filevers=(2017, 1, 1, 1),
    prodvers=(1, 1, 1, 1),
    # Contains a bitmask that specifies the valid bits 'flags'
    mask=0x3f,
    # Contains a bitmask that specifies the Boolean attributes of the file.
    flags=0x0,
    # The operating system for which this file was designed.
    # 0x4 - NT and there is no need to change it.
    OS=0x4,
    # The general type of file.
    # 0x1 - the file is an application.
    fileType=0x1,
    # The function of the file.
    # 0x0 - the function is not defined for this fileType
    subtype=0x0,
    # Creation date and time stamp.
    date=(0, 0)
    ),
  kids=[
    StringFileInfo(
      [
      StringTable(
        u'040904b0',
        [StringStruct(u'CompanyName', u'python-catalin'),
        StringStruct(u'ProductName', u'test'),
        StringStruct(u'ProductVersion', u'1, 1, 1, 1'),
        StringStruct(u'InternalName', u'tk_app'),
        StringStruct(u'OriginalFilename', u'tk_app.exe'),
        StringStruct(u'FileVersion', u'2017, 1, 1, 1'),
        StringStruct(u'FileDescription', u'test tk'),
        StringStruct(u'LegalCopyright', u'Copyright 2017 free-tutorials.org.'),
        StringStruct(u'LegalTrademarks', u'tk_app is a registered trademark of catafest.'),])
      ]),
    VarFileInfo([VarStruct(u'Translation', [0x409, 1200])])
  ]
) pyinstaller.exe --onefile --windowed --version-file=..\version.txt ..\tk_app.py
If you wand to change the icon then you need to add the --icon=tk_app.ico, where tk_app.ico is the new icon of the executable.
↧
Catalin George Festila: About py-translate python module.
This python module is used for translating text in the terminal.
You can read and see examples with this API on this web page.
Features
Installation
You can read and see examples with this API on this web page.
Features
- Fast! Translate an entire book in less than 5 seconds.
- Made for Python 3 but still works on Python 2
- Fast and easy to install, easy to use
- Supports translation from any language
- Highly composable interface, the power of Unix pipes and filters.
- Simple API and documentation
Installation
C:\>cd Python27

C:\Python27>cd Scripts

C:\Python27\Scripts>pip install py-translate
Collecting py-translate
  Downloading py_translate-1.0.3-py2.py3-none-any.whl (61kB)
    100% |################################| 61kB 376kB/s
Installing collected packages: py-translate
Successfully installed py-translate-1.0.3

C:\Python27\Scripts>>>> import translate
>>> dir(translate)
['TestLanguages', 'TestTranslator', '__author__', '__build__', '__builtins__', '__copyright__', '__doc__', '__file__', '__license__', '__name__', '__package__', '__path__', '__title__', '__version__', 'accumulator', 'coroutine', 'coroutines', 'languages', 'print_table', 'push_url', 'set_task', 'source', 'spool', 'tests', 'translation_table', 'translator', 'write_stream']
>>> from translate import translator
>>> translator('ro', 'en', 'Consider ca dezvoltarea personala este un pas important')
[[[u'I think personal development is an important step', u'Consider ca dezvoltarea personala este un pas important', None, None, 0]], None, u'ro']
>>>↧
Weekly Python StackOverflow Report: (lxxxiii) stackoverflow python report
These are the ten most rated questions at Stack Overflow last week.
Between brackets: [question score / answers count]
Build date: 2017-07-22 19:52:51 GMT
Between brackets: [question score / answers count]
Build date: 2017-07-22 19:52:51 GMT
- What's the efficiency difference between using "+" and "," in print()? - [14/7]
- Unexpected result from `in` operator - Python - [13/3]
- Why is deque implemented as a linked list instead of a circular array? - [13/2]
- What is co_names? - [10/1]
- list comprehension in exec with empty locals: NameError - [9/4]
- Add values of keys and sort it by occurrence of the keys in a list of dictionaries in Python - [8/5]
- Pandas - return n smallest indexes by column - [8/3]
- Differences between generator comprehension expressions - [8/1]
- Sort 2 lists in Python based on the ratio of individual corresponding elements or based on a third list - [7/4]
- Dynamically generating elements of list within list - [7/3]
↧
↧
Full Stack Python: How to Add Hosted Monitoring to Flask Web Applications
How do you know whether your application is running properly with minimal errors after building and deploying it? The fastest and easiest way to monitor your operational Flask web application is to integrate one of the many available fantastic hosted monitoring tools.
In this post we will quickly add Rollbar monitoring to catch errors and visualize our application is running properly. There are also many other great hosted monitoring tools, which you can check out on the monitoring page.
Our Tools
We can use either Python 2 or 3 to build this tutorial, but Python 3 is strongly recommended for all new applications. I used Python 3.6.2 to execute my code. We will also use the following application dependencies throughout the post:
- Flask web framework, version 0.12.2
- pyrollbar monitoring instrumentation library, version 0.13.12
- blinker for signaling support in Flask applications so pyrollbar can report on all errors
- A free Rollbar account where we will send error data and view it when it is captured
- pip and the virtualenv virtual environment library, which come packaged with Python 3, to install and isolate the Flask and Rollbar libraries from other Python projects you are working on
If you need help getting your development environment configured before running this code, take a look at this guide for setting up Python 3 and Flask on Ubuntu 16.04 LTS.
All code in this blog post is available open source under the MIT license on GitHub under the monitor-flask-apps directory of the blog-code-examples repository. Use and abuse the source code as you desire for your own applications.
Installing Dependencies
Change into the directory where you keep your Python virtualenvs. Create a new virtual environment for this project using the following command.
python3 -m venv monitorflask
Activate the virtualenv.
source monitorflask/bin/activate
The command prompt will change after activating the virtualenv:

Remember that you need to activate the virtualenv in every new terminal window where you want to use the virtualenv to run the project.
Flask, Rollbar and Blinker can now be installed into the now-activated virtualenv.
pip install flask==0.12.2 rollbar==0.13.12 blinker==1.4
Our required dependencies should be installed within our virtualenv after a short installation period. Look for output like the following to confirm everything worked.
Installing collected packages: blinker, itsdangerous, click, MarkupSafe, Jinja2, Werkzeug, Flask, idna, urllib3, chardet, certifi, requests, six, rollbar
  Running setup.py install for blinker ... done
  Running setup.py install for itsdangerous ... done
  Running setup.py install for MarkupSafe ... done
  Running setup.py install for rollbar ... done
Successfully installed Flask-0.12.2 Jinja2-2.9.6 MarkupSafe-1.0 Werkzeug-0.12.2 blinker-1.4 certifi-2017.4.17 chardet-3.0.4 click-6.7 idna-2.5 itsdangerous-0.24 requests-2.18.1 rollbar-0.13.12 six-1.10.0 urllib3-1.21.1
Now that we have our Python dependencies installed into our virtualenv we can create the initial version of our application.
Building Our Flask App
Create a folder for your project named monitor-flask-apps. Change into
the folder and then create a file named app.py with the following
code.
importrefromflaskimportFlask,render_template,Responsefromwerkzeug.exceptionsimportNotFoundapp=Flask(__name__)MIN_PAGE_NAME_LENGTH=2@app.route("/<string:page>/")defshow_page(page):try:valid_length=len(page)>=MIN_PAGE_NAME_LENGTHvalid_name=re.match('^[a-z]+$',page.lower())isnotNoneifvalid_lengthandvalid_name:returnrender_template("{}.html".format(page))else:msg="Sorry, couldn't find page with name {}".format(page)raiseNotFound(msg)except:returnResponse("404 Not Found")if__name__=="__main__":app.run(debug=True)The above application code has some standard Flask imports so we can
create a Flask web app and render template files. We have a single
function named show_page to serve a single Flask route. show_page
checks if the URL path contains only lowercase alpha characters for a
potential page name. If the page name can be found in the templates
folder then the page is rendered, otherwise an exception is thrown
that the page could not be found. We need to create at least one template
file if our function is ever going to return a non-error reponse.
Save app.py and make a new subdirectory named templates under your
project directory. Create a new file named battlegrounds.html and put
the following Jinja2 template markup into it.
<!DOCTYPE html><html><head><title>You found the Battlegrounds GIF!</title></head><body><h1>PUBG so good.</h1><imgsrc="https://media.giphy.com/media/3ohzdLMlhId2rJuLUQ/giphy.gif"></body></html>The above Jinja2 template is basic HTML without any embedded template tags. The template creates a very plain page with a header description of "PUBG so good" and a GIF from this excellent computer game.
Time to run and test our code. Change into the base directory of your
project where app.py file is located. Execute app.py using the python
command as follows (make sure your virtualenv is still activated in the
terminal where you are running this command):
python app.py
The Flask development server should start up and display a few lines of output.

What happens when we access the application running on localhost port 5000?

HTTP status 404 page not found, which is what we expected because we only defined a single route and it did not live at the base path.
We created a template named battlegrounds.html that should be accessible
when we go to
localhost:5000/battlegrounds/.

The application successfully found the battlegrounds.html template but
that is the only one available. What if we try
localhost:5000/fullstackpython/?
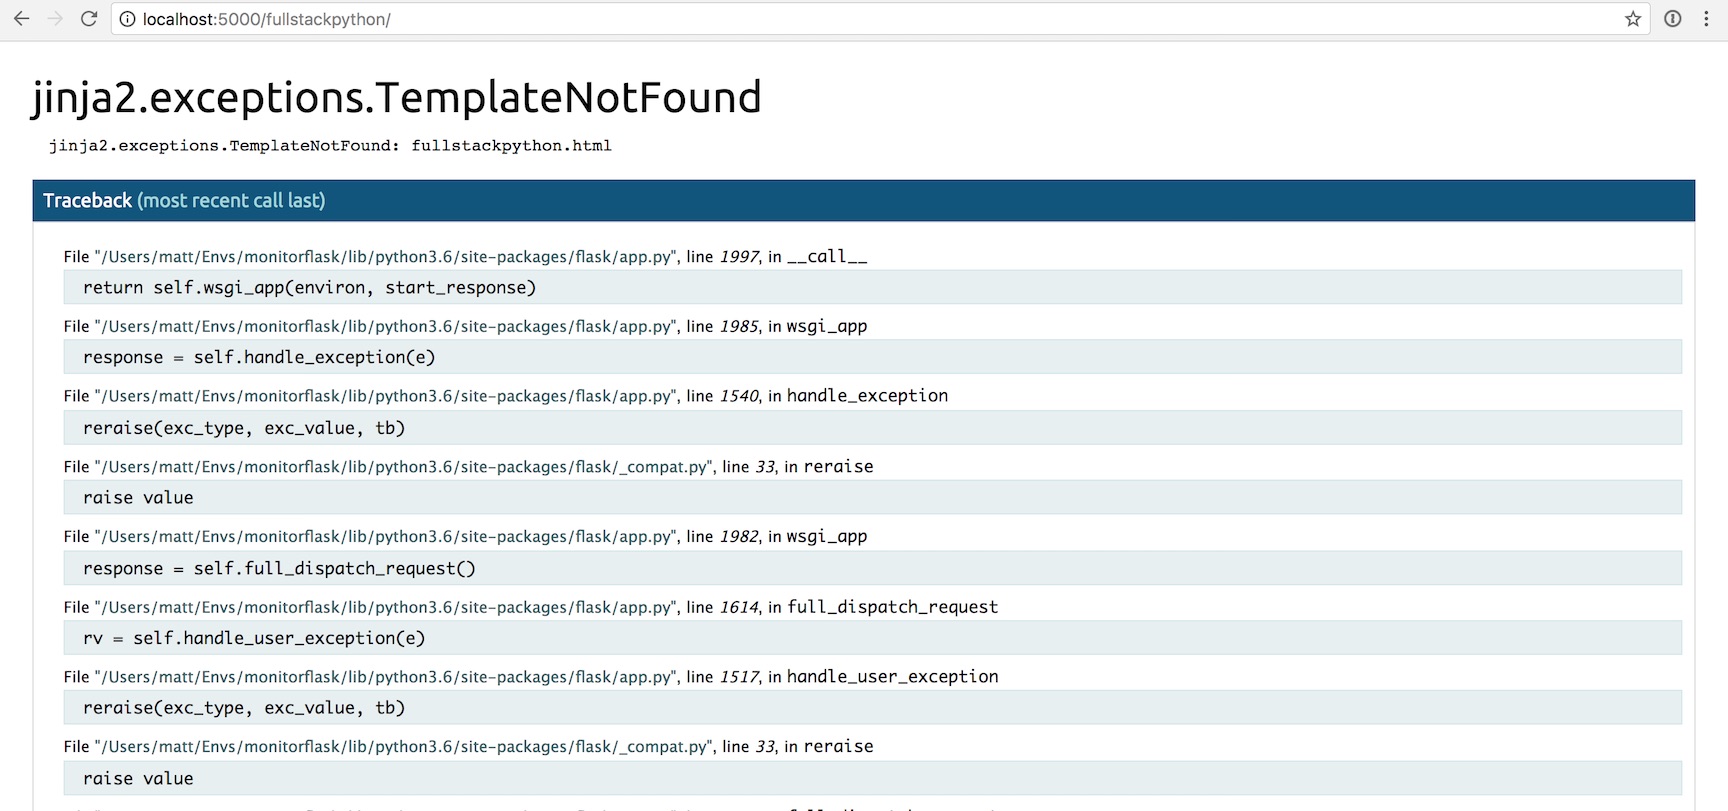
HTTP 500 error. That's no good.
The 404 and 500 errors are obvious to us right now because we are testing the application locally. However, what happens when the app is deployed and a user gets the error in their own web browser? They will typically quit out of frustration and you will never know what happened unless you add some error tracking and application monitoring.
We will now modify our code to add Rollbar to catch and report those errors that occur for our users.
Handling Errors
Head to Rollbar's homepage so we can add their hosted monitoring tools to our oft-erroring Flask app.
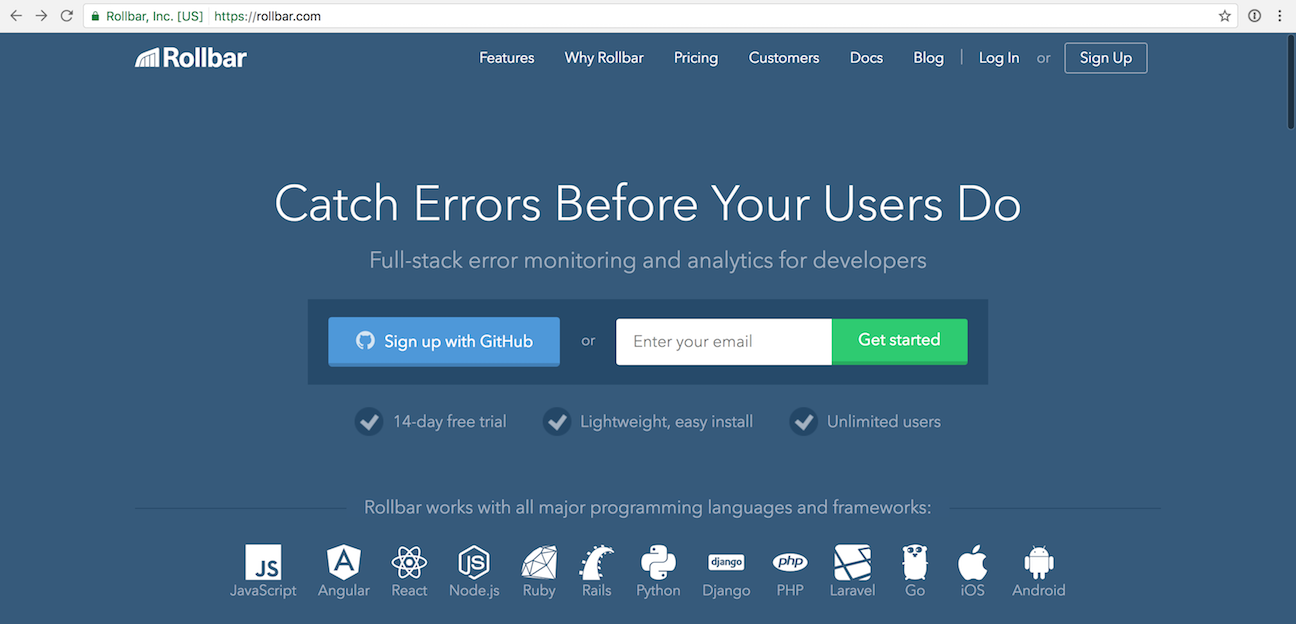
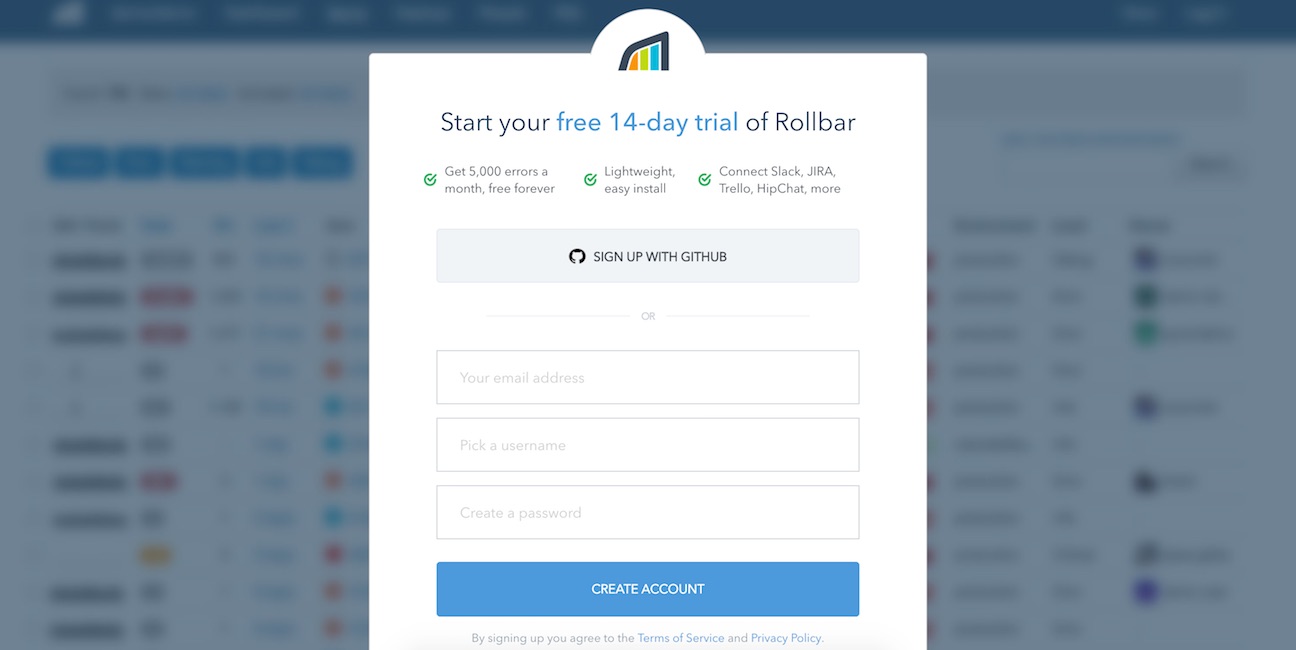
Click the "Sign Up" button in the upper right-hand corner. Enter your email address, a username and the password you want on the sign up page.
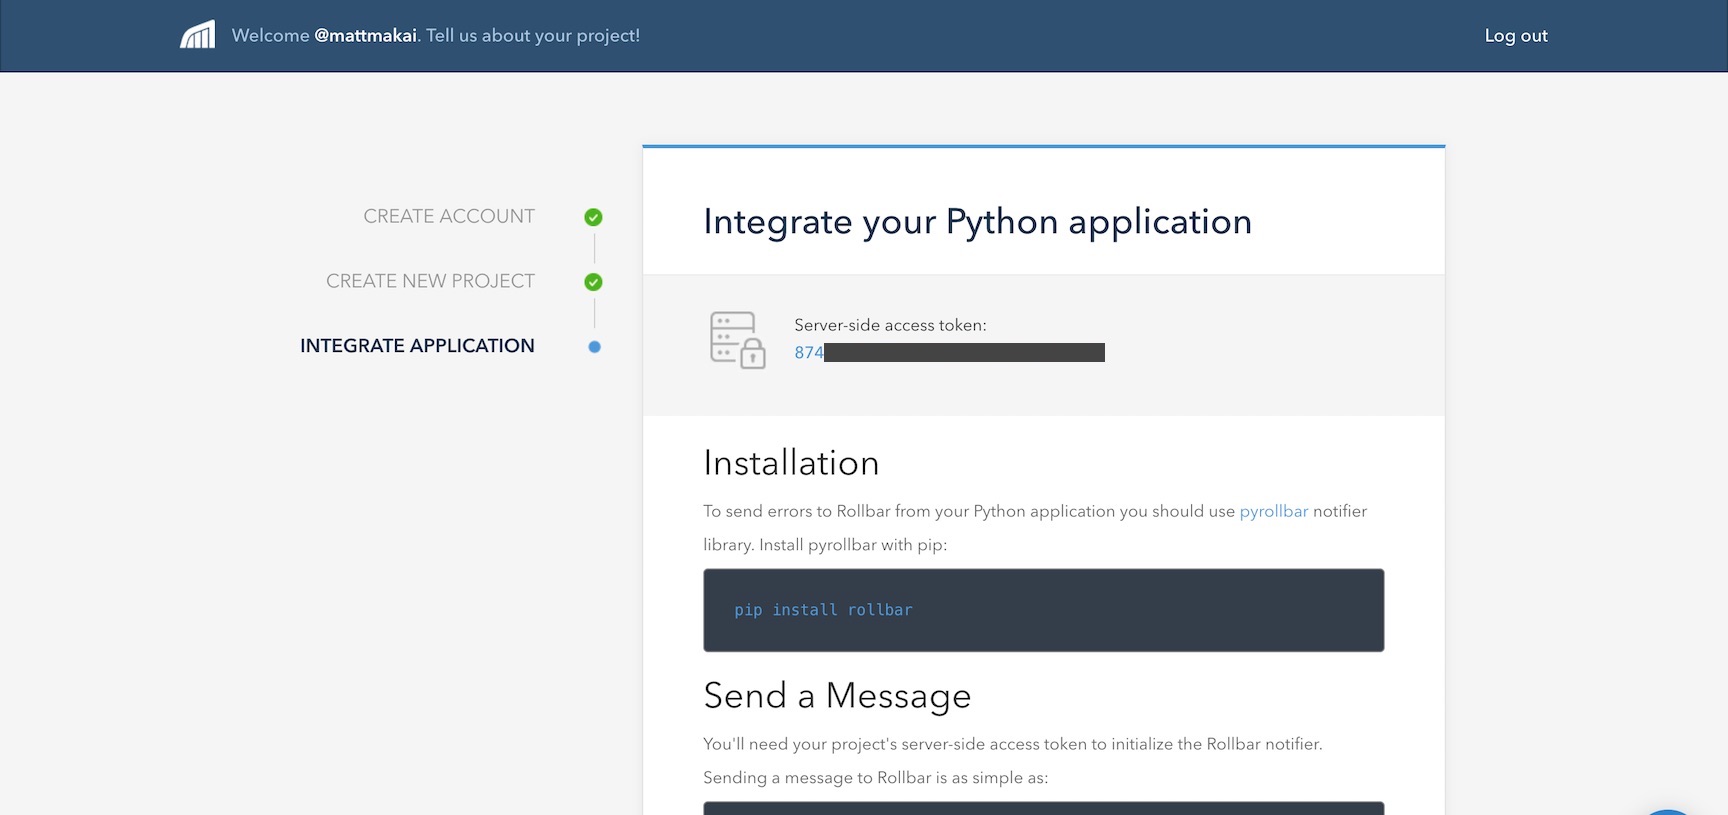
After the sign up page you will see the onboarding flow where you can enter a project name and select a programming language. For project name enter "Battlegrounds" and select that you are monitoring a Python app.
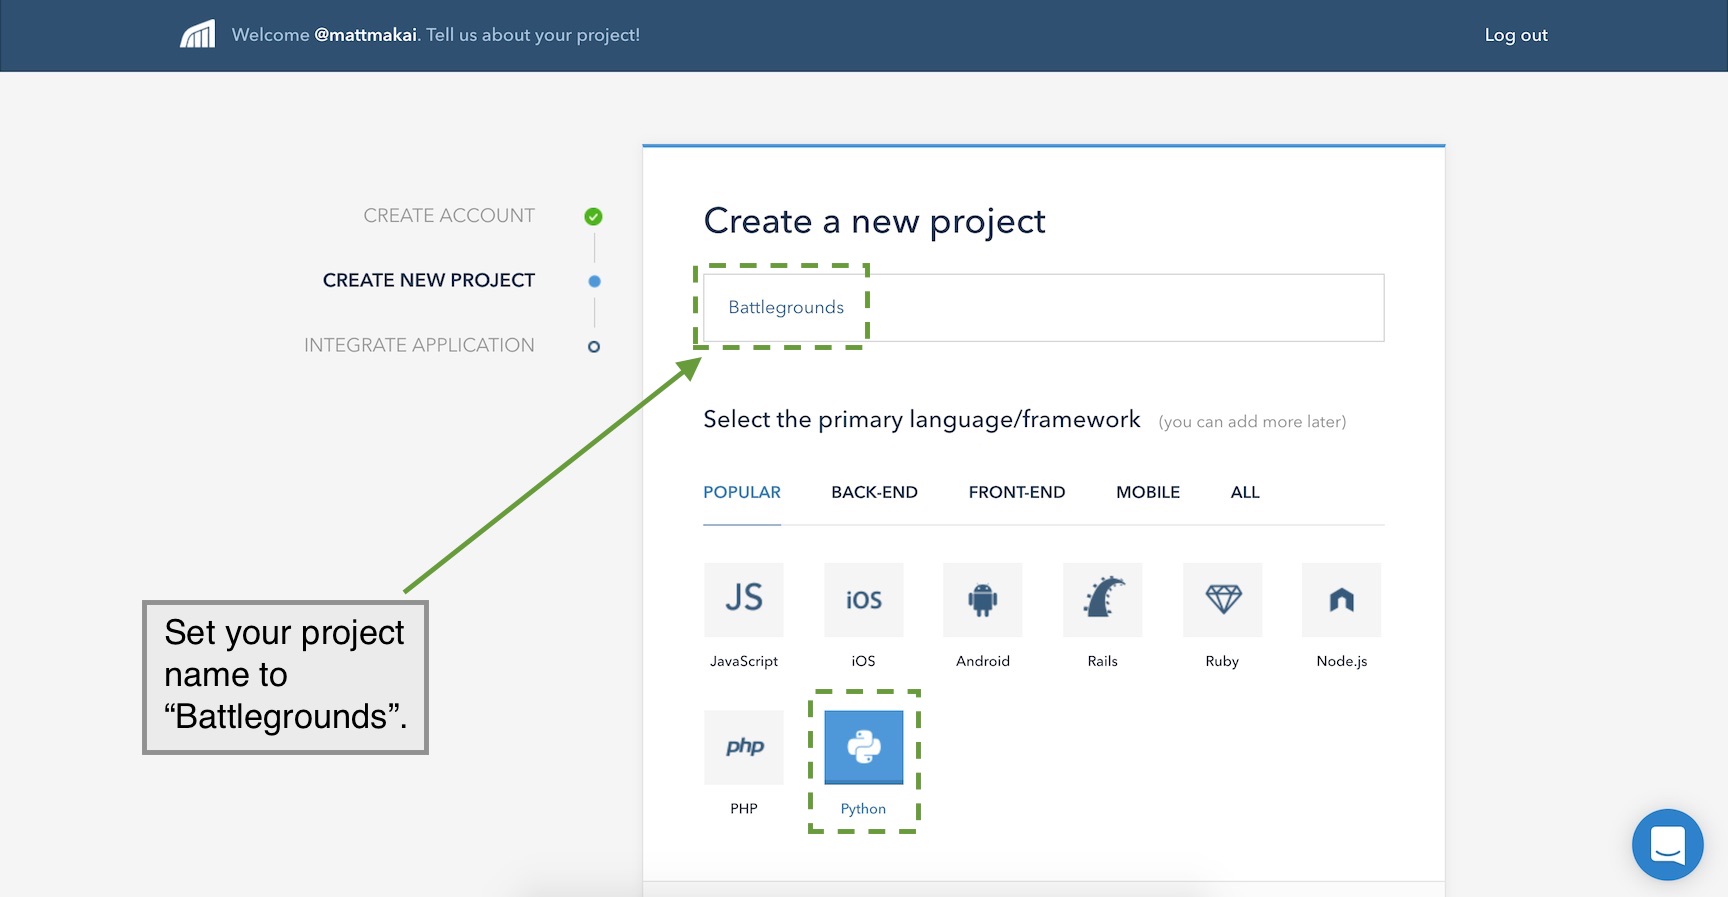
Press the "Continue" button at the bottom to move along. The next screen shows us a few quick instructions to add monitoring to our Flask application.
Let's modify our Flask application to test whether we can properly connect
to Rollbar's service. Change app.py to include the following highlighted
lines.
~~importosimportre~~importrollbarfromflaskimportFlask,render_template,Responsefromwerkzeug.exceptionsimportNotFoundapp=Flask(__name__)MIN_PAGE_NAME_LENGTH=2~~@app.before_first_request~~defadd_monitoring():~~rollbar.init(os.environ.get('ROLLBAR_SECRET'))~~rollbar.report_message('Rollbar is configured correctly')@app.route("/<string:page>/")defshow_page(page):try:valid_length=len(page)>=MIN_PAGE_NAME_LENGTHvalid_name=re.match('^[a-z]+$',page.lower())isnotNoneifvalid_lengthandvalid_name:returnrender_template("{}.html".format(page))else:msg="Sorry, couldn't find page with name {}".format(page)raiseNotFound(msg)except:returnResponse("404 Not Found")if__name__=="__main__":app.run(debug=True)We added a couple of new imports, os and rollbar. os allows us to
grab environment variable values, such as our Rollbar secret key. rollbar
is the library we installed earlier. The two lines below the Flask app
instantiation are to initialize Rollbar using the Rollbar secret token and
send a message to the service that it started correctly.
The ROLLBAR_SECRET token needs to be set in an environment variable.
Save an quit the app.py. Run export ROLLBAR_SECRET='token here' on the
command line where your virtualenv is activated. This token can be found
on the Rollbar onboarding screen.
I typically store all my environment variables in a file like
template.env and invoke it from the terminal using
the . ./template.env command. Make sure to avoid committing your secret
tokens to a source control repository, especially if the repository is
public!
After exporting your ROLLBAR_SECRET key as an environment variable
we can test that Rollbar is working as we run our application. Run it
now using python:
python app.py
Back in your web browser press the "Done! Go to Dashboard" button. Don't worry about the "Report an Error" section code, we can get back to that in a moment.
If the event hasn't been reported yet we'll see a waiting screen like this one:
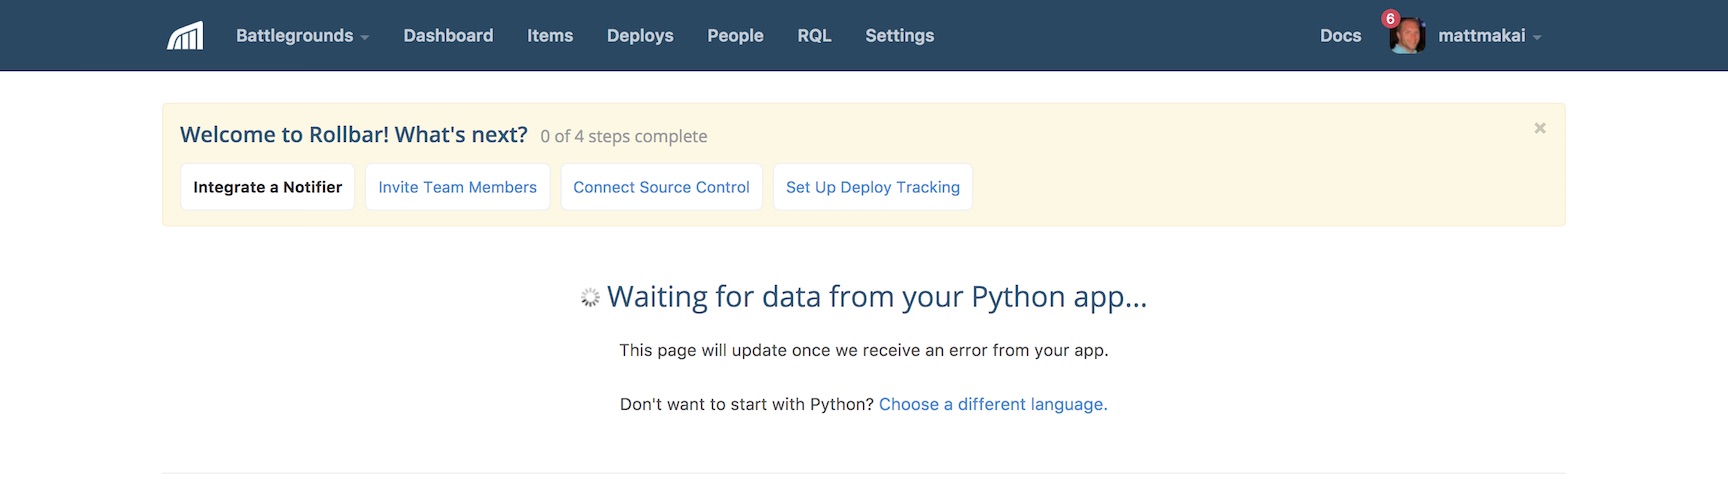
Once Flask starts up though, the first event will be populated on the dashboard.
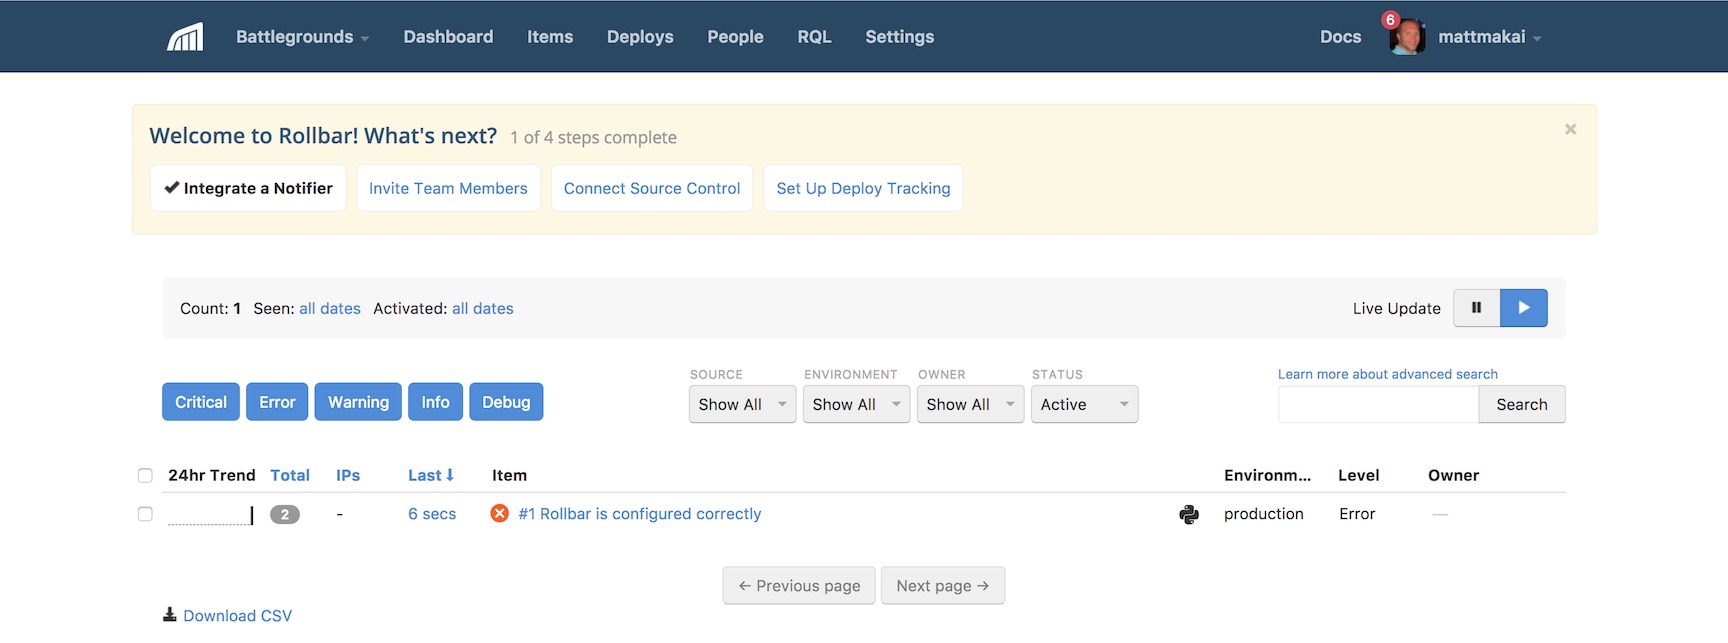
Okay, our first test event has been populated, but we really want to see all the errors from our application, not a test event.
Testing Error Handling
How do we make sure real errors are reported rather than just a simple test event? We just need to add a few more lines of code to our app.
importosimportreimportrollbar~~importrollbar.contrib.flaskfromflaskimportFlask,render_template,Response~~fromflaskimportgot_request_exceptionfromwerkzeug.exceptionsimportNotFoundapp=Flask(__name__)MIN_PAGE_NAME_LENGTH=2@app.before_first_requestdefadd_monitoring():rollbar.init(os.environ.get('ROLLBAR_SECRET'))~~## delete the next line if you dont want this event anymorerollbar.report_message('Rollbar is configured correctly')~~got_request_exception.connect(rollbar.contrib.flask.report_exception,app)@app.route("/<string:page>/")defshow_page(page):try:valid_length=len(page)>=MIN_PAGE_NAME_LENGTHvalid_name=re.match('^[a-z]+$',page.lower())isnotNoneifvalid_lengthandvalid_name:returnrender_template("{}.html".format(page))else:msg="Sorry, couldn't find page with name {}".format(page)raiseNotFound(msg)except:~~rollbar.report_exc_info()returnResponse("404 Not Found")if__name__=="__main__":app.run(debug=True)The above highlighted code modifies the application so it reports all Flask
errors as well as our HTTP 404 not found issues that happen within the
show_page function.
Make sure your Flask development server is running and try to go to localhost:5000/b/. You will receive an HTTP 404 exception and it will be reported to Rollbar. Next go to localhost:5000/fullstackpython/ and an HTTP 500 error will occur.
You should see an aggregation of errors as you test out these errors:
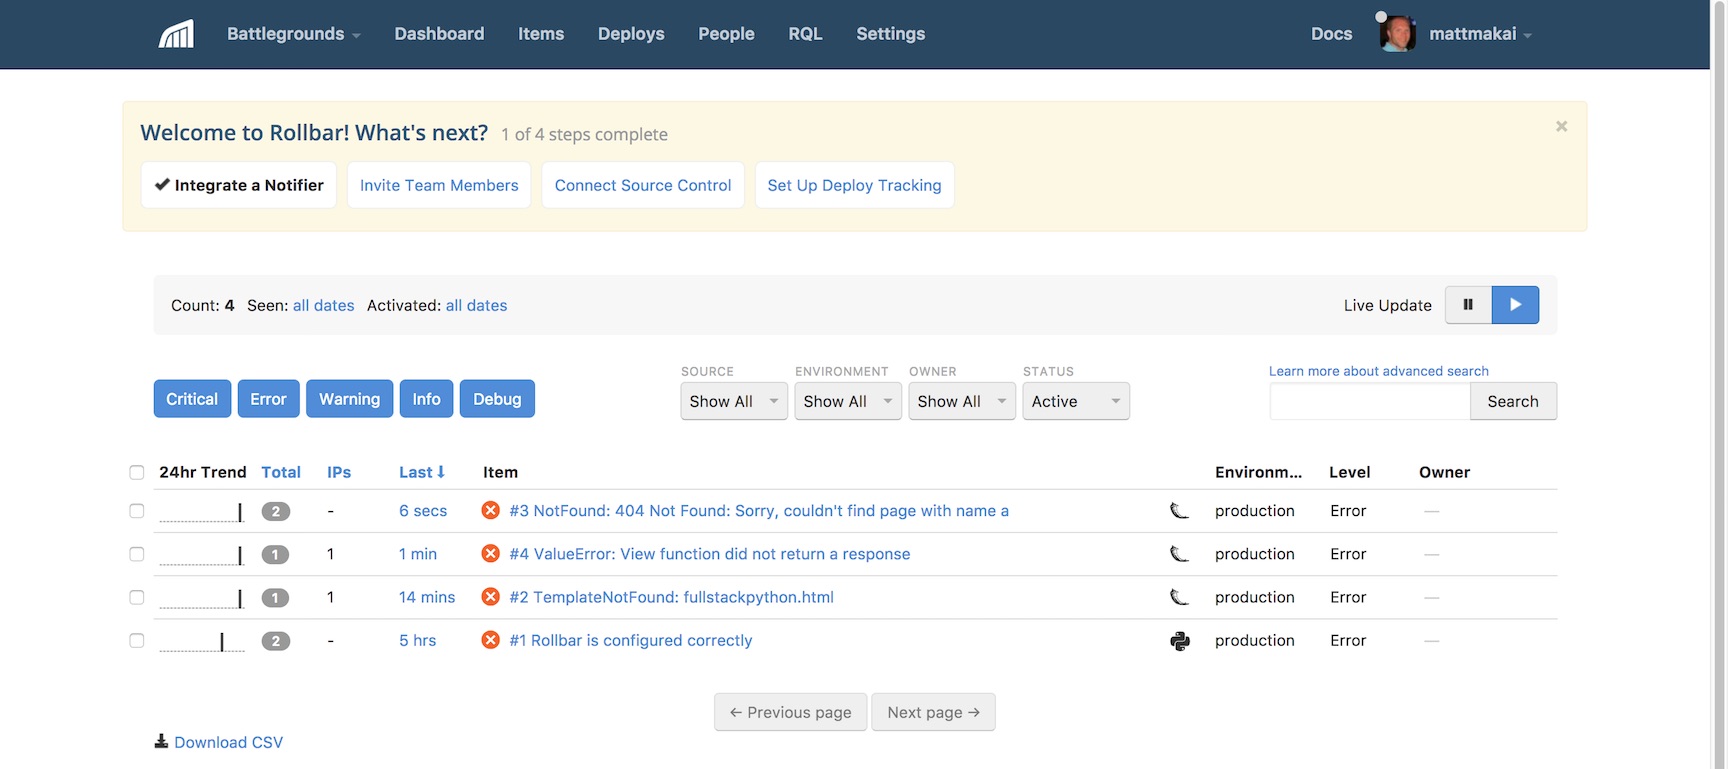
Woohoo, we finally have our Flask app reporting all errors that occur for any user back to the hosted Rollbar monitoring service!
What's Next?
We just learned how to catch and handle errors with Rollbar as a hosted monitoring platform in a simple Flask application. Next you will want to add monitoring to your more complicated web apps. You can also check out some of Rollbar's more advanced features such as:
- tracking and debugging deployment issues
- sorting and viewing errors by user
- setting up custom rules to group errors
There is a lot more to learn about web development and deployments so keep learning by reading up on Flask and other web frameworks such as Django, Pyramid and Sanic. You can also learn more about integrating Rollbar with Python applications via their Python documentation.
Questions? Let me know via a GitHub issue ticket on the Full Stack Python repository, on Twitter @fullstackpython or @mattmakai.
See something wrong in this blog post? Fork this page's source on GitHub and submit a pull request with a fix.
↧
Patricio Paez: Concatenating strings with punctuation
Creating strings of the form “a, b, c and d” from a list [‘a’, ‘b’, ‘c’, ‘d’] is a task I faced some time ago, as I needed to include such strings in some HTML documents. The “,” and the “and” are included according to the amount of elements. [‘a’, ‘b’] yields “a and b“, [‘a’] yields “a” for example. In a recent review to the code, I changed the method from using string concatenation:
if len(items) > 1:
    text = items[0]
    for item in items[1:-1]:
        text += ', ' + item
    text += ' and ' + items[-1]
else:
    text = items[0]
to the use of slicing of the items list, addition of the resulting sublists and str.join to include the punctuation:
first = items[:1]
middle = items[1:-1]
last = items[1:][-1:]
first_middle = [', '.join(first + middle)]
text = ' and '.join(first_middle + last)
The old method requires an additonal elif branch to work when items is an empty list; the new method returns an empty string if the items list is empty. I share this tip in case it is useful to someone else.
↧
Kay Hayen: Nuitka Release 0.5.27
This is to inform you about the new stable release of Nuitka. It is the extremely compatible Python compiler. Please see the page "What is Nuitka?" for an overview.
This release comes a lot of bug fixes and improvements.
Bug Fixes
- Fix, need to add recursed modules immediately to the working set, or else they might first be processed in second pass, where global names that are locally assigned, are optimized to the built-in names although that should not happen. Fixed in 0.5.26.1 already.
- Fix, the accelerated call of methods could crash for some special types. This had been a regress of 0.5.25, but only happens with custom extension types. Fixed in 0.5.26.1 already.
- Python3.5: For async def functions parameter variables could fail to properly work with in-place assignments to them. Fixed in 0.5.26.4 already.
- Compatability: Decorators that overload type checks didn't pass the checks for compiled types. Now isinstance and as a result inspect module work fine for them.
- Compatiblity: Fix, imports from __init__ were crashing the compiler. You are not supposed to do them, because they duplicate the package code, but they work.
- Compatiblity: Fix, the super built-in on module level was crashing the compiler.
- Standalone: For Linux, BSD and MacOS extension modules and shared libraries using their own $ORIGIN to find loaded DLLs resulted in those not being included in the distribution.
- Standalone: Added more missing implicit dependencies.
- Standalone: Fix, implicit imports now also can be optional, as e.g. _tkinter if not installed. Only include those if available.
- The --recompile-c-only was only working with C compiler as a backend, but not in the C++ compatibility fallback, where files get renamed. This prevented that edit and test debug approach with at least MSVC.
- Plugins: The PyLint plug-in didn't consider the symbolic name import-error but only the code F0401.
- Implicit exception raises in conditional expressions would crash the compiler.
New Features
- Added support for Visual Studio 2017. Issue#368.
- Added option --python2-for-scons to specify the Python2 execute to use for calling Scons. This should allow using AnaConda Python for that task.
Optimization
- References to known unassigned variables are now statically optimized to exception raises and warned about if the according option is enabled.
- Unhashable keys in dictionaries are now statically optimized to exception raises and warned about if the according option is enabled.
- Enable forward propagation for classes too, resulting in some classes to create only static dictionaries. Currently this never happens for Python3, but it will, once we can statically optimize __prepare__ too.
- Enable inlining of class dictionary creations if they are mere return statements of the created dictionary. Currently this never happens for Python3, see above for why.
- Python2: Selecting the metaclass is now visible in the tree and can be statically optimized.
- For executables, we now also use a freelist for traceback objects, which also makes exception cases slightly faster.
- Generator expressions no longer require the use of a function call with a .0 argument value to carry the iterator value, instead their creation is directly inlined.
- Remove "pass through" frames for Python2 list contractions, they are no longer needed. Minimal gain for generated code, but more lightweight at compile time.
- When compiling Windows x64 with MinGW64 a link library needs to be created for linking against the Python DLL. This one is now cached and re-used if already done.
- Use common code for NameError and UnboundLocalError exception code raises. In some cases it was creating the full string at compile time, in others at run time. Since the later is more efficient in terms of code size, we now use that everywhere, saving a bit of binary size.
- Make sure to release unused functions from a module. This saves memory and can be decided after a full pass.
- Avoid using OrderedDict in a couple of places, where they are not needed, but can be replaced with a later sorting, e.g. temporary variables by name, to achieve deterministic output. This saves memory at compile time.
- Add specialized return nodes for the most frequent constant values, which are None, True, and False. Also a general one, for constant value return, which avoids the constant references. This saves quite a bit of memory and makes traversal of the tree a lot faster, due to not having any child nodes for the new forms of return statements.
- Previously the empty dictionary constant reference was specialized to save memory. Now we also specialize empty set, list, and tuple constants to the same end. Also the hack to make is not say that {} is {} was made more general, mutable constant references and now known to never alias.
- The source references can be marked internal, which means that they should never be visible to the user, but that was tracked as a flag to each of the many source references attached to each node in the tree. Making a special class for internal references avoids storing this in the object, but instead it's now a class property.
- The nodes for named variable reference, assignment, and deletion got split into separate nodes, one to be used before the actual variable can be determined during tree building, and one for use later on. This makes their API clearer and saves a tiny bit of memory at compile time.
- Also eliminated target variable references, which were pseudo children of assignments and deletion nodes for variable names, that didn't really do much, but consume processing time and memory.
- Added optimization for calls to staticmethod and classmethod built-in methods along with type shapes.
- Added optimization for open built-in on Python3, also adding the type shape file for the result.
- Added optimization for bytearray built-in and constant values. These mutable constants can now be compile time computed as well.
- Added optimization for frozenset built-in and constant values. These mutable constants can now be compile time computed as well.
- Added optimization for divmod built-in.
- Treat all built-in constant types, e.g. type itself as a constant. So far we did this only for constant values types, but of course this applies to all types, giving slightly more compact code for their uses.
- Detect static raises if iterating over non-iterables and warn about them if the option is enabled.
- Split of locals node into different types, one which needs the updated value, and one which just makes a copy. Properly track if a functions needs an updated locals dict, and if it doesn't, don't use that. This gives more efficient code for Python2 classes, and exec using functions in Python2.
- Build all constant values without use of the pickle module which has a lot more overhead than marshal, instead use that for too large long values, non-UTF8 unicode values, nan float, etc.
- Detect the linker arch for all Linux platforms using objdump instead of only a hand few hard coded ones.
Cleanups
- The use of INCREASE_REFCOUNT got fully eliminated.
- Use functions not vulenerable for buffer overflow. This is generally good and avoids warnings given on OpenBSD during linking.
- Variable closure for classes is different from all functions, don't handle the difference in the base class, but for class nodes only.
- Make sure mayBeNon doesn't return None which means normally "unclear", but False instead, since it's always clear for those cases.
- Comparison nodes were using the general comparison node as a base class, but now a proper base class was added instead, allowing for cleaner code.
- Valgrind test runners got changed to using proper tool namespace for their code and share it.
- Made construct case generation code common testing code for re-use in the speedcenter web site. The code also has minor beauty bugs which will then become fixable.
- Use appdirs package to determine place to store the downloaded copy of depends.exe.
- The code still mentioned C++ in a lot of places, in comments or identifiers, which might be confusing readers of the code.
- Code objects now carry all information necessary for their creation, and no longer need to access their parent to determine flag values. That parent is subject to change in the future.
- Our import sorting wrapper automatically detects imports that could be local and makes them so, removing a few existing ones and preventing further ones on the future.
- Cleanups and annotations to become Python3 PyLint clean as well. This found e.g. that source code references only had __cmp__ and need rich comparison to be fully portable.
Tests
- The test runner for construct tests got cleaned up and the constructs now avoid using xrange so as to not need conversion for Python3 execution as much.
- The main test runner got cleaned up and uses common code making it more versatile and robust.
- Do not run test in debugger if CPython also segfaulted executing the test, then it's not a Nuitka issue, so we can ignore that.
- Improve the way the Python to test with is found in the main test runner, prefer the running interpreter, then PATH and registry on Windows, this will find the interesting version more often.
- Added support for "Landscape.io" to ignore the inline copies of code, they are not under our control.
- The test runner for Valgrind got merged with the usage for constructs and uses common code now.
- Construct generation is now common code, intended for sharing it with the Speedcenter web site generation.
- Rebased Python 3.6 test suite to 3.6.1 as that is the Python generally used now.
Organizational
- Added inline copy of appdirs package from PyPI.
- Added credits for RedBaron and isort.
- The --experimental flag is now creating a list of indications and more than one can be used that way.
- The PyLint runner can also work with Python3 pylint.
- The Nuitka Speedcenter got more fine tuning and produces more tags to more easily identify trends in results. This needs to become more visible though.
- The MSI files are also built on AppVeyor, where their building will not depend on me booting Windows. Getting these artifacts as downloads will be the next step.
Summary
This release improves many areas. The variable closure taking is now fully transparent due to different node types, the memory usage dropped again, a few obvious missing static optimizations were added, and many built-ins were completed.
This release again improves the scalability of Nuitka, which again uses less memory than before, although not an as big jump as before.
This does not extend or use special C code generation for bool or any type yet, which still needs design decisions to proceed and will come in a later release.
↧