Quantcast
Channel: Planet Python
Viewing all 23173 articles
Browse latest View live

Wingware: Wing Python IDE Version 9.0.2 - December 20, 2022

$
0
0

Wing 9.0.2 speeds up the debugger during module imports, fixes several issues with match/case, corrects initial directory used with 'python -m', fixes auto-refresh of version control status, adds commands for traversing current selection in the multi-selection dialog, and fixes some stability issues.

See the change log for details.

Download Wing 9.0.2 Now:Wing Pro | Wing Personal | Wing 101 | Compare Products


What's New in Wing 9


Wing 9 Screen Shot

Support for Python 3.11

Wing 9 adds support for Python 3.11, the next major release of Python, so you can take advantage of Python 3.11's substantially improved performance and new features.

Debugger Optimizations

Wing 9 reduces debugger overhead by about 20-50% in Python 3.7+. The exact amount of performance improvement you will see depends on the nature of the code that is being debugged and the Python version that you are using.

Streamlined Light and Dark Theming

Wing 9 allows configuring a light and dark theme independently (on the first Preferences page) in order to make it easier to switch between light and dark modes. Two new light themes New Light and Faerie Storm have been added, and switching display modes should be faster and smoother visually.

Other Improvements

Wing 9 also shows auto-invocation arguments for methods of super(), fixes a number of issues affecting code analysis and multi-threaded debugging, and makes several other improvements.

For a complete list of new features in Wing 9, see What's New in Wing 9.


Try Wing 9 Now!


Wing 9 is an exciting new step for Wingware's Python IDE product line. Find out how Wing 9 can turbocharge your Python development by trying it today.

Downloads:Wing Pro | Wing Personal | Wing 101 | Compare Products

See Upgrading for details on upgrading from Wing 8 and earlier, and Migrating from Older Versions for a list of compatibility notes.


Python Bytes: #315 Some Stickers!

$
0
0
<a href='https://www.youtube.com/watch?v=RY0ABqGmDko' style='font-weight: bold;'>Watch on YouTube</a><br> <br> <p><strong>About the show</strong></p> <p>Sponsored by <a href="http://pythonbytes.fm/foundershub2022"><strong>Microsoft for Startups Founders Hub</strong></a>.</p> <p><strong>Connect with the hosts</strong></p> <ul> <li>Michael: <a href="https://fosstodon.org/@mkennedy"><strong>@mkennedy@fosstodon.org</strong></a></li> <li>Brian: <a href="https://fosstodon.org/@brianokken"><strong>@brianokken@fosstodon.org</strong></a></li> </ul> <p><strong>Michael #1:</strong> <a href="https://blog.jupyter.org/jupyter-server-2-0-is-released-121ac99e909a">Jupyter Server 2.0 is released!</a></p> <ul> <li>Jupyter Server provides the core web server that powers JupyterLab and Jupyter Notebook.</li> <li><strong>New Identity API</strong>: As Jupyter continues to innovate its real-time collaboration experience, identity is an important component.</li> <li><strong>New Authorization API</strong>: Enabling collaboration on a notebook shouldn’t mean “allow everyone with access to my Jupyter Server to edit my notebooks”. What if I want to share my notebook with e.g. a subset of my teammates?</li> <li><strong>New Event System API</strong>: <a href="https://github.com/jupyter/jupyter_events">jupyter_events</a>—a package that provides a JSON-schema-based event-driven system to Jupyter Server and server extensions.</li> <li><strong>Terminals Service is now a Server Extension</strong>: Jupyter Server now ships the “Terminals Service” as an extension (installed and enabled by default) rather than a core Jupyter Service.</li> <li><strong>pytest-jupyter</strong>: A pytest plugin for Jupyter</li> </ul> <p><strong>Brian #2:</strong> <strong>Converting to pyproject.toml</strong></p> <ul> <li>Last week, <a href="https://pythonbytes.fm/episodes/show/314/what-are-you-a-wise-guy-sort-it-out">episode 314</a>, we talked about “Tools for rewriting Python code” and I mentioned a desire to convert setup.py/setup.cfg to pyproject.toml</li> <li>Several of you, including Christian Clauss and Brian Skinn, let me know about a few tools to help in that area. Thank you.</li> <li><a href="https://pypi.org/project/ini2toml/">ini2toml</a> - Automatically translates .ini/.cfg files into TOML <ul> <li>“… can also be used to convert any compatible <a href="https://docs.python.org/3/library/configparser.html#supported-ini-file-structure">.ini/.cfg</a> file to <a href="https://toml.io/en/">TOML</a>.”</li> <li>“ini2toml comes in two flavours: <em>“lite”</em> and <em>“full”</em>. The “lite” flavour will create a TOML document that does not contain any of the comments from the original .ini/.cfg file. On the other hand, the “full” flavour will make an extra effort to translate these comments into a TOML-equivalent (please notice sometimes this translation is not perfect, so it is always good to check the TOML document afterwards).”</li> </ul></li> <li><a href="https://github.com/tox-dev/pyproject-fmt">pyproject-fmt</a> - Apply a consistent format to <code>pyproject.toml</code> files <ul> <li>Having a consistent ordering and such is actually quite nice.</li> <li>I agreed with most changes when I tried it, except one change. <ul> <li>The faulty change: it modified the name of my project. Not cool.</li> <li>pytest plugins are traditionally named pytest-something. <ul> <li>the tool replaced the - with _. Wrong. </li> <li>So, be careful with adding this to your tool chain if you have intentional dashes in the name.</li> </ul></li> <li>Otherwise, and still, cool project.</li> </ul></li> </ul></li> <li><p><a href="https://github.com/abravalheri/validate-pyproject">validate-pyproject</a> - Automated checks on pyproject.toml powered by JSON Schema definitions</p> <ul> <li>It’s a bit terse with errors, but still useful. <pre><code> $ validate-pyproject pyproject.toml Invalid file: pyproject.toml [ERROR] `project.authors[{data__authors_x}]` must be object $ validate-pyproject pyproject.toml Invalid file: pyproject.toml [ERROR] Invalid value (at line 3, column 12) </code></pre></li> </ul></li> <li><p>I’d probably add <a href="https://tox.wiki/en/latest/">tox</a></p> <ul> <li>Don’t forget to build and test your project after making changes to pyproject.toml</li> <li>You’ll catch things like missing dependencies that the other tools will miss.</li> </ul></li> </ul> <p><strong>Michael #3:</strong> <a href="https://github.com/awslabs/aws-lambda-powertools-python">aws-lambda-powertools-python</a></p> <ul> <li>Via Mark Pender</li> <li>A suite of utilities for AWS Lambda Functions that makes distributed tracing, structured logging, custom metrics, idempotency, and many leading practices easier</li> <li>Looks kinda cool if you prefer to work almost entirely in python and avoid using any 3rd party tools like Terraform etc to manage the support functions of deploying, monitoring, debugging lambda functions <a href="https://awslabs.github.io/aws-lambda-powertools-python/2.4.0/core/tracer/"></a>- <a href="https://awslabs.github.io/aws-lambda-powertools-python/2.4.0/core/tracer/"><strong>Tracing</strong></a>: Decorators and utilities to trace Lambda function handlers, and both synchronous and asynchronous functions</li> <li><a href="https://awslabs.github.io/aws-lambda-powertools-python/latest/core/logger/"><strong>Logging</strong></a> - Structured logging made easier, and decorator to enrich structured logging with key Lambda context details</li> <li><a href="https://awslabs.github.io/aws-lambda-powertools-python/latest/core/metrics/"><strong>Metrics</strong></a> - Custom Metrics created asynchronously via CloudWatch Embedded Metric Format (EMF)</li> <li><a href="https://awslabs.github.io/aws-lambda-powertools-python/latest/core/event_handler/appsync/"><strong>Event handler: AppSync</strong></a> - AWS AppSync event handler for Lambda Direct Resolver and Amplify GraphQL Transformer function</li> <li><a href="https://awslabs.github.io/aws-lambda-powertools-python/latest/core/event_handler/api_gateway/"><strong>Event handler: API Gateway and ALB</strong></a> - Amazon API Gateway REST/HTTP API and ALB event handler for Lambda functions invoked using Proxy integration</li> <li><a href="https://awslabs.github.io/aws-lambda-powertools-python/latest/utilities/middleware_factory/"><strong>Bring your own middleware</strong></a> - Decorator factory to create your own middleware to run logic before, and after each Lambda invocation</li> <li><a href="https://awslabs.github.io/aws-lambda-powertools-python/latest/utilities/parameters/"><strong>Parameters utility</strong></a> - Retrieve and cache parameter values from Parameter Store, Secrets Manager, or DynamoDB</li> <li><a href="https://awslabs.github.io/aws-lambda-powertools-python/latest/utilities/batch/"><strong>Batch processing</strong></a> - Handle partial failures for AWS SQS batch processing</li> <li><a href="https://awslabs.github.io/aws-lambda-powertools-python/latest/utilities/typing/"><strong>Typing</strong></a> - Static typing classes to speedup development in your IDE</li> <li><a href="https://awslabs.github.io/aws-lambda-powertools-python/latest/utilities/validation/"><strong>Validation</strong></a> - JSON Schema validator for inbound events and responses</li> <li><a href="https://awslabs.github.io/aws-lambda-powertools-python/latest/utilities/data_classes/"><strong>Event source data classes</strong></a> - Data classes describing the schema of common Lambda event triggers</li> <li><a href="https://awslabs.github.io/aws-lambda-powertools-python/latest/utilities/parser/"><strong>Parser</strong></a> - Data parsing and deep validation using Pydantic</li> <li><a href="https://awslabs.github.io/aws-lambda-powertools-python/latest/utilities/idempotency/"><strong>Idempotency</strong></a> - Convert your Lambda functions into idempotent operations which are safe to retry</li> <li><a href="https://awslabs.github.io/aws-lambda-powertools-python/latest/utilities/feature_flags/"><strong>Feature Flags</strong></a> - A simple rule engine to evaluate when one or multiple features should be enabled depending on the input</li> <li><a href="https://awslabs.github.io/aws-lambda-powertools-python/latest/utilities/streaming/"><strong>Streaming</strong></a> - Streams datasets larger than the available memory as streaming data.</li> </ul> <p><strong>Brian #4:</strong> <a href="https://pybit.es/articles/how-to-create-a-self-updating-github-readme/"><strong>How to create a self updating GitHub Readme</strong></a></p> <ul> <li>Bob Belderbos </li> <li><a href="https://github.com/bbelderbos">Bob’s GitHub profile</a> is nice <ul> <li>Includes latest Pybites articles, latest Python tips, and even latest Fosstodon toots</li> <li>And he includes a link to <a href="https://pybit.es/articles/how-to-create-a-self-updating-github-readme/">an article</a> on how he did this.</li> </ul></li> <li>A Python script that pulls together all of the content, <a href="https://github.com/bbelderbos/bbelderbos/blob/main/build-readme.py">build-readme.py</a> <ul> <li>and fills in a <a href="https://github.com/bbelderbos/bbelderbos/blob/main/TEMPLATE.md">TEMPLATE.md</a> markdown file.</li> <li>It gets called through a GitHub action workflow, <a href="https://github.com/bbelderbos/bbelderbos/blob/main/.github/workflows/update.yml">update.yml</a></li> <li>and automatically commits changes,</li> <li>currently <a href="https://crontab.guru/#45_8_*_*_*">daily at 8:45</a></li> </ul></li> <li>This happens every day, and it looks like there are only commits if </li> <li>Note: <ul> <li>We covered <a href="https://simonwillison.net/2020/Jul/10/self-updating-profile-readme/">Simon Willison’s notes on self updating README</a> on <a href="https://pythonbytes.fm/episodes/show/192/calculations-by-hand-but-in-the-compter-with-handcalcs">episode 192 in 2020</a></li> </ul></li> </ul> <p><strong>Extras</strong> </p> <p>Brian:</p> <ul> <li><a href="https://github.blog/2022-12-15-leaked-a-secret-check-your-github-alerts-for-free/">GitHub can check your repos for leaked secrets.</a></li> <li>Julia Evans has released a new zine, <a href="https://wizardzines.com/zines/debugging-guide/">The Pocket Guide to Debugging</a></li> <li><a href="https://github.com/OrkoHunter/python-easter-eggs">Python Easter Eggs</a> <ul> <li>Includes this fun one from 2009 from Barry Warsaw and Brett Cannon <pre><code> &gt;&gt;&gt; from __future__ import barry_as_FLUFL &gt;&gt;&gt; 1 &lt;&gt; 2 True &gt;&gt;&gt; 1 != 2 File "[HTML_REMOVED]", line 1 1 != 2 ^ SyntaxError: invalid syntax </code></pre></li> </ul></li> <li><a href="https://crontab.guru/#*_*_*_*_*">Crontab Guru</a></li> </ul> <p>Michael:</p> <ul> <li><a href="https://canarymail.io">Canary Email AI</a></li> <li><a href="https://twitter.com/pypi/status/1603089763287826432">3.11 delivers</a></li> <li>First chance to try “iPad as the sole travel device.” Here’s a report. <ul> <li>Follow up from <a href="https://pythonbytes.fm/episodes/show/306/some-fun-pytesting-tools">306</a> and <a href="https://pythonbytes.fm/episodes/show/309/when-malware-pocs-are-themselves-malware">309</a> discussions.</li> </ul></li> <li><a href="https://arstechnica.com/gadgets/2022/12/linux-amazon-meta-and-microsoft-want-to-break-the-google-maps-monopoly/">Maps be free</a></li> <li><a href="https://python-bytes-static.nyc3.digitaloceanspaces.com/michaels-new-laptop-design.jpg">New laptop design</a></li> </ul> <p><img src="https://python-bytes-static.nyc3.digitaloceanspaces.com/michaels-new-laptop-design.jpg" alt="" /></p> <p><strong>Joke:</strong> <a href="https://www.reddit.com/r/programminghumor/comments/z3pj3j/dose_the_cloud_rains_code_then/">What are clouds made of?</a></p>

PyCoder’s Weekly: Issue #556 (Dec. 20, 2022)

$
0
0

#556 – DECEMBER 20, 2022
View in Browser »

The PyCoder’s Weekly Logo


Using a Build System & Continuous Integration in Python

What advantages can a build system provide for a Python developer? What new skills are required when working with a team of developers? This week on the show, Benjy Weinberger from Toolchain is here to discuss the Pants build system and getting started with continuous integration (CI).
REAL PYTHONpodcast

PEP 701: Syntactic Formalization of F-Strings

This Python Enhancement Proposal describes the formalization of a grammar for f-strings, allowing a reduction in the underlying parser code complexity and providing future features like comments in multi-line f-strings.
PYTHON.ORG

TelemetryHub by Scout APM, A One-Step Solution for Open-Telemetry

alt

Imagine a world where you could see all of your logs, metrics, and tracing data in one place. We’ve built TelemetryHub to be the simplest observability tool on the market. We supply peace of mind by providing an intuitive user experience that allows you to easily monitor your application →
SCOUT APMsponsor

Running Python Inside ChatGPT

Did you know that ChatGPT knows Python? It knows Python so well, you can even run a Python REPL inside ChatGPT and it supports non-trivial features like decorators, properties, and asynchronous programming.
RODRIGO GIRÃO SERRÃO• Shared by Rodrigo Girão Serrão

Discussions

Articles & Tutorials

Python Magic Methods You Might Not Have Heard About

Python classes support operations through the definition of magic methods, also known as dunder-methods. To enable to support for len(), you define __len__() on your class. There are many Python magic methods, read on to learn about some of the less common ones.
MARTIN HEINZ• Shared by Martin Heinz

Finding JIT Optimizer Bugs Using SMT Solvers and Fuzzing

Finding bugs can be a challenging exercise, but when your code is a Just-In-Time compiler, your bugs create bugs for other people. PyPy has recently added new techniques to find errors in the JIT optimizer. Dive deep into Z3 theory and using fuzzing to find errors.
PYPY.ORG

Connect, Integrate & Automate Your Data - From Python or Any Other Application

alt

At CData, we simplify connectivity between the application and data sources that power business, making it easier to unlock the value of data. Our SQL-based connectors streamline data access making it easy to access real-time data from on-premise or cloud databases, SaaS, APIs, NoSQL and Big Data →
CDATA SOFTWAREsponsor

Testing AWS Chalice Applications

“AWS Chalice is a Python-based web micro-framework that leverages on the AWS Lambda and API Gateway services. It is used to create serverless applications.” Learn how to write unit and integration tests in the AWS Chalice space.
AUTH0.COM• Shared by Robertino

8 Levels of Using Type Hints in Python

This article introduces the reader to eight separate levels of type-hint use in Python, starting with annotating basic data types and going all the way up to compound and types for classes.
YANG ZHOU

Concurrency in Python With FastAPI

FastAPI is an asyncio friendly library, which means you can dive deep into your concurrency needs. This article shows you how to get high performance out of FastAPI using co-routines.
HORACE GUY

Django Domain-Driven Design Guide

“This style guide combines domain-driven design principles and Django’s apps pattern to provide a pragmatic guide for developing scalable API services with the Django web framework.”
PHALT.GITHUB.IO

Summary of Guido van Rossum Interview

In case you missed the three hour interview by Lex Fridman, or decided that it was a bit too long, this article summarizes key points.
DAVID CASSEL

Context Managers and Python’s with Statement

In this video course, you’ll learn what the Python with statement is and how to use it with existing context managers. You’ll also learn how to create your own context managers.
REAL PYTHONcourse

What I Learned From Pairing by Default

Eve recently worked on a client site where pair programming was the default. She outlines the pros and cons of her experience and what she learned.
EVE RAGINS

How to Use Async Python Correctly

See some common mistakes when writing Python Async and learn how to avoid them to increase your code’s performance.
GUI LATROVA• Shared by Gui Latrova

Projects & Code

Events

XtremePython 2022

December 27 to December 28, 2022
XTREMEPYTHON.DEV


Happy Pythoning!
This was PyCoder’s Weekly Issue #556.
View in Browser »

alt

[ Subscribe to 🐍 PyCoder’s Weekly 💌 – Get the best Python news, articles, and tutorials delivered to your inbox once a week >> Click here to learn more ]

Zato Blog: Service-oriented API task scheduling

$
0
0

An integral part of Zato, its scalable, service-oriented scheduler makes it is possible to execute high-level API integration processes as background tasks. The scheduler runs periodic jobs which in turn trigger services and services are what is used to integrate systems.

Integration process

In this article we will check how to use the scheduler with three kinds of jobs, one-time, interval-based and Cron-style ones.

Sample integration process

What we want to achieve is a sample yet fairly common use-case:

  • Periodically consult a remote REST endpoint for new data
  • Store data found in Redis
  • Push data found as an e-mail attachment

Instead of, or in addition to, Redis or e-mail, we could use SQL and SMS, or MongoDB and AMQP or anything else - Redis and e-mail are just example technologies frequently used in data synchronisation processes that we use to highlight the workings of the scheduler.

No matter the input and output channels, the scheduler works always the same - a definition of a job is created and the job’s underlying service is invoked according to the schedule. It is then up to the service to perform all the actions required in a given integration process.

Python code

Our integration service will read as below:

# -*- coding: utf-8 -*-# Zatofrom zato.common.api import SMTPMessage
from zato.server.service import Service
classSyncData(Service):
    name ='api.scheduler.sync'defhandle(self):
# Which REST outgoing connection to use        rest_out_name ='My Data Source'# Which SMTP connection to send an email through        smtp_out_name ='My SMTP'# Who the recipient of the email will be        smtp_to ='hello@example.com'# Who to put on CC        smtp_cc ='hello.cc@example.com'# Now, let's get the new data from a remote endpoint ..# .. get a REST connection by name ..        rest_conn = self.out.plain_http[rest_out_name].conn
# .. download newest data ..        data = rest_conn.get(self.cid).text
# .. construct a new e-mail message ..        message = SMTPMessage()
        message.subject ='New data'        message.body ='Check attached data'# .. add recipients ..        message.to = smtp_to
        message.cc = smtp_cc
# .. attach the new data to the message ..        message.attach('my.data.txt', data)
# .. get an SMTP connection by name ..        smtp_conn = self.email.smtp[smtp_out_name].conn
# .. send the e-mail message with newest data ..        smtp_conn.send(message)
# .. and now store the data in Redis.        self.kvdb.conn.set('newest.data', data)

Now, we just need to make it run periodically in background.

Mind the timezone

In the next steps, we will use web-admin to configure new jobs for the scheduler.

Keep it mind that any date and time that you enter in web-admin is always interepreted to be in your web-admin user’s timezone and this applies to the scheduler too - by default the timezone is UTC. You can change it by clicking Settings and picking the right timezone to make sure that the scheduled jobs run as expected.

It does not matter what timezone your Zato servers are in - they may be in different ones than the user that is configuring the jobs.

User settings

Endpoint definitions

First, let’s use web-admin to define the endpoints that the service uses. Note that Redis does not need an explicit declaration because it is always available under “self.kvdb” in each service.

  • Configuring outgoing REST APIs
Outgoing REST connections menuOutgoing REST connections form
  • Configuring SMTP e-mail
Outgoing SMTP e-mail connections menuOutgoing SMTP e-mail connections form

Now, we can move on to the actual scheduler jobs.

Three types of jobs

To cover different integration needs, three types of jobs are available:

  • One-time - fires once only at a specific date and time and then never runs again
  • Interval-based - for periodic processes, can use any combination of weeks, days, hours, minutes and seconds for the interval
  • Cron-style - similar to interval-based but uses the syntax of Cron for its configuration
Creating a new scheduler job

One-time

Select one-time if the job should not be repeated after it runs once.

Creating a new one-time scheduler job

Interval-based

Select interval-based if the job should be repeated periodically. Note that such a job will by default run indefinitely but you can also specify after how many times it should stop, letting you to express concepts such as “Execute once per hour but for the next seven days”.

Creating a new interval-based scheduler job

Cron-style

Select cron-style if you are already familiar with the syntax of Cron or if you have some Cron tasks that you would like to migrate to Zato.

Creating a new Cron-style scheduler job

Running jobs manually

At times, it is convenient to run a job on demand, no matter what its schedule is and regardless of what type a particular job is. Web-admin lets you always execute a job directly. Simply find the job in the listing, click “Execute” and it will run immediately.

Extra context

It is very often useful to provide additional context data to a service that the scheduler runs - to achieve it, simply enter any arbitrary value in the “Extra” field when creating or an editing a job in web-admin.

Afterwards, that information will be available as self.request.raw_request in the service’s handle method.

Reusability

There is nothing else required - all is done and the service will run in accordance with a job’s schedule.

Yet, before concluding, observe that our integration service is completely reusable - there is nothing scheduler-specific in it despite the fact that we currently run it from the scheduler.

We could now invoke the service from command line. Or we could mount it on a REST, AMQP, WebSocket or trigger it from any other channel - exactly the same Python code will run in exactly the same fashion, without any new programming effort needed.

Will Kahn-Greene: Volunteer Responsibility Amnesty Day: December 2022

$
0
0

Today is Volunteer Responsibility Amnesty Day where I spend some time taking stock of things and maybe move some projects to the done pile.

In June, I ran a Volunteer Responsibility Amnesty Day[1] for Mozilla Data Org because the idea really struck a chord with me and we were about to embark on 2022h2 where one of the goals was to "land planes" and finish projects. I managed to pass off Dennis and end Puente. I also spent some time mulling over better models for maintaining a lot of libraries.

[1]

I gave the post an exceedingly long slug. I wish I had thought about future me typing that repeatedly and made it shorter like I did this time around.

This time around, I'm just organizing myself.

Here's the list of things I'm maintaining in some way that aren't the big services that I work on:

bleach
what is it:

Bleach is an allowed-list-based HTML sanitizing Python library.

role:

maintainer

keep doing:

no

next step:

more on this next year

everett
what is it:

Python configuration library.

role:

maintainer

keep doing:

yes

next step:

keep on keepin on

markus
what is it:

Python metrics library.

role:

maintainer

keep doing:

yes

next step:

keep on keepin on

fillmore
what is it:

Python library for scrubbing Sentry events.

role:

maintainer

keep doing:

yes

next step:

keep on keepin on

kent
what is it:

Fake Sentry server for local development.

role:

maintainer

keep doing:

yes

next step:

keep on keepin on, but would be happy to pass this off

sphinx-js
what is it:

Sphinx extension for documenting JavaScript and TypeScript.

role:

co-maintainer

keep doing:

yes

next step:

keep on keepin on

crashstats-tools
what is it:

Command line utilities for interacting with Crash Stats

role:

maintainer

keep doing:

yes

next step:

keep on keepin on

paul-mclendahand
what is it:

Utility for combining GitHub pull requests.

role:

maintainer

keep doing:

yes

next step:

keep on keepin on

rob-bugson
what is it:

Firefox addon for attaching GitHub pull requests to Bugzilla.

role:

maintainer

keep doing:

yes

next step:

keep on keepin on

fx-crash-sig
what is it:

Python library for symbolicating stacks and generating crash signatures.

role:

maintainer

keep doing:

maybe

next step:

keep on keepin on for now, but figure out a better long term plan

siggen
what is it:

Python library for generating crash signatures.

role:

maintainer

keep doing:

yes

next step:

keep on keepin on

mozilla-django-oidc
what is it:

Django OpenID Connect library.

role:

contributor (I maintain docker-test-mozilla-django-oidc

keep doing:

maybe

next step:

think about dropping this at some point

That's too many things. I need to pare the list down. There are a few I could probably sunset, but not any time soon.

I'm also thinking about a maintenance model where I'm squishing it all into a burst of activity for all the libraries around some predictable event like Python major releases.

I tried that out this fall and did a release of everything except Bleach (more on that next year) and rob-bugson which is a Firefox addon. I think I'll do that going forward. I need to document it somewhere so as to avoid the pestering of "Is this project active?" issues. I'll do that next year.

Python for Beginners: Check for Not Null Value in Pandas Python

$
0
0

In python, we sometimes need to filter not null and null values. In this article, we will discuss different ways to check for not null in pandas using examples.

We can check for not null in pandas using the notna() function and the notnull() function. Let us discuss each function one by one.

Check for Not Null in Pandas Using the notna() Method

As the name suggests, the notna() method works as a negation of the isna() method. The isna() method is used to check for nan values in pandas.  The notna() function has the following syntax.

pandas.notna(object)

Here, the object can be a single python object or a collection of objects such as a python list or tuple.

If we pass a single python object to the notna() method as an input argument, it returns False if the python object is None, pd.NA or np.NaN object. For python objects that are not null, the notna() function returns True. You can observe this in the following example.

import pandas as pd
import numpy as np
x=pd.NA
print("The value is:",x)
output=pd.notna(x)
print("Is the value not Null:",output)

Output:

The value is: <NA>
Is the value not Null: False

In the above example, we have passed the pandas.NA object to the notna() function. Hence, it returns False.

When we pass a list or numpy array of elements to the notna() function, the notna() function is executed with each element of the array. After execution, it returns a list or array containing True and False values. The True values of the output array correspond to all the values that are not NA, NaN, or None at the same position in the input list or array. The False values in the output array correspond to all the NA, NaN, or None values at the same position in the input list or array. You can observe this in the following example.

import pandas as pd
import numpy as np
x=[1,2,pd.NA,4,5,None, 6,7,np.nan]
print("The values are:",x)
output=pd.notna(x)
print("Are the values not Null:",output)

Output:

The values are: [1, 2, <NA>, 4, 5, None, 6, 7, nan]
Are the values not Null: [ True  True False  True  True False  True  True False]

In this example, we have passed a list containing 9 elements to the notna() function. After execution, the notna() function returns a list of 9 boolean values. Each element in the output list is associated with the element at the same index in the input list given to the notna() function. At the indices where the input list does not contain Null values, the output list contains True. Similarly, at indices where the input list contains null values, the output list contains False.

Check for Not NA in a Pandas Dataframe Using notna() Method

Along with the notna() function, python also provides us with the notna() method to check for not null values in pandas dataframes and series objects.

The notna() method, when invoked on a pandas dataframe, returns another dataframe containing True and False values. True values of the output dataframe correspond to all the values that are not NA, NaN, or None at the same position in the input dataframe. The False values in the output dataframe correspond to all the NA, NaN, or None values at the same position in the input dataframe. You can observe this in the following example.

import pandas as pd
import numpy as np
df=pd.read_csv("grade.csv")
print("The dataframe is:")
print(df)
output=df.notna()
print("Are the values not Null:")
print(output)

Output:

The dataframe is:
    Class  Roll        Name  Marks Grade
0       1    11      Aditya   85.0     A
1       1    12       Chris    NaN     A
2       1    14         Sam   75.0     B
3       1    15       Harry    NaN   NaN
4       2    22         Tom   73.0     B
5       2    15        Golu   79.0     B
6       2    27       Harsh   55.0     C
7       2    23       Clara    NaN     B
8       3    34         Amy   88.0     A
9       3    15    Prashant    NaN     B
10      3    27      Aditya   55.0     C
11      3    23  Radheshyam    NaN   NaN
Are the values not Null:
    Class  Roll  Name  Marks  Grade
0    True  True  True   True   True
1    True  True  True  False   True
2    True  True  True   True   True
3    True  True  True  False  False
4    True  True  True   True   True
5    True  True  True   True   True
6    True  True  True   True   True
7    True  True  True  False   True
8    True  True  True   True   True
9    True  True  True  False   True
10   True  True  True   True   True
11   True  True  True  False  False

In the above example, we have invoked the notna() method on a dataframe containing NaN values along with other values. The notna() method returns a dataframe containing boolean values. Here, False values of the output dataframe correspond to all the values that are NA, NaN, or None at the same position in the input dataframe. The True values in the output dataframe correspond to all the not null values at the same position in the input dataframe.

Check for Not Null Values in a Column in Pandas Dataframe

Instead of the entire dataframe, you can also check for not null values in a column of a pandas dataframe. For this, you just need to invoke the notna() method on the particular column as shown below.

import pandas as pd
import numpy as np
df=pd.read_csv("grade.csv")
print("The dataframe column is:")
print(df["Marks"])
output=df["Marks"].notna()
print("Are the values not Null:")
print(output)

Output:

The dataframe column is:
0     85.0
1      NaN
2     75.0
3      NaN
4     73.0
5     79.0
6     55.0
7      NaN
8     88.0
9      NaN
10    55.0
11     NaN
Name: Marks, dtype: float64
Are the values not Null:
0      True
1     False
2      True
3     False
4      True
5      True
6      True
7     False
8      True
9     False
10     True
11    False
Name: Marks, dtype: bool

Check for Not NA in a Pandas Series Using notna() Method

Like a dataframe, we can also invoke the notna() method on a pandas Series object. In this case, the notna() method returns a Series containing True and False values. You can observe this in the following example.

import pandas as pd
import numpy as np
x=pd.Series([1,2,pd.NA,4,5,None, 6,7,np.nan])
print("The series is:")
print(x)
output=pd.notna(x)
print("Are the values not Null:")
print(output)

Output:

The series is:
0       1
1       2
2    <NA>
3       4
4       5
5    None
6       6
7       7
8     NaN
dtype: object
Are the values not Null:
0     True
1     True
2    False
3     True
4     True
5    False
6     True
7     True
8    False
dtype: bool

In this example, we have invoked the notna() method on a pandas series. The notna() method returns a Series of boolean values after execution. Here, False values of the output series correspond to all the values that are NA, NaN, or None at the same position in the input series. The True values in the output series correspond to all the not null values at the same position in the input series.

Check for Not Null in Pandas Using the notnull() Method

The notnull() method is an alias of the notna() method. Hence, it works exactly the same as the notna() method.

When we pass a NaN value, pandas.NA value, pandas.NaT value, or None object to the notnull() function, it returns False. 

import pandas as pd
import numpy as np
x=pd.NA
print("The value is:",x)
output=pd.notnull(x)
print("Is the value not Null:",output)

Output:

The value is: <NA>
Is the value not Null: False

In the above example, we have passed pandas.NA value to the notnull() function. Hence, it returns False.

When we pass any other python object to the notnull() function, it returns True as shown below.

import pandas as pd
import numpy as np
x=1117
print("The value is:",x)
output=pd.notnull(x)
print("Is the value not Null:",output)

Output:

The value is: 1117
Is the value not Null: True

In this example, we passed the value 1117 to the notnull() function. Hence, it returns True showing that the value is not a null value.

When we pass a list or numpy array to the notnull() function, it returns a numpy array containing True and False values. You can observe this in the following example.

import pandas as pd
import numpy as np
x=[1,2,pd.NA,4,5,None, 6,7,np.nan]
print("The values are:",x)
output=pd.notnull(x)
print("Are the values not Null:",output)

Output:

The values are: [1, 2, <NA>, 4, 5, None, 6, 7, nan]
Are the values not Null: [ True  True False  True  True False  True  True False]

In this example, we have passed a list to the notnull() function. After execution, the notnull() function returns a list of boolean values. Each element in the output list is associated with the element at the same index in the input list given to the notnull() function. At the indices where the input list contains Null values, the output list contains False. Similarly, at indices where the input list contains integers, the output list contains True.

Check for Not Null in a Pandas Dataframe Using the notnull() Method

You can also invoke the notnull() method on a pandas dataframe to check for nan values as shown below.

import pandas as pd
import numpy as np
df=pd.read_csv("grade.csv")
print("The dataframe is:")
print(df)
output=df.notnull()
print("Are the values not Null:")
print(output)

Output:

The dataframe is:
    Class  Roll        Name  Marks Grade
0       1    11      Aditya   85.0     A
1       1    12       Chris    NaN     A
2       1    14         Sam   75.0     B
3       1    15       Harry    NaN   NaN
4       2    22         Tom   73.0     B
5       2    15        Golu   79.0     B
6       2    27       Harsh   55.0     C
7       2    23       Clara    NaN     B
8       3    34         Amy   88.0     A
9       3    15    Prashant    NaN     B
10      3    27      Aditya   55.0     C
11      3    23  Radheshyam    NaN   NaN
Are the values not Null:
    Class  Roll  Name  Marks  Grade
0    True  True  True   True   True
1    True  True  True  False   True
2    True  True  True   True   True
3    True  True  True  False  False
4    True  True  True   True   True
5    True  True  True   True   True
6    True  True  True   True   True
7    True  True  True  False   True
8    True  True  True   True   True
9    True  True  True  False   True
10   True  True  True   True   True
11   True  True  True  False  False

In the output, you can observe that the notnull() method behaves in exactly the same manner as the notna() method.

Instead of the entire dataframe, you can also use the notnull() method to check for not nan values in a column as shown in the following example.

import pandas as pd
import numpy as np
df=pd.read_csv("grade.csv")
print("The dataframe column is:")
print(df["Marks"])
output=df["Marks"].notnull()
print("Are the values not Null:")
print(output)

Output:

The dataframe column is:
0     85.0
1      NaN
2     75.0
3      NaN
4     73.0
5     79.0
6     55.0
7      NaN
8     88.0
9      NaN
10    55.0
11     NaN
Name: Marks, dtype: float64
Are the values not Null:
0      True
1     False
2      True
3     False
4      True
5      True
6      True
7     False
8      True
9     False
10     True
11    False
Name: Marks, dtype: bool

In a similar manner, you can invoke the notnull() method on a pandas series as shown below.

import pandas as pd
import numpy as np
x=pd.Series([1,2,pd.NA,4,5,None, 6,7,np.nan])
print("The series is:")
print(x)
output=pd.notnull(x)
print("Are the values not Null:")
print(output)

Output:

The series is:
0       1
1       2
2    <NA>
3       4
4       5
5    None
6       6
7       7
8     NaN
dtype: object
Are the values not Null:
0     True
1     True
2    False
3     True
4     True
5    False
6     True
7     True
8    False
dtype: bool

In the above example, we have invoked the notnull() method on a series. The notnull() method returns a Series of boolean values after execution. Here, the True values of the output series correspond to all the values that are not NA, NaN, or None at the same position in the input series. The False values in the output series correspond to all the NA, NaN, or None values at the same position in the input series.

Conclusion

In this article, we have discussed different ways to check for not null values in pandas. To learn more about python programming, you can read this article on how to sort a pandas dataframe. You might also like this article on how to drop columns from a pandas dataframe.

I hope you enjoyed reading this article. Stay tuned for more informative articles.

Happy Learning!

The post Check for Not Null Value in Pandas Python appeared first on PythonForBeginners.com.

Real Python: Generate Images With DALL·E 2 and the OpenAI API

$
0
0

Describe any image, then let a computer create it for you. What sounded futuristic only a few years ago has become reality with advances in neural networks and latent diffusion models (LDM). DALL·E by OpenAI has made a splash through the amazing generative art and realistic images that people create with it.

OpenAI now allows access to DALL·E through their API, which means that you can incorporate its functionality into your Python applications.

In this tutorial, you’ll:

  • Get started using the OpenAI Python library
  • Explore API calls related to image generation
  • Create images from text prompts
  • Create variations of your generated image
  • Convert Base64 JSON responses to PNG image files

You’ll need some experience with Python, JSON, and file operations to breeze through this tutorial. You can also study up on these topics while you go along, as you’ll find relevant links throughout the text.

If you haven’t played with the web user interface (UI) of DALL·E before, then try it out before coming back to learn how to use it programmatically with Python.

Source Code:Click here to download the free source code that you’ll use to generate stunning images with DALL·E 2 and the OpenAI API.

Complete the Setup Requirements

If you’ve seen what DALL·E can do and you’re eager to make its functionality part of your Python applications, then you’re in the right spot! In this first section, you’ll quickly walk through what you need to do to get started using DALL·E’s image creation capabilities in your own code.

Install the OpenAI Python Library

Confirm that you’re running Python version 3.7.1 or higher, create and activate a virtual environment, and install the OpenAI Python library:

PS> python--versionPython 3.11.0PS> python-mvenvvenvPS> .\venv\Scripts\activate(venv)PS> python-mpipinstallopenai
$ python --version
Python 3.11.0$ python -m venv venv
$ source venv/bin/activate
(venv)$ python -m pip install openai

The openai package gives you access to the full OpenAI API. In this tutorial, you’ll focus on the Image class, which you can use to interact with DALL·E to create and edit images from text prompts.

Get Your OpenAI API Key

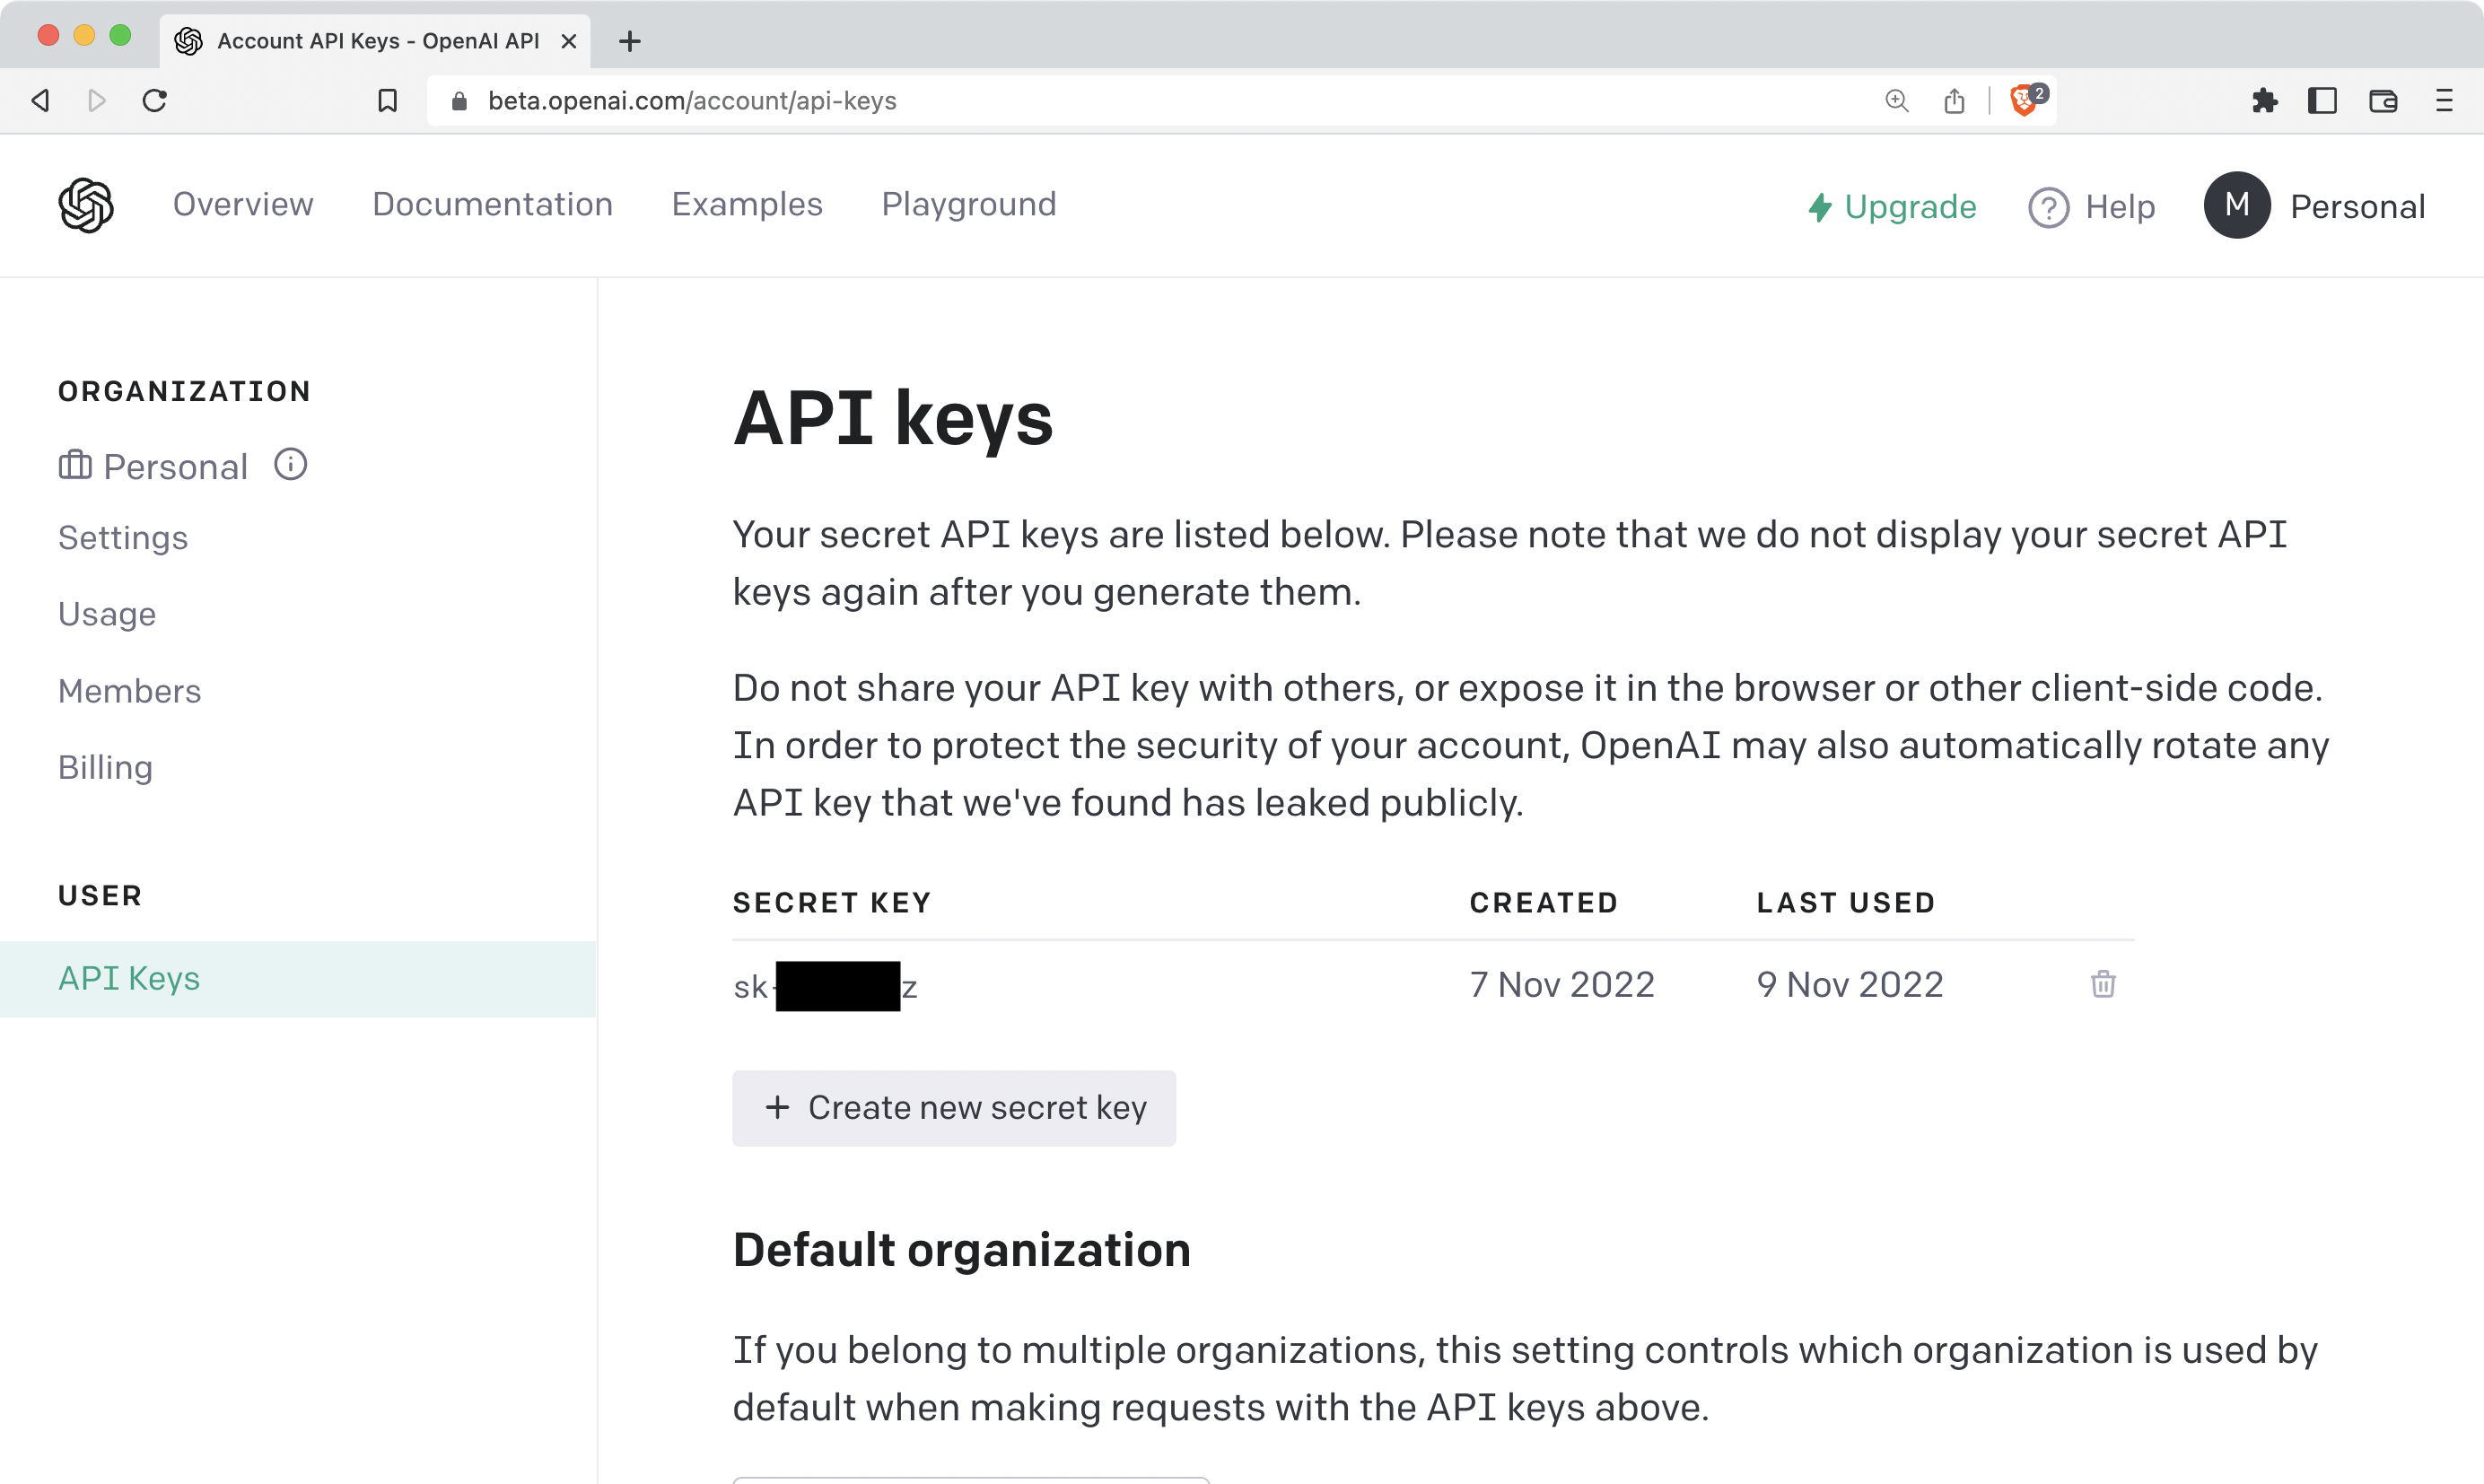
You need an API key to make successful API calls. Sign up for the OpenAI API and create a new API key by clicking on the dropdown menu on your profile and selecting View API keys:

API key page in the OpenAI web UI profile window

On this page, you can manage your API keys, which allow you to access the service that OpenAI offers through their API. You can create and delete secret keys.

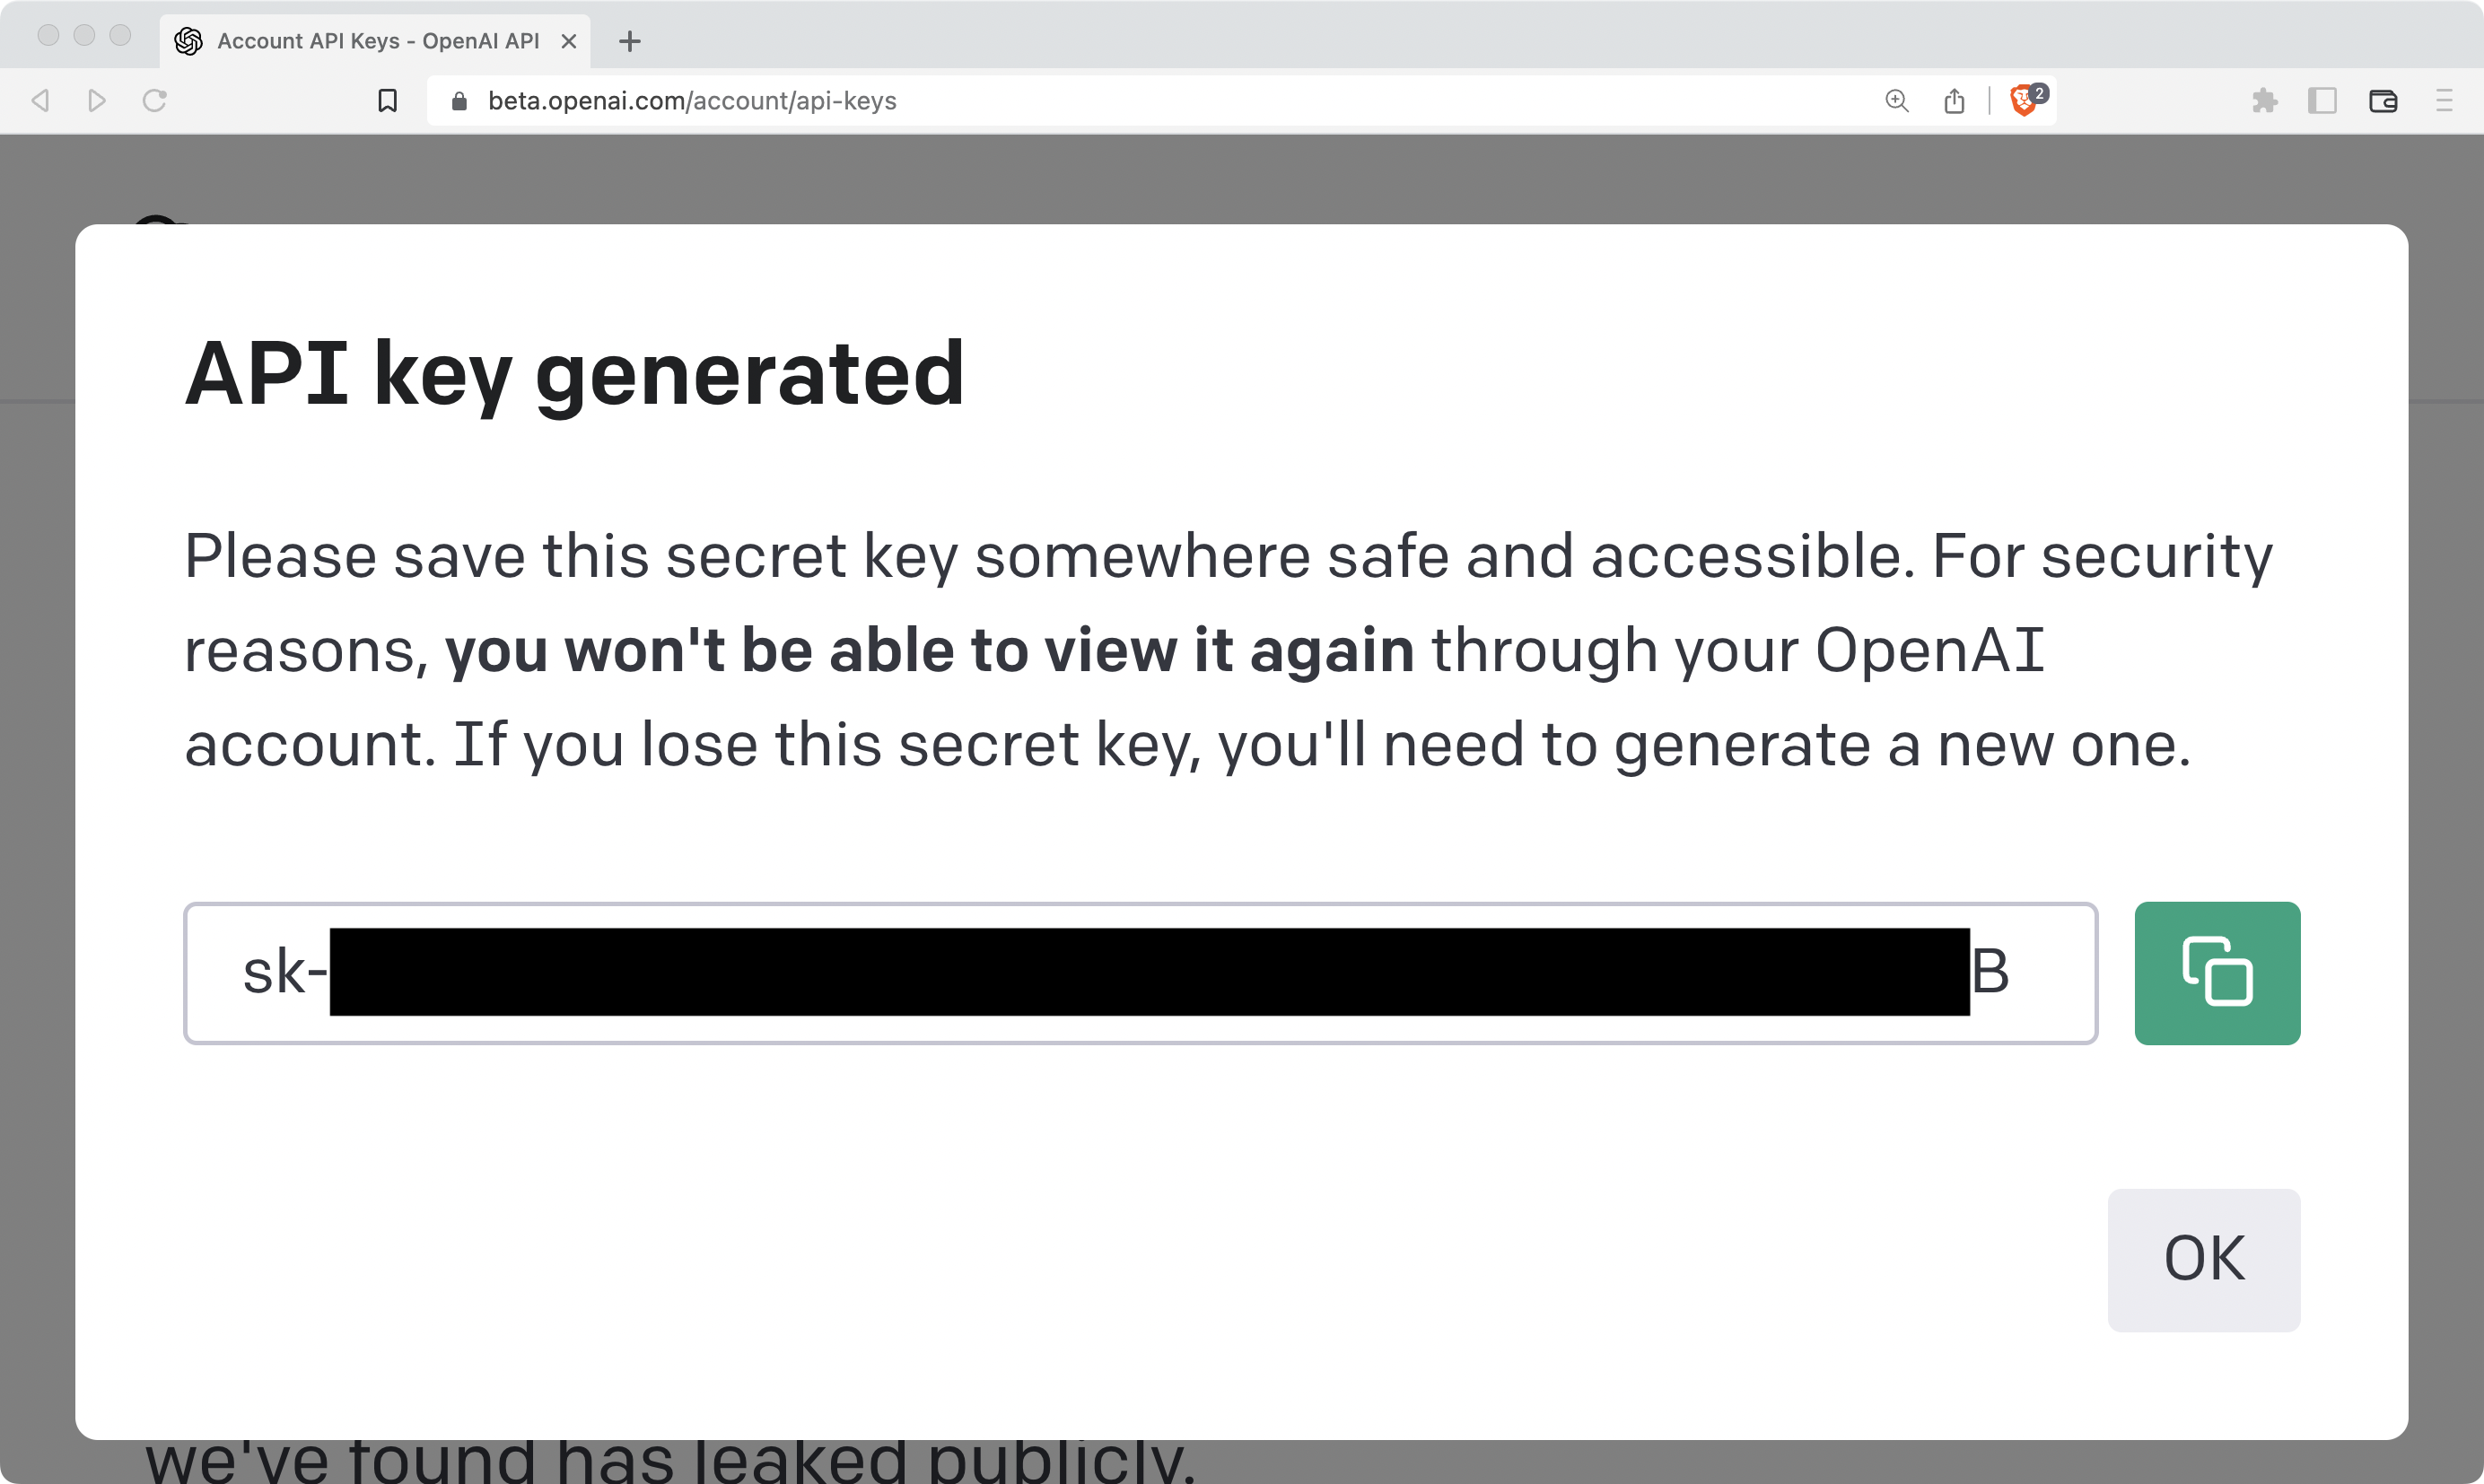
Click on Create new secret key to create a new API key, and copy the value shown in the pop-up window:

Pop up window displaying the generated secret API key

Always keep this key secret! Copy the value of this key so you can later use it in your project. You’ll only see the key value once.

Save Your API Key as an Environment Variable

A quick way to save your API key and make it available to your Python scripts is to save it as an environment variable. Select your operating system to learn how:

(venv)PS> $ENV:OPENAI_API_KEY="<your-key-value-here>"
(venv)$ exportOPENAI_API_KEY="<your-key-value-here>"

Read the full article at https://realpython.com/generate-images-with-dalle-openai-api/ »


[ Improve Your Python With 🐍 Python Tricks 💌 – Get a short & sweet Python Trick delivered to your inbox every couple of days. >> Click here to learn more and see examples ]

Everyday Superpowers: Using Sublime Text for python

$
0
0
Five or so years ago, I was frustrated by my coding environment. I was working on .net web sites and felt like I was fighting Microsoft's Visual Studio to get my work done. I started jumping between Visual Studio, Notepad++, Eclipse, and other programs. With all my jumping around, I was not really happy with my experience in any of them.
I came across an article that encouraged me to invest in my coding tools; that is to pick one program and dive deep into it, find out what it's good for, and try to enjoy it to its maximum, before looking to other tools.
Given that inspiration, I turned to Sublime Text and the myriad of how-to articles and videos for it, and within a month it was my favorite editor. I could list dozens of reasons why you should give it a try, but Daniel Bader has done a great job.
I list several packages that I find crucial to helping my development experience.
Read more...

Everyday Superpowers: New python web app not working?

$
0
0
How many times have you had the thrill of releasing a new service or app to the world, only to have it crashing down when you test the URL and find a server error page instead of your work? I'm collecting a few tips I use when I'm trying to figure out why the new python service I have set up is not working.
Read more...

Everyday Superpowers: A Sublime User in PyCharm Land

$
0
0
I have written few articles about how Sublime Text has been such a great environment to get my work done—and there's more to come, I have been extremely happy with Sublime for years. But listening to Michael Kennedy and some guests on his Talk Python to Me podcast gush about PyCharm's great features made me wonder what I was missing. I was lucky to receive a trial license for PyCharm almost a year ago, but I found it opaque and harsh compared to my beloved Sublime. With my license ending soon and a couple new python projects at work, I thought I would invest some effort to get used to PyCharm and see if I could get any benefit from it. Read my thoughts of the first few months of using PyCharm.
Read more...

Everyday Superpowers: What is Your Burnout Telling You?

$
0
0

I am glad that mental health is being discussed more often in the programming world. In particular, I would like to thank Kenneth Reitz for his transparency over the last few years and contributing his recent essay on developer burnout.
Having just recently experienced a period of burnout, I would like to share some ideas that might help you skirt by it in your own life.
And, before I go on, let me say loud and clear, there is absolutely no shame in experiencing, or reaching out for help from, anxiety, fear, anger, burnout, depression, or any other mental condition.
If you think you might be struggling with something, please reach out for help! You might have to reach out several times to multiple sources, but remember you are too valuable to waste time with this funk.


Read more...

Everyday Superpowers: TIL Debug any python file in VS Code

$
0
0

One of my frustrations with VisualStudio Code was creating a `launch.json` file whenever I wanted to debug a one-off Python file.

Today, I learned that you could add a debugger configuration to your user settings. This allows you always to have a debugging configuration available.

How to do this

Create a debugging (or launch) configuration:

  1. Select the "Run and Debug" tab and click "create a launch.json file"

A screen capture that shows a VisualStudio Code window with  the

2. Choose "Python File"

3. VS Code will generate a configuration for you. This is the one I used, where I changed the `"justMyCode"` to `false`, so I can step in to any Python code.

{
    "name": "Python: Current File",
    "type": "python",
    "request": "launch",
    "program": "${file}",
    "console": "integratedTerminal",
    "justMyCode": false
}

4. Copy the config (including the curly braces)

5. Open your user configuration (`⌘`/`Ctrl` + `,`) and search for "launch".

6. Click "Edit in settings.json"

7. Add your configuration to the `"configurations"` list.

This is what mine looks like, for reference:

...
"launch": {
    "configurations": [
        {
            "name": "Python: Current File",
            "type": "python",
            "request": "launch",
            "program": "${file}",
            "console": "integratedTerminal",
            "justMyCode": false
        }
    ],
    "compounds": []
}

Read more...

PyBites: Reflections on the Zen of Python

$
0
0

An initial version of this article appeared as a Pybites email first. If you like it join our friends list to get our valuable Python, developer and mindset content first …

How following the Zen of Python will make your code better, a lot better.

This epic set of axioms (triggered by typing import this in the Python REPL) says a lot about code quality and good software design principles.

Although each one is profound, let’s look at a few in particular:

Explicit is better than implicit.

This is an important one. If we don’t state things explicitly we miss obvious facts when looking at the code later, which will lead to mistakes.

This axiom is much about expressing intent and being informative for the next engineer, who will often be you!

You read software way more often than you write it. Plus the code you do write is for humans first and machines second. 

Hence using meaningful variable / function / module names, and structuring your code properly, matters. As the Zen also says: Readability counts (and I think Python’s required indenting, like it or not, helps with this too).

Simple is better than complex.

Software inherently grows complex over time. I think keeping things simple as a system grows, is the greatest challenge we face as programmers.

Following this criteria alone is often the only way to keep a system maintainable!

Sometimes you cannot avoid a certain level of complexity though. That’s where great libraries design great abstractions. The underlying code is complicated but it’s hidden behind a nice usable interface (great examples are Typer, FastAPI, rich, requests, Django, etc).

As the Zen says: Complex is better than complicated, and the isolation of code and behavior those interfaces create, are a testament to the other Zen axiom that Namespaces are one honking great idea.

Regarding namespacing see also this discussion I recently opened about Python imports.

Flat is better than nested.

This is one of the things I often highlight in my code reviews. Deeply nested code (the horrendous “arrow shape”) is an indication of overly complex code and should be refactored.


Did you know that Flake8 is a wrapper around PyFlakes, pep8 and Ned Batchelder’s McCabe script?

McCabe checks complexity and anything that goes beyond 10 is considered too complex.

So the good news is that you can measure this using Flake8’s --max-complexity option.


Often it’s just a matter of breaking code out into more helper functions / smaller pieces.

You can also make your code less nested by using more early returns and constructs like continue and break.

Similarly Zen’s Sparse is better than dense is all about keeping your code organized and using line breaks for more breathing space.

For example, in a function, do some input validation -> add two line breaks -> do the actual work -> add two line breaks -> handle the return.

Just adding some more space / using blocks, your code will be so much more peaceful and readable, an easy win.

Same with clever one-liners, they are generally not readable. Do your fellow developers (and future you) a favor and break them out over multiple lines.

Special cases aren’t special enough to break the rules. Although practicality beats purity.

I like this axiom a lot because we all start software projects with a lot of good intentions, but as complexity grows, and adjusting to (inevitable) user requirements on the fly, we’ll inevitably have to make compromises.

It’s good to set the standards high but shipping fast and being responsive to changing needs also requires you to be a Pragmatic Programmer (as per one of my favorite programming books).

Regarding software in the real world, I like what somebody said the other day after working with us:

Most valuable thing I learned from you and the program was not only iterating quickly but having it be in the hands of users.

PDM client on the importance of shipping code requiring a good dose of practicality.

If the implementation is hard to explain, it’s a bad idea + If the implementation is easy to explain, it may be a good idea.

Another important one. We often think we can implement something right the first time, but sometimes we don’t understand the problem good enough yet (or we try to be clever lol).

A good test is to see how easy you can explain the design to a colleague (or rubber duck lol). If you struggle, maybe you should not start coding yet, but spend some more time at the whiteboard and talking to your stakeholders.

What’s the real problem you’re trying to solve? How will it be future proof? The latter usually becomes more apparent as more code gets written.

We talk about this in our live developer mindset trainings and on our podcast as well.


I hope this made you reflect on Python code and software development overall.

We should be grateful to Tim Peters for writing these axioms up and for Python’s creator + core developers for so elegantly implementing these almost everywhere you look in the Standard Library and beyond.

It makes Python a joy to work with and the error ratio to be consistently lower. In Python things usually just work which makes code written in it more maintainable which is awesome 😎😍


What’s your favorite Zen axiom and/or has changed the way you code?

Hit me up on Twitter or on Mastodon and let me know …

PyCharm: The PyCharm 2022.3.1 Release Candidate is out!

$
0
0

This build contains important bug fixes for PyCharm 2022.3. Look through the list of improvements and update to the latest version for a better experience.

Download PyCharm 2022.3.1 RC

  • Packaging: PyCharm no longer uses excessive disk space caching PyPI. [PY-57156]
  • HTTP client: Setting a proxy no longer breaks package inspection. [PY-57612]
  • Python console: Code that is run with the Emulate terminal in output console option enabled now has the correct indentation level. [PY-57706]
  • Inspections:The Loose punctuation mark inspection now works correctly for reStructuredText fields in docstrings. [PY-53047]
  • Inspections: Fixed an SOE exception where processing generic types broke error highlighting in the editor. [PY-54336]
  • Debugger: We fixed several issues for the debugger.[PY-57296], [PY-57055]
  • Code insight: Code insight for IntEnum properties is now correct. [PY-55734]
  • Code insight: Code insight has been improved for dataclass arguments when wildcard import is used. [PY-36158]

For the full list of improvements, please refer to the release notes. Share your feedback in the comments under this post or in our issue tracker.

Ned Batchelder: Secure maintainer workflow, continued

$
0
0

Picking up from Secure maintainer workflow, especially the comments there (thanks!), here are some more things I’m doing to keep my maintainer workflow safe.

1Password ssh: I’m using 1Password as my SSH agent. It works really well, and uses the Mac Touch ID for authorization. Now I have no private keys in my ~/.ssh directory. I’ve been very impressed with 1Password’s helpful and comprehensive approach to configuration and settings.

Improved environment variables: I’ve updated my opvars and unopvars shell functions that set environment variables from 1Password. Now I can name sets of credentials (defaulting to the current directory name), and apply multiple sets. Then unopvars knows all that have been set, and clears all of them.

Public/private GitHub hosts: There’s a problem with using a fingerprint-gated SSH agent: some common operations want an SSH key but aren’t actually security sensitive. When pulling from a public repo, you don’t want to be interrupted to touch the sensor. Reading public information doesn’t need authentication, and you don’t want to become desensitized to the importance of the sensor. Pulling changes from a git repo with a “git@” address always requires SSH, even if the repo is public. It shouldn’t require an alarming interruption.

Git lets you define “insteadOf” aliases so that you can pull using “https:” and push using “git@”. The syntax seems odd and backwards to me, partly because I can define pushInsteadOf, but there’s no pullInsteadOf:

[url "git@github.com:"]
    # Git remotes of "git@github.com" should really be pushed using ssh.
    pushInsteadOf = git@github.com:

[url "https://github.com/"]
    # Git remotes of "git@github.com" should be pulled over https.
    insteadOf = git@github.com:

This works great, except that private repos still need to be pulled using SSH. To deal with this, I have a baroque contraption arrangement using a fake URL scheme “github_private:” like this:

[url "git@github.com:"]
    pushInsteadOf = git@github.com:
    # Private repos need ssh in both directions.
    insteadOf = github_private:

[url "https://github.com/"]
    insteadOf = git@github.com:

Now if I set the remote URL to “github_private:nedbat/secret.git”, then activity will use “git@github.com:nedbat/secret.git” instead, for both pushing and pulling. (BTW: if you start fiddling with this, “git remote -v” will show you the URLs after these remappings, and “git config --get-regex ‘remote.*.url’” will show you the actual settings before remapping.)

But how to set the remote to “github_private:nedbat/secret.git”? I can set it manually for specific repos with “git remote”, but I also clone entire organizations and don’t want to have to know which repos are private. I automate the remote-setting with an aliased git command I can run in a repo directory that sets the remote correctly if the repo is private:

[alias]
    # If this is a private repo, change the remote from "git@github.com:" to
    # "github_private:".  You can remap "github_private:" to "git@" like this:
    #
    #   [url "git@github.com:"]
    #       insteadOf = github_private:
    #
    # This requires the gh command: https://cli.github.com/
    #
    fix-private-remotes = "!f() { \
        vis=$(gh api 'repos/{owner}/{repo}' --template '{{.visibility}}'); \
        if [[ $vis == private ]]; then \
            for rem in $(git remote); do \
                echo Updating remote $rem; \
                git config remote.$rem.url $(git config remote.$rem.url | \
                    sed -e 's/git@github.com:/github_private:/'); \
            done \
        fi; \
    }; f"

This uses GitHub’s gh command-line tool, which is quite powerful. I’m using it more and more.

This is getting kind of complex, and is still a work in progress, but it’s working. I’m always interested in ideas for improvements.


Talk Python to Me: #395: Tools for README.md Creation and Maintenance

$
0
0
If you maintain projects on places like GitHub, you know that having a classy readme is important and that maintaining a change log can be helpful for you and consumers of the project. It can also be a pain. That's why I'm excited to welcome back Ned Batchelder to the show. He has a lot of tools to help here as well as some opinions we're looking forward to hearing. We cover his tools and a bunch of others he and I found along the way.<br/> <br/> <strong>Links from the show</strong><br/> <br/> <div><b>Ned on Mastodon</b>: <a href="https://hachyderm.io/@nedbat" target="_blank" rel="noopener">@nedbat@hachyderm.io</a><br/> <b>Ned's website</b>: <a href="https://nedbatchelder.com" target="_blank" rel="noopener">nedbatchelder.com</a><br/> <br/> <b>Readme as a Service</b>: <a href="https://readme.so" target="_blank" rel="noopener">readme.so</a><br/> <b>hatch-fancy-pypi-readme</b>: <a href="https://github.com/hynek/hatch-fancy-pypi-readme" target="_blank" rel="noopener">github.com</a><br/> <b>Shields.io badges</b>: <a href="https://shields.io" target="_blank" rel="noopener">shields.io</a><br/> <b>All Contributors</b>: <a href="https://allcontributors.org" target="_blank" rel="noopener">allcontributors.org</a><br/> <b>Keep a changelog</b>: <a href="https://keepachangelog.com" target="_blank" rel="noopener">keepachangelog.com</a><br/> <b>Scriv: Changelog management tool</b>: <a href="https://github.com/nedbat/scriv" target="_blank" rel="noopener">github.com</a><br/> <b>changelog_manager</b>: <a href="https://github.com/masukomi/changelog_manager" target="_blank" rel="noopener">github.com</a><br/> <b>executablebooks' github activity</b>: <a href="https://github.com/executablebooks/github-activity" target="_blank" rel="noopener">github.com</a><br/> <b>dinghy: A GitHub activity digest tool</b>: <a href="https://github.com/nedbat/dinghy" target="_blank" rel="noopener">github.com</a><br/> <b>cpython's blurb</b>: <a href="https://github.com/python/core-workflow/tree/master/blurb" target="_blank" rel="noopener">github.com</a><br/> <b>release drafter</b>: <a href="https://github.com/release-drafter/release-drafter" target="_blank" rel="noopener">github.com</a><br/> <b>Towncrier</b>: <a href="https://github.com/twisted/towncrier" target="_blank" rel="noopener">github.com</a><br/> <b>mktestdocs testing code samples in readmes</b>: <a href="https://github.com/koaning/mktestdocs" target="_blank" rel="noopener">github.com</a><br/> <b>shed</b>: <a href="https://github.com/Zac-HD/shed" target="_blank" rel="noopener">github.com</a><br/> <b>blacken-docs</b>: <a href="https://github.com/adamchainz/blacken-docs" target="_blank" rel="noopener">github.com</a><br/> <b>Cog</b>: <a href="https://github.com/nedbat/cog" target="_blank" rel="noopener">github.com</a><br/> <b>Awesome tools for readme</b>: <a href="https://github.com/HaiDang666/awesome-tool-for-readme-profile" target="_blank" rel="noopener">github.com</a><br/> <br/> <b>coverage.py</b>: <a href="ttps://coverage.readthedocs.io" target="_blank" rel="noopener">coverage.readthedocs.io</a><br/> <b>Tailwind CSS "Landing page"</b>: <a href="https://tailwindcss.com" target="_blank" rel="noopener">tailwindcss.com</a><br/> <b>Poetry "Landing page"</b>: <a href="https://python-poetry.org" target="_blank" rel="noopener">python-poetry.org</a><br/> <b>Textual</b>: <a href="https://www.textualize.io" target="_blank" rel="noopener">textualize.io</a><br/> <b>Rich</b>: <a href="https://github.com/Textualize/rich" target="_blank" rel="noopener">github.com</a><br/> <b>Join Mastodon Page</b>: <a href="https://joinmastodon.org" target="_blank" rel="noopener">joinmastodon.org</a><br/> <b>Watch this episode on YouTube</b>: <a href="https://www.youtube.com/watch?v=K7jeBfiNqR4" target="_blank" rel="noopener">youtube.com</a><br/> <b>Episode transcripts</b>: <a href="https://talkpython.fm/episodes/transcript/395/tools-for-readme.md-creation-and-maintenance" target="_blank" rel="noopener">talkpython.fm</a><br/> <br/> <b>--- Stay in touch with us ---</b><br/> <b>Subscribe to us on YouTube</b>: <a href="https://talkpython.fm/youtube" target="_blank" rel="noopener">youtube.com</a><br/> <b>Follow Talk Python on Mastodon</b>: <a href="https://fosstodon.org/web/@talkpython" target="_blank" rel="noopener"><i class="fa-brands fa-mastodon"></i>talkpython</a><br/> <b>Follow Michael on Mastodon</b>: <a href="https://fosstodon.org/web/@mkennedy" target="_blank" rel="noopener"><i class="fa-brands fa-mastodon"></i>mkennedy</a><br/></div><br/> <strong>Sponsors</strong><br/> <a href='https://talkpython.fm/max'>Local Maximum Podcast</a><br> <a href='https://talkpython.fm/sentry'>Sentry Error Monitoring, Code TALKPYTHON</a><br> <a href='https://talkpython.fm/assemblyai'>AssemblyAI</a><br> <a href='https://talkpython.fm/training'>Talk Python Training</a>

Python Software Foundation: More Python Everywhere, All at Once: Looking Forward to 2023

$
0
0
The PSF works hard throughout the year to put on PyCon US, support smaller Python events around the world through our Grants program and of course to provide the critical infrastructure and expertise that keep CPython and PyPI running smoothly for the 8 million (and growing!) worldwide base of Python users. We want to invest more deeply in education and outreach in 2023, and donations from individuals (like you) can make sure we have the resources to start new projects and sustain them alongside our critical community functions.

Supporting Membership is a particularly great way to contribute to the PSF. By becoming a Supporting Member, you join a core group of PSF stakeholders, and since Supporting Members are eligible to vote in our Board and bylaws elections, you gain a voice in the future of the PSF. And we have just introduced a new sliding scale rate for Supporting Members, so you can join at the standard rate of an annual $99 contribution, or for as little as $25 annually if that works better for you. We are about three quarters of the way to our goal of 100 new supporting members by the end of 2022 – Can you sign up today and help push us over the edge?

Thank you for reading and for being a part of the one-of-a-kind community that makes Python and the PSF so special.

With warmest wishes to you and yours for a happy and healthy new year,
Deb

Sumana Harihareswara - Cogito, Ergo Sumana: Speech-to-text with Whisper: How I Use It &amp; Why

$
0
0
Speech-to-text with Whisper: How I Use It & Why

Peter Bengtsson: Pip-Outdated.py - a script to compare requirements.in with the output of pip list --outdated

$
0
0

Simply by posting this, there's a big chance you'll say "Hey! Didn't you know there's already a well-known script that does this? Better." Or you'll say "Hey! That'll save me hundreds of seconds per year!"

The problem

Suppose you have a requirements.in file that is used, by pip-compile to generate the requirements.txt that you actually install in your Dockerfile or whatever server deployment. The requirements.in is meant to be the human-readable file and the requirements.txt is for the computers. You manually edit the version numbers in the requirements.in and then run pip-compile --generate-hashes requirements.in to generate a new requirements.txt. But the "first-class" packages in the requirements.in aren't the only packages that get installed. For example:

▶ cat requirements.in | rg '==' | wc -l
      54

▶ cat requirements.txt | rg '==' | wc -l
     102

In other words, in this particular example, there are 76 "second-class" packages that get installed. There might actually be more stuff installed that you didn't describe. That's why pip list | wc -l can be even higher. For example, you might have locally and manually done pip install ipython for a nicer interactive prompt.

The solution

The command pip list --outdated will list packages based on the requirements.txt not the requirements.in. To mitigate that, I wrote a quick Python CLI script that combines the output of pip list --outdated with the packages mentioned in requirements.in:

#!/usr/bin/env pythonimportsubprocessdefmain(*args):ifnotargs:requirements_in="requirements.in"else:requirements_in=args[0]required={}withopen(requirements_in)asf:forlineinf:if"=="inline:package,version=line.strip().split("==")package=package.split("[")[0]required[package]=versionres=subprocess.run(["pip","list","--outdated"],capture_output=True)ifres.returncode:raiseException(res.stderr)lines=res.stdout.decode("utf-8").splitlines()relevant=[lineforlineinlinesifline.split()[0]inrequired]longest_package_name=max([len(x.split()[0])forxinrelevant])ifrelevantelse0forlineinrelevant:p,installed,possible,*_=line.split()ifpinrequired:print(p.ljust(longest_package_name+2),"INSTALLED:",installed.ljust(9),"POSSIBLE:",possible,)if__name__=="__main__":importsyssys.exit(main(*sys.argv[1:]))

Installation

To install this, you can just download the script and run it in any directory that contains a requirements.in file.

Or you can install it like this:

curl -L https://gist.github.com/peterbe/099ad364657b70a04b1d65aa29087df7/raw/23fb1963b35a2559a8b24058a0a014893c4e7199/Pip-Outdated.py > ~/bin/Pip-Outdated.py
chmod +x ~/bin/Pip-Outdated.py

Pip-Outdated.py

Real Python: The Real Python Podcast – Episode #138: 2022 Real Python Tutorial & Video Course Wrap Up

$
0
0

It's been another year of changes at Real Python! The Real Python team has written, edited, curated, illustrated, and produced a mountain of Python material this year. We added some new members to the team, updated the site's features, and created new styles of tutorials and video courses.


[ Improve Your Python With 🐍 Python Tricks 💌 – Get a short & sweet Python Trick delivered to your inbox every couple of days. >> Click here to learn more and see examples ]

Viewing all 23173 articles
Browse latest View live


<script src="https://jsc.adskeeper.com/r/s/rssing.com.1596347.js" async> </script>