Quantcast
Channel: Planet Python
Viewing all 23314 articles
Browse latest View live

IslandT: How to write a python program with PyCharm

$
0
0

In this article, I am going to show you how to write your first program in the PyCharm community edition. PyCharm is the IDE I am using to write my Python program since 2019 and it is a fantastic IDE to write a python program.

The first step you all need to do is to download PyCharm through this link, remember if you wish to get a free version then always pick the community edition. You can always buy a professional version later if you like the free one but you want to get a better version with lots of other features in it. Once you have downloaded the IDE just installed it on your pc.

The second step is to download the latest Python package through this link… Once you have downloaded the module just installed it on your laptop. The python installer is getting very smart now, you do not need to do anything, just follow the instruction on the screen and a new Python package will get installed on your laptop within minutes.

The next step is to check whether the python has been installed correctly on Windows, open the command prompt and type in python –version, and press the enter key! You will see the new python version if the installation is successful.

The next thing is to add the Python module as the python interpreter of the IDE, goto Run->Edit Configurations, under python interpreter select the latest python version you have installed on your laptop, and press the OK button.

Now it is time to create a project folder for all the files you want to put inside it, goto File->New Project and then create a new folder there!

Finally, it is time to test run a python file, there is already a main.py file ready for you in the new project folder so all you need to do is just to change a few lines of codes and see the result!

Change the code as follow and then press Run->’main’

def print_hi(name):
    # Use a breakpoint in the code line below to debug your script.
    print(f'Hi, {name}')  # Press Ctrl+F8 to toggle the breakpoint.


# Press the green button in the gutter to run the script.
if __name__ == '__main__':
    print_hi('Hello My World!')
PyCharmPycharm hello world

That is it! It seems like the PyCharm team is working hard to improve their product, now there are no more installation problems and other issues, keep up the good job!


Anwesha Das: Python for Everyone, yes it is

$
0
0

I moved to Sweden a few months back. I met a lot of women like me who came from different countries. Many of them had flourishing careers in their respective countries. Teacher, architect, economist, marketing professional, HR, lawyer, you name it. But now, in this country, they cannot find a living for themselves. The reason being many but majorly the language. The majority of them do not have fluency in Swedish. Moving countries/ continents is complex. And what makes it more challenging than when you lose your individuality, financial independence, and career. I could feel their pain and more so since I am going through a somewhat similar kind of situation as them.

The only difference between them is that I had project Sigsum to support me (for my job
), PyLadies Stockholm and the greater Python Sweden community. So I thought, why not share some of my fortunes with them. Many of them wanted to build their career in tech. And we PyLadies may be a help to them. I shared my idea with our excellent PyLadies Stockholm organizer and Python Sweden Board chair, Christine. She gave me the green signal and the mantra “go do it” :). I started reaching out to companies and communities for spaces. Christine shared me with a few contacts. But it was so hard to get a place :(. Since it is midsummer, none of the offices was working as it is supposed to function. Finally, Sunet came to the rescue and provided the space for the meetup.

signal-2022-06-28-125916_003

signal-2022-06-28-125916_004

June twenty-first, 2022, was the date for our meetup. We had women coming from different educational and cultural backgrounds. One thing we all had in common was that we wanted to learn a new skill to give life a fresh start and do it together. We know it is an uphill battle, and we are ready for the struggle. After a little nudge from me, the group, which was hesitant to give their introduction initially, started sharing their projects and ideas with each other. The “Show and Tell” was a great success (and the 50 minutes session was extended to 1 hour and 30 minutes). How lovely is that? People shared such a variety of projects with us. Ranging from different Python libraries, web design projects, projects on the Password manager, and why what excites them about Python and what they want to achieve. After that, I talked about the program “Python for everyone” - > what is it? And why is it? And whom is it for? It was an up, close and personal session.

signal-2022-06-28-125916_002

signal-2022-06-28-125916_005

We are going to have another mingle in the first half of August. And our Python for Everyone sessions will begin with the Python 101 session on August second. In the meantime, we will focus on building the foundation, so we are ready for our sessions in August. Join us on our slack channel and stay connected.

signal-2022-06-28-125916_001

pyladies_anwesha

PyCharm: Start Studying Machine Learning With PyCharm

Real Python: Building a Site Connectivity Checker

$
0
0

Building a site connectivity checker in Python is an interesting project to level up your skills. With this project, you’ll integrate knowledge related to handling HTTP requests, creating command-line interfaces (CLI), and organizing your application’s code using common Python project layout practices.

By building this project, you’ll learn how Python’s asynchronous features can help you deal with multiple HTTP requests efficiently.

In this video course, you’ll learn how to:

  • Create command-line interfaces (CLI) using Python’s argparse
  • Check if a website is online using Python’s http.client from the standard library
  • Implement synchronous checks for multiple websites
  • Check if a website is online using the aiohttp third-party library
  • Implement asynchronous checks for multiple websites

[ Improve Your Python With 🐍 Python Tricks 💌 – Get a short & sweet Python Trick delivered to your inbox every couple of days. >> Click here to learn more and see examples ]

Mike Driscoll: Python 101 - An Intro to Functions

$
0
0

Functions are reusable pieces of code. Anytime you find yourself writing the same code twice, that code should probably go in a function.

For example, Python has many built-in functions, such as dir() and sum(). You also imported the math module and used its square root function, sqrt().

In this tutorial you will learn about:

  • Creating a function
  • Calling a function
  • Passing arguments
  • Type hinting your arguments
  • Passing keyword arguments
  • Required and default arguments
  • *args and **kwargs
  • Positional-only arguments
  • Scope

Let's get started!

Creating a Function

A function starts with the keyword, def followed by the name of the function, two parentheses, and then a colon. Next, you indent one or more lines of code under the function to form the function "block".

Here is an empty function:

def my_function():
    pass

When you create a function, it is usually recommended that the name of the function is all lowercase with words separated by underscores. This is called snake-case.

The pass is a keyword in Python that Python knows to ignore. You can also define an empty function like this:

def my_function():
    ...

In this example, the function has no contents besides an ellipses.

Let's learn how to use a function next!

Calling a Function

Now that you have a function, you need to make it do something. Let's do that first:

def my_function():
    print('Hello from my_function')

Now instead of an ellipses or the keyword pass, you have a function that prints out a message.

To call a function, you need to write out its name followed by parentheses:

>>> def my_function():
...     print('Hello from my_function')
... 
>>> my_function()
Hello from my_function

That was nice and easy!

Now let's learn about passing arguments to your functions.

Passing Arguments

Most functions let you pass arguments to them. The reason for this is that you will normally want to pass one or more positional arguments to a function so that the function can do something with them.

Let's create a function that takes an argument called name and then prints out a welcome message:

>>> def welcome(name):
...     print(f'Welcome {name}')
... 
>>> welcome('Mike')
Welcome Mike

If you have used other programming languages, you might know that some of them require functions to return something. Python automatically returns None if you do not specify a return value.

Let's try calling the function and assigning its result to a variable called return_value:

>>> def welcome(name):
...     print(f'Welcome {name}')
... 
>>> return_value = welcome('Mike')
Welcome Mike
>>> print(return_value)
None

When you print out the return_value, you can see that it is None.

Type Hinting Your Arguments

Some programming languages use static types so that when you compile your code, the compiler will warn you of type-related errors. Python is a dynamically typed language, so that doesn't happen until run time

However, in Python 3.5, the typing module was added to Python to allow developers to add type hinting to their code. This allows you to specify the types of arguments and return values in your code, but does not enforce it. You can use external utilities, such as mypy (http://mypy-lang.org/) to check that your code base is following the type hints that you have set.

Type hinting is not required in Python and it is not enforced by the language, but it is useful when working with teams of developers, especially when the teams are made up of people who are unfamiliar with Python.

Let's rewrite that last example so that it uses type hinting:

>>> def welcome(name: str) -> None:
...     print(f'Welcome {name}')
... 
>>> return_value = welcome('Mike')
Welcome Mike
>>> print(return_value)
None

This time when you put in the name argument, you end it with a colon (:) followed by the type that you expect. In this case, you expect a string type to be passed in. After that you will note the -> None: bit of code. The -> is special syntax to indicate what the return value is expected to be. For this code, the return value is None.

If you want to return a value explicitly, then you can use the return keyword followed by what you wish to return.

When you run the code, it executes in exactly the same manner as before.

To demonstrate that type hinting is not enforced, you can tell Python to return an integer by using the return keyword:

>>> def welcome(name: str) -> None:
...     print(f'Welcome {name}')
...     return 5
... 
>>> return_value = welcome('Mike')
Welcome Mike
>>> print(return_value)
5

When you run this code, you can see the type hint says that the return value should be None, but you coded it such that it returns the integer 5. Python does not throw an exception.

You can use the mypy tool against this code to verify that it is following the type hinting. If you do so, you will find that it does show an issue. You will learn how to use mypy in Part II of this book.

The main takeaway here is that Python supports type hinting. Python does not enforce types though. However, some Python editors can use type hinting internally to warn you about issues related to types, or you can use mypy manually to find issues.

Now let's learn what else you can pass to a function.

Passing Keyword Arguments

Python also allows you to pass in keyword arguments. A keyword argument is specified by passing in a named argument, for example you might pass in age=10.

Let's create a new example that shows a regular argument and a single keyword argument:

>>> def welcome(name: str, age: int=15) -> None:
...     print(f'Welcome {name}. You are {age} years old.')
... 
>>> welcome('Mike')
Welcome Mike. You are 15 years old.

This example has a regular argument, name and a keyword argument, age, which is defaulted to 15. When you call this code without specifying the age, you see that it defaults to 15.

To make things extra clear, here's a different way you can call it:

>>> def welcome(name: str, age: int) -> None:
...     print(f'Welcome {name}. You are {age} years old.')
... 
>>> welcome(age=12, name='Mike')
Welcome Mike. You are 12 years old.

In this example, you specified both age and name parameters. When you do that, you can specify them in any order. For example, here you specified them in reverse order and Python still understood what you meant because you specified BOTH values.

Let's see what happens when you don't use keyword arguments:

>>> def welcome(name: str, age: int) -> None:
...     print(f'Welcome {name}. You are {age} years old.')
... 
>>> welcome(12, 'Mike')
Welcome 12. You are Mike years old.

When you pass in values without specifying where they should go, they will be passed in order. So name becomes 12 and age becomes 'Mike'.

Required and Default Arguments

Default arguments are a handy way to make your function callable with less arguments, whereas required arguments are ones that you have to pass in to the function for the function to execute.

Let's look at an example that has one required argument and one default argument:

>>> def multiply(x: int, y: int=5) -> int:
...     return x * y
... 
>>> multiply(5)
25

The first argument, x is required. If you call multiply() without any arguments, you will receive an error:

>>> multiply()
Traceback (most recent call last):
  Python Shell, prompt 25, line 1
builtins.TypeError: multiply() missing 1 required positional argument: 'x'

The second argument y, is not required. In other words, it is a default argument where the default is 5. This allowed you to call multiply() with only one argument!

What are *args and **kwargs?

Most of the time, you will want your functions to only accept a small number of arguments, keyword arguments or both. You normally don't want too many arguments as it becomes more complicated to change your function later.

However Python does support the concept of any number of arguments or keyword arguments.

You can use this special syntax in your functions:

  • *args - An arbitrary number of arguments
  • **kwargs - An arbitrary number of keyword arguments

The bit that you need to pay attention to is the * and the **. The name, arg or kwarg can be anything, but it is a convention to name them args and kwargs. In other words, most Python developers call them *args or **kwargs. While you aren't forced to do so, you probably should so that the code is easy to recognize and understand.

Let's look at an example:

>>> def any_args(*args):
...     print(args)
... 
>>> any_args(1, 2, 3)
(1, 2, 3)
>>> any_args(1, 2, 'Mike', 4)
(1, 2, 'Mike', 4)

Here you created any_args() which accepts any number of arguments including zero and prints them out.

You can actually create a function that has a required argument plus any number of additional arguments:

>>> def one_required_arg(required, *args):
...     print(f'{required=}')
...     print(args)
... 
>>> one_required_arg('Mike', 1, 2)
required='Mike'
(1, 2)

So in this example, your function's first argument is required. If you were to call one_required_arg() without any arguments, you would get an error.

Now let's try adding keyword arguments:

>>> def any_keyword_args(**kwargs):
...     print(kwargs)
... 
>>> any_keyword_args(1, 2, 3)
Traceback (most recent call last):
  Python Shell, prompt 7, line 1
builtins.TypeError: any_keyword_args() takes 0 positional arguments but 3 were given

Oops! You created the function to accept keyword arguments but only passed in normal arguments. This caused a TypeError to be thrown.

Let's try passing in the same values as keyword arguments:

>>> def any_keyword_args(**kwargs):
...     print(kwargs)
... 
>>> any_keyword_args(one=1, two=2, three=3)
{'one': 1, 'two': 2, 'three': 3}

This time it worked the way you would expect it to.

Now let's inspect our *args and **kwargs and see what they are:

>>> def arg_inspector(*args, **kwargs):
...     print(f'args are of type {type(args)}')
...     print(f'kwargs are of type {type(kwargs)}')
... 
>>> arg_inspector(1, 2, 3, x='test', y=5)
args are of type <class 'tuple'>
kwargs are of type <class 'dict'>

What this means is that args is a tuple and kwargs are a dict.

Let's see if we can pass our function a tuple and dict for the *args and **kwargs:

>>> my_tuple = (1, 2, 3)
>>> my_dict = {'one': 1, 'two': 2}
>>> def output(*args, **kwargs):
...     print(f'{args=}')
...     print(f'{kwargs=}')
... 
>>> output(my_tuple)
args=((1, 2, 3),)
kwargs={}
>>> output(my_tuple, my_dict)
args=((1, 2, 3), {'one': 1, 'two': 2})
kwargs={}

Well that didn't work quite right. Both the tuple and the dict ended up in the *args. Not only that, but the tuple stayed a tuple instead of being turned into three arguments.

You can make this work if you use a special syntax though:

>>> def output(*args, **kwargs):
...     print(f'{args=}')
...     print(f'{kwargs=}')
... 
>>> output(*my_tuple)
args=(1, 2, 3)
kwargs={}
>>> output(**my_dict)
args=()
kwargs={'one': 1, 'two': 2}
>>> output(*my_tuple, **my_dict)
args=(1, 2, 3)
kwargs={'one': 1, 'two': 2}

In this example, you call output() with *my_tuple. Python will extract the individual values in the tuple and pass each of them in as arguments. Next you passed in **my_dict, which tells Python to pass in each key/value pair as keyword arguments.

The final example passes in both the tuple and the dict.

Pretty neat!

Positional-only Parameters

Python 3.8 added a new feature to functions known as positional-only parameters. These use a special syntax to tell Python that some parameters have to be positional and some have to be keyword.

Let's look at an example:

>>> def positional(name, age, /, a, b, *, key):
...     print(name, age, a, b, key)
... 
>>> positional(name='Mike')
Traceback (most recent call last):
  Python Shell, prompt 21, line 1
builtins.TypeError: positional() got some positional-only arguments passed as 
keyword arguments: 'name'

The first two parameters, name and age are positional-only. They can't be passed in as keyword arguments, which is why you see the TypeError above. The arguments, a and b can be positional or keyword. Finally, key, is keyword-only.

The forward slash, /, indicates to Python that all arguments before the forward-slash as positional-only arguments. Anything following the forward slash are positional or keyword arguments up to th *. The asterisk indicates that everything following it as keyword-only arguments.

Here is a valid way to call the function:

>>> positional('Mike', 17, 2, b=3, keyword='test')
Mike 17 2 3 test

However, if you try to pass in only positional arguments, you will get an error:

>>> positional('Mike', 17, 2, 3, 'test')
Traceback (most recent call last):
  Python Shell, prompt 25, line 1
builtins.TypeError: positional() takes 4 positional arguments but 5 were given

The positional() function expects the last argument to be a keyword argument.

The main idea is that positional-only parameters allow the parameter name to change without breaking client code.

You may also use the same name for positional-only arguments and **kwargs:

>>> def positional(name, age, /, **kwargs):
...     print(f'{name=}')
...     print(f'{age=}')
...     print(f'{kwargs=}')
... 
>>> positional('Mike', 17, name='Mack')
name='Mike'
age=17
kwargs={'name': 'Mack'}

You can read about the full implementation and reasoning behind the syntax here:

Let's move on and learn a little about the topic of scope!

Scope

All programming languages have the idea of scope. Scope tells the programming language what variables or functions are available to them.

Let's look at an example:

>>> name = 'Mike'
>>> def welcome(name):
...     print(f'Welcome {name}')
... 
>>> welcome()
Traceback (most recent call last):
  Python Shell, prompt 34, line 1
builtins.TypeError: welcome() missing 1 required positional argument: 'name'
>>> welcome('Nick')
Welcome Nick
>>> name
'Mike'

The variable name is defined outside of the welcome() function. If you try to call welcome() without passing it an argument, it throws an error even though the argument matches the variable name. If you pass in a value to welcome(), that variable is only changed inside of the welcome() function. The name that you defined outside of the function remains unchanged.

Let's look at an example where you define variables inside of functions:

>>> def add():
...     a = 2
...     b = 4
...     return a + b
... 
>>> def subtract():
...     a = 3
...     return a - b
... 
>>> add()
6
>>> subtract()
Traceback (most recent call last):
  Python Shell, prompt 40, line 1
  Python Shell, prompt 38, line 3
builtins.NameError: name 'b' is not defined

In add(), you define a and b and add them together. The variables, a and b have local scope. That means they can only be used within the add() function.

In subtract(), you only define a but try to use b. Python doesn't check to see if b exists in the subtract() function until runtime.

What this means is that Python does not warn you that you are missing something here until you actually call the subtract() function. That is why you don't see any errors until there at the end.

Python has a special global keyword that you can use to allow variables to be used across functions.

Let's update the code and see how it works:

>>> def add():
...     global b
...     a = 2
...     b = 4
...     return a + b
... 
>>> def subtract():
...     a = 3
...     return a - b
... 
>>> add()
6
>>> subtract()
-1

This time you define b as global at the beginning of the add() function. This allows you to use b in subtract() even though you haven't defined it there.

Globals are usually not recommended. It is easy to overlook them in large code files, which makes tracking down subtle errors difficult -- for example, if you had called subtract() before you called add() you would still get the error, because even though b is global, it doesn't exist until add() has been run.

In most cases where you would want to use a global, you can use a class instead.

There is nothing wrong with using globals as long as you understand what you are doing. They can be helpful at times. But you should use them with care.

Wrapping Up

Functions are a very useful way to reuse your code. They can be called repeatedly. Functions allow you to pass and receive data too.

In this tutorial, you learned about the following topics:

  • Creating a function
  • Calling a function
  • Passing arguments
  • Type hinting your arguments
  • Passing keyword arguments
  • Required and default arguments
  • *args and **kwargs
  • Positional-only arguments
  • Scope

You can use functions to keep your code clean and useful. A good function is self-contained and can be used easily by other functions. While it isn't covered in this tutorial, you can nest functions inside of each other.

Related Articles

The post Python 101 - An Intro to Functions appeared first on Mouse Vs Python.

Python Bytes: #290 Sentient AI? If so, then what?

$
0
0
<p><strong>Watch the live stream:</strong></p> <a href='https://www.youtube.com/watch?v=E-yIQgq08jI' style='font-weight: bold;'>Watch on YouTube</a><br> <br> <p><strong>About the show</strong></p> <p>Sponsored by us! Support our work through:</p> <ul> <li>Our <a href="https://training.talkpython.fm/"><strong>courses at Talk Python Training</strong></a></li> <li><a href="https://testandcode.com/"><strong>Test &amp; Code</strong></a> Podcast</li> <li><a href="https://www.patreon.com/pythonbytes"><strong>Patreon Supporters</strong></a></li> </ul> <p>Special guest: <a href="https://twitter.com/Spirix3"><strong>Nick Muoh</strong></a></p> <p><strong>Brian #1:</strong> <a href="https://github.com/microsoft/picologging"><strong>picologging</strong></a></p> <ul> <li>From a <a href="https://twitter.com/anthonypjshaw/status/1539735691890163714?s=20&amp;t=AofRg_xUHlAmMMhG4uMHlA">tweet by Anthony Shaw</a></li> <li>From README.md</li> <li>“early-alpha” stage project with some incomplete features. (cool to be so up front about that) <ul> <li>“Picologging is a high-performance logging library for Python. picologging is 4-10x faster than the <code>logging</code> module in the standard library.”</li> <li>“Picologging is designed to be used as a <em>drop-in</em> replacement for applications which already use logging, and supports the same API as the <code>logging</code> module.”</li> </ul></li> <li>Now you’ve definitely got my attention.</li> <li>For many common use cases, it’s just way faster. </li> <li>Sounds great, why not use it? A few limitations listed: <ul> <li>process and thread name not captured. </li> <li>Some logging globals not observed: <code>logging.logThreads</code>, <code>logging.logMultiprocessing</code>, <code>logging.logProcesses</code></li> <li>Logger will always default to the Sys.stderr and not observe (emittedNoHandlerWarning).</li> </ul></li> </ul> <p><strong>Michael #2:</strong> <a href="https://github.com/everythingishacked/CheekyKeys"><strong>CheekyKeys</strong></a></p> <ul> <li>via Prayson Daniel</li> <li>What if you could silently talk to your computer?</li> <li>CheekyKeys uses OpenCV and MediaPipe's Face Mesh to perform real-time detection of facial landmarks from video input.</li> <li>The primary input is to "type" letters, digits, and symbols via Morse code by opening and closing your mouth quickly for <code>.</code> and slightly longer for <code>-</code>.</li> <li>Most of the rest of the keyboard and other helpful actions are included as modifier gestures, such as: <ul> <li><code>shift</code>: close right eye</li> <li><code>command</code>: close left eye</li> <li><code>arrow up/down</code>: raise left/right eyebrow</li> <li>…</li> </ul></li> <li>Watch <a href="https://www.youtube.com/watch?v=rZ0DBi1avMM">the video</a> where he does a coding interview for a big tech company using no keyboard.</li> </ul> <p><strong>Nick</strong> <strong>#3:</strong> <a href="https://www.theguardian.com/technology/2022/jun/12/google-engineer-ai-bot-sentient-blake-lemoine"><strong>Is Google’s LaMDA Model Sentient?</strong></a></p> <ul> <li>authored by <a href="https://www.theguardian.com/profile/richardluscombe"><strong>Richard Luscombe</strong></a> (The Guardian)</li> <li>The Google engineer who thinks the company’s AI has come to life</li> <li><a href="https://cajundiscordian.medium.com/is-lamda-sentient-an-interview-ea64d916d917">Transcript of conversation</a></li> </ul> <p><strong>Brian #4:</strong> <a href="https://github.com/tonybaloney/rich-bench"><strong>richbench</strong></a></p> <ul> <li>Also from Anthony</li> <li>“A little Python benchmarking tool.”</li> <li>Give it a list of (first_func, second_func, “label”), and it times them and prints out a comparison.</li> <li>Simple and awesome. <pre><code>def sort_seven(): """Sort a list of seven items""" for _ in range(10_000): sorted([3,2,4,5,1,5,3]) def sort_three(): """Sort a list of three items""" for _ in range(10_000): sorted([3,2,4]) __benchmarks__ = [ (sort_seven, sort_three, "Sorting 3 items instead of 7") ] </code></pre></li> </ul> <p><strong>Michael #5:</strong> <a href="https://github.com/agronholm/typeguard"><strong>typeguard</strong></a></p> <ul> <li>A run-time type checker for Python</li> <li>Three principal ways to do type checking are provided, each with its pros and cons: <ul> <li>Manually with function calls</li> <li><code>@typechecked</code> decorator</li> <li>import hook (<code>typeguard.importhook.install_import_hook()</code>)</li> </ul></li> <li>Example: <pre><code>@typechecked def some_function(a: int, b: float, c: str, *args: str) -&gt; bool: ... return retval </code></pre></li> </ul> <p><strong>Nick</strong> <strong>#6:</strong> <a href="https://github.com/TomSchimansky/CustomTkinter"><strong>CustomTkinter</strong></a></p> <ul> <li>A modern and customizable python UI-library based on Tkinter. </li> </ul> <p><strong>Extras</strong> </p> <p>Michael:</p> <ul> <li><a href="https://openssf.org/blog/2022/06/20/openssf-funds-python-and-eclipse-foundations-and-acquires-sos-dev-through-alpha-omega-project/"><strong>OpenSSF Funds Python and Eclipse Foundations</strong></a> - OpenSSF’s Alpha-Omega Project has committed $400K to the Python Software Foundation (PSF), in order to create a new role which will provide security expertise for Python, the Python Package Index (PyPI), and the rest of the Python ecosystem, as well as funding a security audit. (via Python Weekly)</li> </ul> <p>Nick: </p> <ul> <li><a href="https://tosdr.org/">Terms of Service Didn’t Read</a> - Terms of Service; Didn't Read” (short: ToS;DR) is a young project started in June 2012 to help fix the “biggest lie on the web”: almost no one really reads the terms of service we agree to all the time.</li> </ul> <p><strong>Joke:</strong> </p> <ul> <li><a href="https://twitter.com/pr0grammerhum0r/status/1536362784144908288?s=21&amp;t=XQLdkT0BwFv4s15eHbBmPQ"><strong>Serverless</strong></a></li> <li><a href="https://twitter.com/the_unix_guru/status/1541084815927164933"><strong>A DevOps approach to COVID-19</strong></a></li> </ul>

PyBites: Automating the Boring Stuff and Plotting Student Data

$
0
0

My name is Russell Helmstedter. I am a middle school math and computer science teacher at De Anza Academy of Technology & the Arts (DATA). My first exposure to Python was in March of 2020. For some reason, I was stuck at home and couldn’t go out and do things. I decided to learn how to code. After googling things like “what coding language should I learn” and “learn how to code”, I found Al Sweigart’s Automate the Boring Stuff. I was hooked.

I began learning everything I could about Python. I started listening to podcasts, reading blogs, searching for courses and tutorials. The next school year (2020-2021), I had the to opportunity to start teaching the computer science course at DATA. Eventually, I stumbled across PyBites and knew I had to have this be part of the learning experience for my students. I pitched the idea to my principal, reached out to Bob and Julian, and by January of this year we started using PyBites as part of DATA’s computer science curriculum.

The Problem

Somewhere along the line I, ambitiously (read: what was I thinking?), decided that I was going to print student certificates and display them on the wall.

student certificatesPybites student certificates mounted on the wall

This devolved into a painful process of hapless searching and clicking. First, students are sorted by when they joined the platform, not alphabetical order. Second, their name is built off of their email which makes it difficult to scan quickly (but at least there is Ctrl+F). Then, after located the student’s profile the school admin dashboard it was a click to open their profile, click to choose the certificate (newbie, intro, etc…), click to open the certificate, click the print button (or Ctrl+P) to open print dialog, click print to print, click to close certificate tab (or Ctrl+W), click to close student profile tab. When dealing with one student at a time, not too bad. But with over 130 students at 7 clicks each and possibly doing this for multiple certificates, it adds up quickly. (You know I couldn’t resist doing the calculations right? For 130 students earning a newbie and an intro certificate: 130 * 7 * 2 = 1820 clicks.)

In addition to this, there was the matter of grading. I decided to make assignments for completing the newbie bites, intro bites, and some regular bites. This entailed heading back to the school admin dashboard and parsing the list of students again which looked like the figure below. Each row contains the class, the student name, and all of bites the student has at least attempted followed by an emoji that indicates whether the student had attempted (🔄), completed (👏), or looked at the solution (🤔). How do I know how many of which bites the student has completed? I had to count by hand. To make matters worse, these are listed in the order of attempt, not numerically. If a student went out of order (and trust me, they do) I had to slow down even more and make sure they weren’t missing any. Having my first experience to code being Automate the boring stuff and after watching Raymond Hettinger pound the table time and time again, I thought, there must be a better way.

sanitized student datascreenshot of school admin dashboard

The Solution

Enter python. I reached out to Bob and asked if he could create a way to export student data into a form that was easier to parse at scale. Boy did he deliver. He added the most beautiful button I have ever laid eyes on.

dspd button

It allows me to download all my students’ data as JSON. For each student it provides the following information:

{
   "name": str,
   "email": str,
   "class_": str,
   "profile_url": str,
   "newbie_completed": int,
   "intro_completed": int,
   "regular_completed": int,
   "certificates": list[str],
}

Luckily for me, I had just cracked Bite 227: Convert Warcraft json data to csv. So I wrote a little script to save the JSON as CSV. I opened it in Excel and it was glorious. I was able to sort by student name. There was an actual integer value of bites completed for each type of bite. There was even a list of URLs that links to student certificates (more on that to come). But then I had a thought. What if I wanted to compare classes? Maybe see calculate the average number of bites completed per class? Wait, aren’t I going to do this several times a year. I need a way to repeat this process efficiently. So I wrote a little CLI tool that writes a CSV file and plots the data I am interested in directly in my terminal.

The Code

All of the code presented in this article is located in the student PyBites data (spd) github repo. I encourage you to clone it, try it out, and offer any feedback. The data included is based on my students, but any identifying data has been removed.

The Libraries

from pathlib import Path

import pandas as pd
import plotext as plt
import typer
from rich import print
from rich.prompt import Confirm

Path from pathlib was used in both type hinting and for determining where to read and write data the data. By default, the CLI tries to use your current working directory (CWD). Pandas is used to manipulate the data. I even created a new column called “total_completed” which is the sum of the “newbie_completed”, “intro_completed”, and “regular_completed” columns. Plotext is an awesome library that provides an matplotlib like API for data visualization in the terminal. Typer is what creates the slick CLI. And rich provides some nice printing including color for the warning, a convenient Confirm functionality before the user accidentally overwrites the data, and, of course, emojis.

Writing to CSV

CWD = Path.cwd()

cli = typer.Typer()


@cli.command()
def write_csv(
    location: Path = typer.Option(
        CWD,
        "--location",
        "-L",
        help="Directory to read and write from. Default: cwd",
    ),
    json_file: str = typer.Option(
        "cleaned_data.json",
        "--json",
        "-J",
        help="Json file to read. Default: cleaned_data.json",
    ),
    csv_file: str = typer.Option(
        "cleaned_data.csv",
        "--csv",
        "-C",
        help="Csv file to write. Default: cleaned_data.csv",
    ),
) -> None:
    """Writes a csv file based on the json data from PyBites."""
    json_path = location.resolve() / json_file
    csv_path = location.resolve() / csv_file
    if csv_path.is_file():
        print(f"[yellow]:warning: File already exists @ {csv_path}.")
        if not Confirm.ask("Do you want to overwrite the file?"):
            print("Exiting without creating a csv.")
            return
    data = pd.read_json(json_path)
    data.to_csv(csv_path)
    print(f"Successfully created csv file @ {csv_path}")

The tool starts by creating a variable for the CWD and reads and writes files from that location by default. The cli object creates Typer application for the command line interface. Each command uses the @cli.command() decorator. This allows the user to use the name of the function directly on the command line. The arguments of the function are options that can be passed on the command line as well. I tried to use sane defaults like reading and writing in the cwd and a generic name so that you can try out the tool with the data in the repo.

The first command is write_csv (though when run on the command line Typer expects “write-csv”). It takes in a location (directory), a JSON file name (to read), and a CSV file name (to write). For both the json_path and csv_path objects I went with .resolve(). This is probably overkill, but it resolves symlinks, notation such as ~/path/to/location and ../location. As an added bonus, it works on both Windows and Linux/Unix platforms. The function then checks if there is an existing file at csv_path. If there is, it uses rich’s Confirm to prevent the user from accidentally overwriting the data. This is really convenient because I didn’t have to code any of the logic. It just works™. Then the actual conversion. Originally I converted the JSON to CSV using the built-in libraries and a for loop. But since I ended up using pandas later anyway, I went with that to convert it in just two lines code. Finally, it displays the success message. Here is a screenshot:

writecsvscreenshot of write-csv in action

Cleaning Up the DataFrame

def _clean_data(csv_path: Path) -> pd.DataFrame:
    """Creates a pandas DataFrame from a csv file.

    :csv_path: Path to csv file
    :returns: pd.DataFrame
    """
    df = pd.read_csv(csv_path)
    return (
        df.where(df.class_ != "DEA")
        .assign(
            total_completed=lambda x: x.newbie_completed
            + x.intro_completed
            + x.regular_completed
        )
        .groupby(["class_"])
        .mean()
        .reset_index()
        .round(1)
    )

This is a helper function for the plotting command and you can not call it as part of the CLI. This takes in a path to a CSV file and creates a pandas DataFrame objext. I used chaining (shout out to Matt Harrison) to manipulate the data into a form I can use. It reads as a recipe:

  1. Keep all of the classes from the “class_” column not called “DEA”. (My colleague Alex Wulff and I are building a Design and Engineering Academy so I created a DEA class for him and another colleague to join PyBites. But I don’t want this in my class data.)
  2. Create a new column called “total_completed” that is the sum of the three types of bites available. E.g., if a student completes 25 newbies, 10 intros, and 5 regulars, their total_completed column would be 40.
  3. Group the data according to the “class_” column. For me, this is period 1, period 2, …, period 6. This also results in dropping all of the columns that are not numeric. So the only columns that remain are “newbie_completed”, “intro_completed”, “regular_completed”, and “total_completed”.
  4. For each class, fill in the average number of bites completed for each column respectively.
  5. When the data is grouped by the class, the index of each row becomes the class. Resetting the index turns the class back into a column so I can use the classes in the plotting function.
  6. Round all of the values to one decimal place.

If you want to see this in action check out some sample data in the Pandas Tutor. I have loaded up some sample data for you to play with. It shows you exactly what is happening with each step of the chain.

Plotting the Data

@cli.command()
def plot(
    location: Path = typer.Option(
        CWD, "--location", "-L", help="Directory to read csv. Default: cwd."
    ),
    csv_file: str = typer.Option(
        "cleaned_data.csv",
        "--csv",
        "-C",
        help="Csv file to read. Default: cleaned_data.csv.",
    ),
    sort_by_average: bool = typer.Option(
        False,
        "--sort-by-average",
        "-S",
        is_flag=True,
        help="Sort by average bites completed instead of class",
    ),
) -> None:
    """Plots average number of bites completed by class"""
    csv_path = location.resolve() / csv_file
    data = _clean_data(csv_path)
    if sort_by_average:
        data = data.sort_values("total_completed", ascending=True).reset_index()
    else:
        data = data.sort_values("class_", ascending=False).reset_index()

    plt.bar(data.class_, data.total_completed, orientation="h", width=0.3, marker="fhd")
    plt.theme("pro")
    plt.plot_size(75, (2 * len(data.class_) - 1) + 4)
    plt.title("Average Bites Completed by Class")
    plt.xlim(0, max(data.total_completed) * 1.1)
    plt.show()

This is where the magic of plotting in the terminal happens. This command takes arguments of location, the CSV file name and a sorting option. The result of this function is a horizontal bar graph that displays the average number of bites completed by class. The sort-by-average option is sweet because sometimes I want to view my classes in order of what they are called, and other times I want to sort them in order of performance. After some experimenting, I realized that plotext plots the first row at the bottom of the horizontal chart, so if I want Period 1 on the top and I to sort the DataFrame with ascending=False.

I mostly lifted the plot from plotext’s own documentation. I did need to add the plt.xlim() to force the graph to start at 0, otherwise it gave a distorted view of the data. There is a second function called stacked() that plots a stacked bar chart of the same data. It is pretty similar to plot() so I won’t discuss it here. The results of both commands are shown below.

horizontal bar chartstacked bar chart

Bonus: Sanitizing the Student Data to share

from pathlib import Path
import json
from rich import print

JSON_PATH = Path.cwd() / 'student_data.json'
CLEANED_PATH = Path.cwd() / 'cleaned_data.json'

with open(JSON_PATH) as f:
    data = json.load(f)

cleaned_data = []

for i, student in enumerate(data[2:], 1):
    student["name"] = f"student{i}"
    student["email"] = f"student{i}@pybites.org"
    student["profile_url"] = f"https://codechalleng.es/profiles/student{i}"
    student["certificates"] = ""
    cleaned_data.append(student)


with open(CLEANED_PATH, 'w') as f:
    json.dump(cleaned_data, f)

Here is the little script I used to sanitize the data so I could share it with you all. Essentially I loaded up the original JSON data. Then I looped over it replacing sensitive details with generic details. So the student name became “student{number}”, created a made up email and profile, and just made the list of certificate URLs an empty string. Then I created a new json file based on the sanitized data.

Future Plans

Moving forward I want to find a way to streamline grading and printing the certificates. For the certificates I have an idea of opening the URLs with webbrowser and then using pyautogui to click the print buttons for me. Maybe I can split the list of certificates into individual columns with an addition column of “printed” for each. “printed” could be a boolean letting me know if I have already printed that one. Grading will be more difficult. Our current student information system doesn’t allow me to uploads grades via CSV. (Or any other format for that matter, I mean its 2022, c’mon man!)

This was a fun project to put together. It solved a real problem I was facing and I got to mess around with plotting data, which I always love. I want to give a huge shout out to Bob for giving me the option to download the data and encouraging me to write about it. If you have questions, comments, or suggestions for improvement please reach out. I am @RHelmstedter on Twitter or @Russell Helmstedter in the PyBites Slack Channel.

PyCoder’s Weekly: Issue #531 (June 28, 2022)

$
0
0

#531 – JUNE 28, 2022
View in Browser »

The PyCoder’s Weekly Logo


Build a Tic-Tac-Toe Game With Python and Tkinter

In this step-by-step project, you’ll learn how to create a tic-tac-toe game using Python and the Tkinter GUI framework. Tkinter is cross-platform and is available in the Python standard library. Creating a game in Python is a great and fun way to learn something new and exciting!
REAL PYTHON

Six Things I Do Every Time I Start a Django Project

When you start a new Django project you have some housekeeping tasks and some decisions to make. This article talks about some of the key things you might want to do when starting a new project.
BRENTON CLEELAND

Get Started: Infrastructure as Code With Python on AWS [Workshop]

alt

In this on-demand workshop, you will learn the fundamentals of Infrastructure as Code through a series of guided exercises. You will be introduced to Pulumi, an infrastructure as code platform, where you can use Python to provision modern cloud infrastructure →
PULUMIsponsor

Should You Use AsyncIO for Your Next Web Application?

Python’s AsyncIO web ecosystem continues to mature, but should you build your next production application with one of these shiny new frameworks such as FastAPI, Starlette, or Quart?
STEVEN PATE• Shared by Steven Pate

Discussions

Python Jobs

Senior Python Software Engineer (San Francisco, CA, USA)

MyOme

Senior Full-Stack Web Developer (Anywhere)

MonetizeMore

Backend Software Developer (Draper, UT, USA)

Canopy

Gameful Learning Developer (Ann Arbor, MI, USA)

University of Michigan

Python Technical Architect (USA)

Blenderbox

Software Engineer (Los Angeles or Dallas) (Los Angeles, CA, USA)

Causeway Capital Management LLC

DevOps Engineer (Ann Arbor, MI, USA)

University of Michigan

Academic Innovation Developer (Ann Arbor, MI, USA)

University of Michigan

Software Development Lead (Ann Arbor, MI, USA)

University of Michigan

Principal Python Engineer (100% Remote) (San Francisco, CA, USA)

Nira

More Python Jobs >>>

Articles & Tutorials

How to Patch requests to Have a Default Timeout

Python’s requests provides the ability to timeout when fetching content, but it isn’t turned on by default. If you’ve got a large code base there is a chance you have a call that could hang forever. This article describes how to monkeypatch requests to provide default timeout capabilities.
ADAM JOHNSON

Python mmap: Doing File I/O With Memory Mapping

In this video course, you’ll learn how to use Python’s mmap module to improve your code’s performance when you’re working with files. You’ll get a quick overview of the different types of memory before diving into how and why memory mapping with mmap can make your file I/O operations faster.
REAL PYTHONcourse

Data Elixir: Data Science Newsletter

alt

Data Elixir is an email newsletter that keeps you on top of the latest tools and trends in Data Science. Covers machine learning, data visualization, analytics, and strategy. Curated weekly with top picks from around the web →
DATA ELIXIRsponsor

The subprocess Module: Wrapping Programs With Python

In this tutorial, you’ll learn how to leverage other apps and programs that aren’t Python, wrapping them or launching them from your Python scripts using the subprocess module. You’ll learn about processes all the way up to interacting with a process as it executes.
REAL PYTHON

Don’t Let Dicts Spoil Your Code

The dict is the go-to data structure for Python programmers, but its loose relationship to the data can be problematic in large data streams. Learn more about why you might choose a different data structure and when.
ROMAN IMANKULOV

String translate and maketrans Methods

The str methods translate and maketrans are lesser used, but helpful. You can use translate to replace characters in a string using a translation map, and maketrans helps you to build those maps.
RODRIGO GIRÃO SERRÃO

3 Things to Know Before Building With PyScript

PyScript is a browser-embedded python environment built on top of Pyodide. Although it is a powerful tool, there are some things you need to be careful with. Read on to find out more.
BRADEN RIGGS

How Can You Emulate Do-While Loops in Python?

In this tutorial, you’ll learn how to emulate do-while loops in Python. The most common technique to do this is to create an infinite while loop with a conditional statement that controls the loop and jumps out of it using a break statement.
REAL PYTHON

Find Your Next Tech Job Through Hired

Hired has 1000s of companies of all sizes who are actively hiring developers, data scientists, mobile engineers, and more. It’s really simple: create a profile with your skills for hiring managers to reach you directly. Sign up today!
HIREDsponsor

6 Usage Patterns for the ThreadPoolExecutor in Python

The ThreadPoolExecutor gives a lot of power an flexibility for concurrent code. This article describes six different patterns that can be used when coding with this context manager.
JASON BROWNLEE

Python Lazy Imports With Cinder

Instagram has implemented a lazy import mechanism to improve application loading times. This article describes why they built it and how it helps.
GERMÁN MÉNDEZ BRAVO

Projects & Code

Events


Happy Pythoning!
This was PyCoder’s Weekly Issue #531.
View in Browser »

alt

[ Subscribe to 🐍 PyCoder’s Weekly 💌 – Get the best Python news, articles, and tutorials delivered to your inbox once a week >> Click here to learn more ]


Israel Fruchter: Takes from pyconil 2022

$
0
0

Takes from pyconil 2022

First in person conference I attend since Covid-19, was fun to meet some of the familiar faces and meet a few new ones. I’ve tried live tweeting, but seem like I’m not very good at it. (I’m better at hijacking others live tweets)

Day 1

Keynote

Keynote speaker couldn’t make it, and was replaced by a panel of the known experts in python While Sim Zacks asks them popular questions about python

@alonisser and I were a bit surprised, and live tweeted the panel session:

Hidden cost of your favorite function

@mayaGBar was talking about reason to profile, and the importance of looking under the hood of the utilities and functions we use and demonstrated using a profiler comparing different numpy function to achieve the same goal.

my live tweet

Hidden Hacks in Linters for Better & More Secure Code

@gemanor explained about a use case he and his team need to build lint checkers for block different personas form doing things that shouldn’t.

even that he introduce him self as non-pythonista (“alien” in his words), he managed to showcase a high level python craftsmanship, and a fun talk overall. he’s my MVP for this day

my live tweet

What happens when you import a module?

@reuvenmlerner with very interesting talk about how exactly the import system works while showing how to implement some parts of it.

while drinking the morning coffee, we had a talk with Reuven (me and someone I don’t remember his name..) about possible use-cases for using importlib.

one was for decryption of the sourcecode before executing it, to safeguard the patented algorithms and company secrets.

and my use case of using it for testing script that were meant to be run as main module. which is a nice way to avoid using subprocess, so mocks can be used: https://github.com/scylladb/scylla/pull/10809/files#diff-a9fc368799be893485a61ba81b9b736b2f3f9918a228351e7d6abe7293011584R104

my live tweet

Off road profiling - when the automated profilers just don’t cut it.

@ShacharSh goes over how to manually profile some bits of code, and how the project he built manprof can help with that.

that was last talk for the day, and I’ve could really concentrate on tweeting about it, but it was very nice to see Shachar talk, and improvise punchlines at the right time like when someone’s phone rang during his talk.

It was a shame that his package isn’t yet public (said something about legal didn’t yet improve, which always makes me a bit sad, that those processes are never straight forward)

הדרן עלך יום ראשון

let see how it goes tomorrow

Python for Beginners: Largest Element in a List in Python

$
0
0

We often use lists to store numbers. In this article, we will discuss different ways to find the largest element in a list in python.

Largest Element in a List Using the sort() Method in Python

If a list is sorted, the largest element resides at the end of the list and we can access it using the syntax list_name[-1]. If the list is sorted in descending order, the largest element in the list lies at the first position i.e. index 0. We can access it using the syntax list_name[0]

When a list is unsorted, finding the largest number is a slightly different task. In this situation, we can first sort the list and then access the last element of the sorted list. Alternatively, we can check each element of the list and then find the largest element in the list.

To find the largest element by sorting the list, we can use the sort() method. The sort() method, when invoked on a list, sorts the list in ascending order. After sorting, we can get the largest element of the list from the index -1 as follows.

myList = [1, 23, 12, 45, 67, 344, 26]
print("The given list is:")
print(myList)
myList.sort()
print("The maximum element in the list is:", myList[-1])

Output:

The given list is:
[1, 23, 12, 45, 67, 344, 26]
The maximum element in the list is: 344

Using the sorted() Method to Find the Largest Element in A List

If you are not allowed to sort the original list, you can use the sorted() function to sort the list. The sorted() function takes a list as an input argument and returns a sorted list. After obtaining the sorted list, we can find the largest element of the list at index -1 as follows.

myList = [1, 23, 12, 45, 67, 344, 26]
print("The given list is:")
print(myList)
newList = sorted(myList)
print("The maximum element in the list is:", newList[-1])

Output:

The given list is:
[1, 23, 12, 45, 67, 344, 26]
The maximum element in the list is: 344

Largest Element in a List Using a Temporary Variable  in Python

Sorting a list requires O(n*log(n)) time, where n is the number of elements in the list. For larger lists, it may take a long time to sort the list before we can obtain the largest element. Using an alternative approach, we can find the largest element in the list in O(n) time. 

In this approach, we will create a variable myVar and initialize it with the first element of the list. Now, we will consider that myVar has the largest element. After that, we will compare myVar with each element of the list. If any element is found to be greater than myVar, we will update the value in myVar with the current value. After traversing the entire list, we will get the largest element of the list in the myVar variable. You can observe this in the following example.

myList = [1, 23, 12, 45, 67, 344, 26]
print("The given list is:")
print(myList)
myVar = myList[0]
for element in myList:
    if element > myVar:
        myVar = element
print("The maximum element in the list is:", myVar)

Output:

The given list is:
[1, 23, 12, 45, 67, 344, 26]
The maximum element in the list is: 344

Largest Element in a List Using the max() Function in Python

Instead of the above approach, you can directly use the max() function to find the largest element of the list. The max() function takes the list as an input argument and returns the largest element of the list as shown below.

myList = [1, 23, 12, 45, 67, 344, 26]
print("The given list is:")
print(myList)
myVar = max(myList)
print("The maximum element in the list is:", myVar)

Output:

The given list is:
[1, 23, 12, 45, 67, 344, 26]
The maximum element in the list is: 344

Conclusion

In this article, we have discussed various to find the largest element in a list in python. To learn more about lists in python, you can read this article on list comprehension in python. You might also like this article on set comprehension in python.

The post Largest Element in a List in Python appeared first on PythonForBeginners.com.

Real Python: Python Stacks, Queues, and Priority Queues in Practice

$
0
0

Queues are the backbone of numerous algorithms found in games, artificial intelligence, satellite navigation, and task scheduling. They’re among the top abstract data types that computer science students learn early in their education. At the same time, software engineers often leverage higher-level message queues to achieve better scalability of a microservice architecture. Plus, using queues in Python is simply fun!

Python provides a few built-in flavors of queues that you’ll see in action in this tutorial. You’re also going to get a quick primer on the theory of queues and their types. Finally, you’ll take a look at some external libraries for connecting to popular message brokers available on major cloud platform providers.

In this tutorial, you’ll learn how to:

  • Differentiate between various types of queues
  • Implement the queue data type in Python
  • Solve practical problems by applying the right queue
  • Use Python’s thread-safe, asynchronous, and interprocess queues
  • Integrate Python with distributed message queue brokers through libraries

To get the most out of this tutorial, you should be familiar with Python’s sequence types, such as lists and tuples, and the higher-level collections in the standard library.

You can download the complete source code for this tutorial with the associated sample data by clicking the link in the box below:

Get Source Code:Click here to get access to the source code and sample data that you’ll use to explore queues in Python.

Learning About the Types of Queues

A queue is an abstract data type that represents a sequence of elements arranged according to a set of rules. In this section, you’ll learn about the most common types of queues and their corresponding element arrangement rules. At the very least, every queue provides operations for adding and removing elements in constant time or O(1) using the Big O notation. That means both operations should be instantaneous regardless of the queue’s size.

Some queues may support other, more specific operations. It’s time to learn more about them!

Queue: First-In, First-Out (FIFO)

The word queue can have different meanings depending on the context. However, when people refer to a queue without using any qualifiers, they usually mean a FIFO queue, which resembles a line that you might find at a grocery checkout or tourist attraction:

Tourists Queuing Up to Enter the American Museum of Natural History in New YorkTourists Queuing Up to Enter the American Museum of Natural History in New York

Note that unlike the line in the photo, where people are clustering side by side, a queue in a strict sense will be single file, with people admitted one at a time.

FIFO is short for first-in, first-out, which describes the flow of elements through the queue. Elements in such a queue will be processed on a first-come, first-served basis, which is how most real-life queues work. To better visualize the element movement in a FIFO queue, have a look at the following animation:

Unbounded FIFO Queue

Notice that, at any given time, a new element is only allowed to join the queue on one end called the tail—which is on the right in this example—while the oldest element must leave the queue from the opposite end. When an element leaves the queue, then all of its followers shift by exactly one position towards the head of the queue. These few rules ensure that elements are processed in the order of their arrival.

Note: You can think of elements in a FIFO queue as cars stopping at a traffic light.

Adding an element to the FIFO queue is commonly referred to as an enqueue operation, while retrieving one from it is known as a dequeue operation. Don’t confuse a dequeue operation with the deque (double-ended queue) data type that you’ll learn about later!

Enqueuing and dequeuing are two independent operations that may be taking place at different speeds. This fact makes FIFO queues the perfect tool for buffering data in streaming scenarios and for scheduling tasks that need to wait until some shared resource becomes available. For example, a web server flooded with HTTP requests might place them in a queue instead of immediately rejecting them with an error.

Note: In programs that leverage concurrency, a FIFO queue often becomes the shared resource itself to facilitate two-way communication between asynchronous workers. By temporarily locking the read or write access to its elements, a blocking queue can elegantly coordinate a pool of producers and a pool of consumers. You’ll find more information about this use case in later sections about queues in multithreading and multiprocessing.

Another point worth noting about the queue depicted above is that it can grow without bounds as new elements arrive. Picture a checkout line stretching to the back of the store during a busy shopping season! In some situations, however, you might prefer to work with a bounded queue that has a fixed capacity known upfront. A bounded queue can help to keep scarce resources under control in two ways:

  1. By irreversibly rejecting elements that don’t fit
  2. By overwriting the oldest element in the queue

Under the first strategy, once a FIFO queue becomes saturated, it won’t take any more elements until others leave the queue to make some space. You can see an animated example of how this works below:

Bounded FIFO Queue (Bounce)

Read the full article at https://realpython.com/queue-in-python/ »


[ Improve Your Python With 🐍 Python Tricks 💌 – Get a short & sweet Python Trick delivered to your inbox every couple of days. >> Click here to learn more and see examples ]

PyBites: Data engineering involves more Python than you might think!

$
0
0

Listen here:

This week we have Christo back on the show to talk about his experience in the data engineering field.

He shares some valuable tips how to become a more effective data engineer which, surprisingly or not, increasingly requires a well-rounded Python developer skill set.

Enjoy and feel free to reach out to Christo below …

Christo’s website: 
https://www.christoolivier.com

Christo is a PDM coach now, check it out: 
https://pybit.es/catalogue/the-pdm-program/

Previous episode Christo was on:
https://www.pybitespodcast.com/1501156/8005574-013-the-mindset-of-a-developer

He is also in our Slack community:
http://pybit.es/community/

Mike Driscoll: Using Python to Serve Files Locally (Video)

PyBites: The Importance of Disconnecting as a Developer

$
0
0

You don’t need library to download the scent of honeysuckle. You can hear the music of a chattering creek without a secure connection or authentication.

We spend so much time connected to and with our tech and our code that we forget what it feels like to be connected to the world around us, to nature, and even to people “in real life.”

I suggested to a friend, a talented and prolific coder, who had been feeling stressed and a bit off balance lately, to make a conscious effort to avoid tech, just to be present with her surroundings and notice the details of the natural world. She reached out to me a few days later:

I’ve started becoming more aware of nature and sounds around me. I took a walk this morning and didn’t look at my phone once! It felt amazing! I’ve been so distracted lately by tech, news, etc. I just need a brain break.

I was fortunate enough to have a week off between jobs. During that time I explored my neighborhood, visiting parks, seeing places I had never seen. It was the peak of cherry blossom season so I visited a local Japanese garden. I sat on a bench looking at the trees hanging over a lake, feeling the breeze, sensing the solidness of the ground beneath my feet, watching the branches sway. I had my phone on silent in my pocket. There was no software, no data, nothing to execute and nothing to “check.” I was able just to be there enjoying the fleeting beauty of the cherry blossoms. My mind grew calm. The stress drained out of me. I let myself get lost in the moment.

PXL 20220410 193125042The beautiful local Japanese garden

At one point someone walked past me, staring into his phone. He aimed it at a cherry tree, took a photo and turned and walked away. He hadn’t paused once to look at the tree close up with his own eyes. He hadn’t taken a moment to be present with the experience, to smell the air, or to watch petals caught in a breeze.

He had a flat image he could upload later, though, and collect some likes on social media. It’ll remind him of a moment, but the moment will be devoid of ambience gained from using all your senses. I take plenty of pictures myself but they are to help me recall the richness of an occasion that I have taken the time to experience fully.

I find that richness to be cleansing, using different parts of my brain so that others may rest, creating memories that are substantive and not as fleeting as a notification or a headline or the latest frontend framework. I also find that when I do reconnect to the tech, and my projects, it is like coming back from vacation rested and alert.

How do you disconnect from technology and what does it mean to you?

ListenData: Pointwise mutual information (PMI) in NLP

$
0
0

Natural Language Processing (NLP) has secured so much acceptance recently as there are many live projects running and now it's not just limited to academics only. Use cases of NLP can be seen across industries like understanding customers' issues, predicting the next word user is planning to type in the keyboard, automatic text summarization etc. Many researchers across the world trained NLP models in several human languages like English, Spanish, French, Mandarin etc so that benefit of NLP can be seen in every society. In this post we will talk about one of the most useful NLP metric called Pointwise mutual information (PMI) to identify words that can go together along with its implementation in Python and R.

Table of Contents

What is Pointwise mutual information?

PMI helps us to find related words. In other words, it explains how likely the co-occurrence of two words than we would expect by chance. For example the word "Data Science" has a specific meaning when these two words "Data" and "Science" go together. Otherwise meaning of these two words are independent. Similarly "Great Britain" is meaningful since we know the word "Great" can be used with several other words but not so relevant in meaning like "Great UK, Great London, Great Dubai etc."

When words 'w1' and 'w2' are independent, their joint probability is equal to the product of their individual probabilities. Imagine when the formula of PMI as shown below returns 0, it means the numerator and denominator is same and then taking log of 1 produces 0. In simple words it means the words together has NO specific meaning or relevance. Question arises what are we trying to achieve here. We are focusing on the words which have high joint probability with the other word but having not so high probability of occurrence if words are considered separately. It implies that this word pair has a specific meaning.

Pointwise mutual information (PMI)
Our objective is to find pairs of words that have high pointwise mutual information.

Steps to compute PMI

Let's understand with an example. Suppose you have the following text and you are asked to calculate PMI scores based on that.
this is a foo bar bar black sheep  foo bar bar black sheep foo bar bar black sheep shep bar bar black sentence
READ MORE »

IslandT: Create a sale application project with Python

$
0
0

The old project starts again

After a while of stopping this project has started again, I am going to edit a few lines of code in this project and then added in brand new sections in the next post but in this post let us take a look again at what this project is all about!

The purpose of this project

I am creating this project to show myself where am I selling my goods as well as plot a graph showing the sale data as follows.

Goods sale vs MonthGoods sale vs Month

Basically, this application will receive the input from a user and then save it in the database and then show the graph plot once the user asks for it!

Below is the application user interface.

user interfaceuser interface

I have plenty of the previous projects and I am going to make them great again by rewriting all or parts of the code to make the application more useful in nature!

In this post, I will not show you the python code but all of us will get into coding in the next chapter so stay tuned and get ready for the bumpy ride!

PyCharm: PyCharm 2022.2 EAP 4 Is Out!

$
0
0

The fourth EAP build supports another Python 3.11 PEP, gets Angular standalone components, improves code insight for ParamSpec, fixes long-awaited debugging issues for WSL projects and the WSL interpreter, and introduces more fixes.

A new build is available from our website, via the Toolbox App, or as a snap package (if you are using Ubuntu). If you are on macOS, there is a separate build for Apple Silicon (M1 chip). 

Important: EAP builds are not fully tested and might be unstable.

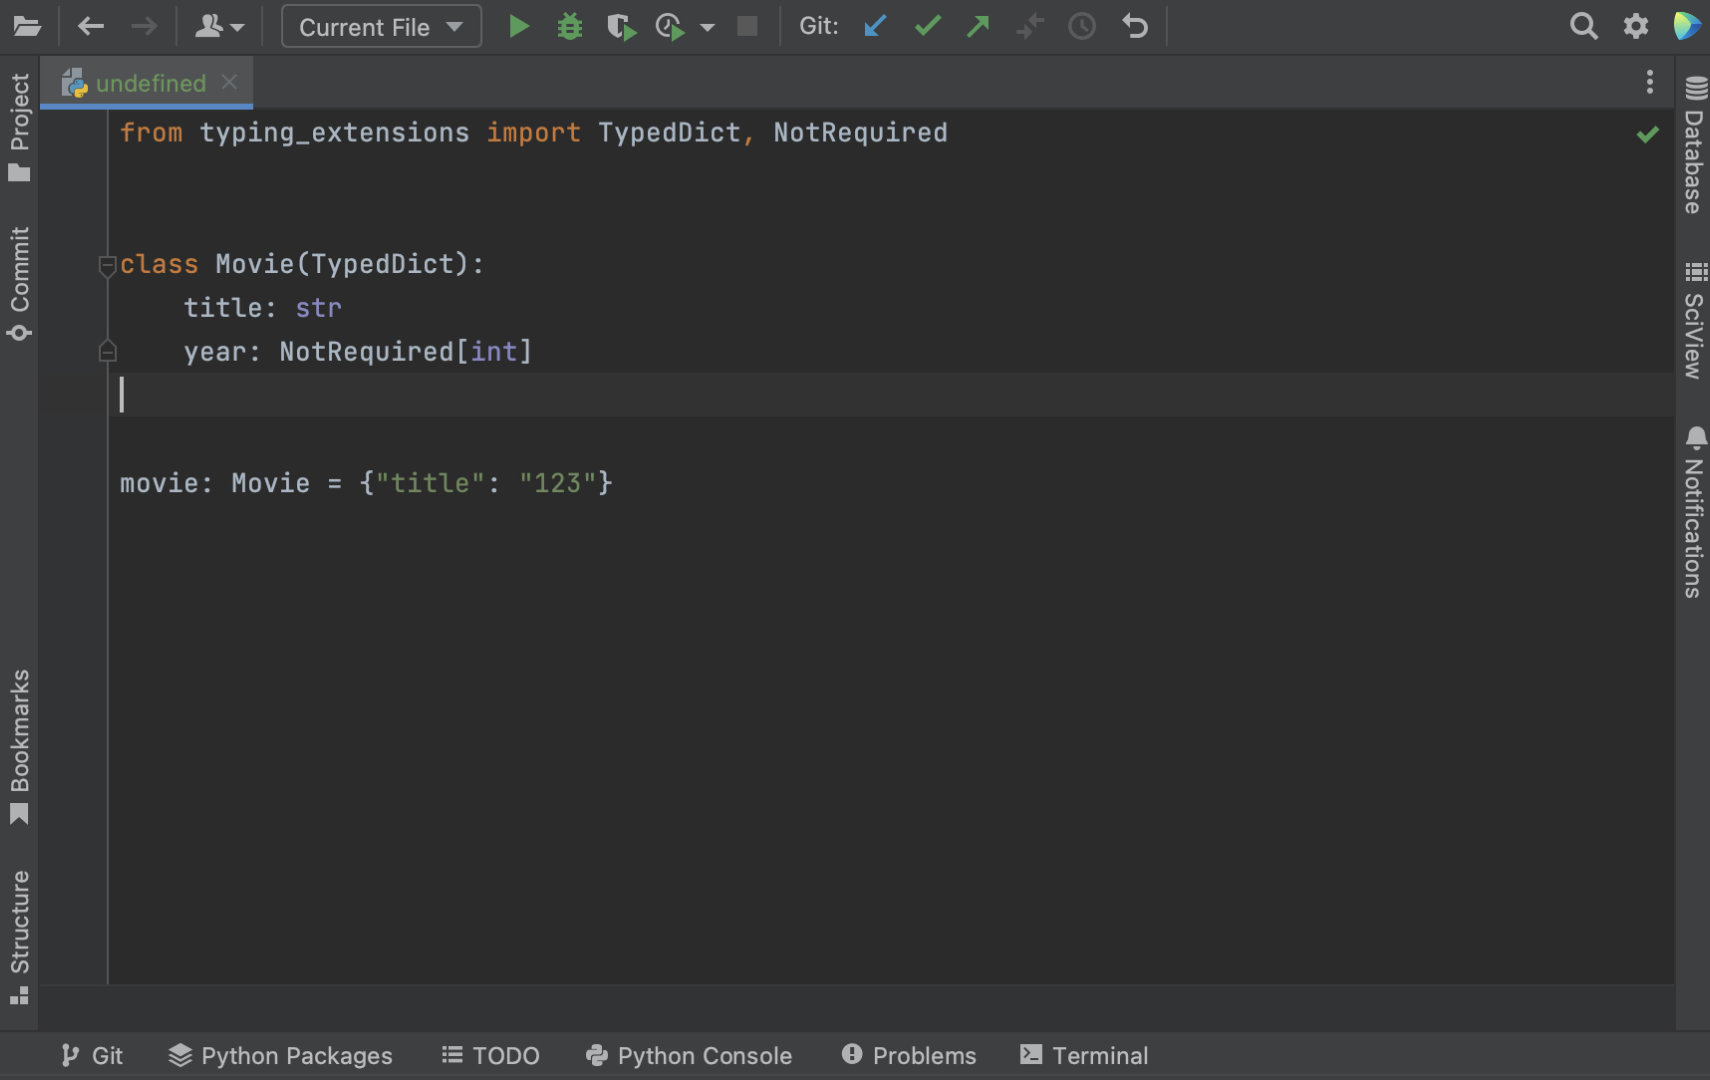
Python 3.11: Support for marking individual TypedDict items as required or potentially-missing (PEP 655)

Python 3.11 adds the ability to mark individual keys of TypedDict as Required or NotRequired, so there’s no need to create complex class hierarchies using the total parameter. PyCharm 2022.2 understands Required[ ] and NotRequired[ ] notations and will provide code insight for them.

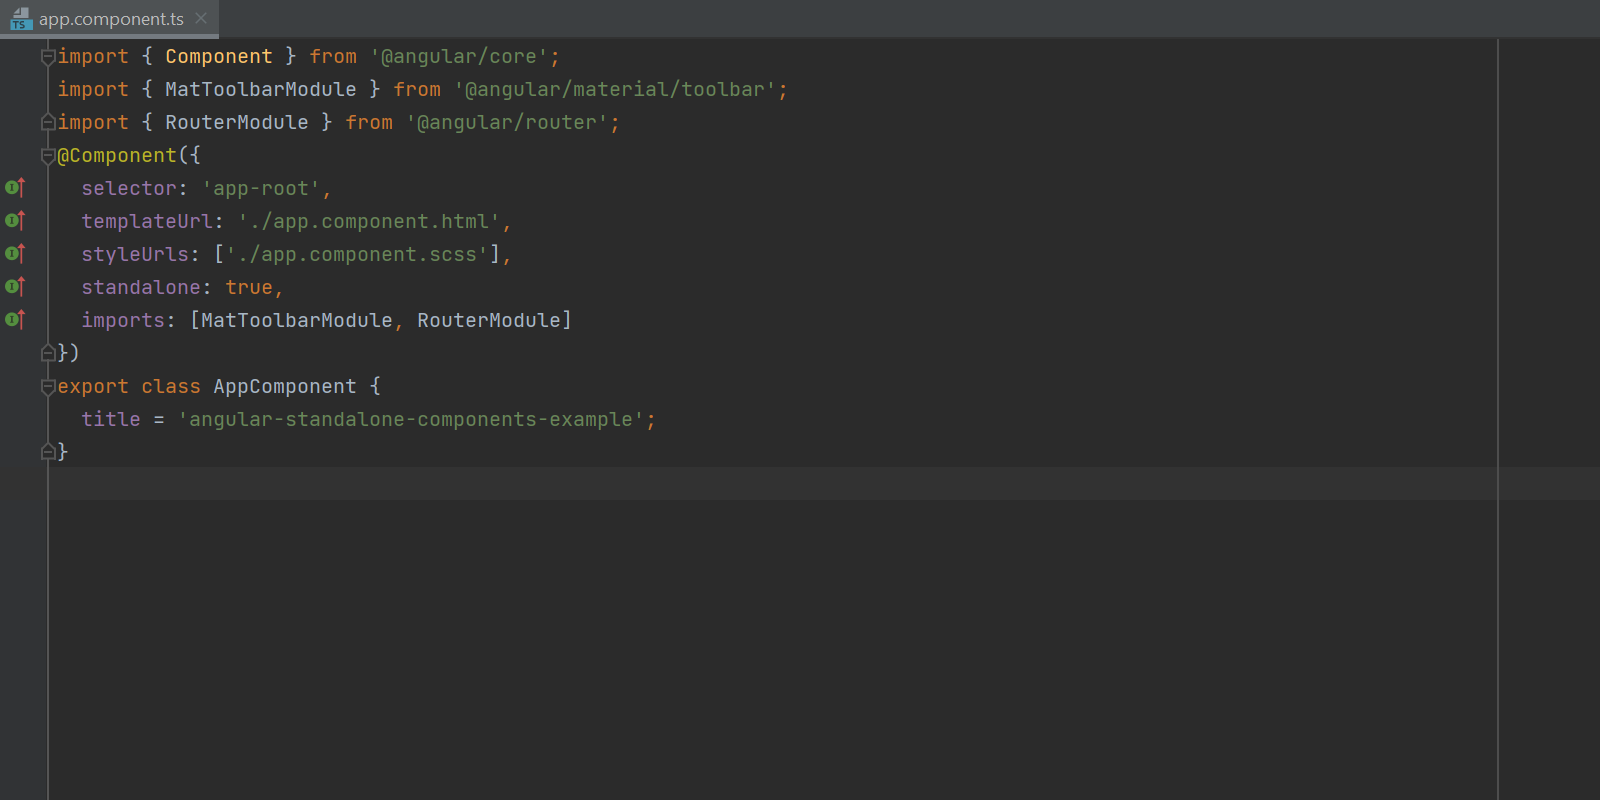
Support for Angular standalone components

We’ve been actively working to support Angular 14 in PyCharm. The most important addition we’ve made in this release is supporting Angular standalone components. Standalone components offer a simplified way to build Angular applications. Components, directives, and pipes can now be marked as standalone: true. Angular classes marked as standalone do not need to be declared in an NgModule.

Give it a try and share your feedback with us. We have more Angular 14-related improvements in the works – stay tuned!

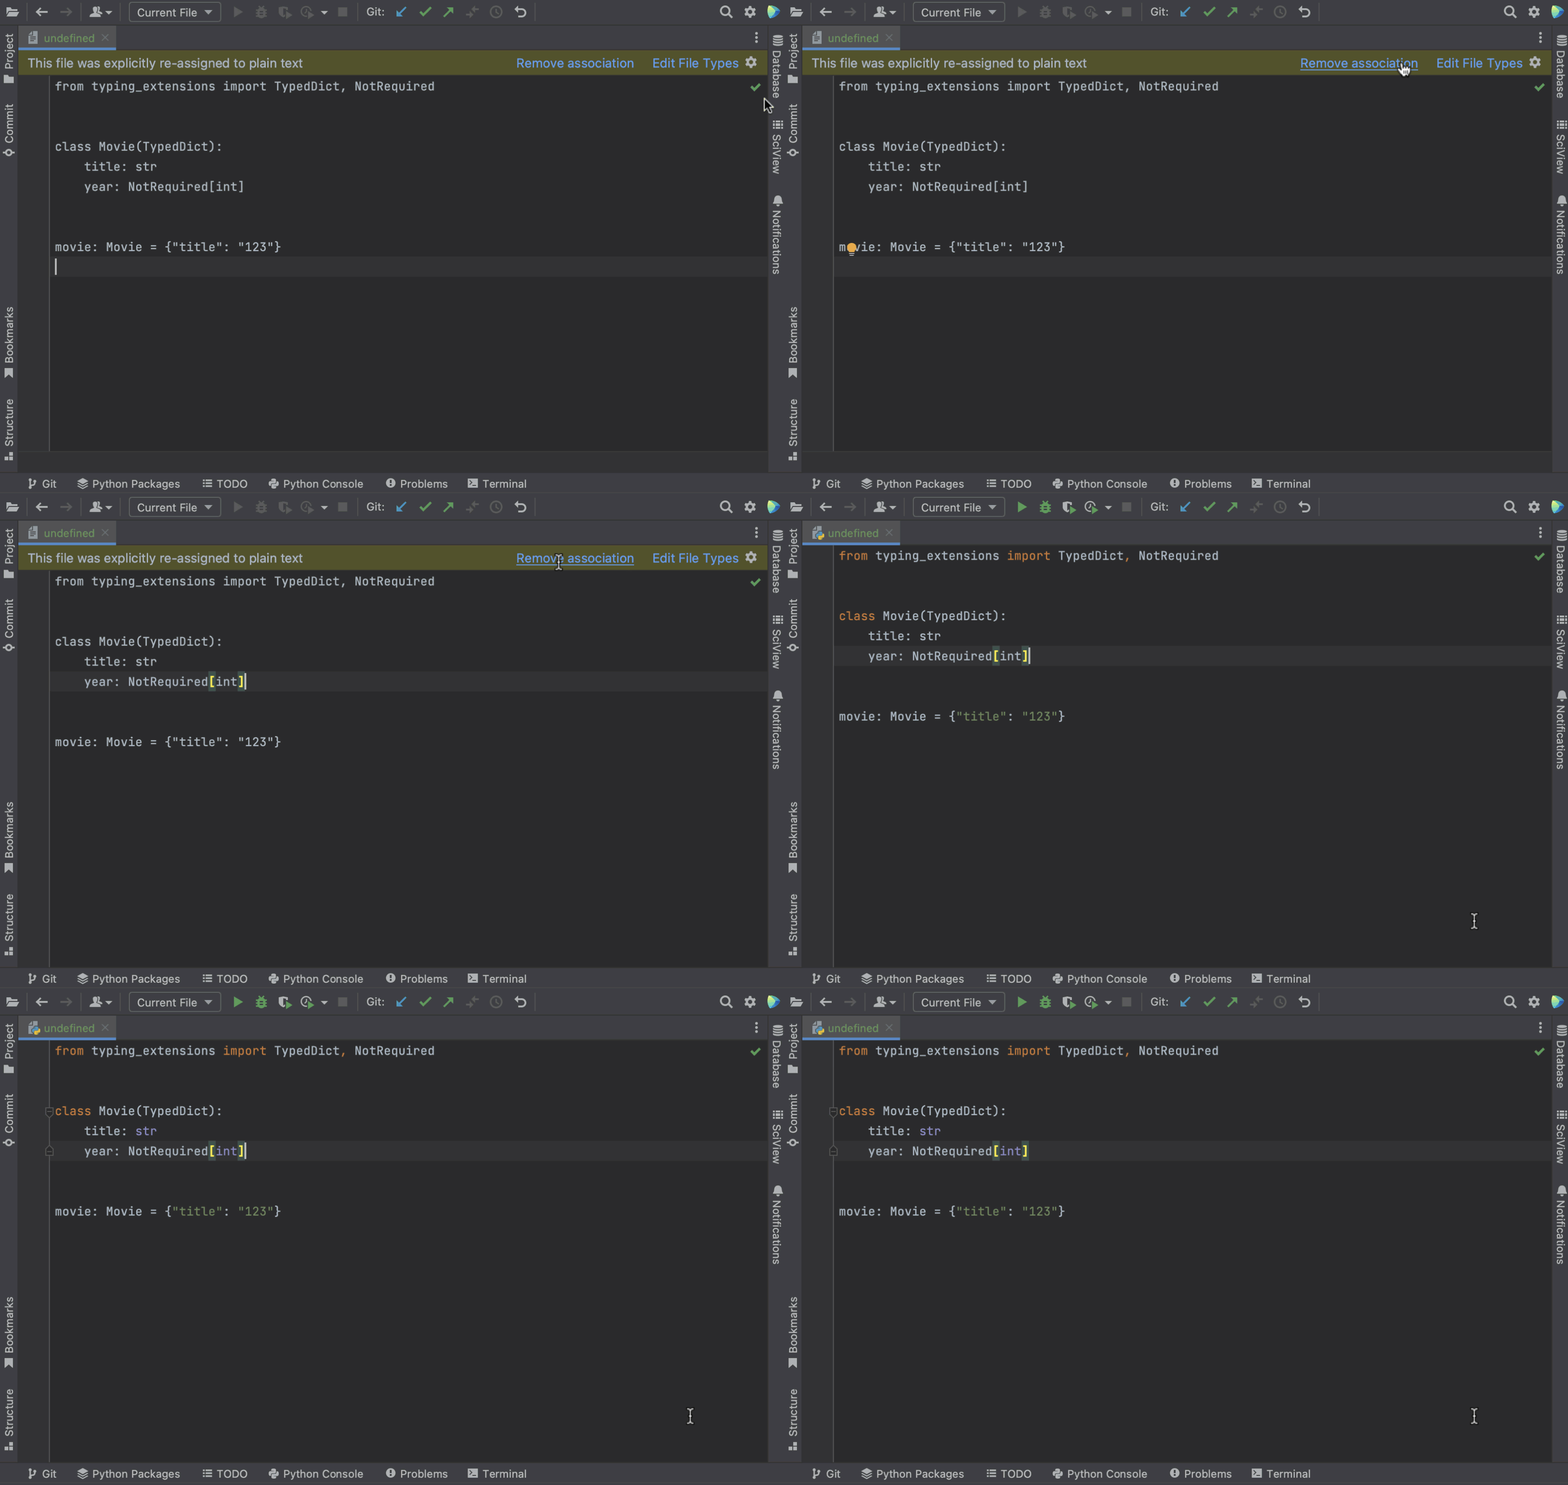
New notification panel for tuning file type associations

When a file is detected as plain text and doesn’t feature proper highlighting, PyCharm now suggests resetting the file type association right from the editor rather than going to Preferences / Settings and configuring the file types manually.

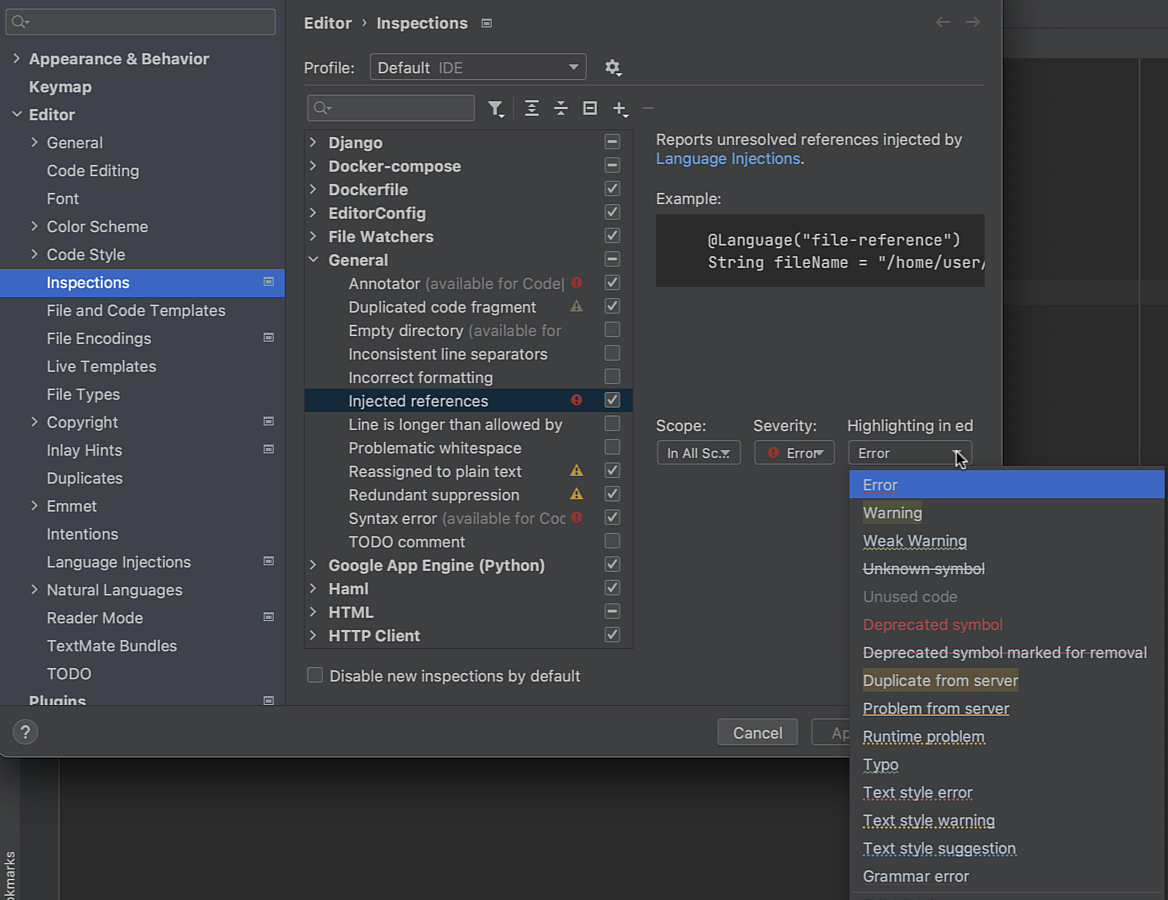
Enhanced configuration for highlighting problematic code

PyCharm has dozens of inspections that find and report problems in your code so you can keep it error-free. In this release, we’ve improved the configuration of in-editor highlighting for those inspections.

For each inspection, you can now choose how it is highlighted in the editor. Error, Warning, and Typo are just a few of the available options. You can find the full list in Preferences / Settings | Editor | Inspections– just look for the inspection you need and change the value selected under Highlighting in editor.

Importing trusted SSL certificates

PyCharm 2022.2 can now help you import trusted SSL certificates from system trust stores. It will automatically use the custom certificates specific to your enterprise environment. No extra actions are required – everything should work right out of the box.

Improvements to WSL support

We fixed a long-standing issue when debugging WSL projects. Instead of providing the newly edited local files after debugging, PyCharm was providing old, outdated versions that had been stored on WSL for further debugging. 

Now PyCharm uses an editable package source, so you see all of your changes, just like you would when using the local interpreter. The same editable package source is used for debugging, making it clear and easy to follow. 

PyCharm also now recognizes packages, newly installed or uninstalled via the terminal or outside of PyCharm, and provides correct code insight for package import.

Other notable bug fixes:

  • We’ve added support for named parameters in ParamSpecs [PY-50404].
  • We’ve fixed code insight for different names in ParamSpec string argument and variable name [PY-50401].
  • Rename refactoring works again in the Python plugin for CLion [PY-54337].
  • The debugger now stops in processes created with execv() [PY-37960].
  • Concurrency diagrams are now generated correctly with the concurrent activities analyzer [PY-52681].
  • The debugger now supports working with dictionaries that have unicode keys and values in Python 2 [PY-31680].
  • FastAPI Run/Debug configuration now can recognize dynamically created apps. For complicated cases, it is possible to configure the app name manually [PY-51881].

To see the full list of improvements, check out the release notes. We are looking forward to hearing your feedback in comments, on Twitter, or using our issue tracker.

Mike Driscoll: How to Convert CSV to Excel with Python and pandas (Video)

Python Morsels: How I made a dataclass remover

$
0
0

My journey creating a dataclass converter by using abstract syntax trees, match-case, the dedent utility and more. You may learn something new along the way.

How does this undataclass.py script work?

Essentially the undaclass.py script:

  1. Parses the contents of a Python file into an abstract syntax tree (using the ast module)
  2. Identifies dataclass-related AST nodes representing dataclasses, dataclass fields, and __post_init__ methods
  3. Builds up strings representing Python code for the various equivalent non-dataclass methods
  4. Parses those strings into AST nodes and injects them into the was-a-dataclass node
  5. Converts all the AST nodes back into Python code

I used some tricks I don't usually get to use in Python. I used:

  1. Many very hairy match-case blocks which replaced even hairier if-elif blocks
  2. A sentinel object to keep track of a location that needed replacing
  3. Python's textwrap.dedent utility, which I feel should be more widely known & used
  4. slice assignment to inject one list into another
  5. The ast module's unparse function to convert an abstract syntax tree into Python code

Let's take a look at some of the code.

Structural pattern matching

Python's structural pattern matching can …

Read the full article: https://www.pythonmorsels.com/making-a-dataclass-remover/

ItsMyCode: [Solved] TypeError: missing 2 required positional arguments

$
0
0

If we have a function that accepts 2 arguments, and while calling the method, if we do not pass those 2 required arguments Python interpreter will throw TypeError: missing 2 required positional arguments

In this tutorial, we will look at what exactly TypeError: missing 2 required positional arguments and how to resolve this error with examples.

What is TypeError: missing 2 required positional arguments

Let us take a simple example to demonstrate this issue.

# Performs Sum of 2 numbers
def calculate_sum(x, y):
    return x+y

# No args are passed 
output = calculate_sum()
print("Sum of 2 numbers is ", output)

Output

TypeError: calculate_sum() missing 2 required positional arguments: 'x' and 'y'

In the above code, we have a method called calculate_sum() that takes 2 positional arguments and returns the sum of 2 numbers.

In the following statement, we call the method calculate_sum() without passing any positional arguments to the method; hence, we get the TypeError: missing 2 required positional arguments.

How to fix TypeError: missing 2 required positional arguments

There are different ways to resolve this TypeError. Let us look at each of these solutions with examples.

Solution 1 – Pass the required positional arguments

The easy way to resolve the error is to pass the necessary positional arguments to the method. Here in our example, the function takes two arguments, and we can solve them by providing the values for both x and y args, as shown below.

# Performs Sum of 2 numbers
def calculate_sum(x, y):
    return x+y

# 2 required args are passed
output = calculate_sum(5, 6)
print("Sum of 2 numbers is ", output)

Output

Sum of 2 numbers is  11

Solution 2 – Set the default values for the arguments

In Python, the function arguments can have the default values. If we call the function without passing any argument values, the default values are used instead of throwing a TypeError.

The default values are set using the assignment operator (=). The syntax will be in the form of keyword=value.

Let us see how we can implement the default values in our example and resolve the issue.

# Performs Sum of 2 numbers
def calculate_sum(x=0, y=0):
    return x+y


# No args are passed
output = calculate_sum()
print("Sum of 2 numbers is ", output)

Output

Sum of 2 numbers is  0

In the above example, we are not passing the required positional arguments to the method calculate_sum(). However, the default values we have set in the function args are taken to calculate the sum of 2 numbers.

Here you need to ensure that the default values are set only on the value types and not on the reference types.

The reference types such as Dictionary, List, Array, Tuple, Set, etc., can cause different issues, as shown below.

Notice that the method takes the empty dictionary as the default value when we do not pass any arguments.

Here both emp1 and emp2 objects hold the reference of the employee dictionary object, and changing the emp1 object will implicitly change the emp2, as demonstrated in the below code.

# Fetch Employee Details
def get_employee_details(employee={}):
    return employee


# No args are passed
emp1 = get_employee_details()
emp2 = get_employee_details()

# Since the emp1 and emp2 object holds a reference of employee object
# changing emp1 will change emp2 object implicitly.
emp1["name"] = "Chandler Bing"

print("Employee 1 details are  ", emp1)
print("Employee 2 details are  ", emp2)

Output

Employee 1 details are   {'name': 'Chandler Bing'}
Employee 2 details are   {'name': 'Chandler Bing'}

As shown below, we can fix this issue by setting the default argument to None and conditionally returning the empty dictionary if the parameter is None.

# Fetch Employee Details
def get_employee_details(employee=None):
    if (employee is None):
        employee = {}
    return employee


# No args are passed
emp1 = get_employee_details()
emp1["name"] = "Chandler Bing"
emp2 = get_employee_details()


print("Employee 1 details are  ", emp1)
print("Employee 2 details are  ", emp2)

Output

Employee 1 details are   {'name': 'Chandler Bing'}
Employee 2 details are   {}

Conclusion

The TypeError: missing 2 required positional arguments occurs if we do not pass the 2 required positional arguments while calling the function or the method.

We can resolve the issue by passing the required positional arguments to the function or by setting the default values for the arguments using the assignment operator.

Viewing all 23314 articles
Browse latest View live


<script src="https://jsc.adskeeper.com/r/s/rssing.com.1596347.js" async> </script>