Quantcast
Channel: Planet Python
Viewing all 23425 articles
Browse latest View live

Real Python: Pagination for a User-Friendly Django App

$
0
0

You can improve the user experience of your Django web app significantly by spreading your content over multiple pages instead of serving all of it at once. This practice is called pagination. To implement pagination, you have to consider page count, items per page, and the order of pages.

But if you’re using Django for your web projects, you’re in luck! Django has the pagination functionality built in. With only a few configuration steps, you can provide paginated content to your users.

In this tutorial, you’ll learn how to:

  • Decide when to use Django’s paginator
  • Implement pagination in class-based views
  • Implement pagination in function-based views
  • Add pagination elements to templates
  • Browse pages directly with paginated URLs
  • Combine Django pagination with JavaScript calls

This tutorial is for intermediate Python programmers with basic Django experience. Ideally, you’ve completed some introductory tutorials or created your own smaller Django projects. To have the best experience with this tutorial, you should know what models, views, and templates are and how to create them. If you need a refresher, then check out the tutorial on how to build a portfolio app with Django.

Get Source Code:Click here to get the source code that you’ll use to implement Django pagination.

Pagination in the Wild

Before you try your hand at building your own pagination flows with Django, it’s worth looking around to spot pagination in action. Pagination is so common on bigger websites that you’ve most likely experienced it in one form or another when browsing the Internet.

What Pagination Is

Pagination describes the practice of distributing your website’s content across multiple consecutive pages instead of serving it on a single page. If you visit shopping sites, blogs, or archives, you’re likely to encounter paginated content.

On GitHub, you’ll find paginated content on Django’s pull requests page. When you reach the bottom of the page, you can navigate to other pages:

Pagination Example: GitHub

Imagine how crowded the bottom of the page would be if all the page numbers were displayed. What’s more, consider how long the page would take to load if all the issues were displayed at once instead of being spread over 615 pages.

You could even argue that having page numbers is unnecessary. How could anybody know which issue is on which page? For that reason, some sites ditch page numbers entirely and give you a condensed form of pagination.

The PyCoder’s Weekly Newsletter paginates its archive with Previous and Next buttons. This type of pagination lets you conveniently browse through all newsletter issues:

Pagination Example: PyCoders Weekly

Underneath the Subscribe button, you see the pagination controls for navigating to the previous and next issues. Thanks to this pagination technique, you’re able hop from one newsletter issue to another instead of selecting issues from the archive one by one.

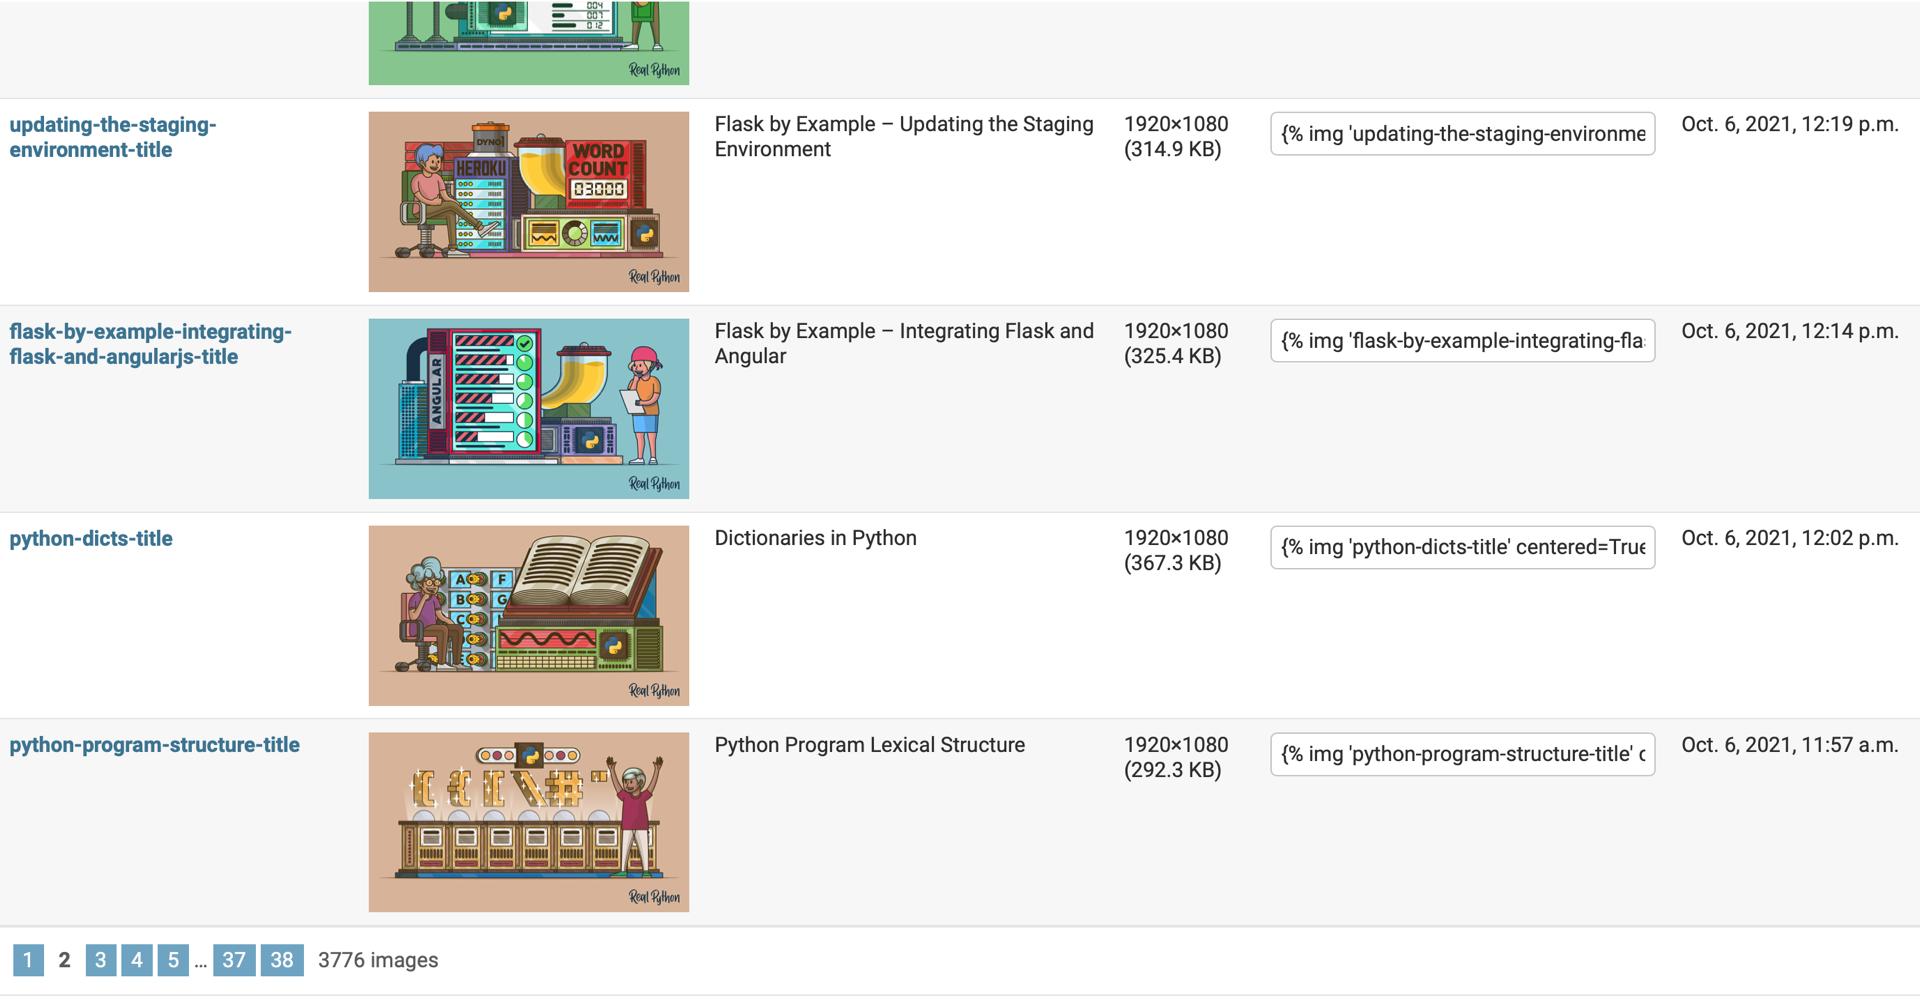
You can also see pagination in action when you’ve got more than one hundred objects in your Django admin interface. To access more content, you have to click another page number:

Django Pagination Example: Django Admin

Instead of showing a list of all 3,776 items, the Django admin divides the content into 38 pages. Again, imagine how overwhelming the Django admin interface would be if all the content were presented in one giant table!

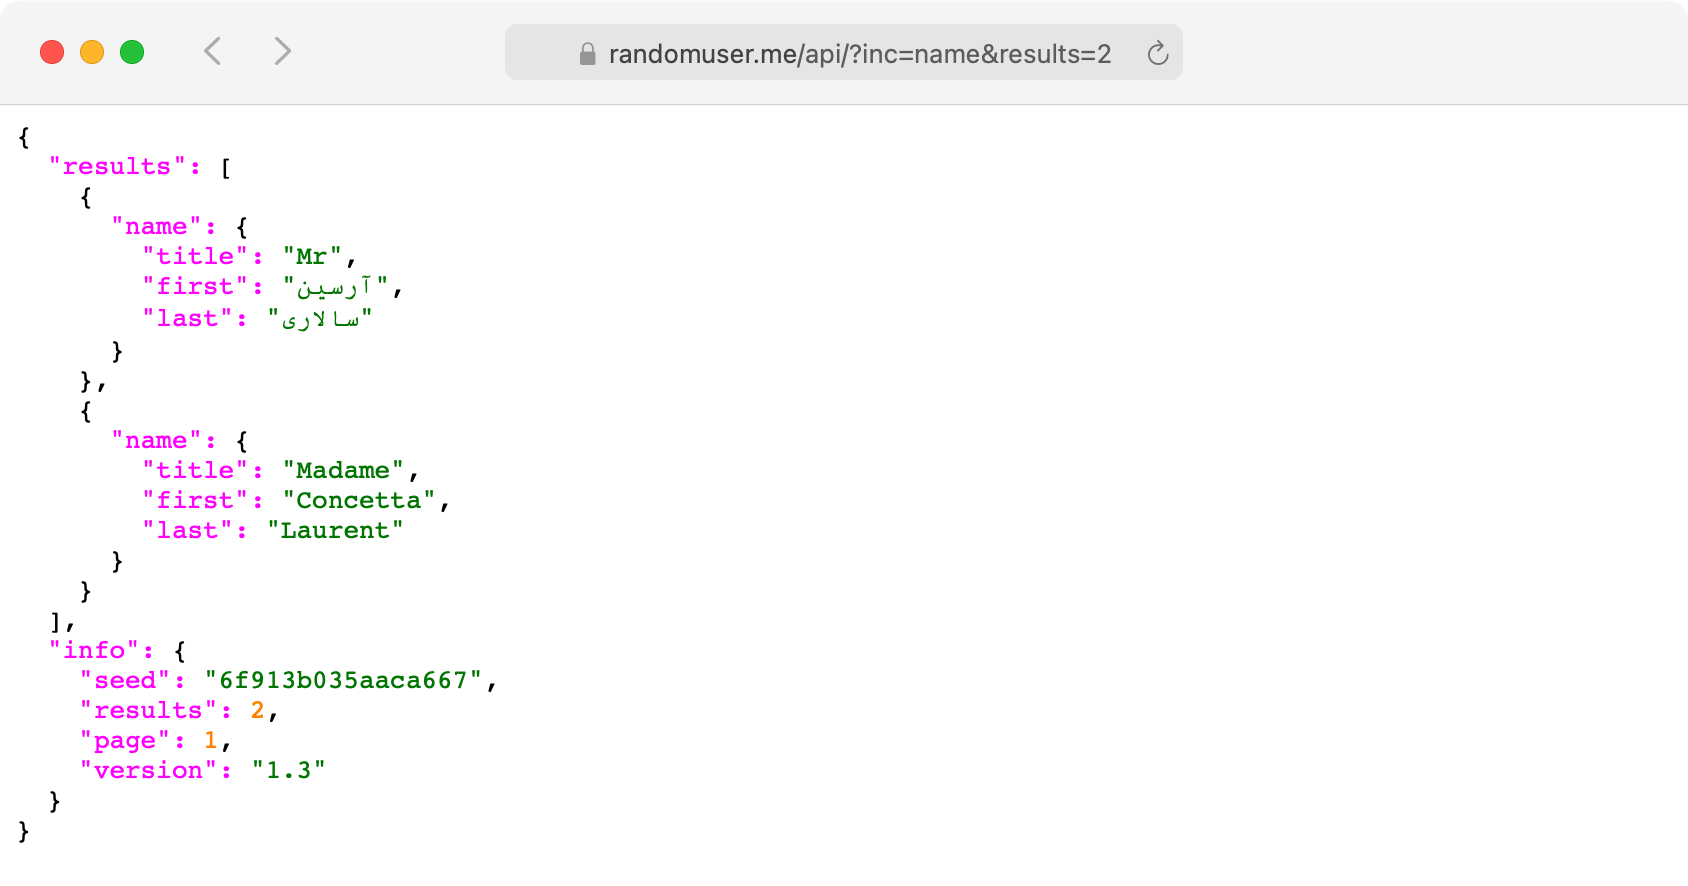
But pagination is not only used in the front-end design of websites. It’s also very common to paginate the content of API responses. The Random User API is one of many REST APIs that give you the option of paginating the response:

Pagination Example: Random User API

By adding a results=2 parameter, you tell the Random User API that you only want two results per response. With the page parameter, you can navigate to a specific page of these paginated responses.

Note: Do you have any interesting examples of websites or APIs that use pagination? Share them with the community in the comments below!

Once you know what pagination is, you’ll probably notice it often while surfing the Web. In thinking about implementing pagination in your projects, it’s worth taking a closer look at when to use pagination and when not to use it.

Read the full article at https://realpython.com/django-pagination/ »


[ Improve Your Python With 🐍 Python Tricks 💌 – Get a short & sweet Python Trick delivered to your inbox every couple of days. >> Click here to learn more and see examples ]


Anarcat: What is going on with web servers

$
0
0

I stumbled upon this graph recently, which is w3techs.com graph of "Historical yearly trends in the usage statistics of web servers". It seems I hadn't looked at it in a long while because I was surprised at many levels:

  1. Apache is now second, behind Nginx, since ~2022 (so that's really new at least)

  2. Cloudflare "server" is third ahead of the traditional third (Microsoft IIS) - I somewhat knew that Cloudflare was hosting a lot of stuff, but I somehow didn't expect to see it there at all for some reason

  3. I had to lookup what LiteSpeed was (and it's not a bike company): it's a drop-in replacement (!?) of the Apache web server (not a fork, a bizarre idea but which seems to be gaining a lot of speed recently, possibly because of its support for QUIC and HTTP/3

So there. I'm surprised. I guess the stats should be taken with a grain of salt because they only partially correlate with Netcraft's numbers which barely mention LiteSpeed at all. (But they do point at a rising share as well.)

Netcraft also puts Nginx's first place earlier in time, around April 2019, which is about when Microsoft's IIS took a massive plunge down. That is another thing that doesn't map with w3techs' graphs at all either.

So it's all lies and statistics, basically. Moving on.

Oh and of course, the two first most popular web servers, regardless of the source, are package in Debian. So while we're working on statistics and just making stuff up, I'm going to go ahead and claim all of this stuff runs on Linux and that BSD is dead. Or something like that.

Kushal Das: Introducing Very Bad Web Application

$
0
0

I am planning to add a few chapters on securing services in my Linux Command Line book. But, to make it practical & hands on, I needed one real application which the readers can deploy and secure. I needed something simple, say one single binary so that it becomes easier to convert it into a proper systemd service.

I decided to write one in Rust :) This also helps to showcase that one can write totally insecure code even in Rust (or any other language). Let me introduce Very Bad Web application. The README contains the build instructions. The index page shows the available API.

Issues in the service

The service has the following 3 major issues:

  • Directory traversal
  • Arbitrary file read
  • Remote code execution

I am currently updating the systemd (services) chapter in my book to show how to secure the service using only the features provided by the latest systemd. In future I will also have chapters on SELinux and AppArmor and learn how to secure the service using those two options.

If you think I should add some other nice security holes in this application, please feel free to suggest :)

Python GUIs: QPSQL driver not loaded: Using Postgres with Qt & Python on Windows

$
0
0

If you're trying to use Postgres with PyQt5/6 or PySide2/PySide6 you may have come across an issue with loading the driver. Qt (correctly) lists the driver as available in Qt, but when trying to load it the load will fail. This is because the Qt library depends on Postgres' own library, which must be available in the path to load.

The following script will let you test if the Postgres library is loading correctly.

python
from PyQt5.QtSql import QSqlDatabase
from PyQt5.QtWidgets import QApplication

app = QApplication([])

db = QSqlDatabase("QPSQL")
print("Available drivers", db.drivers())

if not db.open():
    print("Unable to connect.")
    print('Last error', db.lastError().text())
else:
    print("Connection to the database successful")

python
from PyQt6.QtSql import QSqlDatabase
from PyQt6.QtWidgets import QApplication

app = QApplication([])

db = QSqlDatabase("QPSQL")
print("Available drivers", db.drivers())

if not db.open():
    print("Unable to connect.")
    print('Last error', db.lastError().text())
else:
    print("Connection to the database successful")

python
from PySide2.QtSql import QSqlDatabase
from PySide2.QtWidgets import QApplication

app = QApplication([])

db = QSqlDatabase("QPSQL")
print("Available drivers", db.drivers())

if not db.open():
    print("Unable to connect.")
    print('Last error', db.lastError().text())
else:
    print("Connection to the database successful")

python
from PySide6.QtSql import QSqlDatabase
from PySide6.QtWidgets import QApplication

app = QApplication([])

db = QSqlDatabase("QPSQL")
print("Available drivers", db.drivers())

if not db.open():
    print("Unable to connect.")
    print('Last error', db.lastError().text())
else:
    print("Connection to the database successful")

Executing the above script in a new command prompt will give the following output (if Postgres is not accessible).

command
>python test.py
QSqlDatabase: QPSQL driver not loaded
QSqlDatabase: available drivers: QSQLITE QODBC QODBC3 QPSQL QPSQL7
Available drivers ['QSQLITE', 'QODBC', 'QODBC3', 'QPSQL', 'QPSQL7']
Unable to connect.
Last error Driver not loaded Driver not loaded

The list of "available drivers" shows the Qt drivers which are available in your PyQt5 (or PyQt6, or PySide2, or PySide6) installation. For example, in my installation the driver files are under site-packages\PyQt5\Qt5\plugins\sqldrivers

command
C:\Users\Martin\AppData\Local\Programs\Python\Python37\Lib\site-packages\PyQt5\Qt5\plugins\sqldrivers> dir

 Volume in drive C has no label.
 Volume Serial Number is 0A6A-65ED

 Directory of C:\Users\Martin\AppData\Local\Programs\Python\Python37\Lib\site-packages\PyQt5\Qt5\plugins\sqldrivers

02/12/2021  14:35    <DIR>          .
02/12/2021  14:35    <DIR>          ..
02/12/2021  14:35         1,412,080 qsqlite.dll
02/12/2021  14:35            98,288 qsqlodbc.dll
02/12/2021  14:35            79,856 qsqlpsql.dll
               3 File(s)      1,590,224 bytes
               2 Dir(s)  174,429,970,432 bytes free

The Driver not loaded error is occurring because the Qt Postgres driver cannot find the Postgres libraries. The Qt Postgres driver is a wrapper around these libraries, rather than a complete implementation of Postgres itself.

To get this working you need to ensure the required Postgres library files are available in your path. You can do this by adding your Postgres installation bin folder to your path. For example, on my computer Postgres is installed under C:\Program Files\PostgreSQL\14\ (I'm using version 14). We need to add to the Postgres bin folder to the PATH as this contains libpq.dll (Postgres Access Library) which Qt needs.

command
SET PATH=%PATH%;C:\Program Files\PostgreSQL\14\bin

With that in place, running the script again will show that that driver has loaded successfully. The connection still isn't working, since it needs the username and password set. But if you get this far you know the driver is working properly.

command
U:\home\martin\www\pythonguis\content\faq\qt-postgres-driver>python test.py
Available drivers ['QSQLITE', 'QODBC', 'QODBC3', 'QPSQL', 'QPSQL7']
Unable to connect.
Last error connection to server at "localhost" (::1), port 5432 failed: fe_sendauth: no password supplied
QPSQL: Unable to connect

We can modify the test script to add your username and password to complete the connection.

python
from PyQt5.QtSql import QSqlDatabase
from PyQt5.QtWidgets import QApplication

app = QApplication([])

db = QSqlDatabase("QPSQL")
db.setUserName("postgres")  # postgres is the default root username
db.setPassword("")    # add your password here
print("Available drivers", db.drivers())

if not db.open():
    print("Unable to connect.")
    print('Last error', db.lastError().text())
else:
    print("Connection to the database successful")
python
from PyQt6.QtSql import QSqlDatabase
from PyQt6.QtWidgets import QApplication

app = QApplication([])

db = QSqlDatabase("QPSQL")
db.setUserName("postgres")  # postgres is the default root username
db.setPassword("")    # add your password here
print("Available drivers", db.drivers())

if not db.open():
    print("Unable to connect.")
    print('Last error', db.lastError().text())
else:
    print("Connection to the database successful")
python
from PySide2.QtSql import QSqlDatabase
from PySide2.QtWidgets import QApplication

app = QApplication([])

db = QSqlDatabase("QPSQL")
db.setUserName("postgres")  # postgres is the default root username
db.setPassword("")    # add your password here
print("Available drivers", db.drivers())

if not db.open():
    print("Unable to connect.")
    print('Last error', db.lastError().text())
else:
    print("Connection to the database successful")
python
from PySide6.QtSql import QSqlDatabase
from PySide6.QtWidgets import QApplication

app = QApplication([])

db = QSqlDatabase("QPSQL")
db.setUserName("postgres")  # postgres is the default root username
db.setPassword("")    # add your password here
print("Available drivers", db.drivers())

if not db.open():
    print("Unable to connect.")
    print('Last error', db.lastError().text())
else:
    print("Connection to the database successful")

...and then the connection will complete as expected.

command
>python test-userpass.py
Available drivers ['QSQLITE', 'QODBC', 'QODBC3', 'QPSQL', 'QPSQL7']
Connection to the database successful

For an in-depth guide to building GUIs with Python see my PyQt6 book.

Mike Driscoll: Automating Excel with Python Video Overview

Inspired Python: Tower Defense Game: Finite State Automata / State Machines

$
0
0

Tower Defense Game: Finite State Automata / State Machines

Complex codebases – and games are usually complex – tend to rely on a lot of state, usually captured in variables. Navigating from one screen in a game to another involves a lot of change: you need to render different things; the key bindings you use may change also; and perhaps you need to clear out old objects, like if you change from game play to the score screen.

But instead of having an ever-increasing number of variables to represent what your code is supposed to do – like, is_in_menu, has_won_game, is_in_level_editor, etc. – you should consider formalizing your stateful code using finite state automata, or commonly called a state machine.

To improve our code’s extensibility, it’s time to consider how we can effectively use a simple state machine to represent the state the game is in, and how OOP and inheritance can help with separation of concerns.


Read More ->

Inspired Python: Tower Defense Game: Game Loop and Initializing PyGame

$
0
0

Tower Defense Game: Game Loop and Initializing PyGame

How do you instruct your computer game to draw things to the screen consistently and to a drum-beat that ensures there’s no awkward pauses or jitter? What about listening to the keyboard and mouse inputs, or updating the score board for your game? The physics engine?

Get any one of these things wrong, or forget to do them, and your game misbehaves. Worse, it can misbehave in ways that you won’t necessarily catch on your own machine.

That’s why all computer games – big or small – has one (or more!) game loops that ensure the game carries out its most essential tasks in a repeatable and stable manner.

It’s time to write our skeleton game loop that will serve us throughout the course of the development of our tower defense game.


Read More ->

Inspired Python: Tower Defense Game: Getting Started

$
0
0

Tower Defense Game: Getting Started

Python package management is not the easiest thing to wrap your head around. Nevertheless, it’s important that we capture the requirements our game has, properly, and commit them to a Python package.


Read More ->

Inspired Python: Make your own Tower Defense Game with PyGame

$
0
0

Make your own Tower Defense Game with PyGame

In this course you’ll learn how to write a 2d Tower Defense Game from scratch, using PyGame. Writing a game is easy; but writing one that is maintainable and easy to extend is not. A tower defense game is a perfect place to learn how to write a substantial game that will test your skills as a Python programmer. It is also a perfect template for many other 2d games.

Part of the challenge of writing a game is the many disparate discplines that rear their heads once you move beyond the truly basic. During the course you’ll learn the following skills:

What is a Game Loop?

How do games actually update and display things on the screen in a manner that is maintainable and easy to reason about for the budding game developer?

The Game Loop is a cornerstone of all games, big and small. You’ll learn how to create one, and how it’s used to handle keyboard and mouse input, graphics rendering, updating the physics of entities on the screen, and more.

State Machines and Transitions

Few games have just one screen, and thus one state. Most games have a main menu, a score board, the actual game, and possibly more states that a player interacts with during game play. Understanding how to transition your game’s state between these different concepts is critical to writing a game free of spaghetti code.

You’ll learn about finite-state machines, an important concept in Computer Science, and how it can easily make transform a complex set of confusing requirements into neat and tidy code.

Lazy evaluation, Generators and Iterables

Keeping track of the position of things – and calculating the next position of something, such as a flying bullet – is easily solved with a liberal use of Python’s itertools library and generators.

Master a part of Python that gets short thrift from most developers, as they’re harder to reason about than normal for-loops.

Drawing and manipulating graphics

Learn what a sprite is, how to manipulate it to move, rotate, scale it, and how to do it efficiently and in a manner that is clear and easy to reason about.

Level Editing

You’ll write a complete level editor capable of placing and editing all the entities that make up a tower defense game using a simple UI you will build yourself.

The level editor forms a core part of the game, and includes details on how to write a save and load feature, so you can share your levels with friends.

Path finding and Recursion

Learn about recursion, a powerful programming concept, to find valid paths through a map for the enemies to traverse. You’ll learn about basic graph theory and how Depth-First Search is used to traverse a map and find a route from start to end.

Vector Mathematics

Come to grips with the mathematics required to ensure a bullet travels in a straight line towards a target; that your enemies walk smoothly across the map; and how to do simple text-based animations using simple arithmetic.

You’ll learn about simple vector arithmetic, interpolation, and basic affine transformations (like scaling and rotating).

Object-Oriented Programming (OOP)

Improve your understanding of classes and objects and how to best leverage inheritance, the factory pattern, and Python’s dataclasses to succinctly describe your game world using simple classes.

Animation

Learn how to chain together frames of images into simple animations so the enemies walk across the screen and collapse when they’re struck by exploding projectiles.

Collision Detection

Important stuff: how does the turret know when to fire at an enemy that is in its crosshairs? What about when the bullet strikes an enemy?

Are you ready? Let’s code!


Read More ->

Real Python: Using Python's datetime Module

$
0
0

Python has several different modules to deal with dates and times. This course concentrates on the primary one, datetime. Dates and times are messy things! Shifts due to daylight savings time and time zones complicate any computing with dates and times.

In this course, you’ll tackle that messiness and learn:

  • How to use the datetime module
  • What the zoneinfo module does and how to use it
  • How to calculate the difference between two datetime objects

[ Improve Your Python With 🐍 Python Tricks 💌 – Get a short & sweet Python Trick delivered to your inbox every couple of days. >> Click here to learn more and see examples ]

Trey Hunner: Overlooked facts about variables and objects in Python: it's all about pointers

$
0
0

This article was originally published on Python Morsels.

In Python, variables and data structures don’t contain objects. This fact is both commonly overlooked and tricky to internalize.

You can happily use Python for years without really understanding the below concepts, but this knowledge can certainly help alleviate many common Python gotchas.

Table of Contents:

    Terminology

    Let’s start with by introducing some terminology. The last few definitions likely won’t make sense until we define them in more detail later on.

    Object (a.k.a. value): a “thing”. Lists, dictionaries, strings, numbers, tuples, functions, and modules are all objects. “Object” defies definition because everything is an object in Python.

    Variable (a.k.a. name): a name used to refer to an object.

    Pointer (a.k.a. reference): describes where an object lives (often shown visually as an arrow)

    Equality: whether two objects represent the same data

    Identity: whether two pointers refer to the same object

    These terms are best understood by their relationships to each other and that’s the primarily purpose of this article.

    Python’s variables are pointers, not buckets

    Variables in Python are not buckets containing things; they’re pointers (they point to objects).

    The word “pointer” may sound scary, but a lot of that scariness comes from related concepts (e.g. dereferencing) which aren’t relevant in Python. In Python a pointer just represents the connection between a variable and an objects.

    Imagine variables living in variable land and objects living in object land. A pointer is a little arrow that connects each variable to the object it points to.

    This above diagram represents the state of our Python process after running this code:

    123
    >>> numbers=[2,1,3,4,7]>>> numbers2=[11,18,29]>>> name="Trey"

    If the word pointer scares you, use the word reference instead. Whenever you see pointer-based phrases in this article, do a mental translation to a reference-based phrase:

    • pointerreference
    • point torefer to
    • pointed toreferenced
    • point X to Ycause X to refer to Y

    Assignments point a variable to an object

    Assignment statements point a variable to an object. That’s it.

    If we run this code:

    123
    >>> numbers=[2,1,3,4,7]>>> numbers2=numbers>>> name="Trey"

    The state of our variables and objects would look like this:

    Note that numbers and numbers2point to the same object. If we change that object, both variables will seem to “see” that change:

    123456
    >>> numbers.pop()7>>> numbers[2, 1, 3, 4]>>> numbers2[2, 1, 3, 4]

    That strangeness was all due to this assignment statement:

    1
    >>> numbers2=numbers

    Assignment statements don’t copy anything: they just point a variable to an object. So assigning one variable to another variable just points two variables to the same object.

    The 2 types of “change” in Python

    Python has 2 distinct types of “change”:

    1. Assignment changes a variable (it changes which object it points to)
    2. Mutation changes an object (which any number of variables might point to)

    The word “change” is often ambiguous. The phrase “we changed x” could mean “we re-assigned x” or it might mean “we mutated the object x points to”.

    Mutations change objects, not variables. But variables point to objects. So if another variable points to an object that we’ve just mutated, that other variable will reflect the same change; not because the variable changed but because the object it points to changed.

    Equality compares objects and identity compares pointers

    Python’s == operator checks that two objects represent the same data (a.k.a. equality):

    1234
    >>> my_numbers=[2,1,3,4]>>> your_numbers=[2,1,3,4]>>> my_numbers==your_numbersTrue

    Python’s is operator checks whether two objects are the same object (a.k.a. identity):

    12
    >>> my_numbersisyour_numbersFalse

    The variables my_numbers and your_numbers point to objects representing the same data, but the objects they point to are not the same object.

    So changing one object doesn’t change the other:

    123
    >>> my_numbers[0]=7>>> my_numbers==your_numbersFalse

    If two variables point to the same object:

    123
    >>> my_numbers_again=my_numbers>>> my_numbersismy_numbers_againTrue

    Changing the object one variable points also changes the object the other points to because they both point to the same object:

    12345
    >>> my_numbers_again.append(7)>>> my_numbers_again[2, 1, 3, 4, 7]>>> my_numbers[2, 1, 3, 4, 7]

    The == operator checks for equality and the is operator checks for identity. This distinction between identity and equality exists because variables don’t contain objects, they point to objects.

    In Python equality checks are very common and identity checks are very rare.

    There’s no exception for immutable objects

    But wait, modifying a number doesn’t change other variables pointing to the same number, right?

    1234567
    >>> n=3>>> m=n# n and m point to the same number>>> n+=2>>> n# n has changed5>>> m# but m hasn't changed!3

    Well, modifying a number is not possible in Python. Numbers and strings are both immutable, meaning you can’t mutate them. You cannot change an immutable object.

    So what about that += operator above? Didn’t that mutate a number? (It didn’t.)

    With immutable objects, these two statements are equivalent:

    12
    >>> n+=2>>> n=n+2

    For immutable objects, augmented assignments (+=, *=, %=, etc.) perform an operation (which returns a new object) and then do an assignment (to that new object).

    Any operation you might think changes a string or a number instead returns a new object. Any operation on an immutable object always returns a new object instead of modifying the original.

    Data structures contain pointers

    Like variables, data structures don’t contain objects, they contain pointers to objects.

    Let’s say we make a list-of-lists:

    1
    >>> matrix=[[1,2,3],[4,5,6],[7,8,9]]

    And then we make a variable pointing to the second list in our list-of-lists:

    123
    >>> row=matrix[1]>>> row[4, 5, 6]

    The state of our variables and objects now looks like this:

    Our row variable points to the same object as index 1 in our matrix list:

    12
    >>> rowismatrix[1]True

    So if we mutate the list that row points to:

    1
    >>> row[0]=1000

    We’ll see that change in both places:

    1234
    >>> row[1000, 5, 6]>>> matrix[[1, 2, 3], [1000, 5, 6], [7, 8, 9]]

    It’s common to speak of data structures “containing” objects, but they actually only contain pointers to objects.

    Function arguments act like assignment statements

    Function calls also perform assignments.

    If you mutate an object that was passed-in to your function, you’ve mutated the original object:

    123456789
    >>> defsmallest_n(items,n):... items.sort()# This mutates the list (it sorts in-place)... returnitems[:n]...>>> numbers=[29,7,1,4,11,18,2]>>> smallest_n(numbers,4)[1, 2, 4, 7]>>> numbers[1, 2, 4, 7, 11, 18, 29]

    But if you reassign a variable to a different object, the original object will not change:

    123456789
    >>> defsmallest_n(items,n):... items=sorted(items)# this makes a new list (original is unchanged)... returnitems[:n]...>>> numbers=[29,7,1,4,11,18,2]>>> smallest_n(numbers,4)[1, 2, 4, 7]>>> numbers[29, 7, 1, 4, 11, 18, 2]

    We’re reassigning the items variable here. That reassignment changes which object the items variable points to, but it doesn’t change the original object.

    We changed an object in the first case and we changed a variable in the second case.

    Here’s another example you’ll sometimes see:

    1234
    classWidget:def__init__(self,attrs=(),choices=()):self.attrs=list(attrs)self.choices=list(choices)

    Class initializer methods often copy iterables given to them by making a new list out of their items. This allows the class to accept any iterable (not just lists) and decouples the original iterable from the class (modifying these lists won’t upset the original caller). The above example was borrowed from Django.

    Don’t mutate the objects passed-in to your function unless the function caller expects you to.

    Copies are shallow and that’s usually okay

    Need to copy a list in Python?

    1
    >>> numbers=[2000,1000,3000]

    You could call the copy method (if you’re certain your iterable is a list):

    1
    >>> my_numbers=numbers.copy()

    Or you could pass it to the list constructor (this works on any iterable):

    1
    >>> my_numbers=list(numbers)

    Both of these techniques make a new list which points to the same objects as the original list.

    The two lists are distinct, but the objects within them are the same:

    1234
    >>> numbersismy_numbersFalse>>> numbers[0]ismy_numbers[0]True

    Since integers (and all numbers) are immutable in Python we don’t really care that each list contains the same objects because we can’t mutate those objects anyway.

    With mutable objects, this distinction matters. This makes two list-of-lists which each contain pointers to the same three lists:

    12
    >>> matrix=[[1,2,3],[4,5,6],[7,8,9]]>>> new_matrix=list(matrix)

    These two lists aren’t the same, but each item within them is the same:

    1234
    >>> matrixisnew_matrixFalse>>> matrix[0]isnew_matrix[0]True

    Here’s a rather complex visual representation of these two objects and the pointers they contain:

    So if we mutate the first item in one list, it’ll mutate the same item within the other list:

    12345
    >>> matrix[0].append(100)>>> matrix[[1, 2, 3, 100], [4, 5, 6], [7, 8, 9]]>>> new_matrix[[1, 2, 3, 100], [4, 5, 6], [7, 8, 9]]

    When you copy an object in Python, if that object points to other objects, you’ll copy pointers to those other objects instead of copying the objects themselves.

    New Python programmers respond to this behavior by sprinkling copy.deepcopy into their code. The deepcopy function attempts to recursively copy an object along with all objects it points to.

    Sometimes new Python programmers will use deepcopy to recursively copy data structures:

    123456789
    fromcopyimportdeepcopyfromdatetimeimportdatetimetweet_data=[{"date":"Feb 04 2014","text":"Hi Twitter"},{"date":"Apr 16 2014","text":"At #pycon2014"}]# Parse date strings into datetime objectsprocessed_data=deepcopy(tweet_data)fortweetinprocessed_data:tweet["date"]=datetime.strptime(tweet["date"],"%b %d %Y")

    But in Python, we often prefer to make new objects instead of mutating existing objects. So we could entirely remove that deepcopy usage above by making a new list of new dictionaries instead of deep-copying our old list-of-dictionaries.

    12345
    # Parse date strings into datetime objectsprocessed_data=[{**tweet,"date":datetime.strptime(tweet["date"],"%b %d %Y")}fortweetintweet_data]

    We tend to prefer shallow copies in Python. If you don’t mutate objects that don’t belong to you you usually won’t have any need for deepcopy.

    The deepcopy function certainly has its uses, but it’s often unnecessary. “How to avoid using deepcopy” warrants a separate discussion in a future article.

    Summary

    Variables in Python are not buckets containing things; they’re pointers (they point to objects).

    Python’s model of variables and objects boils down to two primary rules:

    1. Mutation changes an object
    2. Assignment points a variable to an object

    As well as these corollary rules:

    1. Reassigning a variable points it to a different object, leaving the original object unchanged
    2. Assignments don’t copy anything, so it’s up to you to copy objects as needed

    Furthermore, data structures work the same way: lists and dictionaries container pointers to objects rather than the objects themselves. And attributes work the same way: attributes point to objects (just like any variable points to an object). So objects cannot contain objects in Python (they can only point to objects).

    And note that while mutations change objects (not variables), multiple variables can point to the same object. If two variables point to the same object changes to that object will be seen when accessing either variable (because they both point to the same object).

    For more on this topic see:

    This mental model of Python is tricky to internalize so it’s okay if it still feels confusing! Python’s features and best practices often nudge us toward “doing the right thing” automatically. But if your code is acting strangely, it might be due to changing an object you didn’t mean to change.

    ItsMyCode: SyntaxError: (unicode error) ‘unicodeescape’ codec can’t decode bytes in position 2-3: truncated \UXXXXXXXX escape

    $
    0
    0

    The SyntaxError: (unicode error) ‘unicodeescape’ codec can’t decode bytes in position 2-3: truncated \UXXXXXXXX escape occurs if you are trying to access a file path with a regular string.

    In this tutorial, we will take a look at what exactly (unicode error) ‘unicodeescape’ codec can’t decode bytes in position 2-3: truncated \UXXXXXXXX escape means and how to fix it with examples.

    What is SyntaxError: (unicode error) ‘unicodeescape’ codec can’t decode bytes in position 2-3: truncated \UXXXXXXXX escape?

    The Python String literals can be enclosed in matching single quotes (‘) or double quotes (“). 

    String literals can also be prefixed with a letter ‘r‘ or ‘R‘; such strings are called raw strings and use different rules for backslash escape sequences.

    They can also be enclosed in matching groups of three single or double quotes (these are generally referred to as triple-quoted strings). 

    The backslash (\) character is used to escape characters that otherwise have a special meaning, such as newline, backslash itself, or the quote character. 

    Now that we have understood the string literals. Let us take an example to demonstrate the issue.

    import pandas
    
    # read the file
    pandas.read_csv("C:\Users\itsmycode\Desktop\test.csv")
    

    Output

      File "c:\Personal\IJS\Code\program.py", line 4
        pandas.read_csv("C:\Users\itsmycode\Desktop\test.csv")                                                                                     ^
    SyntaxError: (unicode error) 'unicodeescape' codec can't decode bytes in position 2-3: truncated \UXXXXXXXX escape

    We are using the single backslash in the above code while providing the file path. Since the backslash is present in the file path, it is interpreted as a special character or escape character (any sequence starting with ‘\’). In particular, “\U” introduces a 32-bit Unicode character.

    How to fix SyntaxError: (unicode error) ‘unicodeescape’ codec can’t decode bytes in position 2-3: truncated \UXXXXXXXX escape?

    Solution 1 – Using Double backslash (\\)

    In Python, the single backslash in the string is interpreted as a special character, and the character U(in users) will be treated as the Unicode code point.

    We can fix the issue by escaping the backslash, and we can do that by adding an additional backslash, as shown below.

    import pandas
    
    # read the file
    pandas.read_csv("C:\\Users\\itsmycode\\Desktop\\test.csv")

    Solution 2 – Using raw string by prefixing ‘r’

    We can also escape the Unicode by prefixing r in front of the string. The r stands for “raw” and indicates that backslashes need to be escaped, and they should be treated as a regular backslash.

    import pandas
    
    # read the file
    pandas.read_csv("C:\\Users\\itsmycode\\Desktop\\test.csv")

    Solution 3 – Using forward slash 

    Another easier way is to avoid the backslash and instead replace it with the forward-slash character(/), as shown below.

    import pandas
    
    # read the file
    pandas.read_csv("C:/Users/itsmycode/Desktop/test.csv")
    

    Conclusion

    The SyntaxError: (unicode error) ‘unicodeescape’ codec can’t decode bytes in position 2-3: truncated \UXXXXXXXX escape occurs if you are trying to access a file path and provide the path as a regular string.

    We can solve the issue by escaping the single backslash with a double backslash or prefixing the string with ‘r,’ which converts it into a raw string. Alternatively, we can replace the backslash with a forward slash.

    PyCoder’s Weekly: Issue #518 (March 29, 2022)

    $
    0
    0

    #518 – MARCH 29, 2022
    View in Browser »

    The PyCoder’s Weekly Logo


    Python and the James Webb Space Telescope

    Python is used extensively in the data pipeline for the James Web Space Telescope. Michael Kennedy interviews Megan Sosey and Mike Swarm from the project and they talk all about it.
    TALK PYTHONpodcast

    Processing Large JSON Files Without Running Out of Memory

    Loading complete JSON files into Python can use too much memory, leading to slowness or crashes. The solution: process JSON data one chunk at a time.
    ITAMAR TURNER-TRAURING

    Data Elixir: Data Science Newsletter

    alt

    Data Elixir is an email newsletter that keeps you on top of the latest tools and trends in Data Science. Covers machine learning, data visualization, analytics, and strategy. Curated weekly with top picks from around the web →
    DATA ELIXIRsponsor

    Image Processing With the Python Pillow Library

    Learn how to use the Python Pillow library to deal with images. Combine this with some NumPy for image processing and to creating animations.
    REAL PYTHON

    Discussions

    Python Jobs

    Python Technical Architect (USA)

    Blenderbox

    Academic Innovation Software Developer (Ann Arbor, MI, USA)

    University of Michigan

    Software Development Lead (Ann Arbor, MI, USA)

    University of Michigan

    Senior Platform Engineer (USA)

    Parade

    Senior Backend Software Engineer (USA)

    Parade

    Senior Backend Software Engineer (USA)

    Clay

    Advanced Python Engineer (Newport Beach, CA, USA)

    Research Affiliates

    Senior Full-Stack Web Developer (White Rock, BC, Canada)

    MonetizeMore

    Full-Stack Software Engineer Python (USA)

    Deep Sentinel

    Senior Software Engineer (Anywhere)

    Droice Labs

    More Python Jobs >>>

    Articles & Tutorials

    Becoming More Effective at Manipulating Data With Pandas

    Do you wonder if you’re taking the right approach when shaping data in pandas? Is your Jupyter workflow getting out of hand? This week on the show, Matt Harrison talks about his new book, “Effective Pandas: Patterns for Data Manipulation.”
    REAL PYTHONpodcast

    How To Classify Text With Python, Transformers & scikit-learn

    Natural Language Processing is a powerful tool for gaining semantic knowledge about text based data. Text classification is about categorizing such data and scikit-learn is popular toolkit that does this and more.
    NEWSCATCHERAPI.COM

    Scout APM: Find and Fix Performance Issues with Ease

    alt

    Scout’s APM tool pinpoints and prioritizes performance and stability issues in Python applications. With Scout’s tracing logic, developers can detect the exact line of code causing the performance abnormality, and with detailed backtraces, you can fix the issue before customers ever notice →
    SCOUT APMsponsor

    Validating JSON Documents Using Pydantic

    Pydantic is a popular Python library for doing data validation. This article introduces you to how to use it to specify and validate against a schema for your JSON encoded data.
    NITHISH RAGHUNANDANAN• Shared by Nithish Raghunandanan

    Deploying a Django Application to Elastic Beanstalk

    Elastic Beanstalk is an AWS service that wraps hosting and deploying inside of the AWS environment. Learn how to deploy production-ready Django to Elastic Beanstalk.
    TESTDRIVEN.IO• Shared by Nik Tomazic

    How to run uWSGI

    uWSGI has loads of options to choose from, how do you know which ones to choose? This article talks about the more common settings and how to pick good values.
    IONEL CRISTIAN MĂRIEȘ

    Python Class Constructors: Control Your Object Instantiation

    Learn how class constructors work in Python and explore the two steps of Python’s instantiation process: instance creation and instance initialization.
    REAL PYTHON

    Setting Up a Basic Django Project With Poetry

    Poetry is a package dependency management tool. In this article you’ll learn the step-by-step process for setting up a Django project using Poetry.
    RASUL KIREEV

    Up Your Coding Game and Discover Python Issues Early

    SonarLint is a free & Open Source IDE extension that helps you find & fix bugs and security issues from the moment you start writing Python code. Simply install from your IDE marketplace. Learn More.
    SONARLINTsponsor

    The Right Way to Compare Floats in Python

    Floating-point numbers are prone to errors. Learn why floating-point errors are common, why they make sense, and how to deal with them in Python.
    DAVID AMOS

    Python Virtual Environments and Package Management

    Modern Python projects need a bit more than venv and pip. Learn about the best tools for package management and environment isolation.
    BAS STEINS

    Projects & Code

    Events


    Happy Pythoning!
    This was PyCoder’s Weekly Issue #518.
    View in Browser »

    alt

    [ Subscribe to 🐍 PyCoder’s Weekly 💌 – Get the best Python news, articles, and tutorials delivered to your inbox once a week >> Click here to learn more ]

    PyPy: PyPy v7.3.9 security release

    $
    0
    0

    PyPy v7.3.9 security release

    The PyPy team is proud to release version 7.3.9 of PyPy. This is a security release to match the recent CPython release and updates the portable pypy tarballs with bzip2 1.0.8, openssl1.1.1n, and libexpat 2.4.7. Along the way this release fixes some issues discovered after the 7.3.8 release and updates sqlite3 to 3.38.2. It includes:

    • PyPy2.7, which is an interpreter supporting the syntax and the features of Python 2.7 including the stdlib for CPython 2.7.18+ (the + is for backported security updates)

    • PyPy3.7, which is an interpreter supporting the syntax and the features of Python 3.7, including the stdlib for CPython 3.7.13. This will be the last release of PyPy3.7.

    • PyPy3.8, which is an interpreter supporting the syntax and the features of Python 3.8, including the stdlib for CPython 3.8.13.

    • PyPy3.9, which is an interpreter supporting the syntax and the features of Python 3.9, including the stdlib for CPython 3.9.12. We relate to this as "beta" quality. We welcome testing of this version, if you discover incompatibilities, please report them so we can gain confidence in the version.

    The interpreters are based on much the same codebase, thus the multiple release. This is a micro release, all APIs are compatible with the other 7.3 releases. Highlights of the release, since the release of 7.3.8 in February 2022, include:

    • Fixed some failing stdlib tests on PyPy3.9

    • Update the bundled libexpat to 2.4.6 and sqlite3 to 3.38.2

    We recommend updating. You can find links to download the v7.3.9 releases here:

    https://pypy.org/download.html

    We would like to thank our donors for the continued support of the PyPy project. If PyPy is not quite good enough for your needs, we are available for direct consulting work. If PyPy is helping you out, we would love to hear about it and encourage submissions to our blog via a pull request to https://github.com/pypy/pypy.org

    We would also like to thank our contributors and encourage new people to join the project. PyPy has many layers and we need help with all of them: PyPy and RPython documentation improvements, tweaking popular modules to run on PyPy, or general help with making RPython's JIT even better. Since the 7.3.7 release, we have accepted contributions from 6 new contributors, thanks for pitching in, and welcome to the project!

    If you are a python library maintainer and use C-extensions, please consider making a HPy / CFFI / cppyy version of your library that would be performant on PyPy. In any case both cibuildwheel and the multibuild system support building wheels for PyPy.

    What is PyPy?

    PyPy is a Python interpreter, a drop-in replacement for CPython 2.7, 3.7, 3.8 and 3.9. It's fast (PyPy and CPython 3.7.4 performance comparison) due to its integrated tracing JIT compiler.

    We also welcome developers of other dynamic languages to see what RPython can do for them.

    This PyPy release supports:

    • x86 machines on most common operating systems (Linux 32/64 bits, Mac OS X 64 bits, Windows 64 bits, OpenBSD, FreeBSD)

    • 64-bit ARM machines running Linux. A shoutout to Huawei for sponsoring the VM running the tests.

    • s390x running Linux

    • big- and little-endian variants of PPC64 running Linux,

    PyPy support Windows 32-bit, PPC64 big- and little-endian, and ARM 32 bit, but does not release binaries. Please reach out to us if you wish to sponsor releases for those platforms.

    Known Issues with PyPy3.9

    • We slightly modified the concurrent future's ProcessExcecutorPool to start all the worker processes when the first task is received (like on Python3.8) to avoid an apparent race condition when using fork and threads (issue 3650).

    What else is new?

    For more information about the 7.3.9 release, see the full changelog.

    Please update, and continue to help us make PyPy better.

    Cheers, The PyPy team

    Stack Abuse: Graphs in Python: Depth-First Search (DFS) Algorithm

    $
    0
    0

    Introduction

    Originating from mathematics, graphs are now widely used data structures in Computer Science. One of the first problems we encounter when constructing any algorithm regarding Graph processing or traversal is how we represent the graph and then, how to traverse that representation.

    Graph traversal is not a trivial problem, and given the difficulty of the task - many algorithms have been devised for efficient (yet not perfect) graph traversal.

    In this guide, we'll take a look at one of the two complementary, fundamental and simplest algorithms for Graph traversal - Depth-First Search (DFS). It's the most commonly used algorithm alongside the related Breadth-First Search (BFS) given their simplicity. After going over the main idea used for DFS, we'll implement it in Python on a Graph representation - an adjacency list.

    Depth-First Search - Theory

    Depth-First Search (DFS) is an algorithm used to traverse or locate a target node in a graph or tree data structure. It priorities depth and searches along one branch, as far as it can go - until the end of that branch. Once there, it backtracks to the first possible divergence from that branch, and searches until the end of that branch, repeating the process.

    Given the nature of the algorithm, you can easily implement it recursively - and you can always implement a recursive algorithm iteratively as well:

    dfs animation

    The start node is the root node for tree data structures, while with more generic graphs - it can be any node.

    DFS is widely-used as a part of many other algorithms that resolve graph-represented problems. From cycle searches, path finding, topological sorting, to finding articulation points and strongly connected components. The reason behind this widespread use of the DFS algorithm lies in its overall simplicity and easy recursive implementation.

    The DFS Algorithm

    The DFS algorithm is pretty simple and consists of the following steps:

    1. Mark the current node as visited.
    2. Traverse the neighboring nodes that aren't visited and recursively call the DFS function for that node.

    The algorithm stops either when the target node is found, or the whole graph has been traversed (all nodes are visited).

    Note: Since graphs can have cycles, we'll need a system to avoid them so we don't fall into infinity loops. That's why we "mark" every node we pass as visited by adding them to a Set containing only unique entries.

    By marking nodes as "visited", if we ever encounter that node again - we're in a loop! Endless computational power and time have been wasted on loops, lost in the aether.

    Pseudocode

    Given these steps, we can summarize DFS in pseudocode:

    DFS(G, u):
        # Input processing
        u.visited = true
        for each v in G.adj[u]:
            if !v.visited:
                DFS(G, v)
                # Output processing

    Input and output processing is performed depending on the purpose of the graph search. Our input processing for DFS will be checking if the current node is equal to the target node.

    With this view, you can really start to appreciate just how simple yet useful this algorithm is.

    Depth-First Search - Implementation

    The first thing we need to consider before diving into the implementation of the DFS algorithm itself is how to implement a graph. As in any other article from this series, we've opted to implement it using a fairly basic Graph class. It contains a graph representation and a couple of methods you need to operate with graphs:

    classGraph:# Constructordef__init__(self, num_of_nodes, directed=True):
            self.m_num_of_nodes = num_of_nodes
            self.m_nodes = range(self.m_num_of_nodes)
    		
            # Directed or Undirected
            self.m_directed = directed
    		
            # Graph representation - Adjacency list# We use a dictionary to implement an adjacency list
            self.m_adj_list = {node: set() for node in self.m_nodes}      
    	
        # Add edge to the graphdefadd_edge(self, node1, node2, weight=1):
            self.m_adj_list[node1].add((node2, weight))
    
            ifnot self.m_directed:
                self.m_adj_list[node2].add((node1, weight))
        
        # Print the graph representationdefprint_adj_list(self):for key in self.m_adj_list.keys():
            print("node", key, ": ", self.m_adj_list[key])
    

    Let's just quickly recap how does the Graph class work. The __init__() method defines a constructor. It consists of a number of nodes, a set of nodes, and the graph representation. In this case, a graph is represented by an adjacency list - effectively a Python dictionary with each node of the graph set to be one key. A set of adjacent nodes is assigned to each node (key).

    Note: An adjacency list is a type of graph representation in code, it consists of keys that represent each node, and a set of values for each of them containing nodes that are connected to the key node with an edge.
    Using a dictionary for this is the easiest way to quickly represent a graph in Python, though you could also define your own Node classes and add them to a Graph instance instead.

    As its name suggests, the add_edge() method is used to add edges to the graph representation. Each edge is represented as in any usual adjacency list. For example, edge 1-2 is represented by adding 2 as the adjacent node of node 1 in the adjacency list. Additionally, our implementation enables you to assign a weight to any edge.

    Lastly, we've created the method that prints the graph representation - print_adj_list().

    Now we can implement the DFS algorithm in the Graph class. Depth-First Search implementation is usually recursive in code given how natural of a pair that is, but it can also be easily implemented non-recursively. We'll be using the recursive method:

    defdfs(self, start, target, path = [], visited = set()):
        path.append(start)
        visited.add(start)
        if start == target:
            return path
        for (neighbour, weight) in self.m_adj_list[start]:
            if neighbour notin visited:
                result = self.dfs(neighbour, target, path, visited)
                if result isnotNone:
                    return result
        path.pop()
        returnNone

    We added the start node to the beginning of our traversal path and marked it as visited by adding it to a set of visited nodes. Then, we traversed the start node's neighbors that aren't already visited and called the function recursively for each of them. Recursive calls result in going as deep as we can along one "branch".

    We then saved a reference to the result. In the case the function returns None, that means that the target node was not found in this branch and that we should try another. If the recursive call, in fact, does not return None, that means we have found our target node and we return the traversal path as result.

    In the end, if we find ourselves outside of the for loop, it means that all the neighbor branches of the current node have been visited and none of them lead to our target node. So, we remove the current node from the path and return None as result.

    Running DFS

    Let's illustrate how the code works through an example. As we've stated before, we'll be using Graph class to represent the graph. Internally, it represents a graph as an adjacency list. Here's the graph we'll be using in the following example:

    graph

    We'll be searching for a path from node 0 to node 3, if it exists, the path will be saved into a set of visited nodes, called traversal_path so we can reconstruct it for printing.

    The first thing we need to do is to create an instance of the Graph class. Our example graph is undirected and has 5 nodes, so we'll create its representation in the following way:

    graph = Graph(5, directed=False)
    

    This will create the instance of the Graph representing undirected graph with 5 nodes. Next, we need to add all edges from the example graph into our graph representation:

    graph.add_edge(0, 1)
    graph.add_edge(0, 2)
    graph.add_edge(1, 3)
    graph.add_edge(2, 3)
    graph.add_edge(3, 4)
    

    Now, we've created the complete representation of the example graph. Let's take a look at how does the Graph class internally store our example graph:

    graph.print_adj_list()
    

    Which outputs the following:

    node 0 :  {(1, 1), (2, 1)}
    node 1 :  {(0, 1), (3, 1)}
    node 2 :  {(0, 1), (3, 1)}
    node 3 :  {(1, 1), (4, 1), (2, 1)}
    node 4 :  {(3, 1)}
    

    This shows the structure of the dictionary used to represent an adjacency list. It's perfectly in line with the implementation of an adjacency list provided in the article about graph representations in Python.

    Finally, we can find a path from node 0 to node 3:

    traversal_path = []
    traversal_path = graph.dfs(0, 3)
    print(traversal_path)
    

    This will output the found path:

    [0, 1, 3]
    

    Now it would be useful to take a look at the steps our algorithm took:

    • Add node 0 to the traversal path and mark it as visited. Check if node 0 is equal to target node 3, since it's not, continue and traverse its neighbors (1 and 2).
    • Is neighbor 1 visited? - No. Then, the algorithm calls the function recursively for that node.
      • Recursive call for node 1: Add node 1 to the traversal path and mark it as visited. Is 1 equal to our target node 3? - No, continue and traverse its neighbors (0 and 3).
      • Is neighbor 0 visited? - Yes, move on to the next one.
      • Is neighbor 3 visited? - No, call the function recursively for this node.
        • Recursive call for node 3: Add node 3 to the traversal path and mark it as visited. Is 3 equal to our target node 3? - Yes, the target node has been found, return the traversal path.
    Current NodePathVisited
    0[0]{0}
    1[0, 1]{0, 1}
    3[0, 1, 3]{0, 1, 3}

    The algorithm stops and our program prints out the resulting traversal path from node 0 to node 3:

    [0, 1, 3]
    

    After the search, the marked nodes on the graph represent the path we took to get to the target node:

    marked graph

    In case there was no path between the start and target node, the traversal path would be empty.

    Note: Graphs can also be disconnected, meaning that there are at least two nodes that cannot be connected by a path. In this case, DFS would ignore the nodes that it can't get to.

    disconnected graph

    For example in this graph, if we were to start DFS from node 0 to node 4, there would be no such path because it has no way of getting to the target node.

    Conclusion

    In this article, we've explained the theory behind the Depth-First Search algorithm. We've depicted the widely-used recursive Python implementation, and went over the borderline cases for which the algorithm will not work properly.


    Peter Bengtsson: How to close a HTTP GET request in Python before the end

    $
    0
    0

    Does you server barf if your clients close the connection before it's fully downloaded? Well, there's an easy way to find out. You can use this Python script:

    importsysimportrequestsurl=sys.argv[1]assert'://'inurl,urlr=requests.get(url,stream=True)ifr.encodingisNone:r.encoding='utf-8'forchunkinr.iter_content(1024,decode_unicode=True):break

    I use the xh CLI tool a lot. It's like curl but better in some things. By default, if you use --headers it will make a regular GET request but close the connection as soon as it has gotten all the headers. E.g.

    ▶ xh --headers https://www.peterbe.com
    HTTP/2.0 200 OK
    cache-control: public,max-age=3600
    content-type: text/html; charset=utf-8
    date: Wed, 30 Mar 2022 12:37:09 GMT
    etag: "3f336-Rohm58s5+atf5Qvr04kmrx44iFs"
    server: keycdn-engine
    strict-transport-security: max-age=63072000; includeSubdomains; preload
    vary: Accept-Encoding
    x-cache: HIT
    x-content-type-options: nosniff
    x-edge-location: usat
    x-frame-options: SAMEORIGIN
    x-middleware-cache: hit
    x-powered-by: Express
    x-shield: active
    x-xss-protection: 1; mode=block

    That's not be confused with doing HEAD like curl -I ....

    So either with xh or the Python script above, you can get that same effect. It's a useful trick when you want to make sure your (async) server doesn't attempt to do weird stuff with the "Response" object after the connection has closed.

    Codementor: Tutorial: Python Variables

    $
    0
    0
    Introduction Variables in any programming language are similar to the variables in mathematics. For instance, we write x = 5 in mathematics. This means that x is the name of a variable and it...

    Real Python: Python GUI Programming With Tkinter

    $
    0
    0

    Python has a lot of GUI frameworks, but Tkinter is the only framework that’s built into the Python standard library. Tkinter has several strengths. It’s cross-platform, so the same code works on Windows, macOS, and Linux. Visual elements are rendered using native operating system elements, so applications built with Tkinter look like they belong on the platform where they’re run.

    Although Tkinter is considered the de facto Python GUI framework, it’s not without criticism. One notable criticism is that GUIs built with Tkinter look outdated. If you want a shiny, modern interface, then Tkinter may not be what you’re looking for.

    However, Tkinter is lightweight and relatively painless to use compared to other frameworks. This makes it a compelling choice for building GUI applications in Python, especially for applications where a modern sheen is unnecessary, and the top priority is to quickly build something that’s functional and cross-platform.

    In this tutorial, you’ll learn how to:

    • Get started with Tkinter with a Hello, World application
    • Work with widgets, such as buttons and text boxes
    • Control your application layout with geometry managers
    • Make your applications interactive by associating button clicks with Python functions

    Once you’ve mastered these skills by working through the exercises at the end of each section, you’ll tie everything together by building two applications. The first is a temperature converter, and the second is a text editor. It’s time to dive right in and learn how to build an application with Tkinter!

    Note: This tutorial is adapted from the chapter “Graphical User Interfaces” of Python Basics: A Practical Introduction to Python 3.

    The book uses Python’s built-in IDLE editor to create and edit Python files and interact with the Python shell. In this tutorial, references to IDLE have been removed in favor of more general language.

    The bulk of the material in this tutorial has been left unchanged, and you should have no problems running the example code from the editor and environment of your choice.

    Free Bonus:5 Thoughts On Python Mastery, a free course for Python developers that shows you the roadmap and the mindset you’ll need to take your Python skills to the next level.

    Building Your First Python GUI Application With Tkinter

    The foundational element of a Tkinter GUI is the window. Windows are the containers in which all other GUI elements live. These other GUI elements, such as text boxes, labels, and buttons, are known as widgets. Widgets are contained inside of windows.

    First, create a window that contains a single widget. Start up a new Python shell session and follow along!

    Note: The code examples in this tutorial have all been tested on Windows, macOS, and Ubuntu Linux 20.04 with Python version 3.10.

    If you’ve installed Python with the official installers available for Windows and macOS from python.org, then you should have no problem running the sample code. You can safely skip the rest of this note and continue with the tutorial!

    If you haven’t installed Python with the official installers, or there’s no official distribution for your system, then here are some tips for getting up and going.

    Python on macOS with Homebrew:

    The Python distribution for macOS available on Homebrew doesn’t come bundled with the Tcl/Tk dependency required by Tkinter. The default system version is used instead. This version may be outdated and prevent you from importing the Tkinter module. To avoid this problem, use the official macOS installer.

    Ubuntu Linux 20.04:

    To conserve memory space, the default version of the Python interpreter that comes pre-installed on Ubuntu Linux 20.04 has no support for Tkinter. However, if you want to continue using the Python interpreter bundled with your operating system, then install the following package:

    $ sudo apt-get install python3-tk
    

    This installs the Python GUI Tkinter module.

    Other Linux Flavors:

    If you’re unable to get a working Python installation on your flavor of Linux, then you can build Python with the correct version of Tcl/Tk from the source code. For a step-by-step walk-through of this process, check out the Python 3 Installation & Setup Guide. You may also try using pyenv to manage multiple Python versions.

    With your Python shell open, the first thing you need to do is import the Python GUI Tkinter module:

    >>>
    >>> importtkinterastk

    A window is an instance of Tkinter’s Tk class. Go ahead and create a new window and assign it to the variablewindow:

    >>>
    >>> window=tk.Tk()

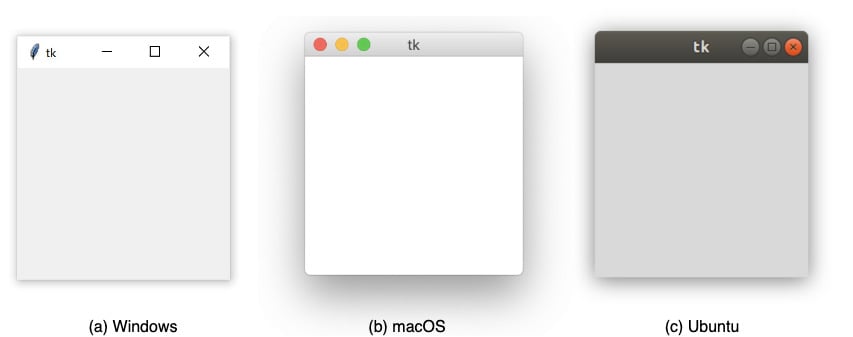
    When you execute the above code, a new window pops up on your screen. How it looks depends on your operating system:

    A blank Tkinter application window on Windows 10, macOS, and Ubuntu Linux

    Throughout the rest of this tutorial, you’ll see Windows screenshots.

    Adding a Widget

    Now that you have a window, you can add a widget. Use the tk.Label class to add some text to a window. Create a Label widget with the text "Hello, Tkinter" and assign it to a variable called greeting:

    >>>
    >>> greeting=tk.Label(text="Hello, Tkinter")

    The window you created earlier doesn’t change. You just created a Label widget, but you haven’t added it to the window yet. There are several ways to add widgets to a window. Right now, you can use the Label widget’s .pack() method:

    >>>
    >>> greeting.pack()

    The window now looks like this:

    Read the full article at https://realpython.com/python-gui-tkinter/ »


    [ Improve Your Python With 🐍 Python Tricks 💌 – Get a short & sweet Python Trick delivered to your inbox every couple of days. >> Click here to learn more and see examples ]

    Wingware: Wing Python IDE Version 8.3 - March 30, 2022

    $
    0
    0

    Wing 8.3 improves remote development by allowing it to work without an SSH agent or command line OpenSSH or PuTTY configuration. This release also supports forwarding of the SSH agent to the remote host, allows blocking access to any SSH agent, improves analysis of match/case statements, avoids reporting spurious exceptions in async def coroutines, and makes a number of other improvements to refactoring, code reformatting, debugging, and other features.

    See the change log for details.

    Download Wing 8.3 Now:Wing Pro | Wing Personal | Wing 101 | Compare Products


    What's New in Wing 8.3


    Wing 8 Screen Shot

    Support for Containers and Clusters

    Wing 8 adds support for developing, testing, and debugging Python code that runs inside containers, such as those provided by Docker and LXC/LXD, and clusters of containers managed by a container orchestration system like Docker Compose. A new Containers tool can be used to start, stop, and monitor container services, and new Docker container environments may be created during project creation.

    For details, see Working with Containers and Clusters.

    New Package Management Tool

    Wing 8 adds a new Packages tool that provides the ability to install, remove, and update packages found in the Python environment used by your project. This supports pipenv, pip, and conda as the underlying package manager. Packages may be selected manually from PyPI or by package specifications found in a requirements.txt or Pipfile.

    For details, see Package Manager .

    Improved Project Creation

    Wing 8 redesigns NewProject support so that the host, project directory, Python environment, and project type may all be selected independently. New projects may use either an existing or newly created source directory, optionally cloning code from a revision control repository. An existing or newly created Python environment may be selected, using virtualenv, pipenv, conda, or Docker.

    Improved Python Code Analysis and Warnings

    Wing 8 expands the capabilities of Wing's static analysis engine, by improving its support for f-strings, named tuples, and other language constructs. FindUses, Refactoring, and auto-completion now work within f-string expressions, Wing's built-in code warnings work with named tuples, the Source Assistant displays more detailed and complete value type information, and code warning indicators are updated more cleanly during edits.

    Improved Remote Development

    Wing 8 makes it easier to configure remote development and provides more flexibility in conforming to local security policies. The new built-in SSH implementation may be used instead of separately configuring OpenSSH or PuTTY. Remote development can now also work without access to an SSH agent: Wing will prompt for passwords, private key passphrases, and other input needed to establish an SSH connection.

    And More

    Wing 8 also adds support for Python 3.10, including match/case statements, native executable for Apple Silicon (M1) hardware, a new Nord style display theme, reduced application startup time, support for Unreal Engine, Delete Symbol and Rename Current Module refactoring operations, improved debug stepping and exception handling in async code, remote development without an SSH agent, expanded support for branching, stashing/shelving and other operations for Git and Mercurial, and much more.

    For a complete list of new features in Wing 8, see What's New in Wing 8.


    Try Wing 8.3 Now!


    Wing 8.3 is an exciting new step for Wingware's Python IDE product line. Find out how Wing 8 can turbocharge your Python development by trying it today.

    Downloads:Wing Pro | Wing Personal | Wing 101 | Compare Products

    See Upgrading for details on upgrading from Wing 7 and earlier, and Migrating from Older Versions for a list of compatibility notes.

    Python Engineering at Microsoft: Python in Visual Studio Code – April 2022 Release

    $
    0
    0

    The April 2022 release of the Python Extension for Visual Studio Code is now available.

    In this release we’re introducing the following changes:

    • Pylint extension
    • Interpreter display in the status bar moved to the right
    • Simpler way to create empty Python and Jupyter Notebook files
    • Fix for running and debugging files with conda environments

    If you are interested, you can check the full list of improvements in our changelogs for the Python, Jupyter and Pylance extensions.

    Pylint extension

    Our team is working towards breaking the tools support we offer in the Python extension into separate extensions, with the intent of improving performance, stability and no longer requiring the tools to be installed in a Python environment – as they can be shipped alongside an extension. The first one we started to work on is Pylint.

    This new extension uses the Language Server Protocol to provide linting support, and it ships with the latest version of pylint.Pylint errors and warnings being displayed on Python code in Visual Studio Code.

    It also provides additional ways to configure the severity levels of the issues reported via pylint. For example:

    “pylint.severity” : {
        "convention": "Information",
        "error": "Error",
        "fatal": "Error",
        "refactor": "Hint",
        "warning": "Warning",
        "info": "Information",
        "W0611": "Error", //per error code
        "unused-import": "Error" //per error diagnostic
    }
    

    Note: You may see two entries for the same problem in the Problems panel if you also have Pylint enabled in the Python extension. You can disable the built-in linting functionality by setting “python.linting.pylintEnabled”: false.

    You can try this new extension out today by installing it from the marketplace. If you have any issues or feature requests, you can file them at the Pylint extension’s GitHub repository.

    Interpreter display in the status bar moved to the right

    To be more consistent with other extensions in VS Code, we moved the selected interpreter version display towards the right side in the status bar, next to the language status item Python. It is now only displayed when a Python or a settings.json file is currently open, to avoid cluttering the status bar:

    Interpreter information displayed on the bottom-right of the editor, on the status bar.

    Simpler way to create empty Python and Jupyter Notebook files

    You can now create empty Python or Jupyter notebook files by running the “File: Create New…” command in the command palette, or by clicking on “New File…”  from VS Code’s welcome page:

    Clicking on

    Fix for running and debugging files with conda environments

    In the February 2022 release, we made some improvements to the experience when using Anaconda environments, which caused a regression when running files in activated conda environments. These issues are now fixed in this release.

    Other Changes and Enhancements

    We have also added small enhancements and fixed issues requested by users that should improve your experience working with Python   and Jupyter Notebooks in Visual Studio Code. Some notable changes include:

    Add support for detection and selection of conda environments lacking a python interpreter. When selecting such environment, the Python extension will automatically install a Python interpreter. (vscode-python#18357)

    We would also like to extend special thanks to this month’s contributors:

    Try out these new improvements by downloading the Python extension and the Jupyter extension from the Marketplace or install them directly from the extensions view in Visual Studio Code (Ctrl + Shift + X or ⌘ + ⇧ + X). You can learn more about Python support in Visual Studio Code in the documentation. If you run into any problems or have suggestions, please file an issue on the Python VS Code GitHub page.

    The post Python in Visual Studio Code – April 2022 Release appeared first on Python.

    Viewing all 23425 articles
    Browse latest View live


    <script src="https://jsc.adskeeper.com/r/s/rssing.com.1596347.js" async> </script>