Quantcast
Channel: Planet Python
Viewing all 22419 articles
Browse latest View live

Erik Marsja: How to Convert a Pandas DataFrame to a NumPy Array

$
0
0

The post How to Convert a Pandas DataFrame to a NumPy Array appeared first on Erik Marsja.

In this short Python Pandas tutorial, we will learn how to convert a Pandas dataframe to a NumPy array.  Specifically, we will learn how easy it is to transform a dataframe to an array using the two methods values and to_numpy, respectively. Furthermore, we will also learn how to import data from an Excel file and change this data to an array.

Now, if we want to carry out some high-level mathematical functions using the NumPy package, we may need to change the dataframe to a 2-d NumPy array.

Prerequisites

Now, if we want to convert a Pandas dataframe to a NumPy array we need to have Python, Pandas, and NumPy installed, of course. Check the post about how to install Python packages to learn more about the installation of packages. It is recommended, however, that we install Python packages in a virtual environment. Finally, if we install and download a Python distribution, we will get everything we need. Nice and easy!

How do you convert a DataFrame to an array in Python?

Now, to convert a Pandas DataFrame into a NumPy array() we can use the values method (DataFrame.values). For instance, if we want to convert our dataframe called df we can add this code: np_array = df.values.

<<<<<<

Convert a Pandas Dataframe to a Numpy Array Example 1:

In this section, we are going to three easy steps to convert a dataframe into an array.

Step #1: Import the Python Libraries

In the first example of how to convert a dataframe to an array, we will create a dataframe from a Python dictionary. The first step, however, is to import the Python libraries we need:

import pandas as pd
import numpy as np

Step #2: Get your Data into a Pandas Dataframe

In the second step, we will create the Python dictionary and convert it to a Pandas dataframe:

<pre><code class="lang-py">data = {'Rank':[1, 2, 3, 4, 5, 6],
       'Language': ['Python', 'Java',
                   'Javascript',
                   'C#', 'PHP',
                   'C/C++'],
       'Share':[29.88, 19.05, 8.17,
               7.3, 6.15, 5.92],
       'Trend':[4.1, -1.8, 0.1, -0.1, -1.0, -0.2]}

df = pd.DataFrame(data)

display(df)</code></pre>

Check the post about how to convert a dictionary to a Pandas dataframe for more information on creating dataframes from dictionaries.

Step #3 Convert the Dataframe to an Array:

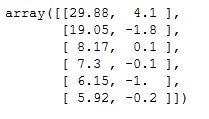
Finally, in the third step, we are ready to use the values method to convert the dataframe to a NumPy array:

<pre><code class="lang-py">df.values</code></pre>
convert dataframe to numpy array

How to Change a Dataframe to a Numpy Array Example 2:

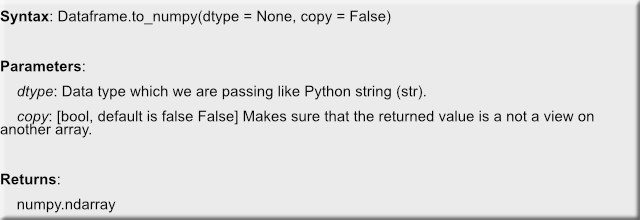
In the second example, we are going to convert a Pandas dataframe to a NumPy Array using the to_numpy() method. Now, the to_numpy() method is as simple as the values method. However, this method to convert the dataframe to an array can also take parameters.

Now, here’s a simple convert example, generating the same NumPy array as in the previous the example;

df.to_numpy()

If we want to convert just one column, we can use the dtype parameter. For instance, here we will convert one column of the dataframe (i.e., Share) to a NumPy array of NumPy Float data type;

<pre><code class="lang-py">df['Share'].to_numpy(np.float64)</code></pre>

Convert a Dataframe to a NumPy Array Example 3:

Now, if we only want the numeric values from the dataframe to be converted to NumPy array it is possible. Here, we need to use the select_dtypes method.

df.select_dtypes(include=float).to_numpy()
convert pandas dataframe to numpy array

Note, when selecting the columns with float values we used the parameter float. If we, on the other hand, want to select the columns with integers we could use int.

Read an Excel File to a Dataframe and Convert it to a NumPy Array Example 4:

Now, of course, many times we have the data stored in a file. For instance, we may want to read the data from an Excel file using Pandas and then transform it into a NumPy 2-d array. Here’s a quick an example using Pandas to read an Excel file:

df = pd.read_excel('http://open.nasa.gov/datasets/NASA_Labs_Facilities.xlsx',
                  skiprows=1)

df.iloc[0:5, 0:5]

Now, in the code, above we read an Excel (.xlsx) file from a URL. Here, the skiprows parameter was used to skip the first empty row. Moreover, we used Pandas iloc to slice columns and rows, from this df and print it.

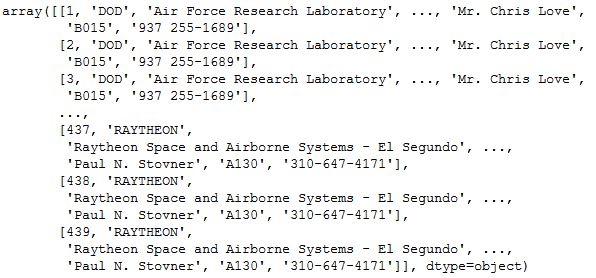
In the last example we will, again, use df.to_numpy() to convert the dataframe to a NumPy array:

np_array = df.to_numpy()
convert dataframe to numpy array

Summary Statistics of NumPy Array

In this last section, we are going to convert a dataframe to a NumPy array and use some of the methods of the array object.

data = {'Rank':[1, 2, 3, 4, 5, 6],
       'Language': ['Python', 'Java',
                   'Javascript',
                   'C#', 'PHP',
                   'C/C++'],
       'Share':[29.88, 19.05, 8.17,
               7.3, 6.15, 5.92],
       'Trend':[4.1, -1.8, 0.1, -0.1, -1.0, -0.2]}

df = pd.DataFrame(data)

np_array = df.select_dtypes(include=float).to_numpy()

First, we are going to summarize the two dimensions using the sum() method.

np_array.sum(axis=0)

Second, we can calculate the mean values of the two dimensions using the mean():

np_array.sum(axis=0)

Note, that we used the parameter axis and set it to “0”. Now, if we didn’t use this parameter and set it to “0” we would have calculated it along each row, sort of speaking, of the array.

Conclusion

In this Pandas dataframe tutorial, we have learned how to convert Pandas dataframes to NumPy arrays. It was an easy task and we learned how to do this using valuesand to_numpy.

The post How to Convert a Pandas DataFrame to a NumPy Array appeared first on Erik Marsja.


PyCoder’s Weekly: Issue #410 (March 3, 2020)

$
0
0

#410 – MARCH 3, 2020
View in Browser »

The PyCoder’s Weekly Logo


Advanced Usage of Python Requests

“While it’s easy to immediately be productive with requests because of the simple API, the library also offers extensibility for advanced use cases. If you’re writing an API-heavy client or a web scraper you’ll probably need tolerance for network failures, helpful debugging traces and syntactic sugar.”
DANI HODOVIC

EOF Is Not a Character

Do you know how an application knows when a read operation reaches the end of a file? In this interesting read, explore what EOF (end-of-file) really is by writing your own version of the Linux cat command in ANSI C, Python, Go, and JavaScript.
RUSLAN SPIVAK

Automate & Standardize Code Reviews for Python

alt

Take the hassle out of code reviews - Codacy flags errors automatically, directly from your Git workflow. Customize standards on coverage, duplication, complexity & style violations. Use in the cloud or on your servers for 30 different languages. Get started for free →
CODACYsponsor

Double-Checked Locking With Django ORM

The double-checked locking pattern is useful when you need to restrict access to a certain resource to stop simultaneous process from working on it at the same time. Learn how to apply this pattern in Django using the ORM and database level locking features.
LUKE PLANT

Python Bindings: Calling C or C++ From Python

What are Python bindings? Should you use ctypes, CFFI, or a different tool? In this step-by-step tutorial, you’ll get an overview of some of the options you can use to call C or C++ code from Python.
REAL PYTHON

PyPy Status Blog: PyPy and CFFI Have Moved to Heptapod

PyPy has moved the center of their development off Bitbucket and to the new foss.heptapod.net/pypy
MOREPYPY.BLOGSPOT.COM

PyCon 2020: March 2 Update on COVID-19

“As of March 2, PyCon 2020 in Pittsburgh, PA is scheduled to happen.”
PYCON.BLOGSPOT.COM

Discussions

Python Jobs

Senior Python/Django Software Engineer (London, UK)

Zego

Python Developer (Malta)

Gaming Innovation Group

Senior Python Software Engineer (London, UK)

Tessian

Sr Software Engineer Backend (Denver, CO, USA)

CyberGRX

Senior Software Developer (Vancouver, BC, Canada)

AbCellera

More Python Jobs >>>

Articles & Tutorials

Packaging and Distributing cppyy-Generated Python Bindings for C++ Projects With CMake and Setuptools

“I rewrote the cppyy CMake modules to be much more user friendly and to work using only Anaconda/PyPI packages, and to generate more feature-complete and customizable Python packages using CMake’s configure_file, while also supporting distribution of cppyy pythonization functions.”
CAMILLE SCOTT

Polynomial Regression From Scratch in Python

Polynomial regression is a core concept underlying machine learning. Learn how to build a polynomial regression model from scratch in Python by working you a real world example to predict salaries based on job position.
RICK WIERENGA

How To Build A Digital Virtual Assistant In Python

alt

The rise of AI has resulted in rapid growth of the digital assistant market, including Siri and Alexa. With Python, it’s easy to code your own digital assistant with voice activation and responses to basic inquiries. Check out ActiveState’s tutorial to learn how →
ACTIVESTATEsponsor

How to Implement a Python Stack

Learn how to implement a stack data structure in Python. You’ll see how to recognize when a stack is a good choice for data structures, how to decide which implementation is best for a program, and what extra considerations to make about stacks in a threading or multiprocessing environment.
REAL PYTHONvideo

Pass the Python Thread State Explicitly

Eric Snow has been working on solving multi-core Python via subinterpreters since 2015. In this article, core developer Victor Stinner discusses how state is passed between interpreters and summarizes his proposal for explicitly passing state to internal C function calls.
VICTOR STINNER

nbdev: Use Jupyter Notebooks for Everything

A Python programming environment called nbdev, which allows you to create complete python packages, including tests and a rich documentation system, all in Jupyter Notebooks.
JEREMY HOWARD

Dealing With Legacy Code

Learn about some of the common problems you encounter when dealing with legacy codebases and how to overcome them in an efficient way that balances delivery with code quality.
ISHA TRIPATHI

Totally Ordered Enums in Python With ordered_enum

Python’s enum.Enum does not provide ordering by default. See how ordering can be added to enums and why these orderings are useful in the first place.
WILLIAM WOODRUFF

Conditional Coverage

Sometimes your code has to take different paths based on the external environment. Make sure that your coverage follows it smoothly.
NIKITA SOBOLEV• Shared by sobolevn

Deploying Machine Learning Models: gRPC and TensorFLow Serving

Learn how to deploy TensorFlow models and consume predictions via gRPC.
RUBIKSCODE.NET

Blackfire Profiler Public Beta Open—Get Started in Minutes

Blackfire Profiler now supports Python, through a Public Beta. Profile Python code with Blackfire’s intuitive developer experience and appealing user interface. Spot bottlenecks in your code, and compare code iterations profiles.
BLACKFIREsponsor

Projects & Code

Events

PyTexas 2020

May 16 to 17, 2020 in Austin, TX
PYTEXAS.ORG


Happy Pythoning!
This was PyCoder’s Weekly Issue #410.
View in Browser »

alt

[ Subscribe to 🐍 PyCoder’s Weekly 💌 – Get the best Python news, articles, and tutorials delivered to your inbox once a week >> Click here to learn more ]

Roberto Alsina: Episodio 27: Interpretado, mis polainas!

IslandT: 64 bit Python installation on Windows 10

$
0
0

After a brief introduction to Python programming language in the previous article, in this chapter, we will go ahead and install 64 bit Python on Windows 10 operating system before we start to write the python program in the next chapter. I assume most of you are using the 64 bit Windows operating system’s laptop or desktop if it is otherwise then you can follow the Python installation instructions either on Installing Python 3 on Mac OS or Installing Python 3 on Linux.

Let us go to the python homepage and download the latest version of the python package, in this case, Python 3.8.2!

Under the Files section of that download page, look for Windows x86-64 executable installer under the version section to download the 64bit Python for Windows 10 operating system.

After you have downloaded the Python installer and follow all necessary steps to install Python 3.8.2 on the Windows 10 OS, you will need to make the Windows os recognize the Python path on the computer hard drive! Do the following…

Under Control Panel, select System and Security, then System->Advanced system settings. Click on the Environment Variables button to open the Environment Variables panel, under the User variables section, select Path and click on the Edit button.
Click on the New button to add in the path where the Python installer has installed the Python 3.8.2 package on your laptop’s hard drive (probably under the AppData folder)
Next is the time to verify that the windows 10 operating system has recognized the path to the python 3.8.2 package on the hard drive. Open the windows command prompt and type in python –version which will show you the version of python which has been installed at the moment.
Next type in py then start to type in print(“Hello World!”) after the >>> sign within the command prompt, if everything is fine then Hello World! will be printed on the screen.

As you can see, Python code is really simple and easy as compared to Java which in order to print out the “Hello World!” phrase, we will need to write many lines of code instead of only one.

In the next chapter, we will start to write the python program. If you are really interested in learning Python, do check out this Python e-book!

Test and Code: 104: Top 28 pytest plugins - Anthony Sottile

$
0
0

pytest is awesome by itself. pytest + plugins is even better.
In this episode, Anthony Sottile and Brian Okken discuss the top 28 pytest plugins.

Some of the plugins discussed (we also mention a few plugins related to some on this list):

  1. pytest-cov
  2. pytest-timeout
  3. pytest-xdist
  4. pytest-mock
  5. pytest-runner
  6. pytest-instafail
  7. pytest-django
  8. pytest-html
  9. pytest-metadata
  10. pytest-asyncio
  11. pytest-split-tests
  12. pytest-sugar
  13. pytest-rerunfailures
  14. pytest-env
  15. pytest-cache
  16. pytest-flask
  17. pytest-benchmark
  18. pytest-ordering
  19. pytest-watch
  20. pytest-pythonpath
  21. pytest-flake8
  22. pytest-pep8
  23. pytest-repeat
  24. pytest-pylint
  25. pytest-randomly
  26. pytest-selenium
  27. pytest-mypy
  28. pytest-freezegun

Honorable mention:

  • pytest-black
  • pytest-emoji
  • pytest-poo

Special Guest: Anthony Sottile.

Sponsored By:

Support Test & Code: Python Software Testing & Engineering

Links:

<p>pytest is awesome by itself. pytest + plugins is even better.<br> In this episode, Anthony Sottile and Brian Okken discuss the top 28 pytest plugins.</p> <p>Some of the plugins discussed (we also mention a few plugins related to some on this list):</p> <ol> <li> pytest-cov</li> <li> pytest-timeout</li> <li> pytest-xdist</li> <li> pytest-mock</li> <li> pytest-runner</li> <li> pytest-instafail</li> <li> pytest-django</li> <li> pytest-html</li> <li> pytest-metadata</li> <li>pytest-asyncio</li> <li>pytest-split-tests</li> <li>pytest-sugar</li> <li>pytest-rerunfailures</li> <li>pytest-env</li> <li>pytest-cache</li> <li>pytest-flask</li> <li>pytest-benchmark</li> <li>pytest-ordering</li> <li>pytest-watch</li> <li>pytest-pythonpath</li> <li>pytest-flake8</li> <li>pytest-pep8</li> <li>pytest-repeat</li> <li>pytest-pylint</li> <li>pytest-randomly</li> <li>pytest-selenium</li> <li>pytest-mypy</li> <li>pytest-freezegun</li> </ol> <p>Honorable mention:</p> <ul> <li>pytest-black</li> <li>pytest-emoji</li> <li>pytest-poo</li> </ul><p>Special Guest: Anthony Sottile.</p><p>Sponsored By:</p><ul><li><a href="https://oxylabs.io/testandcode" rel="nofollow">Oxylabs</a>: <a href="https://oxylabs.io/testandcode" rel="nofollow">Visit oxylabs.io/testandcode to find out more about their services and to apply for a free trial of their Next-Generation Residential Proxies.</a></li><li><a href="http://go.thoughtleaders.io/1758720200302" rel="nofollow">Springboard</a>: <a href="http://go.thoughtleaders.io/1758720200302" rel="nofollow">Check out Springboards machine learning engineering career track.</a> Promo Code: AISPRINGBOARD</li></ul><p><a href="https://www.patreon.com/testpodcast" rel="payment">Support Test & Code: Python Software Testing & Engineering</a></p><p>Links:</p><ul><li><a href="https://pypistats.org/" title="PyPI Download Stats" rel="nofollow">PyPI Download Stats</a></li><li><a href="https://hugovk.github.io/top-pypi-packages/" title="Top PyPI Packages: A monthly dump of the 4,000 most-downloaded packages from PyPI" rel="nofollow">Top PyPI Packages: A monthly dump of the 4,000 most-downloaded packages from PyPI</a></li><li><a href="https://testandcode.com/25" title="Test & Code 25: Selenium, pytest, Mozilla – Dave Hunt" rel="nofollow">Test & Code 25: Selenium, pytest, Mozilla – Dave Hunt</a></li><li><a href="https://pre-commit.com/" title="pre-commit" rel="nofollow">pre-commit</a></li></ul>

Django Weblog: Django security releases issued: 3.0.4, 2.2.11, and 1.11.29

$
0
0

In accordance with our security release policy, the Django team is issuing Django 3.0.4, Django 2.2.11 and Django 1.11.29. These releases address the security issue detailed below. We encourage all users of Django to upgrade as soon as possible.

CVE-2020-9402: Potential SQL injection via tolerance parameter in GIS functions and aggregates on Oracle

GIS functions and aggregates on Oracle were subject to SQL injection, using a suitably crafted tolerance.

Thank you to Norbert Szetei for the report.

Affected supported versions

  • Django master branch
  • Django 3.0
  • Django 2.2
  • Django 1.11

Resolution

Patches to resolve the issue have been applied to Django's master branch and the 3.0, 2.2, and 1.11 release branches. The patches may be obtained from the following changesets:

The following releases have been issued:

The PGP key ID used for these releases is Mariusz Felisiak: 2EF56372BA48CD1B.

General notes regarding security reporting

As always, we ask that potential security issues be reported via private email to security@djangoproject.com, and not via Django's Trac instance or the django-developers list. Please see our security policies for further information.

Real Python: Alexa Python Development: Build and Deploy an Alexa Skill

$
0
0

Smart home speakers were a novel idea just a couple of years ago. Today, they’ve become a central part of many people’s homes and offices and their adoption is only expected to grow. Among the most popular of these devices are those controlled by Amazon Alexa. In this tutorial, you’ll become an Alexa Python developer by deploying your own Alexa skill, an application that users will interact with using voice commands to Amazon Alexa devices.

In this tutorial, you’ll learn:

  • What the main components of an Alexa skill are
  • How to set up an Alexa skill and create Intents
  • What the ask_sdk_core Alexa Python package is
  • How to use ask_sdk_core to create the business logic of your Alexa Python skill
  • How to build, deploy, and test your Alexa Python skill using the online developer console

Free Bonus:Click here to download a Python speech recognition sample project with full source code that you can use as a basis for your own speech recognition apps.

Getting Started With Alexa Python Development

To follow this tutorial, you’ll need to make a free Alexa developer account. On that page, you’ll take the following steps:

  1. Click the Get Started button.
  2. Click the Sign-Up button on the subsequent page.
  3. Click Create your Amazon Account.
  4. Fill out the form with the required details.
  5. Click Submit to complete the sign-up process.

You’ll also need to be familiar with concepts such as lists and dictionaries in Python, as well as JavaScript Object Notation (JSON). If you’re new to JSON, then check out Working With JSON Data in Python.

Let’s get started!

Understanding Alexa Skills

An Alexa Python developer must be familiar with a number of different Alexa skill components, but the two most important components are the interface and the service:

  1. The skill interface processes the user’s speech inputs and maps it to an intent.
  2. The skill service contains all the business logic that determines the response for a given user input and returns it as a JSON object.

The skill interface will be the frontend of your Alexa skill. This is where you’ll define the intents and the invocation phrases that will perform a certain function. Essentially, this is the part of the skill that’s responsible for interacting with the users.

The skill service will be the backend of your Alexa skill. When a specific intent is triggered by the user, it will send that information as a request to the skill service. This will contain the business logic to be returned along with valuable information to the frontend, which will finally be relayed back to the user.

Setting Up Your Environment

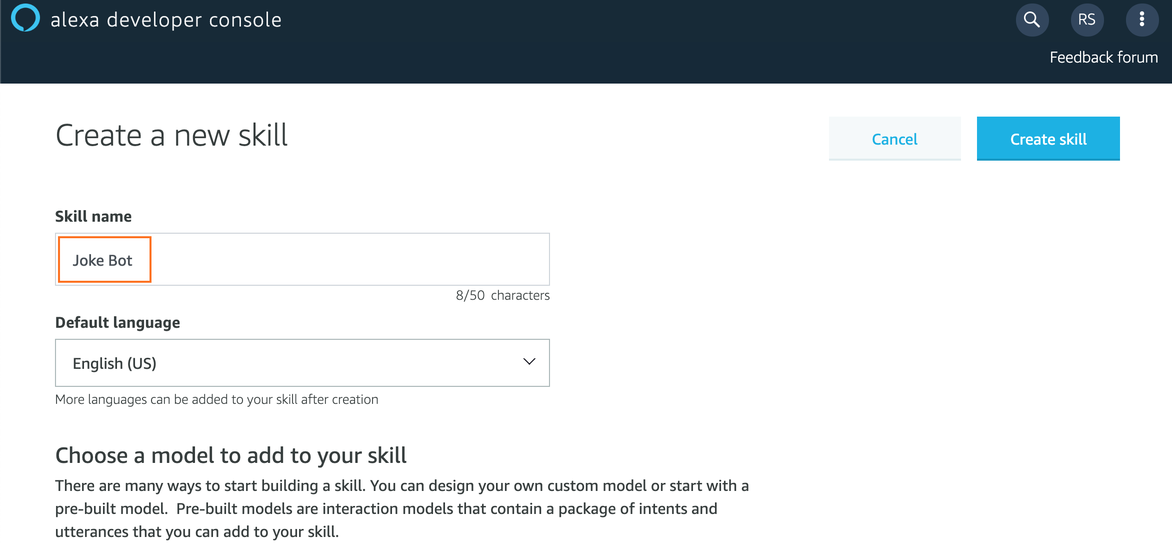
It’s time to start building your first Alexa Python skill! Sign in to the Alexa developer console and click on the Create Skill button to get started. On the next page, enter the Skill name, which will be Joke Bot:

Creating a new Alexa Skill

This will be the invocation phrase of your skill. It’s the phrase a user will speak to start using your Alexa skill. You can change this to something else later on if you’d like. Also, note that Alexa skills can interact in many languages, which you can see from the Default Language dropdown menu. For now, just set it to English (US).

Next, you’ll need to choose a model to add to your skill. These models are like templates that have been pre-designed by the Amazon team to help you get started with Alexa Python development, based on some common use cases. For this tutorial, you should select the Custom model.

Finally, you need to select a method to host the backend of your Alexa skill. This service will contain the business logic of your application.

Note: If you select the Provision your own option, then you’ll have to host your own backend for your Alexa Python projects. This can be an API built and hosted on a platform of your choice. The other option is to create a separate AWS Lambda function and link it to your Alexa skill. You can learn more about AWS Lambda pricing on their pricing page.

For now, select Alexa-Hosted (Python) as the backend for your Alexa skill. This will automatically provide you with a hosted backend within the AWS free tier so you don’t have to pay anything upfront or set up a complicated backend right now.

Finally, click the Create Skill button to proceed. You might be asked to fill out a CAPTCHA here, so complete that as well. After a minute or so, you should be redirected to the Build section of the developer console.

Understanding the Alexa Skill Model

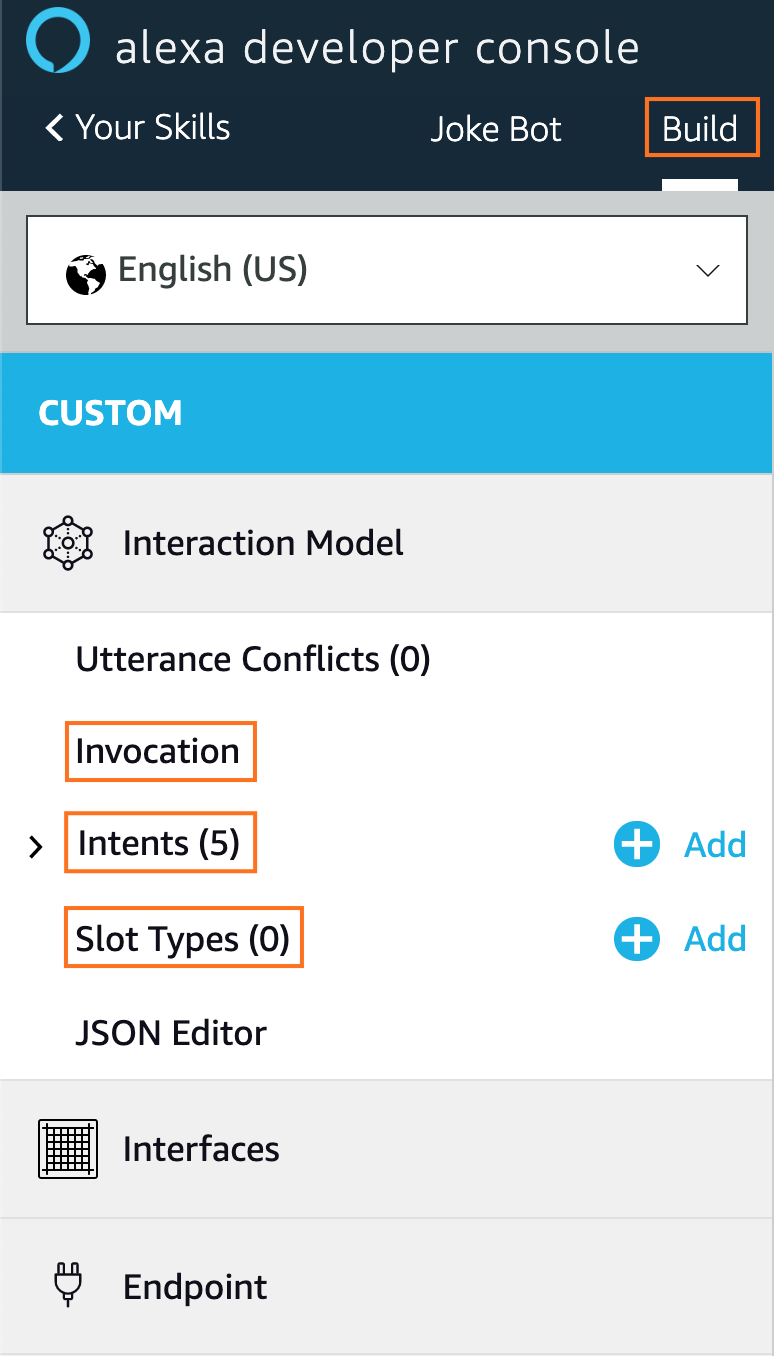
Once you’ve logged into the Alexa developer console and selected or created a skill, you’ll be greeted with the Build section. This section provides you with a lot of options and controls to set up the interaction model of the skill. The components of this interaction model allow you to define how the users will interact with your skill. These properties can be accessed through the left-side panel, which looks something like this:

Alexa Developer Console Walkthrough

As an Alexa Python developer, there are a few components of an Alexa skill interaction model that you’ll need to know about. The first is the invocation. This is what users will say to begin interacting with your Alexa skill. For example, the user will say, “Joke Bot,” to invoke the Alexa skill you’ll build in this tutorial. You can change this from the Invocation section at any time.

Another component is the intent, which represents the core functionality of your application. Your app will have a set of intents that will represent what kinds of actions your skill can perform. To provide contextual information for a given intent, you’ll use a slot, which is a variable in an utterance phrase.

Consider the following example. A sample utterance to invoke the weather intent could be, “Tell me about the weather.” To make the skill more useful, you can set the intent to be, “Tell me about the weather in Chicago,” where the word “Chicago” will be passed as a slot variable, which improves the user experience.

Lastly, there are slot types, which define how data in a slot is handled and recognized. For example, the AMAZON.DATE slot type easily converts words that indicate a date—like “today, “tomorrow”, and others—into a standard date format (such as “2019-07-05”). You can check out the official slot type reference page to learn more.

Note: To learn more about the Alexa skill interaction model, check out the official documentation.

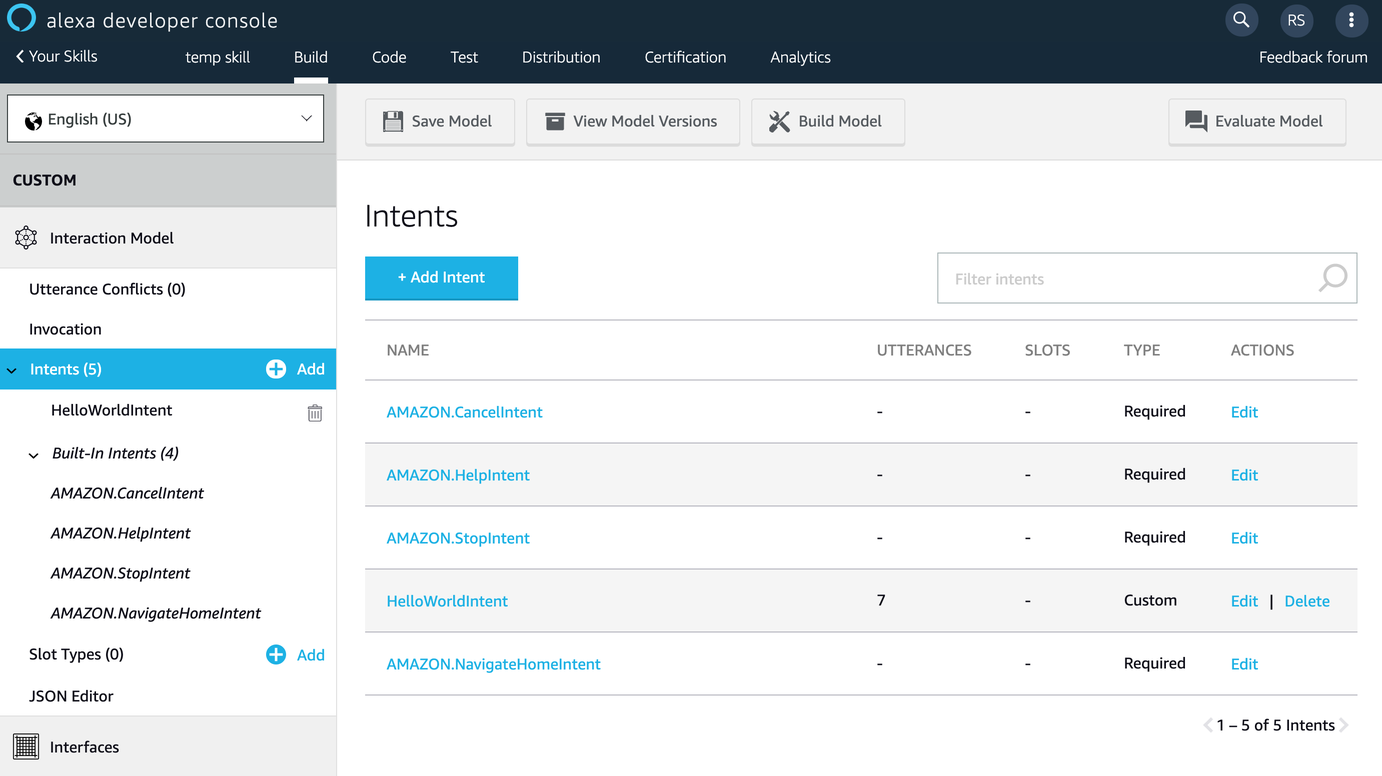
At this point, the Intents panel should be open. If it’s not, then you can open it by selecting Intents from the sidebar on the left. You’ll notice that there are five intents already set up by default:

Alexa Developer Console Intents Panel

The Intents panel includes a HelloWorldIntent and five Built-in Intents. The built-in intents are there to remind you to account for some common cases that are important to making a user-friendly bot. Here’s a brief overview:

  1. AMAZON.CancelIntent lets the user cancel a transaction or task. Examples include, “Never mind,” “Forget it,” “Exit,” and “Cancel,” though there are others.
  2. AMAZON.HelpIntent provides help about how to use the skill. This could be used to return a sentence that serves as a manual for the user on how to interact with your skill.
  3. AMAZON.StopIntent allows the user to exit the skill.
  4. AMAZON.NavigateHomeIntent navigates the user to the device home screen (if a screen is being used) and ends the skill session.

By default, there are no sample utterances assigned to trigger these intents, so you’ll have to add those as well. Consider it part of your training as an Alexa Python developer. You can learn more about these built-in intents in the official documentation.

Viewing a Sample Intent

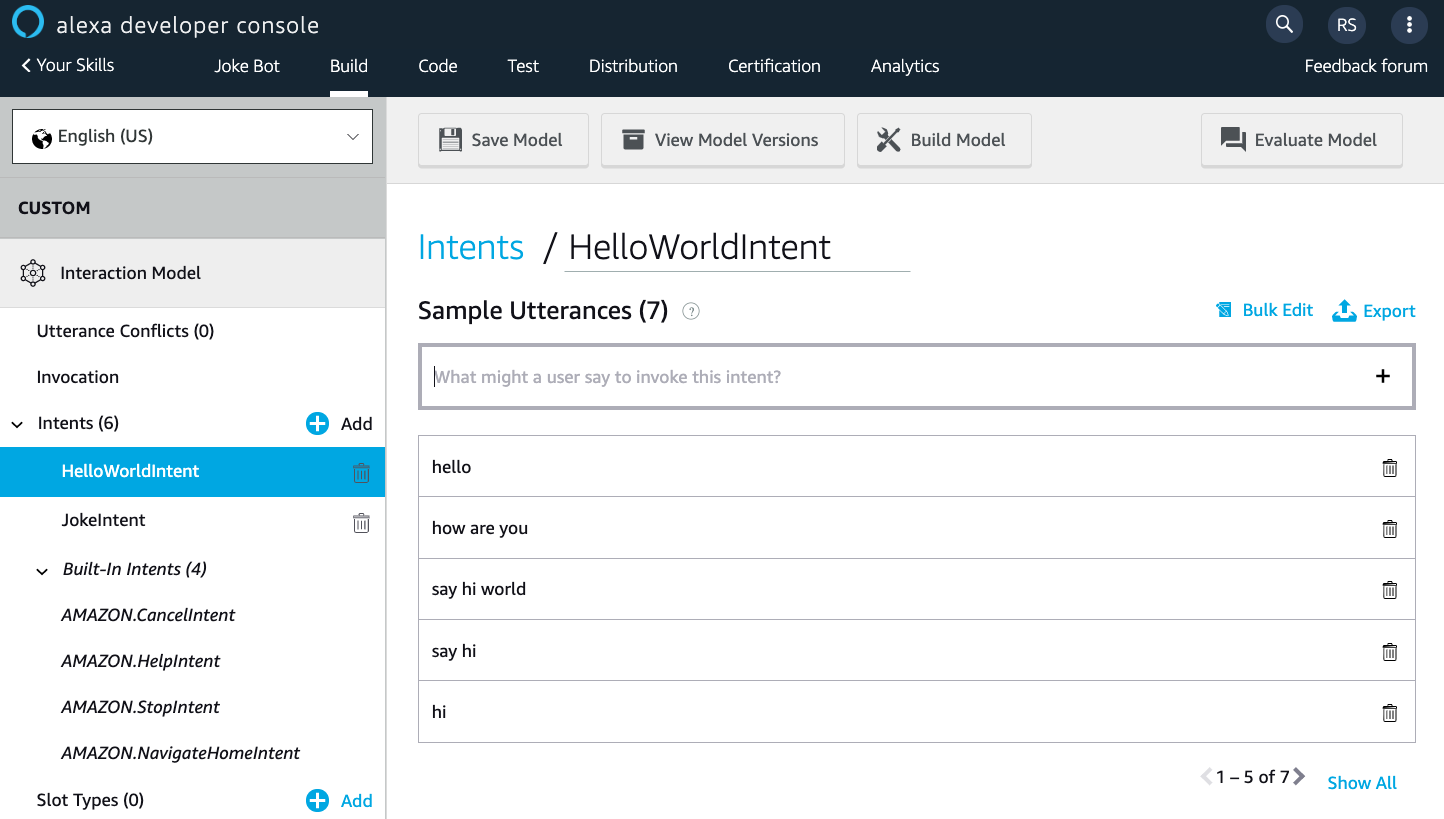
Later in this tutorial, you’ll learn how to make a new intent, but for now, it’s a good idea to take a look at some existing intents that are part of every new skill you create. To start, click the HelloWorldIntent to see its properties:

Hello World Intent Properties

You can see the sample utterances that a user can speak to invoke this intent. When this intent is invoked, this information is sent to the backend service of your Alexa skill, which will then execute the required business logic and return a response.

Below this, you have the option to set up the Dialog Delegation Strategy, which allows you to delegate a specific dialog that you define to a particular intent. While you won’t cover this in this tutorial, you can read more about it in the official documentation.

Next, you have the option to define slots for some particular data that your intent is supposed to collect. For example, if you were to create an intent that tells the weather for a given day, then you’d have a Date slot here that would collect the date information and send it to your backend service.

Note: In addition, the Intent Confirmation option can be useful in a case when you’re collecting a number of different data points from your user in a single intent and you want to prompt the user before sending it on for further processing.

Whenever you make changes to an intent, you need to click the Save Model button to save it. Then, you can click the Build Model button to go ahead and test your Alexa Python skill.

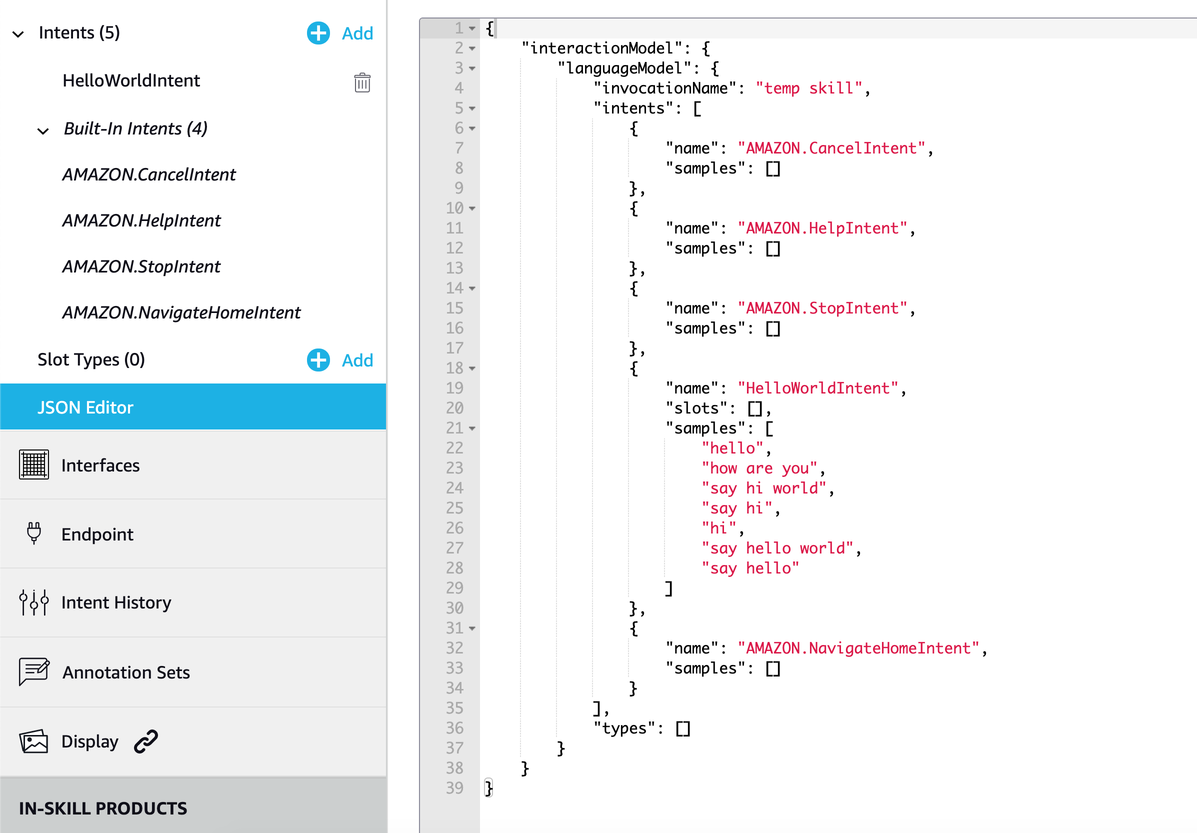
It’s helpful to know that the interaction model of a skill can be completely represented in a JSON format. To see the current structure of your Alexa skill, click the JSON Editor option from the left side panel of the console:

Alexa Developer Console JSON Editor

If you make a change directly using the JSON editor, then the changes are also reflected in the developer console UI. To test this behavior, add a new intent and click Save Model.

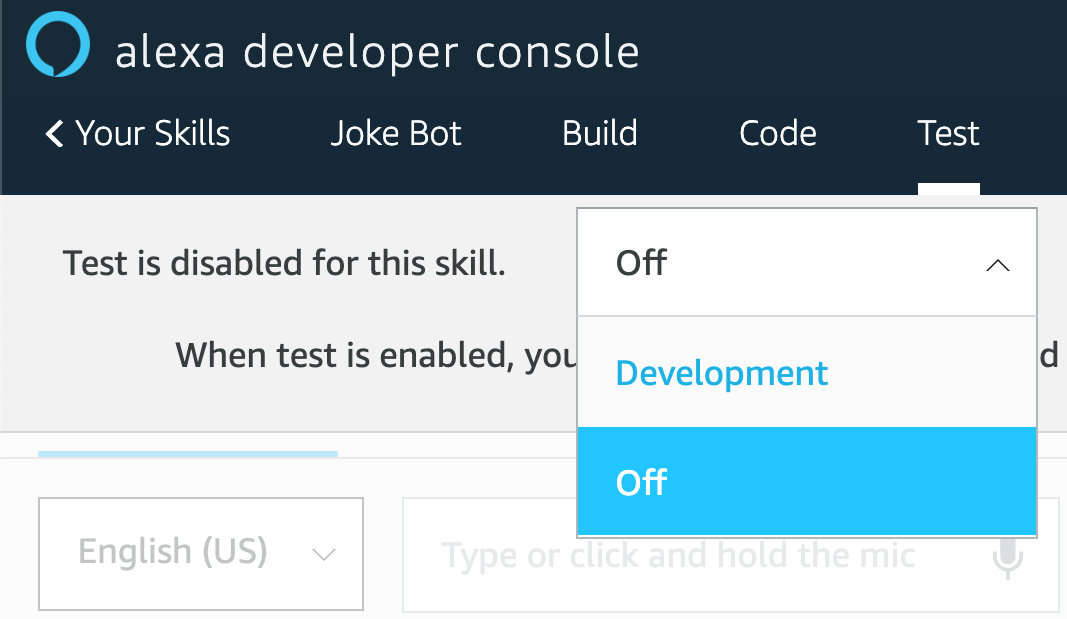
Once you’ve made all the necessary changes to the interaction model of your skill, you can open the Test section of the developer console to test out your skill. Testing is an important part of becoming an Alexa Python developer, so be sure not to skip this step! Click the Test button from the top navigation bar on the developer console. By default, testing will be disabled. From the drop-down menu, select Development to start testing:

Alexa Developer Console Test Section

Here, you have a number of ways that you can test out your Alexa Python skill. Let’s do a quick test so that you can get an idea of how your Alexa skill will respond to an utterance.

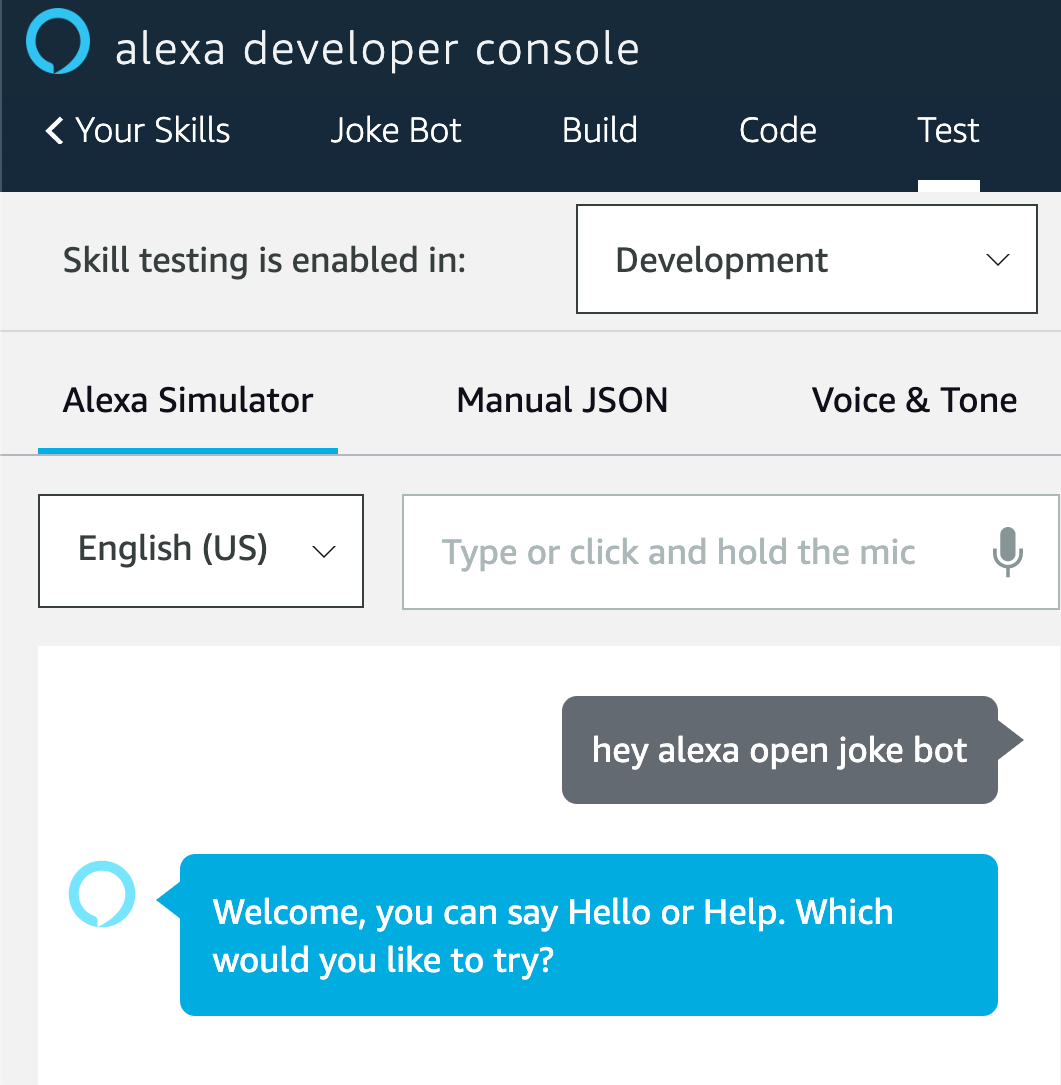
Select the Alexa Simulator option from the left side panel, then enter the phrase, “Hey Alexa, open Joke Bot.” You can do this either by typing it in the input box or by using the Mic option. After a couple of seconds, a response will be returned back to you:

Testing Alexa Simulator

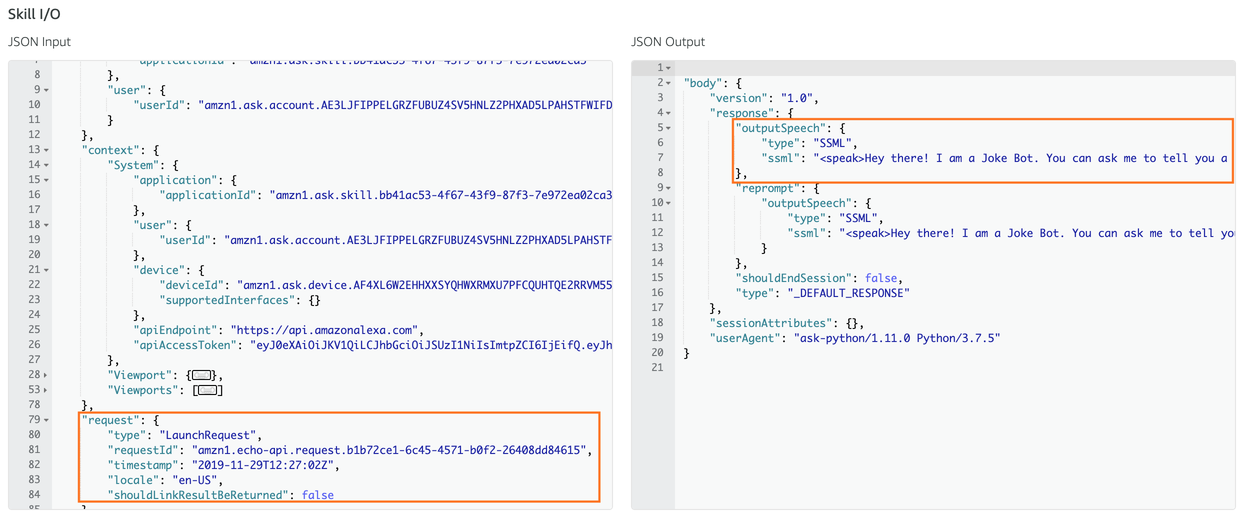
In addition to the voice response, you can also see the JSON Input that was sent to the backend service of your Alexa skill, as well as the JSON Output that was received back to the console:

Alexa Skill Test JSON Input/Output

Here’s what’s happened so far:

  • The JSON input object was constructed from input data that the user entered through voice or text.
  • The Alexa simulator packaged up the input along with other relevant metadata and sent it to the backend service. You can see this in the JSON Input box.
  • The backend service received the input JSON object and parsed it to check the type of the request. Then, it passed the JSON to the relevant intent handler function.
  • The intent handler function processed the input and gathered the required response, which is sent back as a JSON response to the Alexa simulator. You can see this in the JSON Output box.
  • The Alexa simulator parsed this JSON and read the speech response back to you.

Note: You can read about the JSON request-response mechanism for Alexa skills in the official docs.

Now that you have an overview of the different components of an Alexa skill and how information flows from one part to the other, it’s time to start building your Joke Bot! In the next section, you’ll put your Alexa Python developer skills to the test by creating a new intent.

Creating New Intents

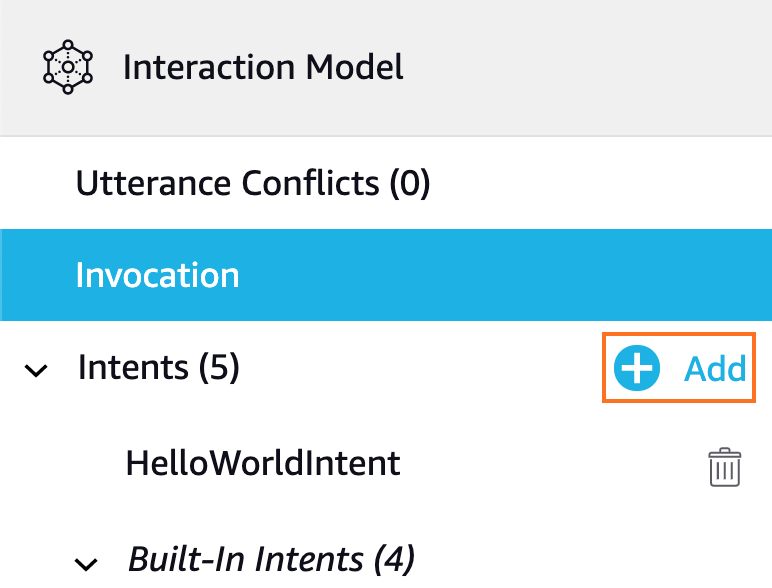
Let’s start by creating the JokeIntent, which will return a random joke from a list to the user. Open the Build section of your Alexa developer console. Then, click the Add button next to the Intents option from the left side panel:

Add new Intent

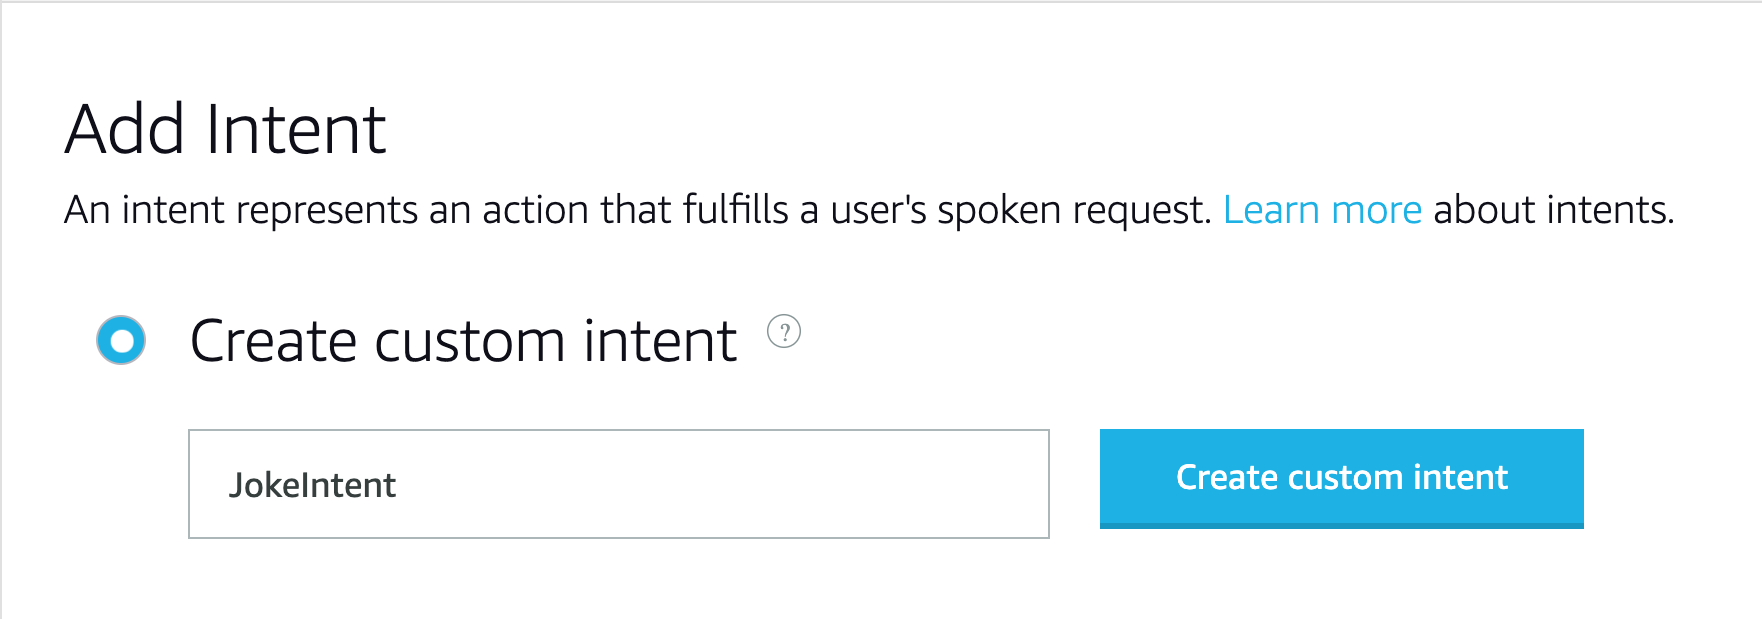
With the Create custom intent option selected, set the name to JokeIntent and then click the Create custom intent button:

Create new Intent

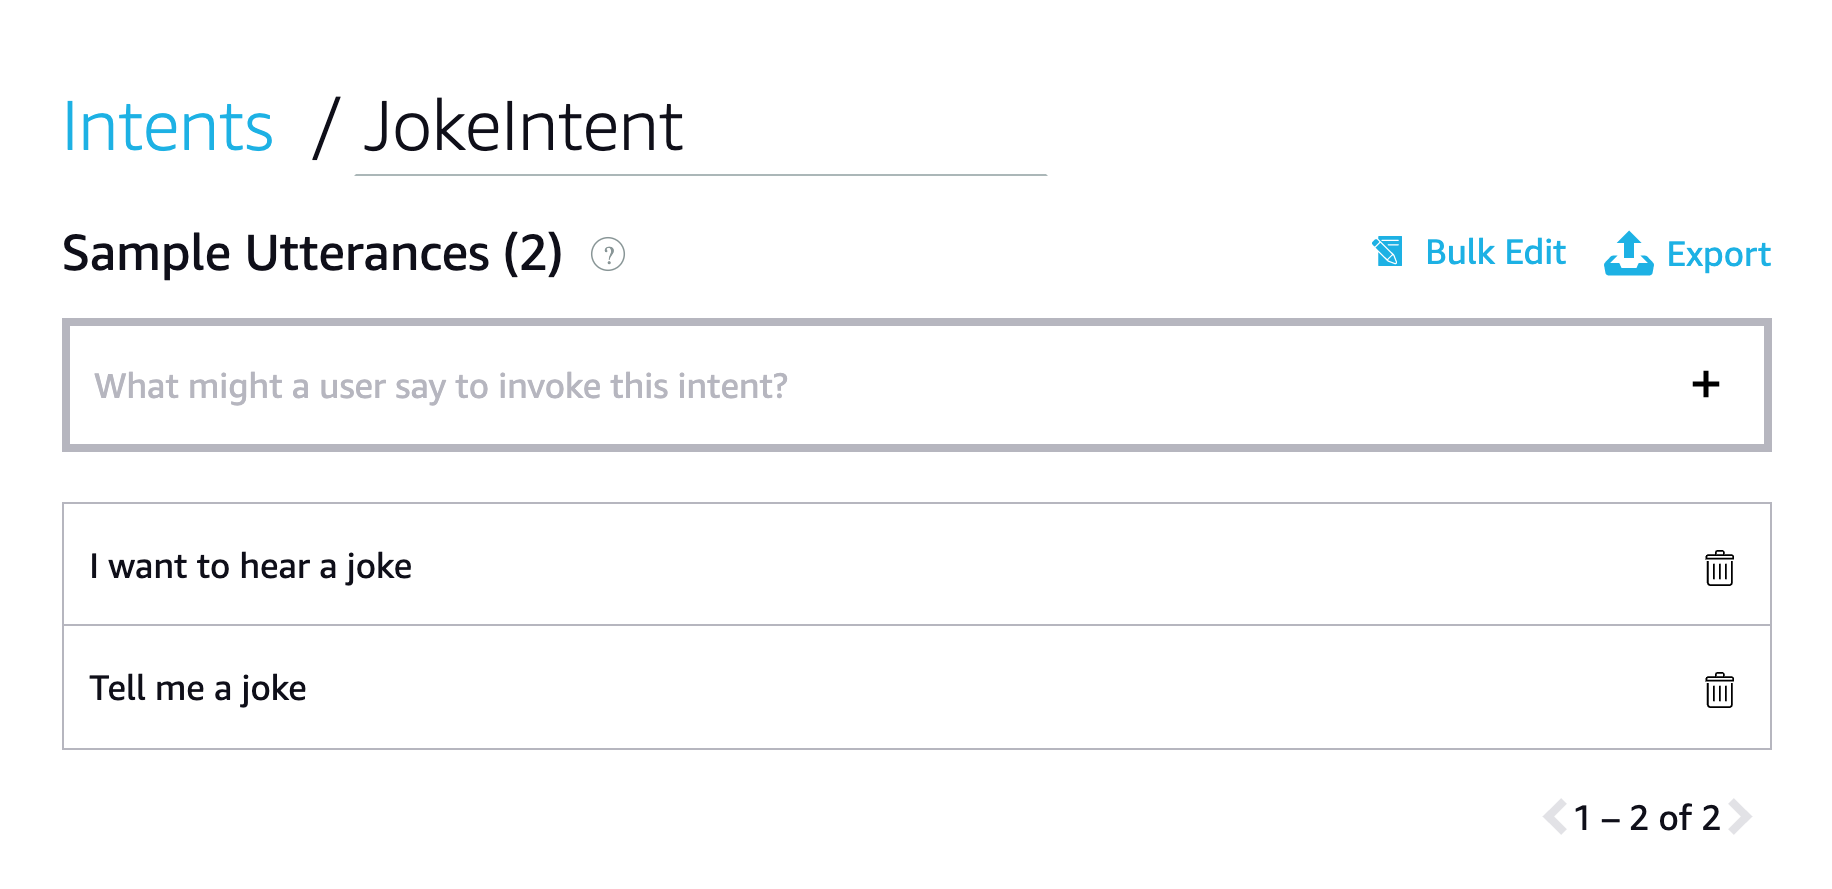
Next, you need to add sample utterances that the user will speak to invoke this intent. These can be phrases like “Tell me a joke” or “I want to hear a joke.” Type in a phrase and click the plus sign (+) to add it as a sample utterance. Here’s what that should look like:

Add sample utterances for Intent

You can add more sample utterances, but for now, these will do just fine. Lastly, click the Save Model button in the top-left corner of the window to save these changes.

Remember, you’ll need to build your model before you can test it out. Click the Build Model button to re-build the interaction model of your Alexa Python skill. You’ll see a progress notification on the bottom-right of your browser window. Once the build process is successful, you should see another pop-up notification indicating the status of the build process.

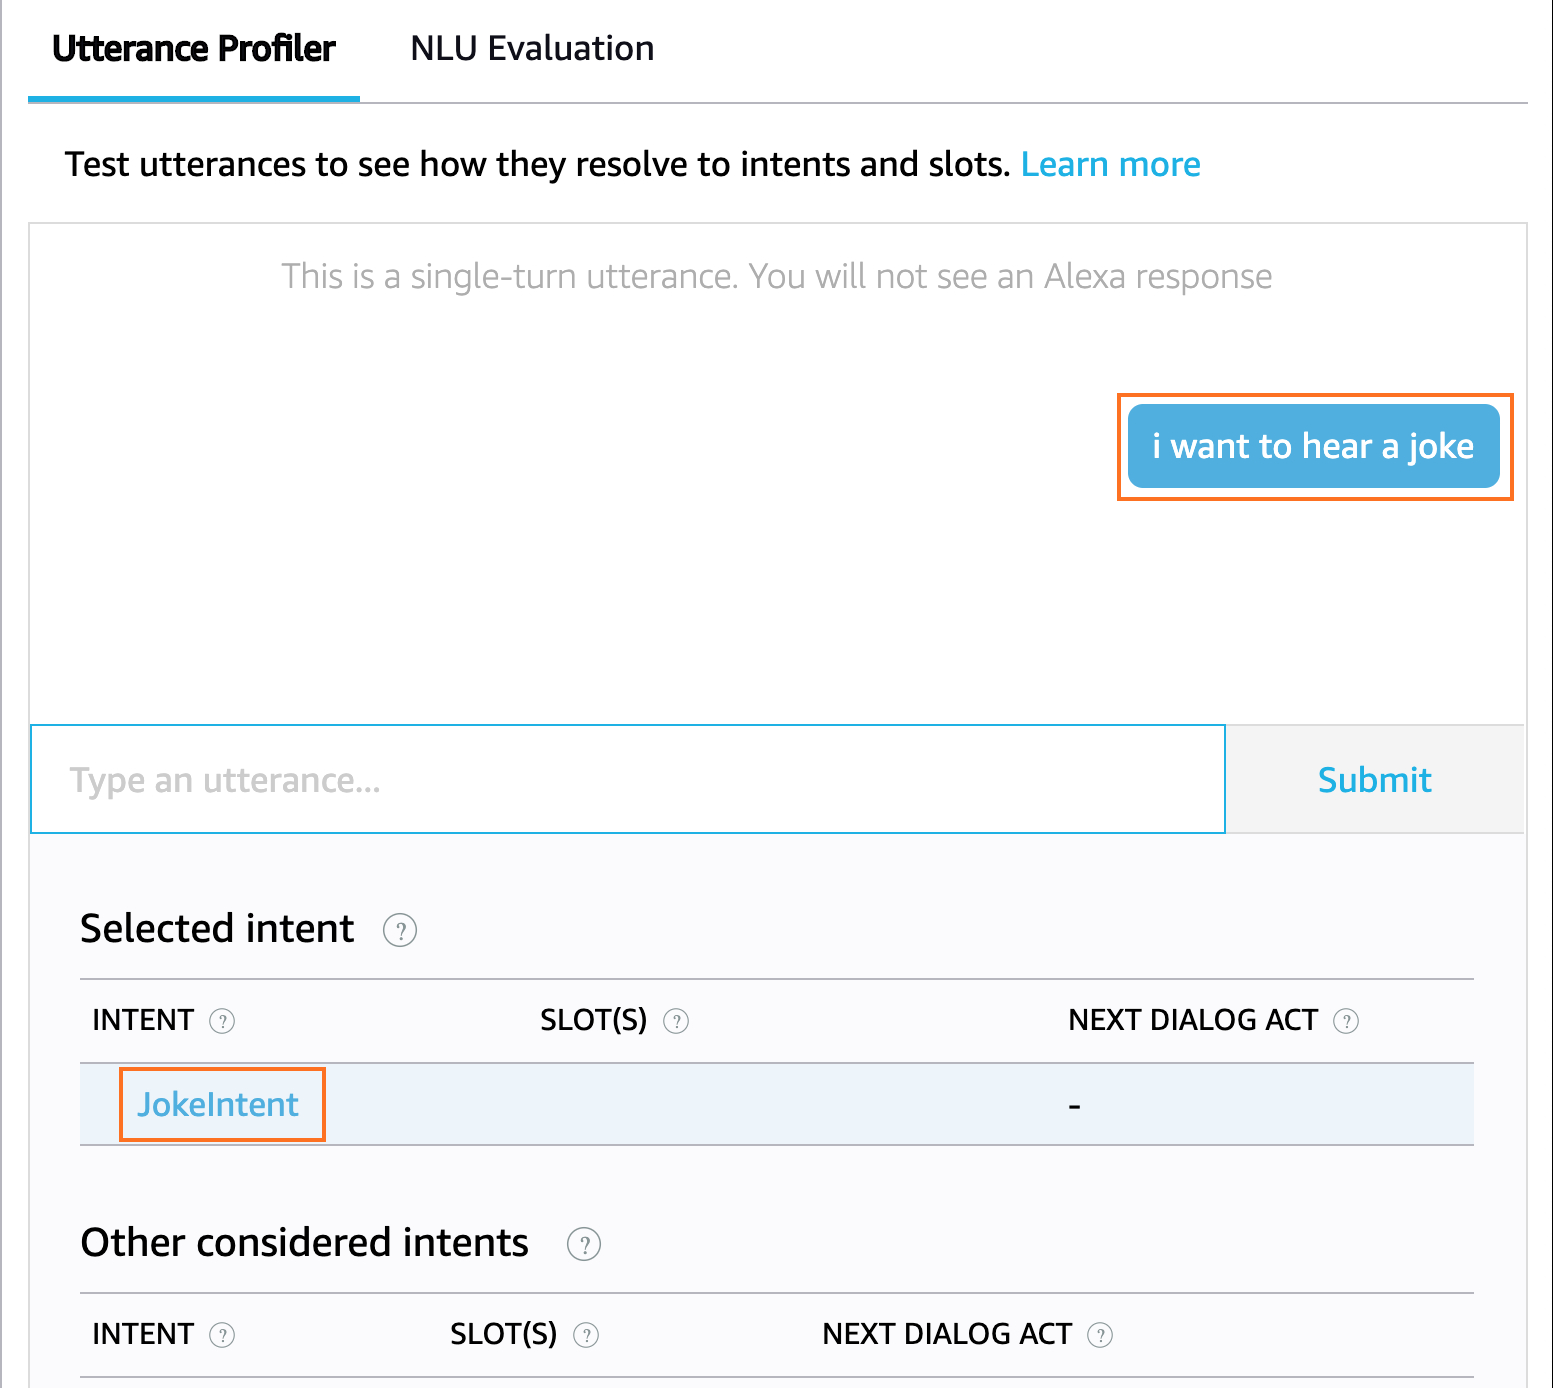
You can check to see if the JokeIntent is successfully triggered or not. Click the Evaluate Model button in the top-right corner of the developer console. A small window will pop in from the side allowing you to check what intent will be triggered by a given input utterance. Type in any of the sample utterances to make sure that the JokeIntent is being invoked successfully.

Evaluate Interaction Model

To get rid of the evaluate pop-up window, click the Evaluate Model button again.

Note: A key thing to remember here is that the model is very flexible in terms of the keywords that are part of the sample utterance phrases. For example, take the phrase, “Is this some kind of a joke?” Even this phrase will trigger the JokeIntent. As an Alexa Python developer, it’s important to select utterances that have a low probability of executing other intents in your skill.

Now that you’ve successfully created an intent, it’s time to write the Python code that will handle this intent and return back a joke as a response.

Building the Skill Backend

Now that you have an intent created that can be triggered by the user, you need to add functionality in the skill backend to handle this intent and return useful information. Open the Code section of the Alexa developer console to get started.

Note: Since you selected the Alexa-Hosted Python option during the setup process, you’re provided with a complete online code editor where you can write, test, build, and deploy the backend of your Alexa skill, all within the developer console.

When you open the Code section of the developer console, you can see an online code editor with some files already set up for you to get started. In particular, you’ll see the following three files in the lambda sub-directory:

  1. lambda_function.py: This is the main entry point of the backend service. All the request data from the Alexa intent is received here and is supposed to be returned from this file only.
  2. requirements.txt: This file contains the list of Python packages that are being used in this project. This is especially useful if you’re choosing to set up your own backend service instead of using what’s provided by Amazon. To learn more about requirements files, check out Using Requirements Files.
  3. utils.py: This file contains some utility functions required for the lambda function to interact with the Amazon S3 service. It contains some sample code on how to fetch data from an Amazon S3 bucket, which you might find useful later on. Right now, this file is not being used in lambda_function.py.

For now, you’ll only be making changes in lambda_function.py, so let’s take a closer look at the structure of the file:

 7 importlogging 8 importask_sdk_core.utilsasask_utils 9 10 fromask_sdk_core.skill_builderimportSkillBuilder11 fromask_sdk_core.dispatch_componentsimportAbstractRequestHandler12 fromask_sdk_core.dispatch_componentsimportAbstractExceptionHandler13 fromask_sdk_core.handler_inputimportHandlerInput14 15 fromask_sdk_modelimportResponse16 17 logger=logging.getLogger(__name__)18 logger.setLevel(logging.INFO)19 20 21 classLaunchRequestHandler(AbstractRequestHandler):22 """Handler for Skill Launch."""23 defcan_handle(self,handler_input):24 # type: (HandlerInput) -> bool25 26 returnask_utils.is_request_type("LaunchRequest")(handler_input)27 28 defhandle(self,handler_input):29 # type: (HandlerInput) -> Response30 speak_output="Welcome, you can say Hello or Help. " \
31 "Which would you like to try?"32 33 return(34 handler_input.response_builder35 .speak(speak_output)36 .ask(speak_output)37 .response38 )39 ...

First, you import the necessary utilities that were provided in the ask_sdk_core Alexa Python package. Then, there are three main tasks you need to perform in lambda_function.py to handle a request from an intent received from the front-end of the Alexa skill:

  1. Create an intent handler class, which inherits from the AbstractRequestHandler class, with functions can_handle() and handle(). There are already a couple of handler classes defined in lambda_function.py, such as LaunchRequestHandler, HelpIntentHandler, and so on. These handle the fundamental intents of an Alexa skill. An important point to note here is that you need to create a new intent handler class for each of the intents you define.
  2. Create a SkillBuilder object, which acts as the entry point for your Alexa Python skill. This routes all the incoming request and response payloads to the intent handlers that you define.
  3. Pass the intent handler class as an argument to .add_request_handler() so that they’re called in order whenever a new request is received. The SkillBuilder is a singleton, so only one instance of it is needed to handle the routing of all incoming requests.

This is a good time for you to go through lambda_function.py. You’ll notice that the same pattern is followed over and over again to handle different intents that can be triggered by your Alexa Python skill.

Now that you have a broad overview of all the different things you need to do to handle an intent in your backend, it’s time to write the code that will handle the JokeIntent that you built in the previous section.

Creating the JokeIntent Handler

Since the important utilities from the ask_sdk_core Alexa Python package have already been imported, you don’t need to import them again. If you want to learn more about these in-depth, then you can check out the official documentation.

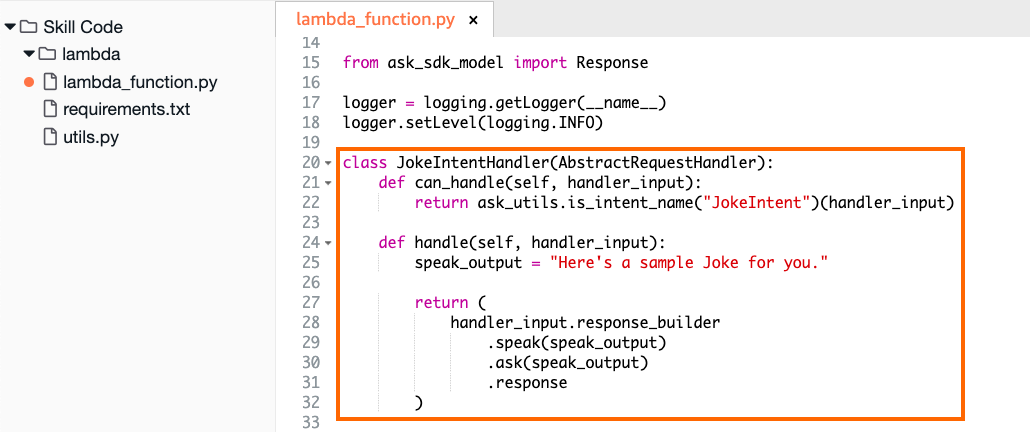
Next, you’ll create a new intent handler that will handle the request received from the JokeIntent. In the code snippet below, the intent handler will simply return with a sample phrase. This indicates that the response to the JokeIntent was received from the backend. Add the following code to lambda_function.py above the class definition of LaunchRequestHandler():

20 classJokeIntentHandler(AbstractRequestHandler):21 defcan_handle(self,handler_input):22 returnask_utils.is_intent_name("JokeIntent")(handler_input)23 24 defhandle(self,handler_input):25 speak_output="Here's a sample joke for you."26 27 return(28 handler_input.response_builder29 .speak(speak_output)30 .ask(speak_output)31 .response32 )

Let’s take a look at what each section does. In line 20 you create a new intent handler class for the JokeIntent, which is a child class of the AbstractRequestHandler class. When you create an intent in the frontend, you need to create an intent handler class in the backend that can handle requests from Alexa. The code you write for this needs to do two things:

  1. JokeIntentHandler.can_handle() recognizes each incoming request that Alexa sends.
  2. JokeIntentHandler.handle() returns an appropriate response.

In line 21 you define .can_handle(). It takes in handler_input as a parameter, which is an object of type dict() that contains all the input request information. Then, it uses ask_utils.is_intent_name() or ask_utils.is_request_type() to check whether the JSON input it received can be handled by this intent handler function or not.

You use .is_intent_name() and pass in the name of the intent. This returns a predicate, which is a function object that returns True if the given handler_input originates from the indicated intent. If this is true, then the SkillBuilder object will call JokeIntentHandler.handle().

Note: If the JokeIntent is triggered from the Alexa skill frontend, then it will send a JSON object containing a key type in the body of request that indicates that the intent named JokeIntent was received as input.

This statement subsequently calls .handle(), which you define in line 24. This method receives the input request along with any other important information that might be needed. It contains the business logic that’s required to successfully handle a particular intent. In the case of the JokeIntent, this method is required to send a response containing a joke back to the Alexa frontend.

The speak_ouput variable contains the sentence which will be spoken back to the user by the Alexa skill frontend. speak(speak_output) indicates what the Alexa frontend will play to the user as speech. ask("Question to ask...") can be used to ask a follow-up question. In this method, an object of class response_builder returns the response back to the Alexa skill.

Note: A default response message (Sorry, I had trouble doing what you asked. Please try again.) will be sent back if .handle() does not exist.

Notice that the value of speak_output is set to a fixed response right now. You’ll change this later on to return a random joke from a list of jokes.

Here’s what your code looks like in an editor:

Creating new Intent Handler

Once you’ve created an intent handler class, you need to pass it as an argument to SkillBuilder.add_request_handler. Scroll to the bottom of lambda_function.py and add the following line:

sb.add_request_handler(JokeIntentHandler())

An important thing to note here is that the placement of this line is important, as the code is processed from top to bottom. So, make sure that the call for your custom intent handler is above the call for the InstantReflectHandler() class. This is how it should look:

171 sb=SkillBuilder()172 173 sb.add_request_handler(LaunchRequestHandler())174 sb.add_request_handler(JokeIntentHandler())175 sb.add_request_handler(HelloWorldIntentHandler())176 sb.add_request_handler(HelpIntentHandler())177 sb.add_request_handler(CancelOrStopIntentHandler())178 sb.add_request_handler(SessionEndedRequestHandler())179 180 # Make sure IntentReflectorHandler is last so it181 # Doesn't override your custom intent handlers182 sb.add_request_handler(IntentReflectorHandler())183 184 sb.add_exception_handler(CatchAllExceptionHandler())185 186 ...

Alright, it’s time to test your code! Click the Deploy button to save the changes and deploy the backend service. You’ll be checking whether it’s going to work as expected from the Alexa skill frontend.

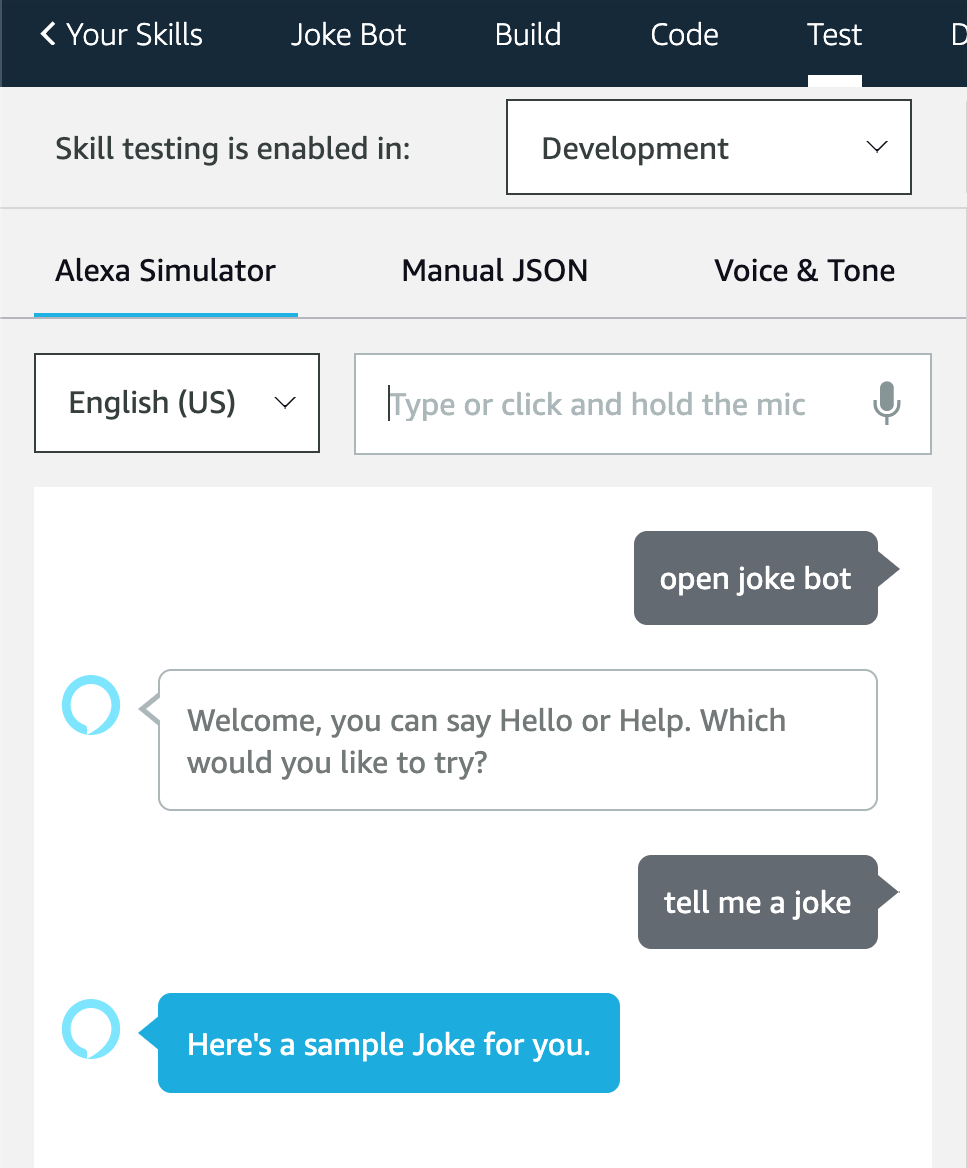
Once the Deploy process is successful, head back to the Test section of the developer console and invoke the JokeIntent. Remember, enter the utterance phrase to invoke your Alexa Python skill, then input a phrase to execute an intent:

Testing the Joke Intent

If you get a response similar to the one in the image above, then it means you’ve successfully created an intent handler for the JokeIntent in your skill’s backend service. Congratulations! Now, all that’s left to do is to return a random joke from a list back to the skill frontend.

Adding Jokes

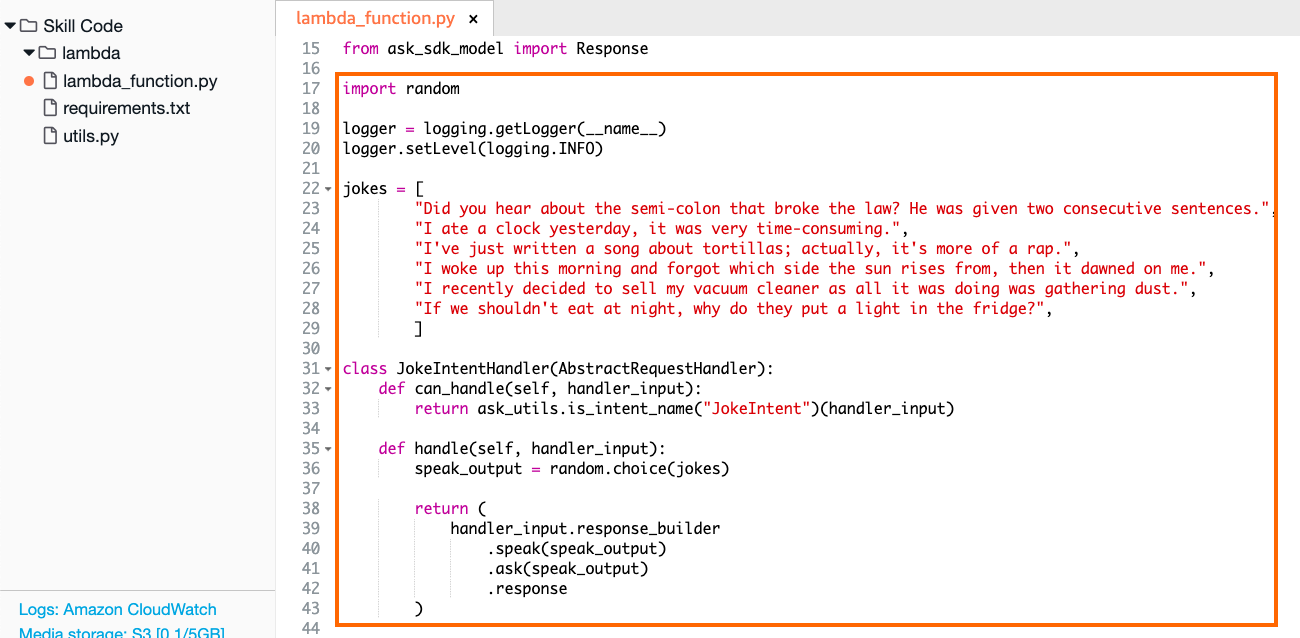
Open the Code section of the developer console. Then, add the jokes variable in lambda_function.py:

15 fromask_sdk_modelimportResponse16 17 logger=logging.getLogger(__name__)18 logger.setLevel(logging.INFO)19 20 jokes=[21 "Did you hear about the semi-colon that broke the law? He was given two consecutive sentences.",22 "I ate a clock yesterday, it was very time-consuming.",23 "I've just written a song about tortillas; actually, it's more of a rap.",24 "I woke up this morning and forgot which side the sun rises from, then it dawned on me.",25 "I recently decided to sell my vacuum cleaner as all it was doing was gathering dust.",26 "If you shouldn't eat at night, why do they put a light in the fridge?",27 ]28 29 classJokeIntentHandler(AbstractRequestHandler):30 ...

Here, jokes is a variable of type list containing some one-liner jokes. Make sure to add this outside of a function or class definition so that it has global scope.

Note: Since this list will only be referenced by the JokeIntentHandler() class, it doesn’t really matter if you declare this in the body of a function or not. However, doing it this way does help the function body to be free of clutter.

Next, you’ll add the functionality that .handle() needs to randomly pick one joke from the list of jokes and return it to the user. Modify the body of JokeIntentHandler.handle() with the following code:

29 classJokeIntentHandler(AbstractRequestHandler):30 defcan_handle(self,handler_input):31 returnask_utils.is_intent_name("JokeIntent")(handler_input)32 33 defhandle(self,handler_input):34 speak_output=random.choice(jokes)35 36 return(37 handler_input.response_builder38 .speak(speak_output)39 .ask(speak_output)40 .response41 )

In the body of .handle(), you select a random joke from the list jokes using random.choice() and return it back as a response to the Alexa skill frontend.

Finally, import the random package by adding an import statement to the top of lambda_function.py:

15 fromask_sdk_modelimportResponse16 17 importrandom18 19 logger=logging.getLogger(__name__)20 logger.setLevel(logging.INFO)21 22 ...

This is how the editor should look at this point:

Updating the Joke Intent Handler

There’s one final change to make before testing. You need to allow Alexa to give an acknowledgment that the skill has been triggered. To do this, look inside LaunchRequestHandler.handle() for the speak_output variable and set its value to the text in the highlighted line below:

45 classLaunchRequestHandler(AbstractRequestHandler):46 """Handler for Skill Launch."""47 defcan_handle(self,handler_input):48 # type: (HandlerInput) -> bool49 50 returnask_utils.is_request_type("LaunchRequest")(handler_input)51 52 defhandle(self,handler_input):53 # type: (HandlerInput) -> Response54 speak_output="Hey there! I am a Joke Bot. You can ask me to tell you a random Joke that might just make your day better!"55 56 return(57 handler_input.response_builder58 .speak(speak_output)59 .ask(speak_output)60 .response61 )62 ...

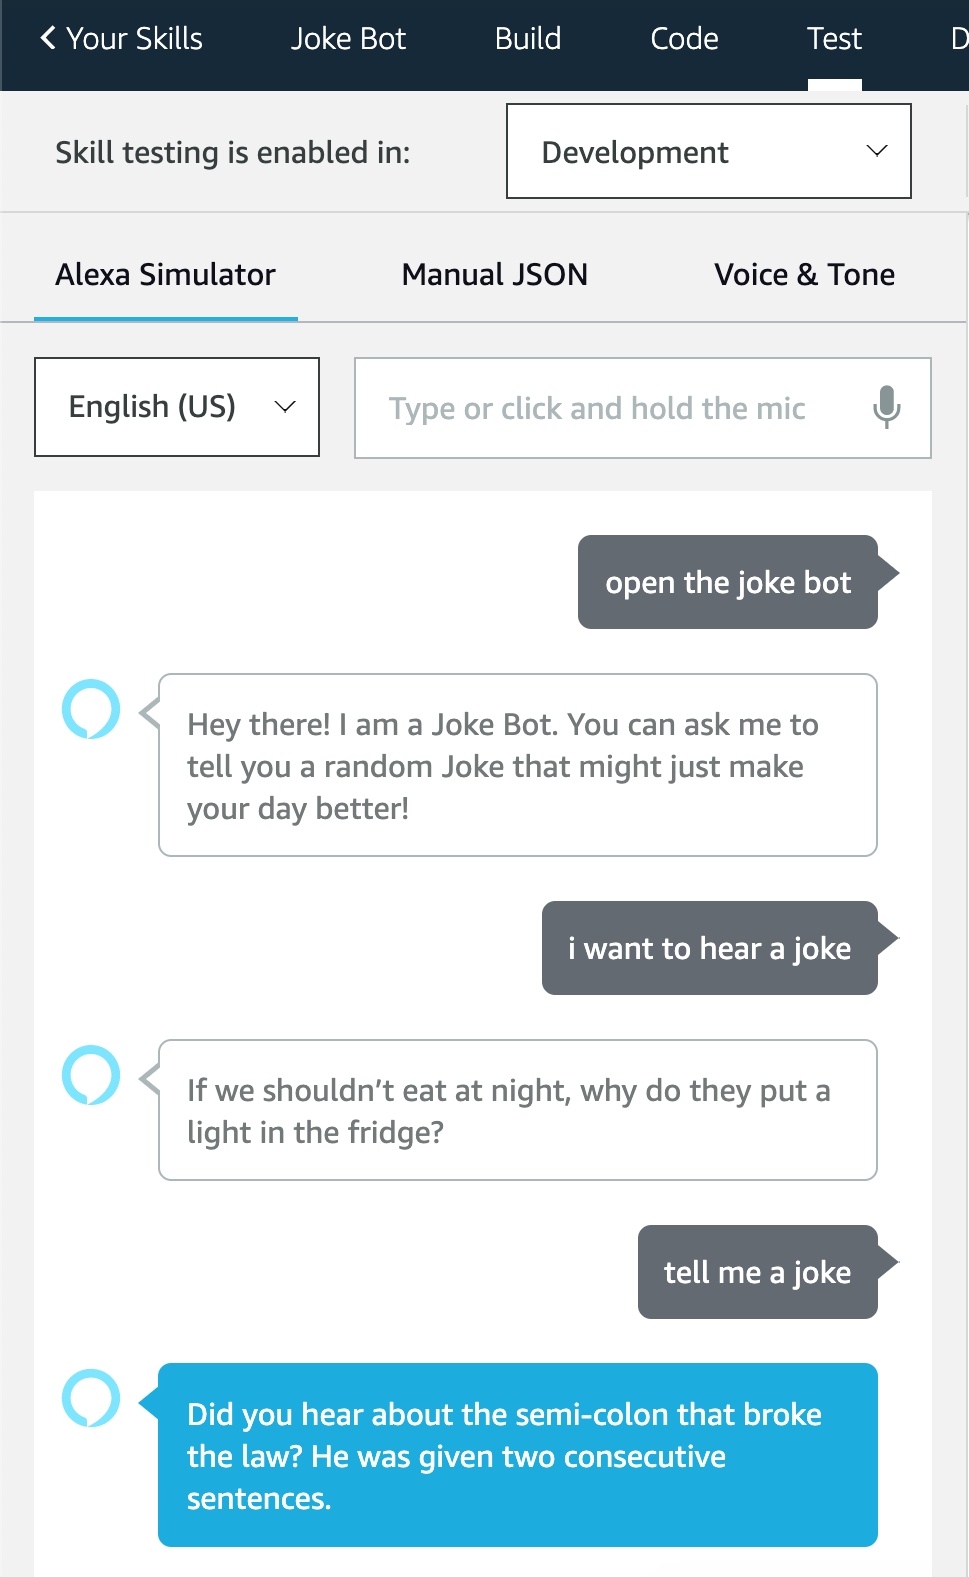
Your Joke Bot is ready for final testing! Click the Deploy button to save the changes and head back to the Test section of the developer console. This time, you should see a new greeting message when your skill is first invoked. Then, when you ask the bot to tell you a joke, it should give you a different joke every time:

Final Testing of Python Alexa Skill

That’s it! You’ve successfully created your first skill as an Alexa Python developer!

Conclusion

Congratulations on taking your first steps into Alexa Python development! You’ve now successfully built your very own Alexa Python skill. You now know how to create a new skill, create intents, write Python code to handle those intents, and return valuable information back to the user.

Level-up your skills by trying some of the following:

  • Increase the list of jokes in the backend.
  • Create a new Intent named Trivia which will respond with a fun trivia fact.
  • Publish your skill to the Amazon Marketplace.

The possibilities are endless, so go ahead and dive right in! To learn more about Alexa Python development, check out the official docs. You can also check out How to Make a Twitter Bot in Python With Tweepy and How to Make a Discord Bot in Python to learn more about how you can make bots for different platforms using Python.


[ Improve Your Python With 🐍 Python Tricks 💌 – Get a short & sweet Python Trick delivered to your inbox every couple of days. >> Click here to learn more and see examples ]

RMOTR: Spatial Data with Python - Operations!

$
0
0
This is the second post in the Spatial Data with Python series. You can find the first post here.

We did it. We’ve taken the first step towards our data analysis project. We know the fundamental concepts of geographical data and how to load, inspect and visualize data in our Python project.

Let’s keep going. Remember the vector files we worked on in the first post? We have the limits of every country in the world (world_gdf) and the position of 1,509 volcanoes around the planet (volcanoes_gdf). In this post, we’ll be working with a shapefile containing 7,343 cities all over the world (cities_gdf), which you can download from Natural Earth (the simple version will suffice for this project).

Let’s load the shapefiles into GeoDataFrames and take a quick look at the first rows to remember what they were about.

https://medium.com/media/5650841cdbb10f8051d556742fd1d935/href

display(world_gdf.head())
print(“world_gdf shape: {}”.format(world_gdf.shape))

world_gdf shape: (246, 12)

display(volcanoes_gdf.head())
print(“volcanoes_gdf shape: {}”.format(volcanoes_gdf.shape))

volcanoes_gdf shape: (1509, 10)

display(cities_gdf.head())
print(“cities_gdf shape: {}”.format(cities_gdf.shape))

cities_gdf shape: (7343, 4)

Let’s Save the World! 💪

Let’s briefly imagine the following situation:

Some of the volcanoes from our dataset are active. They could erupt at any moment! We’re responsible for reporting which countries and cities face serious risk.

(We’ll consider a volcano ‘active’ if its state value is ‘Historica’)

Good thing we’re only playing 😁. Decisions like this require a level of rigor that we’ll not be maintaining in this post (data validation, knowledge in the domain, and more…). But we’re still going to try!

There’s a lot of information we can extract from our dataset to make the best possible decisions. Answering these questions may help:

1) Which countries have the most active volcanoes in their territory? And which of these have the highest density of active volcanoes (volcanoes/km2)?

2) Which cities with a population >500,000 are closest to an active volcano?

We have the data and we know Python… let’s get to work! 💻

Active Volcanoes

First, we’ll filter volcanoes_gdf to work only with the active ones.

volcanoes_gdf = volcanoes_gdf.query(“STATUS == ‘Historica’”)
print(volcanoes_gdf.shape)

(541, 10)

Volcanoes by Country

We can apply different methods to calculate how many active volcanoes there are in each country.

Attribute Based Joins

Using the values from the columns NAME (world_gdf) and LOCATION (volcanoes_gdf) we can determine the number of active volcanoes in each country from world_gdf. Right?

For example, we can count how many times each country is repeated in the column LOCATION from volcanoes_gdf and then add that result to a new column in world_gdf using the mergeoperation.

https://medium.com/media/3eb3ed594558461b9178eb5284b185e4/hrefMost values in ‘volcanoes_country_count’ are NaN

Do you think this is a good solution? I’m not totally convinced:

· The countries’ names are not normalized, so the same country could be written in different ways in each of the DataFrames.

· It is possible that a country present in volcanoes_gdf could not exist in world_gdf (and the other way around).

https://medium.com/media/44a01b917c866311084c156e2e8d320b/href
Countries in 'volcanoes_gdf' and 'world_gdf': 16
Countries in 'volcanoes_gdf' but not in 'world_gdf': 83
Countries in 'world_gdf' but not in 'volcanoes_gdf': 230

Yeah, we were right. Only 16 countries are in both datasets.

Spatial Joins

Knowing that the countries are represented with polygons in world_gdf and the volcanoes are points in volcanoes_gdf,a better option would be to use a function that takes advantage of the spatial relation between these objects, in order to calculate what we need. We can make use of the Spatial Join(sjoin) function from GeoPandas. In this way, we’ll create a new GeoDataFrame (world_volcanoes_gdf) that will have data for each volcano from the country it resides in.

Let’s see:

world_volcanoes_gdf = gpd.sjoin(volcanoes_gdf, world_gdf, how=”left”, op=”within”)
display(world_volcanoes_gdf.loc[:, [“NAME_”, “LOCATION”, “NAME”]].head(20))

It looks better now, doesn’t it?

We can now see which countries contain the most active volcanoes:

world_volcanoes_gdf[“NAME”].value_counts().head(5)

Indonesia 62
United States 50
Japan 47
Russia 44
Chile 31
Name: NAME, dtype: int64

Let’s plot this.

https://medium.com/media/600bb339de5e97cd45629636806bb8ed/href

Volcanoes’ Density

We also want to know which countries have the highest density of active volcanoes. We recently added volcanoes_count to world_gdf. So we just have to divide this value by the area (AREA).

Let’s do it!

https://medium.com/media/704e6c4fc8061f3f8c01da223d721562/hrefHighest density of active volcanoes

Distances between cities and volcanoes

Now it’s time to figure out the distances between the cities (represented by point in cities_gdf) and the volcanoes (also represented by points in volcanos_gdf). Calculating the geodesic distance (shortest distance between two points on a surface) on our planet’s surface is not trivial. First, we must understand that this calculation won’t be exact: it’s impossible to take into account all of our planet’s irregularities. For this reason, the Earth is usually modelled as a plane, a sphere or an ellipsoid. In turn, each of these models can vary in their parameters, generating different representations of the planet. For example, here we can see a table of historical ellipsoid models of Earth.

Source: http://physics.nmsu.edu/

We’ll be using the library GeoPyto calculate the distances. This library offers methods such as great_circle ( Earth as a sphere) and geodesic (Earth as an ellipsoid model). We are going to use the latter method, with its default model: WGS-84.

The first thing we need to do is make a calculation to corroborate the result’s precision. Let’s calculate the distance between La Plata (my city!) to New York, and compare the result against the 8571km that distance.to estimates.

https://medium.com/media/4175f29601ed50916ace937950282ccb/href
New York coordinates: (40.75192492259464, -73.98196278740681)
La Plata coordinates: (-34.90961464563105, -57.959961183287135)
Distance: 8536km

8536km is our calculation’s result. Not bad! Let’s proceed.

We’ll save in big_cities_gdf the cities with a population higher than 500,000.

big_cities_gdf = cities_gdf.loc[cities_gdf[“pop_max”] > 500000]
print(big_cities_gdf.shape)

(988, 4)

Lastly, we calculate the distances. We’ll use the list distances to save the Series which contain the distances from each city to each one of the volcanoes. Later, we’ll convert this list to a DataFrame (distance_matrix_gdf).

Attention: this may take several minutes to calculate. Refill your coffee.

https://medium.com/media/d54818e4bac4e6d87ca0b4bcbb9979c8/hrefdistance_matrix_df.shape = (988, 541)

Let’s see which 5 cities with a population >500,000 are closest to an active volcano:

top_5_indexes = distance_matrix_df.min(axis=1).sort_values(ascending=True).head(5).index
display(cities_gdf.loc[top_5_indexes])

Well, that’s it! I hope this has been helpful in saving the world… 😆

Resources

Distance calculator: https://www.distance.to

EarthWorks — volcanoes of the world: https://earthworks.stanford.edu/catalog/harvard-glb-volc

Geopandas Documentation: http://geopandas.org/

GeoPy Documentation: https://geopy.readthedocs.io/en/stable/#

Historical Earth ellipsoids — Wikipedia: https://en.wikipedia.org/wiki/Earth_ellipsoid#Historical_Earth_ellipsoids

Natural Earth — Populated Places: https://www.naturalearthdata.com/downloads/10m-cultural-vectors/10m-populated-places/

Thematic Mapping — World Borders: http://thematicmapping.org/downloads/world_borders.php


Spatial Data with Python - Operations! was originally published in rmotr.com on Medium, where people are continuing the conversation by highlighting and responding to this story.


Python Insider: Python 3.7.7rc1 is now available for testing

$
0
0
Python 3.7.7rc1, the release preview of the next maintenance release of Python 3.7,is now available for testing. Assuming no critical problems are found prior to 2020-02-10, no code changes are planned between this release candidate and the final release. The release candidate is intended to give you the opportunity to test the new security and bug fixes in 3.7.7. While we strive to not introduce any incompatibilities in new maintenance releases, we encourage you to test your projects and report issues found to bugs.python.org as soon as possible. Please keep in mind that, since this is a preview release, its use is not recommended for production environments.

You can find the release files, a link to the changelog, and more information here:

Roberto Alsina: Episodio 28: Y meta clases, y meta clases!

$
0
0

Metaclases. ¿Qué son? ¿Cómo funcionan? ¿Sirven para algo? (no)

Catalin George Festila: Python 3.6.9 : My colab tutorials - part 002.

$
0
0
This is another notebook with the Altair python package. The development team comes with this intro: Altair is a declarative statistical visualization library for Python, based on Vega and Vega-Lite. Altair offers a powerful and concise visualization grammar that enables you to build a wide range of statistical visualizations quickly. Here is an example of using the Altair API to quickly

Python Software Foundation: An Update PyPI Funded Work

$
0
0
Originally announced at the end of 2018, a gift from Facebook Research is funding improvements for the security PyPI and its users.

What's been done

After launching a request for information and subsequent request for proposal in the second half of 2019, contractors were selected and work commenced on Milestone 2 of the project in December 2019 and was completed in February 2020.
The result is that PyPI now has tooling in place to implement automated checks that run in response to events such as Project or Release creation or File uploads as well as on schedules. In addition to documentation example checks were also implemented that demonstrate event based and scheduled checks.
Results from checks are made available for PyPI moderators and administrators to review, but will not have any automated responses put in place. As a check suite is developed and refined we hope that these will help to identify malicious uploads and spam that PyPI regularly contends with.

What's next

With the acceptance of PEP 458 on February 15 we're excited to announce that work on implementation of The Update Framework has started.
This work will enable clients like pip to ensure that they have downloaded valid files from PyPI and equip the PyPI administrators to better respond in event of a compromise.
The timeline for this work is currently planned over the coming months, with an initial key signing to be held at PyCon 2020 in Pittsburgh, Pennsylvania and rollout of the services needed to support TUF enabled clients in May or June.

Other PyPI News

For users who have enabled two factor authentication on PyPI, support has been added for Account Recovery codes. These codes are intended for use in the case where you've lost your Webauthn device or TOTP application, allowing you to recover access to your account.
You can generate and store recovery codes now by visiting your account settings and clicking "Generate Recovery Codes".

Matt Layman: How To Style Sign Up - Building SaaS #47

$
0
0
In this episode, I added styling to the Sign Up page of the site. We chatted about CSS tools and frameworks, the benefit of feature flags to control what UI is displayed to users, and how to use Tailwind CSS to modify a design quickly. In the first portion of the stream, we focused on CSS frameworks. We compared Bootstrap, Semantic UI, and Tailwind CSS. After that discussion, I talked about feature flags.

Python Anywhere: System updates on 3 and 5 March

$
0
0

On 3 March we upgraded our EU-based system at eu.pythonanywhere.com to the latest version of our code, and this morning (5 March) we upgraded our US-based system at www.pythonanywhere.com to the same version.

Everything went very smoothly, and all systems are working well. There were a bunch of infrastructure-related changes in this update:

  • We've made some improvements to the beta of our new virtualisation system, which is currently in public beta. More about that next week, we hope!
  • We've updated almost all of our machines to the most recent AWS Intel server types; the remainder will be upgraded over the coming two weeks. CPU geeks will be glad to hear that we're going to start experimenting with AMD. We might also consider ARM for our own internal systems, though right now it feels like sticking with x86-64 for the servers where our users run their code is the best option (let us know if in the comments if you disagree!)
  • A certain amount of code that was (somewhat embarrassingly) still Python 2 was upgraded to Python 3. blush

As usual, there were also a number of minor tweaks and minor bugfixes.

Onwards and upwards!

Roberto Alsina: Episodio 29: Python Moderno 1: Poetry.

$
0
0

Primera parte de una serie mostrando herramientas nuevas que reemplazan cosas viejas con algo mejor. En este video: poetry, reemplazando setup.py!


Python Bytes: #171 Chilled out Python decorators with PEP 614

Stack Abuse: Removing Stop Words from Strings in Python

$
0
0

In this article, you are going to see different techniques for removing stop words from strings in Python. Stop words are those words in natural language that have a very little meaning, such as "is", "an", "the", etc. Search engines and other enterprise indexing platforms often filter the stop words while fetching results from the database against the user queries.

Stop words are often removed from the text before training deep learning and machine learning models since stop words occur in abundance, hence providing little to no unique information that can be used for classification or clustering.

Removing Stop Words with Python

With the Python programming language, you have a myriad of options to use in order to remove stop words from strings. You can either use one of the several natural language processing libraries such as NLTK, SpaCy, Gensim, TextBlob, etc., or if you need full control on the stop words that you want to remove, you can write your own custom script.

In this article you will see a number of different the approaches, depending on the NLP library you're using.

Using Python's NLTK Library

The NLTK library is one of the oldest and most commonly used Python libraries for Natural Language Processing. NLTK supports stop word removal, and you can find the list of stop words in the corpus module. To remove stop words from a sentence, you can divide your text into words and then remove the word if it exits in the list of stop words provided by NLTK.

Let's see a simple example:

from nltk.corpus import stopwords
nltk.download('stopwords')
from nltk.tokenize import word_tokenize

text = "Nick likes to play football, however he is not too fond of tennis."
text_tokens = word_tokenize(text)

tokens_without_sw = [word for word in text_tokens if not word in stopwords.words()]

print(tokens_without_sw)

In the script above, we first import the stopwords collection from the nltk.corpus module. Next, we import the word_tokenize() method from the nltk.tokenize class. We then create a variable text, which contains a simple sentence. The sentence in the text variable is tokenized (divided into words) using the word_tokenize() method. Next, we iterate through all the words in the text_tokens list and checks if the word exists in the stop words collection or not. If the word doesn't exist in the stopword collection, it is returned and appended to the tokens_without_sw list. The tokens_without_sw list is then printed.

Here is how the sentence looks without the stop words:

['Nick', 'likes', 'play', 'football', ',', 'however', 'fond', 'tennis', '.']

You can see that the words to, he, is, not, and too have been removed from the sentence.

You can join the list of above words to create a sentence without stop words, as shown below:

filtered_sentence = (" ").join(tokens_without_sw)
print(filtered_sentence)

Here is the output:

Nick likes play football , however fond tennis .

Adding or Removing Stop Words in NLTK's Default Stop Word List

You can add or remove stop words as per your choice to the existing collection of stop words in NLTK. Before removing or adding stop words in NLTK, let's see the list of all the English stop words supported by NLTK:

print(stopwords.words('english'))

Output:

['i', 'me', 'my', 'myself', 'we', 'our', 'ours', 'ourselves', 'you', "you're", "you've", "you'll", "you'd", 'your', 'yours', 'yourself', 'yourselves', 'he', 'him', 'his', 'himself', 'she', "she's", 'her', 'hers', 'herself', 'it', "it's", 'its', 'itself', 'they', 'them', 'their', 'theirs', 'themselves', 'what', 'which', 'who', 'whom', 'this', 'that', "that'll", 'these', 'those', 'am', 'is', 'are', 'was', 'were', 'be', 'been', 'being', 'have', 'has', 'had', 'having', 'do', 'does', 'did', 'doing', 'a', 'an', 'the', 'and', 'but', 'if', 'or', 'because', 'as', 'until', 'while', 'of', 'at', 'by', 'for', 'with', 'about', 'against', 'between', 'into', 'through', 'during', 'before', 'after', 'above', 'below', 'to', 'from', 'up', 'down', 'in', 'out', 'on', 'off', 'over', 'under', 'again', 'further', 'then', 'once', 'here', 'there', 'when', 'where', 'why', 'how', 'all', 'any', 'both', 'each', 'few', 'more', 'most', 'other', 'some', 'such', 'no', 'nor', 'not', 'only', 'own', 'same', 'so', 'than', 'too', 'very', 's', 't', 'can', 'will', 'just', 'don', "don't", 'should', "should've", 'now', 'd', 'll', 'm', 'o', 're', 've', 'y', 'ain', 'aren', "aren't", 'couldn', "couldn't", 'didn', "didn't", 'doesn', "doesn't", 'hadn', "hadn't", 'hasn', "hasn't", 'haven', "haven't", 'isn', "isn't", 'ma', 'mightn', "mightn't", 'mustn', "mustn't", 'needn', "needn't", 'shan', "shan't", 'shouldn', "shouldn't", 'wasn', "wasn't", 'weren', "weren't", 'won', "won't", 'wouldn', "wouldn't"]
Adding Stop Words to Default NLTK Stop Word List

To add a word to NLTK stop words collection, first create an object from the stopwords.words('english') list. Next, use the append() method on the list to add any word to the list.

The following script adds the word play to the NLTK stop word collection. Again, we remove all the words from our text variable to see if the word play is removed or not.

all_stopwords = stopwords.words('english')
all_stopwords.append('play')

text_tokens = word_tokenize(text)
tokens_without_sw = [word for word in text_tokens if not word in all_stopwords]

print(tokens_without_sw)

Output:

['Nick', 'likes', 'football', ',', 'however', 'fond', 'tennis', '.']

The output shows that the word play has been removed.

You can also add a list of words to the stopwords.words list using the append method, as shown below:

sw_list = ['likes','play']
all_stopwords.extend(sw_list)

text_tokens = word_tokenize(text)
tokens_without_sw = [word for word in text_tokens if not word in all_stopwords]

print(tokens_without_sw)

The script above adds two words likes and play to the stopwords.word list. In the output, you will not see these two words as shown below:

Output:

['Nick', 'football', ',', 'however', 'fond', 'tennis', '.']
Removing Stop Words from Default NLTK Stop Word List

Since stopwords.word('english') is merely a list of items, you can remove items from this list like any other list. The simplest way to do so is via the remove() method. This is helpful for when your application needs a stop word to not be removed. For example, you may need to keep the word not in a sentence to know when a statement is being negated.

The following script removes the stop word not from the default list of stop words in NLTK:

all_stopwords = stopwords.words('english')
all_stopwords.remove('not')

text_tokens = word_tokenize(text)
tokens_without_sw = [word for word in text_tokens if not word in all_stopwords]

print(tokens_without_sw)

Output:

['Nick', 'likes', 'play', 'football', ',', 'however', 'not', 'fond', 'tennis', '.']

From the output, you can see that the word not has not been removed from the input sentence.

Using Python's Gensim Library

The Gensim library is another extremely useful library for removing stop words from a string in Python. All you have to do is to import the remove_stopwords() method from the gensim.parsing.preprocessing module. Next, you need to pass your sentence from which you want to remove stop words, to the remove_stopwords() method which returns text string without the stop words.

Let's take a look at a simple example of how to remove stop words via the Gensim library.

from gensim.parsing.preprocessing import remove_stopwords

text = "Nick likes to play football, however he is not too fond of tennis."
filtered_sentence = remove_stopwords(text)

print(filtered_sentence)

Output:

Nick likes play football, fond tennis.

It is important to mention that the output after removing stop words using the NLTK and Gensim libraries is different. For example, the Gensim library considered the word however to be a stop word while NLTK did not, and hence didn't remove it. This shows that there is no hard and fast rule as to what a stop word is and what it isn't. It all depends upon the task that you are going to perform.

In a later section, you will see how to add or remove stop words to an existing collection of stop words in Gensim.

Adding and Removing Stop Words in Default Gensim Stop Words List

Let's first take a look at the stop words in Python's Gensim library:

import gensim
all_stopwords = gensim.parsing.preprocessing.STOPWORDS
print(all_stopwords)

Output:

frozenset({'her', 'during', 'among', 'thereafter', 'only', 'hers', 'in', 'none', 'with', 'un', 'put', 'hence', 'each', 'would', 'have', 'to', 'itself', 'that', 'seeming', 'hereupon', 'someone', 'eight', 'she', 'forty', 'much', 'throughout', 'less', 'was', 'interest', 'elsewhere', 'already', 'whatever', 'or', 'seem', 'fire', 'however', 'keep', 'detail', 'both', 'yourselves', 'indeed', 'enough', 'too', 'us', 'wherein', 'himself', 'behind', 'everything', 'part', 'made', 'thereupon', 'for', 'nor', 'before', 'front', 'sincere', 'really', 'than', 'alone', 'doing', 'amongst', 'across', 'him', 'another', 'some', 'whoever', 'four', 'other', 'latterly', 'off', 'sometime', 'above', 'often', 'herein', 'am', 'whereby', 'although', 'who', 'should', 'amount', 'anyway', 'else', 'upon', 'this', 'when', 'we', 'few', 'anywhere', 'will', 'though', 'being', 'fill', 'used', 'full', 'thru', 'call', 'whereafter', 'various', 'has', 'same', 'former', 'whereas', 'what', 'had', 'mostly', 'onto', 'go', 'could', 'yourself', 'meanwhile', 'beyond', 'beside', 'ours', 'side', 'our', 'five', 'nobody', 'herself', 'is', 'ever', 'they', 'here', 'eleven', 'fifty', 'therefore', 'nothing', 'not', 'mill', 'without', 'whence', 'get', 'whither', 'then', 'no', 'own', 'many', 'anything', 'etc', 'make', 'from', 'against', 'ltd', 'next', 'afterwards', 'unless', 'while', 'thin', 'beforehand', 'by', 'amoungst', 'you', 'third', 'as', 'those', 'done', 'becoming', 'say', 'either', 'doesn', 'twenty', 'his', 'yet', 'latter', 'somehow', 'are', 'these', 'mine', 'under', 'take', 'whose', 'others', 'over', 'perhaps', 'thence', 'does', 'where', 'two', 'always', 'your', 'wherever', 'became', 'which', 'about', 'but', 'towards', 'still', 'rather', 'quite', 'whether', 'somewhere', 'might', 'do', 'bottom', 'until', 'km', 'yours', 'serious', 'find', 'please', 'hasnt', 'otherwise', 'six', 'toward', 'sometimes', 'of', 'fifteen', 'eg', 'just', 'a', 'me', 'describe', 'why', 'an', 'and', 'may', 'within', 'kg', 'con', 're', 'nevertheless', 'through', 'very', 'anyhow', 'down', 'nowhere', 'now', 'it', 'cant', 'de', 'move', 'hereby', 'how', 'found', 'whom', 'were', 'together', 'again', 'moreover', 'first', 'never', 'below', 'between', 'computer', 'ten', 'into', 'see', 'everywhere', 'there', 'neither', 'every', 'couldnt', 'up', 'several', 'the', 'i', 'becomes', 'don', 'ie', 'been', 'whereupon', 'seemed', 'most', 'noone', 'whole', 'must', 'cannot', 'per', 'my', 'thereby', 'so', 'he', 'name', 'co', 'its', 'everyone', 'if', 'become', 'thick', 'thus', 'regarding', 'didn', 'give', 'all', 'show', 'any', 'using', 'on', 'further', 'around', 'back', 'least', 'since', 'anyone', 'once', 'can', 'bill', 'hereafter', 'be', 'seems', 'their', 'myself', 'nine', 'also', 'system', 'at', 'more', 'out', 'twelve', 'therein', 'almost', 'except', 'last', 'did', 'something', 'besides', 'via', 'whenever', 'formerly', 'cry', 'one', 'hundred', 'sixty', 'after', 'well', 'them', 'namely', 'empty', 'three', 'even', 'along', 'because', 'ourselves', 'such', 'top', 'due', 'inc', 'themselves'})

You can see that Gensim's default collection of stop words is much more detailed, when compared to NLTK. Also, Gensim stores default stop words in a frozen set object.

Adding Stop Words to Default Gensim Stop Words List

To access the list of Gensim stop words, you need to import the frozen set STOPWORDS from the gensim.parsing.preprocessong package. A frozen set in Python is a type of set which is immutable. You cannot add or remove elements in a frozen set. Hence, to add an element, you have to apply the union function on the frozen set and pass it the set of new stop words. The union method will return a new set which contains your newly added stop words, as shown below.

The following script adds likes and play to the list of stop words in Gensim:

from gensim.parsing.preprocessing import STOPWORDS

all_stopwords_gensim = STOPWORDS.union(set(['likes', 'play']))

text = "Nick likes to play football, however he is not too fond of tennis."
text_tokens = word_tokenize(text)
tokens_without_sw = [word for word in text_tokens if not word in all_stopwords_gensim]

print(tokens_without_sw)

Output:

['Nick', 'football', ',', 'fond', 'tennis', '.']

From the output above, you can see that the words like and play have been treated as stop words and consequently have been removed from the input sentence.

Removing Stop Words from Default Gensim Stopword List

To remove stop words from Gensim's list of stop words, you have to call the difference() method on the frozen set object, which contains the list of stop words. You need to pass a set of stop words that you want to remove from the frozen set to the difference() method. The difference() method returns a set which contains all the stop words except those passed to the difference() method.

The following script removes the word not from the set of stop words in Gensim:

from gensim.parsing.preprocessing import STOPWORDS

all_stopwords_gensim = STOPWORDS
sw_list = {"not"}
all_stopwords_gensim = STOPWORDS.difference(sw_list)

text = "Nick likes to play football, however he is not too fond of tennis."
text_tokens = word_tokenize(text)
tokens_without_sw = [word for word in text_tokens if not word in all_stopwords_gensim]

print(tokens_without_sw)

Output:

['Nick', 'likes', 'play', 'football', ',', 'not', 'fond', 'tennis', '.']

Since the word not has now been removed from the stop word set, you can see that it has not been removed from the input sentence after stop word removal.

Using the SpaCy Library

The SpaCy library in Python is yet another extremely useful language for natural language processing in Python.

To install SpaCy, you have to execute the following script on your command terminal:

$ pip install -U spacy

Once the library is downloaded, you also need to download the language model. Several models exist in SpaCy for different languages. We will be installing the English language model. Execute the following command in your terminal:

$ python -m spacy download en

Once the language model is downloaded, you can remove stop words from text using SpaCy. Look at the following script:

import spacy
sp = spacy.load('en_core_web_sm')

all_stopwords = sp.Defaults.stop_words

text = "Nick likes to play football, however he is not too fond of tennis."
text_tokens = word_tokenize(text)
tokens_without_sw= [word for word in text_tokens if not word in all_stopwords]

print(tokens_without_sw)

In the script above we first load the language model and store it in the sp variable. The sp.Default.stop_words is a set of default stop words for English language model in SpaCy. Next, we simply iterate through each word in the input text and if the word exists in the stop word set of the SpaCy language model, the word is removed.

Here is the output:

Output:

['Nick', 'likes', 'play', 'football', ',', 'fond', 'tennis', '.']

Adding and Removing Stop Words in SpaCy Default Stop Word List

Like the other NLP libraries, you can also add or remove stop words from the default stop word list in Spacy. But before that, we will see a list of all the existing stop words in SpaCy.

print(len(all_stopwords))
print(all_stopwords)

Output:

326
{'whence', 'here', 'show', 'were', 'why', 'n’t', 'the', 'whereupon', 'not', 'more', 'how', 'eight', 'indeed', 'i', 'only', 'via', 'nine', 're', 'themselves', 'almost', 'to', 'already', 'front', 'least', 'becomes', 'thereby', 'doing', 'her', 'together', 'be', 'often', 'then', 'quite', 'less', 'many', 'they', 'ourselves', 'take', 'its', 'yours', 'each', 'would', 'may', 'namely', 'do', 'whose', 'whether', 'side', 'both', 'what', 'between', 'toward', 'our', 'whereby', "'m", 'formerly', 'myself', 'had', 'really', 'call', 'keep', "'re", 'hereupon', 'can', 'their', 'eleven', '’m', 'even', 'around', 'twenty', 'mostly', 'did', 'at', 'an', 'seems', 'serious', 'against', "n't", 'except', 'has', 'five', 'he', 'last', '‘ve', 'because', 'we', 'himself', 'yet', 'something', 'somehow', '‘m', 'towards', 'his', 'six', 'anywhere', 'us', '‘d', 'thru', 'thus', 'which', 'everything', 'become', 'herein', 'one', 'in', 'although', 'sometime', 'give', 'cannot', 'besides', 'across', 'noone', 'ever', 'that', 'over', 'among', 'during', 'however', 'when', 'sometimes', 'still', 'seemed', 'get', "'ve", 'him', 'with', 'part', 'beyond', 'everyone', 'same', 'this', 'latterly', 'no', 'regarding', 'elsewhere', 'others', 'moreover', 'else', 'back', 'alone', 'somewhere', 'are', 'will', 'beforehand', 'ten', 'very', 'most', 'three', 'former', '’re', 'otherwise', 'several', 'also', 'whatever', 'am', 'becoming', 'beside', '’s', 'nothing', 'some', 'since', 'thence', 'anyway', 'out', 'up', 'well', 'it', 'various', 'four', 'top', '‘s', 'than', 'under', 'might', 'could', 'by', 'too', 'and', 'whom', '‘ll', 'say', 'therefore', "'s", 'other', 'throughout', 'became', 'your', 'put', 'per', "'ll", 'fifteen', 'must', 'before', 'whenever', 'anyone', 'without', 'does', 'was', 'where', 'thereafter', "'d", 'another', 'yourselves', 'n‘t', 'see', 'go', 'wherever', 'just', 'seeming', 'hence', 'full', 'whereafter', 'bottom', 'whole', 'own', 'empty', 'due', 'behind', 'while', 'onto', 'wherein', 'off', 'again', 'a', 'two', 'above', 'therein', 'sixty', 'those', 'whereas', 'using', 'latter', 'used', 'my', 'herself', 'hers', 'or', 'neither', 'forty', 'thereupon', 'now', 'after', 'yourself', 'whither', 'rather', 'once', 'from', 'until', 'anything', 'few', 'into', 'such', 'being', 'make', 'mine', 'please', 'along', 'hundred', 'should', 'below', 'third', 'unless', 'upon', 'perhaps', 'ours', 'but', 'never', 'whoever', 'fifty', 'any', 'all', 'nobody', 'there', 'have', 'anyhow', 'of', 'seem', 'down', 'is', 'every', '’ll', 'much', 'none', 'further', 'me', 'who', 'nevertheless', 'about', 'everywhere', 'name', 'enough', '’d', 'next', 'meanwhile', 'though', 'through', 'on', 'first', 'been', 'hereby', 'if', 'move', 'so', 'either', 'amongst', 'for', 'twelve', 'nor', 'she', 'always', 'these', 'as', '’ve', 'amount', '‘re', 'someone', 'afterwards', 'you', 'nowhere', 'itself', 'done', 'hereafter', 'within', 'made', 'ca', 'them'}

The output shows that there 326 stop words in the default list of stop words in the SpaCy library.

Adding Stop Words to Default SpaCy Stop Words List

The SpaCy stop word list is basically a set of strings. You can add a new word to the set like you would add any new item to a set.

Look at the following script in which we add the word tennis to existing list of stop words in Spacy:

import spacy
sp = spacy.load('en_core_web_sm')

all_stopwords = sp.Defaults.stop_words
all_stopwords.add("tennis")

text = "Nick likes to play football, however he is not too fond of tennis."
text_tokens = word_tokenize(text)
tokens_without_sw = [word for word in text_tokens if not word in all_stopwords]

print(tokens_without_sw)

Output:

['Nick', 'likes', 'play', 'football', ',', 'fond', '.']

The output shows that the word tennis has been removed from the input sentence.

You can also add multiple words to the list of stop words in SpaCy as shown below. The following script adds likes and tennis to the list of stop words in SpaCy:

import spacy
sp = spacy.load('en_core_web_sm')

all_stopwords = sp.Defaults.stop_words
all_stopwords |= {"likes","tennis",}

text = "Nick likes to play football, however he is not too fond of tennis."
text_tokens = word_tokenize(text)
tokens_without_sw = [word for word in text_tokens if not word in all_stopwords]

print(tokens_without_sw)

Output:

['Nick', 'play', 'football', ',', 'fond', '.']

The ouput shows tha the words likes and tennis both have been removed from the input sentence.

Removing Stop Words from Default SpaCy Stop Words List

To remove a word from the set of stop words in SpaCy, you can pass the word to remove to the remove method of the set.

The following script removes the word not from the set of stop words in SpaCy:

import spacy
sp = spacy.load('en_core_web_sm')

all_stopwords = sp.Defaults.stop_words
all_stopwords.remove('not')

text = "Nick likes to play football, however he is not too fond of tennis."
text_tokens = word_tokenize(text)
tokens_without_sw = [word for word in text_tokens if not word in all_stopwords]

print(tokens_without_sw)

Output:

['Nick', 'play', 'football', ',', 'not', 'fond', '.']

In the output, you can see that the word not has not been removed from the input sentence.

Using Custom Script to Remove Stop Words

In the previous section, you saw different how we can use various libraries to remove stop words from a string in Python. If you want full control over stop word removal, you can write your own script to remove stop words from your string.

The first step in this regard is to define a list of words that you want treated as stop words. Let's create a list of some of the most commonly used stop words:

my_stopwords = ['i', 'me', 'my', 'myself', 'we', 'our', 'ours', 'ourselves', 'you', "you're", "you've", "you'll", "you'd", 'your', 'yours', 'yourself', 'yourselves', 'he', 'him', 'his', 'himself', 'she', "she's", 'her', 'hers', 'herself', 'it', "it's", 'its', 'itself', 'they', 'them', 'their', 'theirs', 'themselves', 'what', 'which', 'who', 'whom', 'this', 'that', "that'll", 'these', 'those', 'am', 'is', 'are', 'was', 'were', 'be', 'been', 'being', 'have', 'has', 'had', 'having', 'do', 'does', 'did', 'doing', 'a', 'an', 'the', 'and', 'but', 'if', 'or', 'because', 'as', 'until', 'while', 'of', 'at', 'by', 'for', 'with', 'about', 'against', 'between', 'into', 'through', 'during', 'before', 'after', 'above', 'below', 'to', 'from', 'up', 'down', 'in', 'out', 'on', 'off', 'over', 'under', 'again', 'further', 'then', 'once', 'here', 'there', 'when', 'where', 'why', 'how', 'all', 'any', 'both', 'each', 'few', 'more', 'most', 'other', 'some', 'such', 'no', 'nor', 'not', 'only', 'own', 'same', 'so', 'than', 'too', 'very', 's', 't', 'can', 'will', 'just', 'don', "don't", 'should', "should've", 'now', 'd', 'll', 'm', 'o', 're', 've', 'y', 'ain', 'aren', "aren't", 'couldn', "couldn't", 'didn', "didn't", 'doesn', "doesn't", 'hadn', "hadn't", 'hasn', "hasn't", 'haven', "haven't", 'isn', "isn't", 'ma', 'mightn', "mightn't", 'mustn', "mustn't", 'needn', "needn't", 'shan', "shan't", 'shouldn', "shouldn't", 'wasn', "wasn't", 'weren', "weren't", 'won', "won't", 'wouldn', "wouldn't"]

Next, we will define a function that will accept a string as a parameter and will return the sentence without the stop words:

def remove_mystopwords(sentence):
    tokens = sentence.split(" ")
    tokens_filtered= [word for word in text_tokens if not word in my_stopwords]
    return (" ").join(tokens_filtered)

Let's now try to remove stop words from a sample sentence:

text = "Nick likes to play football, however he is not too fond of tennis."
filtered_text = remove_mystopwords(text)
print(filtered_text)

Output:

Nick likes play , however fond tennis .

You can see that stop words that exist in the my_stopwords list has been removed from the input sentence.

Since my_stopwords list is a simple list of strings, you can add or remove words into it. For example, let's add a word football in the list of my_stopwords and again remove stop words from the input sentence:

text = "Nick likes to play football, however he is not too fond of tennis."
filtered_text = remove_mystopwords(text)
print(filtered_text)

Output:

Nick likes play , however fond tennis .

The output now shows that the word football is also removed from the input sentence as we added the word in the list of our custom stop words.

Let's now remove the word football from the list of stop word and again apply stop word removal to our input sentence:

my_stopwords.remove("football")

text = "Nick likes to play football, however he is not too fond of tennis."
filtered_text = remove_mystopwords(text)
print(filtered_text)

Output:

Nick likes play football , however fond tennis .

The word football has not been removed now since we removed it from the list of our stop words list.

Conclusion

In this article, you saw different libraries that can be used to remove stop words from a string in Python. You also saw how to add or remove stop words from lists of the default stop words provided by various libraries. At the end, we showed how this can be done if you have a custom script used for removing stop words.
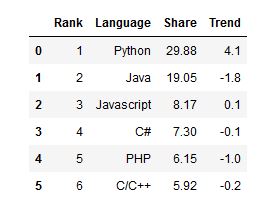
Reinout van Rees: Rotterdam python meetup

$
0
0

Microservices with Python for AI in radiology - Coert Metz

In radiology, people take a long time to become experienced. Medical school, MD, certified radiologist... And when they're 68 they're off to a pension. What they did at Quantib was to try and "scale radiology experience with AI".

Detection and classification of prostate lesions. Same with breast MRIs. Brain shrinkage. They hope it increases the amount of MRI scans that can be processed. And also the quality of the analysis.

He demoed the application. There's detection of brain regions in the software, for instance. When you compare two MRI scans at different points in time, you can see the difference and compare that difference with what you would see in a healthy person.

Hospital practice often means downloading radiology RMI images from a central hospital image storage server ("PACS"), taking them to a separate workstation for analysis and then going back with reports. This takes time, so it is sometimes omitted due to time pressure...

What they're working on now is to run their AI software on a server and connect it to the image storage service. They designed their software as a bunch of microservices. Storage service, import, dispatch, workflow service, processing.

Nice idea: you can add exporter plugins to the system by means of docker containers.

Why microservices?

  • Better scalable. AI on GPU nodes can be expensive. So it is more cost effective to only have to scale those AI services there and use regular nodes for the rest.
  • Cloud-ready.
  • It is easier to reason about a separate service in isolation. Failure modes and security is easier to figure out. And, important for a hospital, regulatory requirements are better manageable: risk management, cybersecurity.
  • Of course, testing in isolation is easier.

Microservices are a bit harder to setup than a monolith. Especially when a large part of the team isn't really experienced with devops type of work.

The core services and the front end are down with python and django. The services also mostly use django restframework. All the communication between the services is done with REST APIs. Extensions also talk to the APIs. Django restframework is mostly straightforward to use.

When designing an API, make it a nice clean clear consistent REST API. Follow REST good practices. Plural nouns (workflow/workflows). Use HTTP verbs (get/put/post/delete). If resources are nested, also nest them in the URLs. A puzzle: using the right HTTP status codes. There are nice decision trees available for that online. Don't compromise!

The front-end consists of a separate django app that communicates with the back-end microservices. The user interface is done in javascript.

Testing: regular unittests plus django's test cases. Javascript: jest (they have about 90% coverage). For integration testing they use PACT-python (consumer driven contracts). It is all done automatically on the continuous integration server. Getting the integration tests to work well was a challenge, btw. What helped was to return only minimal responses when mocking.

Deployment: docker in swarm mode (they'll move to kubernates later). Docker secrets. Gunicorn+nginx. TLS everywhere: both ways between services. Regular single-way between the browser and the front-end service.

Home Automation and python - Bas Nijholt

Bas likes using programming in his life. For instance home automation: https://github.com/basnijholt/home-assistant-config

He didn't care about home automation until he found a way to do it in python (home assistant) and he had a good use case. The use case was the elaborate video/audio system of a family member where they were moving in. It should not take six different buttons to finally get the TV running. Time to automate it.

Home automation is an expensive and time consuming hobby ("if it doesn't cost time and if it doesn't cost money, it is no hobby"). Changing lights. Turning heating on or off. When you go to the bathroom at night after you've been sleeping, don't turn on the bright light in the toilet, but use a soft red light. Controlling the robot vacuum cleaner to only do its work when everyone is out of the house. Using a smart current meter connected to the washing machine that sends a message to your phone when it is ready. A packet sniffer between the regular thermostat and the heater to intercept and control it. A humidity sensor in the bathroom to detect when you're showering: then the lights should stay on despite there being almost no movement :-)

Home automation should be fun and (mostly) useful. It should not invade your privacy or complicate your life.

Regarding complication, two things to keep in mind from the python philosophy:

  • If the implementation is hard to explain, it is a bad idea.
  • If the implementation is easy to explain, it may be a good idea.

System Message: WARNING/2 (<string>, line 79); backlink

Duplicate explicit target name: "home assistant".

So: home assistant. The big problem that it solves is that it ties everything together: all the various protocols (wifi, bluetooth, infrared, etc), all the various devices (temperature, humidity, switches, cameras, sockets, etc) and all the various companies... It is written in python. You have abstract "Devices" classes that can be subclassed. And there are lots of examples.

It is open source. Really open source, as it is in the top 10 github projects when you look at the number of contributors. There are lots of active developers. There are even four full time developers paid for by home assistant users!

He then showed his dashboard... A list of plants with their humidity level, for instance. Energy usage. Which lights were on or off. He sent his robot vacuum to a certain room through the web interface. He also showed a video he recorded: nice!

To start with, a raspberry pi and some sensors is enough. Probably you already have a few devices in home already that you can connect.

Detecting outages at scale - Sander van de Graaf

Sander works at down detector. A service that detects when something is down. They monitor loads of services (facebook, etc). Often they notice it earlier than the actual service itself.

They make most of their money from enterprise subscriptions that use it to monitor their own services and also the services they in turn depend on.

They're using python and django and started in 2012. They initially used python-nltk to scrape twitter messages to determine if there was an outage for a certain service.

They started on physical servers (which he hates, as they tend to die sometimes), then moved to AWS and they're now using serverless a lot. For serverless they switched parts from django to flask. Django is now used for database migrations and the admin, mostly.

Basically: async everything. A server creates jobs in redis, workers get jobs. A separate service monitors the queue size and increases and decreases the number of workers.

They use python RQ, "easy job queues for python", which works with redis. He is really enthousiastic about it. It is really simple to use.

He then explained their setup, which uses loads of amazon services. A question from the audience was "don't you have extreme lock-in this way?" His answer was: "if you use the cloud, go all-in". If you can only use a small subset because you might want to move to a different cloud provider, you're missing out on a lots of stuff. You ought to just use a regular virtual server, then. Much cheaper. If you have the money to use the cloud, go all in. Use all the nice tools and all the managed services.

What they also like: python's @lru_cache cache decorator. Also: "black" for code formatting. Flask. Pipenv. https://codecov.io. statsd. Grafanacloud.

Personal Github projects - Ambar

He quicky showed some personal projects at https://github.com/ambardas .

Based on the book "deep work", he wrote https://github.com/ambardas/make_my_day_planner to re-schedule his google calender a bit.

In between he showed how to use pytest, doctests and coverage. And github actions to automatically run it on github. Note: quite a lot of audience members mentioned that they like github actions, especially the speed.

Fun: https://github.com/ambardas/sorting_performance (currently, look in the development branch . A small project to determine the optimal on-a-table sorting process for supermarket footbal cards. You can optimize for speed or for you-can-do-it-while-doing-other-things.

See https://visualgo.net/bn/sorting for nice visualisations.

pythonwise: Using __getattr__ for nicer configuration API

$
0
0
Typically, you'll read configuration from files (such as YAML) and get them as a dictionary. However in Python you'd like to write config.httpd.port and not config['httpd']['port']

__getattr__ is a hook method that's called by Python when regular attribute lookup fails (not to be confused with the lower level __getattribute__, which is much harder to work with). You can use it to wrap the configuration dictionary. Here's a small example.


Roberto Alsina: Episodio 30: Python Moderno 2: Black and Flake8

$
0
0

Herramientas para mejorar la calidad de tu código! Que más querés????

Viewing all 22419 articles
Browse latest View live


<script src="https://jsc.adskeeper.com/r/s/rssing.com.1596347.js" async> </script>