Quantcast
Channel: Planet Python
Viewing all 22412 articles
Browse latest View live

Mike Driscoll: Python 101 2nd Edition Kickstarter Preview

$
0
0

I have been kicking around the idea of updating my first book, Python 101, for over a year. After doing a lot of planning and outlining, I am ready to announce that I have started work on the book.

Python 101 2nd Ed Kickstarter

The new Python 101, 2nd Edition, will be a completely new book rather than just an updated book like a lot of publishers like to do. I feel like updating a chapter or two is a disservice to my readers. This new book will cover most of the items in the the original. However I am dropping the the tour of the standard library and replacing it with a “How-To” section as I think seeing live, working code is better than talking about syntax.

You can follow my Kickstarter now if you’d like to. The Kickstarter will go live February 17th at approx 8 a.m. CST and run 30 days.

The post Python 101 2nd Edition Kickstarter Preview appeared first on The Mouse Vs. The Python.


Real Python: Playing and Recording Sound in Python

$
0
0

In this course, you’ll learn how to play and record sound in Python using some of the most popular audio libraries. You’ll learn about the most straightforward methods for playing and recording sound first, and then you’ll learn about some libraries that offer some more functionality in exchange for a few extra lines of code.

By the end of this course, you’ll know how to:

  • Play MP3 and WAV files, as well as a range of other audio formats
  • Play NumPy and Python arrays containing sound
  • Record sound using Python
  • Save your recordings or audio files in a range of different file formats

[ Improve Your Python With 🐍 Python Tricks 💌 – Get a short & sweet Python Trick delivered to your inbox every couple of days. >> Click here to learn more and see examples ]

PyCoder’s Weekly: Issue #407 (Feb. 11, 2020)

$
0
0

#407 – FEBRUARY 11, 2020
View in Browser »

The PyCoder’s Weekly Logo


Understanding Best-Practice Python Tooling by Comparing Popular Project Templates

“Use Flake8, pytest, and Sphinx in your current Python project. Also evaluate pre-commit, black, and Pylint. For your next project, consider adding poetry and Dependabot.”
JONAS KEMPER

Playing and Recording Sound in Python

Learn about libraries that can be used for playing and recording sound in Python, such as PyAudio and python-sounddevice. You’ll also see code snippets for playing and recording sound files and arrays, as well as for converting between different sound file formats.
REAL PYTHONvideo

Automate & Standardize Code Reviews for Python

alt

Take the hassle out of code reviews - Codacy flags errors automatically, directly from your Git workflow. Customize standards on coverage, duplication, complexity & style violations. Use in the cloud or on your servers for 30 different languages. Get started for free →
CODACYsponsor

Understand Group by in Django With SQL

Understand GROUP BY in Django ORM by comparing QuerySets and SQL side by side. If SQL is where you are most comfortable, this is the Django GROUP BY tutorial for you.
HAKI BENITA

TV Backlight Compensation With Python & Custom Shaders

Extending a broken TV’s lifetime with Python code and some custom shaders. Impressive!
PEKKA VÄÄNÄNEN

Applying Mypy to Real-World Projects

Hints and tips for getting started with Mypy and introducing it to existing projects.
CAL PATERSON

Discussions

Learn Python the NSA Way…

“I put in a FOIA request to the NSA for their Python training materials and got back a 400-page printout of their COMP 3321 training course. So, I scanned and OCR’d it. Here is a PDF (warning: 118 MB)”
TWITTER.COM/CHRIS_SWENSON

Python Jobs

Senior Software Engineer Python/Django (London, UK)

Zego

Python Developer (Malta)

Gaming Innovation Group

Sr Software Engineer Backend (Denver, CO, USA)

CyberGRX

Senior Software Developer (Vancouver, BC, Canada)

AbCellera

More Python Jobs >>>

Articles & Tutorials

Create a macOS Menu Bar App With Python (Pomodoro Timer)

“On my Mac, I use the menu bar countless times per day. In this post we will go through the process of creating a custom macOS menu bar app using Python.”
CAMILLO VISINI• Shared by Camillo Visini

Implementing an Interface in Python

In this tutorial, you’ll explore how to use a Python interface. You’ll come to understand why interfaces are so useful and learn how to implement formal and informal interfaces in Python. You’ll also examine the differences between Python interfaces and those in other programming languages.
REAL PYTHON

Become a Python Guru With PyCharm

alt

PyCharm is the Python IDE for Professional Developers by JetBrains providing a complete set of tools for productive Python, Web and scientific development. Be more productive and save time while PyCharm takes care of the routine →
JETBRAINSsponsor

SciPy 1.0: Fundamental Algorithms for Scientific Computing in Python

“In this work, we provide an overview of the capabilities and development practices of SciPy 1.0 and highlight some recent technical developments.”
NATURE.COM

Prevent Repetition With Assignment Expressions

An assignment expression—also known as the walrus operator—is a new syntax introduced in Python 3.8 to solve a long-standing problem with the language that can cause code duplication.
BRETT SLATKIN

Python Command Line Arguments

Python command line arguments are the key to converting your programs into useful and enticing tools that are ready to be used in the terminal of your operating system. In this step-by-step tutorial, you’ll learn their origins, standards, and basics, and how to implement them in your program.
REAL PYTHON

The Parallelism Blues: When Faster Code Is Slower

“As it turns out, for certain operations NumPy will parallelize operations transparently. And if you’re not careful, this can actually slow down your code.”
ITAMAR TURNER-TRAURING

sys.getsizeof Is Not What You Want

sys.getsizeof is almost never what you want, for two reasons: it doesn’t count all the bytes, and it counts the wrong bytes.”
NED BATCHELDER

Python asyncio and await-ing Multiple Functions

How to call await on multiple functions in Python using the asyncio package.
ERIC URBAN

Projects & Code

Events

PyCon Namibia 2020

February 18 to February 21, 2020
PYCON.ORG

Open Source Festival Africa

February 20 to February 23, 2020
OSCAFRICA.ORG

PyCon Belarus 2020

February 21 to February 23, 2020
PYCON.ORG


Happy Pythoning!
This was PyCoder’s Weekly Issue #407.
View in Browser »

alt

[ Subscribe to 🐍 PyCoder’s Weekly 💌 – Get the best Python news, articles, and tutorials delivered to your inbox once a week >> Click here to learn more ]

Python Bytes: #168 Race your donkey car with Python

Mike Driscoll: The NSA Has a Beginner Python Course

$
0
0

The National Security Agency (NSA) recently released a free Python programming course for beginners after a Freedom of Information Act (FOIA) request according to ZDNet. There is almost 400 pages of material that has been uploaded to Digital Oceans Spaces by Chris Swenson, the software developer who made the original request.

You can access the course PDF directly here. Interestingly, the document mentions a couple of No Starch Press’s most popular books, such as “Automate the Boring Stuff with Python” and “Python Crash Course”.

The document is a bit dry, but it is interesting to see how the United States government is teaching Python.

Kushal Das has spent more time than I have digging through the materials and has posted about his discoveries on his blog. I personally found it interesting that they were using the Anaconda distribution rather than the CPython one.

Anyway, if you have some time, you should check it out.


The post The NSA Has a Beginner Python Course appeared first on The Mouse Vs. The Python.

Codementor: K-Nearest Neighbors explained

$
0
0
In this post, I explain the intuition and logic behind KNN algorithm and show simple implementation written in pure pandas which yield 98% accuracy on the IRIS dataset.

Zato Blog: Generating API documentation for both external and internal users

$
0
0

A recurring need in larger integration projects is generation of API documentation for users belonging to different, yet related, target groups. Read on to learn how to generate Zato-based API specifications for more than one group from a single source of information.

A typical scenario is granting access to the same APIs to external and internal users - what they have in common is that all of them may want to access the same APIs yet not all of them should have access to documentation on the same level of details.

For instance - external developers should only know what a given endpoint is for and how to use it but internal ones may also be given information about its inner workings, the kind of details that external users should never learn about.

If documentation for two such groups is kept separately, it may require more maintenance effort than necessary - after all, if most of it is the same for everyone then it would make sense to keep it in one place and only add or remove details, depending on which group particular API documentation needs to be generated for.

The previous article went through the process of generating API specifications step by step - this one goes even further by adding introducing the notion of tags that drive which parts of documentation to generate or not.

Python docstrings

Let us use one of the same services as previously - here is its basic form:

# -*- coding: utf-8 -*-# Zatofromzato.server.serviceimportInt,ServiceclassRechargeCard(Service):""" Recharges a pre-paid card.    Amount must not be less than 1 and it cannot be greater than 10000."""classSimpleIO:input_required='number',Int('amount')output_required=Int('status')

The result, when generated as Sphinx, will be like below:

Now, we would like to add some details that only internal users should have access to - this is how the docstring should be modified, assuming for a moment that there are two CRM systems in the company the usage of which depends on a particular end user's account ..

# -*- coding: utf-8 -*-# Zatofromzato.server.serviceimportInt,ServiceclassRechargeCard(Service):""" Recharges a pre-paid card.    Amount must not be less than 1 and it cannot be greater than 10000.    #internal    For user accounts starting with QM - MyCRM is queried.    For any other account - MyCRM-2 is queried."""classSimpleIO:input_required='number',Int('amount')output_required=Int('status')

.. with the corresponding change in the output:

What happened above was that we applied a tag called #internal - anything that follows it is included in the output only if that very tag is requested when generating the documentation.

Note that the tag name is arbitrary, it could be any other name. Note also that there may be more than tag in a docstring, e.g. #confidential, #private or anything else.

Command-line usage

To actually include the #internal tag, the zato apispec command needs to be told about it explicitly, as below:

$ zato apispec /path/to/server \
  --dir /path/to/output/directory \
  --include api.* \
  --tags public,internal

If you do not give the command any tags, only the public part of the docstring, one without any tags, will be included in the resulting documentation.

To make your clear to other developers, you can also directly use the tag public in the command - this will make it easier to understand that you want to generate publicly available information and nothing else.

$ zato apispec /path/to/server \
  --dir /path/to/output/directory \
  --include api.* \
  --tags public

Wrapping it up

This is it, you are done now - you can keep your API documentation in one place now and include only the relevant parts of it depending on context - this ensures that no matter who the recipient of your documentation is, it will be always generated from a single source, thus ensuring that all the output will stay in sync.

PyBites: The Pythonic Fast Lane, Digest of a 30 Min Mentoring Session

$
0
0

The other day I had an awesome mentoring session with a beginner Pythonista, amazing what 30 min of screen sharing can do. Read on to learn more ...

There was a clear goal: get data from an API so I taught the following:

  • First make a virtual environment, activate it and pip install requests.

  • Open a script.py, import the library and define the API endpoint.

  • Use an f-string to embed variables into the API endpoint.

  • Use requests.get with the endpoint URL and its kwargs to send HTTP Headers / secret auth token (more below).

  • How to load in the token from the environment (os.getenv) to hide it from the source (we added it to venv/bin/activate).

  • Use pdb to inspect the response (one of my favorites).

  • How to read code of an external library.

  • And more ...

Feeling as excited as we were hacking this together?

Well, this was only the technical part!

What was more interesting was teaching the PROCESS:

  • He saw me use the tools of a professional environment: venv, pip, requests, coding in vim, etc.

  • He got an idea how I approached this problem, my thought process. This is golden when you get started.

  • I did not write a function. I just got something to work first (drop perfectionism).

  • We hit a 401 which meant we were not doing authentication right so we advanced from there (quickly iterate).

  • Similarly we hardcoded the token in the code to get it working, later we pulled it into an env variable.

  • Sending HTTP headers with requests was not something I knew from memory so I had to Google it and landed on Stackoverflow. As a developer you keep learning and googling, you just come better at how to look. He made me aware of this.

  • It was nice to teach the bare minimum but leave enough up to a challenge for him. Good mentoring is to give mentees just enough to get going, but they have to do the work. You just guide them.

  • Although he was a beginner, he saw how I used pdb to inspect variables, a powerful skill.

  • I typed help in pdb (duh), then in the REPL, but ended up going to requests' source code which he really enjoyed. I told him that "if there was one thing I would have done earlier as a becoming programmer ...".

  • I hardcoded a variable and added a TODO to make it a command line arg later.

Invaluable stuff. Coaching has a clear win/win here:

  • Mentees win because they can focus their efforts.

  • Mentors win by better understanding the concepts at hand, gaining tactics for effective knowledge transfer, and learning about common knowledge gaps and roadblocks.

Cliche or not, but the best way to learn is to teach.

Have you had a similar experience, be it as a mentee or a mentor? Share it in the comments below ...

Keep Calm and Code in Python!

-- Bob

With so many avenues to pursue in Python it can be tough to know what to do. If you're looking for some direction or want to take your Python code and career to the next level, schedule a call with us now. We can help you!


Real Python: Python Community Interview With Brett Slatkin

$
0
0

Today I’m speaking to Brett Slatkin, a principal software engineer at Google and the author of the Python programming book Effective Python. Join us as we discuss Brett’s experience working with Python at Google, refactoring, and the challenges he faced when writing the second edition of his book. Without any further ado, let’s get into it!

Ricky:Welcome to Real Python, Brett. I’m glad you could join me for this interview. Let’s start the same way we do with all our guests. How’d you get into programming, and when did you start using Python?

Brett Slatkin

Brett: Thanks for having me! My path to programming was long and varied. Python was a surprising twist at the end of my education. It was something that I never expected, but it was a blessing. Once I learned the language, I fell in love with it.

When I was growing up, my family had computers in our house, which was an enormous privilege. I always loved taking things apart to see how they worked, and I don’t remember a time when I wasn’t using computers and trying to figure them out. One of my late grandfather’s favorite stories was about the time he was having a printing problem and I fixed it for him. (I was 3 years old.)

In the 5th grade, my whole class went to a computer lab one day and programmed with Logo on an Apple IIgs. I’m lucky that my mom encouraged my interest in programming after that by buying me books and enrolling me in nerdy summer camps. I used Lego Technic Control Center kits to program small machines. These were the precursor to today’s Lego Mindstorms.

I also used Borland Delphi to build simple GUI apps, like guess the number games. Then, the staff at my local internet cafe showed me Unix, Linux, and C, which blew my mind. That’s when I knew I wanted to be a programmer when I grew up.

During high school, I took free classes at my local community college and studied C, C++, x86 assembly, and game development. I read Scott Meyers’ second edition of Effective C++ and became a huge fan of C++ and all of its arcane features. One summer, I had an unpaid internship with a dot-com bubble startup where I wrote web apps in ASP and VBScript. I was most excited about network programming and tried to build my own versions of DikuMUD and Hotline.

In college, I majored in computer engineering because I wanted to understand how computers worked at the transistor level. Most of my coursework was electrical engineering, where I used programming tools like SPICE, VHDL, and MATLAB. For computer science classes, I learned LISP and wrote a lot of Java. I was a teaching assistant for a variety of classes and really enjoyed teaching others.

Finally, my first encounter with Python was in 2003 when I was looking into how the BitTorrent client worked. (It was open source back then.) I thought the code was ugly because of all the __dunder__ special methods, and I ignored the language for all of my projects!

I went to Google in 2005 after graduating from college because it seemed like the best place to learn more about network programming. But in those earlier days of the company, you didn’t get to pick what you worked on as a new hire. You were just assigned to a team.

On my first day, my boss gave me a copy of the book Python in a Nutshell and told me to go fix a ~25KLOC codebase that was broken. I thought that in the job I would be writing C++ for networked systems, but I ended up having to do something completely different. What made matters worse was that I was on my own because the original programmer had gone on mandatory vacation due to burnout!

Luckily, Alex Martelli was a colleague on the team I joined. He was the author of the book Python in a Nutshell and he helped me learn the language. I was able to rewrite most of the codebase I inherited, fix its fundamental issues, and scale it to Google’s entire production fleet of machines. Believe it or not, this code is still in use today, nearly 15 years later.

The productivity I gained from using Python was dramatic compared to my experience with C++ and Java. My perspective on programming and languages had completely changed. I was now excited about Python!

Ricky:You’ve already touched on using Python at Google, where you’re now a principal software engineer, but in your tenure, you launched Google’s first cloud product, the App Engine. Now you’re the technical lead on Google Surveys, among other projects. How instrumental was Python in helping you develop these, and what does the future of Python look like at Google?

Brett: There’s no doubt that I owe my career at Google to Python, but there’s more to the story. As background, it’s important for you to know that the five engineers who founded App Engine were originally using JavaScript, similar to Netscape’s Livewire server from 1995. However, this was before the release of Chrome and the large performance improvements of V8, which led to NodeJS.

The founders were concerned that server-side JavaScript would make the system seem too niche. They wanted to provide the LAMP stack, which was very popular at the time. The “P” in LAMP stood for Perl, PHP, or Python. Perl was generally on its way out of style, and PHP wasn’t a language Google used internally. But Python was, thanks to Peter Norvig, and so it was the natural choice.

I started on the App Engine team with a 20% project in late 2006 when I implemented the dev_appserver in Python. Before that, there was no way to locally run an app before deploying it. I was so excited by the product’s potential and its use of Python that I moved over to work on it full-time shortly after.

Guido van Rossum, who also worked at Google then, soon joined us. I had the exciting privilege of doing the live demo during the launch event in 2008, where I wrote a web app in Python from scratch and deployed it in just a few minutes. I collaborated with Guido on a variety of projects over the years, the most interesting of which was ndb (the precursor to asyncio) that I beta tested extensively.

What I enjoyed the most was writing full applications with Python in the App Engine environment to push the product’s limits. I would frequently break the system with my demo apps by hitting new barriers that we didn’t realize we had. This would lead us to build infrastructure improvements to ensure that the next app that needed to scale, such as Snapchat, wouldn’t hit the same issues.

My favorite demo app was the PubSubHubbub protocol and hub that Brad Fitzpatrick and I developed together. The protocol turned RSS feeds into real-time streams. It brought the liveliness of services like Twitter to the open web.

At its height, our hub app was processing millions of feeds and thousands of requests per second, all using Python on App Engine. Since then, the hub has been integrated into Google’s standard web crawling infrastructure. PubSubHubbub (now called WebSub) became part of a larger group of specifications that made up OStatus, which helped get Mastadon off the ground.

Google Surveys started as another Python demo app on App Engine. I prototyped the whole system end-to-end in just a few weeks. My co-founder and I had the chance to show it off to Larry Page, and he greenlit the project. We launched a year later with a lean team, thanks to the leverage that Python provides.

Our services now handle 500K+ requests per second and impact the majority of Google’s users and revenue. The codebase has grown from ~10KLOC to over 1MLOC, with the majority of it being in Python. We’ve had to migrate some services over to Go, C++, and Java as we’ve hit various CPU cost and latency constraints, but Python is still at the core of everything we do.

Python has found its place at Google primarily as the tool for data science, machine learning, and DevOps / SRE. Right now, engineers across the company are working towards deprecating Python 2 and moving the whole monorepo over to Python 3 to stay in line with the Python community and open source packages.

Ricky:On top of what you just talked about, you’re also an author of the popular Python programming book,Effective Python, which we previously reviewed in The Best Python Books. You’ve recently published a second edition, which has substantial updates. What do the updates include, and what’s changed since the first edition?

Brett: Thanks for considering my book one of the best! The response to the first edition has been wonderful. It was even translated into eight languages! There’s a lot of info about the new book on the official website, including the full table of contents with all of the item titles, a variety of samples, and the example code.

The second edition of Effective Python is nearly twice the length of the original and significantly revises all of the items of advice, in addition to providing 30+ new ones. The first edition of the book was written back in 2014 with Python 2.7 and Python 3.4 in mind. So much has been added in Python 3.5 through Python 3.8 over the past 5 years, so there was a lot to write about! The general style is the same and it still includes multi-color syntax highlighting.

The new book covers the walrus operator, f-strings, best practices for dictionaries, class decorators, and all of the important features of functions (including asynchronous execution). I get into the details of unpacking generalizations, customized sorting, testing facilities, and algorithmic performance in the standard library. I also explain how to leverage more advanced tools such as the typing module and the memoryview type.

In this new edition, my advice about metaclasses has completely changed, thanks to the addition of __init_subclass__ and __set_name__ to the language. My recommendation for advanced generator usage with send() and throw() is now the opposite of what it was in the first edition. (Now I say to avoid them.) I compare the benefits of asyncio to threads and processes, which was entirely missing before. I provide guidance on how to convert synchronous code to asynchronous code, as well as how to mix asyncio with threads.

Anyone out there who reads the book, please feel free to send me questions or feedback!

Ricky:At PyCon 2016, you gave a talk titled Refactoring Python: Why and How to Restructure Your Code, which made our Top 10 Must-Watch PyCon Talks list, too. I’m curious to know your motivations for giving the talk. What was it about refactoring (or the lack thereof) that inspired you to give a talk about it? Do people seem to struggle with refactoring? Are they falling for the same common pitfalls?

Brett: Thanks for including my talk in your top ten list!

When I put this talk together, I had been working in the same codebase for about six years. Any code of that age needs to be refactored constantly and updated to prevent it from rotting and becoming unusable.

The rot I’m talking about happens when dependencies change in backward-incompatible ways, when the underlying infrastructure shifts to have different performance characteristics, or when product decisions break a large number of prior assumptions. So, refactoring was an ongoing necessity and it was on my mind frequently. This experience gave me a new appreciation for how crucial the skill of refactoring is.

People often talk about how testing, tooling, and frameworks make them more effective programmers. But I believe refactoring is the big underappreciated fundamental skill that every programmer needs to focus on improving. Why? In my view, the best code is code that doesn’t exist and has been deleted or was never written. The best program you can have is an empty .py file. The question is how do you get from where you are in a project to closer to that ideal? By refactoring.

I wanted to help the other programmers on my team learn how to become better at refactoring, but the book Refactoring by Martin Fowler hadn’t been updated since 1999. So I was considering writing a Python-specific version of the book to modernize it into something my colleagues could read. However, I put that on hold when I learned that Fowler was working on the second edition of Refactoring, which has since been released and uses JavaScript as the implementation language.

Unfortunately, it still falls short of what I need. I would love to see a Python-specific refactoring book, or a set of workable examples, that take advantage of everything the language has to offer.

Ricky:Now for my last few questions. What else do you get up to in your spare time? What other hobbies and interests do you have, aside from Python and programming?

Brett: We have two very young children at home, so my wife and I spend a lot of time with them. Singing songs and playing music (piano primarily, but sometimes guitar, ukulele, xylophone, and harmonica) have been the best ways to enjoy our time together. I’m terrible at all of these instruments, and not a great singer either, but we still have a lot of nice times.

I like to be outside every day, either walking the hills of San Francisco or going for a run (usually while pushing a stroller). I love to surf when I get a chance. I enjoy reading, especially long-form journalism, but in reality, it’s mostly reddit and Lobsters. I’d like to be a better cook and find the right balance between laziness and deliciousness. I’m also trying to teach myself how to build statistical models using Bayesian methods. If I’ve learned anything over the years, it’s that nothing is for certain.


Thank you, Brett, for joining me this week! You can find Brett on Twitter or GitHub, and learn more about the second edition of Effective Python at effectivepython.com.

If there’s someone you’d like me to interview in the future, then reach out to me in the comments below, or send me a message on Twitter. Happy coding!


[ Improve Your Python With 🐍 Python Tricks 💌 – Get a short & sweet Python Trick delivered to your inbox every couple of days. >> Click here to learn more and see examples ]

Erik Marsja: How to Plot a Histogram with Pandas in 3 Simple Steps

$
0
0

The post How to Plot a Histogram with Pandas in 3 Simple Steps appeared first on Erik Marsja.

In this post, we are going to learn how to plot histograms with Pandas in Python. Specifically, we are going to learn 3 simple steps to make a histogram with Pandas. Now, plotting a histogram is a good way to explore the distribution of our data.

Prerequisites

First of all, and quite obvious, we need to have Python 3.x and Pandas installed to be able to create a histogram with Pandas. Now, Python and Pandas will be installed if we have a scientific Python distribution, such as Anaconda or ActivePython, installed. On the other hand, Pandas can be installed, as many Python packages, using Pip: pip install pandas.

How to Make a Pandas Histogram

Now, before we go on and learn how to make a histogram in Pandas step-by-step here’s how we generally create a histogram using Pandas: pandas.DataFrame.hist(). That is, we use the method available on a dataframe object: df.hist(column='DV'). Note, that DV is the column with the dependent variable we want to plot.

How to Plot a Histogram with Pandas in 3 Simple Steps:

Now, we are ready to learn how to make a Histogram using Pandas. It’s, as previously mentioned, very easy and we will go through each step here.

1. Import Pandas

In the first step, we import pandas as pd. That is, write the following on top of the Python script, or Jupyter notebook:

import pandas as pd

2. Import Data

In the second step, we are going to load data from an Excel file using Pandas read_excel() method. Here’s how to read data:

from pathlib import Path
datafile = Path('Simdata', 'play_data.xlsx')

df = pd.read_excel(datafile, 
               index_col=0)

Note, that in the example above the Excel file (i.e., the data) is located in the same folder as the Python script (or Jupyter notebook). It’s also possible to read CSV files into Pandas dataframes. That is if we store our data in that file type.

3. Create the Histogram using Pandas hist()

In the third, and final step, we are going to create a histogram with Pandas. Specifically, we are going to use df.hist() to do this.

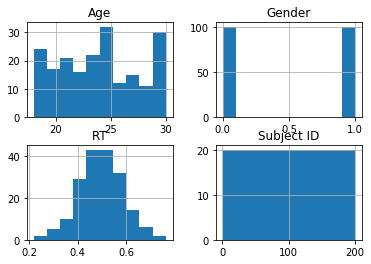
df.hist(column='RT')
how to plot histogram using Pandas

As can be seen in the code chunk above, we have also selected one column (i.e., by “column=’RT’”) to create the histogram from. Note, if we didn’t select the “RT” column, Pandas hist() method would have created histograms of all numeric variables in the dataframe:

how to make a histogram using Pandas hist()

How to Plot Histograms by Group using Pandas:

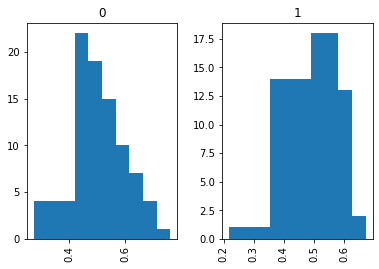
Now, Pandas hist() have more parameters than column that we can work with. In this section, we are going to create a histogram by gender. We will accomplish this by using the by argument:

df.hist(by='Gender',
       column='RT')/code>
how to create a histogram with Pandas

In the histogram above, we grouped by gender. It is also possible to group the dataframe, before plotting, using Pandas groupby().

How to Change the Size of a Pandas Histogram:

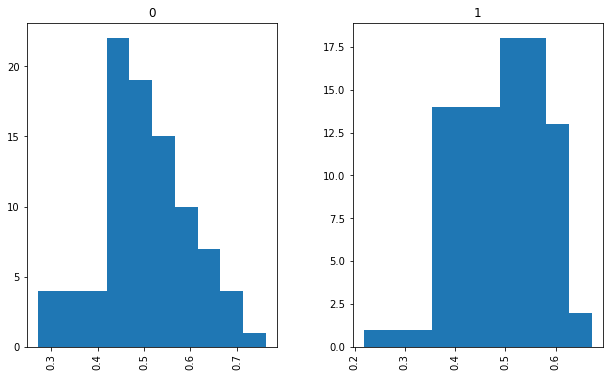
In this section, we will use the figsize argument to change the size of the histogram:

df.hist(by='Gender',
       column='RT',
       figsize=[10, 6]))/code>
how to plot histogram with pandas

There are, of course, other arguments that can be used when plotting histograms using Pandas. Make sure you check the documentation when needed. For instance, the ticks can be rotated using the xrot argument.

Here’s a Jupyter notebook with all the code examples.

Conclusion: How to Create a Histogram with Pandas in Python

In this short post, we learned 3 simple steps to plot a histogram with Pandas. Furthermore, we learned how to create histograms by a group and how to change the size of a Pandas histogram.

The post How to Plot a Histogram with Pandas in 3 Simple Steps appeared first on Erik Marsja.

Codementor: Tensorflow basics

$
0
0
Tensorflow basics - constants and variables

Nikolaos Diamantis: World's average country population and inspection paradox

$
0
0
Have you ever thought how much is the world’s average country population? And what does it say about the country you are living in or for the quality of life of the average person? All these questions are related to what we call the “Inspection Paradox” which we are going to illustrate here using Python. First of all we need to find some data. For that purpose we could use wikipedia.

Codementor: Is Switching From Python to Java is a Good Idea?

$
0
0
Knowing two languages is always better than one. If you are thinking of learning a second language after Python, Java could be a really nice choice. In this article, we are going to discuss switching from Python to Java in the case of a beginner software developer.

Codementor: Designing Big Picture

$
0
0
Web design encompasses many different skills and disciplines in the production and maintenance of websites. The different areas of web de...

Test and Code: 100: A/B Testing - Leemay Nassery

$
0
0

Let's say you have a web application and you want to make some changes to improve it.
You may want to A/B test it first to make sure you are really improving things.

But really what is A/B testing?

That's what we'll find out on this episode with Leemay Nassery.

Special Guest: Leemay Nassery.

Sponsored By:

Support Test & Code: Python Software Testing & Engineering

<p>Let&#39;s say you have a web application and you want to make some changes to improve it.<br> You may want to A/B test it first to make sure you are really improving things.</p> <p>But really what is A/B testing? </p> <p>That&#39;s what we&#39;ll find out on this episode with Leemay Nassery.</p><p>Special Guest: Leemay Nassery.</p><p>Sponsored By:</p><ul><li><a href="https://oxylabs.io/testandcode" rel="nofollow">Oxylabs</a>: <a href="https://oxylabs.io/testandcode" rel="nofollow">Visit oxylabs.io/testandcode to find out more about their services and to apply for a free trial of their Next-Generation Residential Proxies.</a></li></ul><p><a href="https://www.patreon.com/testpodcast" rel="payment">Support Test & Code: Python Software Testing & Engineering</a></p>

Codementor: Mobile Apps for Learning to Code On the Go, Even in Space

$
0
0
In a way, programming is like riding a bicycle. You won’t know how to write code unless you do it for a while. In other words, this skill requires much practice to learn and even more support.

Talk Python to Me: #251 Building and UX Testing Azure's Python SDK

$
0
0
What does it take to build a Python library that will be used by a large number of developers? This happens all the in open source. Projects take off and become wildly successful.

Ned Batchelder: Re-using my presentations

$
0
0

Yesterday I got an email saying that someone in Turkey had stolen one of my presentations. The email included a YouTube link. The video showed a meetup. The presenter (I’ll call him Samuel) was standing in front of a title slide in my style that said, “Big-O: How Code Slows as Data Grows,” which is the title of my PyCon 2018 talk.

The video was in Turkish, so I couldn’t tell exactly what Samuel was saying, but I scrolled through the video, and sure enough, it was my entire talk, complete with illustrations by my son Ben.

Looking closer, the title slide had been modified:

My title slide, with someone else's name

(I’ve blurred Samuel’s specifics in this image, and Samuel is not his actual name. This post isn’t about Samuel, and I’m not interested in directing any more negative attention to him.)

Scrolling to the end of the talk, my last slide, which repeated my name and contact details, was gone. In its place was a slide promoting other videos featuring Samuel or his firm.

I felt like I had been forcibly elbowed off the stage, and Samuel was taking my place while trying to minimize my contributions.

In 2018, I did two things for this presentation: I wrote it, and I presented it at PyCon 2018. By far the most work was in the writing. It takes months of thinking, writing, designing, and honing to make a good presentation. In fact, of the two types of work, Samuel valued the writing most, since that is the part he kept. The reason this presentation attracted his attention, and why he wanted to present it himself, was because of its content.

“Originally presented by” is hardly the way to credit the author of a presentation, especially in small type while removing his name and leaving only a GitHub handle.

So I tweeted,

This is my talk from PyCon 2018, in its entirety, with my name nearly removed. It’s theft. I was not asked, and did not give permission.

Samuel apologized and took down the video. There were other tweets claiming that this was a pattern of Samuel’s, and that perhaps the apology would not be followed by changed behavior. But again, this post isn’t about Samuel.

This whole event got me thinking about people re-using my presentations.

I enjoy writing presentations. I like thinking about how to explain things. People have liked the explanations I’ve written. I like that they like them enough to want to show them to people.

But I’ve never thought much about how I would answer if someone asked me if they could present one of my talks. If people can use my talks to help strengthen their local community and up-skill their members, I want them to be able to. I am not interested in people using my talks to unfairly promote themselves.

I’m not sure re-using someone else’s presentation is a good idea. Wouldn’t it be better to write your own talk based on what you learned from someone else’s? But if people want to re-use a talk, I’d like to have an answer.

So here are my first-cut guidelines for re-using one of my talks:

  1. Ask me if you can use a talk. If I say no, then you can’t.
  2. Don’t change the main title slide. I wrote the presentation, my name should be on it. If you were lecturing about a novel, you wouldn’t hand out copies of the book with your name in place of the author’s.
  3. Make clear during the presentation that I was the author and first presenter. A way to do that would be to include a slide about that first event, with links, and maybe even a screenshot of me from the video recording of the first event.
  4. I include a bit.ly short-link and my Twitter handle in the footer of my slides. Leave these in place. We live in a social online world. I want to benefit from the connections that might arise from one of my presentations.
  5. Keep my name and contact details prominent in the end slide.
  6. If your video is posted online, include my name and the point about this being a re-run in the first paragraph of the description.

It would be great if my talks could get a broader reach than I can make happen all by myself. To be honest, I’m still not sure if it’s a good idea to present someone else’s talk, but it’s better to do it this way than the way that just happened.

Roberto Alsina: Looking for a new job!

$
0
0

My current employer (not anymore!) and I have decided to part ways. So, I am now open to new adventures in Python-land.

I am located near Buenos Aires, so remote positions much preferred, local Buenos Aires ones could work too if it's the right one.

I have a ton of Python experience, lots of engineering management experience and I am looking forward to learning new stuff and try new things, so let´s make this an opportunity!

My resume is here: https://docdro.id/crBrIey

Techiediaries - Django: Multiple Image/File Upload with Django 3, Ionic 5 and FormData

$
0
0

In this tutorial, you'll learn to implement multiple file upload with Ionic 5, django 3 and FormData.

In a previous tutorial, we've created a django 3 RESTful application for uploading files using django 3 REST framework and Ionic 5.

Ionic 5 upload example

Since the backend code will be the same as we only need an /upload endpoint that accepts POST requests we'll simply clone the previous and start our django 3 REST API server using the following command:

$ cd ~/demos
$ mkdir ionic-file-upload
$ cd ionic-file-upload
$ git clone https://github.com/techiediaries/django-rest-file-upload.git backend

Next, create and activate a virtual environment using the following commands:

$ cd backend
$ python3 -m venv .env
$ source .env/bin/activate

Next, install the Python packages used in the project:

$ pip install -r requirements.txt

You can then start the development server using:

$ python manage.py makemigrations
$ python manage.py migrate
$ python manage.py runserver

Your RESTful django 3 server will be available from the 127.0.0.1:8000 address.

Here is some information about our restful server:

  • It exposes an /upload endpoint which accepts POST requests for uploading files.
  • It has CORS enabled so you can send requests from different doamins without getting blocked by the Same Origin Policy.

Prerequisites

This tutorial makes use of Ionic 5 with Angular and TypeScript so you need to the following prerequisites:

  • Node.js and npm installed on your system. You can simply head to the official website and get the binaries for your operating system.
  • Working knowledge of TypeScript and Angular.

Now, let's get started!

Installing Ionic CLI v4

Let's install Ionic CLI 4 which is required to generate Ionic 5 projects. Open a new terminal and run the following command:

$ npm install -g @ionic/cli

Note: You many need to add sudo before your command in linux (debian-based) and macOS systems to install npm modules globally. Otherwise you simply to fix your npm permissions.

Generating your Ionic 5 Project

Next, you can generate a project based on Angular by running the following command:

$ ionic start

The CLI will interactively prompt you for some information about your project such as the name (Enter fileuploadapp or any name you choose) and the starter template (Select blank which will give you a starting project with a single page)

Next type Enter!

The CLI will start generating the files and installing the dependencies from npm. When prompted if you want to Install the free Ionic Appflow SDK and connect your app? (Y/n) Just type n for now.

Importing HttpClientModule

We'll need to use HttpClient to send a POST for uploading files to the RESTful server so we need to import HttpClientModule in our application module. Open the src/app/app.module.ts file and the following changes:

// [...]import{HttpClientModule}from'@angular/common/http';@NgModule({declarations:[AppComponent],entryComponents:[],imports:[/* ... */,HttpClientModule],providers:[StatusBar,SplashScreen,{provide:RouteReuseStrategy,useClass:IonicRouteStrategy}],bootstrap:[AppComponent]})exportclassAppModule{}

Generating an Uploading Service

After creating the project, let's start our journey by creating a service that encapsulates the code for uploading files to the django 3 server. In your terminal, navigate to your project's root folder and and generate the service using the following commands:

$ cd ./fileuploadapp
$ ionic generate service uploading

You will get the following output:

> ng generate service uploading
CREATE src/app/uploading.service.spec.ts (348 bytes)
CREATE src/app/uploading.service.ts (138 bytes)[OK] Generated service!

Open the src/app/uploading.service.ts and change the code accordingly:

import{Injectable}from'@angular/core';import{HttpClient}from'@angular/common/http';@Injectable({providedIn:'root'})exportclassUploadingService{DJANGO_API_SERVER:string="http://localhost:8000";constructor(privatehttp:HttpClient){}publicuploadFormData(formData){returnthis.http.post<any>(`${this.DJANGO_API_SERVER}/upload/`,formData);}}

Generating an Ionic Page

Let's now generate an Ionic page for adding the upload UI. In your terminal, run the following command:

$ ionic generate page upload

The output of this command will be:

> ng generate page upload
CREATE src/app/upload/upload.module.ts (543 bytes)
CREATE src/app/upload/upload.page.scss (0 bytes)
CREATE src/app/upload/upload.page.html (133 bytes)
CREATE src/app/upload/upload.page.spec.ts (691 bytes)
CREATE src/app/upload/upload.page.ts (256 bytes)
UPDATE src/app/app-routing.module.ts (451 bytes)[OK] Generated page!

You can access this page from 127.0.0.1:4200/upload.

Installing and Setting up ng2-file-upload

We'll make use of the ng2-file-upload package which provides some directives for handling file upload in Angular. First install the package from npm using the following command

$ npm install --save ng2-file-upload

Next, you will need to import FileUploadModule in your page module. Open the src/app/upload/upload.module.ts file and the add these changes:

import{NgModule}from'@angular/core';import{CommonModule}from'@angular/common';import{FormsModule}from'@angular/forms';import{Routes,RouterModule}from'@angular/router';import{IonicModule}from'@ionic/angular';import{UploadPage}from'./upload.page';import{FileUploadModule}from'ng2-file-upload';constroutes:Routes=[{path:'',component:UploadPage}];@NgModule({imports:[CommonModule,FormsModule,IonicModule,RouterModule.forChild(routes),FileUploadModule],declarations:[UploadPage]})exportclassUploadPageModule{}

Open the src/app/upload/upload.page.ts file and add the following imports:

// [...]import{UploadingService}from'../uploading.service';import{FileUploader,FileLikeObject}from'ng2-file-upload';import{concat}from'rxjs';

Next, define the following variables:

exportclassUploadPageimplementsOnInit{publicfileUploader:FileUploader=newFileUploader({});publichasBaseDropZoneOver:boolean=false;

Next, inject UploadingService:

exportclassUploadPageimplementsOnInit{constructor(privateuploadingService:UploadingService){}

Next, add the following methods:

fileOverBase(event):void{this.hasBaseDropZoneOver=event;}getFiles():FileLikeObject[]{returnthis.fileUploader.queue.map((fileItem)=>{returnfileItem.file;});}uploadFiles(){letfiles=this.getFiles();letrequests=[];files.forEach((file)=>{letformData=newFormData();formData.append('file',file.rawFile,file.name);requests.push(this.uploadingService.uploadFormData(formData));});concat(...requests).subscribe((res)=>{console.log(res);},(err)=>{console.log(err);});}

Next, open the src/app/upload/upload.page.html file and the following code:

<ion-header><ion-toolbarcolor="primary"><ion-title>Upload Page</ion-title></ion-toolbar></ion-header><ion-contentcolor="dark"padding><divng2FileDrop[ngClass]="{'drop-file-over':hasBaseDropZoneOver}"(fileOver)="fileOverBase($event)"[uploader]="fileUploader"class="area"><divid="dropZone">Drop files here</div></div><inputtype="file"accept="image/*"ng2FileSelect[uploader]="fileUploader"multiple/><ion-button(click)="uploadFiles()">Upload files</ion-button><h2>Your files: {{ fileUploader?.queue?.length }}</h2><ul><li*ngFor="let item of fileUploader.queue">
      {{ item?.file?.name }}
    </li></ul></ion-content>

Next, open the src/app/upload/upload.page.scss file and add these styles:

.area{width:95%;padding:15px;margin:15px;border:1pxsolid#333;background:rgba(0,0,0,0.7);}#dropZone{border:2pxdashed#bbb;-webkit-border-radius:5px;border-radius:5px;padding:50px;text-align:center;font:21ptboldarial;color:#bbb;}.drop-file-over{background:#333;}

This is a screenshot of the page:

Ionic 5 upload example

Finally, start your development server using:

$ ionic serve

Head over to the 127.0.0.1:8100 address then select and drop some files and click on the UPLOAD FILES button:

Ionic 5 file upload example

Viewing all 22412 articles
Browse latest View live


<script src="https://jsc.adskeeper.com/r/s/rssing.com.1596347.js" async> </script>