Matt Layman: URLs Lead The Way
Tim Arnold / reachtim: The contextmanager Decorator
Table of Contents
Overview
Generally, you create a context manager by creating a class with
__enter__and__exit__methods, but this example shows you how to use the@contextlib.contextmanagerto create a simple context manager.
Context managers provide a cool programming pattern, especially if you’re forgetful or just have too much to keep track of and you want to simplify your life.
You’ll find them helpful when you have opened something and need to close it, locked something and need to release
it, or changed something and need to reset it. There are several built in context managers that you’re probably
familiar with like open to open a file or socket to use a socket. The bog-standard example:
withopen('myfile.txt')asf:lines=f.readlines()do_stuff(lines)The open context manager opens a file, returns an object we name as f. When we’ve done all the
things we’re going to with it,
(we fall out of the with statement block), the file is automatically closed for us.
In this brief article, you’ll see how you can create a dead-simple context manager from a generator.
Let’s Code
Create the Context Manager
First import the contextlib module. It has several helpers
(read more here: contextlib module).
We’re just going to decorate the chdir function as a contextlib.contextmanager.
importcontextlib@contextlib.contextmanagerdefchdir(path):""" On enter, change directory to specified path. On exit, change directory to original."""this_dir=os.getcwd()os.chdir(path)try:yieldfinally:os.chdir(this_dir)To make this work, the function must be a generator and yield exactly once.
At the point of the yield, the calling process is executed.
In chdir, the function takes a single argument, path.
- First it makes a note of the current directory and then changes to the
path. - Then it yields control back to the caller.
- No matter what happens during that process, the function will
finallychange back to the original directory.
Use the Context Manager
Suppose you have some function gather_paths you want to call for a set of directories.
The following example shows how the chdir context manager could be used:
withchdir("/mydownloads/wordpress"):gather_paths()I like this little context manager; it keeps me from having to remember to switch back to the original directory so I don’t get surprised later and find my program is executing somewhere else.
As long as I call the function as a context manager using the with statement,
I don’t have to remember to change back to the original directory or do anything special.
Real Python: Python GUI Programming With Tkinter
Python has a lot of GUI frameworks, but Tkinter is the only framework that’s built into the Python standard library. Tkinter has several strengths. It’s cross-platform, so the same code works on Windows, macOS, and Linux. Visual elements are rendered using native operating system elements, so applications built with Tkinter look like they belong on the platform where they’re run.
Although Tkinter is considered the de-facto Python GUI framework, it’s not without criticism. One notable criticism is that GUIs built with Tkinter look outdated. If you want a shiny, modern interface, then Tkinter may not be what you’re looking for.
However, Tkinter is lightweight and relatively painless to use compared to other frameworks. This makes it a compelling choice for building GUI applications in Python, especially for applications where a modern sheen is unnecessary, and the top priority is to build something that’s functional and cross-platform quickly.
In this tutorial, you’ll learn how to:
- Get started with Tkinter with a “Hello, World!” application
- Work with widgets, such as buttons and text boxes
- Control your application layout with geometry managers
- Make your applications interactive by associating button clicks to Python functions
Once you’ve mastered these skills by working through the exercises at the end of each section, you’ll tie everything together by building two applications. The first is a temperature converter, and the second is a text editor. It’s time to dive right in and see how to build an application with Tkinter!
Note: This tutorial is adapted from the chapter “Graphical User Interfaces” of Python Basics: A Practical Introduction to Python 3.
The book uses Python’s built-in IDLE editor to create and edit Python files and interact with the Python shell. In this tutorial, references to IDLE have been removed in favor of more general language.
The bulk of the material in this tutorial has been left unchanged, and you should have no problems running the example code from the editor and environment of your choice.
Free Bonus:5 Thoughts On Python Mastery, a free course for Python developers that shows you the roadmap and the mindset you'll need to take your Python skills to the next level.
Building Your First Python GUI Application With Tkinter
The foundational element of a Tkinter GUI is the window. Windows are the containers in which all other GUI elements live. These other GUI elements, such as text boxes, labels, and buttons, are known as widgets. Widgets are contained inside of windows.
First, create a window that contains a single widget. Start up a new Python shell session and follow along!
Note: The code examples in this tutorial have all been tested on Windows, macOS, and Ubuntu Linux 18.04 with Python versions 3.6, 3.7, and 3.8.
If you’ve installed Python with the official installers available for Windows and macOS from python.org, then you should have no problem running the sample code. You can safely skip the rest of this note and continue with the tutorial!
If you haven’t installed Python with the official installers, or there’s no official distribution for your system, then here are some tips for getting up and going.
Python on macOS with Homebrew:
The Python distribution for macOS available on Homebrew does not come bundled with the Tcl/Tk dependency Tkinter. The default system version is used instead. This version may be outdated and prevent you from importing the Python GUI Tkinter module. To avoid this problem, use the official macOS installer.
Ubuntu Linux 16.04:
The latest version of Python available in the Ubuntu Linux 16.04 Universe repository is 3.5. You can install the latest version with the deadsnakes PPA. Here are the commands to set up the PPA and download the latest version of Python with the correct Tcl/Tk version:
$ sudo add-apt-repository ppa:deadsnakes/ppa
$ sudo apt-get update
$ sudo apt-get install python3.8 python3-tk
The first two commands add the deadsnakes PPA to your system’s repository list, and the last command installs Python 3.8 and the Python GUI Tkinter module.
Ubuntu Linux 18.04:
You can install the latest version of Python with the correct Tcl/Tk version from the Universe repository with the following command:
$ sudo apt-get install python3.8 python3-tk
This installs Python 3.8, as well as the Python GUI Tkinter module.
Other Linux Flavors:
If you’re unable to get a working Python installation on your flavor of Linux, then you can build Python with the correct version of Tcl/Tk from the source code. For a step-by-step walkthrough of this process, check out the Python 3 Installation & Setup Guide.
With your Python shell open, the first thing you need to do is import the Python GUI Tkinter module:
>>> importtkinterastkA window is an instance of Tkinter’s Tk class. Go ahead and create a new window and assign it to the variable window:
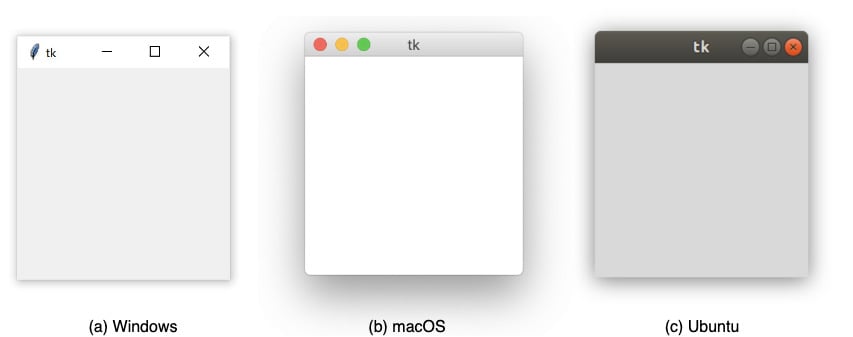
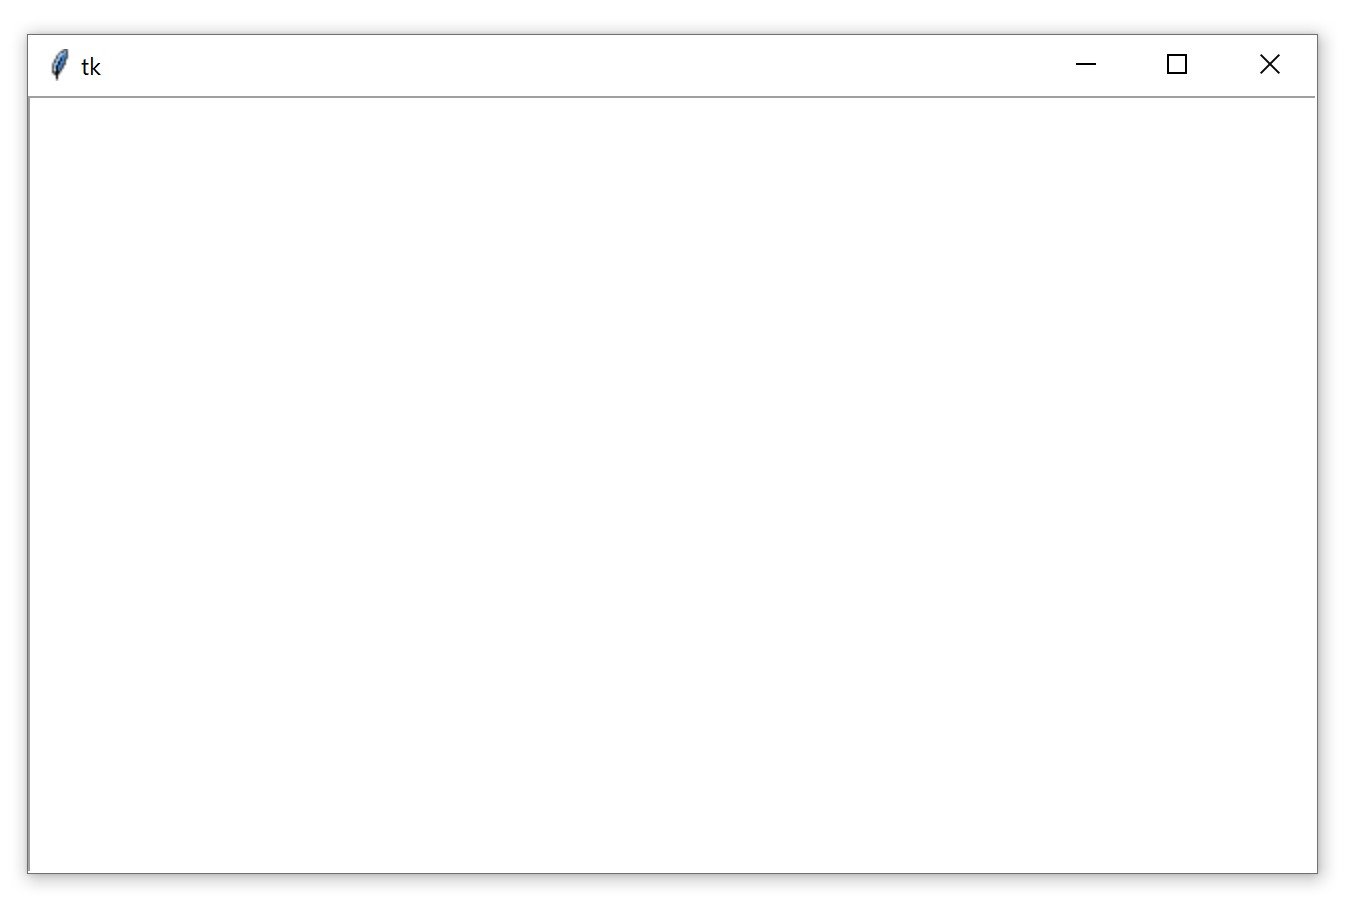
>>> window=tk.Tk()When you execute the above code, a new window pops up on your screen. How it looks depends on your operating system:
Throughout the rest of this tutorial, you’ll see Windows screenshots.
Adding a Widget
Now that you have a window, you can add a widget. Use the tk.Label class to add some text to a window. Create a Label widget with the text "Hello, Tkinter" and assign it to a variable called greeting:
>>> greeting=tk.Label(text="Hello, Tkinter")The window you created earlier doesn’t change. You just created a Label widget, but you haven’t added it to the window yet. There are several ways to add widgets to a window. Right now, you can use the Label widget’s .pack() method:
>>> greeting.pack()The window now looks like this:
When you .pack() a widget into a window, Tkinter sizes the window as small as it can while still fully encompassing the widget. Now execute the following:
>>> window.mainloop()Nothing seems to happen, but notice that a new prompt does not appear in the shell.
window.mainloop() tells Python to run the Tkinter event loop. This method listens for events, such as button clicks or keypresses, and blocks any code that comes after it from running until the window it’s called on is closed. Go ahead and close the window you’ve created, and you’ll see a new prompt displayed in the shell.
Warning: When you work with Tkinter from a Python REPL, updates to windows are applied as each line is executed. This is not the case when a Tkinter program is executed from a Python file!
If you don’t include window.mainloop() at the end of a program in a Python file, then the Tkinter application will never run, and nothing will be displayed.
Creating a window with Tkinter only takes a couple of lines of code. But blank windows aren’t very useful! In the next section, you’ll learn about some of the widgets available in Tkinter, and how you can customize them to meet your application’s needs.
Check Your Understanding
Expand the code blocks below to check your understanding:
You can expand the code block below to see a solution:
Here’s one possible solution:
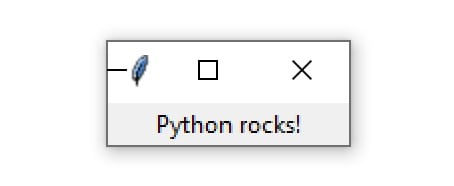
importtkinterastkwindow=tk.Tk()label=tk.Label(text="Python rocks!")label.pack()window.mainloop()Keep in mind your code may look different.
When you’re ready, you can move on to the next section.
Working With Widgets
Widgets are the bread and butter of the Python GUI framework Tkinter. They are the elements through which users interact with your program. Each widget in Tkinter is defined by a class. Here are some of the widgets available:
| Widget Class | Description |
|---|---|
Label | A widget used to display text on the screen |
Button | A button that can contain text and can perform an action when clicked |
Entry | A text entry widget that allows only a single line of text |
Text | A text entry widget that allows multiline text entry |
Frame | A rectangular region used to group related widgets or provide padding between widgets |
You’ll see how to work with each of these in the following sections. Note that Tkinter has many more widgets than the ones listed here. For a full list, check out Basic Widgets and More Widgets in the TkDocs tutorial. For now, take a closer look at the Label widget.
Displaying Text and Images With Label Widgets
Label widgets are used to display text or images. The text displayed by a Label widget can’t be edited by the user. It’s for display purposes only. As you saw in the example at the beginning of this tutorial, you can create a Label widget by instantiating the Label class and passing a string to the text parameter:
label=tk.Label(text="Hello, Tkinter")Label widgets display text with the default system text color and the default system text background color. These are typically black and white, respectively, but you may see different colors if you have changed these settings in your operating system.
You can control Label text and background colors using the foreground and background parameters:
label=tk.Label(text="Hello, Tkinter",foreground="white",# Set the text color to whitebackground="black"# Set the background color to black)There are numerous valid color names, including:
"red""orange""yellow""green""blue""purple"
Many of the HTML color names work with Tkinter. A chart with most of the valid color names is available here. For a full reference, including macOS and Windows-specific system colors that are controlled by the current system theme, check out the colors manual page.
You can also specify a color using hexadecimal RGB values:
label=tk.Label(text="Hello, Tkinter",background="#34A2FE")This sets the label background to a nice, light blue color. Hexadecimal RGB values are more cryptic than named colors, but they’re also more flexible. Fortunately, there are tools available that make getting hexadecimal color codes relatively painless.
If you don’t feel like typing out foreground and background all the time, then you can use the shorthand fg and bg parameters to set the foreground and background colors:
label=tk.Label(text="Hello, Tkinter",fg="white",bg="black")You can also control the width and height of a label with the width and height parameters:
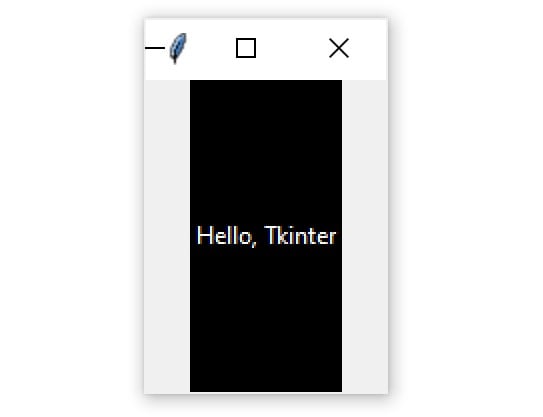
label=tk.Label(text="Hello, Tkinter",fg="white",bg="black",width=10,height=10)Here’s what this label looks like in a window:
It may seem strange that the label in the window isn’t square event though the width and height are both set to 10. This is because the width and height are measured in text units. One horizontal text unit is determined by the width of the character "0", or the number zero, in the default system font. Similarly, one vertical text unit is determined by the height of the character "0".
Note: Tkinter uses text units for width and height measurements, instead of something like inches, centimeters, or pixels, to ensure consistent behavior of the application across platforms.
Measuring units by the width of a character means that the size of a widget is relative to the default font on a user’s machine. This ensures the text fits properly in labels and buttons, no matter where the application is running.
Labels are great for displaying some text, but they don’t help you get input from a user. The next three widgets that you’ll look at are all used to get user input.
Displaying Clickable Buttons With Button Widgets
Button widgets are used to display clickable buttons. They can be configured to call a function whenever they’re clicked. You’ll cover how to call functions from button clicks in the next section. For now, take a look at how to create and style a Button.
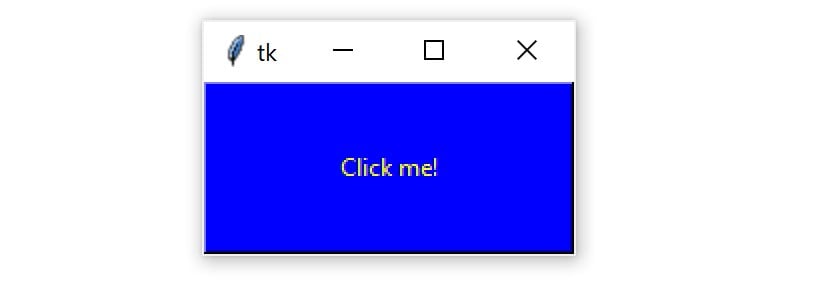
There are many similarities between Button and Label widgets. In many ways, a Button is just a Label that you can click! The same keyword arguments you use to create and style a Label will work with Button widgets. For example, the following code creates a Button with a blue background and yellow text. It also sets the height and width to 10 and 5 text units, respectively:
button=tk.Button(text="Click me!",width=25,height=5,bg="blue",fg="yellow",)Here’s what the button looks like in a window:
Pretty nifty! The next two widgets you’ll see are used to collect text input from a user.
Getting User Input With Entry Widgets
When you need to get a little bit of text from a user, like a name or an email address, use an Entry widget. They display a small text box that the user can type some text into. Creating and styling an Entry widget works pretty much exactly like Label and Button widgets. For example, the following code creates a widget with a blue background, some yellow text, and a width of 50 text units:
entry=tk.Entry(fg="yellow",bg="blue",width=50)The interesting bit about Entry widgets isn’t how to style them, though. It’s how to use them to get input from a user. There are three main operations that you can perform with Entry widgets:
- Retrieving text with
.get() - Deleting text with
.delete() - Inserting text with
.insert()
The best way to get an understanding of Entry widgets is to create one and interact with it. Open up a Python shell and follow along with the examples in this section. First, import tkinter and create a new window:
>>> importtkinterastk>>> window=tk.Tk()Now create a Label and an Entry widget:
>>> label=tk.Label(text="Name")>>> entry=tk.Entry()The Label describes what sort of text should go in the Entry widget. It doesn’t enforce any sort of requirements on the Entry, but it tells the user what your program expects them to put there. You need to .pack() the widgets into the window so that they’re visible:
>>> label.pack()>>> entry.pack()Here’s what that looks like:
Notice that Tkinter automatically centers the Label above the Entry widget in the window. This is a feature of .pack(), which you’ll learn more about in later sections.
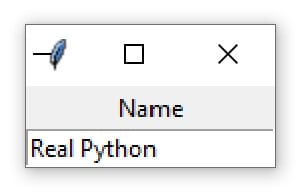
Click inside the Entry widget with your mouse and type "Real Python":
Now you’ve got some text entered into the Entry widget, but that text hasn’t been sent to your program yet. You can use .get() to retrieve the text and assign it to a variable called name:
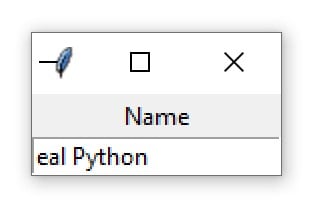
>>> name=entry.get()>>> name'Real Python'You can .delete() text as well. This method takes an integer argument that tells Python which character to remove. For example, the code block below shows how .delete(0) deletes the first character from the Entry:
>>> entry.delete(0)The text remaining in the widget is now "eal Python":
Note that, just like Python string objects, text in an Entry widget is indexed starting with 0.
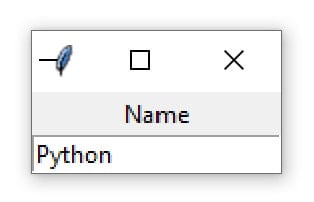
If you need to remove several characters from an Entry, then pass a second integer argument to .delete() indicating the index of the character where deletion should stop. For example, the following code deletes the first four letters in the Entry:
>>> entry.delete(0,4)The remaining text now reads "Python":
Entry.delete() works just like string slicing. The first argument determines the starting index, and the deletion continues up to but not including the index passed as the second argument. Use the special constant tk.END for the second argument of .delete() to remove all text in an Entry:
>>> entry.delete(0,tk.END)You’ll now see a blank text box:
On the opposite end of the spectrum, you can also .insert() text into an Entry widget:
>>> entry.insert(0,"Python")The window now looks like this:
The first argument tells .insert() where to insert the text. If there is no text in the Entry, then the new text will always be inserted at the beginning of the widget, no matter what value you pass as the first argument. For example, calling .insert() with 100 as the first argument instead of 0, as you did above, would have generated the same output.
If an Entry already contains some text, then .insert() will insert the new text at the specified position and shift all existing text to the right:
>>> entry.insert(0,"Real ")The widget text now reads "Real Python":
Entry widgets are great for capturing small amounts of text from a user, but because they’re only displayed on a single line, they’re not ideal for gathering large amounts of text. That’s where Text widgets come in!
Getting Multiline User Input With Text Widgets
Text widgets are used for entering text, just like Entry widgets. The difference is that Text widgets may contain multiple lines of text. With a Text widget, a user can input a whole paragraph or even several pages of text! Just like Entry widgets, there are three main operations you can perform with Text widgets:
- Retrieve text with
.get() - Delete text with
.delete() - Insert text with
.insert()
Although the method names are the same as the Entry methods, they work a bit differently. It’s time to get your hands dirty by creating a Text widget and seeing what all it can do.
Note: Do you still have the window from the previous section open?
If so, then you can close it by executing the following:
>>> window.destroy()You can also close it manually by clicking the Close button.
In your Python shell, create a new blank window and .pack() a Text() widget into it:
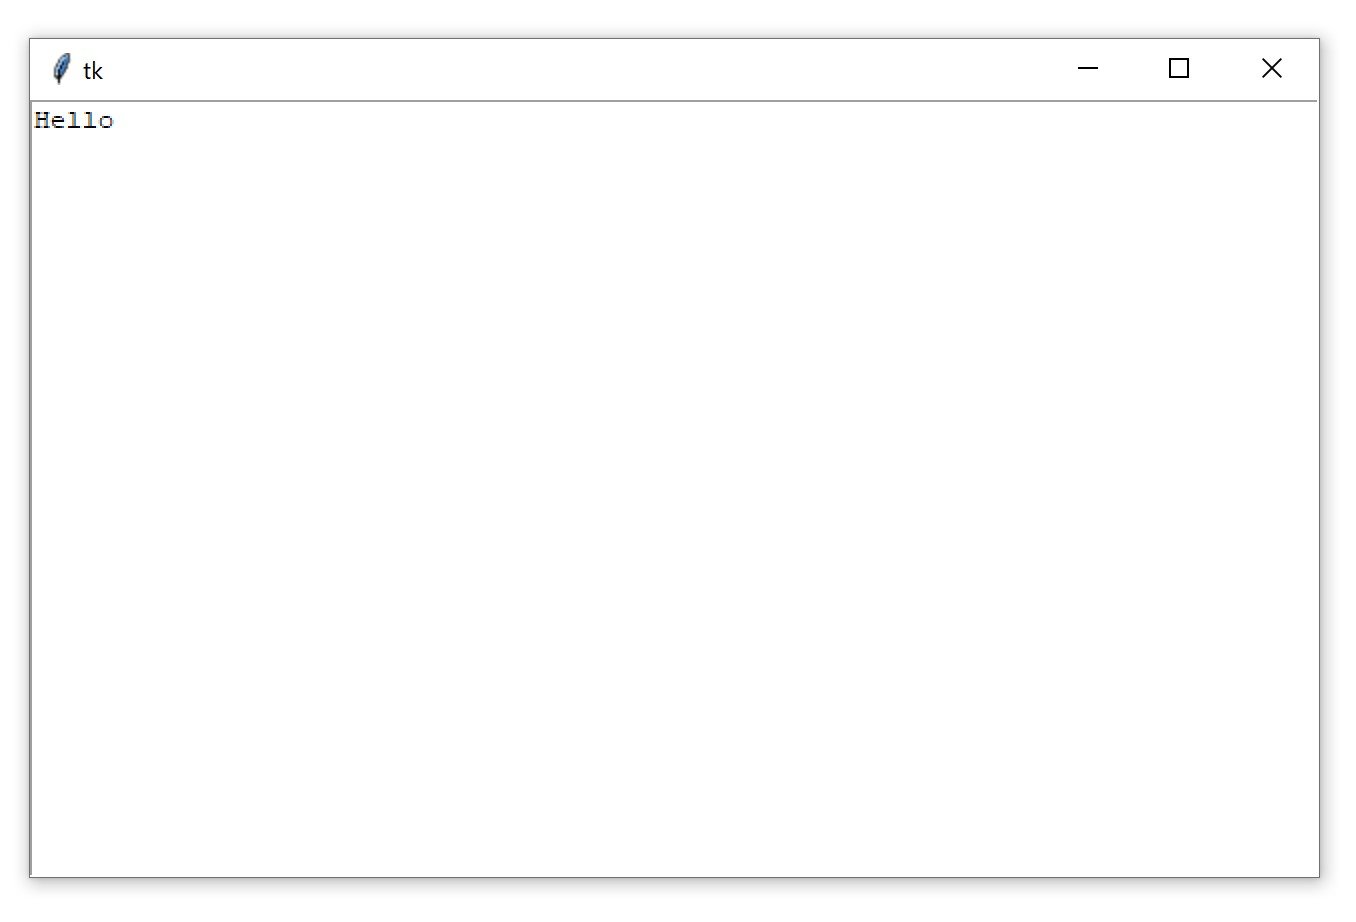
>>> window=tk.Tk()>>> text_box=tk.Text()>>> text_box.pack()Text boxes are much larger than Entry widgets by default. Here’s what the window created above looks like:
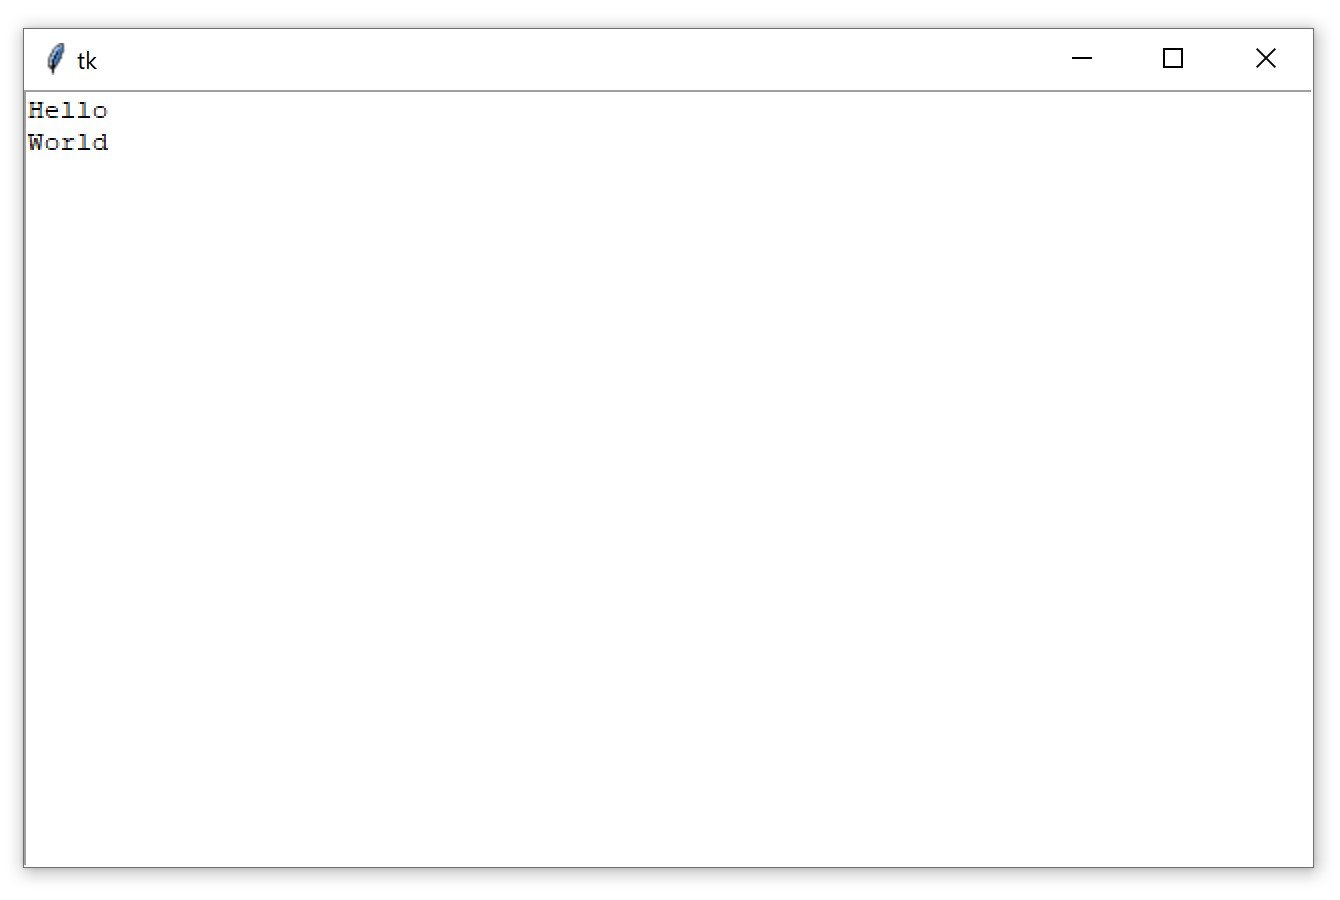
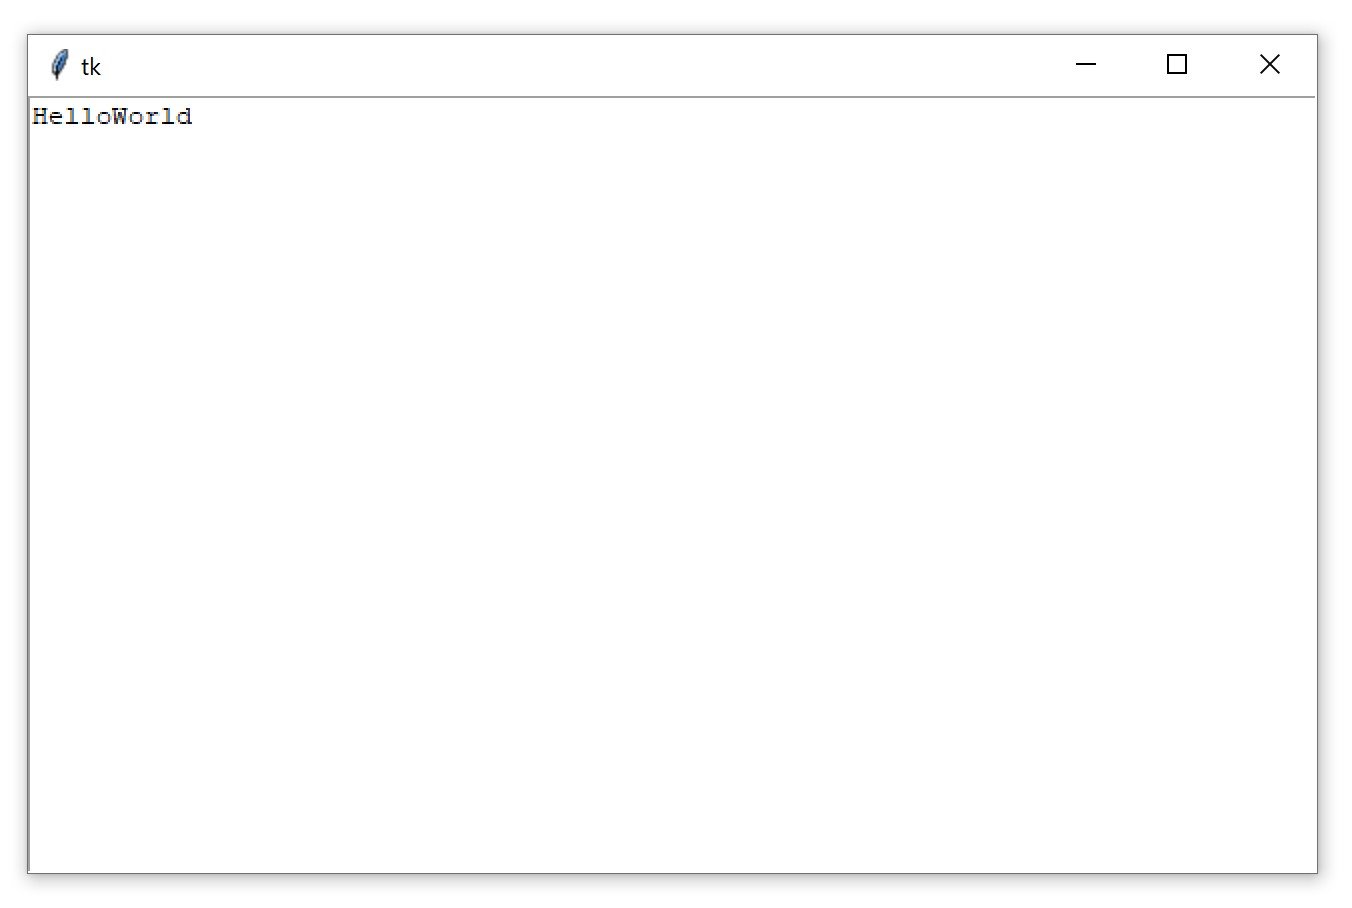
Click anywhere inside the window to activate the text box. Type in the word "Hello". Then press Enter and type "World" on the second line. The window should now look like this:
Just like Entry widgets, you can retrieve the text from a Text widget using .get(). However, calling .get() with no arguments doesn’t return the full text in the text box like it does for Entry widgets. It raises an exception:
>>> text_box.get()Traceback (most recent call last):
  File "<pyshell#4>", line 1, in <module>text_box.get()TypeError: get() missing 1 required positional argument: 'index1'
Text.get() required at least one argument. Calling .get() with a single index returns a single character. To retrieve several characters, you need to pass a start index and an end index. Indices in Text widgets work differently than Entry widgets. Since Text widgets can have several lines of text, an index must contain two pieces of information:
- The line number of a character
- The position of a character on that line
Line numbers start with 1, and character positions start with 0. To make an index, you create a string of the form "<line>.<char>", replacing <line> with the line number and <char> with the character number. For example, "1.0" represents the first character on the first line, and "2.3" represents the fourth character on the second line.
Use the index "1.0" to get the first letter from the text box you created earlier:
>>> text_box.get("1.0")'H'There are five letters in the word "Hello", and the character number of o is 4, since character numbers start from 0, and the word "Hello" starts at the first position in the text box. Just like Python string slices, in order to get the entire word "Hello" from the text box, the end index must be one more than the index of the last character to be read.
So, to get the word "Hello" from the text box, use "1.0" for the first index and "1.5" for the second index:
>>> text_box.get("1.0","1.5")'Hello'To get the word "World" on the second line of the text box, change the line numbers in each index to 2:
>>> text_box.get("2.0","2.5")'World'To get all of the text in a text box, set the starting index in "1.0" and use the special tk.END constant for the second index:
>>> text_box.get("1.0",tk.END)'Hello\nWorld\n'Notice that text returned by .get() includes any newline characters. You can also see from this example that every line in a Text widget has a newline character at the end, including the last line of text in the text box.
.delete() is used to delete characters from a text box. It work just like .delete() for Entry widgets. There are two ways to use .delete():
- With a single argument
- With two arguments
Using the single-argument version, you pass to .delete() the index of a single character to be deleted. For example, the following deletes the first character H from the text box:
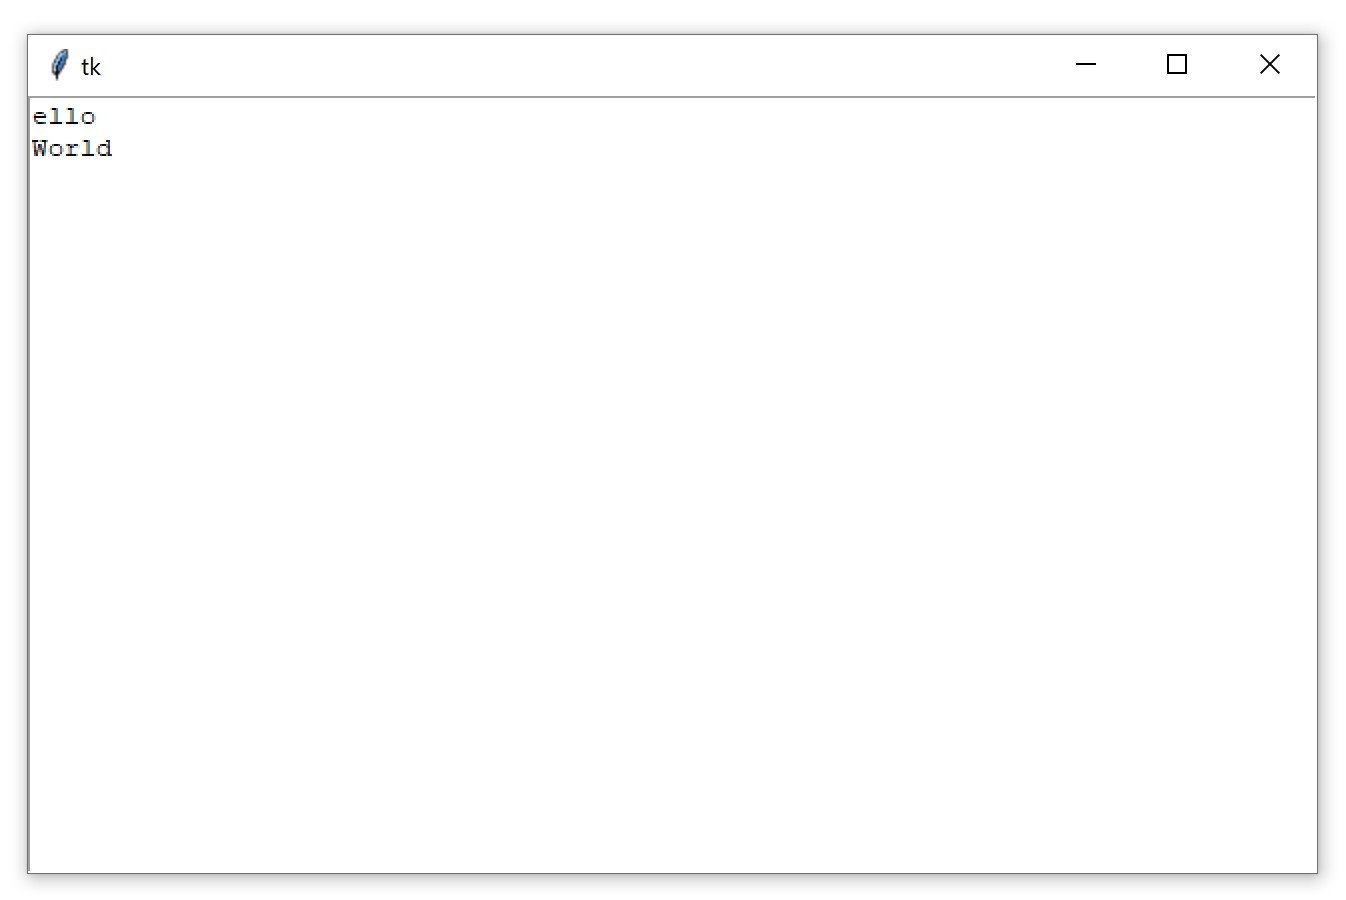
>>> text_box.delete("1.0")The first line of text in the window now reads "ello":
With the two-argument version, you pass two indices to delete a range of characters starting at the first index and up to, but not including, the second index.
For example, to delete the remaining "ello" on the first line of the text box, use the indices "1.0" and "1.4":
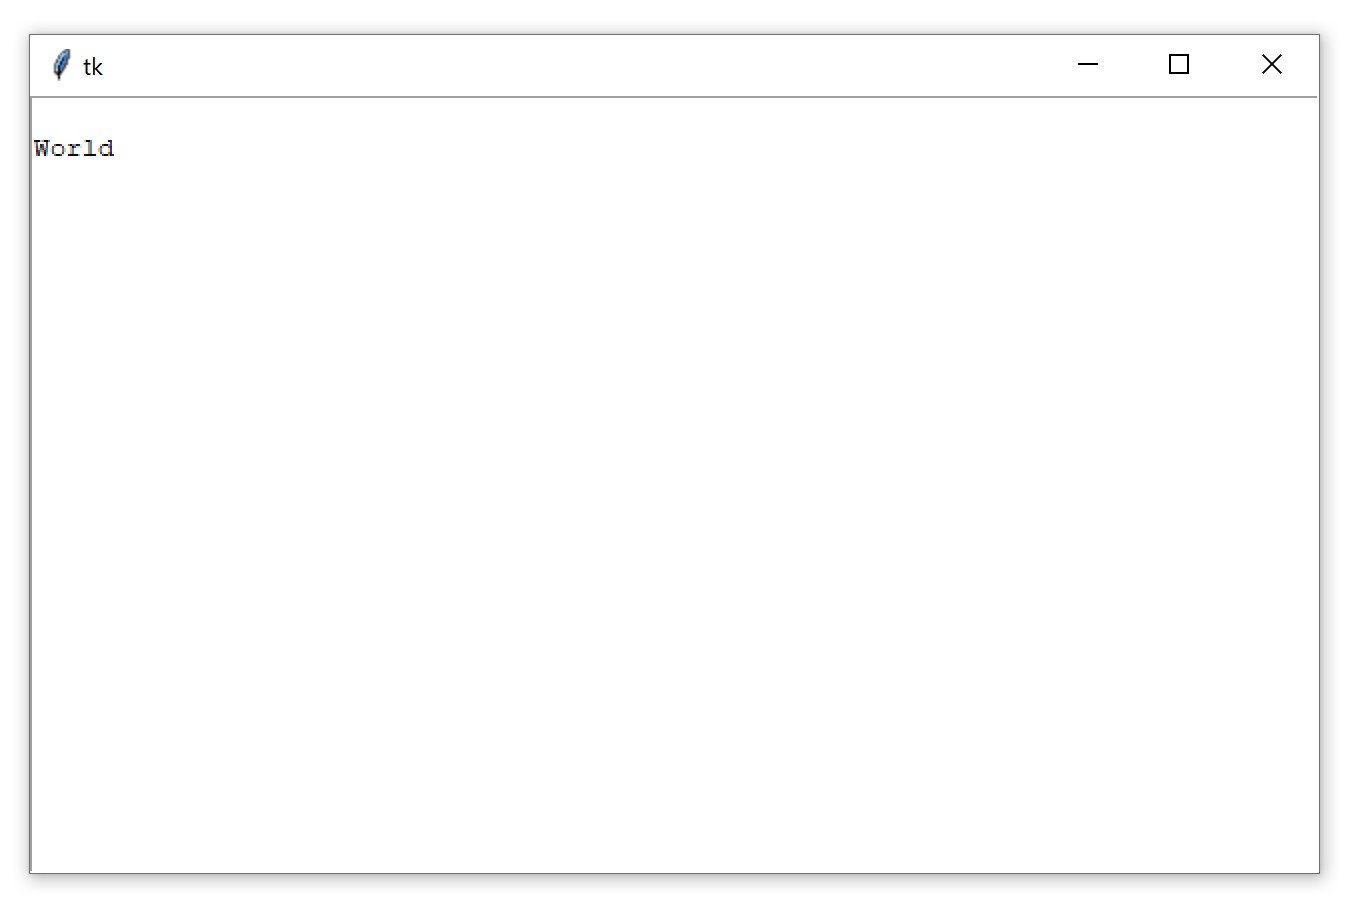
>>> text_box.delete("1.0","1.4")Notice that the text is gone from the first line. This leaves a blank line followed the word World on the second line:
Even though you can’t see it, there’s still a character on the first line. It’s a newline character! You can verify this using .get():
>>> text_box.get("1.0")'\n'If you delete that character, then the rest of the contents of the text box will shift up a line:
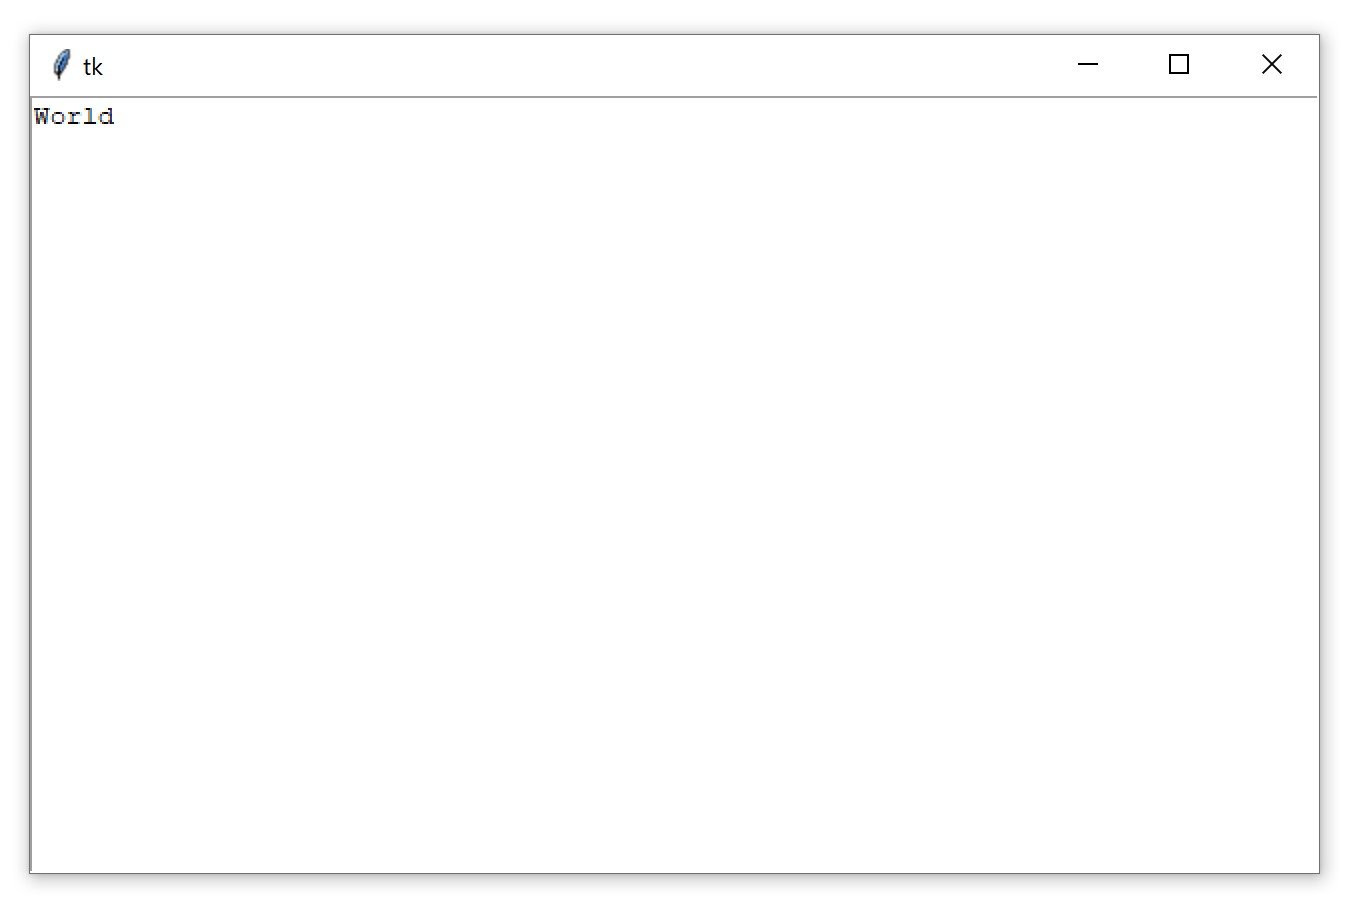
>>> text_box.delete("1.0")Now, "World" is on the first line of the text box:
Try to clear out the rest of the text in the text box. Set "1.0" as the start index and use tk.END for the second index:
>>> text_box.delete("1.0",tk.END)The text box is now empty:
You can insert text into a text box using .insert():
>>> text_box.insert("1.0","Hello")This inserts the word "Hello" at the beginning of the text box, using the same "<line>.<column>" format used by .get() to specify the insertion position:
Check out what happens if you try to insert the word "World" on the second line:
>>> text_box.insert("2.0","World")Instead of inserting the text on the second line, the text is inserted at the end of the first line:
If you want to insert text onto a new line, then you need to insert a newline character manually into the string being inserted:
>>> text_box.insert("2.0","\nWorld")Now "World" is on the second line of the text box:
.insert() will do one of two things:
- Insert text at the specified position if there’s already text at or after that position.
- Append text to the specified line if the character number is greater than the index of the last character in the text box.
It’s usually impractical to try and keep track of what the index of the last character is. The best way to insert text at the end of a Text widget is to pass tk.END to the first parameter of .insert():
text_box.insert(tk.END,"Put me at the end!")Don’t forget to include the newline character (\n) at the beginning of the text if you want to put it on a new line:
text_box.insert(tk.END,"\nPut me on a new line!")Label, Button, Entry, and Text widgets are just a few of the widgets available in Tkinter. There are several others, including widgets for checkboxes, radio buttons, scroll bars, and progress bars. For more information on all of the available widgets, see the Additional Widgets list in the Additional Resources section.
Assigning Widgets to Frames With Frame Widgets
In this tutorial, you’re going to work with only five widgets. These are the four you’ve seen so far plus the Frame widget. Frame widgets are important for organizing the layout of your widgets in an application.
Before you get into the details about laying out the visual presentation of your widgets, take a closer look at how Frame widgets work, and how you can assign other widgets to them. The following script creates a blank Frame widget and assigns it to the main application window:
importtkinterastkwindow=tk.Tk()frame=tk.Frame()frame.pack()window.mainloop()frame.pack() packs the frame into the window so that the window sizes itself as small as possible to encompass the frame. When you run the above script, you get some seriously uninteresting output:
An empty Frame widget is practically invisible. Frames are best thought of as containers for other widgets. You can assign a widget to a frame by setting the widget’s master attribute:
frame=tk.Frame()label=tk.Label(master=frame)To get a feel for how this works, write a script that creates two Frame widgets called frame_a and frame_b. In this script, frame_a contains a label with the text "I'm in Frame A", and frame_b contains the label "I'm in Frame B". Here’s one way to do this:
importtkinterastkwindow=tk.Tk()frame_a=tk.Frame()frame_b=tk.Frame()label_a=tk.Label(master=frame_a,text="I'm in Frame A")label_a.pack()label_b=tk.Label(master=frame_b,text="I'm in Frame B")label_b.pack()frame_a.pack()frame_b.pack()window.mainloop()Note that frame_a is packed into the window before frame_b. The window that opens shows the label in frame_a above the label in frame_b:
Now see what happens when you swap the order of frame_a.pack() and frame_b.pack():
importtkinterastkwindow=tk.Tk()frame_a=tk.Frame()label_a=tk.Label(master=frame_a,text="I'm in Frame A")label_a.pack()frame_b=tk.Frame()label_b=tk.Label(master=frame_b,text="I'm in Frame B")label_b.pack()# Swap the order of `frame_a` and `frame_b`frame_b.pack()frame_a.pack()window.mainloop()The output looks like this:
Now label_b is on top. Since label_b is assigned to frame_b, it moves to wherever frame_b is positioned.
All four of the widget types you’ve learned about—Label, Button, Entry, and Text—have a master attribute that’s set when you instantiate them. That way, you can control which Frame a widget is assigned to. Frame widgets are great for organizing other widgets in a logical manner. Related widgets can be assigned to the same frame so that, if the frame is ever moved in the window, then the related widgets stay together.
In addition to grouping your widgets logically, Frame widgets can add a little flare to the visual presentation of your application. Read on to see how to create various borders for Frame widgets.
Adjusting Frame Appearance With Reliefs
Frame widgets can be configured with a relief attribute that creates a border around the frame. You can set relief to be any of the following values:
tk.FLAT: Has no border effect (the default value).tk.SUNKEN: Creates a sunken effect.tk.RAISED: Creates a raised effect.tk.GROOVE: Creates a grooved border effect.tk.RIDGE: Creates a ridged effect.
To apply the border effect, you must set the borderwidth attribute to a value greater than 1. This attribute adjusts the width of the border in pixels. The best way to get a feel for what each effect looks like is to see them for yourself. Here’s a script that packs five Frame widgets into a window, each with a different value for the relief argument:
1 importtkinterastk 2 3 border_effects={ 4 "flat":tk.FLAT, 5 "sunken":tk.SUNKEN, 6 "raised":tk.RAISED, 7 "groove":tk.GROOVE, 8 "ridge":tk.RIDGE, 9 }10 11 window=tk.Tk()12 13 forrelief_name,reliefinborder_effects.items():14 frame=tk.Frame(master=window,relief=relief,borderwidth=5)15 frame.pack(side=tk.LEFT)16 label=tk.Label(master=frame,text=relief_name)17 label.pack()18 19 window.mainloop()Here’s a breakdown of this script:
Lines 3 to 9 create a dictionary whose keys are the names of the different relief effects available in Tkinter. The values are the corresponding Tkinter objects. This dictionary is assigned to the
border_effectsvariable.Line 13 starts a
forloop to loop over each item in theborder_effectsdictionary.Line 14 creates a new
Framewidget and assigns it to thewindowobject. Thereliefattribute is set to the corresponding relief in theborder_effectsdictionary, and theborderattribute is set to5so that the effect is visible.Line 15 packs the
Frameinto the window using.pack(). Thesidekeyword argument tells Tkinter in which direction to pack theframeobjects. You’ll see more about how this works in the next section.Lines 16 and 17 create a
Labelwidget to display the name of the relief and pack it into theframeobject you just created.
The window produced by the above script looks like this:
In this image, you can see the following effects:
tk.FLATcreates a frame that appears to be flat.tk.SUNKENadds a border that gives the frame the appearance of being sunken into the window.tk.RAISEDgives the frame a border that makes it appear to protrude from the screen.tk.GROOVEadds a border that appears as a sunken groove around an otherwise flat frame.tk.RIDGEgives the appearance of a raised lip around the edge of the frame.
These effects give your Python GUI Tkinter application a bit of visual appeal.
Understanding Widget Naming Conventions
When you create a widget, you can give it any name you like, as long as it’s a valid Python identifier. It’s usually a good idea to include the name of the widget class in the variable name you assign to the widget instance. For example, if a Label widget is used to display a user’s name, then you might name the widget label_user_name. An Entry widget used to collect a user’s age might be called entry_age.
When you include the widget class name in the variable name, you help yourself (and anyone else that needs to read your code) to understand what type of widget the variable name refers to. However, using the full name of the widget class can lead to long variable names, so you may want to adopt a shorthand for referring to each widget type. For the rest of this tutorial, you’ll use the following shorthand prefixes to name widgets:
| Widget Class | Variable Name Prefix | Example |
|---|---|---|
Label | lbl | lbl_name |
Button | btn | btn_submit |
Entry | ent | ent_age |
Text | txt | txt_notes |
Frame | frm | frm_address |
In this section, you learned how to create a window, use widgets, and work with frames. At this point, you can make some plain windows that display messages, but you’ve yet to create a full-blown application. In the next section, you’ll learn how to control the layout of your applications using Tkinter’s powerful geometry managers.
Check Your Understanding
Expand the code block below for an exercise to check your understanding:
You can expand the code block below to see a solution:
There are a couple of ways to solve this exercise. Here’s one solution that uses the bg and fg parameters to set the Entry widget’s background and foreground colors:
importtkinterastkwindow=tk.Tk()entry=tk.Entry(width=40,bg="white",fg="black")entry.pack()entry.insert(0,"What is your name?")window.mainloop()This solution is great because it explicitly sets the background and foreground colors for the Entry widget.
On most systems, the default background color for an Entry widget is white, and the default foreground color is black. So, you might be able to generate the same window with the bg and fg parameters left out:
importtkinterastkwindow=tk.Tk()entry=tk.Entry(width=40)entry.pack()entry.insert(0,"What is your name?")window.mainloop()Keep in mind your code may look different.
When you’re ready, you can move on to the next section.
Controlling Layout With Geometry Managers
Up until now, you’ve been adding widgets to windows and Frame widgets using .pack(), but you haven’t learned what exactly this method does. Let’s clear things up! Application layout in Tkinter is controlled with geometry managers. While .pack() is an example of a geometry manager, it isn’t the only one. Tkinter has two others:
.place().grid()
Each window and Frame in your application can use only one geometry manager. However, different frames can use different geometry managers, even if they’re assigned to a frame or window using another geometry manager. Start by taking a closer look at .pack().
The .pack() Geometry Manager
.pack() uses a packing algorithm to place widgets in a Frame or window in a specified order. For a given widget, the packing algorithm has two primary steps:
- Compute a rectangular area called a parcel that’s just tall (or wide) enough to hold the widget and fills the remaining width (or height) in the window with blank space.
- Center the widget in the parcel unless a different location is specified.
.pack() is powerful, but it can be difficult to visualize. The best way to get a feel for .pack() is to look at some examples. See what happens when you .pack() three Label widgets into a Frame:
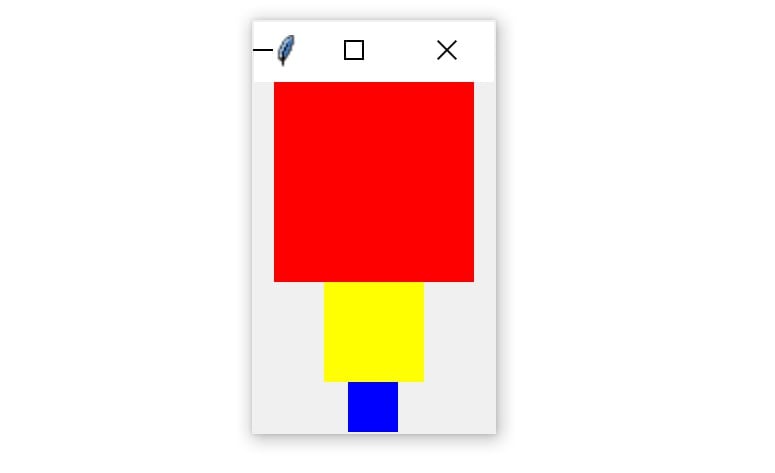
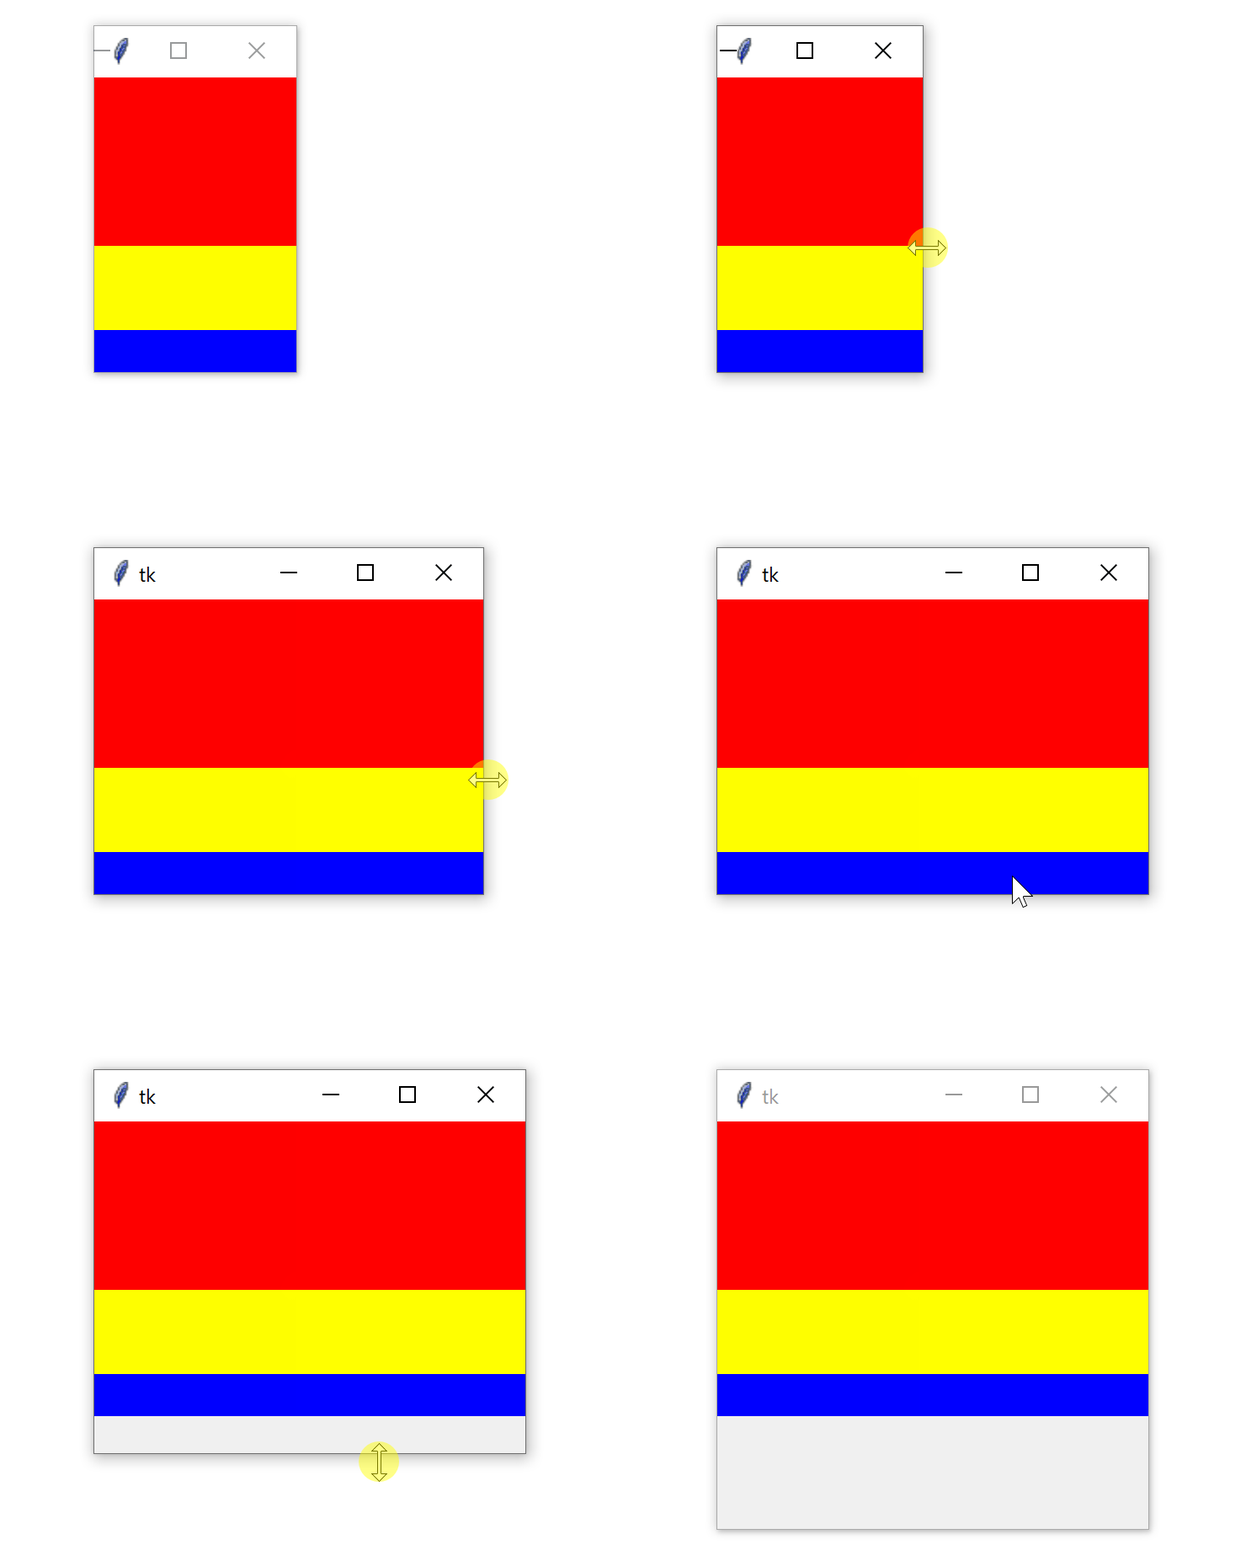
importtkinterastkwindow=tk.Tk()frame1=tk.Frame(master=window,width=100,height=100,bg="red")frame1.pack()frame2=tk.Frame(master=window,width=50,height=50,bg="yellow")frame2.pack()frame3=tk.Frame(master=window,width=25,height=25,bg="blue")frame3.pack()window.mainloop().pack() places each Frame below the previous one by default, in the order that they’re assigned to the window:
Each Frame is placed at the top-most available position. The red Frame is placed at the top of the window. Then the yellow Frame is placed just below the red one and the blue Frame just below the yellow one.
There are three invisible parcels containing each of the three Frame widgets. Each parcel is as wide as the window and as tall as the Frame that it contains. Since no anchor point was specified when .pack() was called for each Frame, they’re all centered inside of their parcels. That’s why each Frame is centered in the window.
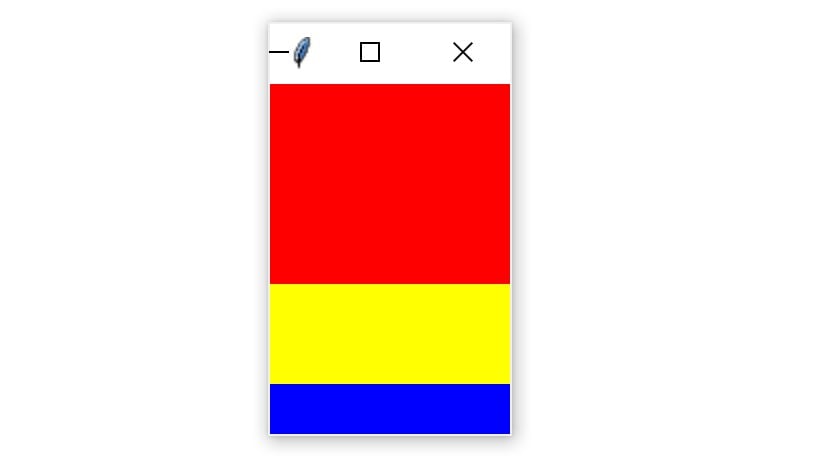
.pack() accepts some keyword arguments for more precisely configuring widget placement. For example, you can set the fill keyword argument to specify in which direction the frames should fill. The options are tk.X to fill in the horizontal direction, tk.Y to fill vertically, and tk.BOTH to fill in both directions. Here’s how you would stack the three frames so that each one fills the whole window horizontally:
importtkinterastkwindow=tk.Tk()frame1=tk.Frame(master=window,height=100,bg="red")frame1.pack(fill=tk.X)frame2=tk.Frame(master=window,height=50,bg="yellow")frame2.pack(fill=tk.X)frame3=tk.Frame(master=window,height=25,bg="blue")frame3.pack(fill=tk.X)window.mainloop()Notice that the width is not set on any of the Frame widgets. width is no longer necessary because each frame sets .pack() to fill horizontally, overriding any width you may set.
The window produced by this script looks like this:
One of the nice things about filling the window with .pack() is that the fill is responsive to window resizing. Try widening the window generated by the previous script to see how this works. As you widen the window, the width of the three Frame widgets grow to fill the window:
Notice, though, that the Frame widgets don’t expand in the vertical direction.
The side keyword argument of .pack() specifies on which side of the window the widget should be placed. These are the available options:
tk.TOPtk.BOTTOMtk.LEFTtk.RIGHT
If you don’t set side, then .pack() will automatically use tk.TOP and place new widgets at the top of the window, or at the top-most portion of the window that isn’t already occupied by a widget. For example, the following script places three frames side-by-side from left to right and expands each frame to fill the window vertically:
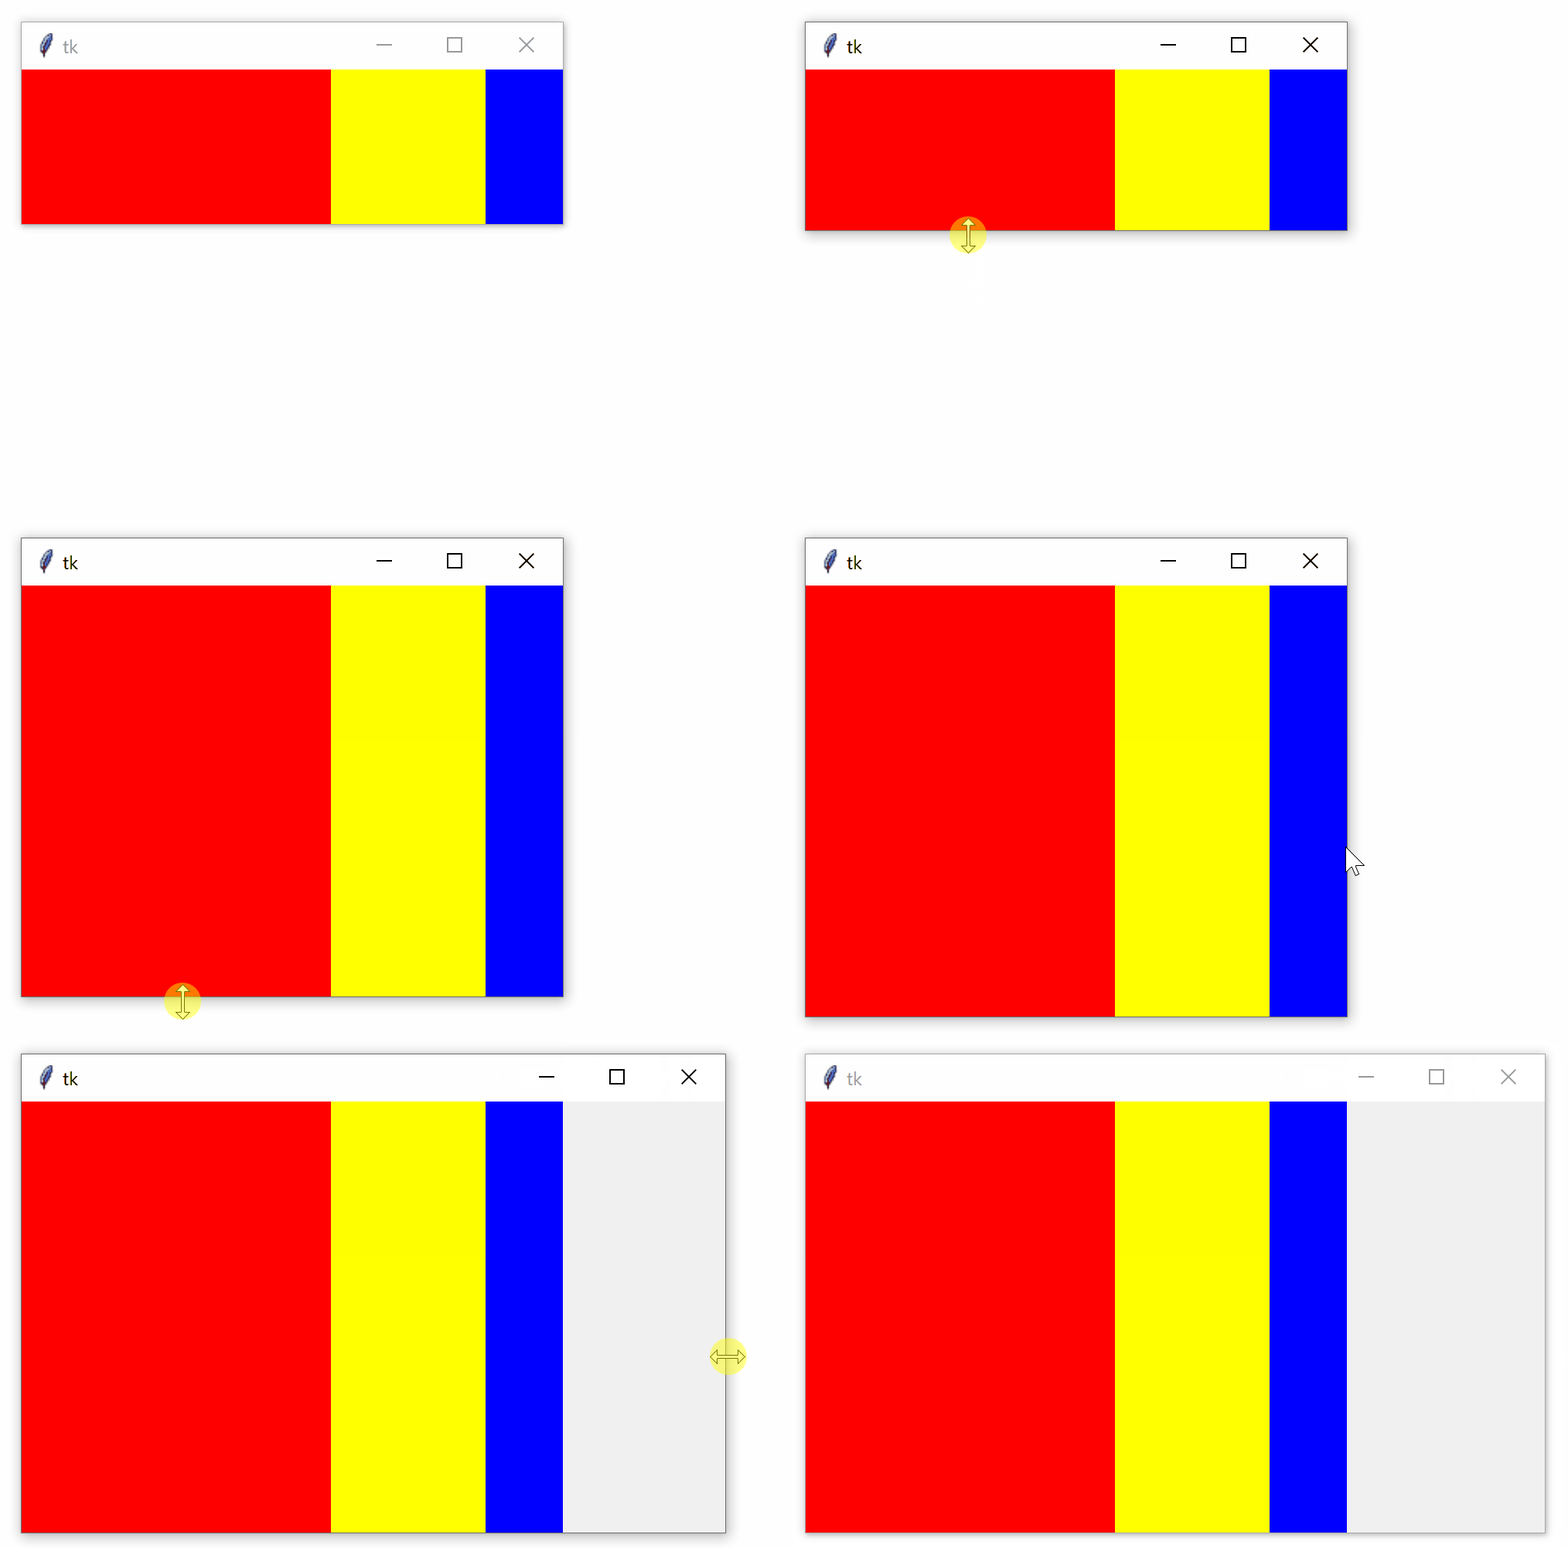
importtkinterastkwindow=tk.Tk()frame1=tk.Frame(master=window,width=200,height=100,bg="red")frame1.pack(fill=tk.Y,side=tk.LEFT)frame2=tk.Frame(master=window,width=100,bg="yellow")frame2.pack(fill=tk.Y,side=tk.LEFT)frame3=tk.Frame(master=window,width=50,bg="blue")frame3.pack(fill=tk.Y,side=tk.LEFT)window.mainloop()This time, you have to specify the height keyword argument on at least one of the frames to force the window to have some height.
The resulting window looks like this:
Just like when you set fill=tk.X to make the frames responsive when you resized the window horizontally, you can set fill=tk.Y to make the frames responsive when you resize the window vertically:
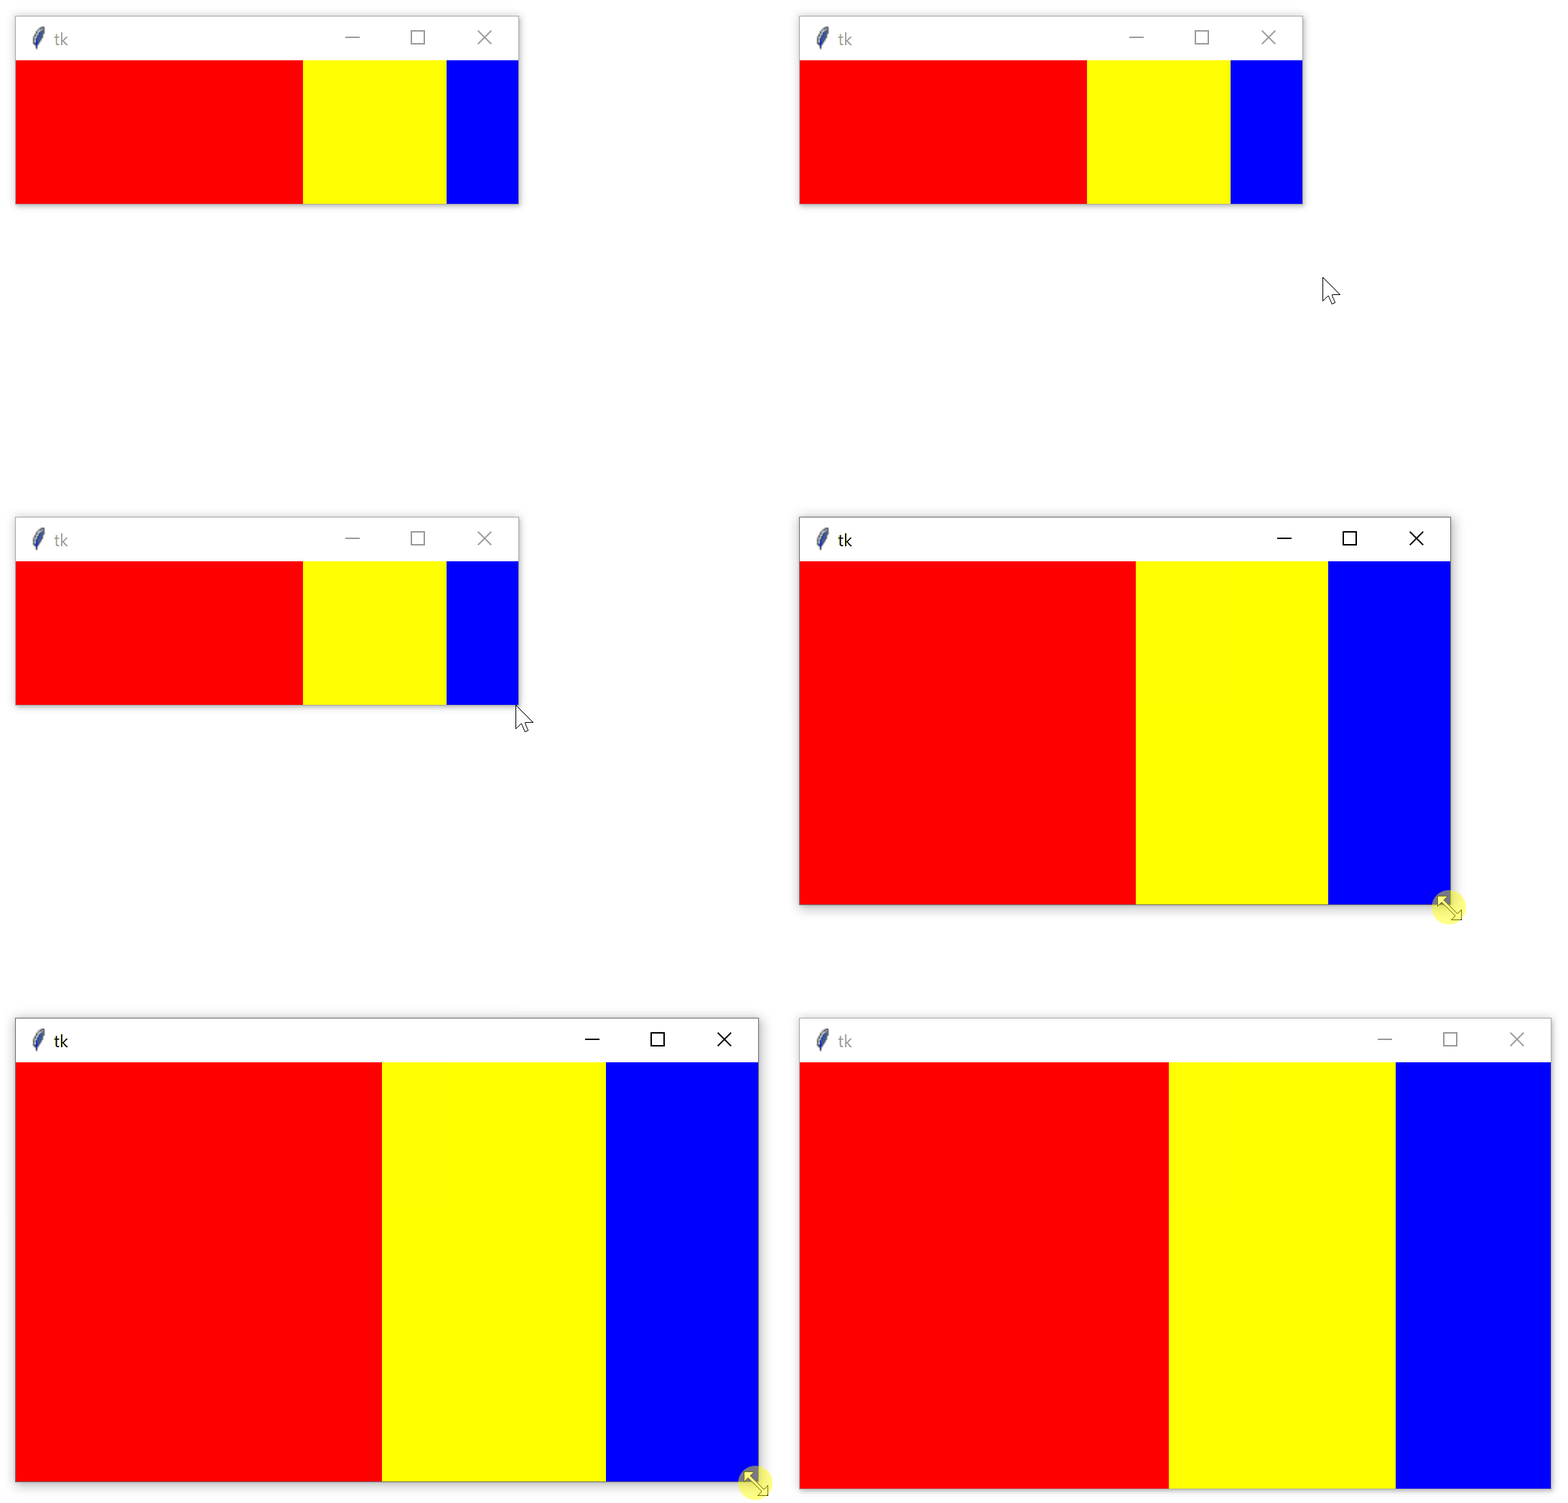
To make the layout truly responsive, you can set an initial size for your frames using the width and height attributes. Then, set the fill keyword argument of .pack() to tk.BOTH and set the expand keyword argument to True:
importtkinterastkwindow=tk.Tk()frame1=tk.Frame(master=window,width=200,height=100,bg="red")frame1.pack(fill=tk.BOTH,side=tk.LEFT,expand=True)frame2=tk.Frame(master=window,width=100,bg="yellow")frame2.pack(fill=tk.BOTH,side=tk.LEFT,expand=True)frame3=tk.Frame(master=window,width=50,bg="blue")frame3.pack(fill=tk.BOTH,side=tk.LEFT,expand=True)window.mainloop()When you run the above script, you’ll see a window that initially looks the same as the one you generated in the previous example. The difference is that now you can resize the window however you want and the frames will expand and fill the window responsively:
Pretty cool!
The .place() Geometry Manager
You can use .place() to control the precise location that a widget should occupy in a window or Frame. You must provide two keyword arguments, x and y, which specify the x- and y-coordinates for the top-left corner of the widget. Both x and y are measured in pixels, not text units.
Keep in mind that the origin (where x and y are both 0) is the top-left corner of the Frame or window. So, you can think of the y argument of .place() as the number of pixels from the top of the window, and the x argument as the number of pixels from the left of the window.
Here’s an example of how the .place() geometry manager works:
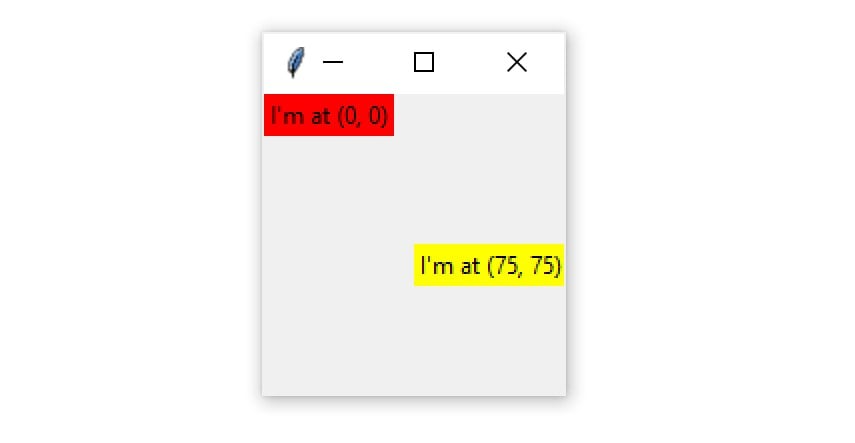
1 importtkinterastk 2 3 window=tk.Tk() 4 5 frame=tk.Frame(master=window,width=150,height=150) 6 frame.pack() 7 8 label1=tk.Label(master=frame,text="I'm at (0, 0)",bg="red") 9 label1.place(x=0,y=0)10 11 label2=tk.Label(master=frame,text="I'm at (75, 75)",bg="yellow")12 label2.place(x=75,y=75)13 14 window.mainloop()Here’s how this code works:
- Lines 5 and 6 create a new
Framewidget calledframe1, one that’s150pixels wide and150pixels tall, and pack it into the window with.pack(). - Lines 8 and 9 create a new
Labelcalledlabel1with a yellow background and place it inframe1at position (0, 0). - Lines 11 and 12 create a second
Labelcalledlabel2with a red background and place it inframe1at position (75, 75).
Here’s the window the code produces:
.place() is not used often. It has two main drawbacks:
- Layout can be difficult to manage with
.place(). This is especially true if your application has lots of widgets. - Layouts created with
.place()are not responsive. They don’t change as the window is resized.
One of the main challenges of cross-platform GUI development is making layouts that look good no matter which platform they are viewed on, and .place() is a poor choice for making responsive and cross-platform layouts.
That’s not to say .place() should never be used! In some cases, it might be just what you need. For example, if you’re creating a GUI interface for a map, then .place() might be the perfect choice to ensure widgets are placed at the correct distance from each other on the map.
.pack() is usually a better choice than .place(), but even .pack() has some downsides. The placement of widgets depends on the order in which .pack() is called, so it can be difficult to modify existing applications without fully understanding the code controlling the layout. The .grid() geometry manager solves a lot of these issues, as you’ll see in the next section.
The .grid() Geometry Manager
The geometry manager you’ll likely use most often is .grid(), which provides all the power of .pack() in a format that’s easier to understand and maintain.
.grid() works by splitting a window or Frame into rows and columns. You specify the location of a widget by calling .grid() and passing the row and column indices to the row and column keyword arguments, respectively. Both row and column indices start at 0, so a row index of 1 and a column index of 2 tells .grid() to place a widget in the third column of the second row.
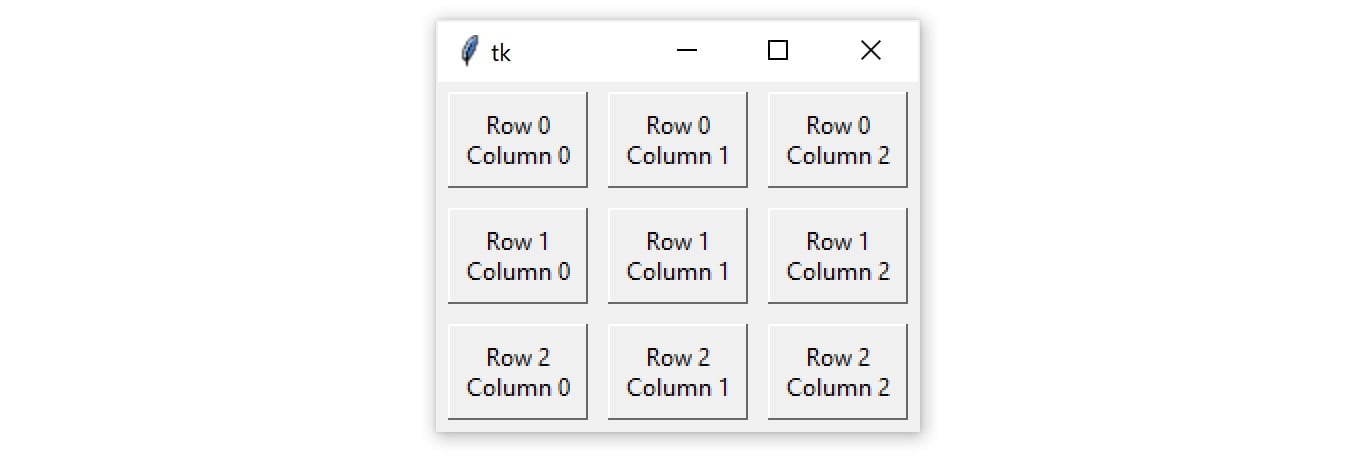
The following script creates a 3 × 3 grid of frames with Label widgets packed into them:
importtkinterastkwindow=tk.Tk()foriinrange(3):forjinrange(3):frame=tk.Frame(master=window,relief=tk.RAISED,borderwidth=1)frame.grid(row=i,column=j)label=tk.Label(master=frame,text=f"Row {i}\nColumn {j}")label.pack()window.mainloop()Here’s what the resulting window looks like:
Two geometry managers are being used in this example. Each Frame is attached to the window with the .grid() geometry manager:
importtkinterastkwindow=tk.Tk()foriinrange(3):forjinrange(3):frame=tk.Frame(master=window,relief=tk.RAISED,borderwidth=1)frame.grid(row=i,column=j)label=tk.Label(master=frame,text=f"Row {i}\nColumn {j}")label.pack()window.mainloop()Each label is attached to its master Frame with .pack():
importtkinterastkwindow=tk.Tk()foriinrange(3):forjinrange(3):frame=tk.Frame(master=window,relief=tk.RAISED,borderwidth=1)frame.grid(row=i,column=j)label=tk.Label(master=frame,text=f"Row {i}\nColumn {j}")label.pack()window.mainloop()The important thing to realize here is that even though .grid() is called on each Frame object, the geometry manager applies to the window object. Similarly, the layout of each frame is controlled with the .pack() geometry manager.
The frames in the previous example are placed tightly next to one another. To add some space around each Frame, you can set the padding of each cell in the grid. Padding is just some blank space that surrounds a widget and separates it visually from its contents.
The two types of padding are external and internal padding. External padding adds some space around the outside of a grid cell. It’s controlled with two keyword arguments to .grid():
padxadds padding in the horizontal direction.padyadds padding in the vertical direction.
Both padx and pady are measured in pixels, not text units, so setting both of them to the same value will create the same amount of padding in both directions. Try to add some padding around the outside of the frames in the previous example:
importtkinterastkwindow=tk.Tk()foriinrange(3):forjinrange(3):frame=tk.Frame(master=window,relief=tk.RAISED,borderwidth=1)frame.grid(row=i,column=j,padx=5,pady=5)label=tk.Label(master=frame,text=f"Row {i}\nColumn {j}")label.pack()window.mainloop()Here’s the resulting window:
.pack() also has padx and pady parameters. The following code is nearly identical to the previous code, except that you add 5 pixels of additional padding around each Label in both the x and y directions:
importtkinterastkwindow=tk.Tk()foriinrange(3):forjinrange(3):frame=tk.Frame(master=window,relief=tk.RAISED,borderwidth=1)frame.grid(row=i,column=j,padx=5,pady=5)label=tk.Label(master=frame,text=f"Row {i}\nColumn {j}")label.pack(padx=5,pady=5)window.mainloop()The extra padding around the Label widgets gives each cell in the grid a little bit of breathing room between the Frame border and the text in the Label:
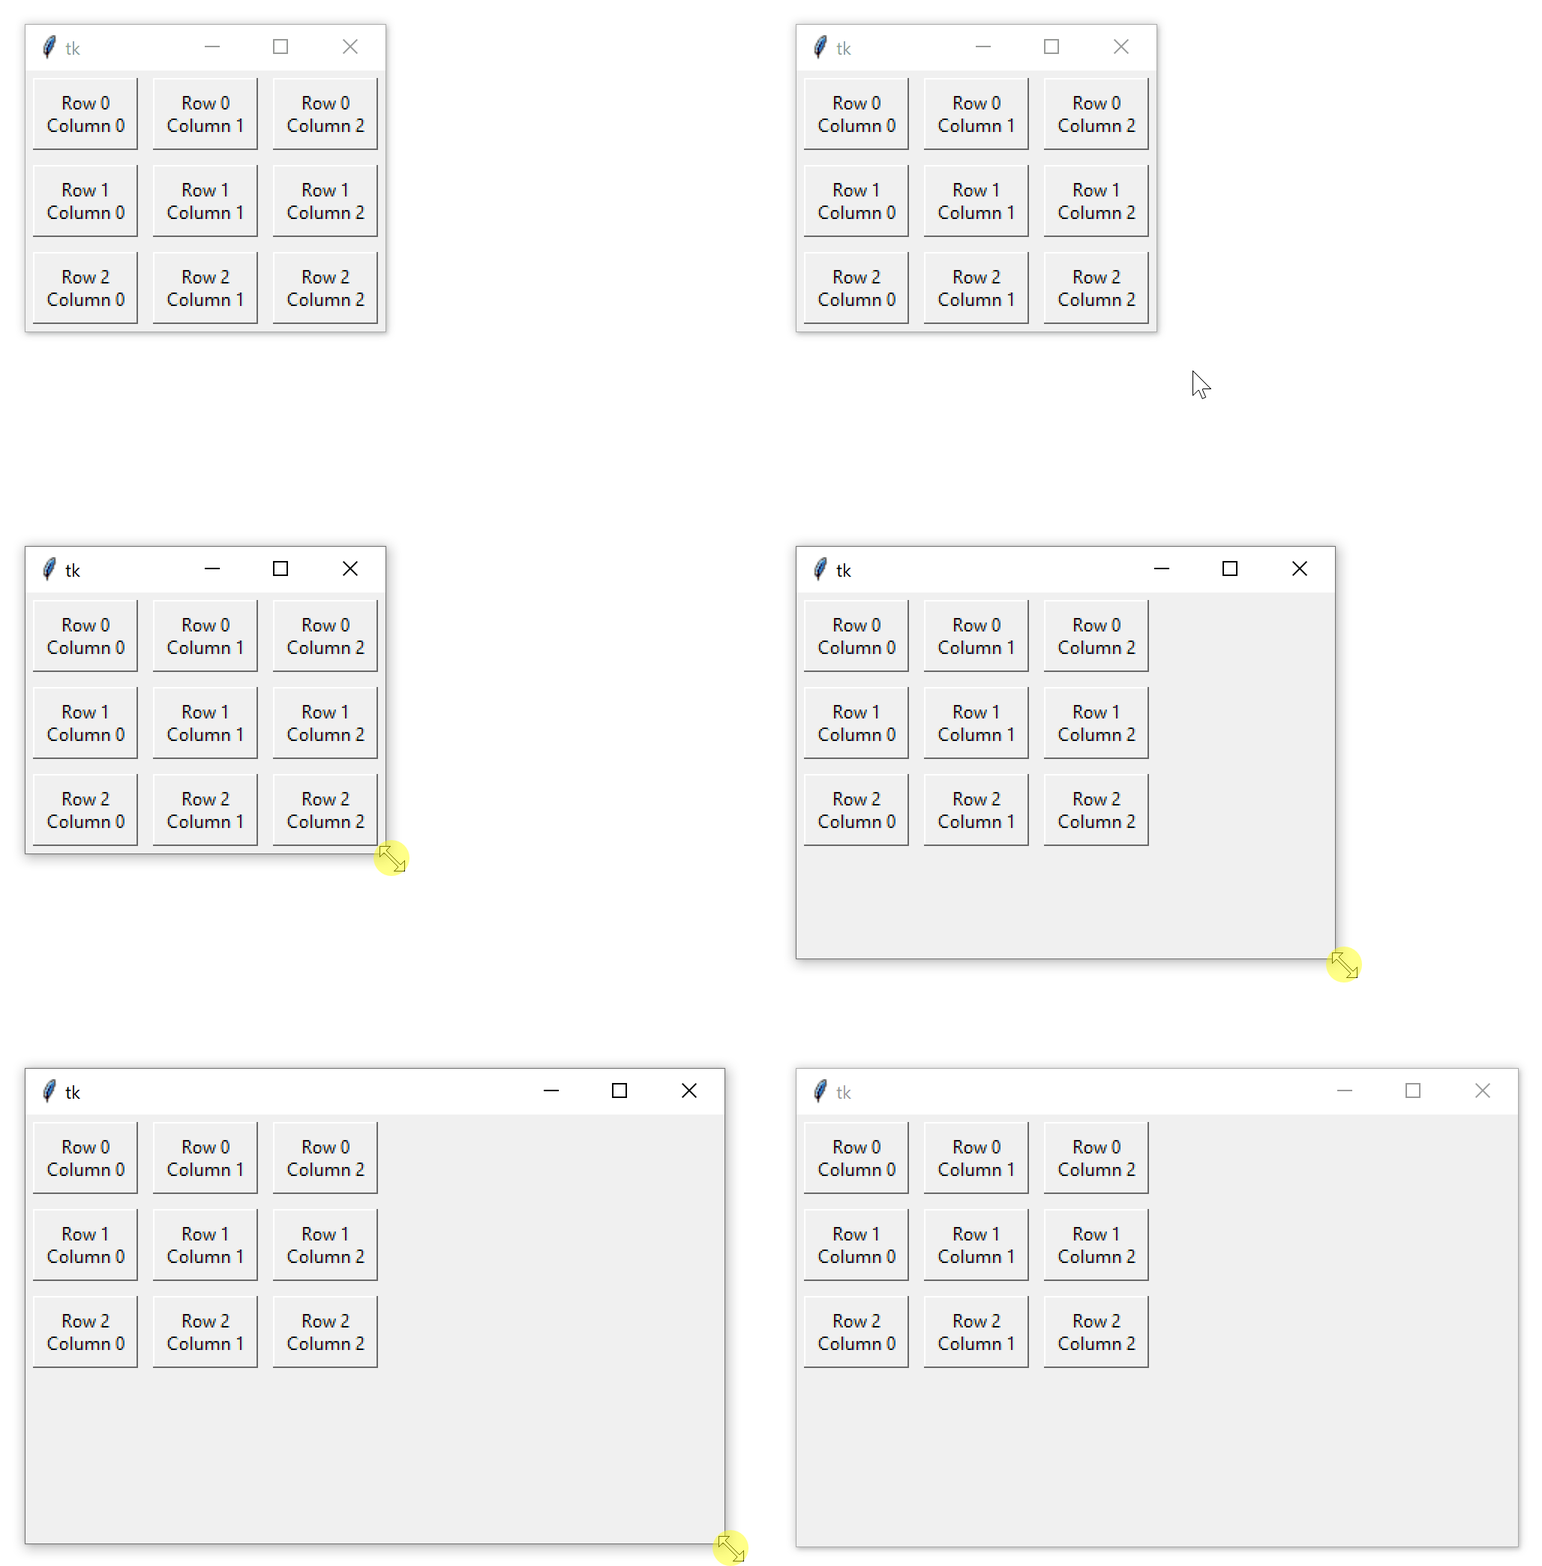
That looks pretty nice! But if you try and expand the window in any direction, then you’ll notice that the layout isn’t very responsive:
The whole grid stays at the top-left corner as the window expands.
You can adjust how the rows and columns of the grid grow as the window is resized using .columnconfigure() and .rowconfigure() on the window object. Remember, the grid is attached to window, even though you’re calling .grid() on each Frame widget. Both .columnconfigure() and .rowconfigure() take three essential arguments:
- The index of the grid column or row that you want to configure (or a list of indices to configure multiple rows or columns at the same time)
- A keyword argument called
weightthat determines how the column or row should respond to window resizing, relative to the other columns and rows - A keyword argument called
minsizethat sets the minimum size of the row height or column width in pixels
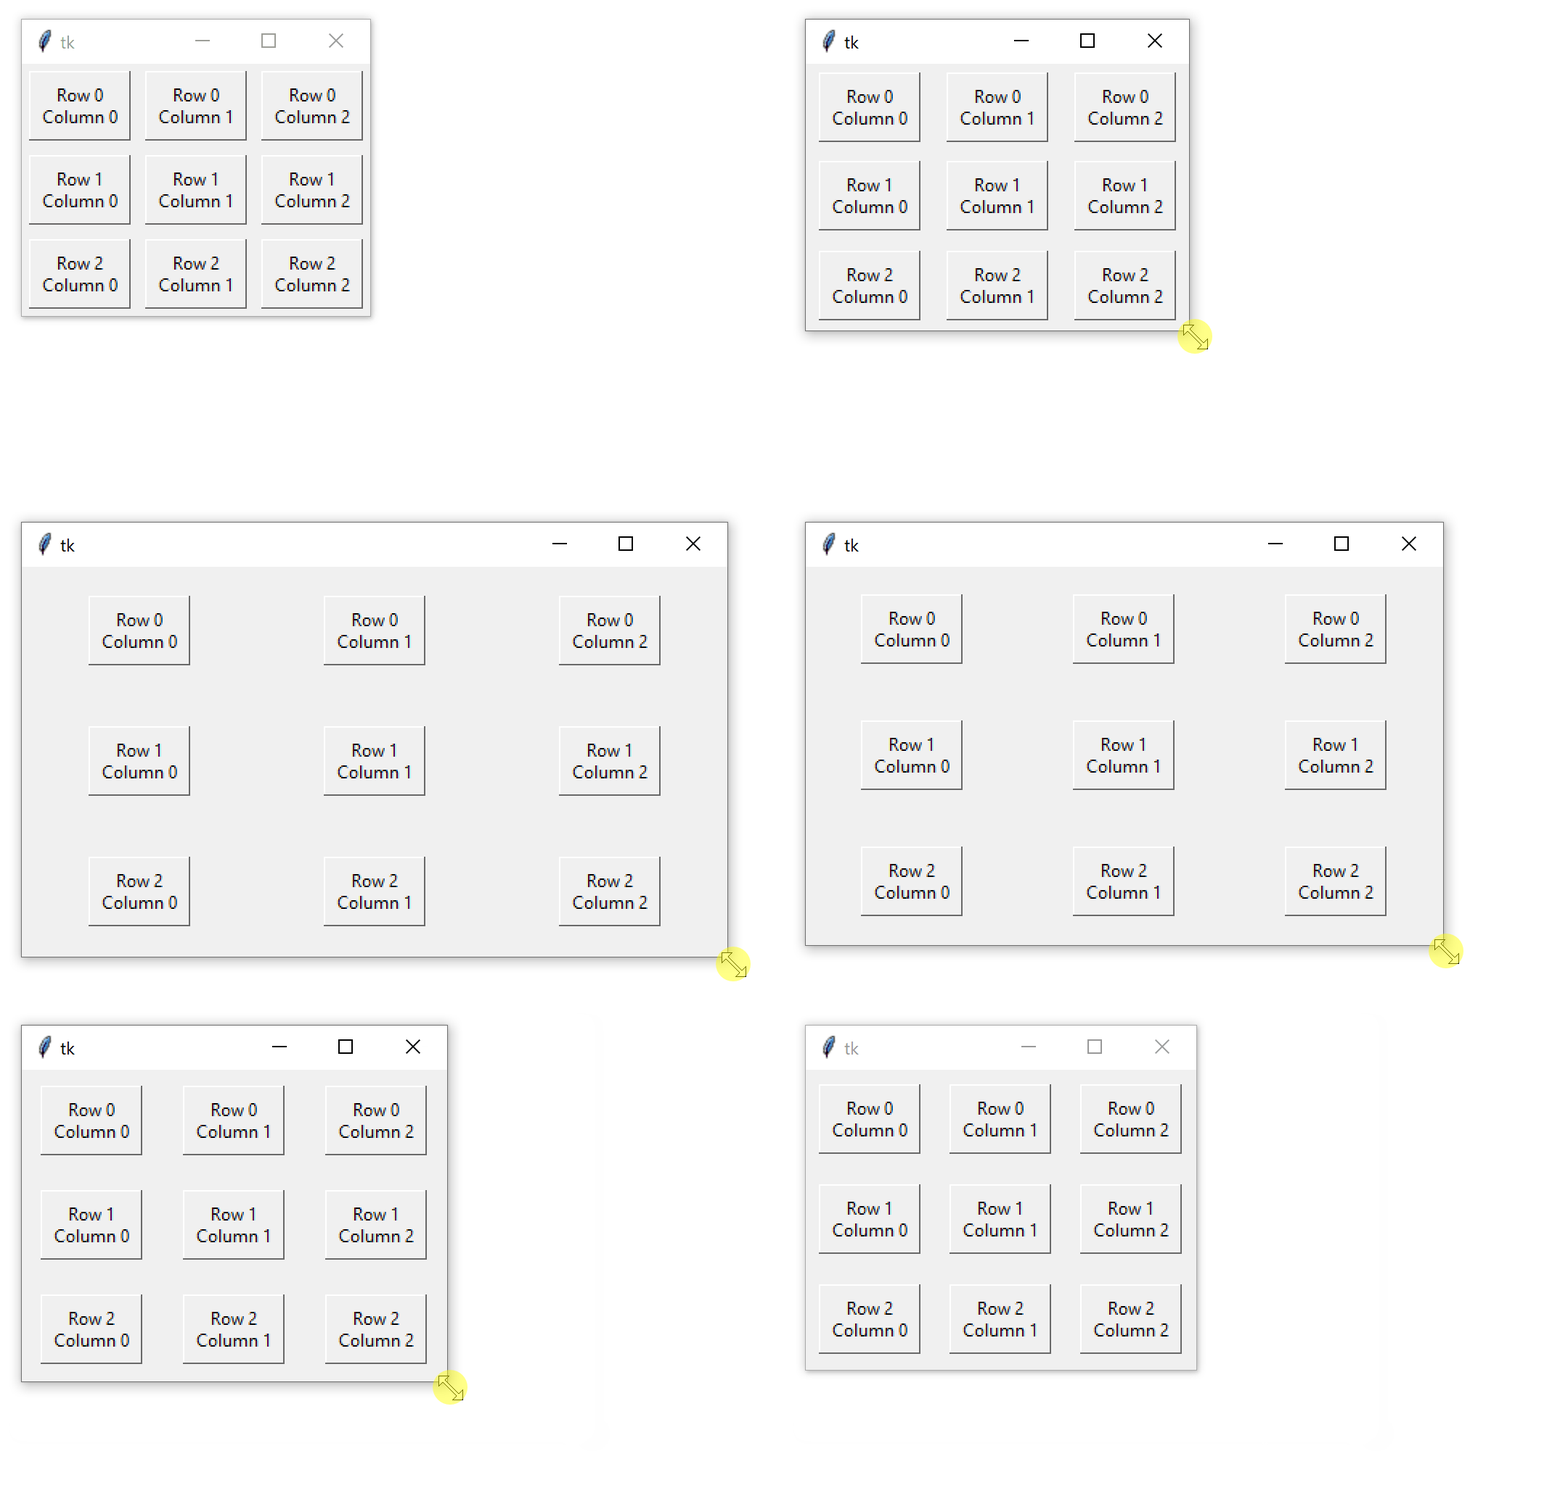
weight is set to 0 by default, which means that the column or row doesn’t expand as the window resizes. If every column and row is given a weight of 1, then they all grow at the same rate. If one column has a weight of 1 and another a weight of 2, then the second column expands at twice the rate of the first. Adjust the previous script to better handle window resizing:
importtkinterastkwindow=tk.Tk()foriinrange(3):window.columnconfigure(i,weight=1,minsize=75)window.rowconfigure(i,weight=1,minsize=50)forjinrange(0,3):frame=tk.Frame(master=window,relief=tk.RAISED,borderwidth=1)frame.grid(row=i,column=j,padx=5,pady=5)label=tk.Label(master=frame,text=f"Row {i}\nColumn {j}")label.pack(padx=5,pady=5)window.mainloop().columnconfigure() and .rowconfigure() are placed in the body of the outer for loop. (You could explicitly configure each column and row outside of the for loop, but that would require writing an additional six lines of code.)
On each iteration of the loop, the i-th column and row are configured to have a weight of 1. This ensures that each row and column expands at the same rate whenever the window is resized. The minsize argument is set to 75 for each column and 50 for each row. This makes sure the Label widget always displays its text without chopping off any characters, even if the window size is extremely small.
The result is a grid layout that expands and contracts smoothly as the window is resized:
Try it yourself to get a feel for how it works! Play around with the weight and minsize parameters to see how they affect the grid.
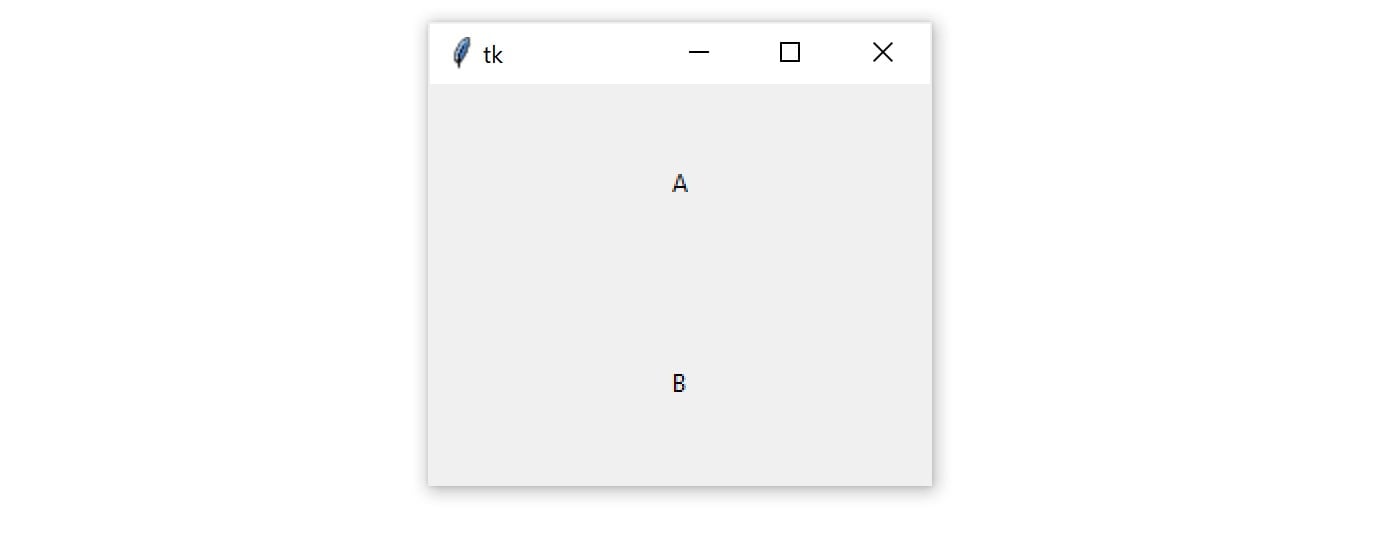
By default, widgets are centered in their grid cells. For example, the following code creates two Label widgets and places them in a grid with one column and two rows:
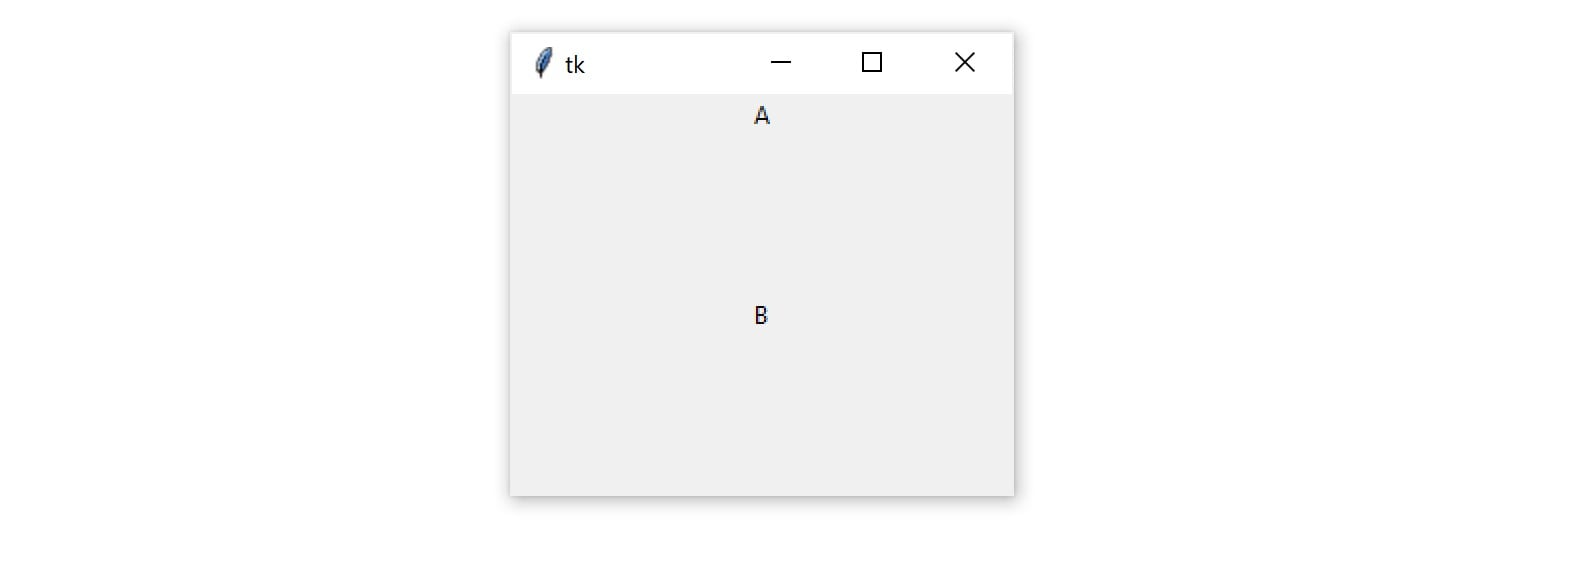
importtkinterastkwindow=tk.Tk()window.columnconfigure(0,minsize=250)window.rowconfigure([0,1],minsize=100)label1=tk.Label(text="A")label1.grid(row=0,column=0)label2=tk.Label(text="B")label2.grid(row=1,column=0)window.mainloop()Each grid cell is 250 pixels wide and 100 pixels tall. The labels are placed in the center of each cell, as you can see in the following figure:
You can change the location of each label inside of the grid cell using the sticky parameter. sticky accepts a string containing one or more of the following letters:
"n"or"N"to align to the top-center part of the cell"e"or"E"to align to the right-center side of the cell"s"or"S"to align to the bottom-center part of the cell"w"or"W"to align to the left-center side of the cell
The letters "n", "s", "e", and "w" come from the cardinal directions north, south, east, and west. Setting sticky to "n" on both Labels in the previous code positions each Label at the top-center of its grid cell:
importtkinterastkwindow=tk.Tk()window.columnconfigure(0,minsize=250)window.rowconfigure([0,1],minsize=100)label1=tk.Label(text="A")label1.grid(row=0,column=0,sticky="n")label2=tk.Label(text="B")label2.grid(row=1,column=0,sticky="n")window.mainloop()Here’s the output:
You can combine multiple letters in a single string to position each Label in the corner of its grid cell:
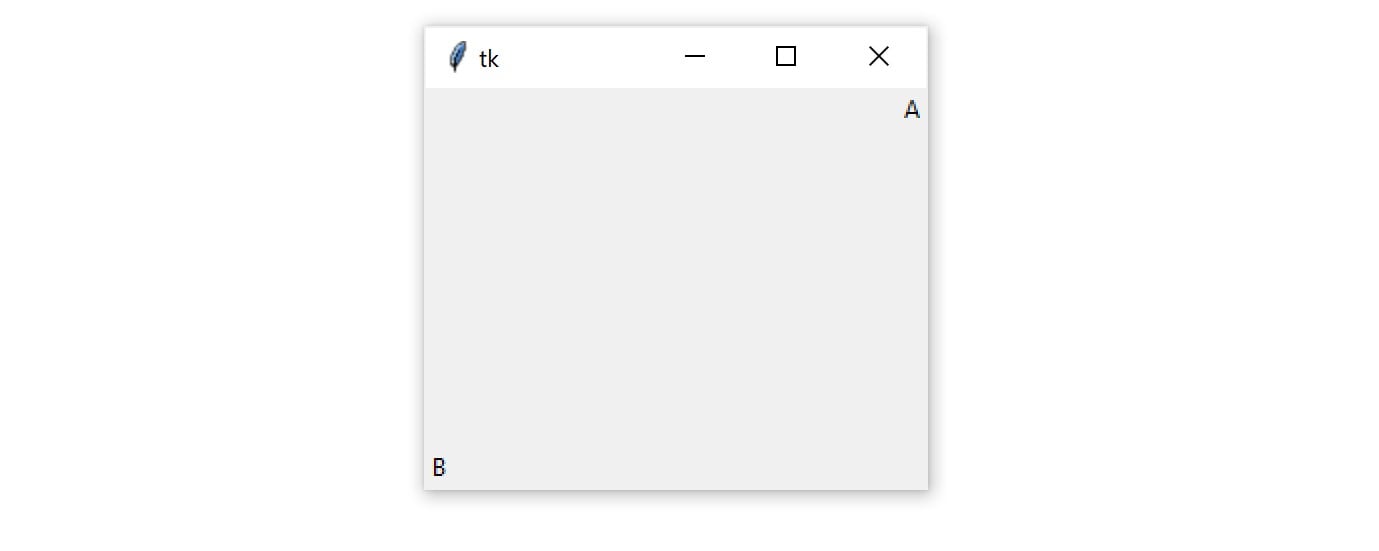
importtkinterastkwindow=tk.Tk()window.columnconfigure(0,minsize=250)window.rowconfigure([0,1],minsize=100)label1=tk.Label(text="A")label1.grid(row=0,column=0,sticky="ne")label2=tk.Label(text="B")label2.grid(row=1,column=0,sticky="sw")window.mainloop()In this example, the sticky parameter of label1 is set to "ne", which places the label at the top-right corner of its grid cell. label2 is positioned in the bottom-left corner by passing "sw" to sticky. Here’s what that looks like in the window:
When a widget is positioned with sticky, the size of the widget itself is just big enough to contain any text and other contents inside of it. It won’t fill the entire grid cell. In order to fill the grid, you can specify "ns" to force the widget to fill the cell in the vertical direction, or "ew" to fill the cell in the vertical direction. To fill the entire cell, set sticky to "nsew". The following example illustrates each of these options:
importtkinterastkwindow=tk.Tk()window.rowconfigure(0,minsize=50)window.columnconfigure([0,1,2,3],minsize=50)label1=tk.Label(text="1",bg="black",fg="white")label2=tk.Label(text="2",bg="black",fg="white")label3=tk.Label(text="3",bg="black",fg="white")label4=tk.Label(text="4",bg="black",fg="white")label1.grid(row=0,column=0)label2.grid(row=0,column=1,sticky="ew")label3.grid(row=0,column=2,sticky="ns")label4.grid(row=0,column=3,sticky="nsew")window.mainloop()Here’s what the output looks like:
What the above example illustrates is that the .grid() geometry manager’s sticky parameter can be used to achieve the same effects as the .pack() geometry manager’s fill parameter. The correspondence between the sticky and fill parameters is summarized in the following table:
.grid() | .pack() |
|---|---|
sticky="ns" | fill=tk.Y |
sticky="ew" | fill=tk.X |
sticky="nsew" | fill=tk.BOTH |
.grid() is a powerful geometry manager. It’s often easier to understand than .pack() and is much more flexible than .place(). When you’re creating new Tkinter applications, you should consider using .grid() as your primary geometry manager.
Note:.grid() offers much more flexibility than you’ve seen here. For example, you can configure cells to span multiple rows and columns. For more information, check out the Grid Geometry Manager section of the TkDocs tutorial.
Now that you’ve got the fundamentals of geometry managers down for the Python GUI framework Tkinter, the next step is to assign actions to buttons to bring your applications to life.
Check Your Understanding
Expand the code block below for an exercise to check your understanding:
You can expand the code block below to see a solution:
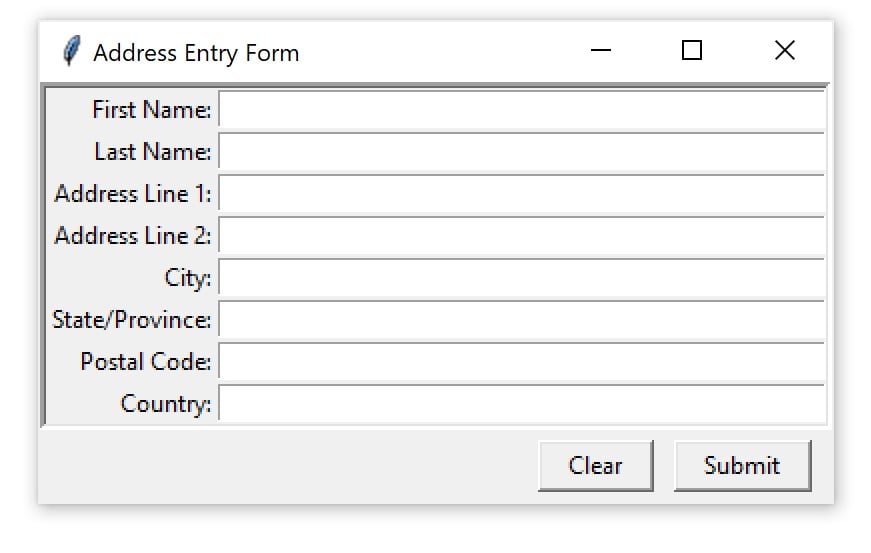
There are many different ways to solve this exercise. If your solution generates a window identical to the one in the exercise statement, then congratulations! You’ve successfully solved the exercise! Below, you can look at two solutions that use the .grid() geometry manager.
One solution creates a Label and Entry widget for each field with the desired settings:
importtkinterastk# Create a new window with the title "Address Entry Form"window=tk.Tk()window.title("Address Entry Form")# Create a new frame `frm_form` to contain the Label# and Entry widgets for entering address information.frm_form=tk.Frame(relief=tk.SUNKEN,borderwidth=3)# Pack the frame into the windowfrm_form.pack()# Create the Label and Entry widgets for "First Name"lbl_first_name=tk.Label(master=frm_form,text="First Name:")ent_first_name=tk.Entry(master=frm_form,width=50)# Use the grid geometry manager to place the Label and# Entry widgets in the first and second columns of the# first row of the gridlbl_first_name.grid(row=0,column=0,sticky="e")ent_first_name.grid(row=0,column=1)# Create the Label and Entry widgets for "Last Name"lbl_last_name=tk.Label(master=frm_form,text="Last Name:")ent_last_name=tk.Entry(master=frm_form,width=50)# Place the widgets in the second row of the gridlbl_last_name.grid(row=1,column=0,sticky="e")ent_last_name.grid(row=1,column=1)# Create the Label and Entry widgets for "Address Line 1"lbl_address1=tk.Label(master=frm_form,text="Address Line 1:")ent_address1=tk.Entry(master=frm_form,width=50)# Place the widgets in the third row of the gridlbl_address1.grid(row=2,column=0,sticky="e")ent_address1.grid(row=2,column=1)# Create the Label and Entry widgets for "Address Line 2"lbl_address2=tk.Label(master=frm_form,text="Address Line 2:")ent_address2=tk.Entry(master=frm_form,width=5)# Place the widgets in the fourth row of the gridlbl_address2.grid(row=3,column=0,sticky=tk.E)ent_address2.grid(row=3,column=1)# Create the Label and Entry widgets for "City"lbl_city=tk.Label(master=frm_form,text="City:")ent_city=tk.Entry(master=frm_form,width=50)# Place the widgets in the fifth row of the gridlbl_city.grid(row=4,column=0,sticky=tk.E)ent_city.grid(row=4,column=1)# Create the Label and Entry widgets for "State/Province"lbl_state=tk.Label(master=frm_form,text="State/Province:")ent_state=tk.Entry(master=frm_form,width=50)# Place the widgets in the sixth row of the gridlbl_state.grid(row=5,column=0,sticky=tk.E)ent_state.grid(row=5,column=1)# Create the Label and Entry widgets for "Postal Code"lbl_postal_code=tk.Label(master=frm_form,text="Postal Code:")ent_postal_code=tk.Entry(master=frm_form,width=50)# Place the widgets in the seventh row of the gridlbl_postal_code.grid(row=6,column=0,sticky=tk.E)ent_postal_code.grid(row=6,column=1)# Create the Label and Entry widgets for "Country"lbl_country=tk.Label(master=frm_form,text="Country:")ent_country=tk.Entry(master=frm_form,width=50)# Place the widgets in the eight row of the gridlbl_country.grid(row=7,column=0,sticky=tk.E)ent_country.grid(row=7,column=1)# Create a new frame `frm_buttons` to contain the# Submit and Clear buttons. This frame fills the# whole window in the horizontal direction and has# 5 pixels of horizontal and vertical padding.frm_buttons=tk.Frame()frm_buttons.pack(fill=tk.X,ipadx=5,ipady=5)# Create the "Submit" button and pack it to the# right side of `frm_buttons`btn_submit=tk.Button(master=frm_buttons,text="Submit")btn_submit.pack(side=tk.RIGHT,padx=10,ipadx=10)# Create the "Clear" button and pack it to the# right side of `frm_buttons`btn_clear=tk.Button(master=frm_buttons,text="Clear")btn_clear.pack(side=tk.RIGHT,ipadx=10)# Start the applicationwindow.mainloop()There’s nothing wrong with this solution. It’s a bit long, but everything is very explicit. If you want to change something, then it’s clear to see exactly where to do so.
That said, the solution can be considerably shortened by recognizing that each Entry has the same width, and that all you need for each Label is the text:
importtkinterastk# Create a new window with the title "Address Entry Form"window=tk.Tk()window.title("Address Entry Form")# Create a new frame `frm_form` to contain the Label# and Entry widgets for entering address information.frm_form=tk.Frame(relief=tk.SUNKEN,borderwidth=3)# Pack the frame into the windowfrm_form.pack()# List of field labelslabels=["First Name:","Last Name:","Address Line 1:","Address Line 2:","City:","State/Province:","Postal Code:","Country:",]# Loop over the list of field labelsforidx,textinenumerate(labels):# Create a Label widget with the text from the labels listlabel=tk.Label(master=frm_form,text=text)# Create an Entry widgetentry=tk.Entry(master=frm_form,width=50)# Use the grid geometry manager to place the Label and# Entry widgets in the row whose index is idxlabel.grid(row=idx,column=0,sticky="e")entry.grid(row=idx,column=1)# Create a new frame `frm_buttons` to contain the# Submit and Clear buttons. This frame fills the# whole window in the horizontal direction and has# 5 pixels of horizontal and vertical padding.frm_buttons=tk.Frame()frm_buttons.pack(fill=tk.X,ipadx=5,ipady=5)# Create the "Submit" button and pack it to the# right side of `frm_buttons`btn_submit=tk.Button(master=frm_buttons,text="Submit")btn_submit.pack(side=tk.RIGHT,padx=10,ipadx=10)# Create the "Clear" button and pack it to the# right side of `frm_buttons`btn_clear=tk.Button(master=frm_buttons,text="Clear")btn_clear.pack(side=tk.RIGHT,ipadx=10)# Start the applicationwindow.mainloop()In this solution, a list is used to store the strings for each Label in the form. They’re stored in the order that each form field should appear. Then, enumerate() gets both the index and string from each value in the labels list.
When you’re ready, you can move on to the next section.
Making Your Applications Interactive
By now, you have a pretty good idea of how to create a window with Tkinter, add some widgets, and control the application layout. That’s great, but applications shouldn’t just look good—they actually need to do something! In this section, you’ll learn how to bring your applications to life by performing actions whenever certain events occur.
Using Events and Event Handlers
When you create a Tkinter application, you must call window.mainloop() to start the event loop. During the event loop, your application checks if an event has occurred. If so, then some code can be executed in response.
The event loop is provided for you with Tkinter, so you don’t have to write any code that checks for events yourself. However, you do have to write the code that will be executed in response to an event. In Tkinter, you write functions called event handlers for the events that you use in your application.
Note: An event is any action that occurs during the event loop that might trigger some behavior in the application, such as when a key or mouse button is pressed.
When an event occurs, an event object is emitted, which means that an instance of a class representing the event is instantiated. You don’t need to worry about creating these classes yourself. Tkinter will create instances of event classes for you automatically.
You’ll write your own event loop in order to understand better how Tkinter’s event loop works. That way, you can see how Tkinter’s event loop fits into your application, and which parts you need to write yourself.
Assume there’s a list called events_list that contains event objects. A new event object is automatically appended to events_list every time an event occurs in your program. (You don’t need to implement this updating mechanism. It just automatically happens for you in this conceptual example.) Using an infinite loop, you can continually check if there are any event objects in events_list:
# Assume that this list gets updated automaticallyevents_list=[]# Run the event loopwhileTrue:# If events_list is empty, then no events have occurred and you# can skip to the next iteration of the loopifevents_list==[]:continue# If execution reaches this point, then there is at least one# event object in events_listevent=events_list[0]Right now, the event loop you’ve created doesn’t do anything with event. Let’s change that. Suppose your application needs to respond to keypresses. You need to check that event was generated by a user pressing a key on their keyboard, and, if so, pass event to an event handler function for key presses.
Assume that event has a .type attribute set to the string "keypress" if the event is a keypress event object, and a .char attribute containing the character of the key that was pressed. Create a new function handle_keypress() and update your event loop code:
events_list=[]# Create an event handlerdefhandle_keypress(event):"""Print the character associated to the key pressed"""print(event.char)whileTrue:ifevents_list==[]:continueevent=events_list[0]# If event is a keypress event objectifevent.type=="keypress":# Call the keypress event handlerhandle_keypress(event)When you call window.mainloop(), something like the above loop is run for you. This method takes care of two parts of the loop for you:
- It maintains a list of events that have occurred.
- It runs an event handler any time a new event is added to that list.
Update your event loop to use window.mainloop() instead of your own event loop:
importtkinterastk# Create a window objectwindow=tk.Tk()# Create an event handlerdefhandle_keypress(event):"""Print the character associated to the key pressed"""print(event.char)# Run the event loopwindow.mainloop().mainloop() takes care of a lot for you, but there’s something missing from the above code. How does Tkinter know when to use handle_keypress()? Tkinter widgets have a method called .bind() for just this purpose.
Using .bind()
To call an event handler whenever an event occurs on a widget, use .bind(). The event handler is said to be bound to the event because it’s called every time the event occurs. You’ll continue with the keypress example from the previous section and use .bind() to bind handle_keypress() to the keypress event:
importtkinterastkwindow=tk.Tk()defhandle_keypress(event):"""Print the character associated to the key pressed"""print(event.char)# Bind keypress event to handle_keypress()window.bind("<Key>",handle_keypress)window.mainloop()Here, the handle_keypress() event handler is bound to a "<Key>" event using window.bind(). Whenever a key is pressed while the application is running, your program will print the character of the key pressed.
.bind() always takes at least two arguments:
- An event that’s represented by a string of the form
"<event_name>", whereevent_namecan be any of Tkinter’s events - An event handler that’s the name of the function to be called whenever the event occurs
The event handler is bound to the widget on which .bind() is called. When the event handler is called, the event object is passed to the event handler function.
In the example above, the event handler is bound to the window itself, but you can bind an event handler to any widget in your application. For example, you can bind an event handler to a Button widget that will perform some action whenever the button is pressed:
defhandle_click(event):print("The button was clicked!")button=tk.Button(text="Click me!")button.bind("<Button-1>",handle_click)In this example, the "<Button-1>" event on the button widget is bound to the handle_click event handler. The "<Button-1>" event occurs whenever the left mouse button is pressed while the mouse is over the widget. There are other events for mouse button clicks, including "<Button-2>" for the middle mouse button and "<Button-3>" for the right mouse button.
Note: For a list of commonly used events, see the Event types section of the Tkinter 8.5 reference.
You can bind any event handler to any kind of widget with .bind(), but there’s an easier way to bind event handlers to button clicks using the Button widget’s command attribute.
Using command
Every Button widget has a command attribute that you can assign to a function. Whenever the button is pressed, the function is executed.
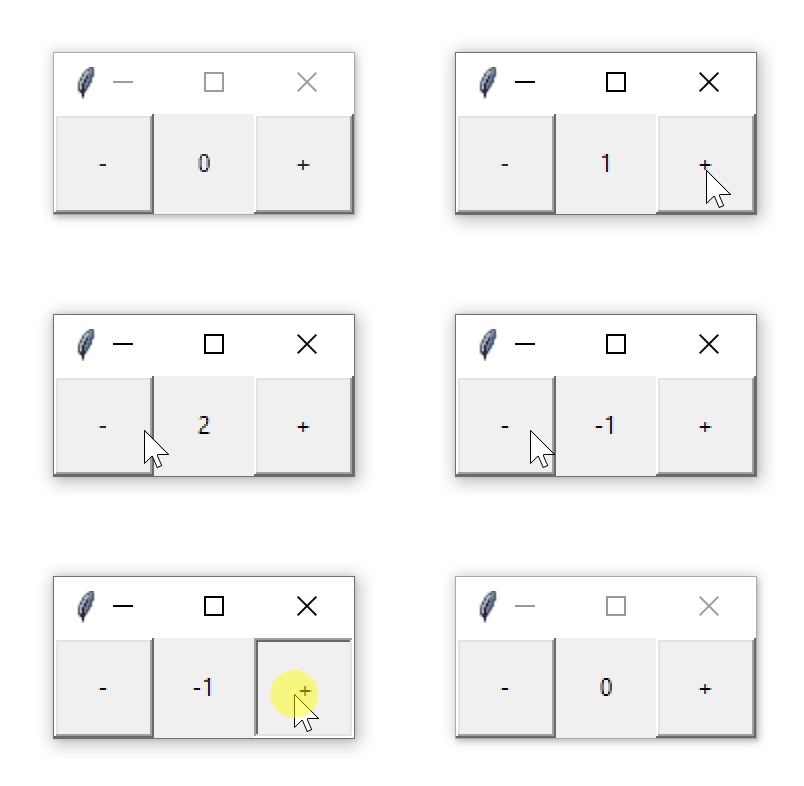
Take a look at an example. First, you’ll create a window with a Label widget that holds a numerical value. You’ll put buttons on the left and right side of the label. The left button will be used to decrease the value in the Label, and the right one will increase the value. Here’s the code for the window:
importtkinterastkwindow=tk.Tk()window.rowconfigure(0,minsize=50,weight=1)window.columnconfigure([0,1,2],minsize=50,weight=1)btn_decrease=tk.Button(master=window,text="-")btn_decrease.grid(row=0,column=0,sticky="nsew")lbl_value=tk.Label(master=window,text="0")lbl_value.grid(row=0,column=1)btn_increase=tk.Button(master=window,text="+")btn_increase.grid(row=0,column=2,sticky="nsew")window.mainloop()The window looks like this:
With the app layout defined, you can bring it to life by giving the buttons some commands. Start with the left button. When this button is pressed, it should decrease the value in the label by 1. There are two things you need to know how to do in order to do this:
- How do you get the text in a
Label? - How do you update the text in a
Label?
Label widgets don’t have .get() like Entry and Text widgets do. However, you can retrieve the text from the label by accessing the text attribute with a dictionary-style subscript notation:
label=Tk.Label(text="Hello")# Retrieve a Label's texttext=label["text"]# Set new text for the labellabel["text"]="Good bye"Now that you know how to get and set a label’s text, write a function increase() that increases the value in the lbl_value by 1:
defincrease():value=int(lbl_value["text"])lbl_value["text"]=f"{value + 1}"increase() gets the text from lbl_value and converts it to an integer with int(). Then, it increases this value by 1 and sets the label’s text attribute to this new value.
You’ll also need decrease() to decrease the value in value_label by 1:
defdecrease():value=int(lbl_value["text"])lbl_value["text"]=f"{value - 1}"Put increase() and decrease() in your code just after the import statement.
To connect the buttons to the functions, assign the function to the button’s command attribute. You can do this when you instantiate the button. For example, to assign increase() to increase_button, update the line that instantiates the button to the following:
btn_increase=tk.Button(master=window,text="+",command=increase)Now assign decrease() to decrease_button:
btn_decrease=tk.Button(master=window,text="-",command=decrease)That’s all you need to do to bind the buttons to increase() and decrease() and make the program functional. Try saving your changes and running the application! Click the buttons to increase and decrease the value in the center of the window:
Here’s the full application code for your reference:
importtkinterastkdefincrease():value=int(lbl_value["text"])lbl_value["text"]=f"{value + 1}"defdecrease():value=int(lbl_value["text"])lbl_value["text"]=f"{value - 1}"window=tk.Tk()window.rowconfigure(0,minsize=50,weight=1)window.columnconfigure([0,1,2],minsize=50,weight=1)btn_decrease=tk.Button(master=window,text="-",command=decrease)btn_decrease.grid(row=0,column=0,sticky="nsew")lbl_value=tk.Label(master=window,text="0")lbl_value.grid(row=0,column=1)btn_increase=tk.Button(master=window,text="+",command=increase)btn_increase.grid(row=0,column=2,sticky="nsew")window.mainloop()This app is not particularly useful, but the skills you learned here apply to every app you’ll make:
- Use widgets to create the components of the user interface.
- Use geometry managers to control the layout of the application.
- Write functions that interact with various components to capture and transform user input.
In the next two sections, you’ll build apps that do something useful. First, you’ll build a temperature converter that converts a temperature value from Fahrenheit to Celsius. After that, you’ll build a text editor that can open, edit, and save text files!
Check Your Understanding
Expand the code block below for an exercise to check your understanding:
Write a program that simulates rolling a six-sided die. There should be one button with the text "Roll". When the user clicks the button, a random integer from 1 to 6 should be displayed.
Hint: You can generate a random number using randint() in the random module. If you’re not familiar with the random module, then check out Generating Random Data in Python (Guide) for more information.
The application window should look something like this:
Try this exercise now.
You can expand the code block below to see a solution:
Here’s one possible solution:
importrandomimporttkinterastkdefroll():lbl_result["text"]=str(random.randint(1,6))window=tk.Tk()window.columnconfigure(0,minsize=150)window.rowconfigure([0,1],minsize=50)btn_roll=tk.Button(text="Roll",command=roll)lbl_result=tk.Label()btn_roll.grid(row=0,column=0,sticky="nsew")lbl_result.grid(row=1,column=0)window.mainloop()Keep in mind your code may look different.
When you’re ready, you can move on to the next section.
Building a Temperature Converter (Example App)
In this section, you’ll build a temperature converter application that allows the user to input temperature in degrees Fahrenheit and push a button to convert that temperature to degrees Celsius. You’ll walk through the code step by step. You can also find the full source code at the end of this section for your reference.
Note: To get the most out of this section, follow along in a Python shell.
Before you start coding, you’ll first design the app. You need three elements:
- An
Entrywidget calledent_temperatureto enter the Fahrenheit value - A
Labelwidget calledlbl_resultto display the Celsius result - A
Buttonwidget calledbtn_convertthat reads the value from theEntrywidget, converts it from Fahrenheit to Celsius, and sets the text of theLabelwidget to the result when clicked
You can arrange these in a grid with a single row and one column for each widget. That gets you a minimally working application, but it isn’t very user-friendly. Everything needs to have labels.
You’ll put a label directly to the right of the ent_temperature widget containing the Fahrenheit symbol (℉) so that the user knows that the value ent_temperature should be in degrees Fahrenheit. To do this, set the label text to "\N{DEGREES FAHRENHEIT}", which uses Python’s named Unicode character support to display the Fahrenheit symbol.
You can give btn_convert a little flair by setting it’s text to the value "\N{RIGHTWARDS BLACK ARROW}", which displays a black arrow pointing to the right. You’ll also make sure that lbl_result always has the Celsius symbol (℃) following the label text "\N{DEGREES CELSIUS}" to indicate that the result is in degrees Celsius. Here’s what the final window will look like:
Now that you know what widgets you need and what the window is going to look like, you can start coding it up! First, import tkinter and create a new window:
importtkinterastkwindow=tk.Tk()window.title("Temperature Converter")window.title() sets the title of an existing window. When you finally run this application, the window will have the text Temperature Converter in its title bar. Next, create the ent_temperature widget with a label called lbl_temp and assign both to a Frame widget called frm_entry:
frm_entry=tk.Frame(master=window)ent_temperature=tk.Entry(master=frm_entry,width=10)lbl_temp=tk.Label(master=frm_entry,text="\N{DEGREE FAHRENHEIT}")ent_temperature is where the user will enter the Fahrenheit value. lbl_temp is used to label ent_temperature with the Fahrenheit symbol. frm_entry is a container that groups ent_temperature and lbl_temp together.
You want lbl_temp to be placed directly to the right of ent_temperature. You can lay them out in the frm_entry using the .grid() geometry manager with one row and two columns:
ent_temperature.grid(row=0,column=0,sticky="e")lbl_temp.grid(row=0,column=1,sticky="w")You’ve set the sticky parameter to "e" for ent_temperature so that it always sticks to the right-most edge of its grid cell. You also set sticky to "w" for lbl_temp to keep it stuck to the left-most edge of its grid cell. This ensures that lbl_temp is always located immediately to the right of ent_temperature.
Now, make the btn_convert and the lbl_result for converting the temperature entered into ent_temperature and displaying the results:
btn_convert=tk.Button(master=window,text="\N{RIGHTWARDS BLACK ARROW}")lbl_result=tk.Label(master=window,text="\N{DEGREE CELSIUS}")Like frm_entry, both btn_convert and lbl_result are assigned to window. Together, these three widgets make up the three cells in the main application grid. Use .grid() to go ahead and lay them out now:
frm_entry.grid(row=0,column=0,padx=10)btn_convert.grid(row=0,column=1,pady=10)lbl_result.grid(row=0,column=2,padx=10)Finally, run the application:
window.mainloop()That looks great! But the button doesn’t do anything just yet. At the top of your script file, just below the import line, add a function called fahrenheit_to_celsius():
deffahrenheit_to_celsius():"""Convert the value for Fahrenheit to Celsius and insert the result into lbl_result."""fahrenheit=ent_temperature.get()celsius=(5/9)*(float(fahrenheit)-32)lbl_result["text"]=f"{round(celsius, 2)} \N{DEGREE CELSIUS}"This function reads the value from ent_temperature, converts it from Fahrenheit to Celsius, and then displays the result in lbl_result.
Now go down to the line where you define btn_convert and set its command parameter to fahrenheit_to_celsius:
btn_convert=tk.Button(master=window,text="\N{RIGHTWARDS BLACK ARROW}",command=fahrenheit_to_celsius# <--- Add this line)That’s it! You’ve created a fully functional temperature converter app in just 26 lines of code! Pretty cool, right?
You can expand the code block below to see the full script:
Here’s the full script for your reference:
importtkinterastkdeffahrenheit_to_celsius():"""Convert the value for Fahrenheit to Celsius and insert the result into lbl_result."""fahrenheit=ent_temperature.get()celsius=(5/9)*(float(fahrenheit)-32)lbl_result["text"]=f"{round(celsius, 2)} \N{DEGREE CELSIUS}"# Set-up the windowwindow=tk.Tk()window.title("Temperature Converter")window.resizable(width=False,height=False)# Create the Fahrenheit entry frame with an Entry# widget and label in itfrm_entry=tk.Frame(master=window)ent_temperature=tk.Entry(master=frm_entry,width=10)lbl_temp=tk.Label(master=frm_entry,text="\N{DEGREE FAHRENHEIT}")# Layout the temperature Entry and Label in frm_entry# using the .grid() geometry managerent_temperature.grid(row=0,column=0,sticky="e")lbl_temp.grid(row=0,column=1,sticky="w")# Create the conversion Button and result display Labelbtn_convert=tk.Button(master=window,text="\N{RIGHTWARDS BLACK ARROW}",command=fahrenheit_to_celsius)lbl_result=tk.Label(master=window,text="\N{DEGREE CELSIUS}")# Set-up the layout using the .grid() geometry managerfrm_entry.grid(row=0,column=0,padx=10)btn_convert.grid(row=0,column=1,pady=10)lbl_result.grid(row=0,column=2,padx=10)# Run the applicationwindow.mainloop()It’s time to kick things up a notch! Read on to learn how to build a text editor.
Building a Text Editor (Example App)
In this section, you’ll build a text editor application that can create, open, edit, and save text files. There are three essential elements in the application:
- A
Buttonwidget calledbtn_openfor opening a file for editing - A
Buttonwidget calledbtn_savefor saving a file - A
TextBoxwidget calledtxt_editfor creating and editing the text file
The three widgets will be arranged so that the two buttons are on the left-hand side of the window, and the text box is on the right-hand side. The whole window should have a minimum height of 800 pixels, and txt_edit should have a minimum width of 800 pixels. The whole layout should be responsive so that if the window is resized, then txt_edit is resized as well. The width of the Frame holding the buttons should not change, however.
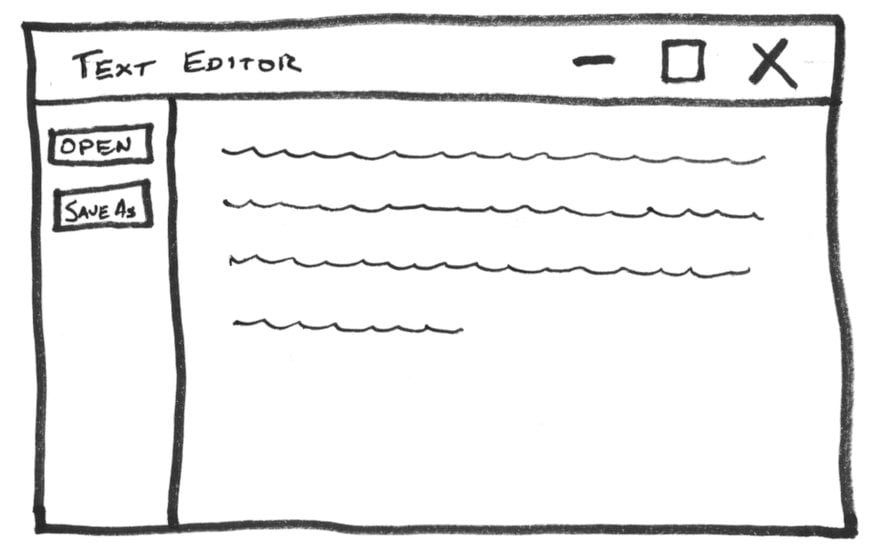
Here’s a sketch of how the window will look:
You can achieve the desired layout using the .grid() geometry manager. The layout contains a single row and two columns:
- A narrow column on the left for the buttons
- A wider column on the right for the text box
To set the minimum sizes for the window and txt_edit, you can set the minsize parameters of the window methods .rowconfigure() and .columnconfigure() to 800. To handle resizing, you can set the weight parameters of these methods to 1.
In order to get both buttons into the same column, you’ll need to create a Frame widget called fr_buttons. According to the sketch, the two buttons should be stacked vertically inside of this frame, with btn_open on top. You can do that with either the .grid() or .pack() geometry manager. For now, you’ll stick with .grid() since it’s a little easier to work with.
Now that you have a plan, you can start coding the application. The first step is to create the all of the widgets you need:
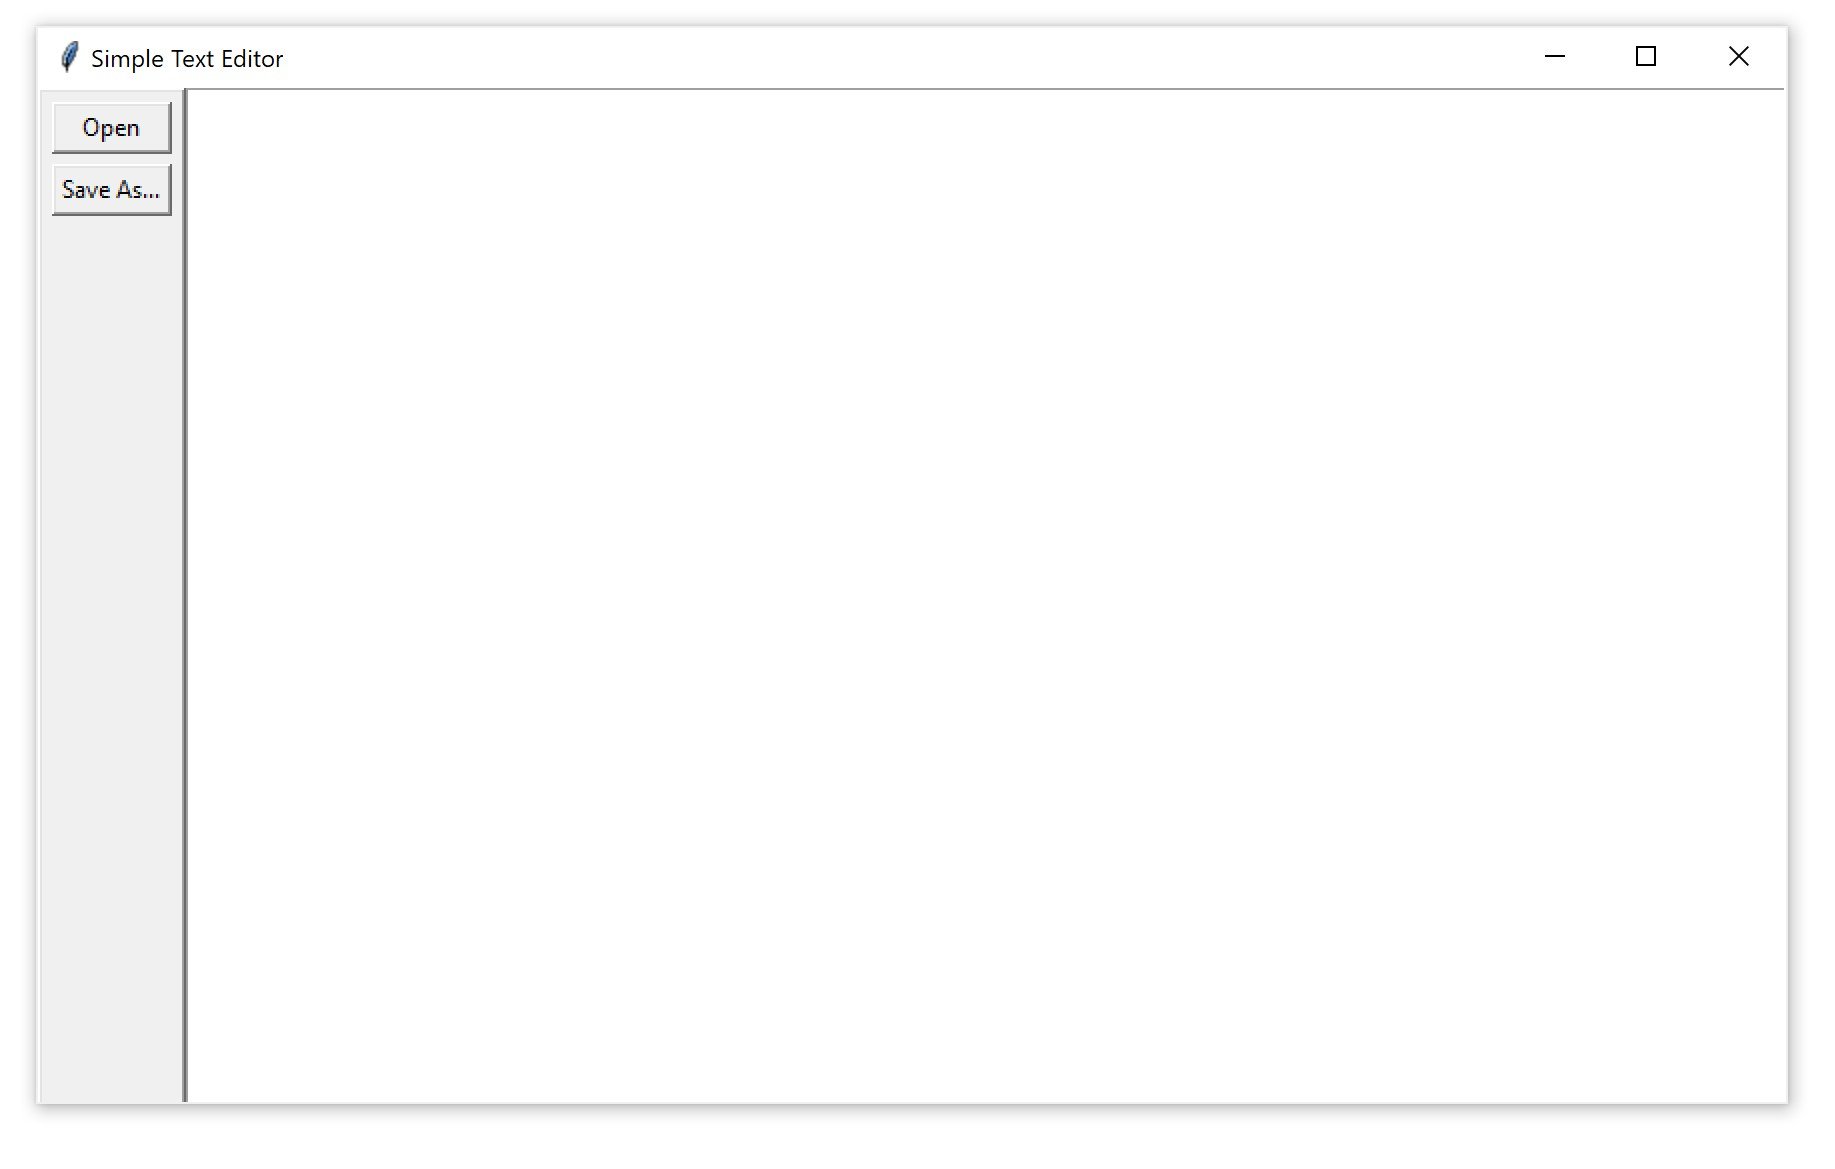
1 importtkinterastk 2 3 window=tk.Tk() 4 window.title("Simple Text Editor") 5 6 window.rowconfigure(0,minsize=800,weight=1) 7 window.columnconfigure(1,minsize=800,weight=1) 8 9 txt_edit=tk.Text(window)10 fr_buttons=tk.Frame(window)11 btn_open=tk.Button(fr_buttons,text="Open")12 btn_save=tk.Button(fr_buttons,text="Save As...")Here’s a breakdown of this code:
- Line 1 imports
tkinter. - Lines 3 and 4 create a new window with the title
"Simple Text Editor". - Lines 6 and 7 set the row and column configurations.
- Lines 9 to 12 create the four widgets you’ll need for the text box, the frame, and the open and save buttons.
Take a look at line 6 more closely. The minsize parameter of .rowconfigure() is set to 800 and weight is set to 1:
window.rowconfigure(0,minsize=800,weight=1)The first argument is 0, which sets the height of the first row to 800 pixels and makes sure that the height of the row grows proportionally to the height of the window. There’s only one row in the application layout, so these settings apply to the entire window.
Let’s also take a closer look at line 7. Here, you use .columnconfigure() to set the width and weight attributes of the column with index 1 to 800 and 1, respectively:
window.columnconfigure(1,minsize=800,weight=1)Remember, row and column indices are zero-based, so these settings apply only to the second column. By configuring just the second column, the text box will expand and contract naturally when the window is resized, while the column containing the buttons will remain at a fixed width.
Now you can work on the application layout. First, assign the two buttons to the fr_buttons frame using the .grid() geometry manager:
btn_open.grid(row=0,column=0,sticky="ew",padx=5,pady=5)btn_save.grid(row=1,column=0,sticky="ew",padx=5)These two lines of code create a grid with two rows and one column in the fr_buttons frame since both btn_open and btn_save have their master attribute set to fr_buttons. btn_open is put in the first row and btn_save in the second row so that btn_open appears above btn_save in the layout, just you planned in your sketch.
Both btn_open and btn_save have their sticky attributes set to "ew", which forces the buttons to expand horizontally in both directions and fill the entire frame. This makes sure both buttons are the same size.
You place 5 pixels of padding around each button by setting the padx and pady parameters to 5. Only btn_open has vertical padding. Since it’s on top, the vertical padding offsets the button down from the top of the window a bit and makes sure that there’s a small gap between it and btn_save.
Now that fr_buttons is laid out and ready to go, you can set up the grid layout for the rest of the window:
fr_buttons.grid(row=0,column=0,sticky="ns")txt_edit.grid(row=0,column=1,sticky="nsew")These two lines of code create a grid with one row and two columns for window. You place fr_buttons in the first column and txt_edit in the second column so that fr_buttons appears to the left of txt_edit in the window layout.
The sticky parameter for fr_buttons is set to "ns", which forces the whole frame to expand vertically and fill the entire height of its column. txt_edit fills its entire grid cell because you set its sticky parameter to "nsew", which forces it to expand in every direction.
Now that the application layout is complete, add window.mainloop() to the bottom of the program and save and run the file. The following window is displayed:
That looks great! But it doesn’t do anything just yet, so you need to start writing the commands for the buttons. btn_open needs to show a file open dialog and allow the user to select a file. It then needs to open that file and set the text of txt_edit to the contents of the file. Here’s a function open_file() that does just this:
1 defopen_file(): 2 """Open a file for editing.""" 3 filepath=askopenfilename( 4 filetypes=[("Text Files","*.txt"),("All Files","*.*")] 5 ) 6 ifnotfilepath: 7 return 8 txt_edit.delete("1.0",tk.END) 9 withopen(filepath,"r")asinput_file:10 text=input_file.read()11 txt_edit.insert(tk.END,text)12 window.title(f"Simple Text Editor - {filepath}")Here’s a breakdown of this function:
- Lines 3 to 5 use the
askopenfilenamedialog from thetkinter.filedialogmodule to display a file open dialog and store the selected file path tofilepath. - Lines 6 and 7 check to see if the user closes the dialog box or clicks the Cancel button. If so, then
filepathwill beNone, and the function willreturnwithout executing any of the code to read the file and set the text oftxt_edit. - Line 8 clears the current contents of
txt_editusing.delete(). - Lines 9 and 10 open the selected file and
.read()its contents before storing thetextas a string. - Line 11 assigns he string
texttotxt_editusing.insert(). - Line 12 sets the title of the window so that it contains the path of the open file.
Now you can update the program so that btn_open calls open_file() whenever it’s clicked. There are a few things you need to do to update the program. First, import askopenfilename() from tkinter.filedialog by adding the following import to the top of your program:
importtkinterastkfromtkinter.filedialogimportaskopenfilenamewindow=tk.Tk()window.title("Simple Text Editor")window.rowconfigure(0,minsize=800,weight=1)window.columnconfigure(1,minsize=800,weight=1)txt_edit=tk.Text(window)fr_buttons=tk.Frame(window)btn_open=tk.Button(fr_buttons,text="Open")btn_save=tk.Button(fr_buttons,text="Save As...")Next, add the definition of open_file() just below the import statements:
importtkinterastkfromtkinter.filedialogimportaskopenfilenamedefopen_file():"""Open a file for editing."""filepath=askopenfilename(filetypes=[("Text Files","*.txt"),("All Files","*.*")])ifnotfilepath:returntxt_edit.delete("1.0",tk.END)withopen(filepath,"r")asinput_file:text=input_file.read()txt_edit.insert(tk.END,text)window.title(f"Simple Text Editor - {filepath}")window=tk.Tk()window.title("Simple Text Editor")window.rowconfigure(0,minsize=800,weight=1)window.columnconfigure(1,minsize=800,weight=1)txt_edit=tk.Text(window)fr_buttons=tk.Frame(window)btn_open=tk.Button(fr_buttons,text="Open")btn_save=tk.Button(fr_buttons,text="Save As...")Finally, set the command attribute of btn_opn to open_file:
importtkinterastkfromtkinter.filedialogimportaskopenfilenamedefopen_file():"""Open a file for editing."""filepath=askopenfilename(filetypes=[("Text Files","*.txt"),("All Files","*.*")])ifnotfilepath:returntxt_edit.delete("1.0",tk.END)withopen(filepath,"r")asinput_file:text=input_file.read()txt_edit.insert(tk.END,text)window.title(f"Simple Text Editor - {filepath}")window=tk.Tk()window.title("Simple Text Editor")window.rowconfigure(0,minsize=800,weight=1)window.columnconfigure(1,minsize=800,weight=1)txt_edit=tk.Text(window)fr_buttons=tk.Frame(window)btn_open=tk.Button(fr_buttons,text="Open",command=open_file)btn_save=tk.Button(fr_buttons,text="Save As...")Save the file and run it to check that everything is working. Then try opening a text file!
With btn_open working, it’s time to work on the function for btn_save. This needs to open a save file dialog box so that the user can choose where they would like to save the file. You’ll use the asksaveasfilename dialog in the tkinter.filedialog module for this. This function also needs to extract the text currently in txt_edit and write this to a file at the selected location. Here’s a function that does just this:
1 defsave_file(): 2 """Save the current file as a new file.""" 3 filepath=asksaveasfilename( 4 defaultextension="txt", 5 filetypes=[("Text Files","*.txt"),("All Files","*.*")], 6 ) 7 ifnotfilepath: 8 return 9 withopen(filepath,"w")asoutput_file:10 text=txt_edit.get("1.0",tk.END)11 output_file.write(text)12 window.title(f"Simple Text Editor - {filepath}")Here’s how this code works:
- Lines 3 to 6 use the
asksaveasfilenamedialog box to get the desired save location from the user. The selected file path is stored in thefilepathvariable. - Lines 7 and 8 check to see if the user closes the dialog box or clicks the Cancel button. If so, then
filepathwill beNone, and the function will return without executing any of the code to save the text to a file. - Line 9 creates a new file at the selected file path.
- Line 10 extracts the text from
txt_editwith.get()method and assigns it to the variabletext. - Line 11 writes
textto the output file. - Line 12 updates the title of the window so that the new file path is displayed in the window title.
Now you can update the program so that btn_save calls save_file() when it’s clicked. Again, there are a few things you need to do in order to update the program. First, import asksaveasfilename() from tkinter.filedialog by updating the import at the top of your script, like so:
importtkinterastkfromtkinter.filedialogimportaskopenfilename,asksaveasfilenamedefopen_file():"""Open a file for editing."""filepath=askopenfilename(filetypes=[("Text Files","*.txt"),("All Files","*.*")])ifnotfilepath:returntxt_edit.delete(1.0,tk.END)withopen(filepath,"r")asinput_file:text=input_file.read()txt_edit.insert(tk.END,text)window.title(f"Simple Text Editor - {filepath}")window=tk.Tk()window.title("Simple Text Editor")window.rowconfigure(0,minsize=800,weight=1)window.columnconfigure(1,minsize=800,weight=1)txt_edit=tk.Text(window)fr_buttons=tk.Frame(window,relief=tk.RAISED,bd=2)btn_open=tk.Button(fr_buttons,text="Open",command=open_file)btn_save=tk.Button(fr_buttons,text="Save As...")btn_open.grid(row=0,column=0,sticky="ew",padx=5,pady=5)btn_save.grid(row=1,column=0,sticky="ew",padx=5)fr_buttons.grid(row=0,column=0,sticky="ns")txt_edit.grid(row=0,column=1,sticky="nsew")window.mainloop()Next, add the definition of save_file() just below the open_file() definition:
importtkinterastkfromtkinter.filedialogimportaskopenfilename,asksaveasfilenamedefopen_file():"""Open a file for editing."""filepath=askopenfilename(filetypes=[("Text Files","*.txt"),("All Files","*.*")])ifnotfilepath:returntxt_edit.delete(1.0,tk.END)withopen(filepath,"r")asinput_file:text=input_file.read()txt_edit.insert(tk.END,text)window.title(f"Simple Text Editor - {filepath}")defsave_file():"""Save the current file as a new file."""filepath=asksaveasfilename(defaultextension="txt",filetypes=[("Text Files","*.txt"),("All Files","*.*")],)ifnotfilepath:returnwithopen(filepath,"w")asoutput_file:text=txt_edit.get(1.0,tk.END)output_file.write(text)window.title(f"Simple Text Editor - {filepath}")window=tk.Tk()window.title("Simple Text Editor")window.rowconfigure(0,minsize=800,weight=1)window.columnconfigure(1,minsize=800,weight=1)txt_edit=tk.Text(window)fr_buttons=tk.Frame(window,relief=tk.RAISED,bd=2)btn_open=tk.Button(fr_buttons,text="Open",command=open_file)btn_save=tk.Button(fr_buttons,text="Save As...")btn_open.grid(row=0,column=0,sticky="ew",padx=5,pady=5)btn_save.grid(row=1,column=0,sticky="ew",padx=5)fr_buttons.grid(row=0,column=0,sticky="ns")txt_edit.grid(row=0,column=1,sticky="nsew")window.mainloop()Finally, set the command attribute of btn_save to save_file:
importtkinterastkfromtkinter.filedialogimportaskopenfilename,asksaveasfilenamedefopen_file():"""Open a file for editing."""filepath=askopenfilename(filetypes=[("Text Files","*.txt"),("All Files","*.*")])ifnotfilepath:returntxt_edit.delete(1.0,tk.END)withopen(filepath,"r")asinput_file:text=input_file.read()txt_edit.insert(tk.END,text)window.title(f"Simple Text Editor - {filepath}")defsave_file():"""Save the current file as a new file."""filepath=asksaveasfilename(defaultextension="txt",filetypes=[("Text Files","*.txt"),("All Files","*.*")],)ifnotfilepath:returnwithopen(filepath,"w")asoutput_file:text=txt_edit.get(1.0,tk.END)output_file.write(text)window.title(f"Simple Text Editor - {filepath}")window=tk.Tk()window.title("Simple Text Editor")window.rowconfigure(0,minsize=800,weight=1)window.columnconfigure(1,minsize=800,weight=1)txt_edit=tk.Text(window)fr_buttons=tk.Frame(window,relief=tk.RAISED,bd=2)btn_open=tk.Button(fr_buttons,text="Open",command=open_file)btn_save=tk.Button(fr_buttons,text="Save As...",command=save_file)btn_open.grid(row=0,column=0,sticky="ew",padx=5,pady=5)btn_save.grid(row=1,column=0,sticky="ew",padx=5)fr_buttons.grid(row=0,column=0,sticky="ns")txt_edit.grid(row=0,column=1,sticky="nsew")window.mainloop()Save the file and run it. You’ve now got a minimal yet fully-functional text editor!
You can expand the code block below to see the full script:
Here’s the full script for your reference:
importtkinterastkfromtkinter.filedialogimportaskopenfilename,asksaveasfilenamedefopen_file():"""Open a file for editing."""filepath=askopenfilename(filetypes=[("Text Files","*.txt"),("All Files","*.*")])ifnotfilepath:returntxt_edit.delete(1.0,tk.END)withopen(filepath,"r")asinput_file:text=input_file.read()txt_edit.insert(tk.END,text)window.title(f"Simple Text Editor - {filepath}")defsave_file():"""Save the current file as a new file."""filepath=asksaveasfilename(defaultextension="txt",filetypes=[("Text Files","*.txt"),("All Files","*.*")],)ifnotfilepath:returnwithopen(filepath,"w")asoutput_file:text=txt_edit.get(1.0,tk.END)output_file.write(text)window.title(f"Simple Text Editor - {filepath}")window=tk.Tk()window.title("Simple Text Editor")window.rowconfigure(0,minsize=800,weight=1)window.columnconfigure(1,minsize=800,weight=1)txt_edit=tk.Text(window)fr_buttons=tk.Frame(window,relief=tk.RAISED,bd=2)btn_open=tk.Button(fr_buttons,text="Open",command=open_file)btn_save=tk.Button(fr_buttons,text="Save As...",command=save_file)btn_open.grid(row=0,column=0,sticky="ew",padx=5,pady=5)btn_save.grid(row=1,column=0,sticky="ew",padx=5)fr_buttons.grid(row=0,column=0,sticky="ns")txt_edit.grid(row=0,column=1,sticky="nsew")window.mainloop()You’ve now built two GUI applications in Python and applied many of the topics you’ve learned about throughout this tutorial. That’s no small achievement, so take some time to feel good about what you’ve done. You’re now ready to tackle some applications on your own!
Conclusion
In this tutorial, you learned how to get started with Python GUI programming. Tkinter is a compelling choice for a Python GUI framework because it’s built into the Python standard library, and it’s relatively painless to make applications with this framework.
Throughout this tutorial, you’ve learned several important Tkinter concepts:
- How to work with widgets
- How to control your application layout with geometry managers
- How to make your applications interactive
- How to use five basic Tkinter widgets (
Label,Button,Entry,Text, andFrame)
Now that you’ve mastered the foundations of Python GUI programming with Tkinter, the next step is to build some of your own applications. What will you create? Share your fun projects down in the comments below!
Additional Resources
In this tutorial, you touched on just the foundations of creating Python GUI applications with Tkinter. There are a number of additional topics that aren’t covered here. In this section, you’ll find some of the best resources available to help you continue on your journey.
Tkinter References
Here are some official resources to check out:
- The official Python Tkinter tutorial covers Python’s Tkinter module in moderate depth. It’s written for more advanced Python developers and is not the best resource for beginners.
- Tkinter 8.5 reference: a GUI for Python is an extensive reference covering the majority of the Tkinter module. It’s exhaustive, but it’s written in the reference style without commentary or examples.
- The Tk Commands reference is the definitive guide to commands in the Tk library. It’s written for the Tcl language, but it answers a lot of questions about why things work the way they do in Tkinter. The official Python docs have a section on mapping basic Tk into Tkinter that’s indispensable when you’re reading the Tk Commands doc.
Additional Widgets
In this tutorial, you learned about the Label, Button, Entry, Text, and Frame widgets. There are several other widgets in Tkinter, all of which are essential for building real-world applications. Here are some resources to continue learning about widgets:
- The TkDocs Tkinter Tutorial is a fairly comprehensive guide for Tk, the underlying code library used by Tkinter. Examples are presented in Python, Ruby, Perl, and Tcl. You can find several examples of widgets beyond those covered here in two sections:
- Basic Widgets covers the same widgets as this tutorial, plus a few more.
- More Widgets covers several additional widgets.
- The official Python docs have three sections covering additional widgets:
- ttk themed widgets covers the Tk themed widget set.
- Extension widgets for Tk covers widgets in the Tk Interface Extension set.
- Scrolled Text Widget details a
Textwidget combined with a vertical scroll bar.
Application Distribution
Once you’ve created an application with Tkinter, you probably want to distribute that to your colleagues and friends. Here are some tutorials to get you going with that process:
- Using PyInstaller to Easily Distribute Python Applications
- 4 Attempts at Packaging Python as an Executable
- Building Standalone Python Applications with PyOxidizer
Other GUI Frameworks
Tkinter is not your only choice for a Python GUI framework. If Tkinter doesn’t meet the needs of your project, then here are some other frameworks to consider:
- How to Build a Python GUI Application With wxPython
- Python and PyQt: Building a GUI Desktop Calculator
- Building a Mobile Application With the Kivy Python Framework
[ Improve Your Python With 🐍 Python Tricks 💌 – Get a short & sweet Python Trick delivered to your inbox every couple of days. >> Click here to learn more and see examples ]
Python Circle: Hello Word in Django: How to start with Django
Wing Tips: Using Black and YAPF Code Reformatting in Wing Python IDE
Wing version 7.2 has been released, so in the next couple Wing Tips we'll take a look at some of its new features.
Wing 7.2 expands the options for automatic code reformatting to include also Black and YAPF, in addition to the previously supported autopep8. Using one of these allows you to develop nicely formatted uniform-looking code without spending time manually adjusting the layout of code.
There are two ways to go about reformatting code in Wing with any of these: (1) You can reformat whole files or the current selection on request at any time, or (2) you can reformat automatically as you edit lines of code or save edited files to disk.
Installing Reformatters
Wing uses its own copy of autopep8 for PEP 8 style formatting. If you plan to use Black or YAPF formatting instead, then you must first install the selected formatter into the Python that you are using with your code. For example:
pip install black
pip install yapf
Or if you are using Anaconda:
conda install black
conda install yapf
After this is done, running Python on the command line with arguments -mblack or -myapf should invoke the reformatter.
Manual Reformatting
The Source>Reformatting menu contains items for reformatting the current file or selection for PEP 8, Black or YAPF:
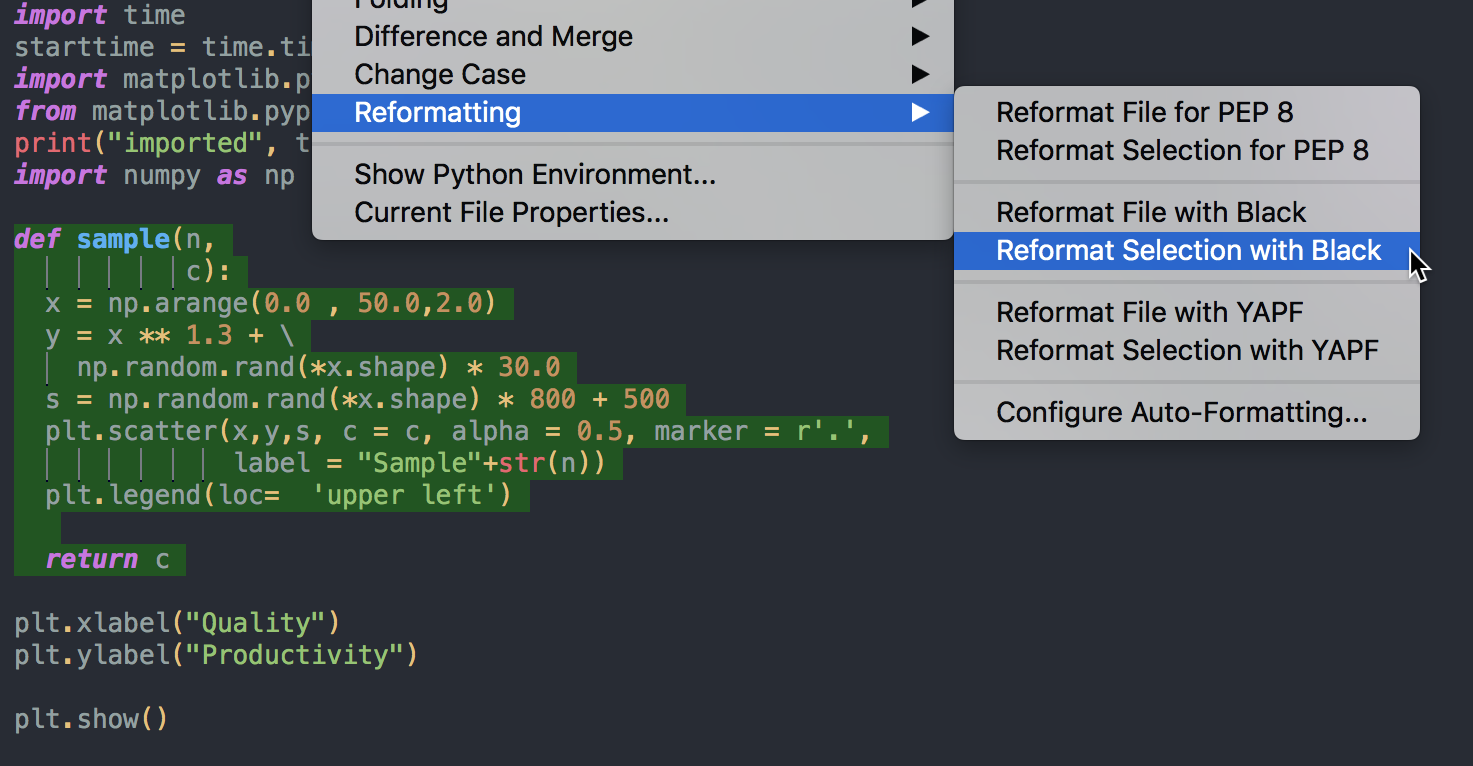
The result of the above operation (reformatting the selection with Black) looks like this:

A single Undo will undo the reformatting operation.
Automatic Reformatting
Wing can also auto-format edited lines after the caret leaves the line, or whole files as they are saved to disk. This is enabled with the Auto-Reformat property under the Options tab in ProjectProperties, or with the Editor>Auto-formatting>Auto-Reformat preference:

When this is set to LinesAfterEdit, Wing only reformats lines that you have edited, as the editor caret leaves that line or before the file is saved. For example, using yapf as the formatter:
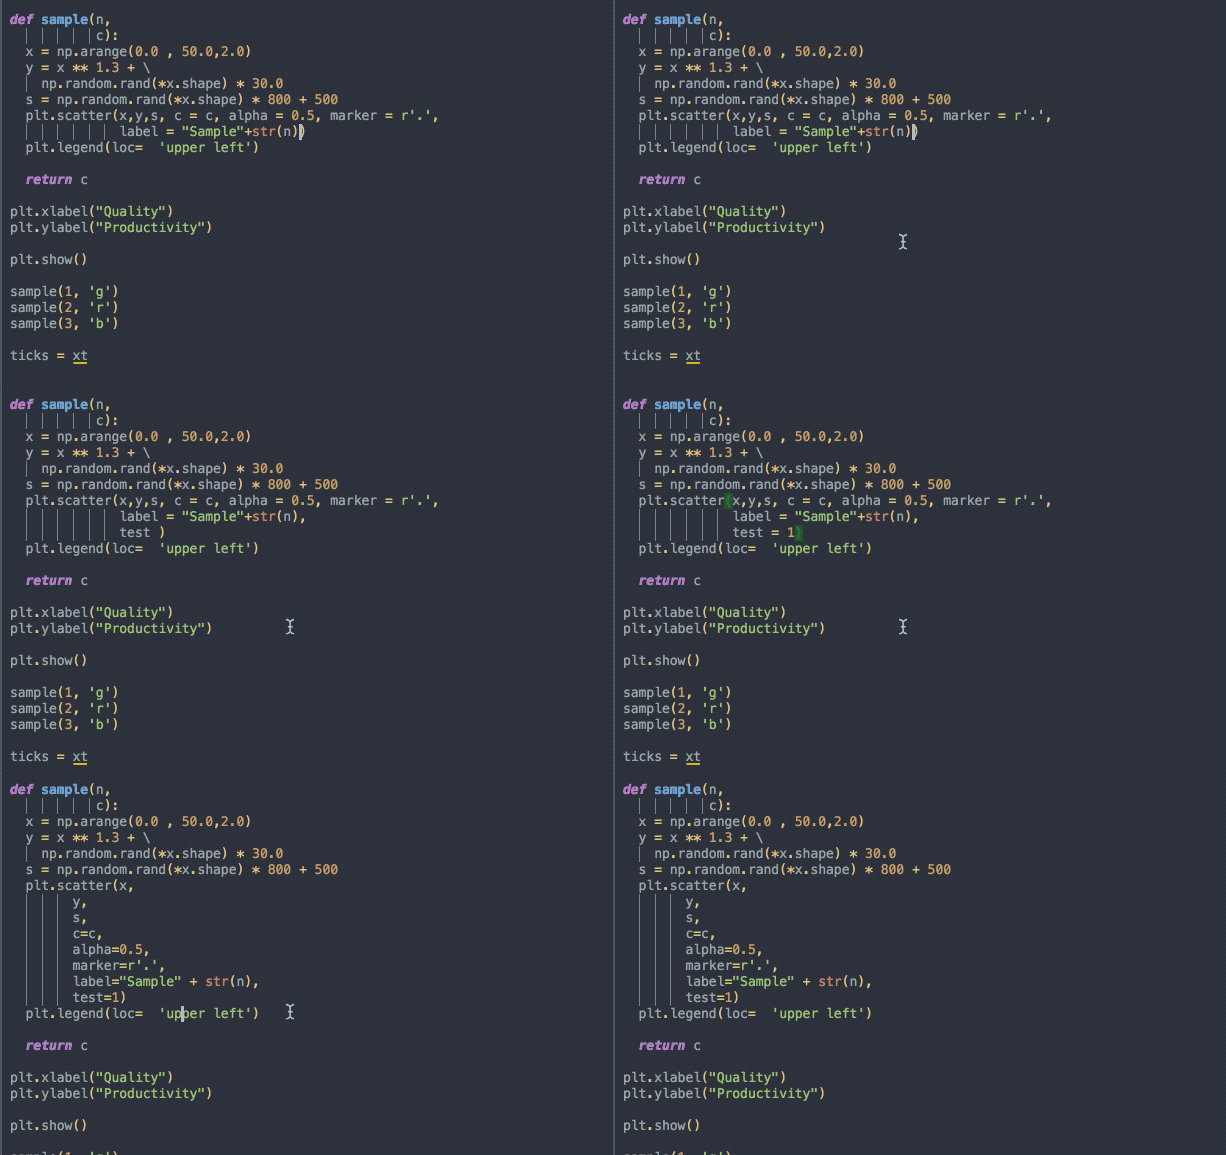
Notice that reformatting applies to whole logical lines which, as in this case, may span more than one physical line.
If WholeFilesBeforeSave auto-reformatting is used instead, then the whole file is reformatted before saving it to disk. For example, using Black as the formatter:
Note that Wing implements some timeouts for reformatting, so that very large files do not hang up saving or other operations, and there are some options available to control the details of formatting. See Auto-Reformatting for more information.
That's it for now! We'll be back soon with more Wing Tips for Wing Python IDE.
As always, please don't hesitate to email support@wingware.com if you run into problems or have any questions.
Davy Wybiral: ESP32-Cam Quickstart with Arduino Code
Learn how to add a camera to your Arduino projects the easy way using one of these cheap ESP32-Cam modules. Great for pet cams, home surveillance, time lapses, and computer vision applications.
Catalin George Festila: Python 3.7.5 : Django security issues - part 003.
Learn PyQt: PyQt5 plotting with matplotlib, embed plots in your GUI applications
In the previous part we covered plotting in PyQt5 using PyQtGraph. That library uses the Qt vector-based QGraphicsScene to draw plots and provides a great interface for interactive and high performance plotting.
However, there is another plotting library for Python which is used far more widely, and which offers a richer assortment of plots — Matplotlib. If you're migrating an existing data analysis tool to a PyQt GUI, or if you simply want to have access to the array of plot abilities that Matplotlib offers, then you'll want to know how to include Matplotlib plots within your application.
In this tutorial we'll cover how to embed Matplotlib plots in your PyQt applications
Installing Matplotlib
The following examples assume you have Matplotlib installed. If not you can install it as normal using Pip, with the following —
pip install matplotlib
A simple example
The following minimal example sets up a Matplotlib canvas FigureCanvasQTAgg which creates the Figure and adds a single set of axes to it. This canvas object is also a QWidget and so can be embedded straight into an application as any other Qt widget.
importsysimportmatplotlibmatplotlib.use('Qt5Agg')fromPyQt5importQtCore,QtWidgetsfrommatplotlib.backends.backend_qt5aggimportFigureCanvasQTAggfrommatplotlib.figureimportFigureclassMplCanvas(FigureCanvasQTAgg):def__init__(self,parent=None,width=5,height=4,dpi=100):fig=Figure(figsize=(width,height),dpi=dpi)self.axes=fig.add_subplot(111)super(MplCanvas,self).__init__(fig)classMainWindow(QtWidgets.QMainWindow):def__init__(self,*args,**kwargs):super(MainWindow,self).__init__(*args,**kwargs)# Create the maptlotlib FigureCanvas object, # which defines a single set of axes as self.axes.sc=MplCanvas(self,width=5,height=4,dpi=100)sc.axes.plot([0,1,2,3,4],[10,1,20,3,40])self.setCentralWidget(sc)self.show()app=QtWidgets.QApplication(sys.argv)w=MainWindow()app.exec_()
In this case we're adding our MplCanvas widget as the central widget on the window with .setCentralWidget(). This means it will take up the entirety of the window and resize together with it. The plotted data [0,1,2,3,4], [10,1,20,3,40] is provided as two lists of numbers (x and y respectively) as required by the .plot method.
 Basic plot with embedded Matplotlib
Plot controls
Plots from Matplotlib displayed in PyQt5 are actually rendered as simple (bitmap) images by the Agg backend. The FigureCanvasQTAgg class wraps this backend and displays the resulting image on a Qt widget. The effect of this architecture is that Qt is unaware of the positions of lines and other plot elements — only the x, y coordinates of any clicks and mouse movements over the widget.
However, support for handling Qt mouse events and transforming them into interactions on the plot is built into Matplotlib. This can be controlled through a custom toolbar which can be added to your applications alongside the plot. In this section we'll look at adding these controls so we can zoom, pan and get data from embedded Matplotlib plots.
The complete code, importing the toolbar widget NavigationToolbar2QT and adding it to the interface within a QVBoxLayout, is shown below —
importsysimportmatplotlibmatplotlib.use('Qt5Agg')fromPyQt5importQtCore,QtGui,QtWidgetsfrommatplotlib.backends.backend_qt5aggimportFigureCanvasQTAgg,NavigationToolbar2QTasNavigationToolbarfrommatplotlib.figureimportFigureclassMplCanvas(FigureCanvasQTAgg):def__init__(self,parent=None,width=5,height=4,dpi=100):fig=Figure(figsize=(width,height),dpi=dpi)self.axes=fig.add_subplot(111)super(MplCanvas,self).__init__(fig)classMainWindow(QtWidgets.QMainWindow):def__init__(self,*args,**kwargs):super(MainWindow,self).__init__(*args,**kwargs)sc=MplCanvas(self,width=5,height=4,dpi=100)sc.axes.plot([0,1,2,3,4],[10,1,20,3,40])# Create toolbar, passing canvas as first parament, parent (self, the MainWindow) as second.toolbar=NavigationToolbar(sc,self)layout=QtWidgets.QVBoxLayout()layout.addWidget(toolbar)layout.addWidget(sc)# Create a placeholder widget to hold our toolbar and canvas.widget=QtWidgets.QWidget()widget.setLayout(layout)self.setCentralWidget(widget)self.show()app=QtWidgets.QApplication(sys.argv)w=MainWindow()app.exec_()
We'll step through the changes.
First we import the toolbar widget from matplotlib.backends.backend_qt5agg.NavigationToolbar2QT renaming it with the simpler name NavigationToolbar. We create an instance of the toolbar by calling NavigationToolbar with two parameters, first the canvas object sc and then the parent for the toolbar, in this case our MainWindow object self. Passing in the canvas links the created toolbar to it, allowing it to be controlled. The resulting toolbar object is stored in the variable toolbar.
We need to add two widgets to the window, one above the other, so we use a QVBoxLayout. First we add our toolbar widget toolbar and then the canvas widget sc to this layout. Finally, we set this layout onto our simple widget layout container which is set as the central widget for the window.
Running the above code will produce the following window layout, showing the plot at the bottom and the controls on top as a toolbar.
 Matplotlib plot with Toolbar
The buttons provided by NavigationToolbar2QT allow the following actions —
- Home, Back/Forward, Pan & Zoom which are used to navigate through the plots. The Back/Forward buttons can step backwards and forwards through navigation steps, for example zooming in and then clicking Back will return to the previous zoom. Home returns to the initial state of the plot.
- Plot margin/position configuration which can adjust the plot within the window.
- Axis/curve style editor, where you can modify plot titles and axes scales, along with setting plot line colours and line styles. The colour selection uses the platform-default colour picker, allowing any available colours to be selected.
- Save, to save the resulting figure as an image (all Matplotlib supported formats).
A few of these configuration settings are shown below.
 Matplotlib figure options
 Matplotlib curves figure options
For more information on navigating and configuring Matplotlib plots, take a look at the official Matplotlib toolbar documentation.
Updating plots
Quite often in applications you'll want to update the data shown in plots, whether in response to input from the user or updated data from an API. There are two ways to update plots in Matplotlib, either
- clearing and redrawing the canvas (simpler, but slower) or,
- by keeping a reference to the plotted line and updating the data.
If performance is important to your app it is recommended you do the latter, but the first is simpler. We start with the simple clear-and-redraw method first below —
Clear and redraw
importsysimportrandomimportmatplotlibmatplotlib.use('Qt5Agg')fromPyQt5importQtCore,QtWidgetsfrommatplotlib.backends.backend_qt5aggimportFigureCanvasQTAggasFigureCanvasfrommatplotlib.figureimportFigureclassMplCanvas(FigureCanvas):def__init__(self,parent=None,width=5,height=4,dpi=100):fig=Figure(figsize=(width,height),dpi=dpi)self.axes=fig.add_subplot(111)super(MplCanvas,self).__init__(fig)classMainWindow(QtWidgets.QMainWindow):def__init__(self,*args,**kwargs):super(MainWindow,self).__init__(*args,**kwargs)self.canvas=MplCanvas(self,width=5,height=4,dpi=100)self.setCentralWidget(self.canvas)n_data=50self.xdata=list(range(n_data))self.ydata=[random.randint(0,10)foriinrange(n_data)]self.update_plot()self.show()# Setup a timer to trigger the redraw by calling update_plot.self.timer=QtCore.QTimer()self.timer.setInterval(100)self.timer.timeout.connect(self.update_plot)self.timer.start()defupdate_plot(self):# Drop off the first y element, append a new one.self.ydata=self.ydata[1:]+[random.randint(0,10)]self.canvas.axes.cla()# Clear the canvas.self.canvas.axes.plot(self.xdata,self.ydata,'r')# Trigger the canvas to update and redraw.self.canvas.draw()app=QtWidgets.QApplication(sys.argv)w=MainWindow()app.exec_()
In this example we've moved the plotting to a update_plot method to keep it self-contained. In this method we take our ydata array and drop off the first value with [1:] then append a new random integer between 0 and 10. This has the effect of scrolling the data to the left.
To redraw we simply call axes.cla() to clear the axes (the entire canvas) and the axes.plot(…) to re-plot the data, including the updated values. The resulting canvas is then redrawn to the widget by calling canvas.draw().
The update_plot method is called every 100 msec using a QTimer. The clear-and-refresh method is fast enough to keep a plot updated at this rate, but as we'll see shortly, falters as the speed increases.

In-place redraw
The changes required to update the plotted lines in-place are fairly minimal, requiring only an addition variable to store and retrieve the reference to the plotted line. The updated MainWindow code is shown below.
classMainWindow(QtWidgets.QMainWindow):def__init__(self,*args,**kwargs):super(MainWindow,self).__init__(*args,**kwargs)self.canvas=MplCanvas(self,width=5,height=4,dpi=100)self.setCentralWidget(self.canvas)n_data=50self.xdata=list(range(n_data))self.ydata=[random.randint(0,10)foriinrange(n_data)]# We need to store a reference to the plotted line # somewhere, so we can apply the new data to it.self._plot_ref=Noneself.update_plot()self.show()# Setup a timer to trigger the redraw by calling update_plot.self.timer=QtCore.QTimer()self.timer.setInterval(100)self.timer.timeout.connect(self.update_plot)self.timer.start()defupdate_plot(self):# Drop off the first y element, append a new one.self.ydata=self.ydata[1:]+[random.randint(0,10)]# Note: we no longer need to clear the axis. ifself._plot_refisNone:# First time we have no plot reference, so do a normal plot.# .plot returns a list of line <reference>s, as we're# only getting one we can take the first element.plot_refs=self.canvas.axes.plot(self.xdata,self.ydata,'r')self._plot_ref=plot_refs[0]else:# We have a reference, we can use it to update the data for that line.self._plot_ref.set_ydata(self.ydata)# Trigger the canvas to update and redraw.self.canvas.draw()
First, we need a variable to hold a reference to the plotted line we want to update, which here we're calling _plot_ref. We initialize self._plot_ref with None so we can check its value later to determine if the line has already been drawn — if the value is still None we have not yet drawn the line.
T> If you were drawing multiple lines you would probably want to use a list or dict data structure to store the multiple references and keep track of which is which.
Finally, we update the ydata data as we did before, rotating it to the left and appending a new random value. Then we either —
- if
self._plotrefisNone(i.e. we have not yet drawn the line) draw the line and store the reference inself._plot_ref, or - update the line in place by calling
self._plot_ref.set_ydata(self.ydata)
We obtain a reference to the plotted when calling .plot. However .plot returns a list (to support cases where a single .plot call can draw more than one line). In our case we're only plotting a single line, so we simply want the first element in that list – a single Line2D object. To get this single value into our variable we can assign to a temporary variable plot_refs and then assign the first element to our self._plot_ref variable.
plot_refs=self.canvas.axes.plot(self.xdata,self.ydata,'r')self._plot_ref=plot_refs[0]
You could also use tuple-unpacking, picking off the first (and only) element in the list with —
self._plot_ref,=self.canvas.axes.plot(self.xdata,self.ydata,'r')
If you run the resulting code, there will be no noticeable difference in performance between this and the previous method at this speed. However if you attempt to update the plot faster (e.g. down to every 10 msec) you'll start to notice that clearing the plot and re-drawing takes longer, and the updates do not keep up with the timer. We can compare the two versions below —
Both using 100 msec timer, clear-and-redraw on the left, update-in-place on the right.

Both using 10 msec timer, clear-and-redraw on the left, update-in-place on the right.

Whether this performance difference is enough to matter in your application depends on what you're building, and should be weighed against the added complication of keeping and managing the references to plotted lines.
Embedding plots from Pandas
Pandas is a Python package focused on working with table (data frames) and series data structures, which is particularly useful for data analysis workflows. It comes with built-in support for plotting with Matplotlib and here we'll take a quick look at how to embed these plots into PyQt5. With this you will be able to start building PyQt5 data-analysis applications built around Pandas.
Pandas plotting functions are directly accessible from the DataFrame objects. The function signature is quite complex, giving a lot of options to control how the plots will be drawn.
DataFrame.plot(x=None,y=None,kind='line',ax=None,subplots=False,sharex=None,sharey=False,layout=None,figsize=None,use_index=True,title=None,grid=None,legend=True,style=None,logx=False,logy=False,loglog=False,xticks=None,yticks=None,xlim=None,ylim=None,rot=None,fontsize=None,colormap=None,table=False,yerr=None,xerr=None,secondary_y=False,sort_columns=False,**kwargs)
The parameter we're most interested in is ax which allows us to pass in our own matplotlib.Axes instance on which Pandas will plot the DataFrame.
importsysimportmatplotlibmatplotlib.use('Qt5Agg')fromPyQt5importQtCore,QtWidgetsfrommatplotlib.backends.backend_qt5aggimportFigureCanvasQTAggfrommatplotlib.figureimportFigureimportpandasaspdclassMplCanvas(FigureCanvasQTAgg):def__init__(self,parent=None,width=5,height=4,dpi=100):fig=Figure(figsize=(width,height),dpi=dpi)self.axes=fig.add_subplot(111)super(MplCanvas,self).__init__(fig)classMainWindow(QtWidgets.QMainWindow):def__init__(self,*args,**kwargs):super(MainWindow,self).__init__(*args,**kwargs)# Create the maptlotlib FigureCanvas object, # which defines a single set of axes as self.axes.sc=MplCanvas(self,width=5,height=4,dpi=100)# Create our pandas DataFrame with some simple# data and headers.df=pd.DataFrame([[0,10],[5,15],[2,20],[15,25],[4,10],],columns=['A','B'])# plot the pandas DataFrame, passing in the # matplotlib Canvas axes.df.plot(ax=sc.axes)self.setCentralWidget(sc)self.show()app=QtWidgets.QApplication(sys.argv)w=MainWindow()app.exec_()
The key step here is passing the canvas axes in when calling the plot method on the DataFrameon the line df.plot(ax=sc.axes). You can use this same pattern to update the plot any time, although bear in mind that Pandas clears and redraws the entire canvas, meaning that it is not ideal for high performance plotting.
The resulting plot generated through Pandas is shown below —
 Pandas plot embedded in PyQt5
Just as before, you can add the Matplotlib toolbar and control support to plots generated using Pandas, allowing you to zoom/pan and modify them live. The following code combines our earlier toolbar example with the Pandas example.
importsysimportmatplotlibmatplotlib.use('Qt5Agg')fromPyQt5importQtCore,QtWidgetsfrommatplotlib.backends.backend_qt5aggimportFigureCanvasQTAggfrommatplotlib.backends.backend_qt5aggimportFigureCanvasQTAgg,NavigationToolbar2QTasNavigationToolbarfrommatplotlib.figureimportFigureimportpandasaspdclassMplCanvas(FigureCanvasQTAgg):def__init__(self,parent=None,width=5,height=4,dpi=100):fig=Figure(figsize=(width,height),dpi=dpi)self.axes=fig.add_subplot(111)super(MplCanvas,self).__init__(fig)classMainWindow(QtWidgets.QMainWindow):def__init__(self,*args,**kwargs):super(MainWindow,self).__init__(*args,**kwargs)# Create the maptlotlib FigureCanvas object, # which defines a single set of axes as self.axes.sc=MplCanvas(self,width=5,height=4,dpi=100)# Create our pandas DataFrame with some simple# data and headers.df=pd.DataFrame([[0,10],[5,15],[2,20],[15,25],[4,10],],columns=['A','B'])# plot the pandas DataFrame, passing in the # matplotlib Canvas axes.df.plot(ax=sc.axes)# Create toolbar, passing canvas as first parament, parent (self, the MainWindow) as second.toolbar=NavigationToolbar(sc,self)layout=QtWidgets.QVBoxLayout()layout.addWidget(toolbar)layout.addWidget(sc)# Create a placeholder widget to hold our toolbar and canvas.widget=QtWidgets.QWidget()widget.setLayout(layout)self.setCentralWidget(widget)self.show()app=QtWidgets.QApplication(sys.argv)w=MainWindow()app.exec_()
Running this you should see the following window, showing a Pandas plot embedded in PyQt5 alongside the Matplotlib toolbar.
 Pandas plot with Matplotlib toolbar
What's next
In this tutorial we looked at how you can embed Matplotlib plots in your PyQt5 applications. Being able to use Matplotlib plots in your applications allows you to create custom data analysis and visualization tools from Python.
Matplotlib is a huge library and too big to cover in detail here. If you're not familiar with Matplotlib plotting and want to give it a try, take a look at the documentation and example plots to see what is possible. If you are familiar with it you should now be able to put those skills to work in your PyQt5 apps!
Artem Rys: “Effective Python” by Brett Slatkin book review
I’d recommend this book to the people who are using Python at least several months and are feeling good with the basics.
Abhijeet Pal: Python Program to Convert Binary Number to Decimal and Vice-Versa
A binary number is a number expressed in the base-2 numeral system or binary numeral system, which uses only two symbols 0 and 1. The decimal numeral system is the standard system for denoting integer and non-integer numbers. All decimal numbers can be converted to equivalent binary values and vice versa for example, the binary equivalent of “2” is “10” to explore more visit binary to decimal converter. In this article, we will create python programs for converting a binary number into decimal and vice versa Convert Binary to Decimal # Taking binary input binary = input("Enter a binary number:") # Calling the function BinaryToDecimal(binary) def BinaryToDecimal(binary): decimal = 0 for digit in binary: decimal = decimal*2 + int(digit) print("The decimal value is:", decimal) Output Enter a binary number:10 The decimal value is: 2 Pythonic way to convert binary into decimal We can use the built-in int() function to convert binary numbers into decimals. The int() function converts the binary string in base 2 number. binary_string = input("Enter a binary number :") try: decimal = int(binary_string,2) print("The decimal value is …
The post Python Program to Convert Binary Number to Decimal and Vice-Versa appeared first on Django Central.
Stack Abuse: String Formatting with Python 3's f-Strings
Introduction
Python 3.6 introduced a new way to format strings: f-Strings. It is faster than other string formatting methods in Python, and they allow us to evaluate Python expressions inside a string.
In this post, we'll look at the various ways we can format strings in Python. Then we'll have a deeper look at f-Strings, looking at how we can use it when displaying different data.
Traditional String Formatting in Python
Before we get into f-Strings, let's have a look at the more "traditional" string formatting options available in Python. If you just want to skip to learning about f-Strings, check out the section String Formatting with f-Strings in this article.
String Concatenation
String concatenation means that we are combining two strings to make a new one. In Python, we typically concatenate strings with the + operator.
In your Python interpreter, let's use concatenation to include a variable in a string:
name = "Python"
print("I like " + name + " very much!")
You would see the following output:
I like Python very much!
String concatenation works only on strings. If you want non-string data to be included, you have to convert it manually.
Let's see by concatenating a number with a string:
age = (10 + 5) * 2
print("You wouldn't believe me, but I am only " + age + " years old")
Running the above you'll see this error:
Traceback (most recent call last):
  File "<stdin>", line 1, in <module>
TypeError: can only concatenate str (not "int") to str
Now, let's convert age to a string:
age = (10 + 5) * 2
print("You wouldn't believe me, but I am only " + str(age) + " years old")
The interpreter would correctly show:
You wouldn't believe me, but I am only 30 years old
This method is not always the quickest for Python to evaluate, nor is it easy for humans to manage with many variables. It's better to use Python's dedicated string formatting methods.
C-Style String Formatting
C-style string formatting, also referred to as the printf style, uses strings as templates that are marked with % so that variables can be substituted.
For example, %d tells Python that we are substituting a number, whereas %s tells Python that we are substituting a string.
There are a few controlling mechanisms available too, for example %02d ensures that the number is at least 2 digits, and if it is not, the rest will be filled by zeros. We can use a marker like %.4f to substitute a decimal with exactly 4 floating points in the string.
In your Python interpreter, type the following code so we can see C-style string formatting in action:
print('Here is an integer %02d' % 4)
print('And a float: %.2f' % 3.141592)
print("And a %s with %d replacements" % ("mess", 2))
Your output should be:
Here is an integer 04
And a float: 3.14
And a mess with 2 replacements
As you could see, with more and more arguments it gets pretty convoluted and hard to follow. So Python takes this one step further and allows you to use dictionaries in % formatting.
Although it isn't much of an improvement in its overall aesthetics, it could help a little bit on the readability front.
Try formatting a C-style string with a dictionary:
print('Using %(dictionary)s format in C-style string formatting, here is %(num)d number to make it more interesting!' % {'dictionary': "named", "num": 1})
As you can see, we can specify the name within parenthesis between the % and the rest of the identifier.
Your interpreter should display:
Using named format in C-style string formatting, here is 1 number to make it more interesting!
If you haven't spent the last 42 years developing in C, the above syntax might not be to your liking. As such, Python gives us another option using the format() method on strings.
Python format() Function
The format() function behaves similarly to the C-style formatting, but it is much more readable. It works by invoking the format() method on your string while providing the replacements in the template within curly brackets - {}.
Using your Python interpreter, we'll use the format() method to format a string. Let's start by substituting one string:
print("This is a first {}".format("attempt!"))
The output will be:
This is a first attempt!
We can use curly brackets multiple times, substituting the variables in order:
print("And {} can add {} string too.".format("we", "more"))
Output:
And we can add more string too.
We can also name the variables we are formatting:
print("String format also supports {dictionary} arguments.".format(dictionary="named"))
The above code should print:
String format also supports named arguments.
While this method is very readable, Python is more efficient with f-Strings, while also being readable. Let's have a look at f-Strings more closely.
String Formatting with f-Strings
F-Strings, or formatted string literals, are prefixed with an f and contain the replacement fields with curly braces. They are evaluated at run-time, which makes them the fastest string formatting option in Python (at least in the standard CPython implementation).
First, verify that you have a Python version that's 3.6 or higher:
$ python3 --version
Python 3.6.0
If your Python version is less than 3.6, you need to upgrade to use this feature.
F-String literals start with an f, followed by any type of strings (i.e. single quotation, double quotation, triple quotation), then you can include your Python expression inside the string, in between curly brackets.
Let's string to use an f-String in your Python shell:
name = "f-String"
print(f"hello {name}!")
And now run it to see the magic:
hello f-String!
It's very similar to using the format() function. However, it comes with a lot of features that are not available with other formatting methods.
Let's have a look at those features, starting with multi-line strings.
Multi-line f-Strings
F-Strings allows for multi-line strings, all you have to do is wrap them in parentheses:
name = "World"
message = (
  f"Hello {name}. "
  "This is from a multi-lined f-string. "
  f"Have a good day, {name}"
)
print(message)
You will see this on printed out:
Hello World. This is from a multi-lined f-string. Have a good day, World
Don't forget to put the f literal in front of lines that have replacements. The substitutions won't work otherwise.
Evaluating Python Expressions in f-Strings
Python's f-Strings allow you to do expressions right in the string itself. The following string is valid:
number = 10
print(f"{number} + 1 = {number+1}")
And outputs:
10 + 1 = 11
You can include any valid expression you want, as long as it doesn't have special characters. For example, we can have function calls:
def func():
  return 42

print(f"func() = {func()}")
This returns:
func() = 42
Formatting Classes with f-Strings
You can include objects created from classes in an f-String. Every class has two different methods that allow an object to be converted to a string:
- The
__str__()method of an object should return a string that is both displayable to the user, and understandable by them. That means it should not have any secret information that should be kept hidden from the user, and it should not have any debug messages. - The
__repr__()method of an object should return a more detailed string, possibly containing debug information.
f-Strings automatically call the __str__() for the object you provide them.
Let's try our f-Strings with a class to see for ourselves. We will create a User class that stores our name and associated database ID that our imaginary system uses.
Create a new file called fstring_classes.py and add the following:
# fstring_classes.py

class User:
    def __init__(self, name, db_id):
        self.name = name
        self.db_id = db_id

    def __str__(self):
        return f"User with name: {self.name}"

my_user = User("Sajjad", 12)
print(f"{my_user}")
In your Terminal, run the file with Python:
$ python fstring_classes.py
This program will show:
User with name: Sajjad
If we wanted to use an f-String with the __repr_() method of an object, you can put an !r in front of your object being substituted.
Edit the fstring_classes.py file and change the last line:
print(f"{my_user}")
Into the following, which includes the !r suffix:
print(f"{my_user!r}")
Now we can run this program again:
$ python fstring_classes.py
And our output will be:
User with name: Sajjad with id 12
Handling Special Characters in f-Strings
F-Strings, like any other Python string, support the use of backslashes to escape characters. All the following are valid Python f-Strings:
print(f'escaping with \\ is also possible, like: \'')
Running this will print:
escaping with \ is also possible, like: '
However, there is one limitation, we cannot use backslashes within the curly braces (the expression part of the f-String). If you try the following in your Python interpreter:
print(f'{ord("\n")}')
You'll get the following error:
  File "<stdin>", line 1
SyntaxError: f-string expression part cannot include a backslash
The same limitation is true for same-type quotation marks. The code below:
a = {"key": "value"}
print(f"the value is {a["key"]}")
Gives us this syntax error:
  File "<stdin>", line 1
    print(f"the value is {a["key"]}")
                               ^
SyntaxError: invalid syntax
To avoid these problems, we can either calculate them outside of the f-String:
ord_newline = ord("\n")
print(f'{ord_newline}')
Which prints:
10
Or we can use different quotation types:
a = {"key": "val"}
print(f"The value is {a['key']}")
Which displays:
The value is val
Conclusion
In this post, we looked at different methods of string formatting in Python, with a focus on the f-String method. In Python, we are spoiled for options as we can concatenate strings, use C-Style formatting with %, or the format() method on strings.
However, with f-Strings, we get a readable solution that Python has optimized for. Aside from its speed benefits, we've seen how well f-Strings work with evaluating expressions and objects from classes.
Matt Layman: Add Styles To Templates - Building SaaS #42
PyCon: Refund policy for Attendees and Financial Aid recipients traveling to PyCon internationally
For All International Travellers to PyCon
- If despite holding a visa you are denied entry upon arrival to the United States, then after you pursue and receive whatever refund your airline might be able to offer, PyCon wants to send you enough money to cover the rest of the cost of your airfare. You will need to document that you indeed arrived in the United States and were denied entry.
- If despite holding a visa you are denied entry upon arrival to the United States, but used our registration page to book a room in a conference hotel, our staff will personally work with the hotel to make sure you do not have to pay a cancellation fee.
- If despite holding a visa you are denied entry upon arrival to the United States, PyCon will fully refund your registration fee. While this is more serious for our conference budget — at such a late date, we will be unlikely to be able to register someone else in your place — we have decided to put the financial safety of our international travelers first.
For International Travellers who are applying for Financial Aid
We have the following policies for recipients of Financial Aid grants.While PyCon’s Financial Aid program does strive to make travel possible for a broader audience than can not comfortably attend the conference on their own budget, it cannot eliminate the risks of travel. Indeed, our mechanism for delivering awarded funds — a disbursement collected at the conference itself — can only succeed for travelers who actually reach PyCon.
With that in mind, let’s review the risks of traveling to PyCon financial aid recipients may encounter, and then learn about the promise that the conference makes for refunds:
- Approved financial aid applicants can ask to have their visa fee reimbursed, even if their visa is denied. See https://us.pycon.org/2020/financial-assistance/faq/#Q6 for a complete list of costs that are covered by PyCon's Financial Aid award. You should apply for your visa, if you decided to attend, right after you receive our response to your Financial Aid application (Jan 31, 2020).
- As you start the visa application process, go ahead and register for the conference. You can do so without risk: we always fully refund a registration fee when a visa application is denied. We even waive our usual $25 fee for processing a cancellation — you receive back the full registration fee that you paid!
- We advise you to delay any non-refundable travel purchases until after you have been granted a visa. Many applicants wait until they have their visa in hand before they even book a hotel room, and almost everyone waits until the visa arrives before purchasing airfare.
- Beyond those guidelines, we have historically provided only the promise that each Financial Aid recipient, if they make it to PyCon, will receive their disbursement. This obviously burdens each applicant with a risk: that if their travel plans go awry and they cannot reach Pittsburgh, that they will receive no Financial Aid. They will have to try cancelling their hotel room in time to receive a refund, and ask their airline if any kind of a refund is possible. With travel risks in mind, we have added the following stipulations to our policy:
- First, if despite holding a visa you are denied entry upon arrival to the United States, then after you pursue and receive whatever refund your airline might be able to offer, PyCon wants to send you enough of your Financial Aid grant to cover the rest of the cost of your airfare (or the whole grant, if the airfare cost more). You will need to document that you indeed arrived in the United States and were denied entry.
- Second: if despite holding a visa you are denied entry upon arrival to the United States, but used our registration page to book a room in a conference hotel, our staff will personally work with the hotel to make sure you do not receive a cancellation fee.
- Third: if despite holding a visa you are denied entry upon arrival to the United States, PyCon will fully refund your registration fee. While this is more serious for our conference budget — at such a late date, we will be unlikely to be able to register someone else in your place — we have decided to put the financial safety of our Financial Aid recipients from overseas first.
In conclusion
We hope that these extra guarantees beyond the normal terms of our refund policy will help attendees plan more confidently and will continue to make PyCon 2020 an option for as many Pythonistas from around the world as possible.- The PyCon Staff and Organizers
IslandT: Create a project to track total sales at different locations with the Python program
In the previous posts, we have gone through a project which will receive the user input and commit those data into the earning table. This program has been further modified to include the plotting of a bar chart to indicate the total sales of various inventories in various locations.
This project has been uploaded to this site, you can download the source code of this project for free through this link. If you like this project, don’t forget to award me with stars on the same project page or share the project page with friends!
Once you have downloaded the files, run the ui.py file and play around with the program.
I am using the Pandas module to plot the graph.
# begin plotting the bar chart
            s = pd.Series(index=label_x, data=label_y)
            s.plot(color="green", kind="bar", title = cc + " Sales for January at " + location)
            plt.show()
 The bar chart of total sales for each inventory
Below are the steps to use the program, under the Shoe Sale and Shirt Sale section, select either the type of shoe or the shirt, then select the amount under earning and select a place under location. Just go ahead and pressed the submit button beside the shoe sale’s Combobox or else pressed the submit button beside the shirt sale’s Combobox to commit the data to the earning table!
 The data we have entered are inside the earning table
In order to display the bar chart, all you need to do is to select the location under the plotting graph section and then pressed either the shoe or the shirt button within that same section.
There are more to come, you can edit the program as you wish to suit your needs. Enjoy!
Erik Marsja: Rename Files in Python: A Guide with Examples using os.rename()
The post Rename Files in Python: A Guide with Examples using os.rename() appeared first on Erik Marsja.
In this post, we are going to work with Python 3 to rename files. Specifically, we will use the Python module os to rename a file and rename multiple files.
First, we will rename a single file in 4 easy steps. After that, we will learn how to rename multiple files using Python 3. To be able to change the name of multiple files using Python can come in handy. For example, if we have a bunch of data files (e.g., .csv files) with long, or strange names, we may want to rename them to make working with them easier later in our projects (e.g., when loading the CSV files into a Pandas dataframe).
 Example of a folder with multiple files
How to Rename a File in Python
For instance, if we have a file called python-rename-files.txt we need to know where we have stored it. There are, of course, different ways to do this. Either, we can place the Python script in the same directory and just run it to rename the file. Here’s a simple example on how to rename a file in Python:
import os
os.rename('python-rename-files.txt', 'renamed-file.txt')
4 Simple Steps to Rename a File in Python
In the first section, we are going to learn how to rename a single file in Python step-by-step. Now, the general procedure is similar when we are using Linux or Windows. However, how we go about in the first step to rename a file in Python may differ depending on which OS we use. In the renaming a file in Python examples below, we will learn how to carry on and changing names both in Linux and Windows.
1. Getting the File Path of the File we Want to Rename With Python
First, to get Python to rename a file Python needs to know where the file is located. That is, step 1 is finding the location of the file we want to change the name on.
That is, if we store our Python scripts (or Jupyter notebooks) in certain directories, we need to tell Python the complete path to the file we want to rename.
Finding the File Path in Windows
If we use Windows, we can open up the File Explorer. First, go to the folder where the file is located (e.g., “Files_To_Rename”) and click on the file path (see image below) It should look something like “C:\Users\erima96\Documents\Files_To_Rename”.
 How to find the Path in Windows
Finding the File Path in Linux
Now, if we are to rename a file, using Python, in Linux we need to know the path. There are, of course, many methods to find the file path in Linux. One method is to open up a Terminal Window and use the readlink and xclip command-line applications:
readlink -f FILE_AND PATH | xclip -iFor instance, if the file we want to rename with Python is located in the folder “/home/jhf/Documents/Files_To_Rename/python-rename-files.txt” this is how we would do it:
 Copying a file path using command-line tools
2. Copy the Path of the File to Rename
Second, we copy the path of the file we want to rename. Note, this is as simple as just right-clicking on the path we already have marked:
 Copy the file path
3. Importing the os Module
Third, we need to import a Python module called os. Luckily, this is very easy and we just type: import os. In the next step, we will actually rename a file using Python!
4. Renaming the File
Finally, we are ready to change the name of the file using the os module from Python. As the file path can be long we will create a string variable, fist, and then rename the file using os.rename. Here’s how to rename a file using Python:os.rename(PATH_TO_THE_FILE, PATH_TO_THE_NEW_FILE)
Changing a Name of a File in Windows
Here’s a full code example, for Windows users, on how to change the name of a file using Python:
import os
file_path = 'C:\\Users\\erima96\\Documents\\Files_To_Rename\\'
os.rename(file_path + 'renamed-file.txt',
          file_path + 'python-rename-files.txt')
Note, how we added an extra ”\” to each subfolder (and at the end). In the os.rename method we also added the file_path to both the file we want to rename and the new file name (the string variable with the path to the file) and added the file name using ‘+’. If we don’t do this the file will also be moved to the folder of the Python script. If we run the above code, we can see that we have successfully renamed the file using Python:
 Renamed file
Renaming a File in Linux
Here’s how to rename the file in Linux. Note, the file path will be a bit different (as we saw earlier when we found the file path):
import os
file_path = '/home/jhf/Documents/Files_To_Rename/python-rename-files.txt'
os.rename(file_path + 'renamed-file.txt',
          file_path + 'python-rename-files.txt')
Now that we have learned how to rename a file in Python we are going to continue with an example in which we change the name of multiple files. As previously mentioned, renaming multiple files can come in handy if we have many files that need new names.
How to Rename Multiple Files in Python
In this section, we are going to learn how to rename multiple files in Python. There are, of course, several ways to do this. One method could be to create a Python list with all the file names that we want to change. However, if we have many files this is not an optimal way to change the name of multiple files. Thus, we are going to use another method from the os module; listdir. Furthermore, we will also use the filter method from the module called fnmatch.
The first step, before renaming the files, is to create a list of all text files in a folder (e.g., in the subfolder “Many_Files”). Note, that we have added the subfolder to the file_path string.
import os, fnmatch

file_path = 'C:\\Users\\erima96\\Documents\\Files_To_Rename\\Many_Files\\'

files_to_rename = fnmatch.filter(os.listdir(file_path), '*.txt')

print(files_to_rename)
Next, we are going to loop through each file name and rename them. In the example below, we are using the file_path string, from the code chunk above, because this is where the files are located. If we were to have the files we want to rename in a different folder, we’d change file_path to that folder. Furthermore, we are creating a new file name (e.g., new_name = ‘new_file’) and we use the enumerate method to give them a unique name. For example, the file ‘euupbihlaqgk.txt’ will be renamed ‘Datafile1.txt’.
code class="lang-py">new_name = 'Datafile'

for i, file_name in enumerate(files_to_rename):
    new_file_name = new_name + str(i) + '.txt'

    os.rename(file_path + file_name,
          file_path + new_file_name)
As can be seen in the rename a file in Python example above, we also used the str() method to change the data type of the integer variable called i to a string.
Remember, if we were using Linux we’d have to change the file_path so that it will find the files we want to rename.
Renaming Multiple Files by Replacing Characters in the File Name
Now, sometimes we have files that we want to replace certain characters from. In this final example, we are going to use the replace method to replace underscores (“_”) from file names. This, of course, means that we need to rename the files.
 Files with underscores
code class="lang-py">import os, fnmatch

file_path = 'C:\\Users\\erima96\\Documents\\Files_To_Rename\\Many_Files\\'

files_to_rename = fnmatch.filter(os.listdir(file_path), '*.txt')

for file_name in files_to_rename:
    os.rename(file_path + file_name,
          file_path + file_name.replace(' ', '-'))
Now, in the code above we have successfully replaced the “_” from the filenames using replace and then we renamed the files. Again, remember if we were to rename files in Linux the file_path string need be changed (e.g. ” “).
 Underscores replaced
Conclusion: Renaming Files in Python
In this post, we have learned how to rename a single file, as well as multiple files, using Python. This was accomplished using the os and fnmatch modules. Finally, we learned how to replace underscores (and rename) files using Python.
The post Rename Files in Python: A Guide with Examples using os.rename() appeared first on Erik Marsja.
Peter Bengtsson: How to pad/fill a string by a variable in Python using f-strings
I often find myself Googling for this. Always a little bit embarrassed that I can't remember the incantation (syntax).
Suppose you have a string mystr that you want to fill with with spaces so it's 10 characters wide:
>>>mystr='peter'>>>mystr.ljust(10)'peter '>>>mystr.rjust(10)' peter'Now, with "f-strings" you do:
>>>mystr='peter'>>>f'{mystr:<10}''peter '>>>f'{mystr:>10}'' peter'What also trips me up is, suppose that the number 10 is variable. I.e. it's not hardcoded into the f-string but a variable from somewhere else. Here's how you do it:
>>>width=10>>>f'{mystr:<{width}}''peter '>>>f'{mystr:>{width}}'' peter'What I haven't figured out yet, is how you specify a different character than a simple single whitespace. I.e. does anybody know how to do this, but with f-strings:
>>>width=10>>>mystr.ljust(width,'*')'peter*****'Abhijeet Pal: Python Program to Convert Octal Number to Decimal and vice-versa
The octal numeral system, or oct for short, is the base-8 number system and uses the digits 0 to 7. The main characteristic of an Octal Numbering System is that there are only 8 distinct counting digits from 0 to 7 with each digit having a weight or value of just 8 starting from the least significant bit (LSB). In the decimal number system, each digit represents the different power of 10 making them base-10 number system. Problem definition Create a python program to convert an octal number into a decimal number. Algorithm for octal to decimal conversion Take an octal number as input. Multiply each digit of the octal number starting from the last with the powers of 8 respectively. Add all the multiplied digits. The total sum gives the decimal number. Program num = input("Enter an octal number :") OctalToDecimal(int(num)) def OctalToDecimal(num): decimal_value = 0 base = 1 while (num): last_digit = num % 10 num = int(num / 10) decimal_value += last_digit * base base = base * 8 print("The decimal value is :",decimal_value) Output Enter an octal number :24 The …
The post Python Program to Convert Octal Number to Decimal and vice-versa appeared first on Django Central.
Stack Abuse: Using SQLAlchemy with Flask and PostgreSQL
Introduction
Databases are a crucial part of modern applications since they store the data used to power them. Generally, we use the Structured Query Language (SQL) to perform queries on the database and manipulate the data inside of it. Though initially done via dedicated SQL tools, we've quickly moved to using SQL from within applications to perform queries.
Naturally, as time passed, Object Relational Mappers (ORMs) came to be - which enable us to safely, easily and conveniently connect to our database programmatically without needing to actually run queries to manipulate the data.
One such ORM is SQLAlchemy. In this post, we will delve deeper into ORMs and specifically SQLAlchemy, then use it to build a database-driven web application using the Flask framework.
What is an ORM and why use it?
Object-relational mapping, as the name suggests, maps objects to relational entities. In object-oriented programming languages, objects aren't that different from relational entities - they have certain fields/attributes that can be mapped interchangeably.
That being said, as it's fairly easy to map an object to a database, the reverse is also very simple. This eases the process of developing software and reduces the chances of making manual mistakes when writing plain SQL code.
Another advantage of using ORMs is that they help us write code that adheres to the DRY (Don't Repeat Yourself) principles by allowing us to use our models to manipulate data instead of writing SQL code every time we need to access the database.
ORMs abstract databases from our application, enabling us to use multiple or switch databases with ease. Say, if we used SQL in our application to connect to a MySQL database, we would need to modify our code if we were to switch to an MSSQL database since they differ in syntax.
If our SQL was integrated at multiple points in our application, this will prove to be quite the hassle. Through an ORM, the changes we would need to make would be limited to just changing a couple of configuration parameters.
Even though ORMs make our life easier by abstracting the database operations, we need to be careful to not forget what is happening under the hood as this will also guide how we use ORMs. We also need to be familiar with ORMs and learn them in order to use them more efficiently and this introduces a bit of a learning curve.
SQLAlchemy ORM
SQLAlchemy is an ORM written in Python to give developers the power and flexibility of SQL, without the hassle of really using it.
SQLAlchemy wraps around the Python Database API (Python DBAPI) which ships with Python and was created to facilitate the interaction between Python modules and databases.
The DBAPI was created to establish consistency and portability when it came to database management though we will not need to interact with it directly as SQLAlchemy will be our point of contact.
It is also important to note that the SQLAlchemy ORM is built on top of SQLAlchemy Core - which handles the DBAPI integration and implements SQL. In other words, SQLAlchemy Core provides the means to generate SQL queries.
While SQLAlchemy ORM makes our applications database-agnostic, it is important to note that specific databases will require specific drivers to connect to them. One good example is Pyscopg which is a PostgreSQL implementation of the DBAPI which when used in conjunction with SQLAlchemy allows us to interact with Postgres databases.
For MySQL databases, the PyMySQL library offers the DBAPI implementation require to interact with them.
SQLAlchemy can also be used with Oracle and the Microsoft SQL Server. Some big names in the industry that rely on SQLAlchemy include Reddit, Yelp, DropBox and Survey Monkey.
Having introduced the ORM, let us build a simple Flask API that interacts with a Postgres database.
Flask with SQLAlchemy
Flask is a lightweight micro-framework that is used to build minimal web applications and through third-party libraries, we can tap into its flexibility to build robust and feature-rich web applications.
In our case, we will build a simple RESTful API and use the Flask-SQLAlchemy extension to connect our API to a Postgres database.
Prerequisites
We will use PostgreSQL (also known as Postgres) to store our data that will be handled and manipulated by our API.
To interact with our Postgres database, we can use the command line or clients that come equipped with graphical user interfaces making them easier to use and much faster to navigate.
For Mac OS, I recommend using Postico which is quite simple and intuitive and provides a clean user interface.
PgAdmin is another excellent client that supports all major operating systems and even provides a Dockerized version.
We will use these clients to create the database and also view the data during the development and execution of our application.
With the installations out of the way, let us create our environment and install the dependencies we will need for our application:
$ virtualenv --python=python3 env --no-site-packages
$ source env/bin/activate
$ pip install psycopg2-binary
$ pip install flask-sqlalchemy
$ pip install Flask-Migrate
The above commands will create and activate a virtualenv, install the Psycopg2 driver, install flask-sqlalchemy, and install Flask-Migrate to handle database migrations.
Flask-Migrate uses Alembic, which is a light database migration tool that helps us interact with our database in a much clearer way by helping us create and recreate databases, move data into and across databases, and identify the state of our database.
In our case, we will not have to recreate the database or tables every time our application starts and will do that automatically for us in case neither exists.
Implementation
We will build a simple API to handle and manipulate information about cars. The data will be stored in a PostgreSQL database and through the API we will perform CRUD operations.
First, we have to create the cars_api database using our PostgreSQL client of choice:

With the database in place, let's connect to it. We'll start by bootstrapping our Flask API in the apps.py file:
from flask import Flask

app = Flask(__name__)

@app.route('/')
def hello():
    return {"hello": "world"}

if __name__ == '__main__':
    app.run(debug=True)
We start by creating a Flask application and a single endpoint that returns a JSON object.
For our demo, we will be using Flask-SQLAlchemy which is an extension specifically meant to add SQLAlchemy functionality to Flask applications.
Let us now integrate Flask-SQLAlchemy and Flask-Migrate into our app.py and create a model that will define the data about our cars that we will store:
# Previous imports remain...
from flask_sqlalchemy import SQLAlchemy
from flask_migrate import Migrate

app = Flask(__name__)
app.config['SQLALCHEMY_DATABASE_URI'] = "postgresql://postgres:postgres@localhost:5432/cars_api"
db = SQLAlchemy(app)
migrate = Migrate(app, db)

class CarsModel(db.Model):
    __tablename__ = 'cars'

    id = db.Column(db.Integer, primary_key=True)
    name = db.Column(db.String())
    model = db.Column(db.String())
    doors = db.Column(db.Integer())

    def __init__(self, name, model, doors):
        self.name = name
        self.model = model
        self.doors = doors

    def __repr__(self):
        return f"<Car {self.name}>"
After importing flask_sqlalchemy, we start by adding the database URI to our application's config. This URI contains our credentials, the server address, and the database that we will use for our application.
We then create a Flask-SQLAlchemy instance called db and used for all our database interactions. The Flask-Migrate instance, called migrate, is created after that and will be used to handle the migrations for our project.
The CarsModel is the model class that will be used to define and manipulate our data. The attributes of the class represent the fields we want to store in the database.
We define the name of the table by using the __tablename__ alongside the columns containing our data.
Flask ships with a command line interface and dedicated commands. For instance, to start our application, we use the command flask run. To tap into this script, we just need to define an environment variable that specifies the script that hosts our Flask application:
$ export FLASK_APP=app.py
$ flask run
 * Serving Flask app "app.py" (lazy loading)
 * Environment: development
 * Debug mode: on
 * Running on http://127.0.0.1:5000/ (Press CTRL+C to quit)
 * Restarting with stat
 * Debugger is active!
 * Debugger PIN: 172-503-577
With our model in place, and Flask-Migrate integrated, let's use it to create the cars table in our database:
$ flask db init
$ flask db migrate
$ flask db upgrade
We start by initializing the database and enabling migrations. The generated migrations are just scripts that define the operations to be undertaken on our database. Since this is the first time, the script will just generate the cars table with columns as specified in our model.
The flask db upgrade command executes the migration and creates our table:

In case we add, delete, or change any columns, we can always execute the migrate and upgrade commands to reflect these changes in our database too.
Creating and Reading Entities
With the database in place and connected to our app, all that's left is to implement the CRUD operations. Let's start off with creating a car, as well as retrieving all currently existing ones:
# Imports and CarsModel truncated

@app.route('/cars', methods=['POST', 'GET'])
def handle_cars():
    if request.method == 'POST':
        if request.is_json:
            data = request.get_json()
            new_car = CarsModel(name=data['name'], model=data['model'], doors=data['doors'])
            db.session.add(new_car)
            db.session.commit()
            return {"message": f"car {new_car.name} has been created successfully."}
        else:
            return {"error": "The request payload is not in JSON format"}

    elif request.method == 'GET':
        cars = CarsModel.query.all()
        results = [
            {
                "name": car.name,
                "model": car.model,
                "doors": car.doors
            } for car in cars]

        return {"count": len(results), "cars": results}
We begin by defining a /cars route which accepts both GET and POST requests. The GET request will return a list of all cars stored in our database while the POST method will receive a car's data in JSON format and populate our database with the information provided.
To create a new car, we use the CarsModel class and provide the information required to fill in the columns for our cars table. After creating a CarsModel object, we create a database session and add our car to it.
To save our car to the database, we commit the session through db.session.commit() which closes the DB transaction and saves our car.
Let's try adding a car using a tool like Postman:

The response message notifies us that our car has been created and saved in the database:

You can see that there is now a record of the car in our database.
With the cars saved in our database, the GET request will help us fetch all the records. We query all the cars stored in our database by using the CarsModel.query.all() function, which is provided by Flask-SQLAlchemy.
This returns a list of CarsModel objects, which we then format and add to a list using a list comprehension and pass it to the response alongside the number of cars in our database. When we request for the list of cars through the API in Postman:
The GET method on the /cars endpoint returns the list of cars as they appear in our database, as well as the total count.
Note: Notice how there's not a single SQL query present in the code. SQLAlchemy takes care of that for us.
Updating and Deleting Entities
So far, we can create a single car and get a list of all cars stored in the database. To complete the set of CRUD operations on cars in our API, we need to add functionality to return the details, modify, and delete a single car.
The HTTP methods/verbs that we will use to achieve this will be GET, PUT, and DELETE, which will be brought together in a single method called handle_car():
# Imports, Car Model, handle_cars() method all truncated

@app.route('/cars/<car_id>', methods=['GET', 'PUT', 'DELETE'])
def handle_car(car_id):
    car = CarsModel.query.get_or_404(car_id)

    if request.method == 'GET':
        response = {
            "name": car.name,
            "model": car.model,
            "doors": car.doors
        }
        return {"message": "success", "car": response}

    elif request.method == 'PUT':
        data = request.get_json()
        car.name = data['name']
        car.model = data['model']
        car.doors = data['doors']
        db.session.add(car)
        db.session.commit()
        return {"message": f"car {car.name} successfully updated"}

    elif request.method == 'DELETE':
        db.session.delete(car)
        db.session.commit()
        return {"message": f"Car {car.name} successfully deleted."}
Our method handle_car() receives the car_id from the URL and gets the car object as it is stored in our database. If the request method is GET, the car details will be simply returned:

To update the details of our car, we use the PUT method and not PATCH. Both methods can be used to update the details, however, the PUT method accepts an updated version of our resource and replaces the one that we have stored in the database.
The PATCH method simply modifies the one we have in our database without replacing it. Therefore, to update a CarsModel record in our database, we have to supply all the attributes of our car including the ones to be updated.
We use the details to modify our car object and commit these changes using db.session.commit() and then return a response to the user:

Our car has been successfully updated.
Lastly, to delete a car, we send a DELETE request to the same endpoint. With the CarsModel object already queried, all we will need to do is use the current session to delete it by executing db.session.delete(car) and committing our transaction to reflect our changes on the database:

Conclusion
Real life applications are not as simple as ours and usually handle data that is related and spread across multiple tables.
SQLAlchemy allows us to define relationships and manipulate related data as well. More information on handling relationships can be found in the official Flask-SQLAlchemy documentation.
Our application can easily be extended to accommodate relationships and even more tables. We can also connect to multiple databases using Binds. More information on Binds can be found in the Binds documentation page.
In this post we have introduced ORMs and specifically the SQLAlchemy ORM. Using Flask and Flask-SQLAlchemy, we have created a simple API that exposes and handles data about cars as stored in a local PostgreSQL database.
The source code for the project in this post can be found on GitHub.
Abhijeet Pal: Python Program To Reverse a Sentence
Problem Definition Create a python program to reverse a sentence. Algorithm Take a string as input. Convert the sentence into a list of words. Join the list in the reverse order which ultimately is the reversed sentence. Program sentence = "dread it run from it destiny still arrives" word_list = sentence.split() reversed_list = word_list[:: -1] reversed_sentence = "".join(reversed_list) print(reversed_sentence) Output arrives still destiny it from run it dread This program can be further be compressed. sentence = "dread it run from it destiny still arrives" print("".join(sentence.split()[::-1])) Output arrives still destiny it from run it dread Python lists can be reversed using the reversed() method, which can be used in place of list[ : : -1] in the program as follows. sentence = "dread it run from it destiny still arrives" word_list = sentence.split() reversed_list = reversed(word_list) reversed_sentence = "".join(reversed_list) print(reversed_sentence) Program for user-provided input sentence = input("Enter a sentence :") print("".join(reversed(sentence.split()))) Output Enter a sentence :This is an input input an is This
The post Python Program To Reverse a Sentence appeared first on Django Central.
PythonClub - A Brazilian collaborative blog about Python: Criando um CI de uma aplicação Django usando Github Actions
Fala pessoal, tudo bom?
Nos vídeo abaixo vou mostrar como podemos configurar um CI de uma aplicação Django usando Github Actions.
