Quantcast
Channel: Planet Python
Viewing all 22411 articles
Browse latest View live

Philippe Normand: HTML overlays with GstWPE, the demo


Roberto Alsina: Episodio 18: ¡Python más rápido que C!

Codementor: Test-Driven Development with PyTest - Part 2

$
0
0
Part two of the test-driven development series on the use of PyTest to create test cases with it.

Ned Batchelder: Coverage 5.0 beta 2

$
0
0

I mean it this time, coverage.py 5.0 is nearly ready. I’m putting out coverage.py 5.0 beta 2 for a week before declaring it really done. Please try it.

Everything I said in the beta 1 announcement still holds: please try the new things!

Thanks.

Andre Roberge: pydeps: a very useful program

$
0
0
A few weeks ago, I was doing some refactoring of Friendly-traceback and had some minor difficulty in avoiding the creation of circular imports.  For some reason (age perhaps), I could not visualize the file structure properly.  Enter pydeps.  After I used it to generate a graph for all the files internal to Friendly-traceback, I was able to use that graph to figure out a better way to structure my program.

Today, as I stared at that graph, after including it in the newly styled documentation, I noticed that the "version" file I had created early on, was really redundant since its content (a single variable) could easily be incorporated in the Public API file.


So, one less file to deal with!

I think I am going to use pydeps a lot more from now on when I want to try to understand the how projects are structured, as I do find this type of graph very useful.

Podcast.__init__: Debugging Python Projects With PySnooper

$
0
0
Debugging is a painful but necessary practice in software development. The tools that are available in Python range from the built-in debugger, to tools integrated with your coding environment, to the trusty print function. In this episode Ram Rachum describes his work on PySnooper and how it can be used to speed up your problem solving in complex or legacy applications.

Summary

Debugging is a painful but necessary practice in software development. The tools that are available in Python range from the built-in debugger, to tools integrated with your coding environment, to the trusty print function. In this episode Ram Rachum describes his work on PySnooper and how it can be used to speed up your problem solving in complex or legacy applications.

Announcements

  • Hello and welcome to Podcast.__init__, the podcast about Python and the people who make it great.
  • When you’re ready to launch your next app or want to try a project you hear about on the show, you’ll need somewhere to deploy it, so take a look at our friends over at Linode. With 200 Gbit/s private networking, scalable shared block storage, node balancers, and a 40 Gbit/s public network, all controlled by a brand new API you’ve got everything you need to scale up. And for your tasks that need fast computation, such as training machine learning models, or running your build servers, they just launched dedicated CPU instances. Go to pythonpodcast.com/linode to get a $20 credit and launch a new server in under a minute. And don’t forget to thank them for their continued support of this show!
  • You listen to this show to learn and stay up to date with the ways that Python is being used, including the latest in machine learning and data analysis. For even more opportunities to meet, listen, and learn from your peers you don’t want to miss out on this year’s conference season. We have partnered with organizations such as O’Reilly Media and the Python Software Foundation. Upcoming events include the Software Architecture Conference in NYC and PyCon US in Pittsburgh. Go to pythonpodcast.com/conferences to learn more about these and other events, and take advantage of our partner discounts to save money when you register today.
  • Your host as usual is Tobias Macey and today I’m interviewing Ram Rachum about PySnooper, an alternative approach to debugging your python projects

Interview

  • Introductions
  • How did you get introduced to Python?
  • How do developers normally debug their code, and what need does PySnooper address that isn’t addressed by the established methods?
  • What is the workflow for using PySnooper for investigating or debugging a project? (This will probably be answered in the answer to the question above)
  • What are some of the pieces of information that it surfaces and how do they aid the developer in directing their investigation?
  • What were some of the projects that you were testing it with and how did they influence the direction that you took PySnooper?
  • Can you describe how PySnooper is implemented and some of the ways that it has evolved since you first began working on it?
  • What are some of the initial goals that you had for the project which you have since abandoned as either not useful or too challenging to implement?
  • What are some of the edge cases or technical challenges that you have encountered while working on PySnooper, either in Python itself or in the tool?
  • There is another project called Snoop which builds on top of your work on PySnooper to add some extra functionality and developer ergonomics. What, if anything, was your reaction to it and how has it influenced your work on PySnooper?
  • One of the notable aspects of your work on PySnooper is the amount of attention that it garnered shortly after you published it. How has that visibility affected the long-term popularity and use of PySnooper?
  • What have been some of the most interesting, unexpected, or difficult aspects of creating, maintaining, and promoting PySnooper?
  • What do you have planned for the future of the project?

Keep In Touch

Picks

Links

Mike Driscoll: PyDev of the Week: Sebastian Steins

$
0
0

This week we welcome Sebastian Steins (@sebastiansteins) as our PyDev of the Week! Sebastian is the creator of the Pythonic News website. You can find out more about Sebastian by checking out what he’s been up to over on Github. Let’s take a few moments to get to know him better!

Sebastian Steins

Can you tell us a little about yourself (hobbies, education, etc):

I am a software developer from Germany and live close to the Dutch and Belgian border. The internet emerged when I was in school. I have always been fascinated by computers and wanted to learn to program. Unfortunately, this was not so easy at the time, and I did not have teachers who could have supported me in that matter. It changed, however, when I got my first modem. The internet opened a whole new world for me, and I started to learn HTML, Perl and later, PHP. I built CGI scripts and small web apps back then, and it was really fun. Eventually, I took programming as my career path, although I sometimes struggled with that decision. Besides my degree in computer science, I also heard lectures on economics and had a few positions in the finance sector early in my career. Now, I enjoy coaching teams of great software engineers in architecture matters and try to pass my knowledge to junior devs.

When I’m not in front of a computer, I like to ride my road bike, learn new stuff from audiobooks and would never say no to a night out in a good restaurant.

Why did you start using Python?

I started using Python when I needed a replacement for PHP, so it was very early on. It was in the very early days of the Python 2.0 release. I immediately liked it, because it was basically like writing pseudocode. This is what I still love about being able to “talk to a computer”: Expressing ideas and see results very quickly. Meanwhile, other languages have kept up and are equally expressive as Python. However, Python has become a little bit of my home base ever since.

What other programming languages do you know and which is your favorite?

I worked in different projects with many different programming languages like Java, C#, C and JavaScript.

What projects are you working on now?

I am working as a freelance consultant in software engineering. Besides that, I teach introductory courses over at smartninja.de. Recently I started a small project called Pythonic News, which is basically a Hacker News clone for the Python community.

Which Python libraries are your favorite (core or 3rd party)?

There are so many great libraries in the Python ecosystem. This is another point which makes programming in Python so enjoyable. Most of these libraries are very Pythonic in a way that ideas can be expressed very concisely. I really like the Django framework, but there are also smaller packages like requests which I use quite frequently.

Bigger ones, such as numpy and pandas really proves that Python is so versatile that there is hardly a problem which cannot be solved with it.

What is the origin of your Pythonic News site?

I’ve built the https://news.python.sc site as a Django project. During the creation, I tried to use as many features of the Django framework as possible. This is because I created it initially as an example app for a Python training and wanted to showcase different ways of achieving things. This is also why not everything in the codebase can be considered as best practise. The goal was to show what could be done with Django, including downsides of particular approaches. For example, I used model inheritance on the core database objects which certainly is not the best choice performance-wise.

What have you learned creating the project?

Just for fun, I posted the project to Reddit and Hacker News. I got so much positive feedback that I wanted to see how it did before it was even complete. I learned that there are still places on the web which feel like the “good old days”. People just like to talk about the topics they care about. The early-2000s esthetics of the site turned out to be a good fit for the audience. There was not a single issue with spam or offensive behaviour. There still is “an internet” which is happening outside the walled gardens of the big tech companies.

This made me very happy!

Furthermore, I saw strangers reacted on GitHub in a way I would never have expected. That made me think that I will create a make-of tutorial series from that project to teach more people about Python. I will publish it on my site when it’s ready.

Do you have any words of wisdom for other content creators?

Just start and let the world know about your ideas and your creation. Even if it’s not perfect, you’ll find people that care. If it’s a Python project you created, of course, you can submit it to the “Show PN” section of Pythonic News.

Thanks for doing the interview, Sebastian!

The post PyDev of the Week: Sebastian Steins appeared first on The Mouse Vs. The Python.

Erik Marsja: Learn all About Installing & Updating Packages in Python

$
0
0

The post Learn all About Installing & Updating Packages in Python appeared first on Erik Marsja.

In this tutorial, we will learn the basics of installing, working and updating packages in Python. First, we will learn how to install Python packages, then how to use them, and finally, how to update Python packages when needed. More specifically, we are going to learn how to install and upgrade packages using pip, conda, and Anaconda Navigator.

Now, before we are going to learn how to install Python packages we are going to answer the question “what is a package in Python?”

What is meant by packages in Python?

Python packages are collection of modules. More specifically, a package typically contains Python functions, methods, and sometimes data, that are packaged in a well-defined format. When we install a package, it gives us access to a set of functions or methods that are not available in the base Python

Installing Packages in Python

There are several methods that enables us to install Python packages. As previously mentioned, here we will learn how to install Python packages using pip, conda paccondakage manager, and Anaconda Navigator. Note, if using conda package manager or Anaconda Navigator we need to have the Python distribution Anaconda installed.

How to install a Python Package using pip.

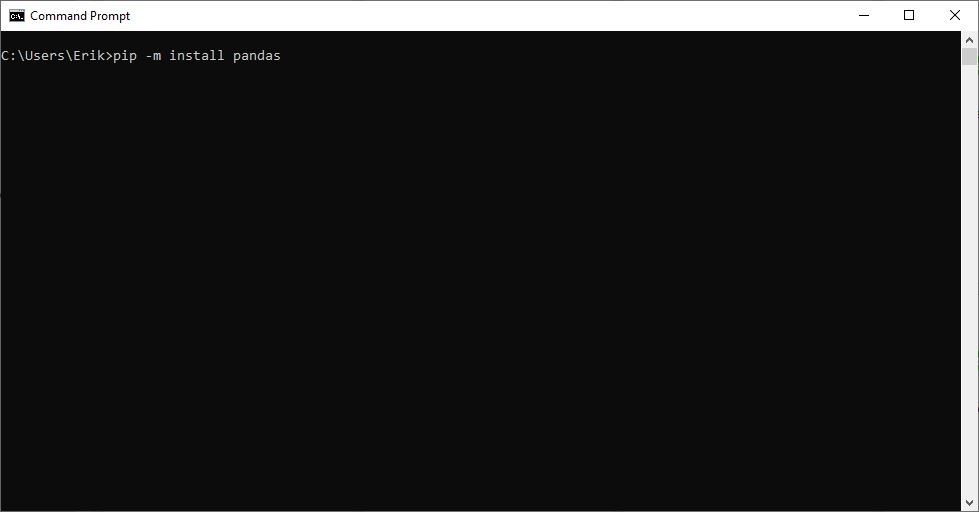
First, we are going to learn how to install Pandas using pip. It’s quite easy! If we are using Windows we start up the Command Prompt. Note, this is done by pressing the Windows icon in the left lower corner (or on your keyboard) and typing “Command Prompt”.

When we have the command prompt started we type the following code and press enter: pip -m install pandas.

how to install a Python package using PipInstall using Pip

If we want to install multiple Python packages on the same time, we just add them after the first:

pip -m install pandas matplotlib seaborn

How to install a Python Package using conda

Second, we are going to learn how to install a Python package using conda. This is also very easy. First, we start up the Anaconda prompt. As in the example above, we press the Windows icon but this time we type “Anaconda Prompt” and hit enter. In the Anaconda prompt, we type conda install -c anaconda pandas.

Note, here we can choose which repository we want to install the Python packages from. In the example above, we used the anaconda repository. However, if we want to use another repo we can of course do this. For instance, if we want to use conda-forge, the community-led repo, to install Python packages we type the following command:

conda install -c conda-forge pandas

How to install a Python Package using Anaconda Navigator

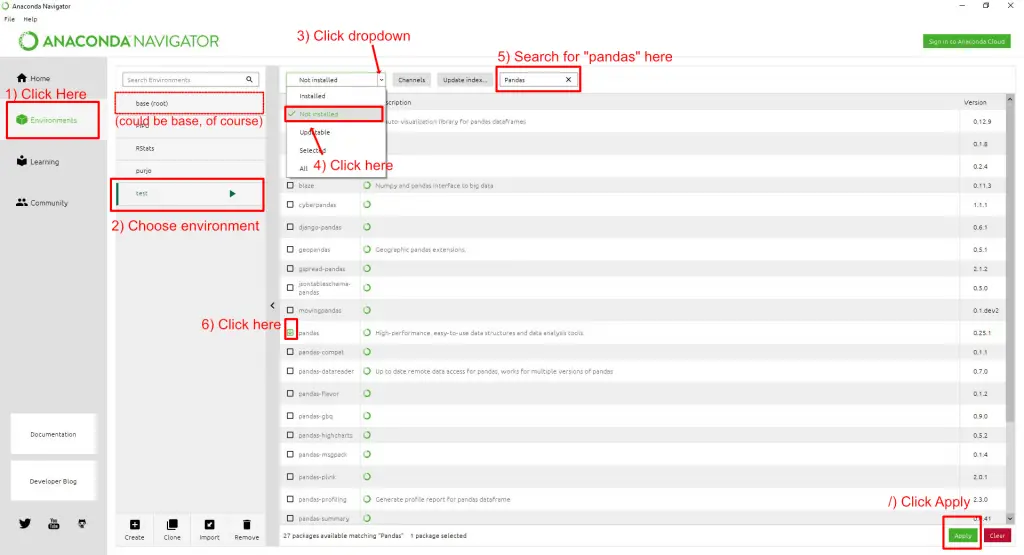
Finally, we are gong to learn installing Python packages using the Anaconda Navigator. To start Anaconda Navigator, we need to have Anaconda installed (see above) and we press the windows icon, down to the left. Here we type, “Anaconda Navigator” and press enter (or click on the app).  Basically, there are 7 steps to install a Python package using Anaconda Navigator.

7 Steps to Installing a Python Package in Anaconda Navigator

  1. With the Anaconda Navigator started, press “Environments”.
  2. Select your environment, create a new one, or just leave it as it is (base environment)
  3. Click on the dropdown menu
  4. Click on “Not Installed”
  5. Search for Pandas and hit enter,
  6. Click on the check icon, when Pandas is found
  7. Click “Apply” in the bottom right corner

Bonus: Installing Python Packages in a Virtual Environment

Now, as a bonus, we will learn how to create a environment, using conda, and install Python packages in this environment. First, we start up the Anaconda Prompt.

Creating a Python Environment using conda

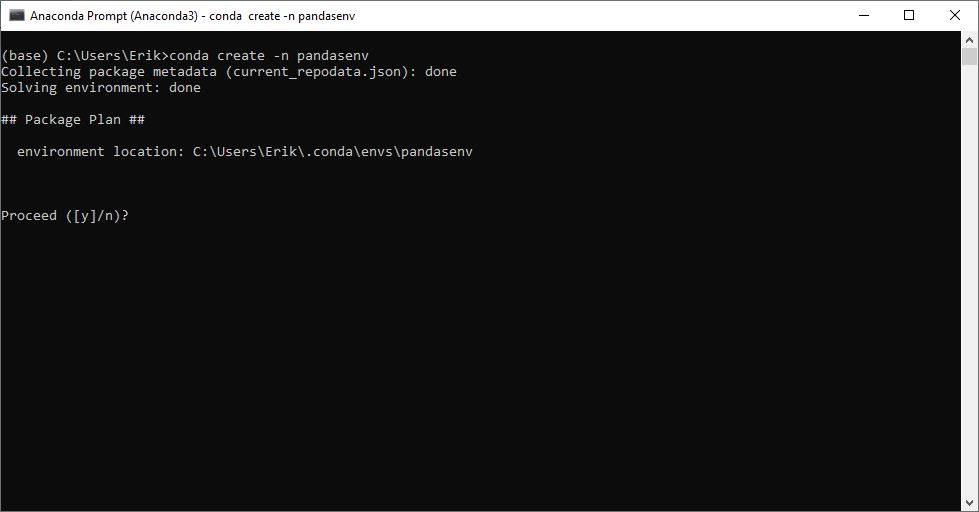
Now, that we have the Anaconda Prompt we can continue to create a Python environment. Creating a Python environment is easy when we are using conda. We just type the following command:

conda create -n pandasenv
Creating a Python Environment

Note, “pandasenv” is the name of the Python environment. If we want our Python environment to have any other name we just change this to the name we want.

Activating the Python Environment

Next, we need to activate the environment. Now, we just type conda activate pandasenvto activate our Python environment.

Installing a Python package in a Python Environment

Of course, installing Python packages, using conda, in an environment is not any different than using conda to install Python packages in the base environment. We just type conda install -c anaconda pandas.

Note, however, if we can also install multiple Python packages when creating the environment. For instance, we may want to install Pandas, matplotlib, seaborn, and statsmodels. In this case, what we will do, is just type conda create -n pandasenv pandas matplotlib seaborn statsmodels

How to use a Python Package

Once a Python package is installed (basically the functions, methods, and so on, are downloaded to your computer), we need to “call” the package into the current session of Python. This is essentially like saying, “Hey Python, we will be using these functions and methods now, please have them ready to go”. Note, that we have to do this ever time we start a new Python script or session, so this should be at the top of our script.

When we want to call a package, use import <packagename> or often we follow some kind of convertion and type import <packagename> as <abbrevation> For instance, after we have installed Pandas we can start up our favorite Python IDE or a Jupyter Notebook. In the beginning of the script, we type import pandas as pd in the top of the script.

Importing multiple Python packages

What Python Packages are Installed Now?

If we ever are curious on what Python packages that we have installed on our computers, we can, of course, check this. In this section, we are going to learn how to list all the installed Python packages using pip and conda.

List all Installed Python Packages using pip

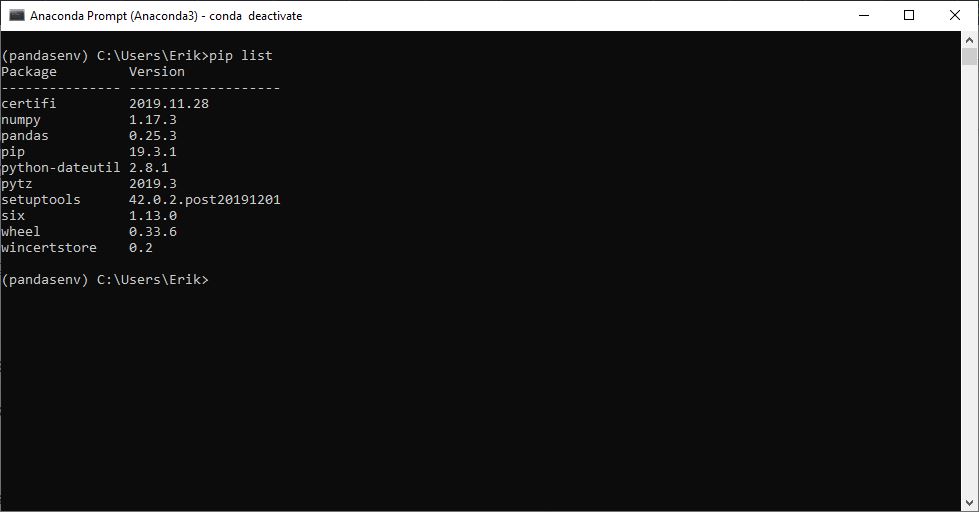
Here, we are going to use pip to list all the installed Python packages. Note, in the example here, we use pip in a Python environment and there are not many packages installed. If we have a lot more packages installed, the result will, of course, look different. Here’s one way to get all the installed Python packages using pip:

pip list
See all installed Python packages

See all Installed Python Packages using conda

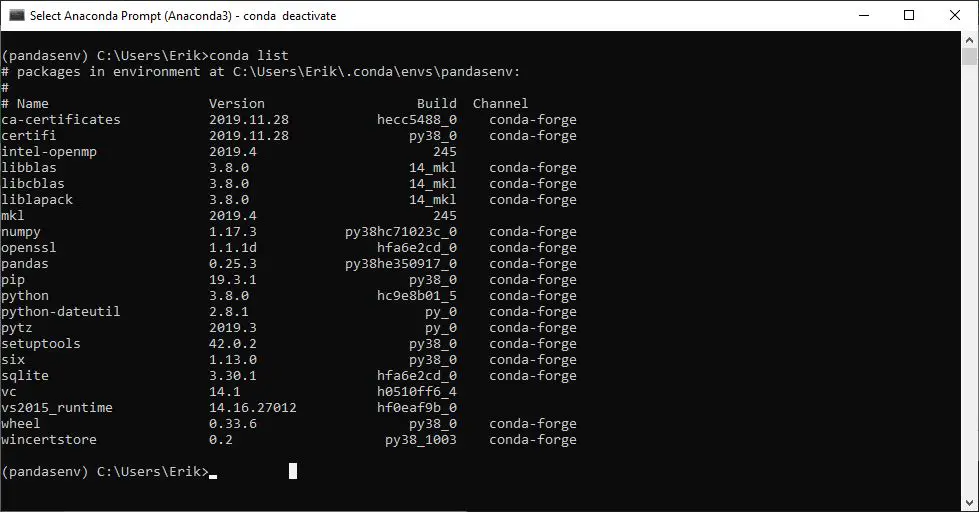
In this subsection, we are going to use conda to see all the Python packages we have installed. This is very simple. We just type conda list.

List all installed Python packages

If we have Anaconda installed, we can also check out the Environments tab. Here we can check what Python packages we have installed in our different environments. We just leave the dropdown on “Installed” and we can scroll down to see all the installed packages.  

Updating Python Packages

In this section, we are going to learn how to update Python packages using pip and conda. This comes in handy as sometimes packages are updated by the users who created them. Updating packages can sometimes make changes to both the package and also to how your code runs. Before we update a Python package, we need to make sure we know what any changes is new and how potentially may affect our code. That is, if we have a lot of Python code, upgrading a Python package may completely change the behavior, or functionality, of our code.

Conda: Updating Python Packages

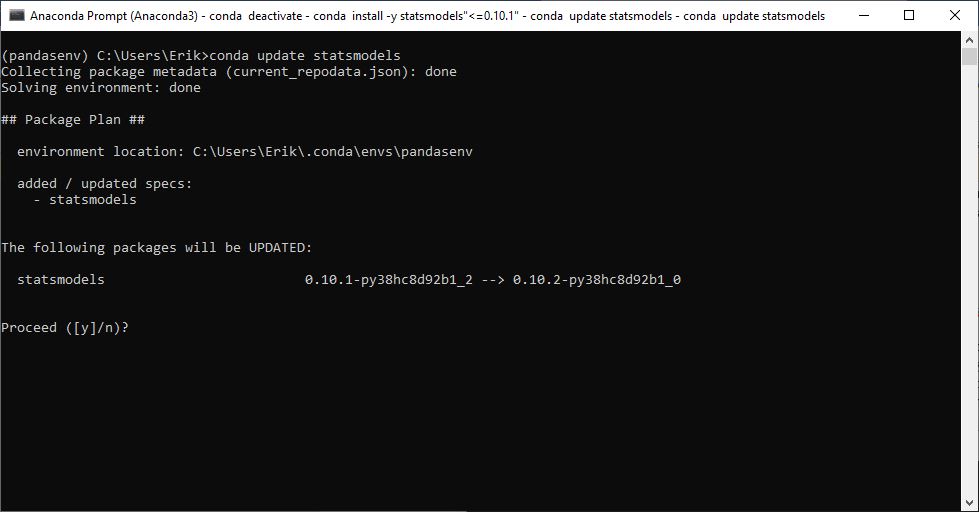
If we have Anaconda installed, we can update a Python package using conda. More specifically, we use the command conda update <packagename>. For instance, if we need to update the Python package statmmodels, we type conda update statsmodels.

Upgrading statsmodels

Updating all Python Packages using conda

If we want to update ALL installed Python packages, we remove the package name and add the “—all” argument:

conda update --all

Upgrading Python Packages using Pip

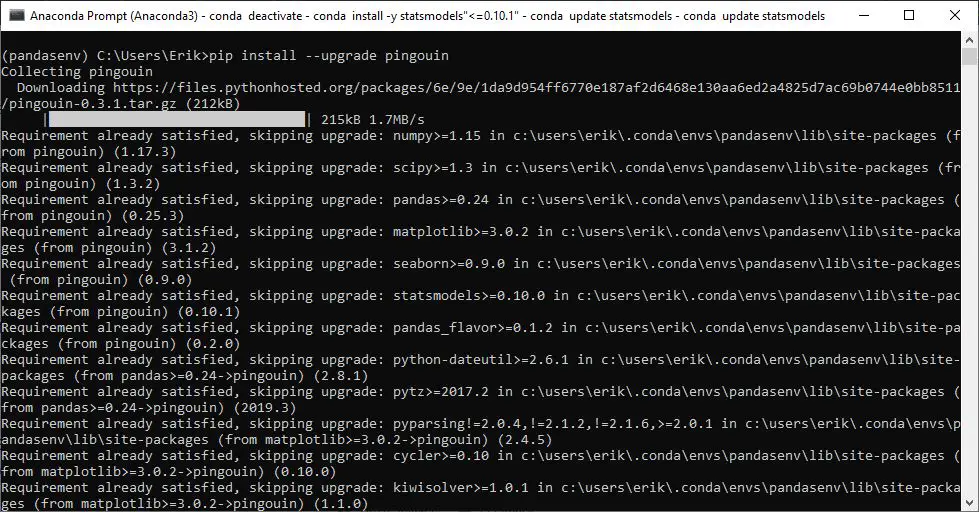
Finally, we are gong to learn how to update packages using pip. It is also very simple. When we need to update a Python package using pip we just type pip install –upgrade and we will upgrade this package. For example, if we want to upgrade the Python package pingouin we type pip –upgrade pingouin.

Sometimes, of course, pip gets an update and we may want to update pip. This can be done, using pip itself, the conda package manager, and the Anaconda Navigator. See more about this in the post 3 easy methods to update pip.

Conclusion:

In this post, we have learned how to install Python packages, how to use them, and how to upgrade Python packages.

Similar Posts:

The post Learn all About Installing & Updating Packages in Python appeared first on Erik Marsja.


Stack Abuse: Creating Command Line Utilities with Python's argparse

$
0
0

Introduction

Most of the user-facing software comes with a visually pleasing interface or via a decorated webpage. At other times, a program can be so small that it does not warrant an entire graphical user interface or web application to expose its functionality to the end-user.

In these cases, we can build programs that are accessible via a Command Line Interface, or CLI.

In this post, we will explore Python's argparse module and use it to build a simple command-line tool to help us shorten URLs swiftly.

Command Line Interface

A Command Line Interface is a text-based user interface that provides a means of interacting with a computer through textual commands. The program that facilitates this interaction by exposing the interface is known as a command-line interpreter or a shell.

It takes in commands in the form of text input, executes programs based on the input provided, then displays the output on the interface. There are many shells available, with the first popular ones being the Bourne shell and C shell for Unix-based systems. The Bourne Again Shell (aka bash) is a hugely popular extension of the Bourne Shell, alongside the Korn Shell (ksh).

It is also worth noting that CLIs, like other software, require user accounts to work with them. The system enforces permissions on these users to help control the level of access and limit of what a user can achieve with the system. This distinction is required since the shell is an interface between the user and the operating system kernel that controls all computer operations. Access to this functionality needs to be restricted to prevent malicious use of the command-line interface.

CLIs offer a prompt, which is usually a dollar sign ($) that indicates that you can enter your command. However, this prompt also indicates that the command entered will be performed without root access.

When root access is granted to the current user interacting with the CLI, the prompt changes to a hash sign (#).

While Graphical User Interfaces (GUIs) are easier to learn and more visually intuitive, CLIs allow users to interact with software using only a keyboard, which can result in faster performance. CLIs also use up fewer computer resources as compared to GUIs, making them lighter and faster.

Scripting

Most command-line interpreters ship with some basic commands that can all be invoked through the command-line interface to perform specific tasks. Some common ones include:

  • uptime: Indicates how long the computer has been on
  • date: Returns the current date and time
  • ls: Returns a list of all the files and folders in a directory
  • cd: Used to move from one directory to another
  • pwd: Used to show the current working directory
  • man: Used to show the manual or instructions of any command
  • touch: Used to create new, empty files
  • mkdir: Used to create new directories

A shell script is a program designed to be executed by a command-line interpreter. It contains a series of commands, like the ones listed above, coupled with variables and conditions instructing the shell on what task or tasks to undertake.

Through shell scripts, a user can perform multiple commands in quick succession without the need to remember them all. They are mostly used to achieve repetitive operations without the repetitive entry of commands, therefore, reducing the effort required by the end-user.

We can write shell scripts that consist of the shell commands to be executed, but also, we can execute other high-level languages, such as Python and JavaScript.

What is argparse?

A Python shell script is just a normal Python program that is executed by the command-line interpreter. When executing a shell script, arguments are passed into our script through sys.argv. This variable is a list of the arguments passed to our program, including the script name, which is also the first argument.

Normally, we can write a simple script that does not require any extra arguments, like a simple script to display the current date. This will, however, limit the functionality we can offer. To make our scripts more versatile and widen the scope of their usage, we have to facilitate customization through arguments that give the user more control and options in terms of functionality.

The argparse module helps us parse the arguments passed with our script and process them in a more convenient way. It also adds customization features such as naming our program and adding descriptions in a simpler way.

argparse also provides a means for us to customize the usage instructions for our script and indicate which arguments are required and which are optional. To explore all these features and more, we'll build our own Python CLI utility in the next section.

Demo Application

Currently if we want to shorten a URL, we will need to fire up a browser and navigate to a URL shortening site in order to do the task. Our goal is to accelerate and enhance this URL shortening process through a script that we can fire up anytime on our terminal. We will only have to pass the URLs we need to shorten as arguments and receive the shortened URLs in response.

For this demo, we'll use Shorte.st as our provider since its API is simple and straightforward.

After creating an account, we can head over to the Link Tools section and select Developers API. Here we will find our access token and the URL which our script will use to shorten our URLs.

Once the user provides a URL to our command line utility to be shortened, we will send the URL to the Shorte.st API endpoint along with our access token. The response will be our shortened URL and a status message.

Let us start by creating a virtual environment and installing the requests module, which we'll use to send HTTP requests to the API:

$ mkdir pyshortener && cd pyshortener
$ virtualenv --python=python3 env --no-site-packages
$ source env/bin/activate
$ pip install requests

In the first line above we have actually combined two commands in one using the double ampersand (&&). This allows us to execute the commands in sequence, unless the first command fails, which then prevents the second command from being executed.

After creating our virtual environment and activating it, we then install our Python dependency.

For this demo we will first build our shortening function and then wrap its functionality using argparse into the final script:

import requests
from requests.exceptions import ConnectionError
import json

def shorten_url(url):
    try:
        response = requests.put("https://api.shorte.st/v1/data/url",
                                {"urlToShorten": url},
                                headers={"public-api-token": "[MY-API-TOKEN]"})

        api_response = json.loads(response.content)

        return {"status": api_response['status'],
                "shortenedUrl": api_response['shortenedUrl'],
                "message": "URL shortened successfully"}

    except ConnectionError:
        return {"status": "error",
                "shortenedUrl": None,
                "message": "Please ensure you are connected to the internet and try again."}

shorten_url(www.stackabuse.com)

Our function takes in a URL and sends it to the Shorte.st API and returns the shortened URL. Let's shorten www.stackabuse.com by executing our script:

$ python pyshortener.py
{'status': 'ok', 'shortenedUrl': 'http://gestyy.com/w6ph2J', 'message': 'URL shortened successfully'}

As we can see, our function works but the output is less than ideal. We also have to hardcode the URL in the script itself, which gives us a fixed input and output.

We are going to take this a step further and allow users to pass in the URL as an argument when they execute the script. In order to do this we will now introduce argparse to help us parse the arguments provided by the user:

import requests
from requests.exceptions import ConnectionError
import json
import argparse # Add the argparse import

def shorten_url(url):
    # Code stays the same...

# Create a parser
parser = argparse.ArgumentParser(description='Shorten URLs on the terminal')

# Add argument
parser.add_argument('--url', default="google.com", help="The URL to be shortened")
args = vars(parser.parse_args())
print(args)

In this version of the script, we don't call shorten_url, but instead just print out the arguments captured and parsed by argparse.

We start by creating an ArgumentParser object using argparse, which will hold all the info required to transform the arguments passed into Python data types we can work with.

After creating the parser, we can now add arguments using parser.add_argument(). This function allows to specify the following information about our arguments:

  • The first argument is a name or a flag used to identify our arguments. Optional arguments are identified by the - prefix, in our case --url is an optional argument.
  • The default option allows to specify a default value when the user has not provided the argument.
  • The help option briefly describes what the argument is.
  • We can also use the choice option to specify allowable values for an argument, such as yes and no.
  • Through a type option we can also specify the type to which our command will be converted to, for instance converting arguments into integers.

When we run our script without providing any arguments, the URL defaults to "google.com", just like we've set in the add_argument method:

$ python pyshortener.py
{'url': 'google.com'}

Now when we pass www.stackabuse.com using the --url flag, it is set as the value to the url key:

$ python pyshortener.py --url www.stackabuse.com
{'url': 'www.stackabuse.com'}

We can now receive a user's URL via the command line and shorten it by modifying our script:

if args.get('url'):
   print(shorten_url(args['url']))

When we run it and pass a URL we should then receive the output from the Shorte.st API:

$ python pyshortener.py --url stackabuse.com
{'status': 'ok', 'shortenedUrl': 'http://gestyy.com/w6pk2R', 'message': 'URL shortened successfully'}

Although our output is not as friendly as we'd want it too, so let us create a function to format our output in a more desirable manner:

def handle_output(result):
   """ Function to format and print the output
   """
   if result["status"] == "ok":
       print(f"{result['message']}. Your shortened URL is:\n"
             f"\t{result['shortenedUrl']}")
   elif result["status"] == "error":
       print(f"{result['message']}")

# Receive and process the argument
args = vars(parser.parse_args())

if args.get('url'):
   result = shorten_url(args['url'])
   handle_output(result)

When we run our script one more time:

$ python pyshortener.py --url www.stackabuse.com
URL shortened successfully. Your shortened URL is:
        http://gestyy.com/w6pk2R

Our output is now more user-friendly due to the addition of the handle_output() function. To see how argparse has generated the help text for our script, we can execute our script with the -h flag to display the help text as follows:

$ python pyshortener.py -h
usage: pyshortener.py [-h] [--url URL]

Shorten URLs on the terminal

optional arguments:
  -h, --help  show this help message and exit
  --url URL   The URL to be shortened

Conclusion

We have built a shell script using Python to help us shorten URLs quickly on the terminal. We have used the argparse module to parse the arguments that are passed into our script and even defined a default value in case the argument is provided.

Our script now also has a beautiful help message that can be displayed using the -h flag which was generated by the argparse module meaning we did not have to write it down manually.

The next step would be to enhance our script to accept a list of URLs or read URLs from a text file to facilitate batch shortening of URLs.

The source code for the script in this project can be found here on Github.

Real Python: MicroPython: An Intro to Programming Hardware in Python

$
0
0

Are you interested in the Internet of Things, home automation, and connected devices? Have you ever wondered what it would be like to build a blaster, a laser sword, or even your own robot? If so, then you’re in luck! MicroPython can help you do all of those things and more.

In this tutorial, you’ll learn about:

  • The history of MicroPython
  • The differences between MicroPython and other programming languages
  • The hardware you’ll use to build devices
  • The process to set up, code, and deploy your own MicroPython project

Free Bonus:5 Thoughts On Python Mastery, a free course for Python developers that shows you the roadmap and the mindset you'll need to take your Python skills to the next level.

Everything’s Coming Up Python

Python’s popularity has skyrocketed in recent years. These days, it’s used everywhere from DevOps to statistical analysis, and even in desktop software. But for a long time, there was one field where Python use was conspicuously missing. Developers working with microcontrollers had not yet adopted the language.

All of that changed in 2013 when Damien George launched a Kickstarter campaign. Damien, an undergraduate at Cambridge University, was an avid robot programmer. He wanted to move the Python world from machines that worked with capacities in the gigabytes down to the kilobytes. His Kickstarter campaign was an attempt to back his development while he turned his proof of concept into a finished implementation.

Many developers jumped at the chance, not only to use Python on microcontrollers but also to get an early version of Damien’s own reference hardware, which was built especially for the task! In fact, by the end of the campaign, Damien had blown past his £15,000 goal. Thanks to over 1,900 backers, he reached just shy of £100,000.

Python Beyond the Desktop

Finally, Python had moved off of desktops and servers and into the world of sensors, actuators, motors, LCD displays, buttons, and circuits. While this presented many challenges, there were also copious opportunities. Desktop and server hardware requires gigahertz processors, gigabytes of RAM, and terabytes of storage. They also need fully-fledged operating systems, device drivers, and true multitasking.

In the microcontroller world, however, MicroPython is the operating system. Essentially, it sits on top of the processors with clock speeds harking back to the 1980s and 90s. MicroPython has no help to deal with all the intricacies of code execution, IO, storage, booting, and so on. If you want to interface with hardware, then you need all code to enable that.

Yet somehow, Damien managed to squeeze a powerful, high-performing, compact Python implementation down into these miniature computers. That opened up a whole new world of potential. If you’re interested to learn more about the differences between CPython and MicroPython, then you can check out a full breakdown on the official GitHub repo.

Electronics as a Hobby and a Career Path

MicroPython is supported by a diverse community of Pythonistas who have a deep interest in seeing the project succeed. Along with testing and supporting the codebase itself, developers contribute tutorials, code libraries, and hardware ports, taking the project far beyond what Damien could have achieved alone.

Over the years, MicroPython has attracted professionals and hobbyists from other platforms who see the potential and convenience of the language. These developers may have come from more mature platforms, like Arduino or PIC. Many came to realize the benefits of using MicroPython, as well as specifying Python and MicroPython together, not least for rapid prototyping and faster time-to-market.

So, is MicroPython ready for serious, mission-critical work? ESA, the European Space Agency, seems to think so! They helped fund Damien’s work on MicroPython because they wanted to use Python in space. You’ll increasingly see a critical mass of hobbyists and learners move into academia, and from there into the professional world of electronics. At that point, MicroPython will truly take off.

Python and STEM

STEM subjects have been under the education microscope for several years, which has led to an explosion of projects and products targeting the classroom. Python and MicroPython are both well-placed for teachers and students alike. The basic syntax and bundled interpreter lend these languages to an effective learning environment. The fact that no development environment is required is only an added bonus!

A few years ago, the BBC launched its Micro:Bit project to get more kids into computing beyond office-style applications. Their goal was to get a microcontroller board into the hands of every school student in the UK. Damien, through his neighbor, acquired one of these boards and quickly got his code running. Thousands of classrooms suddenly had the option to run Python in their lessons!

Most recently, Edublocks has taken the Micro:Bit and enabled a Scratch-like drag-and-drop Python experience. This allowed even more kids to experience microcontrollers and robotics programming for the first time. Patreon donations support the project’s continued growth.

Physical Computing

When it comes to MicroPython, what does physical computing mean? Usually, your project will consist of three elements:

  1. Input: A button, signal, internet event, or sensor reading takes in data.
  2. Processing: A microcontroller processes the input and updates the output.
  3. Output: This can be sent in the form of a motor spinning, an LED lighting up, a counter changing, a message sending, or some similar event.

These elements will usually be connected by wires and powered by some power source.

What Is a Microcontroller?

You may know that a microcontroller is small and not as powerful as the computer on your desktop or in your server rack. What you may not know is that microcontrollers are all around you, adding intelligence and control to your devices. They’re embedded in everything from appliances and home security setups to pacemakers, to HVAC systems and more.

Microcontrollers do relatively simple things day after day, reliably, and in a compact package. They compress a CPU, memory, and IO into one general-purpose chip, rather than requiring a whole board of chips that team up to perform a task. The code that they run is called firmware, which is flashed or burned onto writeable memory before executing.

While those who grew up with early microcomputers (like the ZX81 and Commodore Vic20) may find these chips unbelievably powerful, technically, you have way more power available in your smartwatch. Still, microcontrollers are extremely useful, even if their processing power and memory capabilities are limited. A great deal can be done with these little guys!

Why MicroPython?

If these microcontrollers were proliferating long before MicroPython was dreamed of, then what benefits does MicroPython afford you over traditional practices?

First, the language is more accessible to beginners than competing languages, while still being powerful enough for industrial use cases. You can go from learning the basics to doing real work, and quickly.

Second, Python allows for rapid feedback. This is because you can interactively enter commands and get a response using the REPL. You could even tweak your code and run it right away, rather than iterating through code-compile-upload-execute cycles.

Last, the wealth of Python code and experience out there means that you can do some things more quickly and easily as a Python programmer. I find the Python requests library, string handling, and tools for dealing with JSON much easier to use in the MicroPython world than C++, for example.

What About C++?

C++ is fast, compact, and available everywhere. There are tons of C++ programmers out there, and a rich community of Arduino and PIC developers ready to help you. Isn’t C++, therefore, a better choice?

In my opinion, MicroPython beats C++ in ease of use and convenience. C++ syntax is not as easy to understand right away. What’s more, the code needs to be compiled and then transferred to your board before you can get a result, so you need a compiler handy.

Now, obviously, the tools are getting better, but MicroPython still has the advantage. While C++ may have a speed advantage, MicroPython is fast enough for most purposes. Besides, if you really need C++, then you can even call your C++ code from MicroPython!

What About Assembler?

For raw performance, there is no beating Assembler. However, that doesn’t rule out MicroPython either.

Again, MicroPython tends to be plenty fast enough. If you do need that lowest-level power, then you can add inline assemblers to your MicroPython projects.

What About BASIC?

If you were to switch on one of those old microcomputers from back in the day, then they would almost certainly have booted into BASIC. At the very least, they would have had a dialect of BASIC on hand. This language served as an introduction to programming for a whole generation. This includes Elon Musk, who apparently learned to code on a Vic 20.

Today, the shine of BASIC has dulled somewhat. Python and other block-based languages have replaced it in educational spaces, and it hardly makes a dent in the tech industry. Python has all the advantages of BASIC, with none of the limitations.

What About Raspberry Pi?

Raspberry Pi, which runs Python, is also heavily present in education. It’s found a niche in electronics and physical computing thanks to its general-purpose IO pins. The Raspberry Pi is also a fully-fledged general-purpose Linux desktop computer. It has lots of processor power, memory, and storage capacity, and it even has a GPU.

However, that last aspect can actually be a reason not to choose the Pi and go for a microcontroller board instead! The ability to run desktop applications and multimedia is fantastic, especially when your projects might need that raw power. This might be the case for AI, video streams, and database projects, for example.

But this can cause problems when your use case requires real-time processing. If you need very precise timing, then you don’t want your code to wait while it catches up with dozens of different processes that all want to execute at the same time.

If you want analog input, then the Pi would require additional hardware. In contrast, most microcontrollers capable of running MicroPython have at least one analog input, and maybe even more. In addition, the Pi is not quite as robust, and it can be more expensive. Because of this, it might make more financial sense to leave a microcontroller in your project, rather than a whole Pi.

You don’t have to choose one or the other. Perhaps pairing a Raspberry Pi with a microcontroller is the best solution for your project. For instance, you could use the Pi for processing power and the microcontroller to interface with hardware.

MicroPython Hardware

If you’re interested in giving MicroPython a try, then that’s great! You’ll need some compatible hardware to install MicroPython onto. Fortunately, there are many options, ranging from affordable to premium products. There’s something for every wallet and use case, so take some time to choose the solution that’s right for you.

Built for Python

The Kickstarter that kicked off MicroPython also launched its associated hardware. The MicroPython Pyboard is now up to v1.1.

The Pyboard is one of the most well-specified boards. It’s based on the STM32 and has lots of GPIO. There’s also an SD slot, an accelerometer, and RTC, with a capability of 168 MHzf. If you can find it in stock, then it’ll cost you around $40 USD.

ESP8266 or ESP32

At the other end of the price scale are boards based on the ESP8266. These boards only have one analog input, and there aren’t as many pins as the Pyboard. However, they do have WiFi capability. You can find them in breadboard-friendly boards (such as the NodeMCU) for $10 or less.

The ESP32 is the big brother to the ESP8266. It increases the power and capabilities while adding Bluetooth to the feature set, for a small additional cost. One of the best versions of these boards is the M5 Stack. This unit comes with a peizo speaker, a battery, a card reader, and a color screen.

BBC Micro:Bit

The Micro:Bit is a compact board based around the Nordic nRF51822 microcontroller. It has built-in Bluetooth LE and temperature sensing, plus an accelerometer, a couple of action buttons, and a 5x5 LED grid.

If you’re in the UK, then you might already have one of these boards. They were distributed to schoolchildren in the hopes of inspiring a new generation of coders. Lots of boards inspired by the Micro:Bit are beginning to appear, so it’s bound to increase in popularity!

Adafruit and CircuitPython-Powered Boards

Soon after MicroPython started picking up the pace, Adafruit produced a fork they call CircuitPython. However, there are a few main differences between the two.

One is that CircuitPython offers support for the Adafruit range of hardware. Another difference is the fact that most Adafruit implementations feature the board appearing as a USB-connected drive. In these cases, adding your code is as simple as dragging it to the disk.

The most feature-rich board of the Adafruit premium line-up is the CircuitPlayground Express, with an optional Crickit add-on. When you combine these two boards, you’ll have pins, sensors, motor drivers, RGB LEDs, and more. If you’re looking for an all-in-one solution, then this is the one to check out.

Unfortunately, Adafruit has dropped compatibility with the ESP8266, even for their own ESP8266-based Feather board. Instead, they’ve chosen to go with the ESP32 purely as a WiFi co-processor in future releases.

MicroPython Workflow

If you’re familiar with Arduino or PIC programming, then you might expect to talk first about compilers, development environments, and the toolchain. However, MicroPython is a little different at first glance.

REPL

With MicroPython, as with Python, the language may have come with your hardware, and you have the option of working with it interactively. There are two ways to get an interactive session:

  1. Use a serial terminal connection: This is often done through the command line, or perhaps an IDE.
  2. Use the WebREPL: This is an option for boards with WiFi.

To get a serial REPL on a Mac, for example, you can run the included terminal program Screen and specify your device and the baud rate:

$ screen /dev/tty.wchusbserial1430 115200

You can find your device by listing the attached serial connections:

$ ls /dev/tty.*

The process is similar to what you would do in the Linux terminal.

On Windows, PuTTY is a popular terminal app. There’s also one called Tera Term. Either way, simply connect to the COM port that appears when you attach your device and select 115,200 as your baud rate.

Once you have a REPL connection, you can enter commands just like you would from your Python interactive session. In MicroPython, this interface is also where you might want to do simple OS-style work, such as deleting files or creating folders.

Command-Line Tools

Dave Hyland’s RShell is a well-featured toolset for working with your MicroPython projects.

There’s another great command-line tool for interacting with MicroPython boards called Ampy. This was initially developed by Adafruit but has now been taken on by a community member, since Adafruit is focusing solely on their own hardware.

MicroPython IDEs

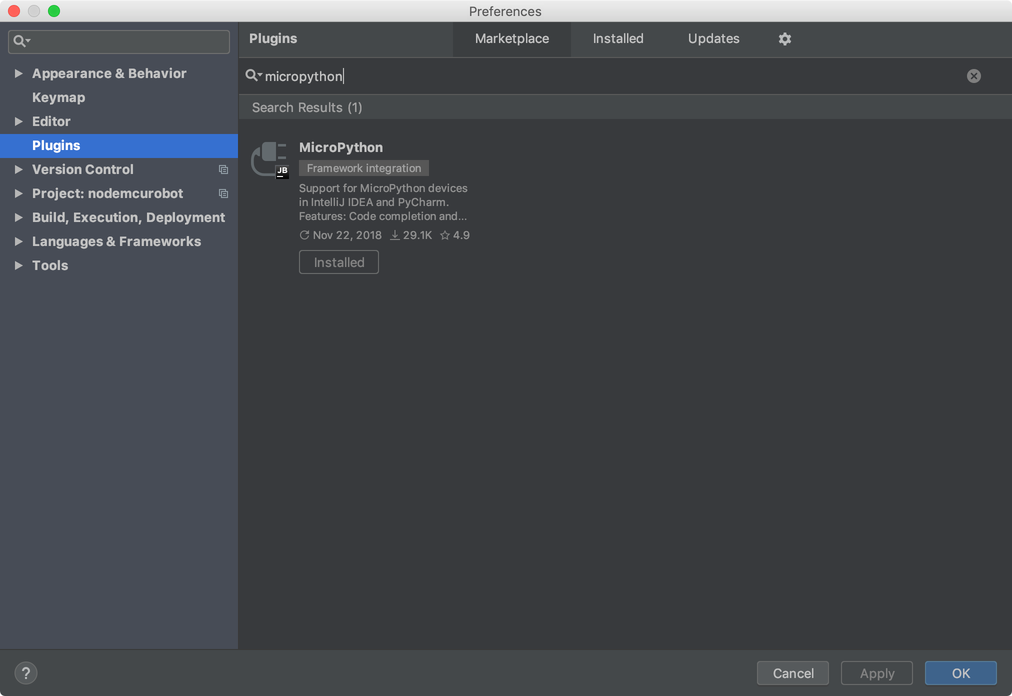
There’s a PyCharm plugin that adds MicroPython support to your IDE. It’s available right in the plugin marketplace:

MicroPython Pycharm

For the Micro:Bit and CircuitPython boards, the best editor right now is the Mu Editor from Nicholas Tollervey. Otherwise, keep an eye on uPyCraft, which looks to have a lot of promise and is already pretty useful.

Once you have connected the correct serial port and selected your device type, you’ll be able to browse the device:

MicroPython Serial Connection

Your device type will either be ESP8266, ESP32, or Micro:Bit. Now you can interact in the REPL!

Setting Up MicroPython on Your Board

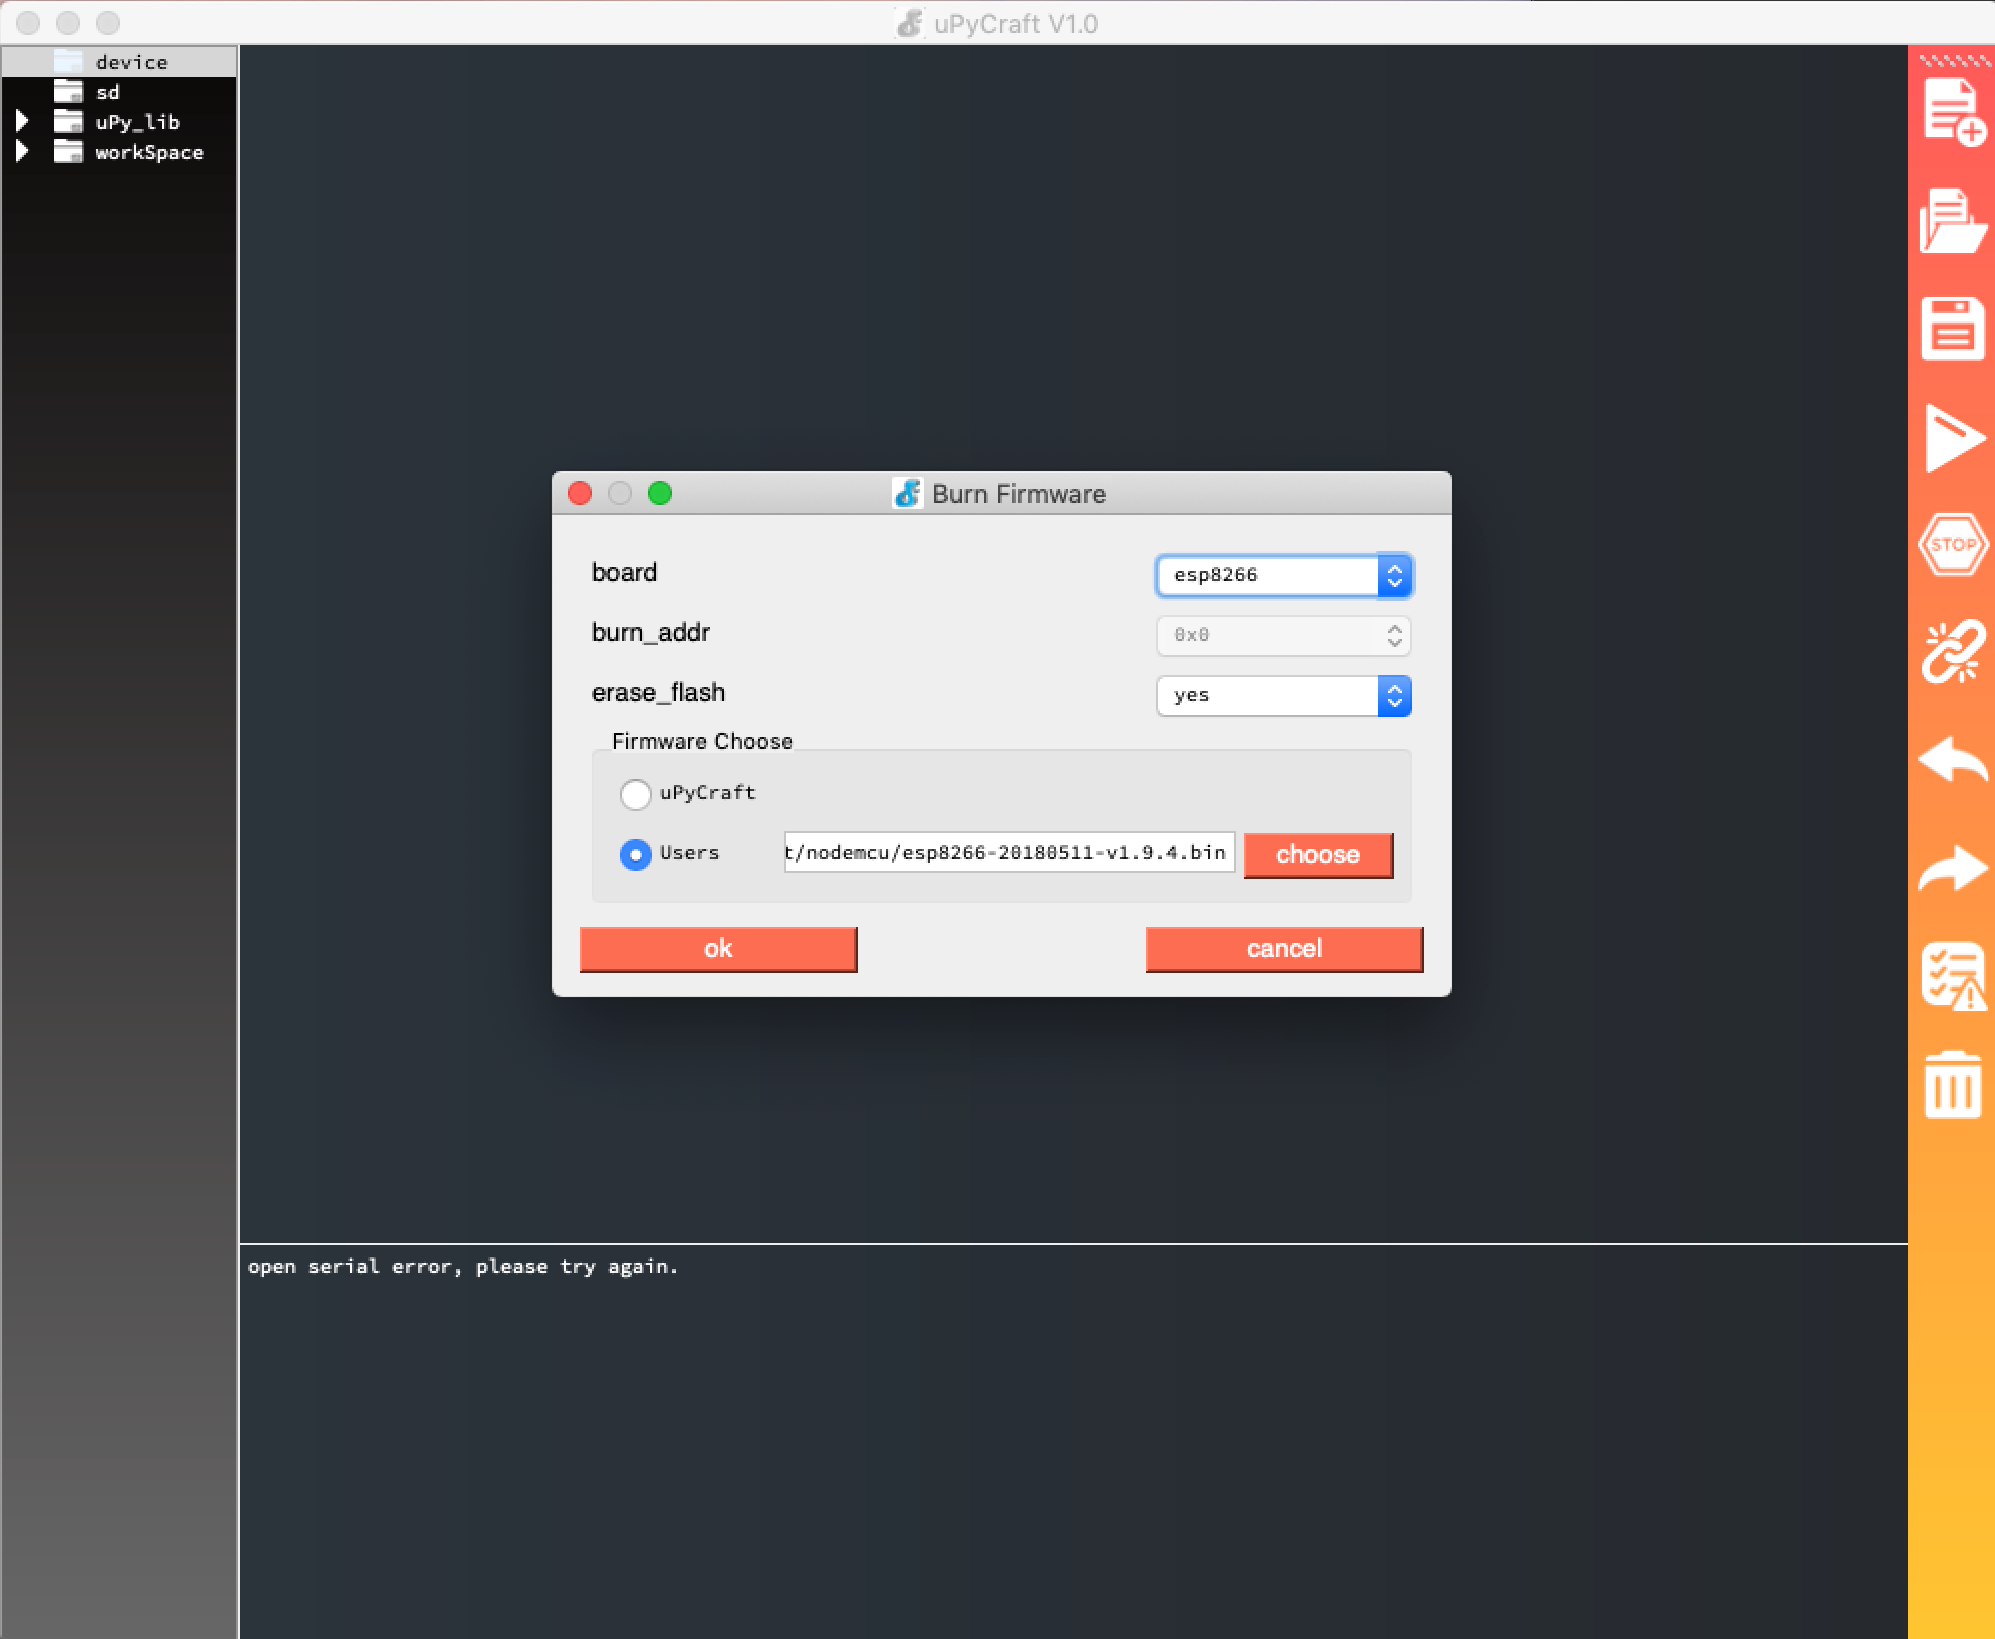
There’s one benefit to choosing uPyCraft, and that’s the option to easily burn the MicroPython firmware to your board without having to use command-line tools. You can choose the uPyCraft default firmware, or a firmware you have downloaded:

MicroPython Burn Firmware

The BBC Micro:Bit shows up as a disk drive. When you use Mu or the web-based editor, they’ll produce files that you can drop straight onto that disk. If you’re using an ESP8266 or ESP32 board with uPyCraft, then you can also install the Python ESPTool with pip and set up your board’s firmware using that.

Other boards might come with MicroPython or CircuitPython installed, or even use a drag-and-drop installer. However, those kinds of boards can get corrupted or go into infinite loops. Be sure you take the time to look into your board’s documentation for how to replace the firmware.

Creating and Deploying Your Code

To execute your code, in most cases you’re going to create .py text files and execute them on your MicroPython device. This process is similar to what you would do with CPython. You’ll transfer the files to your board in one of two ways:

  1. Use your IDE. This can be Mu, uPyCraft, or something similar.
  2. Use a command-line tool. This can be RShell, Ampy, or something similar.

When devices that are running MicroPython boot up, they’ll look for a file called boot.py. If that file is found, then the device will execute it automatically. You can also execute .py files from a REPL prompt:

exec(open('my-program.py').read())

In fact, this is similar to what uPyCraft does when you run your edited Python. It transfers the file to your board and then executes it through the REPL.

Writing Your MicroPython Code

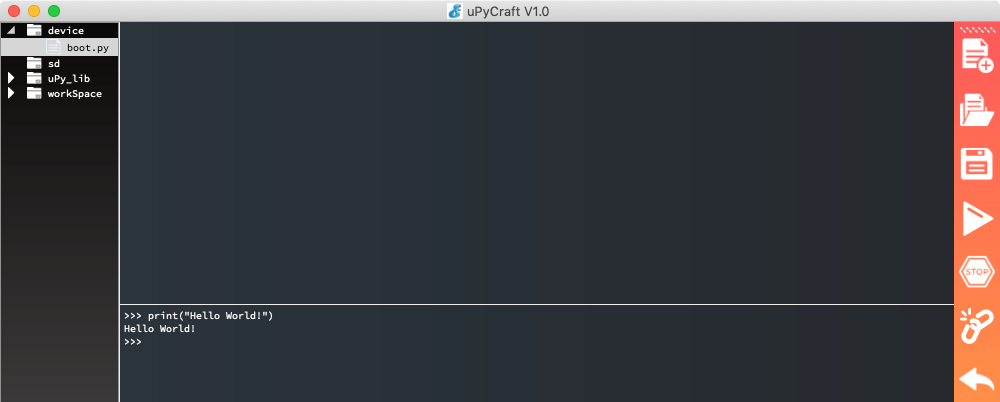
You’ll start with a traditional “Hello, World!” project. You can do this in the REPL by connecting to the correct serial port, and entering the following:

print("Hello World!")

You should see the following output:

MicroPython Hello World

You’ve confirmed that your setup is working.

Creating Digital Output

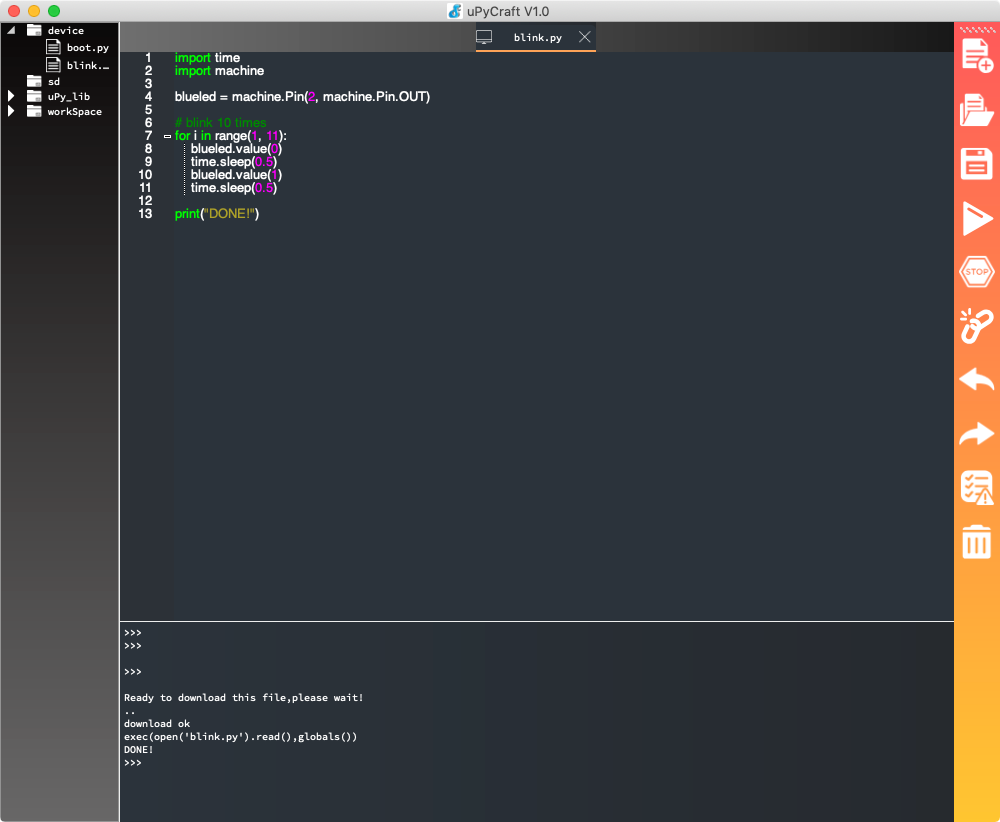
Now, let’s change the output type. Using the following code, you can make the onboard LED blink:

importtimeimportmachineblueled=machine.Pin(2,machine.Pin.OUT)# Blink 10 timesforiinrange(1,11):blueled.value(0)time.sleep(0.5)blueled.value(1)time.sleep(0.5)print("DONE!")

You import time, which lets you insert time delays. You also import machine, a module that gives you easy access to the IO pins on your board. You use this module to set up an object called blueled, which you define as being Pin 2. (On other boards, it may be possibly Pin 16). Then, you set it as an output pin. You should see the following output:

MicroPython Blink LED

You may notice that on the ESP8266, the LED lights up when it’s off and turns off when it’s given a positive value. Odd, but true!

Note: Most boards will have one or more built-in LEDs. Check out the documentation for your specific board for more information.

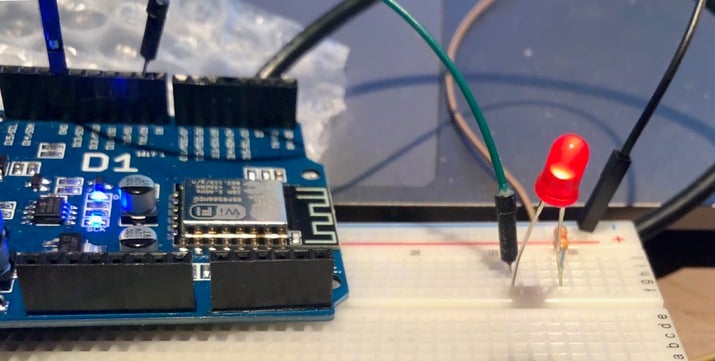
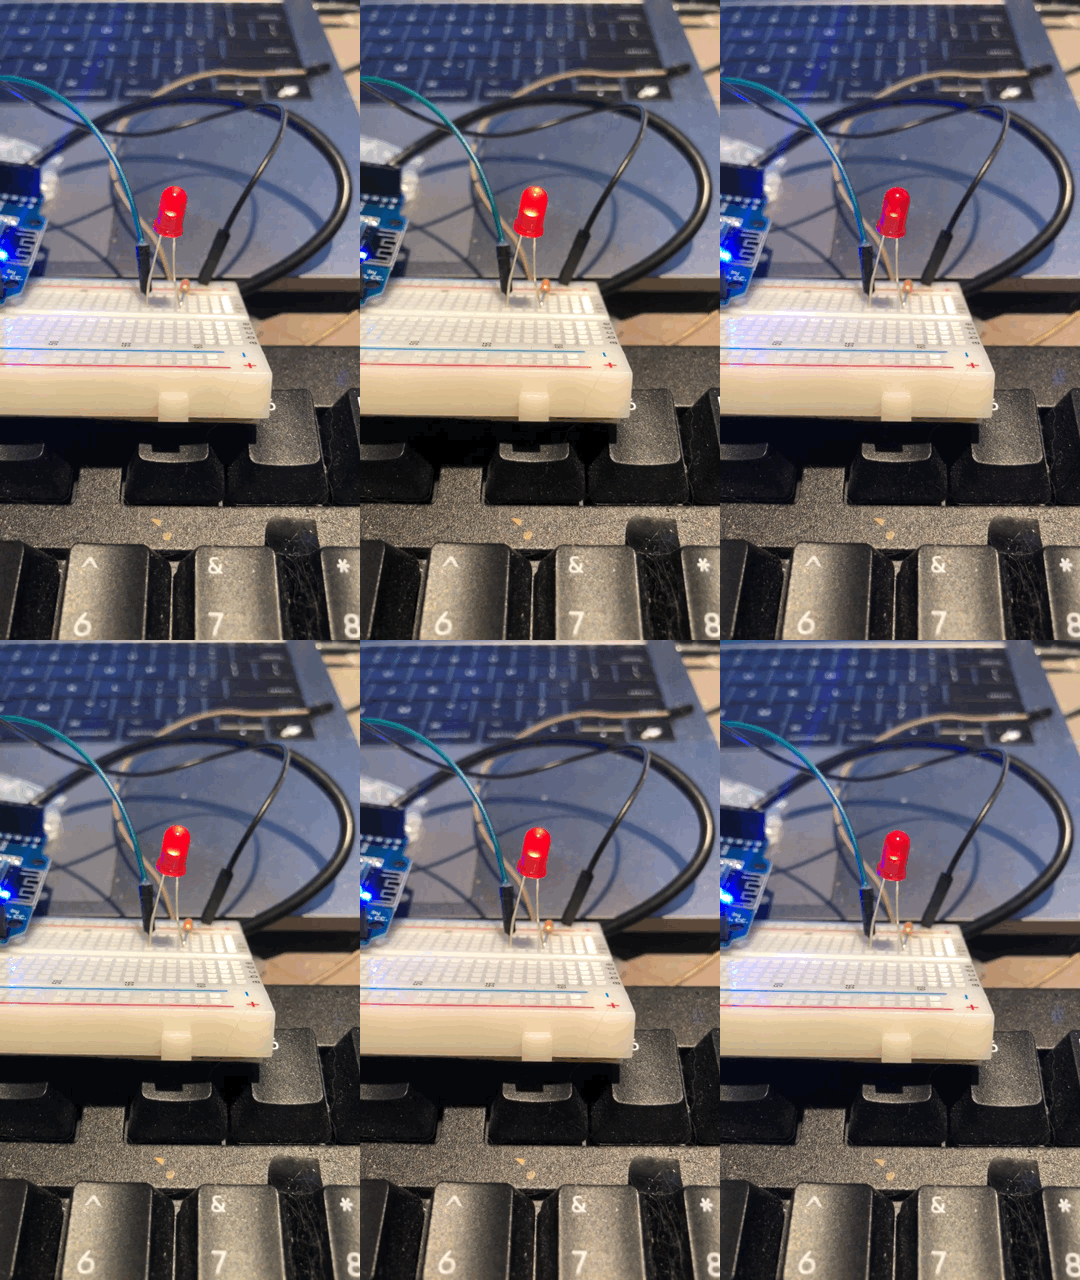
What if you don’t have a built-in LED, or you want to light up an LED that’s not on your board? You’ll need a suitably-sized resistor, such as a 220ohm resistor. You’ll need to connect that to the ground and to the short leg of your LED. The positive, long leg of your LED will connect to the GPIO pin 2. On the Wemos D1 Uno board, GPIO 2 is called Digital Pin 9 on the front face of the board. It has the GPIO number underneath.

In the case of an external LED, it will light up when the value is 1 or on:

MicroPython LED on a Breadboard

You can see the pin has been lit up.

Fading LEDs

In the previous example, you used a for loop, but your hardware can actually blink the LED itself. To do this, set the pin output as PWM, which stands for Pulse Width Modulation (PWM).

This allows you to create a signal of on and off pulses. When you turn an LED on and off very quickly many times a second, it appears that the LED is set to a certain brightness due to how our eyes work. Here’s how your code would look:

frommachineimportPinfrommachineimportPWMimporttime# Set our pin 2 to PWMpwm=PWM(Pin(2))# Brightness between 0 and 1023pwm.duty(700)# Frequency in Hertzpwm.freq(1)

In this new code, you set the brightness and the blink frequency in Hertz, and then let the hardware take over.

You can also use PWM to fade the LED in and out:

frommachineimportPinfrommachineimportPWMimporttime# Set our pin 2 to PWMpwm=PWM(Pin(2))# Frequency = 100hzpwm.freq(100)while1:# Brightness between 0 and 1023forbrightnessinrange(0,1023,100):pwm.duty(brightness)print(brightness)time.sleep(0.1)# Brightness between 1023 and 0forbrightnessinrange(1023,0,-100):pwm.duty(brightness)print(brightness)time.sleep(0.1)

This code gives a pleasing, soft effect:

MicroPython Fade LED PWM

If you’re using the onboard LED, then the light might instead fade out and then in.

Conclusion

It’s never been more accessible for you to program robots, microcontrollers, electronics, and other hardware. Traditionally, to program these devices, you had to use low-level languages like assembler or C++, and sacrifice a lot of functionality. That all changed with the introduction of MicroPython, a version of Python 3 crammed into the tiny capacity of smaller physical computing devices!

In this tutorial, you dove into MicroPython and the world of electronics hardware. You’ve learned about the history of MicroPython and how it compares to other platforms. You also went through the MicroPython workflow, deployed code to your own board, and brought about a real-world effect.

MicroPython is continuing to grow. Developers in the community are always adding new code, tools, projects, and tutorials. There’s never been a more exciting time to be a MicroPython developer!


[ Improve Your Python With 🐍 Python Tricks 💌 – Get a short & sweet Python Trick delivered to your inbox every couple of days. >> Click here to learn more and see examples ]

Continuum Analytics Blog: It’s Time to Upgrade to Python 3 – Time Is Running Out!

Catalin George Festila: Python 3.7.5 : The OSMnx python package.

$
0
0
About this python package named OSMnx, you can read on GitHub. OSMnx is a Python package that lets you download spatial geometries and model, project, visualize, and analyze street networks from OpenStreetMap's APIs. Users can download and model walkable, drivable, or bikable urban networks with a single line of Python code, and then easily analyze and visualize them ... You cannot install osmnx

Django Weblog: 2020 DSF Board Election Results

$
0
0

Our 2020 Django Software Foundation Election results are in. The Top 7 candidates are listed below in order of their ranking:

  1. Frank Wiles
  2. Anna Makarudze
  3. James Bennett
  4. William Vincent
  5. Kátia Nakamura
  6. Aaron Bassett
  7. Sayantika Banik

Our new board will take over at the next board meeting where officer positions will be set. Congratulations to the winners and a special thank you to all that stood for this years election.

I would also like to extend a since thanks to retiring Board Members Jessica Deaton, Katie McLaughlin, and Catherine Holmes. Your hard work and dedication is appreciated!

Mike Driscoll: PyDev of the Week: Sebastian Steins

$
0
0

This week we welcome Sebastian Steins (@sebastiansteins) as our PyDev of the Week! Sebastian is the creator of the Pythonic News website. You can find out more about Sebastian by checking out what he’s been up to over on Github. Let’s take a few moments to get to know him better!

Sebastian Steins

Can you tell us a little about yourself (hobbies, education, etc):

I am a software developer from Germany and live close to the Dutch and Belgian border. The internet emerged when I was in school. I have always been fascinated by computers and wanted to learn to program. Unfortunately, this was not so easy at the time, and I did not have teachers who could have supported me in that matter. It changed, however, when I got my first modem. The internet opened a whole new world for me, and I started to learn HTML, Perl and later, PHP. I built CGI scripts and small web apps back then, and it was really fun. Eventually, I took programming as my career path, although I sometimes struggled with that decision. Besides my degree in computer science, I also heard lectures on economics and had a few positions in the finance sector early in my career. Now, I enjoy coaching teams of great software engineers in architecture matters and try to pass my knowledge to junior devs.

When I’m not in front of a computer, I like to ride my road bike, learn new stuff from audiobooks and would never say no to a night out in a good restaurant.

Why did you start using Python?

I started using Python when I needed a replacement for PHP, so it was very early on. It was in the very early days of the Python 2.0 release. I immediately liked it, because it was basically like writing pseudocode. This is what I still love about being able to “talk to a computer”: Expressing ideas and see results very quickly. Meanwhile, other languages have kept up and are equally expressive as Python. However, Python has become a little bit of my home base ever since.

What other programming languages do you know and which is your favorite?

I worked in different projects with many different programming languages like Java, C#, C and JavaScript.

What projects are you working on now?

I am working as a freelance consultant in software engineering. Besides that, I teach introductory courses over at smartninja.de. Recently I started a small project called Pythonic News, which is basically a Hacker News clone for the Python community.

Which Python libraries are your favorite (core or 3rd party)?

There are so many great libraries in the Python ecosystem. This is another point which makes programming in Python so enjoyable. Most of these libraries are very Pythonic in a way that ideas can be expressed very concisely. I really like the Django framework, but there are also smaller packages like requests which I use quite frequently.

Bigger ones, such as numpy and pandas really proves that Python is so versatile that there is hardly a problem which cannot be solved with it.

What is the origin of your Pythonic News site?

I’ve built the https://news.python.sc site as a Django project. During the creation, I tried to use as many features of the Django framework as possible. This is because I created it initially as an example app for a Python training and wanted to showcase different ways of achieving things. This is also why not everything in the codebase can be considered as best practise. The goal was to show what could be done with Django, including downsides of particular approaches. For example, I used model inheritance on the core database objects which certainly is not the best choice performance-wise.

What have you learned creating the project?

Just for fun, I posted the project to Reddit and Hacker News. I got so much positive feedback that I wanted to see how it did before it was even complete. I learned that there are still places on the web which feel like the “good old days”. People just like to talk about the topics they care about. The early-2000s esthetics of the site turned out to be a good fit for the audience. There was not a single issue with spam or offensive behaviour. There still is “an internet” which is happening outside the walled gardens of the big tech companies.

This made me very happy!

Furthermore, I saw strangers reacted on GitHub in a way I would never have expected. That made me think that I will create a make-of tutorial series from that project to teach more people about Python. I will publish it on my site when it’s ready.

Do you have any words of wisdom for other content creators?

Just start and let the world know about your ideas and your creation. Even if it’s not perfect, you’ll find people that care. If it’s a Python project you created, of course, you can submit it to the “Show PN” section of Pythonic News.

Thanks for doing the interview, Sebastian!

The post PyDev of the Week: Sebastian Steins appeared first on The Mouse Vs. The Python.


Programiz: Python Docstrings

$
0
0
In this tutorial, we will learn about Python docstrings. More specifically, we will learn how and why docstrings are used with the help of examples.

Programiz: Python Comments

$
0
0
In this tutorial, we will learn to create comments in Python with the help of examples.

Python Insider: Python 3.8.1rc1 is now available for testing

$
0
0
Python 3.8.1rc1 is the release candidate of the first maintenance release of Python 3.8.

The Python 3.8 series is the newest feature release of the Python language, and it contains many new features and optimizations. You can find Python 3.8.1rc1 here:

Assuming no critical problems are found prior to 2019-12-16, the scheduled release date for 3.8.1 as well as Ned Deily's birthday, no code changes are planned between this release candidate and the final release.

That being said, please keep in mind that this is a pre-release of 3.8.1 and as such its main purpose is testing.

See the “What’s New in Python 3.8” document for more information about features included in the 3.8 series. Detailed information about all changes made in 3.8.0 can be found in its change log.

Maintenance releases for the 3.8 series will continue at regular bi-monthly intervals, with 3.8.2 planned for February 2020.
  

We hope you enjoy Python 3.8!

Thanks to all of the many volunteers who help make Python Development and these releases possible! Please consider supporting our efforts by volunteering yourself or through organization contributions to the Python Software Foundation.

Robin Wilson: Creating an email service for my son’s childhood memories with Python

$
0
0

For a number of years – since my now-toddler son was a small baby – I’ve been keeping track of various childhood achievements or memories. When I first came up with this I was rather sleep-deprived, and couldn’t decide what the best way to store this information would be – so I went with a very simple option. I just created a Word document with a table in it with two columns: the date, and the activity/achievement/memory. For example:

file

This was very flexible as it allowed me to keep anything else I wanted in this document – and it was portable (to anyone who have access to some way of reading Word documents) – and accessible to non-technical people such as my son’s grandparents.

After a while though, I wondered if I’d made the right decision: shouldn’t I have put it into some other format that could be accessed programmatically? After all, if I kept doing this for his entire childhood then I’d have a lot of interesting data in there…

Well, it turns out that a Word table isn’t too awful a format to store this sort of data in – and you can access it fairly easily from Python.

Once I realised this, I worked out what I wanted to create: a service that would email me every morning listing the things I’d put as diary entries for that day in previous years. I was modelling this very much on the Timehop app that does a similar thing with photographs, tweets and so on, so I called it julian_timehop.

If you just want to go to the code then have a look at the github repo– otherwise, read on to find out how I did it.

Steps

Let’s start by thinking about what the main steps we need to take are:

  1. First we need to get hold of the document. I update it fairly regularly, and it lives on my laptop – whereas this script would need to run on my Linux server, so it can easily run at the same time each day. The easiest way around this was to store the document in Dropbox and use the Dropbox API to grab a copy when we run the script.

  2. We then need to parse the document to extract the table of diary entries.

  3. Once we’ve got the table, we can subset it to the rows that match today’s date (ignoring the year)

  4. We then need to prepare the text of an email based on these rows, and then send the email

Let’s look at each of these in turn now.

Getting the file from Dropbox

We want to do pretty-much the simplest operation possible using the Dropbox API: login and retrieve the latest version of a file. I’ve used the Dropbox API from Python before (see my post about analysing my thesis-writing timeline with Dropbox) and it’s pretty easy. In fact, you can accomplish this task with just four lines of code.

First, we need to connect to Dropbox and authenticate. To do this, we’ll use a Dropbox API key (see here for instructions on how to get one). We don’t want to include this API key directly in the code – as we could accidentally share it with someone else (for example, by uploading the code to Github) – so we store in an environment variable called DROPBOX_KEY.

We can get the key from this environment variable with

dropbox_key = os.environ.get('DROPBOX_KEY')

We can then create a Dropbox API connection and authenticate

dbx = dropbox.Dropbox(dropbox_key)

To download a file, we just call the files_download_to_file method

dbx.files_download_to_file(output_filename, path)

In this case the path argument is the path of the file inside the Dropbox folder – in my case the path is /Notes and diary entries for Julian.docx as the file is in the root Dropbox folder.

Putting this together we get a function to download a file from Dropbox

def download_file(path):
    """
    Download a file from Dropbox, returning the local filename of the downloaded file

    Requires the DROPBOX_KEY env var to be set to a valid Dropbox API key
    """
    dropbox_key = os.environ.get('DROPBOX_KEY')
    dbx = dropbox.Dropbox(dropbox_key)
    output_filename = 'document.docx'
    dbx.files_download_to_file(output_filename, path)

    return output_filename

That’s the first step completed; next we need to extract the table from the Word document.

Extracting the table

In a previous job I did some work which involved automating the creation of Powerpoint presentations, and I used the excellent python-pptx library for reading and writing Powerpoint files. Conveniently, there is a sister library available for Word documents called python-docx which works in a very similar way.

We’re going to convert the Word table to a pandas DataFrame, so after installing python-docx we need to import the main Document class, along with pandas itself

from docx import Document
import pandas as pd

We can parse the document by creating an instance of the Document class with the filename as a parameter

doc = Document(filename)

The doc object has various useful methods and attributes – and one of these is a list of tables in the document. We know that we want to parse the first table – so we just select the 0th index

tab = doc.tables[0]

To create a pandas DataFrame, we need a list containing the contents of each column: here that means a list of dates and a list of entries.

tab.column_cells(0) gives us an iterator over all the cells in column 0, and each cell has a .text method to give the text content of that cell – so we can write a list comprehension to extract all of the contents into a list

dates = [cell.text for cell in tab.column_cells(0)]

We can then use the very handy pd.to_datetime function to convert these to actual date objects. We pass the argument errors='coerce' to force it to parse all entries in the list, without giving errors if one of them isn’t a valid date (in this case it will return NaT or Not a Time).

We can do the same for descriptions, and then put the descriptions and dates together into a DataFrame.

Here is the full code:

def read_table_from_doc(filename):
    doc = Document(filename)
    tab = doc.tables[0]

    dates = [cell.text for cell in tab.column_cells(0)]
    dates = pd.to_datetime(dates, errors='coerce')

    descs = [cell.text for cell in tab.column_cells(1)]

    df = pd.DataFrame({'desc':descs}, index=dates)

    return df

Creating the text for an email

The next step is to create the text to put in an email message, listing the date and the various memories. I wanted an output that looked like this:


01 December

2018:
Memory from 2018

2018:
Another memory from 2018

2017:
A memory from 2017


The code for this is fairly simple, and I’ll only mention the interesting bits.

Firstly, we create a subset of the DataFrame, where we only have the rows where the date was the same as today’s date (ignoring the year):

today = datetime.datetime.now()
subdf = df[(df.index.month == today.month) & (df.index.day == today.day)]

Here we’re combining two boolean indexing operations with &– though do remember to use brackets, as the order of precedence inside these boolean expressions doesn’t always work in the way you’d expect (I’ve been caught out by this a number of times).

As I knew this would only be running on my server, I could use new Python 3.7 features – so I used f-strings. This means that the body of my loop to create the HTML for the email body looks like this

text += f"<p><b>{i.year!s}:</b></br>{row['desc']}</p>\n\n"

Here we’re including variables such as i.year (the year value of the datetime index) and row['desc'] (the value of the desc column of this row).

Putting it together into a function gives the following code, which either returns the HTML text of the email or None if there are no events matching this date

def get_formatted_message(df):
    today = datetime.datetime.now()

    subdf = df[(df.index.month == today.month) & (df.index.day == today.day)]

    if len(subdf) == 0:
        return

    title_date = datetime.datetime.now().strftime('%d %B')
    text = f'<h2>{title_date}</h2>\n\n'
    for i, row in subdf.iterrows():
        text += f"<p><b>{i.year!s}:</b></br>{row['desc']}</p>\n\n"

    return text

Sending the email

I’ve written code to send emails in Python before, and had great difficulty. Emails are a lot more difficult than a lot of people think, and often my emails never got sent, or never got to their destination, or broke in some other way.

This time I managed to avoid all of those problems by using the emails library. Writing a send_email function using this library was so easy:

def send_email(text):
    message = emails.html(html=text,
                          subject='Julian Timehop',
                          mail_from=('Julian Timehop Emailer', 'robin@rtwilson.com'))

    password = os.environ.get('SMTP_PASSWORD')

    r = message.send(to=('R Wilson', 'robin@rtwilson.com'),
                     smtp={'host':'mail.rtwilson.com',
                           'port': 465, 'ssl': True,
                           'user': 'robin@rtwilson.com', 'password': password})

All of the code above is self-explanatory: we’re creating a HTML email message (it details with all of the escaping and encoding necessary), grabbing the password from another environment variable and then sending the email. Easy!

Putting it all together

We’ve now written a function for each individual step – and now we just need to put the functions together. The benefit of writing your script this way is that the main part of your script is just a few lines.

In this case, all we need is

filename = download_file('/Notes and diary entries for Julian.docx')
df = read_table_from_doc(filename)
text = get_formatted_message(df)
if text is not None:
    send_email(text)

Another benefit of this is that for anyone (including yourself) coming back to it in the future, it is very easy to get an overview of what the script does, before delving into the details.

So, I now have this set up on my server to send me an email every morning with some memories of my son’s childhood. Here’s to many more happy memories – and remember to check out the code if you’re interested.


I do freelance work on Python programming and data science – please see my freelance website for more details.

Stack Abuse: Executing Shell Commands with Python

$
0
0

Introduction

Repetitive tasks are ripe for automation. It is common for developers and system administrators to automate routine tasks like health checks and file backups with shell scripts. However, as those tasks become more complex, shell scripts may become harder to maintain.

Fortunately, we can use Python instead of shell scripts for automation. Python provides methods to run shell commands, giving us the same functionality of those shells scripts. Learning how to run shell commands in Python opens the door for us to automate computer tasks in a structured and scalable way.

In this article, we will look at the various ways to execute shell commands in Python, and the ideal situation to use each method.

Using os.system to Run a Command

Python allows us to immediately execute a shell command that's stored in a string using the os.system() function.

Let's start by creating a new Python file called echo_adelle.py and enter the following:

import os

os.system("echo Hello from the other side!")

The first thing we do in our Python file is import the os module, which contains the system function that can execute shell commands. The next line does exactly that, runs the echo command in our shell through Python.

In your Terminal, run this file with using the following command, and you should see the corresponding output:

$ python3 echo_adelle.py
Hello from the other side!

As the echo commands prints to our stdout, os.system() also displays the output on our stdout stream. While not visible in the console, the os.system() command returns the exit code of the shell command. An exit code of 0 means it ran without any problems and any other number means an error.

Let's create a new file called cd_return_codes.py and type the following:

import os

home_dir = os.system("cd ~")
print("`cd ~` ran with exit code %d" % home_dir)
unknown_dir = os.system("cd doesnotexist")
print("`cd doesnotexis` ran with exit code %d" % unknown_dir)

In this script, we create two variables that store the result of executing commands that change the directory to the home folder, and to a folder that does not exist. Running this file, we will see:

$ python3 cd_return_codes.py
`cd ~` ran with exit code 0
sh: line 0: cd: doesnotexist: No such file or directory
`cd doesnotexist` ran with exit code 256

The first command, which changes the directory to the home directory, executes successfully. Therefore, os.system() returns its exit code, zero, which is stored in home_dir. On the other hand, unknown_dir stores the exit code of the failed bash command to change the directory to a folder that does not exist.

The os.system() function executes a command, prints any output of the command to the console, and returns the exit code of the command. If we would like more fine grained control of a shell command's input and output in Python, we should use the subprocess module.

Running a Command with subprocess

The subprocess module is Python's recommended way to executing shell commands. It gives us the flexibility to suppress the output of shell commands or chain inputs and outputs of various commands together, while still providing a similar experience to os.system() for basic use cases.

In a new filed called list_subprocess.py, write the following code:

import subprocess

list_files = subprocess.run(["ls", "-l"])
print("The exit code was: %d" % list_files.returncode)

In the first line, we import the subprocess module, which is part of the Python standard library. We then use the subprocess.run() function to execute the command. Like os.system(), the subprocess.run() command returns the exit code of what was executed.

Unlike os.system(), note how subprocess.run() requires a list of strings as input instead of a single string. The first item of the list is the name of the command. The remaining items of the list are the flags and the arguments of the command.

Note: As a rule of thumb, you need to separate the arguments based on space, for example ls -alh would be ["ls", "-alh"], while ls -a -l -h, would be ["ls", "-a", -"l", "-h"]. As another example, echo hello world would be ["echo", "hello", "world"], whereas echo "hello world" or echo hello\ world would be ["echo", "hello world"].

Run this file and your console's output would be similar to:

$ python3 list_subprocess.py
total 80
-rw-r--r--@ 1 stackabuse  staff    216 Dec  6 10:29 cd_return_codes.py
-rw-r--r--@ 1 stackabuse  staff     56 Dec  6 10:11 echo_adelle.py
-rw-r--r--@ 1 stackabuse  staff    116 Dec  6 11:20 list_subprocess.py
The exit code was: 0

Now let's try to use one of the more advanced features of subprocess.run(), namely ignore output to stdout. In the same list_subprocess.py file, change:

list_files = subprocess.run(["ls", "-l"])

To this:

list_files = subprocess.run(["ls", "-l"], stdout=subprocess.DEVNULL)

The standard output of the command now pipes to the special /dev/null device, which means the output would not appear on our consoles. Execute the file in your shell to see the following output:

$ python3 list_subprocess.py
The exit code was: 0

What if we wanted to provide input to a command? The subprocess.run() facilitates this by its input argument. Create a new file called cat_subprocess.py, typing the following:

import subprocess

useless_cat_call = subprocess.run(["cat"], stdout=subprocess.PIPE, text=True, input="Hello from the other side")
print(useless_cat_call.stdout)  # Hello from the other side

We use subprocess.run() with quite a few commands, let's go through them:

  • stdout=subprocess.PIPE tells Python to redirect the output of the command to an object so it can be manually read later
  • text=True returns stdout and stderr as strings. The default return type is bytes.
  • input="Hello from the other side" tells Python to add the string as input to the cat command.

Running this file produces the following output:

Hello from the other side

We can also raise an Exception without manually checking the return value. In a new file, false_subprocess.py, add the code below:

import subprocess

failed_command = subprocess.run(["false"], check=True)
print("The exit code was: %d" % failed_command.returncode)

In your Terminal, run this file. You will see the following error:

$ python3 false_subprocess.py
Traceback (most recent call last):
  File "false_subprocess.py", line 4, in <module>
    failed_command = subprocess.run(["false"], check=True)
  File "/usr/local/python/3.7.5/Frameworks/Python.framework/Versions/3.7/lib/python3.7/subprocess.py", line 512, in run
    output=stdout, stderr=stderr)
subprocess.CalledProcessError: Command '['false']' returned non-zero exit status 1.

By using check=True, we tell Python to raise any exceptions if an error is encountered. Since we did encounter an error, the print statement on the final line was not executed.

The subprocess.run() function gives us immense flexibility that os.system() doesn't when executing shell commands. This function is a simplified abstraction of the subprocess.Popen class, which provides additional functionality we can explore.

Running a Command with Popen

The subprocess.Popen class exposes more options to the developer when interacting with the shell. However, we need to be more explicit about retrieving results and errors.

By default, subprocess.Popen does not stop processing of a Python program if its command has not finished executing. In a new file called list_popen.py, type the following:

import subprocess

list_dir = subprocess.Popen(["ls", "-l"])
list_dir.wait()

This code is equivalent to that of list_subprocess.py. It runs a command using subprocess.Popen, and waits for it to complete before executing the rest of the Python script.

Let's say we do not want to wait for our shell command to complete execution so the program can work on other things. How would it know when the shell command has finished execution?

The poll() method returns the exit code if a command has finished running, or None if it's still executing. For example, if we wanted to check if list_dir was complete instead of wait for it, we would have the following line of code:

list_dir.poll()

To manage input and output with subprocess.Popen, we need to use the communicate() method.

In a new file called cat_popen.py, add the following code snippet:

import subprocess

useless_cat_call = subprocess.Popen(["cat"], stdin=subprocess.PIPE, stdout=subprocess.PIPE, stderr=subprocess.PIPE, text=True)
output, errors = useless_cat_call.communicate(input="Hello from the other side!")
useless_cat_call.wait()
print(output)
print(errors)

The communicate() method takes an input argument that's used to pass input to the shell command. The communicate method also returns both the stdout and stderr when they are set.

Having seen the core ideas behind subprocess.Popen, we have now covered three ways to run shell commands in Python. Let's re-examine their characteristics so we'll know which method is best suited for a project's requirements.

Which one should I use?

If you need to run one or a few simple commands and do not mind if their output goes to the console, you can use the os.system() command. If you want to manage the input and output of a shell command, use subsystem.run(). If you want to run a command and continue doing other work while it's being executed, use subprocess.Popen.

Here is a table with some usability differences that you can also use to inform your decision:

os.systemsubprocess.runsubprocess.Popen
Requires parsed argumentsnoyesyes
Waits for the commandyesyesno
Communicates with stdin and stdoutnoyesyes
Returnsreturn valueobjectobject

Conclusion

Python allows you to execute shell commands, which you can use to start other programs or better manage shell scripts that you use for automation. Depending on our use case, we can use os.system(), subprocess.run() or subprocess.Popen to run bash commands.

Using these techniques, what external task would you run via Python?

Viewing all 22411 articles
Browse latest View live


<script src="https://jsc.adskeeper.com/r/s/rssing.com.1596347.js" async> </script>