Quantcast
Channel: Planet Python
Viewing all 22852 articles
Browse latest View live

Mike Driscoll: PyDev of the Week: Joannah Nanjekye

$
0
0

This week we welcome Joannah Nanjekye (@Captain_Joannah) as our PyDev of the Week! Joannah is a core developer of the Python programming language. She is also the author of Python 2 and 3 Compatibility. You can find out more about Joannah on here website. Let’s take a few moments to get to know her better!

Can you tell us a little about yourself (hobbies, education, etc):

I am Joannah Nanjekye, I live in Canada, Fredericton but I am originally from Uganda in East Africa. I am a CS grad and doing research related to Python in one of the Python IBM labs at UNB. I went to University in Uganda and Kenya where I studied Software Engineering at Makerere University and Aeronautical Engineering at Kenya Aeronautical College respectively. I am also the Author of Python 2 and 3 compatibility, a book published by Apress. I do not have any serious hobbies but I love flying aircraft. Very expensive hobby heh!!

Why did you start using Python?

I started to use Python because I had to in my first programming class in 2009. Like any CS class Python is simple but some professor decided to make the class so hard. After failing a few assignments in the course, I managed to read my first programming book cover to cover which was a Python book– how to think like a computer scientist and managed to pass my final exams. Nevertheless, my real significant use of Python was in 2012 where I worked on a Django project. I continue to use Python because of its simplicity that allows me to focus on solving the problem at hand.

What other programming languages do you know and which is your favorite?

I have good command and proficiency in Golang, Ruby and C. I would say my favourite would be C because I write more C code in general.

What projects are you working on now?

I full time work on a project related to Python the language itself and may be one of its alternate implementations that I can not go into detail because of some NDA restrictions. I am currently working on aspects related to garbage collection. I also give my time to Cpython and other open source projects.

Which Python libraries are your favorite (core or 3rd party)?

I think currently am very interested and curious in how subinterpreters in Cpython will evolve and solve some current shortcomings we have in the language.

What portion of code do you take care of in Python as a core developer?

I would not say take care of because am not assigned to these areas as an expert. I plan to look more at subinterpreters and garbage collection as far as Cpython is concerned. During the recent core developer sprints, I was able to get some good mileage on the high level subinterpreters module implementation which is PEP 554 with Eric Snow’s guidance. In the same sprint, I talked to Pablo Salgado about GC and what areas of improvement we can look at. I just pray for bandwidth and good health to be able to help.

Do you have any advice for other aspiring core developers?

Cpython needs help from everyone individuals and companies otherwise, we will be building on top of a crumbling infrastructure. The process of becoming a core developer is a very transparent one for Cpython. For anyone interested, join the discussion on different aspects of the project of your interest
and contribute in any way. There are many areas where your skills can benefit Python.

Thanks for doing the interview, Joannah!

The post PyDev of the Week: Joannah Nanjekye appeared first on The Mouse Vs. The Python.


PyCharm: 2019.3 EAP 7

$
0
0

A new Early Access Program (EAP) version for PyCharm 2019.3 is now available! If you wish to try it out do so by downloading it from our website.

New for this version

R plugin support

We are happy to announce that PyCharm now supports the R language and development environment plugin to perform statistical computing as part of our scientific tools offering. Perform data wrangling, manipulation and visualization with the library tools that R has available. To start using it download the R language, install the R plugin in PyCharm and configure the R interpreter.

After doing this you can start creating .R files (that you can easily identify by the py_r_logo icon) for which we will provide code assistance like: error and syntax highlighting, code completion and refactoring, creation of comment lines, intention actions and quick fixes.

To make the most out of this scientific tool you will have available a console, graphic tool window, and packages, HTML and table views to work with:

Screenshot 2019-10-31 at 2.32.41 PM

Want to know more? Visit our R plugin support documentation to get detailed information on installation and usage.

Further improvements

  • An issue causing Docker remote interpreters not to reflect updated libraries in PyCharm was fixed. Now every time you update your Docker packages they will be auto updated as well in PyCharm.
  • The PEP8 warnings showing incorrectly for assignment expressions were solved.
  • For more see the release notes

Interested?

Download this EAP from our website. Alternatively, you can use the JetBrains Toolbox App to stay up to date throughout the entire EAP.

If you’re on Ubuntu 16.04 or later, you can use snap to get PyCharm EAP, and stay up to date. You can find the installation instructions on our website.

John Cook: Generating Python code from SymPy

$
0
0

Yesterday I wrote about Householder’s higher-order generalizations of Newton’s root finding method. For n at least 2, define

H_n(x) = x + (n-1) \frac{\left( \frac{1}{f(x)}\right)^{(n-2)}}{\left( \frac{1}{f(x)}\right)^{(n-1)}}

and iterate Hn to find a root of f(x). When n = 2, this is Newton’s method. In yesterday’s post I used Mathematica to find expressions for H3 and H4, then used Mathematica’s FortranForm[] function to export Python code. (Mathematica doesn’t have a function to export Python code per se, but the Fortran syntax was identical in this case.)

Aaron Muerer pointed out that it would have been easier to generate the Python code in Python using SymPy to do the calculus and labdify() to generate the code. I hadn’t heard of lambdify before, so I tried out his suggestion. The resulting code is nice and compact.

    from sympy import diff, symbols, lambdify

    def f(x, a, b):
        return x**5 + a*x + b

    def H(x, a, b, n):
        x_, a_, b_ = x, a, b
        x, a, b = symbols('x a b')
        expr = diff(1/f(x,a,b), x, n-2) / \
               diff(1/f(x,a,b), x, n-1)
        g = lambdify([x,a,b], expr)
        return x_ + (n-1)*g(x_, a_, b_)

This implements all the Hn at once. The previous post implemented three of the Hn separately.

The first couple lines of H require a little explanation. I wanted to use the same names for the numbers that the function H takes and the symbols that SymPy operated on, so I saved the numbers to local variables.

This code is fine for a demo, but in production you’d want to generate the function g once (for each n) and save the result rather than generating it on every call to H.

Python Software Foundation: The 2019 Python Developer Survey is here, take a few minutes to complete the survey!

$
0
0
It is that time of year and we are excited to start the official Python Developers Survey for 2019!

In 2018, the Python Software Foundation together with JetBrains conducted an official Python Developers Survey for the second time. Over 20,000 developers from almost 150 different countries participated..

With this third iteration of the official Python Developers Survey, we aim to identify how the Python development world looks today and how it compares to the last two years. The results of the survey will serve as a major source of knowledge about the current state of the Python community and how it is changing over the years, so we encourage you to participate and make an invaluable contribution to this community resource. The survey takes approximately 10 minutes to complete.

Please take a few minutes to complete the 2019 Python Developers Survey!

Your valuable opinion and feedback will help us better understand how Python developers use Python, related frameworks, tools, and technologies. We also hope you'll have fun going through the questions.

The survey is organized in partnership between the Python Software Foundation and JetBrains. The Python Software Foundation distributes this survey through community channels only (such as this blog, Twitter, mailing lists, etc). After the survey is over, we will publish the aggregated results and randomly select 100 winners (those who complete the survey in its entirety), who will each receive an amazing Python Surprise Gift Pack.

CubicWeb: Implementing the langserver protocol for RQL

$
0
0

One of our next project for cubicweb and its ecosystem is to implement the langserver protocol for the RQL language that we are using in CW. The langserver protocol is an idea to solve one problem: to integrate operation for various languages, most IDE/tools needs to reimplement the wheel all the time, doing custom plugin etc... To solve this issue, this protocol has been invented with one idea: make one server for a language, then all IDE/tools that talks this protocol will be able to integrate it easily.

language server protocol matrice illustration

You can find the website here: https://langserver.org/

So the idea is simple: let's build our own server for RQL so we'll be able to integrate it everywhere and build tools for it.

One of the goal is to have something similar than that for RQL: https://developer.github.com/v4/explorer/ rql being extremely similar to graphql

github graphql explorer

So this post has several objectives:

  • gather people that would be motivate to work on that subject, for now there is Laurent Wouters and me :)
  • explain to you in more details (not all) how the language server protocol works
  • show what is already existing for both langserver in python and rql
  • show the first roadmap we've discussed with Laurent Wouters on how we think we can do that :)
  • be a place to discuss this project, things aren't fixed yet :)

So, what is the language server protocol (LSP)?

It's a JSON-RPC based protocol where the IDE/tool talks to the server. JSON-RPC, said simply, is a bi-directional protocol in json.

In this procotol you have 2 kind of exchanges:

  • requests: where the client (or server) ask the server (or the server ask the client) something and a reply is expected. For example: where is the definition of this function?
  • notifications: the same but without an expected reply. For example: linting information or error detection

language server protocol example schema

The LSP specifications has 3 bigs categories:

  • everything about initialization/shutdown the server etc...
  • everything regarding text and workspace synchronization between the server and the client
  • the actual things that interest us: a list of languages features that the server supports (you aren't in the obligation to implement everything)

Here is the simplified list of possible languages features that the website present:

  • Code completion
  • Hover
  • Jump to def
  • Workspace symbols
  • Find references
  • Diagnostics

The specification is much more detailed but way less comprehensive (look at the "language features" on the right menu for more details):

  • completion/completion resolve
  • hover (when you put your cursor on something)
  • signatureHelp
  • declaration (go to...)
  • definition (go to...)
  • typeDefinition (go to...)
  • implementation (go to...)
  • references
  • documentHighlight (highlight all references to a symbol)
  • documentSymbol ("symbol" is a generic term for variable, definitions etc...)
  • codeAction (this one is interesting)
  • codeLens/codeLens resolve
  • documentLink/documentLink resolve
  • documentColor/colorPresentation (stuff about picking colors)
  • formatting/rangeFormatting/onTypeFormatting (set tab vs space)
  • rename/prepareRename
  • foldingRange

(Comments are from my current understanding of the spec, it might not be perfect)

The one that is really interesting here (but not our priority right now) is "codeAction", it's basically a generic entry point for every refactoring kind of operations as some examples from the spec shows:

Example extract actions: - Extract method - Extract function - Extract variable - Extract interface from class

Example inline actions:

  • Inline function
  • Inline variable
  • Inline constant

Example rewrite actions:

  • Convert JavaScript function to class
  • Add or remove parameter
  • Encapsulate field
  • Make method static
  • Move method to base class

But I'm not expecting us to have direct need for it but that really seems one to keep in mind.

One question that I frequently got was: is syntax highlight included in the langserver protocol? Having double checked with Laurent Wouters, it's actually not the case (I thought documentSymbol could be used for that but actually no).

But we already have an implementation for that in pygments: https://hg.logilab.org/master/rql/file/d30c34a04ebf/rql/pygments_ext.py

rql pygments syntax highlight

What is currently existing for LSP in python and rql

The state is not great in the python ecosystem but not a disaster. Right now I haven't been able to find any generic python implementation of LSP that we could really reuse and integrate.

There is, right now and to my knowledge, only 2 maintained implementation of LSP in python. One for python and one for ... Fortran x)

Palantir's one makes extensive use of advanced magic code doesn't seems really necessary but it is probably of higher quality code since the Fortran one doesn't seems very idiomatic but looks much simpler.

So we'll ever need to extract the needed code from one of those of implement our own, not so great.

On the RQL side, everything that seems to be useful for our current situation is located in the RQL package that we maintain: https://hg.logilab.org/master/rql

Roadmap

After a discussion with Laurent Wouters, a first roadmap looks like this:

  • extract the code from either palantir or fortran LSP implementation and come with a generic implementation (I'm probably going to do it but Laurent told me he his going to take a look too) When I'm talking about a generic implementation I'm talking about everything listed in the big category of the protocol that isn't related to language features which we don't really want to rewrite again.

Once that's done, start implementing the language features for RQL:

  • the easiest is the syntax errors detection code, we just need to launch to parser on the code and handle the potential errors
  • do that with pretty specific red underline
  • play with RQL AST to extract the symbols and start doing things like codeLens and hover
  • much more complex (and for later): autocompletion (we'll either need a demi compiler or to modify the current one for that)

Side note

To better understand the motivation behind this move, it is part of the more global move of drop the "Web" from CubicWeb and replace all the front end current implementation by reactjs+typescript views. In this context CubicWeb (or Cubic?) will only serves as a backend provide with which we will talk in... RQL! Therefor writing and using RQL will be much more important than right now.

Reuven Lerner: Want to improve your Python fluency? Join Weekly Python Exercise!

$
0
0

A new cohort of Weekly Python Exercise, my family of courses to improve your Python fluency, starts on November 5th.

This time, it’s an advanced-level cohort. We’ll explore topics such as iterators, generators, decorators, objects, and threads.

The course’s structure is simple:

  • Every Tuesday, you get a new question, along with “pytest” tests to check yourself
  • On the following Monday, you get the solution and explanation
  • In between, you can discuss your solutions (and problems) with others in your cohort, on our private forum
  • I also hold live video office hours, where you can ask me questions about the exercises

Questions or comments? Or perhaps you’re eligible for one of my discounts? Read more at http://WeeklyPythonExercise.com/, or send me e-mail at reuven@lerner.co.il.

But don’t delay, because November 5th is coming up soon. And why miss out on improving your Python knowledge and fluency?

The post Want to improve your Python fluency? Join Weekly Python Exercise! appeared first on Reuven Lerner.

Mike Driscoll: The Demos for PySimpleGUI

$
0
0

The PySimpleGUI project has a lot of interesting demos included with their project that you can use to learn how to use PySimpleGUI. The demos cover all the basic widgets as far as I can tell and they also cover the recommended design patterns for the package. In addition, there are a couple of games and other tiny applications too, such as a version of Pong and the Snake game.

In this article, you will see a small sampling of the demos from the project that will give you some idea of what you can do with PySimpleGUI.


Seeing the Available Widgets

PySimpleGUI has a nice little demo called Demo_All_Widgets.py that demonstrates almost all the widgets that PySimpleGUI supports currently. PySimpleGUI has wrapped all of Tkinter’s core widgets, but not the ttk widgets.

This is what the demo looks like when you run it:

All PySimple GUI Widgets

Let’s take a quick look at the code for this demo:

#!/usr/bin/env python'''
Example of (almost) all widgets, that you can use in PySimpleGUI.
''' 
import PySimpleGUI as sg
 
sg.change_look_and_feel('GreenTan') 
# ------ Menu Definition ------ #
menu_def = [['&File', ['&Open', '&Save', 'E&xit', 'Properties']],
            ['&Edit', ['Paste', ['Special', 'Normal', ], 'Undo'], ],
            ['&Help', '&About...'], ] 
# ------ Column Definition ------ #
column1 = [[sg.Text('Column 1', background_color='lightblue', justification='center', size=(10, 1))],
           [sg.Spin(values=('Spin Box 1', '2', '3'),
                    initial_value='Spin Box 1')],
           [sg.Spin(values=('Spin Box 1', '2', '3'),
                    initial_value='Spin Box 2')],
           [sg.Spin(values=('Spin Box 1', '2', '3'), initial_value='Spin Box 3')]] 
layout = [[sg.Menu(menu_def, tearoff=True)],
    [sg.Text('(Almost) All widgets in one Window!', size=(30, 1), justification='center', font=("Helvetica", 25), relief=sg.RELIEF_RIDGE)],
    [sg.Text('Here is some text.... and a place to enter text')],
    [sg.InputText('This is my text')],
    [sg.Frame(layout=[[sg.CBox('Checkbox', size=(10, 1)),
         sg.CBox('My second checkbox!', default=True)],
        [sg.Radio('My first Radio!     ', "RADIO1", default=True, size=(10, 1)),
         sg.Radio('My second Radio!', "RADIO1")]], title='Options',
             title_color='red',
             relief=sg.RELIEF_SUNKEN,
             tooltip='Use these to set flags')],
    [sg.MLine(default_text='This is the default Text should you decide not to type anything', size=(35, 3)),
     sg.MLine(default_text='A second multi-line', size=(35, 3))],
    [sg.Combo(('Combobox 1', 'Combobox 2'), size=(20, 1)),
     sg.Slider(range=(1, 100), orientation='h', size=(34, 20), default_value=85)],
    [sg.OptionMenu(('Menu Option 1', 'Menu Option 2', 'Menu Option 3'))],
    [sg.Listbox(values=('Listbox 1', 'Listbox 2', 'Listbox 3'), size=(30, 3)),
     sg.Frame('Labelled Group', [[
         sg.Slider(range=(1, 100), orientation='v', size=(5, 20), default_value=25, tick_interval=25),
         sg.Slider(range=(1, 100), orientation='v', size=(5, 20), default_value=75),
         sg.Slider(range=(1, 100), orientation='v', size=(5, 20), default_value=10),
         sg.Col(column1, background_color='lightblue')]])],
    [sg.Text('_'*80)],
    [sg.Text('Choose A Folder', size=(35, 1))],
    [sg.Text('Your Folder', size=(15, 1), justification='right'),
     sg.InputText('Default Folder'), sg.FolderBrowse()],
    [sg.Submit(tooltip='Click to submit this form'), sg.Cancel()]] 
window = sg.Window('Everything bagel', layout,
    default_element_size=(40, 1), grab_anywhere=False) 
event, values = window.read()
sg.popup('Title',
         'The results of the window.',
         'The button clicked was "{}"'.format(event),
         'The values are', values)

PySimpleGUI lays out their widgets by using Python lists. You can also see that this demo uses lists for generating the menus too. Then you create a Window object and pass in the layout, which is your list of lists of Elements or widgets.

Let’s see what else you can do!


Graphing with PySimpleGUI

PySimpleGUI also supports creating graphs. One such example can be found in Demo_Graph_Element_Sine_Wave.py. This demo shows the developer how to use the Graph widget.

This is what the demo looks like when you run it:

Graphing with PySimpleGUI

Here is what the code looks like:

import PySimpleGUI as sg
importmath 
# Yet another usage of Graph element. 
SIZE_X = 200
SIZE_Y = 100
NUMBER_MARKER_FREQUENCY = 25 
 
def draw_axis():
    graph.draw_line((-SIZE_X, 0), (SIZE_X, 0))# axis lines
    graph.draw_line((0, -SIZE_Y), (0, SIZE_Y)) 
    for x inrange(-SIZE_X, SIZE_X+1, NUMBER_MARKER_FREQUENCY):
        graph.draw_line((x, -3), (x, 3))# tick marksif x != 0:
            # numeric labels
            graph.draw_text(str(x), (x, -10), color='green') 
    for y inrange(-SIZE_Y, SIZE_Y+1, NUMBER_MARKER_FREQUENCY):
        graph.draw_line((-3, y), (3, y))if y != 0:
            graph.draw_text(str(y), (-10, y), color='blue') 
 
# Create the graph that will be put into the window
graph = sg.Graph(canvas_size=(400, 400),
                 graph_bottom_left=(-(SIZE_X+5), -(SIZE_Y+5)),
                 graph_top_right=(SIZE_X+5, SIZE_Y+5),
                 background_color='white',
                 key='graph')# Window layout
layout = [[sg.Text('Example of Using Math with a Graph', justification='center', size=(50, 1), relief=sg.RELIEF_SUNKEN)],
          [graph],
          [sg.Text('y = sin(x / x2 * x1)', font='COURIER 18')],
          [sg.Text('x1'), sg.Slider((0, 200), orientation='h',
                                 enable_events=True, key='-SLIDER-')],
          [sg.Text('x2'), sg.Slider((1, 200), orientation='h', enable_events=True, key='-SLIDER2-')]] 
window = sg.Window('Graph of Sine Function', layout) 
whileTrue:
    event, values = window.read()if event isNone:
        break
    graph.erase()
    draw_axis()
    prev_x = prev_y = None 
    for x inrange(-SIZE_X, SIZE_X):
        y = math.sin(x/int(values['-SLIDER2-']))*int(values['-SLIDER-'])if prev_x isnotNone:
            graph.draw_line((prev_x, prev_y), (x, y), color='red')
        prev_x, prev_y = x, y
 
window.close()

To make the graph work correctly, you need to erase the graph and redraw it in the while loop above. Play around with the code a bit and see what you can do. There are several other graph related demos in the demo folder that you should check out as well.

PySimpleGUI also supports matplotlib integration. A fun one to play around with is Demo_Matplotlib_Animated.py.

When I ran it, the demo ended up looking like this:

PythonSimpleGUI with Matplotlib

Now let’s check out another demo!


Creating Pong with PySimpleGUI

As I mentioned earlier in this article, you can also create the Pong game pretty easily using PySimpleGUI. You can check out Demo_Pong.py for full details.

Here is what the code creates when you run it:

PySimpleGUI Pong Game

The code for this game is a bit long, but not too hard to follow. At the time of writing, the game is written using 183 lines of code in a single module.

Wrapping Up

There are 150+ demos in PySimpleGUI’s Demo folder. I did discover a few that didn’t work on Linux due to using OS-specific code. However most of the examples seem to work and they are a great way to see what you can do with this project. Check them out to get some ideas of how you could use PySimpleGUI for your own projects or demos.


Related Reading

The post The Demos for PySimpleGUI appeared first on The Mouse Vs. The Python.

Codementor: How I learned python/django


EuroPython Society: EuroPython 2020: Venue and location selected

$
0
0

After a work intense RFP over two months with more than 40 venues competing, 18 first round entries, and two rounds of refinements, we are now happy to announce the winner:

image

EuroPython 2020 will be held at the CCD in 
Dublin, Ireland, from July 20 - 26 2020

We will now start work on the contracts and get the organization going, so that we can all enjoy another edition of EuroPython next year.

Many thanks,

EuroPython Society Board
https://www.europython-society.org/

PyCharm: PyCharm 2019.2.4

$
0
0

PyCharm 2019.2.4 is now available!

Fixed in this Version

  • A regression issue that caused Pytest not to work properly with the debugger console was fixed.
  • The debugger console problem for PyQt5 that caused it to crash was solved.
  • We fixed an issue that was causing NumPy arrays not to be properly formatted in the Data View panel.
  • The IronPython problem causing the debugger to fail was fixed.
  • We took care of the debugger stack trace messages that are displayed when the debugger is stopped so they won’t show so you can properly know when the process was ended.
  • The regression issue causing the Pytest test suite to raise an error in PyCharm was solved.

Further Improvements

  • A platform issue that was modifying original file permissions upon saving them was solved.
  • We tweaked the error messages for SSH connections to show information properly.
  • Adding data source for databases via the explorer now opens directly the actual type of data source selected.
  • Completion for databases is now aware of the database or schema you’re currently working with so it will only show suggestions that belong to that context.
  • And much more, check out our release notes for more details.

Getting the New Version

You can update PyCharm by choosing Help | Check for Updates (or PyCharm | Check for Updates on macOS) in the IDE. PyCharm will be able to patch itself to the new version, there should no longer be a need to run the full installer.

If you’re on Ubuntu 16.04 or later, or any other Linux distribution that supports snap, you should not need to upgrade manually, you’ll automatically receive the new version.

Michael Droettboom: This Week in Glean: November 1, 2019

$
0
0

(“This Week in Glean” is a series of blog posts that the Glean Team at Mozilla is using to try to communicate better about our work. They could be release notes, documentation, hopes, dreams, or whatever: so long as it is inspired by Glean. The last two posts are here and here.)

This week in Glean, we bring you a detective story from the Mozilla telemetry beat. It's a story about how fixing things can often break things in unexpected ways. It's about how things that may work perfectly in the lab, suddenly fail in the wild at scale. And it's about how our team used all of the data sources at our disposal to solve a problem.

Glean is a new effort at Mozilla to collect telemetry based on lessons from our past experiences that can be used across a number of our products and better support our lean data practices. It is currently being used to collect telemetry from Firefox Preview for Android, but will be rolling out to more Mozilla products in the coming months.

When using Firefox Preview, the browser makes measurements (or telemetry) about its usage and how it's performing. Users can choose to disable telemetry if they prefer, however the data from the rest provides us with key insights that allow us to build stable and performant products that meet the needs of our users. This telemetry is periodically sent to Mozilla in bundles called "pings", all of which is orchestrated on Firefox's behalf by the Glean SDK.

The Glean SDK sends a few different kinds of pings, but the two that are relevant to our story are the metrics ping and baseline ping. The metrics ping is sent once a day at 04:00 local time, if the user used the application in the last 24 hours. The baseline ping contains minimal data, but is sent more often: every time the application "goes to background". This happens when the user switches to another application or the device goes to sleep. Given how people normally use their smartphones, the browser "goes to background" a few times a day, so one would expect to see baseline pings occuring more often than metrics pings.

Not long after the release of Firefox Preview, we noticed that we were getting a metrics ping every 24 hours from each user, even if they hadn't used the browser during that period. This wastes bandwidth, both for us and our users, since there's no need to send data if there haven't been any changes.

The bug was happening because every time Glean sent a metrics ping at 4am, it would just go ahead and schedule the next one to be sent 24 hours later. Android doesn't provide a lot of good options to solve this problem. The solution we arrived at is that Glean would schedule the ping for the next 04:00 only if the user is actually using the application at the time. If they aren't using it, we'll just check the next time the user opens the app, and schedule it for the following 04:00 at that time. Android provides an API that can tell our app when the app goes to foreground and background (among other things) called the "LifecycleObserver API". Using that bit of information, Glean can know when the user is using the app and schedule our next metrics ping accordingly.

We merged this fix, feeling we had squashed that bug and moved on. But our jaws dropped when we saw the following graph:

Glean metrics graph

The graph shows the number of clients that sent a baseline ping (green), metrics ping (red) or both a baseline and metrics ping (blue). Around August 20, when we fixed that bug, the number of metrics pings went down (as expected), but the number of baseline pings went down even more, such that there were now fewer baseline pings than metrics pings. How could that possibly be?

We scratched our heads for a few days over this, methodically looking over of the other changes that occurred during that timeframe that may have caused this strange outcome in the data. One by one, all other options were eliminated until all signs pointed to that "fix" for the metrics ping. But understanding how that fix could be connected to this behavior remained elusive.

It turned out the answer lay hidden in our crash data. In addition to the Glean telemetry, Firefox Preview uses Sentry to collect reports about application crashes. These reports contain "backtraces", or specific information about where in the code the crash occurred. For some time, we had seen crash reports that pointed at Android's Lifecycle Observer API, but they were of such low frequency that we hadn't invested the effort to investigate further. Around the time of the "fix" however, there was an uptick in these kinds of crashes.

It turns out the Lifecycle Observer API has an undocumented limitation that it wasn't designed to be called in the way we were calling it (off of the main thread of execution). This caused the Lifecycle Observer to randomly fail, but only sometimes, and only for a fraction of users in the wild. I, personally, have never been able to reproduce the behavior -- we know about it only because Firefox Preview is running on thousands of devices in the world at large and they report back through Sentry.

When the Lifecycle Observer does fail, two interesting things happen in tandem:

  • For the metrics ping, Glean no longer knows when the application is being used, so it sends the metrics ping more often than it should.
  • The baseline ping is triggered directly from the Lifecycle Observer when the application goes to background. So when the Lifecycle Observer fails, Glean sends the baseline ping less often than we should.

These two things in combination are what caused the red and green lines to cross and the fabric of space-time to become unraveled. The culprit is most likely that the fix added a second use of the Lifecycle Observer to the application: it was now being used both to handle the metrics ping and the baseline ping. Using it twice (and potentially concurrently) was enough to push a long latent crash problem into the monster that ate our data.

These sorts of puzzles can be very frustrating until they reveal themselves. Having a great team to brainstorm hypotheses with, and a common mission to find a "cause" without a "blame" is incredibly valuable. Thanks to everyone on the Glean team: Alessio Placitelli, Travis Long, Jan-Erik Rediger, Georg Fritzsche, Chris Hutten-Czapski and Beatriz Rizental.

Join us next week. Who knows what we'll find in the icy fjords of Glean land...

Python Insider: Python 3.5.9 is released

$
0
0
There were no new changes in version 3.5.9; 3.5.9 was released only because of a CDN caching problem, which resulted in some users downloading a prerelease version of the 3.5.8 .xz source tarball. Apart from the version number, 3.5.9 is identical to the proper 3.5.8 release.

You can download Python 3.5.9 here.

Django Weblog: Django bugfix releases issued: 2.2.7, 2.1.14, and 1.11.26

$
0
0

Today we've issued 2.2.7, 2.1.14, and 1.11.26 bugfix releases.

The release package and checksums are available from our downloads page, as well as from the Python Package Index. The PGP key ID used for this release is Mariusz Felisiak: 2EF56372BA48CD1B.

Julien Danjou: Finding definitions from a source file and a line number in Python

$
0
0
Finding definitions from a source file and a line number in Python

My job at Datadog keeps me busy with new and questioning challenges. I recently stumbled upon a problem that sounded easy but was more difficult than I imagined.

Here's the thing: considering a filename and a line number, can you tell which function, method or class this line of code belongs to?

I started to dig into the standard library, but I did not find anything solving this problem. It sounded like I write to do this myself.

The first steps sound easy. Open a file, read it, find the line number. Right.

Then, how do you know which functions this line is in? You don't, expect if you parse the whole file and keep tracks of function definitions. A regular expression parsing each line might be a solution?

Well, you had to be careful as function definitions can span multiple lines.

Using the AST

I decided that a good and robust strategy was not going to use manual parsing or the like, but using Python abstract syntax tree (AST) directly. By leveraging Python's own parsing code, I was sure I was not going to fail while parsing a Python source file.

This can be simply be accomplished with:

import ast

def parse_file(filename):
    with open(filename) as f:
        return ast.parse(f.read(), filename=filename)

And you're done. Are you? No, because that only works in 99.99% of the case. If your source file is using an encoding that is now ASCII or UTF-8, then the function fails. I know you think I'm crazy to think about this but I like my code to be robust.

It turns out Python has a cookie to specify the encoding in the form of # encoding: utf-8 as defined in PEP 263. Reading this cookie would help to find the encoding.

To do that, we need to open the file in binary mode, use a regular expression to match the data, and… Well, it's dull, and somebody already implemented it for us so let's use the fantastic tokenize.open function provided by Python:

import ast
import tokenize

def parse_file(filename):
    with tokenize.open(filename) as f:
        return ast.parse(f.read(), filename=filename)

That should work in 100% of the time. Until proven otherwise.

Browsing the AST

The parse_file function now returns a Python AST. If you never played with Python AST, it's a gigantic tree that represents your source code just before it is compiled down to Python bytecode.

In the tree, there should be statements and expression. In our case, we're interested in finding the function definition that is the closest to our line number. Here's an implementation of that function:

def filename_and_lineno_to_def(filename, lineno):
    candidate = None
    for item in ast.walk(parse_file(filename)):
        if isinstance(item, (ast.FunctionDef, ast.AsyncFunctionDef, ast.ClassDef)):
            if item.lineno > lineno:
                # Ignore whatever is after our line
                continue
            if candidate:
                distance = lineno - item.lineno
                if distance < (lineno - candidate.lineno):
                    candidate = item
            else:
                candidate = item

    if candidate:
        return candidate.name

This iterates over all the node of the AST and returns the node where the line number is the closest to our definition. If we have a file that contains:

class A(object):
    X = 1
    def y(self):
        return 42

the function filename_and_lineno_to_def returns for the lines 1 to 5:

A
A
y
y
y
Return of filename_and_lineo_to_def for lines 1 to 5

It works!

Closures?

The naive approach described earlier likely works for 90% of your code, but there are some edge cases. For example, when defining function closures, the above algorithm fails. With the following code:

class A(object):
   X = 1
   def y(self):
       def foo():
           return 42
       return foo

the function filename_and_lineno_to_def returns for lines 1 to 7:

A
A
y
foo
foo
foo
foo
Return of filename_and_lineo_to_def for lines 1 to 7

Oops. Clearly, lines 6 and 7 do not belong to the foo function. Our approach is too naive to see that starting at line 6, we're back in the y method.

Interval Trees

The correct way of handling that is to consider each function definition as an interval:

Finding definitions from a source file and a line number in PythonPiece of code seen as interval.

Whatever the line number we request is, we should return the node that is responsible for the smallest interval that the line is in.

What we need in this case is a correct data structure to solve our problem: an interval tree fits perfectly our use case. It allows for searching rapidly pieces of code that match our line number.

To solve our problem we need several things:

  • A way to compute the beginning and end line numbers for a function.
  • A tree that is fed with the intervals we computed just before.
  • A way to select the best matching intervals if a line is part of several functions (closure).

Computing Function Intervals

The interval of a function is the first and last lines that compose its body. It's pretty easy to find those by walking through the function AST node:

def _compute_interval(node):
    min_lineno = node.lineno
    max_lineno = node.lineno
    for node in ast.walk(node):
        if hasattr(node, "lineno"):
            min_lineno = min(min_lineno, node.lineno)
            max_lineno = max(max_lineno, node.lineno)
    return (min_lineno, max_lineno + 1)

Given any AST node, the function returns a tuple of the first and last line number of that node.

Building The Tree

Rather than implementing an interval tree, we'll use the intervaltree library. We need to create a tree and feed it with the computed interval:

def file_to_tree(filename):
    with tokenize.open(filename) as f:
        parsed = ast.parse(f.read(), filename=filename)
    tree = intervaltree.IntervalTree()
    for node in ast.walk(parsed):
        if isinstance(node, (ast.FunctionDef, ast.AsyncFunctionDef, ast.ClassDef)):
            start, end = _compute_interval(node)
            tree[start:end] = node
    return tree

Here you go: the function parses the Python file passed as an argument and converts it to its AST representation. It then walks it and feeds the interval tree with every class and function definition.

Querying the Tree

Now that the tree is built, it should be queried with the line number. This is pretty simple:

matches = file_to_tree(filename)[lineno]
if matches:
    return min(matches, key=lambda i: i.length()).data.name

The build tree might return several matches if there are several intervals containing our line number. In that case, we pick the smallest interval and return the name of the node — which is our class or function name!

Mission Success

We did it! We started with a naive approach and iterated to a final solution covering 100% of our cases. Picking the right data structure, interval trees here, helped us solving this in an intelligent approach.

Zero-with-Dot (Oleg Żero): Using dunder methods to refine data model

$
0
0

Introduction

Practically everyone who has ever used Python came across at least one of the so-called Python magic methods. Dunder methods, as they also called that way, are Python’s special functions that allow users to hook into some specific actions being performed. Probably the most frequently encountered one is the __init__ method. It is called when instantiating a new object from a class and by overriding it, we can gain control over that process.

However, this post is not going to take you through a full list of these.

Instead, we will show how you can effectively use this great Python feature by telling of a short story. We will use quaternions as an example to explain the proces of creating of our data model that is easy to handle for other developers, especially those less enthusiastic about advanced algebra. Most importantly, we will explain the decision process and argue why it makes sense to even bother.

Simple object

A quaternion is an algebraic concept often used for describing rotations and widely applied in 3D modeling and gaming. Conceptually, quaternions can be thought of as an extension of complex numbers body, having not one, but three imaginary parts. Depending on the application, they are can also be understood as quotients of three-dimensional vectors or four-dimensional objects or scalar-vector pairs.

OK, but how do we code this thing?

Instantiation

From the programming point of view, we do not need to focus that deep into math. At this stage, all we need to know is that one quaternion is defined by four real numbers.

__int__

1
2
3
4
5
6
classQuaternion:def__init__(self,w,x,y,z):self.w=wself.x=xself.y=yself.z=z

We model our mathematical “being” as an object, and we have our first dunder method. All this code does is to tell Python: “look, when you create a new object of class Quaternion, I will need four numbers from you to instantiate it. Since every quaternion is different, it makes sense to define w, x, y and z as object attributes instead of class properties.

Representation

Let’s create our first quaternion.

>>>q1=Quaternion(1,2,3,4)>>>q1<__main__.Quaternionat0x7f4210f483c8>

Our quaternion is an object, but it looks pretty ugly. By default, we see an address of where that object lives in memory, but that description tells us nothing about the qualities we are interested in.

__repr__, __str__

1
2
3
4
5
6
7
def__repr__(self):return"Quaternion({}, {}, {}, {})".format(self.w,self.x,self.y,self.z)def__str__(self):return"Q = {:.2f} + {:.2f}i + {:.2f}j + {:.2f}k".format(self.w,self.x,self.y,self.z)

Here, we have defined two more methods. The __repr__ method is an “official” representation of the object, and here with this quality that eval(repr(obj)) == obj.

Good. The __repr__ method returns a string that is descriptive enough. However, we can further enhance our representation with __str__. The output will be as follows:

>>>q1# calls q1.__repr__Quaternion(1,2,3,4)>>>print(q1)# calls q1.__str__Q=1.00+2.00i+3.00j+4.00k

Performing algebraic operations

You may wonder, at this point, why not using a list or a dictionary? It is certainly less code and we can easily see the elements.

Well, we indeed need something more than just a “bag of numbers”. There are two main arguments against it:

  1. We don’t want to rely on convention. Is w always going to be named “w” and used as the first argument? What if someone breaks it?
  2. We define this object to reflect upon the mathematical properties it is designed to represent.

Pretty tough, right? Apart from 1., quaternions are additive. Try adding dictionaries or lists together… one will result in TypeError, while the other will extend the number of elements, thus breaking our definition. There is another way.

Addition

__add__

1
2
3
4
5
6
def__add__(self,other):w=self.w+other.wx=self.x+other.xy=self.y+other.yz=self.z+other.zreturnQuaternion(w,x,y,z)

There we have it. We have just overridden the + operator, making the addition of quaternions defined.

>>>q1=Quaternion(1,2,3,4)>>>q2=Quaternion(0,1,3,5)>>>q1+q2Quaternion(1,3,6,9)

Subtraction

__sub__

The same we can do with subtracting. This time we will be fancy and do it in just one line of code.

1
2
def__sub__(self,other):returnQuaternion(*list(map(lambdai,j:i-j,self.__dict__.values(),other.__dict__.values())))

Although that was unnecessary, it also shows another convenient dunder method. The __dict__ method collects all the attributes of an object and returns them as a dictionary.

Multiplication

If you still think that overriding of operations is boring, now it is time for fun.

__matmul__

The easiest of all is the dot product. Represented with @, since Python 3.5, it invokes __matmul__ method, which for quaternions, is defined as a simple element-wise multiplication.

The “normal” multiplication is harder though. First, the algebra distinguishes between quaternion times quaternion multiplication. Secondly, the multiplication is not commutative, meaning that .

__mul__

1
2
3
4
5
6
7
8
9
10
11
def__mul__(self,other):ifisinstance(other,Quaternion):w=self.w*other.w-self.x*other.x-self.y*other.y-self.z*other.zx=self.w*other.x+self.x*other.w+self.y*other.z-self.z*other.yy=self.w*other.y+self.y*other.w+self.z*other.x-self.x*other.zz=self.w*other.z+self.z*other.w+self.x*other.y-self.y*other.xreturnQuaternion(w,x,y,z)elifisinstance(other,(int,float)):returnQuaternion(*[other*iforiinself.__dict__.values()])else:raiseTypeError("Operation undefined.")

Here, if the other is a quaternion, we compute the so-called Hamilton product and return a new object. If the other is a scalar (a number), we multiply each of the quaternion’s coordinates with that number. Finally, anything else raises an exception.

As mentioned earlier, the multiplication of quaternions is not commutative. However, that is only when multiplying quaternions by one another. With the current definition, if we execute 2 * q1, we will get an error. To fix it, we can use __rmul__ which covers our case:

__rmul__

1
2
3
4
5
def__rmul__(self,other):ifisinstance(other,(int,float)):returnself.__mul__(other)else:raiseTypeError("Operation undefined.")

Now, we can multiply a quaternion by a scalar on both sides, while quaternion can multiply another quaternion in a strictly defined order.

Equality

We will skip the division as it follows in the same pattern. Instead look at one more curiosity: equality.

What does it mean that two quaternions are actually equal? Is it when all components are pair-wise equal or perhaps when two objects represent the same truth?

We can go for any of these definitions… however, the very fact that we asked this question to ourselves, justifies overriding one more method.

__eq__

1
2
3
def__eq__(self,other):r=list(map(lambdai,j:abs(i)==abs(j),self.__dict__.values(),other.__dict__.values()))returnsum(r)==len(r)

Here we defined our == as a case where all coordinates’ absolute values having to match.

Other operations

Python defines a list of operators that can be overridden. However, not every mathematical operation is represented in the dunder methods. In these cases, it is better to stick to “normal” methods, since the usage of other symbols would be counterintuitive.

For example:

1
2
3
4
5
6
7
8
9
10
11
12
13
14
15
16
17
18
frommathimportsqrtdefnorm(self):returnsqrt(sum([i**2foriinself.__dict__.values()))defconjugate(self):x,y,z=-self.x,-self.y,-self.zreturnQuaterion(self.w,x,y,z)defnormalize(self):norm=self.norm()returnQuaternion(*[i/normforinself.__dict__.values()])definverse(self):qconj=self.conjugate()norm=self.norm()returnQuaternion(*[i/normforiinqconj.__dict__.values()])

Overriding or overloading?

Throughout this post, we were carefully watching our language. We “wrote over” some of the dunder methods for good reason. However, we did not perform any overloading of operators. Overloading of operators does not exist in Python in a strict sense. One method can only have one interface to it, although Python allows a variable number of arguments.

Do you remember how we instantiated our objects? We used four numbers w, x, y, and z as arguments. When dealing with quaternions, however, it is common to derive them from yaw, pitch and rollangles, which are closely related to Euler angles.

The question arises, how do we go about them programmatically? Do we extend our __init__ method’s interface to accept seven numbers? Is it better to make some of them optional? If yes, then how do we ensure the integrity of our object? What price do we need to pay in terms of the code quality?

Speaking of quaternions, we do have an opportunity to implement something close to overloading, making our code even cleaner.

Pythonic “overloading”

Since all operations, as we saw them, involve w, z, y, z variables, there is no point in adding any more attributes to our class. What we must do, however, is to have an option to bypass the constructor’s interface with something that takes yaw, pitch, and roll converts them to (w, x, y, z) and instantiates of a new object.

First, let’s create the re-calculation method:

1
2
3
4
5
6
7
8
9
10
11
12
13
frommathimportsin,cosdef_ypr_to_coords(yaw,pitch,roll):y=0.5*yawp=0.5*pitchr=0.5*rollw=cos(y)*cos(p)*cos(r)+sin(y)*sin(p)*sin(r)x=cos(y)*cos(p)*sin(r)-sin(y)*sin(p)*cos(r)y=sin(y)*cos(p)*sin(r)+cos(y)*sin(p)*cos(r)z=sin(y)*cos(p)*cos(r)-cos(y)*sin(p)*sin(r)returnw,z,y,z

The method is protected in the sense that it is “internal” to the class. It also does not perform any operations over the object. It only recalculates the angles returns the coordinates.

Next, we use it as a part of our __init__’s second face.

1
2
3
4
5
6
7
8
9
10
11
classQuaternion:def__init__(self,w,x,y,z):self.w=wself.x=xself.y=yself.z=z@classmethoddefcreate_from_ypr(cls,yaw,pitch,roll):r=cls._ypr_to_coords(yaw,pitch,roll)returncls(*r)

Without affecting the __init__ or the attributes, we have now another way to instantiate our quaternion. With @classmethod decorator, we appoint create_from_ypr(...) method to be a class method rather than an object method. When invoked on a class, it recalculates our coordinates and returns the class itself (through former __init__) feeding the necessary arguments in.

This trick allows us to stay true to our definition, but adds more flexibility. We can even use this approach to define special kind of objects:

1
2
3
4
5
6
classQuaternion:...@classmethoddefcreate_identity(cls):returncls(1,0,0,0)
>>>q0=Quaternion.create_identity()>>>print(q0)Q=1.00+0.00i+0.00j+0.00k

Conclusions

In this post, we have presented a pattern behind using some of Python’s special features known as dunder methods. We have given an example of how these methods can be harnessed to model an abstract algebraic object, namely a quaternion. We have also made a clear distinction between overriding and overloading and shown how the latter can be implemented to facilitate working with our objects.

To see more methods, take a look at this gist. If there is anything to improve, please give the feedback in the comments below! Thanks ;)


Real Python: Build a Mobile Application With the Kivy Python Framework

$
0
0

These days, developers are highly likely to be working on a mobile or web application. Python doesn’t have built-in mobile development capabilities, but there are packages you can use to create mobile applications, like Kivy, PyQt, or even Beeware’s Toga library.

These libraries are all major players in the Python mobile space. However, there are some benefits you’ll see if you choose to create mobile applications with Kivy. Not only will your application look the same on all platforms, but you also won’t need to compile your code after every change. What’s more, you’ll be able to use Python’s clear syntax to build your applications.

In this tutorial, you’ll learn how to:

  • Work with Kivy widgets
  • Lay out the UI
  • Add events
  • Use the KV language
  • Create a calculator application
  • Package your application for iOS, Android, Windows, and OS X

This tutorial assumes you’re familiar with object-oriented programming. If you’re not, then check out Object-Oriented Programming (OOP) in Python 3.

Let’s get started!

Free Bonus:Click here to get access to a chapter from Python Tricks: The Book that shows you Python's best practices with simple examples you can apply instantly to write more beautiful + Pythonic code.

Understanding the Kivy Framework

Kivy was first released in early 2011. This cross-platform Python framework can be deployed to Windows, Mac, Linux, and Raspberry Pi. It supports multitouch events in addition to regular keyboard and mouse inputs. Kivy even supports GPU acceleration of its graphics, since they’re built using OpenGL ES2. The project uses the MIT license, so you can use this library for free and commercial software.

When you create an application with Kivy, you’re creating a Natural User Interface or NUI. The idea behind a Natural User Interface is that the user can easily learn how to use your software with little to no instruction.

Kivy does not attempt to use native controls or widgets. All of its widgets are custom-drawn. This means that Kivy applications will look the same across all platforms. However, it also means that your app’s look and feel will differ from your user’s native applications. This could be a benefit or a drawback, depending on your audience.

Installing Kivy

Kivy has many dependencies, so it’s recommended that you install it into a Python virtual environment. You can use either Python’s built-in venv library or the virtualenv package. If you’ve never used a Python virtual environment before, then check out Python Virtual Environments: A Primer.

Here’s how you can create a Python virtual environment:

$ python3 -m venv my_kivy_project

This will copy your Python 3 executable into a folder called my_kivy_project and add a few other subfolders to that directory.

To use your virtual environment, you need to activate it. On Mac and Linux, you can do that by executing the following while inside the my_kivy_project folder:

$source bin/activate

The command for Windows is similar, but the location of the activate script is inside of the Scripts folder instead of bin.

Now that you have an activated Python virtual environment, you can run pip to install Kivy. On Linux and Mac, you’ll run the following command:

$ python -m pip install kivy

On Windows, installation is a bit more complex. Check out the official documentation for how to install Kivy on Windows. (Mac users can also download a dmg file and install Kivy that way.)

If you run into any issues installing Kivy on your platform, then see the Kivy download page for additional instructions.

Working With Kivy Widgets

A widget is an onscreen control that the user will interact with. All graphical user interface toolkits come with a set of widgets. Some common widgets that you may have used include buttons, combo boxes, and tabs. Kivy has many widgets built into its framework.

Running a “Hello, Kivy!” Program

To see how Kivy works, take a look at the following “Hello, World!” application:

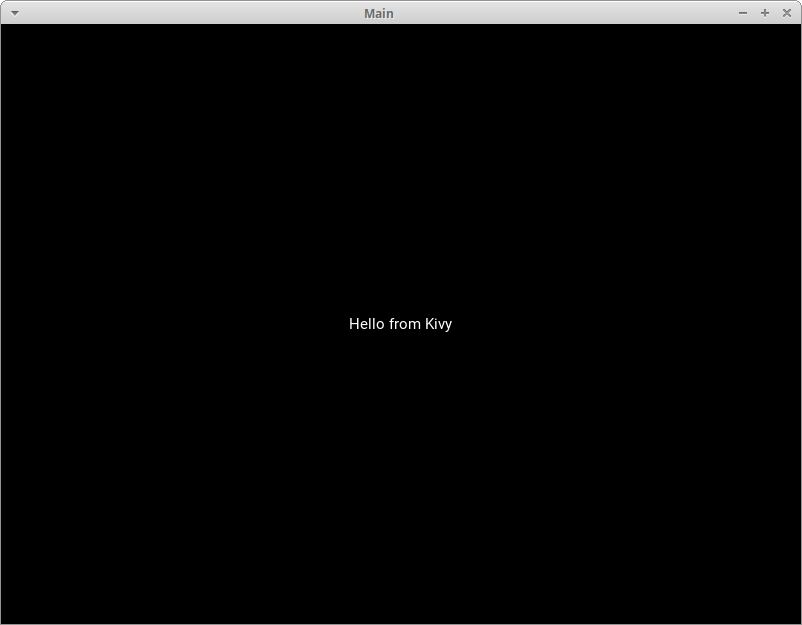
fromkivy.appimportAppfromkivy.uix.labelimportLabelclassMainApp(App):defbuild(self):label=Label(text='Hello from Kivy',size_hint=(.5,.5),pos_hint={'center_x':.5,'center_y':.5})returnlabelif__name__=='__main__':app=MainApp()app.run()

Every Kivy application needs to subclass App and override build(). This is where you’ll put your UI code or make calls to other functions that define your UI code. In this case, you create a Label widget and pass in its text, size_hint, and pos_hint. These last two arguments are not required.

size_hint tells Kivy the proportions to use when creating the widget. It takes two numbers:

  1. The first number is the x size hint and refers to the width of the control.
  2. The second number is the y size hint and refers to the height of the control.

Both of these numbers can be anywhere between 0 and 1. The default value for both hints is 1. You can also use pos_hint to position the widget. In the code block above, you tell Kivy to center the widget on the x and y axes.

To make the application run, you instantiate your MainApp class and then call run(). When you do so, you should see the following on your screen:

Hello World in Kivy

Kivy also outputs a lot of text to stdout:

[INFO   ] [Logger      ] Record log in /home/mdriscoll/.kivy/logs/kivy_19-06-07_2.txt[INFO   ] [Kivy        ] v1.11.0[INFO   ] [Kivy        ] Installed at "/home/mdriscoll/code/test/lib/python3.6/site-packages/kivy/__init__.py"[INFO   ] [Python      ] v3.6.7 (default, Oct 22 2018, 11:32:17)[GCC 8.2.0][INFO   ] [Python      ] Interpreter at "/home/mdriscoll/code/test/bin/python"[INFO   ] [Factory     ] 184 symbols loaded[INFO   ] [Image       ] Providers: img_tex, img_dds, img_sdl2, img_gif (img_pil, img_ffpyplayer ignored)[INFO   ] [Text        ] Provider: sdl2(['text_pango'] ignored)[INFO   ] [Window      ] Provider: sdl2(['window_egl_rpi'] ignored)[INFO   ] [GL          ] Using the "OpenGL" graphics system[INFO   ] [GL          ] Backend used <sdl2>[INFO   ] [GL          ] OpenGL version <b'4.6.0 NVIDIA 390.116'>[INFO   ] [GL          ] OpenGL vendor <b'NVIDIA Corporation'>[INFO   ] [GL          ] OpenGL renderer <b'NVS 310/PCIe/SSE2'>[INFO   ] [GL          ] OpenGL parsed version: 4, 6[INFO   ] [GL          ] Shading version <b'4.60 NVIDIA'>[INFO   ] [GL          ] Texture max size <16384>[INFO   ] [GL          ] Texture max units <32>[INFO   ] [Window      ] auto add sdl2 input provider[INFO   ] [Window      ] virtual keyboard not allowed, single mode, not docked[INFO   ] [Base        ] Start application main loop[INFO   ] [GL          ] NPOT texture support is available

This is useful for debugging your application.

Next, you’ll try adding an Image widget and see how that differs from a Label.

Displaying an Image

Kivy has a couple of different image-related widgets to choose from. You can use Image to load local images from your hard drive or AsyncImage to load an image from a URL. For this example, you’ll stick with the standard Image class:

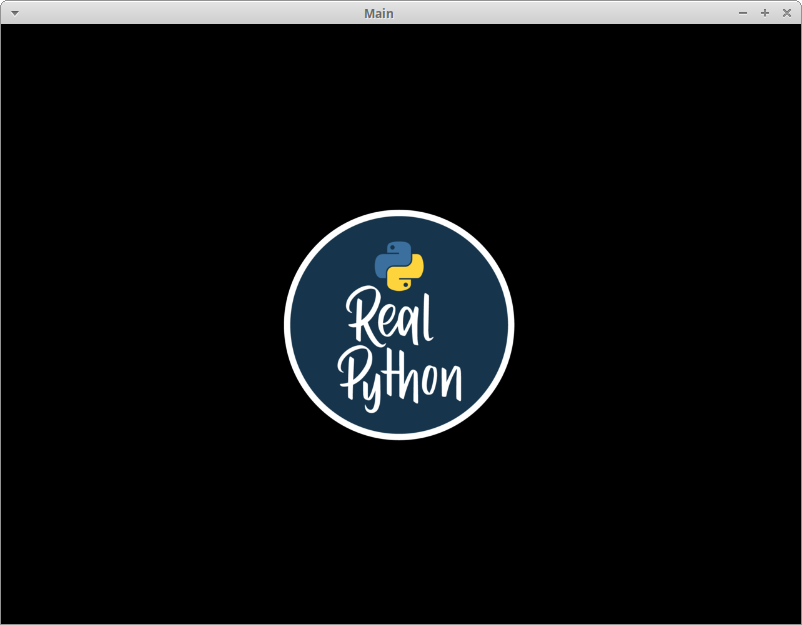
fromkivy.appimportAppfromkivy.uix.imageimportImageclassMainApp(App):defbuild(self):img=Image(source='/path/to/real_python.png',size_hint=(1,.5),pos_hint={'center_x':.5,'center_y':.5})returnimgif__name__=='__main__':app=MainApp()app.run()

In this code, you import Image from the kivy.uix.image sub-package. The Image class takes a lot of different parameters, but the one that you want to use is source. This tells Kivy which image to load. Here, you pass a fully-qualified path to the image. The rest of the code is the same as what you saw in the previous example.

When you run this code, you’ll see something like the following:

Showing an image with Kivy

The text from the previous example has been replaced with an image.

Now you’ll learn how to add and arrange multiple widgets in your application.

Laying Out the UI

Each GUI framework that you use has its own method of arranging widgets. For example, in wxPython you’ll use sizers, while in Tkinter you use a layout or geometry manager. With Kivy, you’ll use Layouts. There are several different types of Layouts that you can use. Here are some of the most common ones:

  • BoxLayout
  • FloatLayout
  • GridLayout

You can search Kivy’s documentation for a full list of available Layouts. You can also look in kivy.uix for the actual source code.

Try out the BoxLayout with this code:

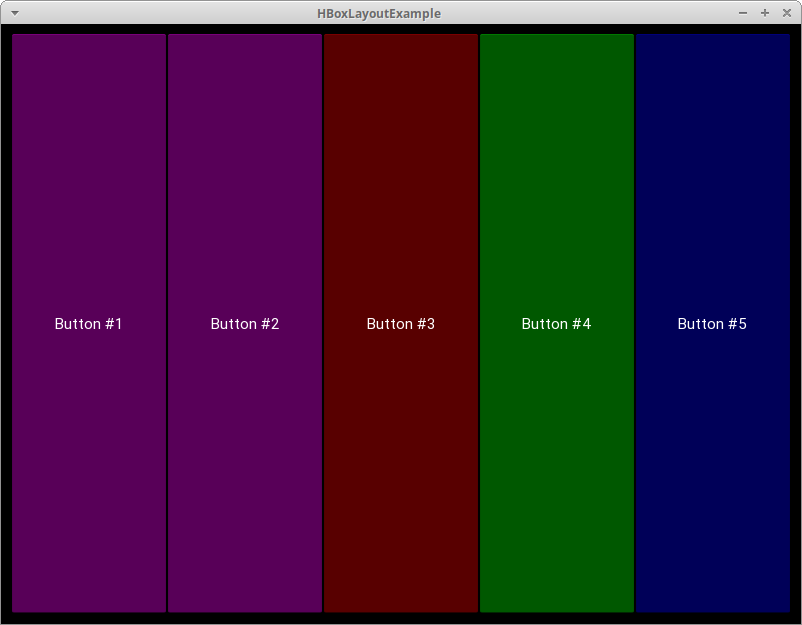
importkivyimportrandomfromkivy.appimportAppfromkivy.uix.buttonimportButtonfromkivy.uix.boxlayoutimportBoxLayoutred=[1,0,0,1]green=[0,1,0,1]blue=[0,0,1,1]purple=[1,0,1,1]classHBoxLayoutExample(App):defbuild(self):layout=BoxLayout(padding=10)colors=[red,green,blue,purple]foriinrange(5):btn=Button(text="Button #%s"%(i+1),background_color=random.choice(colors))layout.add_widget(btn)returnlayoutif__name__=="__main__":app=HBoxLayoutExample()app.run()

Here, you import BoxLayout from kivy.uix.boxlayout and instantiate it. Then you create a list of colors, which are themselves lists of Red-Blue-Green (RGB) colors. Finally, you loop over a range of 5, creating a button btn for each iteration. To make things a bit more fun, you set the background_color of the button to a random color. You then add the button to your layout with layout.add_widget(btn).

When you run this code, you’ll see something like this:

Using a Horizontal BoxLayout in Kivy

There are 5 randomly-colored buttons, one for each iteration of your for loop.

When you create a layout, there are a few arguments you should know:

  • padding: You can specify the padding in pixels between the layout and its children in one of three ways:
    1. A four-argument list: [padding_left, padding_top, padding_right, padding_bottom]
    2. A two-argument list: [padding_horizontal, padding_vertical]
    3. A singular argument:padding=10
  • spacing: You can add space between the children widgets with this argument.
  • orientation: You can change the default orientation of the BoxLayout from horizontal to vertical.

Adding Events

Like most GUI toolkits, Kivy is mostly event-based. The framework responds to user keypresses, mouse events, and touch events. Kivy has the concept of a Clock that you can use to schedule function calls for some time in the future.

Kivy also has the concept of Properties, which works with the EventDispatcher. Properties help you do validation checking. They also let you fire events whenever a widget changes its size or position.

Let’s add a button event to your button code from earlier:

fromkivy.appimportAppfromkivy.uix.buttonimportButtonclassMainApp(App):defbuild(self):button=Button(text='Hello from Kivy',size_hint=(.5,.5),pos_hint={'center_x':.5,'center_y':.5})button.bind(on_press=self.on_press_button)returnbuttondefon_press_button(self,instance):print('You pressed the button!')if__name__=='__main__':app=MainApp()app.run()

In this code, you call button.bind() and link the on_press event to MainApp.on_press_button(). This method implicitly takes in the widget instance, which is the button object itself. Finally, a message will print to stdout whenever the user presses your button.

Using the KV Language

Kivy also provides a design language called KV that you can use with your Kivy applications. The KV language lets you separate your interface design from the application’s logic. This follows the separation of concerns principle and is part of the Model-View-Controller architectural pattern. You can update the previous example to use the KV language:

fromkivy.appimportAppfromkivy.uix.buttonimportButtonclassButtonApp(App):defbuild(self):returnButton()defon_press_button(self):print('You pressed the button!')if__name__=='__main__':app=ButtonApp()app.run()

This code might look a bit odd at first glance, as it creates a Button without setting any of its attributes or binding it to any events. What’s happening here is that Kivy will automatically look for a file that has the same name as the class in lowercase, without the App part of the class name.

In this case, the class name is ButtonApp, so Kivy will look for a file named button.kv. If that file exists and is properly formatted, then Kivy will use it to load up the UI. Go ahead and create this file and add the following code:

 1 <Button>:
 2     text: 'Press me'
 3     size_hint: (.5, .5)
 4     pos_hint: {'center_x': .5, 'center_y': .5}
 5     on_press: app.on_press_button()

Here’s what each line does:

  • Line 1 matches the Button call in your Python code. It tells Kivy to look into the instantiated object for a button definition.
  • Line 2 sets the button’s text.
  • Line 3 sets the width and height with size_hint.
  • Line 4 sets the button’s position with pos_hint.
  • Line 5 sets the on_press event handler. To tell Kivy where the event handler is, you use app.on_press_button(). Here, Kivy knows will look in the Application class for a method called .on_press_button().

You can set up all of your widgets and layouts inside one or more KV language files. The KV language also supports importing Python modules in KV, creating dynamic classes, and much more. For full details, check out Kivy’s guide to the KV Language.

Now you’re ready to create a real application!

Creating a Kivy Application

One of the best ways to learn a new skill is by creating something useful. With that in mind, you’ll use Kivy to build a calculator that supports the following operations:

  • Addition
  • Subtraction
  • Multiplication
  • Division

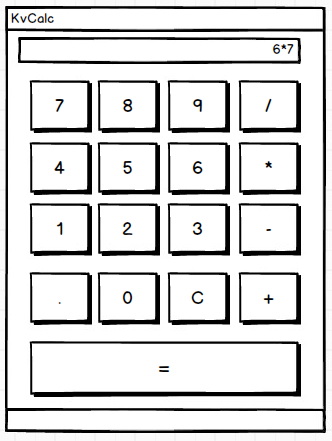
For this application, you’ll need a series of buttons in some kind of layout. You’ll also need a box along the top of your app to display the equations and their results. Here’s a sketch of your calculator:

Kivy Calculator Mockup

Now that you have a goal for the UI, you can go ahead and write the code:

 1 fromkivy.appimportApp 2 fromkivy.uix.boxlayoutimportBoxLayout 3 fromkivy.uix.buttonimportButton 4 fromkivy.uix.textinputimportTextInput 5  6 classMainApp(App): 7 defbuild(self): 8 self.operators=["/","*","+","-"] 9 self.last_was_operator=None10 self.last_button=None11 main_layout=BoxLayout(orientation="vertical")12 self.solution=TextInput(13 multiline=False,readonly=True,halign="right",font_size=5514 )15 main_layout.add_widget(self.solution)16 buttons=[17 ["7","8","9","/"],18 ["4","5","6","*"],19 ["1","2","3","-"],20 [".","0","C","+"],21 ]22 forrowinbuttons:23 h_layout=BoxLayout()24 forlabelinrow:25 button=Button(26 text=label,27 pos_hint={"center_x":0.5,"center_y":0.5},28 )29 button.bind(on_press=self.on_button_press)30 h_layout.add_widget(button)31 main_layout.add_widget(h_layout)32 33 equals_button=Button(34 text="=",pos_hint={"center_x":0.5,"center_y":0.5}35 )36 equals_button.bind(on_press=self.on_solution)37 main_layout.add_widget(equals_button)38 39 returnmain_layout

Here’s how your calculator code works:

  • In lines 8 to 10, you create a list of operators and a couple of handy values, last_was_operator and last_button, that you’ll use later on.
  • In lines 11 to 15, you create a top-level layout main_layout and add a read-only TextInput widget to it.
  • In lines 16 to 21, you create a nested list of lists containing most of your buttons for the calculator.
  • In line 22, you start a for loop over those buttons. For each nested list you’ll do the following:
    • In line 23, you create a BoxLayout with a horizontal orientation.
    • In line 24, you start another for loop over the items in the nested list.
    • In lines 25 to 39, you create the buttons for the row, bind them to an event handler, and add the buttons to the horizontal BoxLayout from line 23.
    • In line 31, you add this layout to main_layout.
  • In lines 33 to 37, you create the equals button (=), bind it to an event handler, and add it to main_layout.

The next step is to create the .on_button_press() event handler. Here’s what that code looks like:

41 defon_button_press(self,instance):42 current=self.solution.text43 button_text=instance.text44 45 ifbutton_text=="C":46 # Clear the solution widget47 self.solution.text=""48 else:49 ifcurrentand(50 self.last_was_operatorandbutton_textinself.operators):51 # Don't add two operators right after each other52 return53 elifcurrent==""andbutton_textinself.operators:54 # First character cannot be an operator55 return56 else:57 new_text=current+button_text58 self.solution.text=new_text59 self.last_button=button_text60 self.last_was_operator=self.last_buttoninself.operators

Most of the widgets in your application will call .on_button_press(). Here’s how it works:

  • Line 41 takes the instance argument so you can access which widget called the function.

  • Lines 42 and 43 extract and store the value of the solution and the button text.

  • Lines 45 to 47 check to see which button was pressed. If the user pressed C, then you’ll clear the solution. Otherwise, move on to the else statement.

  • Line 49 checks if the solution has any pre-existing value.

  • Line 50 to 52 check if the last button pressed was an operator button. If it was, then solution won’t be updated. This is to prevent the user from having two operators in a row. For example, 1 */ is not a valid statement.

  • Lines 53 to 55 check to see if the first character is an operator. If it is, then solution won’t be updated, since the first value can’t be an operator value.

  • Lines 56 to 58 drop to the else clause. If none of the previous conditions are met, then update solution.

  • Line 59 sets last_button to the label of the last button pressed.

  • Line 60 sets last_was_operator to True or False depending on whether or not it was an operator character.

The last bit of code to write is .on_solution():

62 defon_solution(self,instance):63 text=self.solution.text64 iftext:65 solution=str(eval(self.solution.text))66 self.solution.text=solution

Once again, you grab the current text from solution and use Python’s built-in eval() to execute it. If the user created a formula like 1+2, then eval() will run your code and return the result. Finally, you set the result as the new value for the solution widget.

Note:eval() is somewhat dangerous because it can run arbitrary code. Most developers avoid using it because of that fact. However, since you’re only allowing integers, operators, and the period as input to eval(), it’s safe to use in this context.

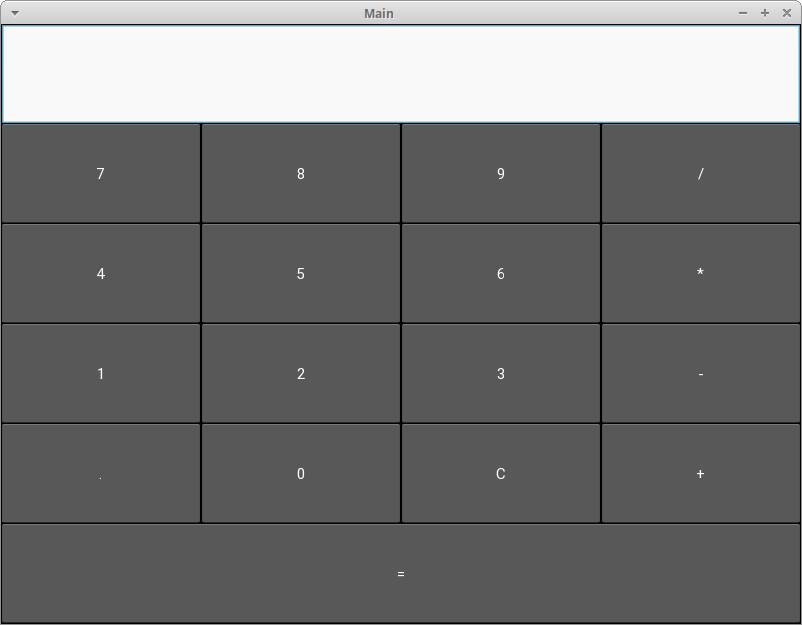
When you run this code, your application will look like this on a desktop computer:

Kivy Calculator

To see the full code for this example, expand the code block below.

Here’s the full code for the calculator:

fromkivy.appimportAppfromkivy.uix.boxlayoutimportBoxLayoutfromkivy.uix.buttonimportButtonfromkivy.uix.textinputimportTextInputclassMainApp(App):defbuild(self):self.operators=["/","*","+","-"]self.last_was_operator=Noneself.last_button=Nonemain_layout=BoxLayout(orientation="vertical")self.solution=TextInput(multiline=False,readonly=True,halign="right",font_size=55)main_layout.add_widget(self.solution)buttons=[["7","8","9","/"],["4","5","6","*"],["1","2","3","-"],[".","0","C","+"],]forrowinbuttons:h_layout=BoxLayout()forlabelinrow:button=Button(text=label,pos_hint={"center_x":0.5,"center_y":0.5},)button.bind(on_press=self.on_button_press)h_layout.add_widget(button)main_layout.add_widget(h_layout)equals_button=Button(text="=",pos_hint={"center_x":0.5,"center_y":0.5})equals_button.bind(on_press=self.on_solution)main_layout.add_widget(equals_button)returnmain_layoutdefon_button_press(self,instance):current=self.solution.textbutton_text=instance.textifbutton_text=="C":# Clear the solution widgetself.solution.text=""else:ifcurrentand(self.last_was_operatorandbutton_textinself.operators):# Don't add two operators right after each otherreturnelifcurrent==""andbutton_textinself.operators:# First character cannot be an operatorreturnelse:new_text=current+button_textself.solution.text=new_textself.last_button=button_textself.last_was_operator=self.last_buttoninself.operatorsdefon_solution(self,instance):text=self.solution.textiftext:solution=str(eval(self.solution.text))self.solution.text=solutionif__name__=="__main__":app=MainApp()app.run()

It’s time to deploy your application!

Packaging Your App for Android

Now that you’ve finished the code for your application, you can share it with others. One great way to do that is to turn your code into an application that can run on your Android phone. To accomplish this, first you’ll need to install a package called buildozer with pip:

$ pip install buildozer

Then, create a new folder and navigate to it in your terminal. Once you’re there, you’ll need to run the following command:

$ buildozer init

This will create a buildozer.spec file that you’ll use to configure your build. For this example, you can edit the first few lines of the spec file as follows:

[app]

# (str) Title of your application
title = KvCalc

# (str) Package name
package.name = kvcalc

# (str) Package domain (needed for android/ios packaging)
package.domain = org.kvcalc

Feel free to browse the rest of the file to see what else you can change.

At this point, you’re almost ready to build your application, but first, you’ll want to install the dependencies for buildozer. Once those are installed, copy your calculator application into your new folder and rename it to main.py. This is required by buildozer. If you don’t have the file named correctly, then the build will fail.

Now you can run the following command:

$ buildozer -v android debug

The build step takes a long time! On my machine, it took 15 to 20 minutes. Depending on your hardware, it may take even longer, so feel free to grab a cup of coffee or go for a run while you wait. Buildozer will download whatever Android SDK pieces it needs during the build process. If everything goes according to plan, then you’ll have a file named something like kvcalc-0.1-debug.apk in your bin folder.

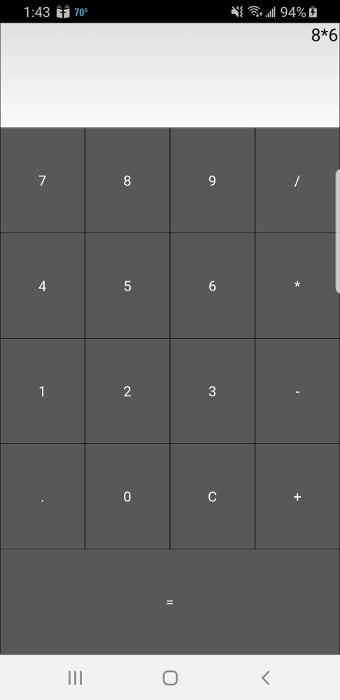
The next step is to connect your Android phone to your computer and copy the apk file to it. Then you can open the file browser on your phone and click on the apk file. Android should ask you if you’d like to install the application. You may see a warning since the app was downloaded from outside Google Play, but you should still be able to install it.

Here’s the calculator running on my Samsung S9:

Kivy Calculator Running on Android Phone

The buildozer tool has several other commands you can use. Check out the documentation to see what else you can do.

You can also package the app using python-for-android if you need more fine-grained control. You won’t cover this here, but if you’re interested, check out the project’s quickstart.

Packaging Your App for iOS

The instructions for building an application for iOS are a bit more complex than Android. For the most up-to-date information, you should always use Kivy’s official packaging documentation. You’ll need to run the following commands before you can package your application for iOS on your Mac:

$ brew install autoconf automake libtool pkg-config
$ brew link libtool
$ sudo easy_install pip
$ sudo pip install Cython==0.29.10

Once those are all installed successfully, you’ll need to compile the distribution using the following commands:

$ git clone git://github.com/kivy/kivy-ios
$cd kivy-ios
$ ./toolchain.py build python3 kivy

If you get an error that says iphonesimulator can’t be found, then see this StackOverflow answer for ways to solve that issue. Then try running the above commands again.

If you run into SSL errors, then you probably don’t have Python’s OpenSSL setup. This command should fix that:

$cd /Applications/Python\ 3.7/
$ ./Install\ Certificates.command

Now go back and try running the toolchain command again.

Once you’ve run all the previous commands successfully, you can create your Xcode project using the toolchain script. Your main application’s entry point must be named main.py before you create the Xcode project. Here is the command you’ll run:

./toolchain.py create <title> <app_directory>

There should be a directory named title with your Xcode project in it. Now you can open that project in Xcode and work on it from there. Note that if you want to submit your application to the App Store, then you’ll have to create a developer account at developer.apple.com and pay their yearly fee.

Packaging Your App for Windows

You can package your Kivy application for Windows using PyInstaller. If you’ve never used it before, then check out Using PyInstaller to Easily Distribute Python Applications.

You can install PyInstaller using pip:

$ pip install pyinstaller

The following command will package your application:

$ pyinstaller main.py -w

This command will create a Windows executable and several other files. The -w argument tells PyInstaller that this is a windowed application, rather than a command-line application. If you’d rather have PyInstaller create a single executable file, then you can pass in the --onefile argument in addition to -w.

Packaging Your App for OS X

You can use PyInstaller to create a Mac executable just like you did for Windows. The only requirement is that you run this command on a Mac:

$ pyinstaller main.py -w --onefile

This will create a single file executable in the dist folder. The executable will be the same name as the Python file that you passed to PyInstaller. If you’d like to reduce the file size of the executable, or you’re using GStreamer in your application, then check out Kivy’s packaging page for OS X for more information.

Conclusion

Kivy is a really interesting GUI framework that you can use to create desktop user interfaces and mobile applications on both iOS and Android. Kivy applications will not look like the native apps on any platform. This can be an advantage if you want your application to look and feel different from the competition!

In this tutorial, you learned the basics of Kivy including how to add widgets, hook up events, lay out multiple widgets, and use the KV language. Then you created your first Kivy application and learned how to distribute it on other platforms, including mobile!

There are many widgets and concepts about Kivy that you didn’t cover here, so be sure to check out Kivy’s website for tutorials, sample applications, and much more.

Further Reading

To learn more about Kivy, check out these resources:

To see how you might create a desktop application with another Python GUI framework, check out How to Build a Python GUI Application With wxPython.


[ Improve Your Python With 🐍 Python Tricks 💌 – Get a short & sweet Python Trick delivered to your inbox every couple of days. >> Click here to learn more and see examples ]

IslandT: Summation of alphabet position with python

$
0
0

In this article, we will create a python function that will turn a string into a list, then return the sum of all the positions of the alphabets within that list based on a-z. a = 1, b =2 and so on, all the alphabets within that given string will be in lower case.

def words_to_marks(s):
    
    word_list = list(s)
    a_z = ['a', 'b', 'c', 'd', 'e', 'f', 'g', 'h', 'i', 'j', 'k', 'l', 'm', 'n', 'o', 'p', 'q', 'r', 's', 't', 'u', 'v', 'w', 'x','y', 'z']
    sum = 0
    for w in word_list:
        sum += a_z.index(w) + 1
    return sum

As you might guess, the above is just another question from CodeWars.

Dear readers, I am working hard to build this website just for Python from now onward, if you like this post, do share the post on any social media site, thank you.

Leave your comment or provide your own solution below this post.

Reuven Lerner: Last chance to join Weekly Python Exercise in 2019!

$
0
0

Over the last year, I’ve taught in-person Python classes to companies in the US, Europe, Israel, India, and China. I’ve taught people from a variety of backgrounds, from absolute beginners to seasoned Pythonistas who want to improve their skills in new areas. And I’ve taught everything from intro Python to data science.

For all of the differences in background, jobs, courses, and education, I consistently got one request: Everyone wants to improve their skills, so that they can program in Python more fluently and easily— solving their current problems more easily, and taking on larger ones.

If this describes you— a competent and experienced Python developer who wants to know more, understand more, and do more with Python — then the new cohort of Weekly Python Exercise, starting tomorrow, is for you.

(Yes, it starts tomorrow. That means that tonight is the deadline to join. Really!)

Join the many developers from around the world who have improved their Python skills, one week at a time, with Weekly Python Exercise. Over the 15-week course, you’ll learn to work with iterators, generators, decorators, objects, and threads. You’ll improve your testing skills with “pytest”. You’ll communicate with other people in our cohort via our private forum. You’ll participate in my live office hours.

And best of all: Each week, you’ll get that much closer to Python fluency and mastery. This is great for your own personal satisfaction, of course, but will also help your career.

Also: The next advanced level cohort will start in March 2020.  So if you’re an experienced Python developer looking to improve your skills, this will be your last chance to do so for several months.  (A new basic-level cohort will be starting in January.)

If the price of WPE seems steep, maybe you qualify for one of my discounts — for pensioners/retirees, students, and anyone living outside of the world’s 30 richest countries. I want to help as many people as possible to improve their Python fluency, no matter where they live or where they are in life.

So join me tomorrow at Weekly Python Exercise, and start improving your Python tomorrow!

The post Last chance to join Weekly Python Exercise in 2019! appeared first on Reuven Lerner.

Continuum Analytics Blog: The Austin American-Statesman Names Anaconda a Winner of the Austin Top Workplaces 2019 Award

Catalin George Festila: Python 3.7.5 : About PEP 506.

$
0
0
Today I did a python evaluation and saw that there are many new aspects that should be kept in mind for a programmer. So I decided to recall some necessary elements of PEP. First, PEP stands for Python Enhancement Proposal. A PEP is a design document providing information to the Python community, or describing a new feature for Python or its processes or environment. My list will not follow a
Viewing all 22852 articles
Browse latest View live


<script src="https://jsc.adskeeper.com/r/s/rssing.com.1596347.js" async> </script>