Do you do data science? Imagine you work with over 200 data scientists. Many of whom have diverse backgrounds or have come from non-CS backgrounds. Some of them want to use Python. Others are keen to work with R.
↧
Talk Python to Me: #236 Scaling data science across Python and R
↧
Python Software Foundation: CPython Core Developer Sprint 2019
During the week of September 9th to September 13th, 34 core CPython committers gathered together in the Bloomberg London headquarters for the 2019 Python core developer sprint. The core developer sprint is an annual week-long meeting in which the CPython core team has the opportunity to meet each other in person in order to work together free from distractions. Having this many core developers in the same room allows us to work efficiently on several aspects of the Python language and CPython (the default implementation). This can include topics such as future designs and in-process PEPs (Python Enhancement Proposals), prototyping exciting changes that we may see in the future, various core development processes such as issue triaging and pull request reviewing, and much more! This is a very exhausting week for everyone, but also a very productive one, as these meetings are known for generating a much-needed boost in core development, especially close to new releases.
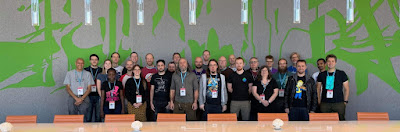 |
| CPython Core Developers in attendance at 2019 Sprint |
This year’s core developer sprint was funded thanks to the Python Software Foundation (PSF) and the donation of PyLondinium 2019 ticket proceeds, which were gathered specifically to support this event. This helped the PSF cover the cost of travel and accommodation for all core developers attending. Additionally, some companies covered their employees’ expenses, such as Microsoft, Facebook, Google and Red Hat. Bloomberg provided the venue, infrastructure and catering, as well as some events that happened during the week.
Major Achievements
One of the main advantages of having the core developers together in the same room is how much smoother the iteration and design process is. For example, major achievements were made around the release of Python 3.8 (and older versions) in terms of stability and documentation and many exciting things were prepared for future releases. Some highlights include:
- More than 120 pull requests were merged in the CPython repository. We had a friendly competition in which attending core developers were ranked based on the number of pull requests merged (only those pull requests created by others were considered). In the end, the winners received a poster with all of the attendees’ names created specifically for the sprint.
- Discussions around PEP 602: Python 3.9 release schedule, including gathering user feedback about several aspects of the PEP.
- Work on improving the bugs.python.org interface and feature set, including updating the infrastructure to the latest roundup version and reworking the CSS to give a friendlier face to the site.
- API design and discussion around PEP 416 -- Add a frozendict built-in type.
- Draft design on a future PEP to implement an exception hierarchy to support TaskGroups and cancel scopes.
- Work towards multiple interpreters: major efforts are needed before we have one GIL per interpreter. This included starting to refactor the existing global state into per-interpreter structures and developing tests that avoid new global state bleeding.
- Work on a PEG-based parser prototype to substitute the current parser in order to improve maintenance and allow dropping the LL(1) restriction in the future.
- Several pull requests to squash some complex bugs in multiprocessing.
- Work on a possible implementation to introduce a Control Flow Graph (CFG) optimizer in CPython.
- Work on the CI process. AppVeyor was dropped and replaced with Azure Pipelines.
- Major improvements in the unittest.mock module, such as perfecting the new AsyncMock and related documentation, work on a prototype to add a WaitableMock class that can be joined (for threaded scenarios), as well as bug squashing around the module.
As you can imagine, with this level of activity, the buildbots were at maximum capacity and many issues were found and fixed both during and after the sprint.
Friday Event
As part of the core dev sprint, an event was organized with the help of Bloomberg in order to let the community know about the work done during the core developer sprint, why these events are important, and the impact they have on the future of the language. The event consisted of 4 lightning talks about some of the things worked on during the sprint:
 |
| Moderated panel discussion at the CPython Core Developer Sprint Friday Event |
- Work in AsyncMock - Lisa Roach
- Removing dead batteries in the standard library - Christian Heimes
- Sub-Interpreters support in the standard library - Eric Snow and Joannah Nanjekye
- Improving bugs.python.org - Ezio Melotti
There was also a moderated Q&A session about the core development sprint and, more generally, Python’s future direction.
We hope that events like this will help communicate more transparently what the core developers do at the sprints and how much impact these events have on maintenance, processes, and the language itself.
Mentorees
As part of the ongoing effort to improve mentoring and growing the core dev team, two mentees who have been contributing for a long period of time and have previously been awarded triaging privileges were invited to the sprint. Joannah Nanjekye was being mentored by Eric Snow, while Karthikeyan Singaravelan was being mentored by Yury Selivanov (and remotely by Andrew Svetlov). Mentoring is a very important part of core development, as it helps to grow the core dev team and allows us to have more impact and scalability in the different areas that are the responsibilities of the core dev team. As a result of this mentoring process, Joannah Nanjekye was been promoted to a core developer a few weeks after the core dev sprint!
Other Blogs
Some of the other attendees have posted their own blogs describing their experiences at the sprints (this list may be updated over time as additional updates are published by other core devs).
Thank you!
A huge thanks to all the participants who attended, the various companies who sponsored parts of the event, and the PSF for covering the majority of travel expenses. We also thank those core developers who could not attend this year.
 | |
|
Attendees: Christian Heimes, Ezio Melotti, Ned Deily, Benjamin Peterson, Mark Shannon, Michael Foord, Joannah Nanjekye, Karthikeyan Singaravelan, Emily Morehouse, Jason R. Coombs, Julien Palard, Stéphane Wirtel, Zachary Ware, Petr Viktorin, Łukasz Langa, Davin Potts, Yury Selivanov, Steve Holden, Stefan Behnel, Larry Hastings, Guido van Rossum, Carol Willing, Gregory P. Smith, Thomas Wouters, Dino Viehland, Mark Dickinson, Vinay Sajip, Paul Ganssle, Steve Dower, Lisa Roach, Eric Snow, Brett Cannon, Pablo Galindo
Written by: Pablo Galindo
↧
↧
qutebrowser development blog: 2019 qutebrowser crowdfunding with shirts, stickers and more!
I'm very happy to announce that the next qutebrowser crowdfunding went live today! o/
This time, I'm focused on recurring donations via GitHub Sponsors. Those donations will allow me to work part-time on qutebrowser! Thanks to the GitHub Matching Fund, all donations (up to $5000 in the first year) will …
↧
Real Python: Python REST APIs With Flask, Connexion, and SQLAlchemy – Part 4
In Part 3 of this series, you added relationships to the REST API and to the database that supports it. This gave you a powerful tool you can use to build interesting programs that send persistent data, as well as the relationships between that data, to a database system. Having a REST API gives you the ability to create a Single-Page Application (SPA) with HTML, CSS, and JavaScript. This is a good starting point before you make the jump to more powerful front-end frameworks, like Angular or React.
In this article, you’ll learn how to:
- Structure an HTML file to act as the template of a single-page web application
- Use Cascading Style Sheets (CSS) to style the presentation of an application
- Use native JavaScript to add interactivity to an application
- Use JavaScript to make HTTP AJAX requests to the REST API you developed in Part 3 of this series
You can get all of the code you’ll see in this tutorial at the link below:
Download Code:Click here to download the code you'll use to learn about Python REST APIs with Flask, Connexion, and SQLAlchemy in this tutorial.
Who This Article Is For
Part 1 of this series guided you through building a REST API, and Part 2 showed you how to connect that REST API to a database. In Part 3, you added relationships to the REST API and the supporting database.
This article is about presenting that REST API to a user as a browser-based web application. This combination gives you both front-end and back-end abilities, which is a useful and powerful skill set.
Creating Single-Page Applications
In Part 3 of this series, you added relationships to the REST API and database to represent notes associated with people. In other words, you created a kind of mini-blog. The web applications you built in part 3 showed you one way to present and interact with the REST API. You navigated between three Single-Page Applications (SPA) to access different parts of the REST API.
While you could have combined that functionality into a single SPA, that approach would make the concepts of styling and interactivity more complex, without much added value. For that reason, each page was a complete, standalone SPA.
In this article, you’ll focus on the People SPA, which presents the list of people in the database and provides an editor feature to create new people and update or delete existing ones. The Home and Notes pages are conceptually similar.
What Existing Frameworks Are There?
There are existing libraries that provide inbuilt and robust functionality for creating SPA systems. For example, the Bootstrap library provides a popular framework of styles for creating consistent and good-looking web applications. It has JavaScript extensions that add interactivity to the styled DOM elements.
There are also powerful web application frameworks, like React and Angular, that give you complete web application development systems. These are useful when you want to create large, multi-page SPAs that would be cumbersome to build from scratch.
Why Build Your Own?
With the availability of tools like those listed above, why would you choose to create an SPA from scratch? Take Bootstrap, for instance. You can use it to create SPAs that look excellent, and you can certainly use it with your JavaScript code!
The problem is that Bootstrap has a steep learning curve you’ll need to climb if you want to use it well. It also adds a lot of Bootstrap-specific attributes to the DOM elements defined in your HTML content. Likewise, tools like React and Angular also have significant learning curves you’ll need to overcome. However, there’s still a place for web applications that don’t rely on tools like these.
Often, when you’re building a web application, you want to build a proof-of-concept first to see if the application is at all useful. You’ll want to get this up and running quickly, so it can be faster for you to roll your own prototype and upgrade it later. Since you won’t invest much time in the prototype, it won’t be too costly to start over and create a new application with a supported, fully-featured framework.
There’s a gap between what you’re going to develop with the People app in this article and what you could build with a complete framework. It’s up to you to decide where the tipping point is between providing the functionality yourself or adopting a framework.
Parts of Single-Page Applications
There are a few main forms of interactivity in traditional web-based systems. You can navigate between pages and submit a page with new information. You can fill out forms containing input fields, radio buttons, checkboxes, and more. When you perform these activities, the webserver responds by sending new files to your browser. Then, your browser renders the content again.
Single-page applications break this pattern by loading everything they need first. Then, any interactivity or navigation is handled by JavaScript or by calls to the server behind the scenes. These activities update the page content dynamically.
There are three major components of a single-page application:
- HTML provides the content of a web page, or what is rendered by your browser.
- CSS provides the presentation, or style, of a web page. It defines how the content of the page should look when rendered by your browser.
- JavaScript provides the interactivity of a web page. It also handles communication with the back-end server.
Next, you’ll take a closer look at each of these major components.
HTML
HTML is a text file delivered to your browser that provides the primary content and structure for a single-page application. This structure includes the definitions for id and class attributes, which are used by CSS to style the content and JavaScript to interact with the structure. Your browser parses the HTML file to create the Document Object Model (DOM), which it uses to render the content to the display.
The markup within an HTML file includes tags, like paragraph tags <p>...</p> and header tags <h1>...</h1>. These tags become elements within the DOM as your browser parses the HTML and renders it to the display. The HTML file also contains links to external resources that your browser will load as it parses the HTML. For the SPA you’re building in this article, these external resources are CSS and JavaScript files.
CSS
Cascading Style Sheets (CSS) are files that contain styling information that will be applied to whatever DOM structure is rendered from an HTML file. In this way, the content of a web page can be separated from its presentation.
In CSS, the style for a DOM structure is determined by selectors. A selector is just a method of matching a style to elements within the DOM. For example, the p selector in the code block below applies styling information to all paragraph elements:
p{font-weight:bold;background-color:cyan;}The above style will apply to all paragraph elements in the DOM. The text will appear as bold and have a background color of cyan.
The cascading part of CSS means that styles defined later, or in a CSS file loaded after another, will take precedence over any previously defined style. For example, you can define a second paragraph style after the style above:
p{font-weight:bold;background-color:cyan;}p{background-color:cornflower;}This new style definition would modify the existing style so that all paragraph elements in the DOM will have a background color of cornflower. This overrides the background-color of the previous style, but it leaves the font-weight setting intact. You could also define the new paragraph style in a CSS file of its own.
The id and class attributes let you apply a style to specific individual elements in the DOM. For example, the HTML to render a new DOM might look like this:
<p>
    This is some introductory text
</p><pclass="panel">
    This is some text contained within a panel
</p>
This will create two paragraph elements within the DOM. The first has no class attribute, but the second has a class attribute of panel. Then, you can create a CSS style like this:
p{font-weight:bold;width:80%;margin-left:auto;margin-right:auto;background-color:lightgrey;}.panel{border:1pxsoliddarkgrey;border-radius:4px;padding:10px;background-color:lightskyblue;}Here, you define a style for any elements that have the panel attribute. When your browser renders the DOM, the two paragraph elements should look like this:

Both paragraph elements have the first style definition applied to them because the p selector selects them both. But only the second paragraph has the .panel style applied to it because it’s the only element with the class attribute panel that matches that selector. The second paragraph gets new styling information from the .panel style, and overrides the background-color style defined in the p style.
JavaScript
JavaScript provides all of the interactive features for an SPA, as well as dynamic communication with the REST API provided by the server. It also performs all of the updates to the DOM, allowing an SPA to act much like a full Graphical User Interface (GUI) application like Word or Excel.
As JavaScript has evolved, it’s become easier and more consistent to work with the DOM provided by modern browsers. You’ll be using a few conventions, like namespaces and separation of concerns, to help keep your JavaScript code from conflicting with other libraries you might include.
Note: You’ll be creating Single-Page Applications using native JavaScript. In particular, you’ll use the ES2017 version, which works with many modern browsers, but could be problematic if your goal is to support older browser versions.
Modules and Namespaces
You might already know about namespaces in Python and why they’re valuable. In short, namespaces give you a way to keep the names in your program unique to prevent conflicts. For example, if you wanted to use log() from both the math and cmath modules, then your code might look something like this:
>>>
>>> importmath>>> importcmath>>> math.log(10)2.302585092994046>>> cmath.log(10)(2.302585092994046+0j)
The Python code above imports both the math and cmath modules, then calls log(10) from each module. The first call returns a real number and the second returns a complex number, which cmath has functions for. Each instance of log() is unique to its own namespace (math or cmath), meaning the calls to log() don’t conflict with each other.
Modern JavaScript has the ability to import modules and assign namespaces to those modules. This is useful if you need to import other JavaScript libraries where there might be a name conflict.
If you look at the end of the people.js file, then you’ll see this:
301 // Create the MVC components302 constmodel=newModel();303 constview=newView();304 constcontroller=newController(model,view);305 306 // Export the MVC components as the default307 exportdefault{308 model,309 view,310 controller311 };The code above creates the three components of the MVC system, which you’ll see later on in this article. The default export from the module is a JavaScript literal object. You import this module at the bottom of the people.html file:
50 <scripttype="module">51 // Give the imported MVC components a namespace52 import*asMVCfrom"/static/js/people.js";53 54 // Create an intentional global variable referencing the import55 window.mvc=MVC;56 </script>Here’s how this code works:
Line 50 uses
type="module"to tell the system that the file is a module and not just a JavaScript file.Line 52 imports the default object from
people.jsand assigns it the nameMVC. This creates a namespace calledMVC. You can give the imported object any name that doesn’t conflict with other JavaScript libraries you might not have control over.Line 55 creates a global variable, which is a convenient step. You can use this to inspect the
mvcobject with a JavaScript debugger and look atmodel,view, andcontroller.
Note: Because MVC is an imported module and not just an included file, JavaScript will default to strict mode, which has some advantages over non-strict mode. One of the biggest is that you can’t use undefined variables.
Without strict mode turned on, this is perfectly legal:
varmyName="Hello";myNane="Hello World";Do you see the error? The first line creates a variable called myName and assigns the literal string "Hello" to it. The second line looks like it changes the contents of the variable to "Hello World", but that isn’t the case!
In the second line, "Hello World" is assigned to the variable name myNane, which is misspelled with an n. In non-strict JavaScript, this creates two variables:
- The correct variable
myName - The unintended typo version
myNane
Imagine if these two lines of JavaScript code were separated by many others. This could create a run-time bug that’s difficult to find! When you use strict mode, you eliminate errors like this one by raising an exception should your code attempt to use an undeclared variable.
Naming Conventions
For the most part, the JavaScript code you’re using here is in camel case. This naming convention is widely used in the JavaScript community, so the code examples reflect that. However, your Python code will use snake case, which is more conventional in the Python community.
This difference in naming can be confusing where your JavaScript code interacts with Python code, and especially where shared variables enter the REST API interface. Be sure to keep these differences in mind as you write your code.
Separation of Concerns
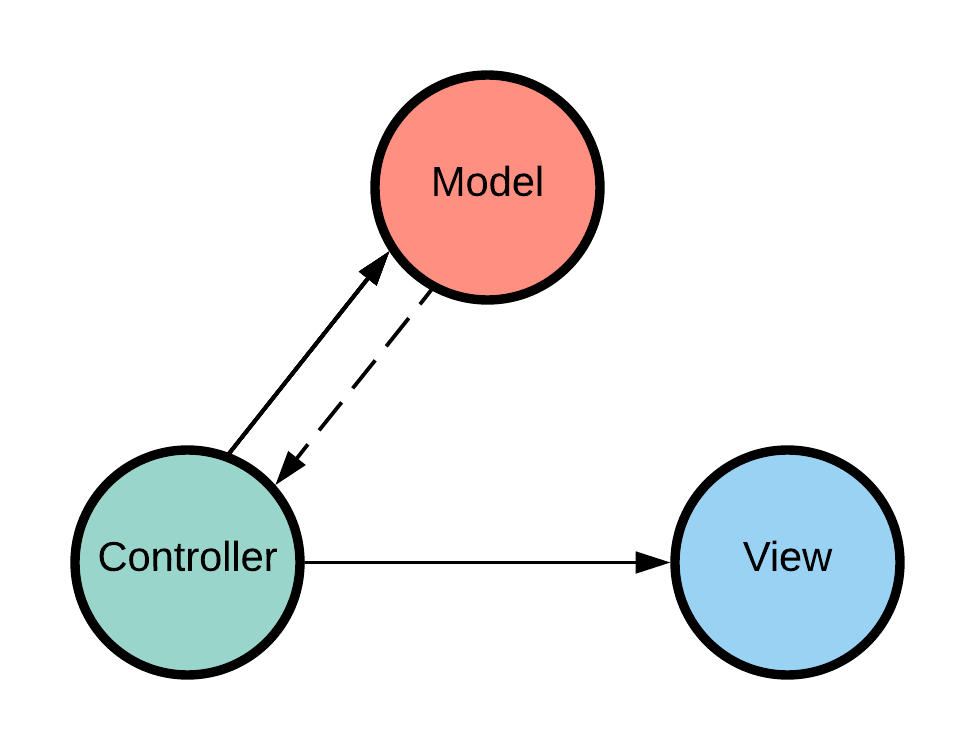
The code that drives an SPA can be complicated. You can use the Model–View–Controller (MVC) architectural pattern to simplify things by creating a separation of concerns. The Home, People, and Notes SPAs use the following MVC pattern:
The Model provides all access to the server REST API. Anything presented on the display comes from the model. Any changes to the data go through the model and back to the REST API.
The View controls all display handling and DOM updates. The view is the only part of the SPA that interacts with the DOM and causes the browser to render and re-render any changes to the display.
The Controller handles all user interaction and any user data entered, like click events. Because the controller reacts to user input, it also interacts with the Model and View based on that user input.
Here’s a visual representation of the MVC concept as implemented in the SPA code:
 Model / View / Controller
In the illustration above, the Controller has a strong connection with both the Model and the View. Again, this is because any user interaction the Controller handles might require reaching out to the REST API to get or update data. It may even require updating the display.
The dotted line that goes from the Model to the Controller indicates a weak connection. Because calls to the REST API are asynchronous, the data that the Model provides to the Controller returns at a later time.
Creating the People SPA
Your mini-blog demonstration app has pages for Home, People, and Notes. Each of these pages is a complete, standalone SPA. They all use the same design and structure, so even though you’re focusing on the People application here, you’ll understand how to construct all of them.
People HTML
The Python Flask web framework provides the Jinja2 templating engine, which you’ll use for the People SPA. There are parts of the SPA that are common to all three pages, so each page uses the Jinja2 template inheritance feature to share those common elements.
You’ll provide the HTML content for the People SPA in two files: parent.html and people.html files. You can get the code for these files at the link below:
Download Code:Click here to download the code you'll use to learn about Python REST APIs with Flask, Connexion, and SQLAlchemy in this tutorial.
Here’s what your parent.html will look like:
 1 <!DOCTYPE html> 2 <htmllang="en"> 3 <head> 4 <metacharset="UTF-8"> 5     {% block head %}
 6 <title>{% block title %}{% endblock %} Page</title> 7     {% endblock %}
 8 </head> 9 <body>10 <divclass="navigation">11 <spanclass="buttons">12 <ahref="/">Home</a>13 <ahref="/people">People</a>14 </span>15 <spanclass="page_name">16 <div></div>17 </span>18 <spanclass="spacer"></span>19 </div>20 21 {% block body %}
22 {% endblock %}
23 </body>24 25 {% block javascript %}
26 {% endblock %}
27 28 </html>
parent.html has a few major elements:
- Line 1 sets the document type as
<!DOCTYPE html>. All new HTML pages begin with this declaration. Modern browsers know this means to use the HTML 5 standard, while older browsers will fall back to the latest standard they can support. - Line 4 tells the browser to use UTF-8 encoding.
- Lines 10 to 19 define the navigation bar.
- Lines 21 and 22 are Jinja2 block markers, which will be replaced by content in
people.html. - Lines 25 and 26 are Jinja2 block markers that act as a placeholder for JavaScript code.
The people.html file will inherit the parent.html code. You can expand the code block below to see the whole file:
 1 {% extends "parent.html" %}
 2 {% block title %}People{% endblock %}
 3 {% block head %}
 4 {% endblock %}
 5 {% block page_name %}Person Create/Update/Delete Page{% endblock %}
 6  7 {% block body %}
 8 <divclass="container"> 9 <inputid="url_person_id"type="hidden"value="{{ person_id }}"/>10 <divclass="section editor">11 <div>12 <span>Person ID:</span>13 <spanid="person_id"></span>14 </div>15 <labelfor="fname">First Name
16 <inputid="fname"type="text"/>17 </label>18 <br/>19 <labelfor="lname">Last Name
20 <inputid="lname"type="text"/>21 </label>22 <br/>23 <buttonid="create">Create</button>24 <buttonid="update">Update</button>25 <buttonid="delete">Delete</button>26 <buttonid="reset">Reset</button>27 </div>28 <divclass="people">29 <table>30 <caption>People</caption>31 <thead>32 <tr>33 <th>Creation/Update Timestamp</th>34 <th>Person</th>35 </tr>36 </thead>37 </table>38 </div>39 <divclass="error">40 </div>41 </div>42 <divclass="error">43 </div>44 45 {% endblock %}
people.html has just two major differences:
- Line 1 tells Jinja2 that this template inherits from the
parent.htmltemplate. - Lines 7 to 45 create the body of the page. This includes the editing section and an empty table to present the list of people. This is the content inserted in the
{% block body %}{% endblock %}section of theparent.htmlfile.
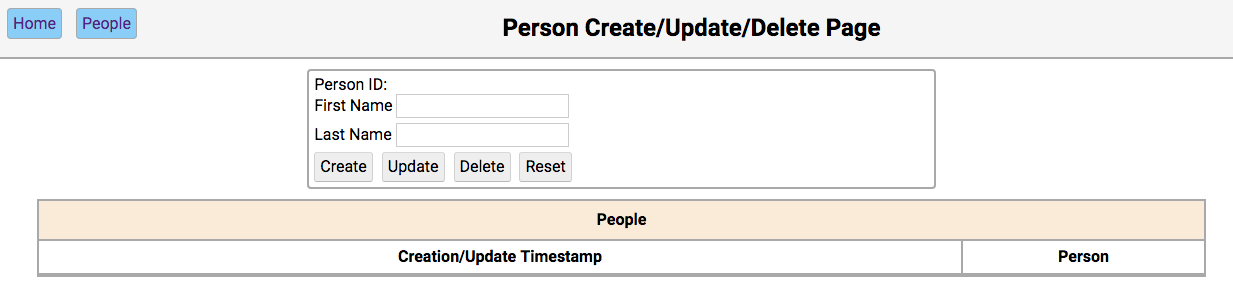
The HTML page generated by parent.html and people.html contains no styling information. Instead, the page is rendered in the default style of whatever browser you use to view it. Here’s what your app looks like when rendered by the Chrome browser:
 People HTML page before styling
It doesn’t look much like a Single-Page Application! Let’s see what you can do about that.
People CSS
To style the People SPA, you first need to add the normalize.css style sheet. This will make sure that all browsers consistently render elements more closely to HTML 5 standards. The specific CSS for the People SPA is supplied by two style sheets:
parent.css, which you pull in withparent.htmlpeople.css, which you pull in withpeople.html
You can get the code for these stylesheets at the link below:
Download Code:Click here to download the code you'll use to learn about Python REST APIs with Flask, Connexion, and SQLAlchemy in this tutorial.
You’ll add both normalize.css and parent.css to the <head>...</head> section of parent.html:
 1 <head> 2 <metacharset="UTF-8"> 3     {% block head %}
 4 <title>{% block title %}{% endblock %} Page</title> 5 <linkrel="stylesheet"href="https://cdnjs.cloudflare.com/ajax/libs/normalize/8.0.0/normalize.min.css"> 6 <linkrel="stylesheet"href="/static/css/parent.css"> 7     {% endblock %}
 8 </head>
Here’s what these new lines do:
- Line 5 gets
normalize.cssfrom a content delivery network (CDN), so you don’t have to download it yourself. - Line 6 gets
parent.cssfrom your app’sstaticfolder.
For the most part, parent.css sets the styles for the navigation and error elements. It also changes the default font to Google’s Roboto font using these lines:
5 @importurl(http://fonts.googleapis.com/css?family=Roboto:400,300,500,700); 6 7 body,.ui-btn{ 8 font-family:Roboto; 9 }You pull in the Roboto font from a Google CDN. Then, you apply this font to all elements in the SPA body that also have a class of .ui-btn.
Likewise, people.css contains styling information specific to the HTML elements that create the People SPA. You add people.css to the people.html file inside the Jinja2 {% block head %} section:
 3 {% block head %}
 4     {{ super() }}
 5 <linkrel="stylesheet"href="/static/css/people.css"> 6 {% endblock %}
The file contains a few new lines:
- Line 2 has a call to {{ super() }}. This tells Jinja2 to include anything that exists in the
{% block head %}section ofparent.html. - Line 3 pulls in the
people.cssfile from your app’s static folder.
After you include the stylesheets, your People SPA will look more like this:
 People HTML page after styling, but before JavaScript
The People SPA is looking better, but it’s still incomplete. Where are the rows of people data in the table? All the buttons in the editor section are enabled, so why don’t they do anything? You’ll fix these issues in the next section with some JavaScript.
People JavaScript
You’ll pull JavaScript files into the People SPA just like you did with the CSS files. You’ll add the following bit of code to the bottom of people.html file:
48 {% block javascript %}
49 {{ super() }}
50 <scripttype="module">51 // Give the imported MVC components a namespace52 import*asMVCfrom"/static/js/people.js";53 54 // Create an intentional global variable referencing the import55 window.mvc=MVC;56 </script>57 {% endblock %}
Notice the type="module" declaration on the opening <script> tag in line 50. This tells the system that the script is a JavaScript module. The ES6 import syntax will be used to pull the exported parts of the code into the browser context.
The People MVC
All of the SPA pages use a variation of the MVC pattern. Here’s an example implementation in JavaScript:
1 // Create the MVC components 2 constmodel=newModel(); 3 constview=newView(); 4 constcontroller=newController(model,view); 5 6 // Export the MVC components as the default 7 exportdefault{ 8 model, 9 view,10 controller11 };This code doesn’t do anything just yet, but you can use it to see the following elements of MVC structure and implementation:
- Line 2 creates an instance of the Model class and assigns it to
model. - Line 3 creates an instance of the View class and assigns it to
view. - Line 4 creates an instance of the Controller class and assigns it to
controller. Note that you pass bothmodelandviewto the constructor. This is how the controller gets a link to themodelandviewinstance variables. - Lines 7 to 11 export a JavaScript literal object as the default export.
Because you pull in people.js at the bottom of people.html, the JavaScript is executed after your browser creates the SPA DOM elements. This means that JavaScript can safely access the elements on the page and begin to interact with the DOM.
Again, the code above doesn’t do anything just yet. To make it work, you’ll need to define your Model, View, and Controller.
People Model
The Model is responsible for communicating with the REST API provided by the Flask server. Any data that comes from the database, and any data the SPA changes or creates, must go through the Model. All communication with the REST API is done using HTTP AJAX calls initiated by JavaScript.
Modern JavaScript provides fetch(), which you can use to make AJAX calls. The code for your Model class implements one AJAX method to read the REST API URL endpoint /api/people and get all the people in the database:
1 classModel{ 2 asyncread(){ 3 letoptions={ 4 method:"GET", 5 cache:"no-cache", 6 headers:{ 7 "Content-Type":"application/json" 8 "accepts":"application/json" 9 }10 };11 // Call the REST endpoint and wait for data12 letresponse=awaitfetch(`/api/people`,options);13 letdata=awaitresponse.json();14 returndata;15 }16 }Here’s how this code works:
Line 1 defines the class
Model. This is what will be exported later as part of themvcobject.Line 2 begins the definition of an asynchronous method called
read(). Theasynckeyword in front ofread()tells JavaScript that this method performs asynchronous work.Lines 3 to 9 create an
optionsobject with parameters for the HTTP call, like the method and what the call expects for data.Line 12 uses
fetch()to make an asynchronous HTTP call to the/api/peopleURL REST endpoint provided by the server. The keywordawaitin front offetch()tells JavaScript to wait asynchronously for the call to complete. When this is finished, the results are assigned toresponse.Line 13 asynchronously converts the JSON string in the response to a JavaScript object and assigns it to
data.Line 14 returns the data to the caller.
Essentially, this code tells JavaScript to make a GET HTTP request to /api/people, and that the caller is expecting a Content-Type of application/json and json data. Recall that a GET HTTP call equates to Read in a CRUD-oriented system.
Based on the Connexion configuration defined in swagger.yml, this HTTP call will call def read_all(). This function is defined in people.py and queries the SQLite database to build a list of people to return to the caller. You can get the code for all of these files at the link below:
Download Code:Click here to download the code you'll use to learn about Python REST APIs with Flask, Connexion, and SQLAlchemy in this tutorial.
In the browser, JavaScript executes in a single thread and is intended to respond to user actions. Because of this, it’s a bad idea to block JavaScript execution that’s waiting for something to complete, like an HTTP request to a server.
What if the request went out across a very slow network, or the server itself was down and would never respond? If JavaScript were to block and wait for the HTTP request to complete in these kinds of conditions, then it might finish in seconds, minutes, or perhaps not at all. While JavaScript is blocked, nothing else in the browser would react to user actions!
To prevent this blocking behavior, HTTP requests are executed asynchronously. This means that an HTTP request returns to the event loop immediately before the request completes. The event loop exists in any JavaScript application that runs in the browser. The loop continuously waits for an event to complete so it can run the code associated with that event.
When you place the await keyword before fetch(), you tell the event loop where to return when the HTTP request completes. At that point, the request is complete and any data returned by the call is assigned to response. Then, controller calls this.model.read() to receive the data returned by the method. This creates a weak link with the controller, as the model doesn’t know anything about what called it, just what it returned to that caller.
People View
this.view is responsible for interacting with the DOM, which is shown by the display. It can change, add, and delete items from the DOM, which are then re-rendered to the display. The controller makes calls to the view’s methods to update the display. The View is another JavaScript class with methods the controller can call.
Below is a slightly simplified version of the People SPA’s View class:
1 classView{ 2 constructor(){ 3 this.table=document.querySelector(".people table"); 4 this.person_id=document.getElementById("person_id"); 5 this.fname=document.getElementById("fname"); 6 this.lname=document.getElementById("lname"); 7 } 8 9 reset(){10 this.person_id.textContent="";11 this.lname.value="";12 this.fname.value="";13 this.fname.focus();14 }15 16 buildTable(people){17 lettbody,18 html="";19 20 // Iterate over the people and build the table21 people.forEach((person)=>{22 html+=`23 <tr data-person_id="${person.person_id}" data-fname="${person.fname}" data-lname="${person.lname}">24 <td class="timestamp">${person.timestamp}</td>25 <td class="name">${person.fname}${person.lname}</td>26 </tr>`;27 });28 // Is there currently a tbody in the table?29 if(this.table.tBodies.length!==0){30 this.table.removeChild(this.table.getElementsByTagName("tbody")[0]);31 }32 // Update tbody with our new content33 tbody=this.table.createTBody();34 tbody.innerHTML=html;35 }36 }Here’s how this code works:
Line 1 begins the class definition.
Lines 2 to 7 define the class constructor, much like the
def __init__(self):definition in a Python class. The constructor is getting elements from the DOM and creating alias variables to use in other parts of the class. Thethis.in front of those variable names is much likeself.in Python. It designates the current instance of the class when used.Lines 9 to 14 define
reset(), which you’ll use to set the page back to a default state.Lines 16 to 36 define
buildTable(), which builds the table of people based on thepeopledata passed to it.
The alias variables are created to cache the DOM objects returned by calls to document.getElementByID() and document.querySelector(), which are relatively expensive JavaScript operations. This allows quick use of the variables in the other methods of the class.
Let’s take a closer look at build_table(), which is the second method in the View class:
16 buildTable(people){17 lettbody,18 html="";19 20 // Iterate over the people and build the table21 people.forEach((person)=>{22 html+=`23 <tr data-person_id="${person.person_id}" data-fname="${person.fname}" data-lname="${person.lname}">24 <td class="timestamp">${person.timestamp}</td>25 <td class="name">${person.fname}${person.lname}</td>26 </tr>`;27 });28 // Is there currently a tbody in the table?29 if(this.table.tBodies.length!==0){30 this.table.removeChild(this.table.getElementsByTagName("tbody")[0]);31 }32 // Update tbody with our new content33 tbody=this.table.createTBody();34 tbody.innerHTML=html;35 }Here’s how the function works:
- Line 16 creates the method and passes the
peoplevariable as a parameter. - Lines 21 to 27 iterate over the
peopledata using JavaScript arrow functions to create a function that builds up the table rows in thehtmlvariable. - Lines 29 to 31 remove any
<tbody>elements in the table if they exist. - Line 33 creates a new
tbodyelement in the table. - Line 34 inserts the
htmlstring previously created into thetbodyelement as HTML.
This function dynamically builds the table in the People SPA from the data passed to it, which is the list of people that came from the /api/people/ REST API call. This data is used along with JavaScript template strings to generate the table rows to insert into the table.
People Controller
The Controller is the central clearinghouse of the MVC implementation, as it coordinates the activity of both model and view. As such, the code to define it is a little more complicated. Here’s a simplified version:
1 classController{ 2 constructor(model,view){ 3 this.model=model; 4 this.view=view; 5 6 this.initialize(); 7 } 8 asyncinitialize(){ 9 awaitthis.initializeTable();10 }11 asyncinitializeTable(){12 try{13 leturlPersonId=parseInt(document.getElementById("url_person_id").value),14 people=awaitthis.model.read();15 16 this.view.buildTable(people);17 18 // Did we navigate here with a person selected?19 if(urlPersonId){20 letperson=awaitthis.model.readOne(urlPersonId);21 this.view.updateEditor(person);22 this.view.setButtonState(this.view.EXISTING_NOTE);23 24 // Otherwise, nope, so leave the editor blank25 }else{26 this.view.reset();27 this.view.setButtonState(this.view.NEW_NOTE);28 }29 this.initializeTableEvents();30 }catch(err){31 this.view.errorMessage(err);32 }33 }34 initializeCreateEvent(){35 document.getElementById("create").addEventListener("click",async(evt)=>{36 letfname=document.getElementById("fname").value,37 lname=document.getElementById("lname").value;38 39 evt.preventDefault();40 try{41 awaitthis.model.create({42 fname:fname,43 lname:lname44 });45 awaitthis.initializeTable();46 }catch(err){47 this.view.errorMessage(err);48 }49 });50 }51 }Here’s how it works:
Line 1 begins the definition of the Controller class.
Lines 2 to 7 define the class constructor and create the instance variables
this.modelandthis.viewwith their respective parameters. It also callsthis.initialize()to set up the event handling and build the initial table of people.Lines 8 to 10 define
initialize()and mark it as an asynchronous method. It callsthis.initializeTable()asynchronously and waits for it to complete. This simplified version only includes this one call, but the full version of the code contains other initialization methods used for the rest of the event handling set up.Line 11 defines
initializeTable()as an asynchronous method. This is necessary because it callsmodel.read(), which is also asynchronous.Line 13 declares and initializes the
urlPersonIdvariable with the value of the HTML hidden inputurl_person_id.Line 14 calls
this.model.read()and asynchronously waits for it to return with people data.Line 16 calls
this.view.buildTable(people)to fill the HTML table with people data.Lines 19 to 28 determine how to update the editor portion of the page.
Line 29 calls
this.initializeTableEvents()to install the event handling for the HTML table.Line 31 calls
this.view.errorMessage(err)to display errors should they occur.Lines 34 to 49 install a click event handler on the create button. This calls
this.model.create(...)to create a new person using the REST API, and updates the HTML table with new data.
The bulk of the controller code is like this, setting event handlers for all the expected events on the People SPA page. The controller continues creating functions in those event handlers to orchestrate calls to this.model and this.view, so that they perform the right actions when those events occur.
When your code is complete, your People SPA page will look like this:
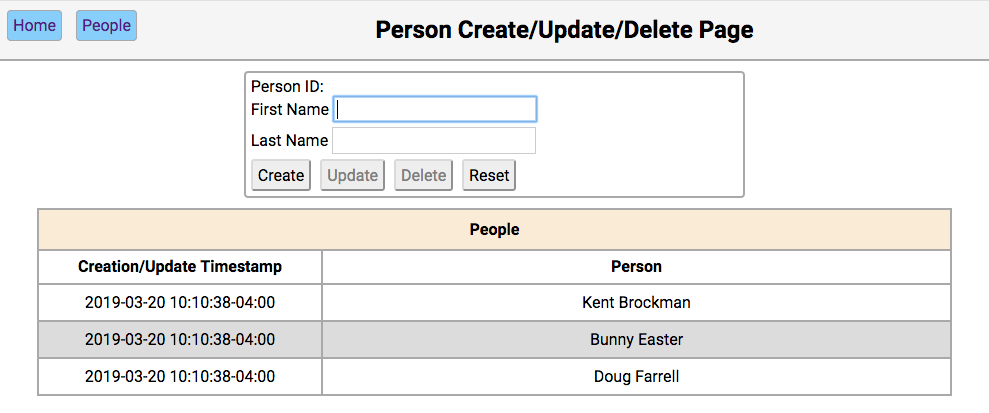 People HTML page after styling and JavaScript
The content, styling, and functionality are all complete!
Conclusion
You’ve covered a great deal of new ground and should be proud of what you’ve learned! It can be tricky to jump back and forth between Python and JavaScript to create a complete Single-Page Application.
If you keep your content (HTML), presentation (CSS), and interaction (JavaScript) separate, then you can substantially reduce the complexity. You can also make JavaScript coding more manageable by using the MVC pattern to further break down the complexity of user interaction.
You’ve seen how using these tools and ideas can help you create reasonably complex Single-Page Applications. Now you’re better equipped to make decisions about whether to build an app this way, or take the plunge into a larger framework!
You can get all of the code you saw in this tutorial at the link below:
Download Code:Click here to download the code you'll use to learn about Python REST APIs with Flask, Connexion, and SQLAlchemy in this tutorial.
[ Improve Your Python With 🐍 Python Tricks 💌 – Get a short & sweet Python Trick delivered to your inbox every couple of days. >> Click here to learn more and see examples ]
↧
TechBeamers Python: Python Write File/ Read File
This tutorial covers the following topic – Python Write File/Read File. It describes the syntax of the writing to a file in Python. Also, it explains how to write to a text file and provides several examples for help. For writing to a file in Python, you would need a couple of functions such as Open(), Write(), and Read(). All these are built-in Python functions and don’t require a module to import. There are majorly two types of files you may have to interact with while programming. One is the text file that contains streams of ASCII or UNICODE (UTF-8)
The post Python Write File/ Read File appeared first on Learn Programming and Software Testing.
↧
↧
Roberto Alsina: Episodio 15: Python más rápido en 5 segundos!
¿Python es lento? ¡Mentira! Estrategias para hacer que tu código Python, SIN MODIFICAR sea 2 veces, 10 veces ... ¡100 veces más rápido!
↧
Test and Code: 93: Software Testing, Book Writing, Teaching, Public Speaking, and PyCarolinas - Andy Knight
Andy Knight is the Automation Panda.
Andy Knight is passionate about software testing, and shares his passion through public speaking, writing on automationpanda.com, teaching as an adjunct professor, and now also through writing a book and organizing a new regional Python conference.
Topics of this episode include:
- Andy's book on software testing
- Being an adjunct professor
- Public speaking and preparing talk proposals
- including tips from Andy about proposals and preparing for talks
- PyCarolinas
Special Guest: Andy Knight.
Sponsored By:
- Raygun: Detect, diagnose, and destroy Python errors that are affecting your customers. With smart Python error monitoring software from Raygun.com, you can be alerted to issues affecting your users the second they happen.
Links:
<p>Andy Knight is the Automation Panda. </p> <p>Andy Knight is passionate about software testing, and shares his passion through public speaking, writing on automationpanda.com, teaching as an adjunct professor, and now also through writing a book and organizing a new regional Python conference.</p> <p>Topics of this episode include:</p> <ul> <li>Andy's book on software testing</li> <li>Being an adjunct professor</li> <li>Public speaking and preparing talk proposals <ul> <li>including tips from Andy about proposals and preparing for talks</li> </ul></li> <li>PyCarolinas</li> </ul><p>Special Guest: Andy Knight.</p><p>Sponsored By:</p><ul><li><a href="https://testandcode.com/raygun" rel="nofollow">Raygun</a>: <a href="https://testandcode.com/raygun" rel="nofollow">Detect, diagnose, and destroy Python errors that are affecting your customers. With smart Python error monitoring software from Raygun.com, you can be alerted to issues affecting your users the second they happen.</a></li></ul><p><a href="https://www.patreon.com/testpodcast" rel="payment">Support Test & Code</a></p><p>Links:</p><ul><li><a href="https://automationpanda.com/" title="Automation Panda" rel="nofollow">Automation Panda</a></li><li><a href="https://automationpanda.com/speaking/" title="Andy's Speaking events" rel="nofollow">Andy's Speaking events</a></li><li><a href="http://pycarolinas.org" title="PyCarolinas 2020" rel="nofollow">PyCarolinas 2020</a></li></ul>↧
Zato Blog: Bash completion in Zato commands
This is a quick tip on how to quickly and easily enable Bash completion for Zato commands - each time you press Tab when typing a Zato command, its arguments and parameters will be auto-completed.
Prerequisites
First off, note that when you install Zato from a .deb or .rpm package, it already ships with the Bash completion functionality and what is needed next is its activation as such.
Thus, there is only one prerequisite, core package needed. For example, this command installs core Bash completion in Ubuntu and Debian:
$ sudo apt-get install bash-completion
Enable Bash completion
Again, each operating system will have its own procedure to enable Bash completion.
For Ubuntu and Debian, edit file ~/.bashrc and add the commands below if they do not exist yet.
# Enable bash completion in interactive shellsif ! shopt -oq posix;thenif[ -f /usr/share/bash-completion/bash_completion ];then
    . /usr/share/bash-completion/bash_completion
  elif[ -f /etc/bash_completion ];then
    . /etc/bash_completion
  fifi
Afterwards, Bash completion will be enabled in every future session and you will be able to use it in the zato command, e.g.:
$ zato st[tab] # This will suggest either 'zato start' or 'zato stop'
$ zato start /path/to/[tab] # This will suggest a file-system path to use
↧
Matt Layman: Configurama - Building SaaS #36
In this episode, we turned our attention to handling settings and configuration. We discussed different techniques for handling settings, looked at available tools, and started integrating one of the tools into the project.
The initial discussion in the stream focused on different ways of doing settings. I talked about what I view as a difference between configuration (mostly static stuff) and settings (dynamic parts of the app).
I also discussed where to get settings from.
↧
↧
Wingware Blog: Efficient Flask Web Development with Wing 7
Wing can develop and debug Python code running under Flask, a web framework that is quick to get started with and easy to extend as your web application grows.
To create a new project, use NewProject in Wing's Project menu and select the project type Flask. If Flask is not installed into your default Python, you may also need to set PythonExecutable to the full path of the python or python.exe you want to use. This is the value of sys.executable (after importsys) in the desired Python installation or virtualenv.
Next, add your files to the project with AddExistingDirectory in the Project menu.
Debugging Flask in Wing
To debug Flask in Wing you need to turn off Flask's built-in debugger, so that Wing's debugger can take over reporting exceptions. This is done by setting the debug attribute on the Flask application to False:
app.debug=FalseThen use SetCurrentasMainEntryPoint in the Debug menu to set your main entry point, so you can start debugging from the IDE even if the main entry point file is not visible in the editor.
Once debug is started, you can load pages from a browser to reach breakpoints or exceptions in your code. Output from the Flask process is shown in Wing's DebugI/O tool.
Example
Here's an example of a complete "Hello World" Flask application that can be debugged with Wing:
importosfromflaskimportFlaskapp=Flask(__name__)@app.route("/")defhello():return"<h3>Hello World!</h3><p>Your app is working.</p>"if__name__=="__main__":if'WINGDB_ACTIVE'inos.environ:app.debug=Falseapp.run()To try it, start debugging it in Wing and use the URL printed to the DebugI/O tool to load the page in a web browser. Setting a breakpoint on the return statement will stop there whenever the page is reloaded in the browser.
Setting up Auto-Reload with Wing Pro
With the above configuration, you will need to restart Flask whenever you make a change to
your code, either with RestartDebugging in the Debug menu or with the ![]() toolbar icon.
toolbar icon.
If you have Wing Pro, you can avoid the need to restart Flask by telling it to auto-restart when code changes on disk, and configuring Wing to automatically debug the restarted process.
Flask is configured by adding a keyword argument to your app.run() line:
app.run(use_reloader=True)Wing is configured by enabling DebugChildProcesses under the Debug/Execute tab in ProjectProperties, from the Project menu. This tells Wing Pro to debug also child processes created by Flask, including the reloader process.
Now Flask will automatically restart on its own whenever you save an already-loaded source file to disk, and Wing will debug the restarted process. You can add additional files for Flask to watch as follows:
watch_files=['/path/to/file1','/path/to/file2']app.run(use_reloader=True,extra_files=watch_files)That's it for now! We'll be back soon with more Wing Tips for Wing Python IDE.
As always, please don't hesitate to email support@wingware.com if you run into problems or have any questions.
↧
Dataquest: Python Datetime Tutorial: Manipulate Times, Dates, and Time Spans
Learn to manipulate times, dates, and time series data in Python and become a master of the datetime module in this Dataquest tutorial.
The post Python Datetime Tutorial: Manipulate Times, Dates, and Time Spans appeared first on Dataquest.
↧
PyCharm: 2019.3 EAP 7
A new Early Access Program (EAP) version for PyCharm 2019.3 is now available! If you wish to try it out do so by downloading it from our website.
New for this version
R plugin support
We are happy to announce that PyCharm now supports the R language and development environment plugin to perform statistical computing as part of our scientific tools offering. Perform data wrangling, manipulation and visualization with the library tools that R has available. To start using it download the R language, install the R plugin in PyCharm and configure the R interpreter.
After doing this you can start creating .R files (that you can easily identify by the ![]() icon) for which we will provide code assistance like: error and syntax highlighting, code completion and refactoring, creation of comment lines, intention actions and quick fixes.
icon) for which we will provide code assistance like: error and syntax highlighting, code completion and refactoring, creation of comment lines, intention actions and quick fixes.
To make the most out of this scientific tool you will have available a console, graphic tool window, and packages, HTML and table views to work with:

Want to know more? Visit our R plugin support documentation to get detailed information on installation and usage.
Further improvements
- An issue causing Docker remote interpreters not to reflect updated libraries in PyCharm was fixed. Now every time you update your Docker packages they will be auto updated as well in PyCharm.
- The PEP8 warnings showing incorrectly for assignment expressions were solved.
- For more see the release notes
Interested?
Download this EAP from our website. Alternatively, you can use the JetBrains Toolbox App to stay up to date throughout the entire EAP.
If you’re on Ubuntu 16.04 or later, you can use snap to get PyCharm EAP, and stay up to date. You can find the installation instructions on our website.
↧
John Cook: Generating Python code from SymPy
Yesterday I wrote about Householder’s higher-order generalizations of Newton’s root finding method. For n at least 2, define

and iterate Hn to find a root of f(x). When n = 2, this is Newton’s method. In yesterday’s post I used Mathematica to find expressions for H3 and H4, then used Mathematica’s FortranForm[] function to export Python code. (Mathematica doesn’t have a function to export Python code per se, but the Fortran syntax was identical in this case.)
Aaron Muerer pointed out that it would have been easier to generate the Python code in Python using SymPy to do the calculus and labdify() to generate the code. I hadn’t heard of lambdify before, so I tried out his suggestion. The resulting code is nice and compact.
    from sympy import diff, symbols, lambdify

    def f(x, a, b):
        return x**5 + a*x + b

    def H(x, a, b, n):
        x_, a_, b_ = x, a, b
        x, a, b = symbols('x a b')
        expr = diff(1/f(x,a,b), x, n-2) / \
               diff(1/f(x,a,b), x, n-1)
        g = lambdify([x,a,b], expr)
        return x_ + (n-1)*g(x_, a_, b_)
This implements all the Hn at once. The previous post implemented three of the Hn separately.
The first couple lines of H require a little explanation. I wanted to use the same names for the numbers that the function H takes and the symbols that SymPy operated on, so I saved the numbers to local variables.
This code is fine for a demo, but in production you’d want to generate the function g once (for each n) and save the result rather than generating it on every call to H.
↧
↧
CubicWeb: implementing the langserver protocol for RQL
One of our next project for cubicweb and its ecosystem is to implement the langserver protocol for the RQL language that we are using in CW. The langserver protocol is an idea to solve one problem: to integrate operation for various languages, most IDE/tools needs to reimplement the wheel all the time, doing custom plugin etc... To solve this issue, this protocol has been invented with one idea: make one server for a language, then all IDE/tools that talks this protocol will be able to integrate it easily.

You can find the website here: https://langserver.org/
So the idea is simple: let's build our own server for RQL so we'll be able to integrate it everywhere and build tools for it.
One of the goal is to have something similar than that for RQL: https://developer.github.com/v4/explorer/ rql being extremely similar to graphql

So this post has several objectives:
- gather people that would be motivate to work on that subject, for now there is Laurent Wouters and me :)
- explain to you in more details (not all) how the language server protocol works
- show what is already existing for both langserver in python and rql
- show the first roadmap we've discussed with Laurent Wouters on how we think we can do that :)
- be a place to discuss this project, things aren't fixed yet :)
So, what is the language server protocol (LSP)?
It's a JSON-RPC based protocol where the IDE/tool talks to the server. JSON-RPC, said simply, is a bi-directional protocol in json.
In this procotol you have 2 kind of exchanges:
- requests: where the client (or server) ask the server (or the server ask the client) something and a reply is expected. For example: where is the definition of this function?
- notifications: the same but without an expected reply. For example: linting information or error detection

The LSP specifications has 3 bigs categories:
- everything about initialization/shutdown the server etc...
- everything regarding text and workspace synchronization between the server and the client
- the actual things that interest us: a list of languages features that the server supports (you aren't in the obligation to implement everything)
Here is the simplified list of possible languages features that the website present:
- Code completion
- Hover
- Jump to def
- Workspace symbols
- Find references
- Diagnostics
The specification is much more detailed but way less comprehensive (look at the "language features" on the right menu for more details):
- completion/completion resolve
- hover (when you put your cursor on something)
- signatureHelp
- declaration (go to...)
- definition (go to...)
- typeDefinition (go to...)
- implementation (go to...)
- references
- documentHighlight (highlight all references to a symbol)
- documentSymbol ("symbol" is a generic term for variable, definitions etc...)
- codeAction (this one is interesting)
- codeLens/codeLens resolve
- documentLink/documentLink resolve
- documentColor/colorPresentation (stuff about picking colors)
- formatting/rangeFormatting/onTypeFormatting (set tab vs space)
- rename/prepareRename
- foldingRange
(Comments are from my current understanding of the spec, it might not be perfect)
The one that is really interesting here (but not our priority right now) is "codeAction", it's basically a generic entry point for every refactoring kind of operations as some examples from the spec shows:
Example extract actions: - Extract method - Extract function - Extract variable - Extract interface from class
Example inline actions:
- Inline function
- Inline variable
- Inline constant
Example rewrite actions:
- Convert JavaScript function to class
- Add or remove parameter
- Encapsulate field
- Make method static
- Move method to base class
But I'm not expecting us to have direct need for it but that really seems one to keep in mind.
One question that I frequently got was: is syntax highlight included in the langserver protocol? Having double checked with Laurent Wouters, it's actually not the case (I thought documentSymbol could be used for that but actually no).
But we already have an implementation for that in pygments: https://hg.logilab.org/master/rql/file/d30c34a04ebf/rql/pygments_ext.py

What is currently existing for LSP in python and rql
The state is not great in the python ecosystem but not a disaster. Right now I haven't been able to find any generic python implementation of LSP that we could really reuse and integrate.
There is, right now and to my knowledge, only 2 maintained implementation of LSP in python. One for python and one for ... Fortran x)
Palantir's one makes extensive use of advanced magic code doesn't seems really necessary but it is probably of higher quality code since the Fortran one doesn't seems very idiomatic but looks much simpler.
So we'll ever need to extract the needed code from one of those of implement our own, not so great.
On the RQL side, everything that seems to be useful for our current situation is located in the RQL package that we maintain: https://hg.logilab.org/master/rql
Roadmap
After a discussion with Laurent Wouters, a first roadmap looks like this:
- extract the code from either palantir or fortran LSP implementation and come with a generic implementation (I'm probably going to do it but Laurent told me he his going to take a look too) When I'm talking about a generic implementation I'm talking about everything listed in the big category of the protocol that isn't related to language features which we don't really want to rewrite again.
Once that's done, start implementing the language features for RQL:
- the easiest is the syntax errors detection code, we just need to launch to parser on the code and handle the potential errors
- do that with pretty specific red underline
- play with RQL AST to extract the symbols and start doing things like codeLens and hover
- much more complex (and for later): autocompletion (we'll either need a demi compiler or to modify the current one for that)
Side note
To better understand the motivation behind this move, it is part of the more global move of drop the "Web" from CubicWeb and replace all the front end current implementation by reactjs+typescript views. In this context CubicWeb (or Cubic?) will only serves as a backend provide with which we will talk in... RQL! Therefor writing and using RQL will be much more important than right now.
↧
Python Software Foundation: The 2019 Python Developer Survey is here, take a few minutes to complete the survey!
It is that time of year and we are excited to start the official Python Developers Survey for 2019!
In 2018, the Python Software Foundation together with JetBrains conducted an official Python Developers Survey for the second time. Over 20,000 developers from almost 150 different countries participated..
With this third iteration of the official Python Developers Survey, we aim to identify how the Python development world looks today and how it compares to the last two years. The results of the survey will serve as a major source of knowledge about the current state of the Python community and how it is changing over the years, so we encourage you to participate and make an invaluable contribution to this community resource. The survey takes approximately 10 minutes to complete.
Please take a few minutes to complete the 2019 Python Developers Survey!
Your valuable opinion and feedback will help us better understand how Python developers use Python, related frameworks, tools, and technologies. We also hope you'll have fun going through the questions.
The survey is organized in partnership between the Python Software Foundation and JetBrains. The Python Software Foundation distributes this survey through community channels only (such as this blog, Twitter, mailing lists, etc). After the survey is over, we will publish the aggregated results and randomly select 100 winners (those who complete the survey in its entirety), who will each receive an amazing Python Surprise Gift Pack.![]()
![]()
![]()
![]()
![]()
In 2018, the Python Software Foundation together with JetBrains conducted an official Python Developers Survey for the second time. Over 20,000 developers from almost 150 different countries participated..
With this third iteration of the official Python Developers Survey, we aim to identify how the Python development world looks today and how it compares to the last two years. The results of the survey will serve as a major source of knowledge about the current state of the Python community and how it is changing over the years, so we encourage you to participate and make an invaluable contribution to this community resource. The survey takes approximately 10 minutes to complete.
Please take a few minutes to complete the 2019 Python Developers Survey!
Your valuable opinion and feedback will help us better understand how Python developers use Python, related frameworks, tools, and technologies. We also hope you'll have fun going through the questions.
The survey is organized in partnership between the Python Software Foundation and JetBrains. The Python Software Foundation distributes this survey through community channels only (such as this blog, Twitter, mailing lists, etc). After the survey is over, we will publish the aggregated results and randomly select 100 winners (those who complete the survey in its entirety), who will each receive an amazing Python Surprise Gift Pack.
↧
Reuven Lerner: Want to improve your Python fluency? Join Weekly Python Exercise!
A new cohort of Weekly Python Exercise, my family of courses to improve your Python fluency, starts on November 5th.
This time, it’s an advanced-level cohort. We’ll explore topics such as iterators, generators, decorators, objects, and threads.
The course’s structure is simple:
- Every Tuesday, you get a new question, along with “pytest” tests to check yourself
- On the following Monday, you get the solution and explanation
- In between, you can discuss your solutions (and problems) with others in your cohort, on our private forum
- I also hold live video office hours, where you can ask me questions about the exercises
Questions or comments? Or perhaps you’re eligible for one of my discounts? Read more at http://WeeklyPythonExercise.com/, or send me e-mail at reuven@lerner.co.il.
But don’t delay, because November 5th is coming up soon. And why miss out on improving your Python knowledge and fluency?
The post Want to improve your Python fluency? Join Weekly Python Exercise! appeared first on Reuven Lerner.
↧
Mike Driscoll: The Demos for PySimpleGUI
The PySimpleGUI project has a lot of interesting demos included with their project that you can use to learn how to use PySimpleGUI. The demos cover all the basic widgets as far as I can tell and they also cover the recommended design patterns for the package. In addition, there are a couple of games and other tiny applications too, such as a version of Pong and the Snake game.
In this article, you will see a small sampling of the demos from the project that will give you some idea of what you can do with PySimpleGUI.
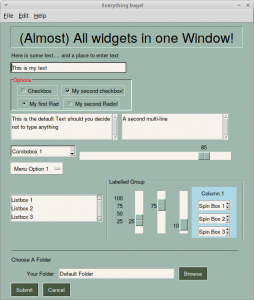
Seeing the Available Widgets
PySimpleGUI has a nice little demo called Demo_All_Widgets.py that demonstrates almost all the widgets that PySimpleGUI supports currently. PySimpleGUI has wrapped all of Tkinter’s core widgets, but not the ttk widgets.
This is what the demo looks like when you run it:
Let’s take a quick look at the code for this demo:
#!/usr/bin/env python'''
Example of (almost) all widgets, that you can use in PySimpleGUI.
'''
import PySimpleGUI as sg

sg.change_look_and_feel('GreenTan')
# ------ Menu Definition ------ #
menu_def = [['&File', ['&Open', '&Save', 'E&xit', 'Properties']],
            ['&Edit', ['Paste', ['Special', 'Normal', ], 'Undo'], ],
            ['&Help', '&About...'], ]
# ------ Column Definition ------ #
column1 = [[sg.Text('Column 1', background_color='lightblue', justification='center', size=(10, 1))],
           [sg.Spin(values=('Spin Box 1', '2', '3'),
                    initial_value='Spin Box 1')],
           [sg.Spin(values=('Spin Box 1', '2', '3'),
                    initial_value='Spin Box 2')],
           [sg.Spin(values=('Spin Box 1', '2', '3'), initial_value='Spin Box 3')]]
layout = [[sg.Menu(menu_def, tearoff=True)],
    [sg.Text('(Almost) All widgets in one Window!', size=(30, 1), justification='center', font=("Helvetica", 25), relief=sg.RELIEF_RIDGE)],
    [sg.Text('Here is some text.... and a place to enter text')],
    [sg.InputText('This is my text')],
    [sg.Frame(layout=[[sg.CBox('Checkbox', size=(10, 1)),
         sg.CBox('My second checkbox!', default=True)],
        [sg.Radio('My first Radio!     ', "RADIO1", default=True, size=(10, 1)),
         sg.Radio('My second Radio!', "RADIO1")]], title='Options',
             title_color='red',
             relief=sg.RELIEF_SUNKEN,
             tooltip='Use these to set flags')],
    [sg.MLine(default_text='This is the default Text should you decide not to type anything', size=(35, 3)),
     sg.MLine(default_text='A second multi-line', size=(35, 3))],
    [sg.Combo(('Combobox 1', 'Combobox 2'), size=(20, 1)),
     sg.Slider(range=(1, 100), orientation='h', size=(34, 20), default_value=85)],
    [sg.OptionMenu(('Menu Option 1', 'Menu Option 2', 'Menu Option 3'))],
    [sg.Listbox(values=('Listbox 1', 'Listbox 2', 'Listbox 3'), size=(30, 3)),
     sg.Frame('Labelled Group', [[
         sg.Slider(range=(1, 100), orientation='v', size=(5, 20), default_value=25, tick_interval=25),
         sg.Slider(range=(1, 100), orientation='v', size=(5, 20), default_value=75),
         sg.Slider(range=(1, 100), orientation='v', size=(5, 20), default_value=10),
         sg.Col(column1, background_color='lightblue')]])],
    [sg.Text('_'*80)],
    [sg.Text('Choose A Folder', size=(35, 1))],
    [sg.Text('Your Folder', size=(15, 1), justification='right'),
     sg.InputText('Default Folder'), sg.FolderBrowse()],
    [sg.Submit(tooltip='Click to submit this form'), sg.Cancel()]]
window = sg.Window('Everything bagel', layout,
    default_element_size=(40, 1), grab_anywhere=False)
event, values = window.read()
sg.popup('Title',
         'The results of the window.',
         'The button clicked was "{}"'.format(event),
         'The values are', values)
PySimpleGUI lays out their widgets by using Python lists. You can also see that this demo uses lists for generating the menus too. Then you create a Window object and pass in the layout, which is your list of lists of Elements or widgets.
Let’s see what else you can do!
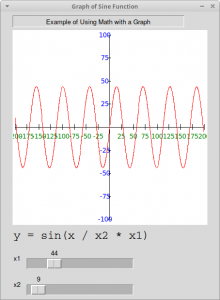
Graphing with PySimpleGUI
PySimpleGUI also supports creating graphs. One such example can be found in Demo_Graph_Element_Sine_Wave.py. This demo shows the developer how to use the Graph widget.
This is what the demo looks like when you run it:
Here is what the code looks like:
import PySimpleGUI as sg
importmath
# Yet another usage of Graph element.
SIZE_X = 200
SIZE_Y = 100
NUMBER_MARKER_FREQUENCY = 25

def draw_axis():
    graph.draw_line((-SIZE_X, 0), (SIZE_X, 0))# axis lines
    graph.draw_line((0, -SIZE_Y), (0, SIZE_Y))
    for x inrange(-SIZE_X, SIZE_X+1, NUMBER_MARKER_FREQUENCY):
        graph.draw_line((x, -3), (x, 3))# tick marksif x != 0:
            # numeric labels
            graph.draw_text(str(x), (x, -10), color='green')
    for y inrange(-SIZE_Y, SIZE_Y+1, NUMBER_MARKER_FREQUENCY):
        graph.draw_line((-3, y), (3, y))if y != 0:
            graph.draw_text(str(y), (-10, y), color='blue')

# Create the graph that will be put into the window
graph = sg.Graph(canvas_size=(400, 400),
                 graph_bottom_left=(-(SIZE_X+5), -(SIZE_Y+5)),
                 graph_top_right=(SIZE_X+5, SIZE_Y+5),
                 background_color='white',
                 key='graph')# Window layout
layout = [[sg.Text('Example of Using Math with a Graph', justification='center', size=(50, 1), relief=sg.RELIEF_SUNKEN)],
          [graph],
          [sg.Text('y = sin(x / x2 * x1)', font='COURIER 18')],
          [sg.Text('x1'), sg.Slider((0, 200), orientation='h',
                                 enable_events=True, key='-SLIDER-')],
          [sg.Text('x2'), sg.Slider((1, 200), orientation='h', enable_events=True, key='-SLIDER2-')]]
window = sg.Window('Graph of Sine Function', layout)
whileTrue:
    event, values = window.read()if event isNone:
        break
    graph.erase()
    draw_axis()
    prev_x = prev_y = None
    for x inrange(-SIZE_X, SIZE_X):
        y = math.sin(x/int(values['-SLIDER2-']))*int(values['-SLIDER-'])if prev_x isnotNone:
            graph.draw_line((prev_x, prev_y), (x, y), color='red')
        prev_x, prev_y = x, y

window.close()
To make the graph work correctly, you need to erase the graph and redraw it in the while loop above. Play around with the code a bit and see what you can do. There are several other graph related demos in the demo folder that you should check out as well.
PySimpleGUI also supports matplotlib integration. A fun one to play around with is Demo_Matplotlib_Animated.py.
When I ran it, the demo ended up looking like this:

Now let’s check out another demo!
Creating Pong with PySimpleGUI
As I mentioned earlier in this article, you can also create the Pong game pretty easily using PySimpleGUI. You can check out Demo_Pong.py for full details.
Here is what the code creates when you run it:
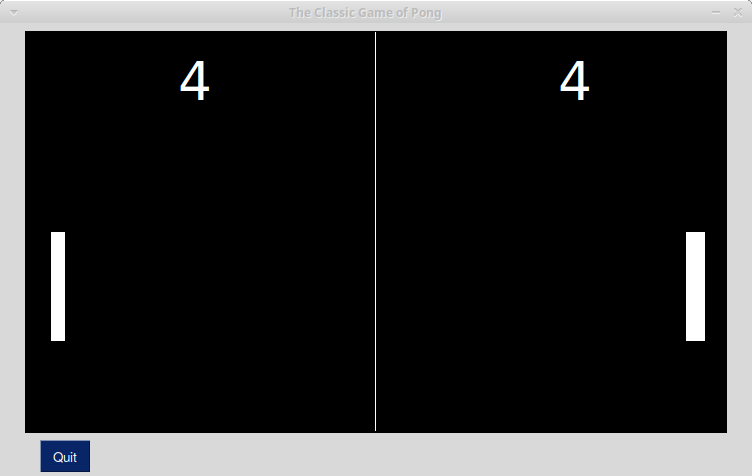
The code for this game is a bit long, but not too hard to follow. At the time of writing, the game is written using 183 lines of code in a single module.
Wrapping Up
There are 150+ demos in PySimpleGUI’s Demo folder. I did discover a few that didn’t work on Linux due to using OS-specific code. However most of the examples seem to work and they are a great way to see what you can do with this project. Check them out to get some ideas of how you could use PySimpleGUI for your own projects or demos.
Related Reading
- A Brief Intro to PySimpleGUI
- PySimpleGUI documentation
- Other simple PySimpleGUI applications
The post The Demos for PySimpleGUI appeared first on The Mouse Vs. The Python.
↧
↧
Codementor: How I learned python/django
Python
↧
EuroPython Society: EuroPython 2020: Venue and location selected
After a work intense RFP over two months with more than 40 venues competing, 18 first round entries, and two rounds of refinements, we are now happy to announce the winner:

EuroPython 2020 will be held at the CCD in
Dublin, Ireland, from July 20 - 26 2020
We will now start work on the contracts and get the organization going, so that we can all enjoy another edition of EuroPython next year.
Many thanks,
–
EuroPython Society Board
https://www.europython-society.org/
↧
PyCharm: PyCharm 2019.2.4
PyCharm 2019.2.4 is now available!
Fixed in this Version
- A regression issue that caused Pytest not to work properly with the debugger console was fixed.
- The debugger console problem for PyQt5 that caused it to crash was solved.
- We fixed an issue that was causing NumPy arrays not to be properly formatted in the Data View panel.
- The IronPython problem causing the debugger to fail was fixed.
- We took care of the debugger stack trace messages that are displayed when the debugger is stopped so they won’t show so you can properly know when the process was ended.
- The regression issue causing the Pytest test suite to raise an error in PyCharm was solved.
Further Improvements
- A platform issue that was modifying original file permissions upon saving them was solved.
- We tweaked the error messages for SSH connections to show information properly.
- Adding data source for databases via the explorer now opens directly the actual type of data source selected.
- Completion for databases is now aware of the database or schema you’re currently working with so it will only show suggestions that belong to that context.
- And much more, check out our release notes for more details.
Getting the New Version
You can update PyCharm by choosing Help | Check for Updates (or PyCharm | Check for Updates on macOS) in the IDE. PyCharm will be able to patch itself to the new version, there should no longer be a need to run the full installer.
If you’re on Ubuntu 16.04 or later, or any other Linux distribution that supports snap, you should not need to upgrade manually, you’ll automatically receive the new version.
↧