Learn how to join multiple iterables into one single object using Python zip function. Learn how to zip lists and matricies, send output to a file, and more
↧
Codementor: Python zip function tutorial (Simple Examples)
↧
PyCoder’s Weekly: Issue #378 (July 23, 2019)
#378 – JULY 23, 2019
View in Browser »
Create a Flask Application With Google Login
In this step-by-step tutorial, you’ll create a Flask application that lets users sign in using their Google login. You’ll learn about OAuth 2 and OpenID Connect and also find out how to implement some code to handle user session management.
REAL PYTHON
Guido on PEG Parsers for Python
“Some years ago someone asked whether it would make sense to switch Python to a PEG parser. […] I looked into it a bit and wasn’t sure what to think, so I dropped the subject. Recently I’ve learned more about PEG (Parsing Expression Grammars), and I now think it’s an interesting alternative to the home-grown parser generator that I developed 30 years ago when I started working on Python.”
GUIDO VAN ROSSUM
Save 40% on Your Order at manning.com
Take the time to learn something new! Manning Publications are offering 40% off everything at manning.com, including everything Pythonic. Just enter the code pycoders40 at the cart before you checkout to save →
MANNING PUBLICATIONSsponsor
Python 2.x Support in Pip Going Forward
“pip will continue to ensure that it runs on Python 2.7 after the CPython 2.7 EOL date. Support for Python 2.7 will be dropped, if bugs in Python 2.7 itself make this necessary (which is unlikely) or Python 2 usage reduces to a level where pip maintainers feel it is OK to drop support. The same approach is used to determine when to drop support for other Python versions.”
PYPA.IO
Logging in Python
Python provides a logging system as a part of its standard library, so you can quickly add logging to your application. In this course, you’ll learn why using this module is the best way to add logging to your application as well as how to get started quickly, and you will get an introduction to some of the advanced features available.
REAL PYTHONvideo
Understand How Celery Works by Building a Clone
“A delayed job processor (also called a background processor, asynchronous task queue, etc.) is a software system that can run code at a later time. Examples of such software includes Celery, Resque, Sidekiq, and others. In this post we will try and understand how these things work by building a clone/replica of such software.”
KOMU WAIRAGU• Shared by Komu Wairagu
Simplify Your Python Developer Environment
Three tools (pyenv, pipx, pipenv) make for smooth, isolated, reproducible Python developer and production environments.
MASON EGGER• Shared by Python Bytes FM
Discussions
Exploring Best Practices for Upcoming Python 3.8 Features
“As a Python 3.8 learning exercise, I’m using the walrus operator, / notation, and f= at every opportunity and then evaluating the result for clarity.”
RAYMOND HETTINGER
Using NumPy With Pandas Without Import NumPy
“Want to use NumPy without importing it? You can access all of its functionality from within pandas…”
TWITTER.COM/JUSTMARKHAM
Python Jobs
Software Engineering Lead, Python (Houston, TX)
Python Software Engineer (Multiple US Locations)
Python Software Engineer (Munich, Germany)
Senior Back-End Web Developer (Vancouver, BC)
Lead Data Scientist (Buffalo, NY)
Python Developer (Remote)
Sr. Python Engineer (Arlington, VA)
Senior Backend Software Engineer (Remote)
Data Engineer (Munich, Germany)
Articles & Tutorials
Making Python Classes More Modular Using Mixins
“In this article I want to discuss mixins: what they are, how they work, and when they’re useful. Hopefully after reading this brief article you will be ready to experiment with this pattern yourself in your own projects.”
ALEKSEY BILOGUR• Shared by Aleksey Bilogur
Keras Learning Rate Schedules and Decay
In this tutorial, you will learn about learning rate schedules and decay using Keras. You’ll learn how to use Keras’ standard learning rate decay along with step-based, linear, and polynomial learning rate schedules.
ADRIAN ROSEBROCK
Safely Roll Out New Features in Python With Optimizely Rollouts
Tired of code rollbacks, hotfixes, or merge conflicts? Instantly turn on or off features in production. Comes with unlimited collaborators and feature flags. Embrace safer CI/CD releases with SDKs for Python and all major platforms →
OPTIMIZELYsponsor
How to Use np.arange()
In this step-by-step tutorial, you’ll learn how to use the NumPy arange() function, which is one of the routines for array creation based on numerical ranges. np.arange() returns arrays with evenly spaced values.
REAL PYTHON
Protecting the Future of Python by Hunting Black Swans
An interview with Russell Keith-Magee about identifying potential black swan events for the Python ecosystem and how to address them for the future of the language and its community.
PYTHONPODCAST.COMpodcast
Writing Sustainable Python Scripts
A standalone Python script can come with a discoverable interface a documentation and some tests to keep it useful a year later.
VINCENT BERNAT
Decoupling Database Migrations From Server Startup: Why and How
Why running migrations on application startup are a bad idea (potential database corruption & downtime) and what to do instead.
ITAMAR TURNER-TRAURING
Train to a Guaranteed Machine Learning Job
1:1 personalized guidance with your own machine expert. Learn through a curated curriculum designed by hiring managers. Get career support and insider connections to jobs with online self-paced course. Get a machine learning job or your money back.
SPRINGBOARDsponsor
Let’s Build a Simple Interpreter: Recognizing Procedure Calls
Part 16 in Ruslan’s amazing tutorial series on building a scripting language interpreter using Python, from scratch.
RUSLAN SPIVAK
Practical Production Python Scripts
A step-by-step refactoring journey from simple fizzbuzz script to a cleaned up and “production-ready” piece of code.
DAN CONNOLLY
The Invasion of Giant Pythons Threatening Florida
Python is eating the world! Related discussion on Hacker News.
SMITHSONIANMAG.COM
Extensive Python Testing on Travis CI
Testing open-source Python on several operating systems using Travis for continous integration.
SHAY PALACHY
Projects & Code
Events
PythOnRio Meetup
July 27, 2019
PYTHON.ORG.BR
Python Sheffield
July 30, 2019
GOOGLE.COM
Heidelberg Python Meetup
July 31, 2019
MEETUP.COM
PiterPy Breakfast
July 31, 2019
TIMEPAD.RU
Reunión Python Valencia
August 1, 2019
GOOGLE.COM
DjangoCon AU 2019
August 2 to August 3, 2019
DJANGOCON.COM.AU
PyCon AU 2019
August 2 to August 7, 2019
PYCON-AU.ORG
Happy Pythoning!
This was PyCoder’s Weekly Issue #378.
View in Browser »
[ Subscribe to 🐍 PyCoder’s Weekly 💌 – Get the best Python news, articles, and tutorials delivered to your inbox once a week >> Click here to learn more ]
↧
↧
Python Bytes: #140 Becoming a 10x Developer (sorta)
↧
Catalin George Festila: Python 3.7.3 : Testing the timeit and Bokeh python module.
The tutorial today has several goals:
testing the timeit function to measure the execution time of a line of print code;
using python lists to record data;
generate lists using the range function;
multiplying a number with an entire list of numbers;
how to use the bokeh module with CustomJSHover and HoverTool
Let's test with the timeit python module, see the official webpage.
This module provides
↧
Kushal Das: Setting up authorized v3 Onion services
Just like v2 Onion services, we can also set up client authorization for Onion services v3. In simple terms, when you have a client authorization setup on an Onion service, only the Tor clients with the private token can access the service. Using this, you can run services (without opening up any port in your system) and only selected people can access that service, that is also being inside of totally encrypted Tor network. Last month, I did a workshop in Rootconf about the same topic, but, I demoed v2 Onion services. In this blog post, I am going to show you how you can do the same with the latest v3 services.
Setting up the Onion service
We assume that we are already running nginx or apache on port 80 of the
server. Add the following two lines at the end of the /etc/tor/torrc file of
your server.
HiddenServiceDir /var/lib/tor/hidden_service/
HiddenServicePort 80 127.0.0.1:80
Then, restart the tor service.
systemctl restart tor
The above command will create the onion service at
/var/lib/tor/hidden_service/ directory, and we can see the address from the
hostname file.
cat /var/lib/tor/hidden_service/hostname
cz2eqjwrned6s7zy3nrmkk3fjoudzhvu53ynq6gdny5efdj26zxf4bid.onion
It should also create a authorized_clients directory at the service
directory.
Next, we will create keys of type x25519, and you can either use any of the
following options to create the keys.
I used the Rust implementation, and I got the secret and the public key.
secret: "TIICFSKY2PECECM2LOA7XLKQKJWHYTN4WLRSIIJKQFCCL3K2II2Q"
public: "RO7N45JLVI5UXOLALOK4V22JLMMF5ZDC2W6DXVKIAU3C7FNIVROQ"
Now, we will use the public key to create a clientname.auth file in
/var/lib/tor/hidden_service/authorized_clients/ directory, I chose the name
kushal.auth.
descriptor:x25519:RO7N45JLVI5UXOLALOK4V22JLMMF5ZDC2W6DXVKIAU3C7FNIVROQ > /var/lib/tor/hidden_service/authorized_clients/kushal.auth
If you look closely, the file format is like below:
descriptor:x25519:public_key
Now, restart the tor service once again in the server.
systemctl restart tor
Setting up client authorization
The first step is to close down my Tor Browser as I will be manually editing
the torrc file of the same. Then, I added the following line to the same
file tor-browser_en-US/Browser/TorBrowser/Data/Tor/torrc.
ClientOnionAuthDir TorBrowser/Data/Tor/onion_auth
Next, we will create the directory.
mkdir tor-browser_en-US/Browser/TorBrowser/Data/Tor/onion_auth
chmod 0700 tor-browser_en-US/Browser/TorBrowser/Data/Tor/onion_auth
Then, add the following in kushal.auth_private file inside of the
onion_auth directory.
cz2eqjwrned6s7zy3nrmkk3fjoudzhvu53ynq6gdny5efdj26zxf4bid:descriptor:x25519:TIICFSKY2PECECM2LOA7XLKQKJWHYTN4WLRSIIJKQFCCL3K2II2Q
The format of the file:
onion_address_56_chars:descriptor:x25519:private_key
Now, start the Tor Browser, and you should be able to visit the authorized Onion service at cz2eqjwrned6s7zy3nrmkk3fjoudzhvu53ynq6gdny5efdj26zxf4bid.onion.
Use case for students
If you want to demo your web project to a selected group of people, but, don’t want to spend money to get a web server or VPS, Onion services is a great way to showcase your work to the world. With the authenticated services, you can choose whom all can view the site/service you are running.
↧
↧
IslandT: Load the data from a file with python
- Load the data from currency.txt to use as the currency string which will form part of the rest url.
- Load the data from crypto.txt to populate the crypto combo box.
- Get the desired cryptocurrency to be used in the cryptocurrency part of the rest url.
In the previous article, we have hardcoded both the cryptocurrency symbol and the currency symbol string into the rest url but in this chapter, we will read those symbols from a file instead. The entire steps of this revised program are as follows:
Load the data from crypto.txt to populate the crypto combo box when a user open up that application.
BTC
ETH
XRP
LTC
BCH
BNB
USDT
EOS
BSV
XLM
TRX
DASH
# read the crypto.txt file then populate the crypto combo box
curr = tuple() # the tuple which will be populated by cryptocurrencies
with open('crypto.txt') as fp:
    for currency in fp.readlines():
        curr += (currency[:-1],)
crypto['values'] = curr
crypto.current(0)
When the user presses the load button, the program will load the currency.txt file then read those currency symbols that will form a string as a part of the rest url.
EUR
JPY
GBP
USD
AUD
 # read the currency file
    c_string = ''
    with open('currency.txt') as fp:
        for currency in fp.readlines():
            c_string += currency[:-1] + ","
    c_string = c_string[:-1]
Finally get the selected cryptocurrency symbol from the crypto combo box to create the full rest url.
base_crypto = crypto.get()  # get the desired crypto currency
    try:
        url = "https://min-api.cryptocompare.com/data/price" #url for API call
        data = {'fsym' : base_crypto, 'tsyms':c_string}
        r = requests.get(url, params=data)
        exchange_rate_s = json.loads(json.dumps(r.json()))

    except:
        print("An exception occurred")
When the program gets the returned data it will populate the currency combo box as well as showing the cryptocurrency/currency exchange rate on the display panel.
import json
from tkinter import *
import tkinter.ttk as tk
import requests

win = Tk() # Create tk instance
win.title("Crypto Calculator") # Add a title
win.resizable(0, 0) # Disable resizing the GUI
win.configure(background='white') # change window background color

selectorFrame = Frame(win, background="white") # create top frame to hold search button and combobox
selectorFrame.pack(anchor = "nw", pady = 2, padx=10)
currency_label = Label(selectorFrame, text = "Select crypto / currency pair :", background="white")
currency_label.pack(anchor="w")

# Create a combo box for crypto currency
select_currency = StringVar() # create a string variable
crypto = tk.Combobox(selectorFrame, textvariable=select_currency)
crypto.pack(side = LEFT, padx=3)

s = StringVar() # create string variable
# create currency frame and text widget to display the incoming exchange rate data
currencyFrame = Frame(win)
currencyFrame.pack(side=TOP)
currency = Label(currencyFrame)
currency.pack()
text_widget = Text(currency, fg='white', background='black')
text_widget.pack()
s.set("Click the find button below to load the crypto currency - currency exchange rate")
text_widget.insert(END, s.get())

buttonFrame = Frame(win) # create a bottom frame to hold the load button
buttonFrame.pack(side = BOTTOM, fill=X, pady = 6)

# read the data from crypto.txt file then populate the crypto combo box
curr = tuple() # the tuple which will be populated by cryptocurrencies
with open('crypto.txt') as fp:
    for currency in fp.readlines():
        curr += (currency[:-1],)
crypto['values'] = curr
crypto.current(0)

def search_currency(): # search currency pair
    pass #for future use

action_search = tk.Button(selectorFrame, text="Search", command=search_currency) # button used to search the currency pair within the text widget
action_search.pack(side=LEFT)

# Create currency combo box
base_currency = StringVar() # create a string variable
based = tk.Combobox(selectorFrame, textvariable=base_currency)
based.pack(side = LEFT, padx=3)

def get_exchange_rate(): # this method will display the incoming exchange rate data after the api called

    global exchange_rate
    global base_crypto

    # read the currency file
    c_string = ''
    with open('currency.txt') as fp:
        for currency in fp.readlines():
            c_string += currency[:-1] + ","
    c_string = c_string[:-1]

    base_crypto = crypto.get()  # get the desired crypto currency
    try:
        url = "https://min-api.cryptocompare.com/data/price" #url for API call
        data = {'fsym' : base_crypto, 'tsyms':c_string}
        r = requests.get(url, params=data)
        exchange_rate_s = json.loads(json.dumps(r.json()))

    except:
        print("An exception occurred")

    curr1 = tuple() # the tuple which will be populated by currency
    sell_buy = ''

    for key, value in exchange_rate_s.items():  # populate exchange rate string and the currency tuple
        sell_buy += base_crypto + ":" + key + "  " + str(value) + "\n"
        curr1 += (key,)

    # fill up combo boxes for both currency and cryptocurrency
    based['values'] = curr1
    based.current(0)

    text_widget.delete('1.0', END)  # clear all those previous text first
    s.set(sell_buy)
    text_widget.insert(INSERT, s.get())  # populate the text widget with new exchange rate data

action_vid = tk.Button(buttonFrame, text="Load", command=get_exchange_rate) # button used to load the exchange rate of currency pairs
action_vid.pack()

win.iconbitmap(r'ico.ico')
win.mainloop()
 The revised application
The program above looks little bit messy but don’t worry because we will tidy up that program in near future.
↧
ListenData: Python : Complete Guide to Date and Time Functions
In this tutorial, we will cover python datetime module and how it is used to handle date, time and datetime formatted columns (variables). It includes various practical examples which would help you to gain confidence in dealing dates and times with python functions. In general, Date types columns are not easy to manipulate as it comes with a lot of challenges like dealing with leap years, different number of days in a month, different date and time formats or if date values are stored in string (character) format etc.
![datetime python with examples]()
READ MORE »
Table of Contents
Introduction : datetime module
It is a python module which provides several functions for dealing with dates and time. It has four classes as follows which are explained in the latter part of this article how these classes work.- datetime
- date
- time
- timedelta

People who have no experience of working with real-world datasets might have not encountered date columns. They might be under impression that working with dates is rarely used and not so important. To enlighten them, I have listed down real-world examples wherein using datetime module can be beneficial.
- Selecting all the saving account holders who were active on 30th June, 2018 and checking their status whether they are still active
- Identifying insureds who filed more than 20 claims in the last 3 months
- Identifying customers who made multiple transactions in the last 6 months
- Extracting dates from timestamp values
Import datetime module
You can import or load datetime module by using the command below - import datetimeYou don't need to install this module as it comes bundled with the installation of python software.
Dates
Here we are usingdatetime.date class which is used to represent calendar date values. today() method is used to fetch current date. datetime.date.today()In order to display it like a proper calendar date, we can wrap it within
Output
datetime.date(2019, 7, 19)
print( ) command.
print(datetime.date.today())

Output
2019-07-19
↧
Codementor: Why and How I use generators in python
Photo by David Carboni (https://unsplash.com/photos/xvkSnspiETA) on Unsplash (https://unsplash.com)
Generators are very powerful feature in python and help you write better and organized code.
WHY...
↧
PyCharm: PyCharm 2019.2 Out Now
PyCharm 2019.2 is out now: improved Jupyter Notebook experience, syntax highlighting for many more languages out of the box, initial Python 3.8 support, and much more. Download now
New in PyCharm
- Jupyter Notebook Integration has been improved. Some of the most highly requested Jupyter Notebook features have been implemented in this version. Now you will be able run all cells with a single button click, select and configure your Jupyter server using a specific project and port to listen to, keep track of variables while debugging them by getting their current state, restart the kernel and publish notebooks from PyCharm to JetBrains Datalore .
- Syntax highlight support for many other languages has been added. Do you work on projects where code in a different language sneaks into your project? PyCharm will now highlight the syntax of Windows .bat files, C#, C++, Groovy, Lua, Makefiles, and more.
- We are adding support for some major Python 3.8 features. Try out positional-only parameters, variable assignment within expressions, ‘Final’ qualifier to restrict usage of methods, classes and variables, and new ways to use f-strings to present values and variables.
- cURL format is now supported for HTTP requests. Just copy your cURL formatted request and paste it directly into your HTTP Request file for it to be converted into its format, and then feel free to modify request params, headers, or body.
Many more features, like cookies preservation between http requests and improved debugging and variable refactoring experiences. Learn more about PyCharm 2019.2 on our website
You can also find the details about our release, in the release notes.
Upgrade Now
To get the new version of PyCharm, upgrade in one of the following ways:
- Download the new version
- Choose Help | Check for Updates in PyCharm
- Use JetBrains Toolbox to upgrade
- If you’re using Ubuntu, or any other distro that supports snap, PyCharm will automatically update using snap (if you’ve installed PyCharm with snap).
Do you have questions, complaints, or suggestions? Please reach out to us! Send questions to our support team, report bugs and suggestions on our issue tracker, or just connect with us on Twitter.
↧
↧
Python Circle: How to host Django app on Pythonanywhere for Free
How to host any python-Django app on pythonanywhere server for free, Best hosting service provider for python-Django apps, Free Django app hosting, Easiest Hosting for Django, Django hosting for free, Cheapest Django Hosting
↧
Python Circle: Preventing cross-site scripting attack on your Django website
XSS attack in Django, preventing cross-site scripting attack in Django website, avoid XSS in Django application, Enabling SECURE_BROWSER_XSS_FILTER in Django website, blocking cross-site scripting attach on Django website
↧
Real Python: Digging Deeper Into Migrations
This is the second article in our Django migrations series:
- Part 1: Django Migrations: A Primer
- Part 2: Digging Deeper Into Django Migrations (current article)
- Part 3: Data Migrations
- Video: Django 1.7 Migrations - A Primer
In the previous article in this series, you learned about the purpose of Django migrations. You have become familiar with fundamental usage patterns like creating and applying migrations. Now it’s time to dig deeper into the migration system and take a peek at some of its underlying mechanics.
By the end of this article, you’ll know:
- How Django keeps track of migrations
- How migrations know which database operations to perform
- How dependencies between migrations are defined
Once you’ve wrapped your head around this part of the Django migration system, you’ll be well prepared to create your own custom migrations. Let’s jump right in where we left off!
This article uses the bitcoin_tracker Django project built in Django Migrations: A Primer. You can either re-create that project by working through that article or you can download the source code:
Download Source Code:Click here to download the code for the Django migrations project you'll be using in this article.
How Django Knows Which Migrations to Apply
Let’s recap the very last step of the previous article in the series. You created a migration and then applied all available migrations with python manage.py migrate.
If that command ran successfully, then your database tables now match your model’s definitions.
What happens if you run that command again? Let’s try it out:
$ python manage.py migrate
Operations to perform:  Apply all migrations: admin, auth, contenttypes, historical_data, sessionsRunning migrations:  No migrations to apply.
Nothing happened! Once a migration has been applied to a database, Django will not apply this migration to that particular database again. Ensuring that a migration is applied only once requires keeping track of the migrations that have been applied.
Django uses a database table called django_migrations. Django automatically creates this table in your database the first time you apply any migrations. For each migration that’s applied or faked, a new row is inserted into the table.
For example, here’s what this table looks like in our bitcoin_tracker project:
| ID | App | Name | Applied |
|---|---|---|---|
| 1 | contenttypes | 0001_initial | 2019-02-05 20:23:21.461496 |
| 2 | auth | 0001_initial | 2019-02-05 20:23:21.489948 |
| 3 | admin | 0001_initial | 2019-02-05 20:23:21.508742 |
| 4 | admin | 0002_logentry_remove... | 2019-02-05 20:23:21.531390 |
| 5 | admin | 0003_logentry_add_ac... | 2019-02-05 20:23:21.564834 |
| 6 | contenttypes | 0002_remove_content_... | 2019-02-05 20:23:21.597186 |
| 7 | auth | 0002_alter_permissio... | 2019-02-05 20:23:21.608705 |
| 8 | auth | 0003_alter_user_emai... | 2019-02-05 20:23:21.628441 |
| 9 | auth | 0004_alter_user_user... | 2019-02-05 20:23:21.646824 |
| 10 | auth | 0005_alter_user_last... | 2019-02-05 20:23:21.661182 |
| 11 | auth | 0006_require_content... | 2019-02-05 20:23:21.663664 |
| 12 | auth | 0007_alter_validator... | 2019-02-05 20:23:21.679482 |
| 13 | auth | 0008_alter_user_user... | 2019-02-05 20:23:21.699201 |
| 14 | auth | 0009_alter_user_last... | 2019-02-05 20:23:21.718652 |
| 15 | historical_data | 0001_initial | 2019-02-05 20:23:21.726000 |
| 16 | sessions | 0001_initial | 2019-02-05 20:23:21.734611 |
| 19 | historical_data | 0002_switch_to_decimals | 2019-02-05 20:30:11.337894 |
As you can see, there is an entry for each applied migration. The table not only contains the migrations from our historical_data app, but also the migrations from all other installed apps.
The next time migrations are run, Django will skip the migrations listed in the database table. This means that, even if you manually change the file of a migration that has already been applied, Django will ignore these changes, as long as there’s already an entry for it in the database.
You could trick Django into re-running a migration by deleting the corresponding row from the table, but this is rarely a good idea and can leave you with a broken migration system.
The Migration File
What happens when you run python manage.py makemigrations <appname>? Django looks for changes made to the models in your app <appname>. If it finds any, like a model that has been added, then it creates a migration file in the migrations subdirectory. This migration file contains a list of operations to bring your database schema in sync with your model definition.
Note: Your app has to be listed in the INSTALLED_APPS setting, and it must contain a migrations directory with an __init__.py file. Otherwise Django will not create any migrations for it.
The migrations directory is automatically created when you create a new app with the startapp management command, but it’s easy to forget when creating an app manually.
The migration files are just Python, so let’s have a look at the first migration file in the historical_prices app. You can find it at historical_prices/migrations/0001_initial.py. It should look something like this:
fromdjango.dbimportmodels,migrationsclassMigration(migrations.Migration):dependencies=[]operations=[migrations.CreateModel(name='PriceHistory',fields=[('id',models.AutoField(verbose_name='ID',serialize=False,primary_key=True,auto_created=True)),('date',models.DateTimeField(auto_now_add=True)),('price',models.DecimalField(decimal_places=2,max_digits=5)),('volume',models.PositiveIntegerField()),('total_btc',models.PositiveIntegerField()),],options={},bases=(models.Model,),),]As you can see, it contains a single class called Migration that inherits from django.db.migrations.Migration. This is the class that the migration framework will look for and execute when you ask it to apply migrations.
The Migration class contains two main lists:
dependenciesoperations
Migration Operations
Let’s look at the operations list first. This table contains the operations that are to be performed as part of the migration. Operations are subclasses of the class django.db.migrations.operations.base.Operation. Here are the common operations that are built into Django:
| Operation Class | Description |
|---|---|
CreateModel | Creates a new model and the corresponding database table |
DeleteModel | Deletes a model and drops its database table |
RenameModel | Renames a model and renames its database table |
AlterModelTable | Renames the database table for a model |
AlterUniqueTogether | Changes the unique constraints of a model |
AlterIndexTogether | Changes the indexes of a model |
AlterOrderWithRespectTo | Creates or deletes the _order column for a model |
AlterModelOptions | Changes various model options without affecting the database |
AlterModelManagers | Changes the managers available during migrations |
AddField | Adds a field to a model and the corresponding column in the database |
RemoveField | Removes a field from a model and drops the corresponding column from the database |
AlterField | Changes a field’s definition and alters its database column if necessary |
RenameField | Renames a field and, if necessary, also its database column |
AddIndex | Creates an index in the database table for the model |
RemoveIndex | Removes an index from the database table for the model |
Note how the operations are named after changes made to model definitions, not the actions that are performed on the database. When you apply a migration, each operation is responsible for generating the necessary SQL statements for your specific database. For example, CreateModel would generate a CREATE TABLE SQL statement.
Out of the box, migrations have support for all the standard databases that Django supports. So if you stick to the operations listed here, then you can do more or less any changes to your models that you want, without having to worry about the underlying SQL. That’s all done for you.
Note: In some cases, Django might not correctly detect your changes. If you rename a model and change several of its fields, then Django might mistake this for a new model.
Instead of a RenameModel and several AlterField operations, it will create a DeleteModel and a CreateModel operation. Instead of renaming the database table for the model, it will drop it and create a new table with the new name, effectively deleting all your data!
Make it a habit to check the generated migrations and test them on a copy of your database before running them on production data.
Django provides three more operation classes for advanced use cases:
RunSQLallows you to run custom SQL in the database.RunPythonallows you to run any Python code.SeparateDatabaseAndStateis a specialized operation for advanced uses.
With these operations, you can basically do any changes you want to your database. However, you won’t find these operations in a migration that has been created automatically with the makemigrations management command.
Since Django 2.0, there are also a couple of PostgreSQL-specific operations available in django.contrib.postgres.operations that you can use to install various PostgreSQL extensions:
BtreeGinExtensionBtreeGistExtensionCITextExtensionCryptoExtensionHStoreExtensionTrigramExtensionUnaccentExtension
Note that a migration containing one of these operations requires a database user with superuser privileges.
Last but not least, you can also create your own operation classes. If you want to look into that, then take a look at the Django documentation on creating custom migration operations.
Migration Dependencies
The dependencies list in a migration class contains any migrations that must be applied before this migration can be applied.
In the 0001_initial.py migration you saw above, nothing has to be applied prior so there are no dependencies. Let’s have a look at the second migration in the historical_prices app. In the file 0002_switch_to_decimals.py, the dependencies attribute of Migration has an entry:
fromdjango.dbimportmigrations,modelsclassMigration(migrations.Migration):dependencies=[('historical_data','0001_initial'),]operations=[migrations.AlterField(model_name='pricehistory',name='volume',field=models.DecimalField(decimal_places=3,max_digits=7),),]The dependency above says that migration 0001_initial of the app historical_data must be run first. That makes sense, because the migration 0001_initial creates the table containing the field that the migration 0002_switch_to_decimals wants to change.
A migration can also have a dependency on a migration from another app, like this:
classMigration(migrations.Migration):...dependencies=[('auth','0009_alter_user_last_name_max_length'),]This is usually necessary if a model has a Foreign Key pointing to a model in another app.
Alternatively, you can also enforce that a migration is run before another migration using the attribute run_before:
classMigration(migrations.Migration):...run_before=[('third_party_app','0001_initial'),]Dependencies can also be combined so you can have multiple dependencies. This functionality provides a lot of flexibility, as you can accommodate foreign keys that depend upon models from different apps.
The option to explicitly define dependencies between migrations also means that the numbering of the migrations (usually 0001, 0002, 0003, …) doesn’t strictly represent the order in which migrations are applied. You can add any dependency you want and thus control the order without having to re-number all the migrations.
Viewing the Migration
You generally don’t have to worry about the SQL that migrations generate. But if you want to double-check that the generated SQL makes sense or are just curious what it looks like, then Django’s got you covered with the sqlmigrate management command:
$ python manage.py sqlmigrate historical_data 0001BEGIN;---- Create model PriceHistory--CREATE TABLE "historical_data_pricehistory" ("id" integer NOT NULL PRIMARY KEY AUTOINCREMENT,"date" datetime NOT NULL,"price" decimal NOT NULL,"volume" integer unsigned NOT NULL);COMMIT;Doing that will list out the underlying SQL queries that will be generated by the specified migration, based upon the database in your settings.py file. When you pass the parameter --backwards, Django generates the SQL to unapply the migration:
$ python manage.py sqlmigrate --backwards historical_data 0001BEGIN;---- Create model PriceHistory--DROP TABLE "historical_data_pricehistory";COMMIT;Once you see the output of sqlmigrate for a slightly more complex migration, you may appreciate that you don’t have to craft all this SQL by hand!
How Django Detects Changes to Your Models
You’ve seen what a migration file looks like and how its list of Operation classes defines the changes performed to the database. But how exactly does Django know which operations should go into a migration file? You might expect that Django compares your models to your database schema, but that is not the case.
When running makemigrations, Django does not inspect your database. Neither does it compare your model file to an earlier version. Instead, Django goes through all migrations that have been applied and builds a project state of what the models should look like. This project state is then compared to your current model definitions, and a list of operations is created, which, when applied, would bring the project state up to date with the model definitions.
Playing Chess With Django
You can think of your models like a chess board, and Django is a chess grandmaster watching you play against yourself. But the grandmaster doesn’t watch your every move. The grandmaster only looks at the board when you shout makemigrations.
Because there’s only a limited set of possible moves (and the grandmaster is a grandmaster), she can come up with the moves that have happened since she last looked at the board. She takes some notes and lets you play until you shout makemigrations again.
When looking at the board the next time, the grandmaster doesn’t remember what the chessboard looked like the last time, but she can go through her notes of the previous moves and build a mental model of what the chessboard looked like.
Now, when you shout migrate, the grandmaster will replay all the recorded moves on another chessboard and note in a spreadsheet which of her records have already been applied. This second chess board is your database, and the spreadsheet is the django_migrations table.
This analogy is quite fitting, because it nicely illustrates some behaviors of Django migrations:
Django migrations try to be efficient: Just like the grandmaster assumes that you made the least number of moves, Django will try to create the most efficient migrations. If you add a field named
Ato a model, then rename it toB, and then runmakemigrations, then Django will create a new migration to add a field namedB.Django migrations have their limits: If you make a lot of moves before you let the grandmaster look at the chessboard, then she might not be able to retrace the exact movements of each piece. Similarly, Django might not come up with the correct migration if you make too many changes at once.
Django migration expect you to play by the rules: When you do anything unexpected, like taking a random piece off the board or messing with the notes, the grandmaster might not notice at first, but sooner or later, she’ll throw up her hands and refuse to continue. The same happens when you mess with the
django_migrationstable or change your database schema outside of migrations, for example by deleting the database table for a model.
Understanding SeparateDatabaseAndState
Now that you know about the project state that Django builds, it’s time to take a closer look at the operation SeparateDatabaseAndState. This operation can do exactly what the name implies: it can separate the project state (the mental model Django builds) from your database.
SeparateDatabaseAndState is instantiated with two lists of operations:
state_operationscontains operations that are only applied to the project state.database_operationscontains operations that are only applied to the database.
This operation lets you do any kind of change to your database, but it’s your responsibility to make sure that the project state fits the database afterwards. Example use cases for SeparateDatabaseAndState are moving a model from one app to another or creating an index on a huge database without downtime.
SeparateDatabaseAndState is an advanced operation and you won’t need on your first day working with migrations and maybe never at all. SeparateDatabaseAndState is similar to heart surgery. It carries quite a bit of risk and is not something you do just for fun, but sometimes it’s a necessary procedure to keep the patient alive.
Conclusion
This concludes your deep dive into Django migrations. Congratulations! You’ve covered quite a lot of advanced topics and now have a solid understanding what happens under the hood of migrations.
You learned that:
- Django keeps track of applied migrations in the Django migrations table.
- Django migrations consist of plain Python files containing a
Migrationclass. - Django knows which changes to perform from the
operationslist in theMigrationclasses. - Django compares your models to a project state it builds from the migrations.
With this knowledge, you’re now ready to tackle the third part of the series on Django migrations, where you’ll learn how to use data migrations to safely make one-time changes to your data. Stay tuned!
This article used the bitcoin_tracker Django project built in Django Migrations: A Primer. You can either re-create that project by working through that article or you can download the source code:
Download Source Code:Click here to download the code for the Django migrations project you'll be using in this article.
[ Improve Your Python With 🐍 Python Tricks 💌 – Get a short & sweet Python Trick delivered to your inbox every couple of days. >> Click here to learn more and see examples ]
↧
PSF GSoC students blogs: [Blog #4] Need For Speed
<meta charset="utf-8">Hey! This is my fifth blog post for GSoC 2019, covering week 7 and 8.
The most of week 7 was spent making Protego compatible with Google's parser. I also worked on the documentation, since Protego codebase is small enough, proper comments and a good readme was sufficient. I uploaded Protego to PyPI - `pip install Protego` that's all it takes to install Protego.
Week 8 was quite interesting. For Protego to become default in Scrapy, it is necessary that it doesn’t throw any kind of error while parsing `robots.txt` files. To make sure that, I decided to download `robots.txt` from top 10,000 websites. I added tests to see if Protego throws any exceptions while parsing the downloaded `robots.txt`. I benchmarked Protego, and the results were quite disappointing. You can see the result here.
We decided to spend the next week improving performance of Protego. I am going to try profiling and heuristics, and see if the performance can be improved.
↧
↧
PSF GSoC students blogs: Weekly check in [week 8 - 15/07 - 21/07]
1. What did you do this week?
- This week I worked mainly on adding the login using GitHub option to the Python Bug Tracker. This was already attempted in the past with partial success. On the previous attempt they tried to authenticate using OpenID, but for this time I completely changed approach and used Oauth2 (which is the method suggested by GitHub). For the moment the implementation is only partly working, the GitHub authentication works, but there are some Roundup related problems. Also the random issue generator was moved from the web interface to a server side script, as it's safe to assume that it will never be used during normal operations. BTW my yet-to-be-created Blog Post will cover how to do Oauth2 authentication with GitHub, so if you need to do something similar it might help you, as I didn't find any good tutorials on this.
2. What is coming up next?
- In the next week the GitHub login functionality will be finished, and any issues that at the moment are still to be solved (for example someone that already has an account also wants to login with GitHub) will be solved.
3. Did you get stuck anywhere?
- I did have issues with Roundup, especially in the way that it handles links, because while the documentation is great, on certain parts it's a bit lacking. I was able to understand properly Roundup's link handling by digging deep enough in the code, but it certainly wasn't fun.
↧
NumFOCUS: Meet our 2019 Google Summer of Code Students (Part 2)
The post Meet our 2019 Google Summer of Code Students (Part 2) appeared first on NumFOCUS.
↧
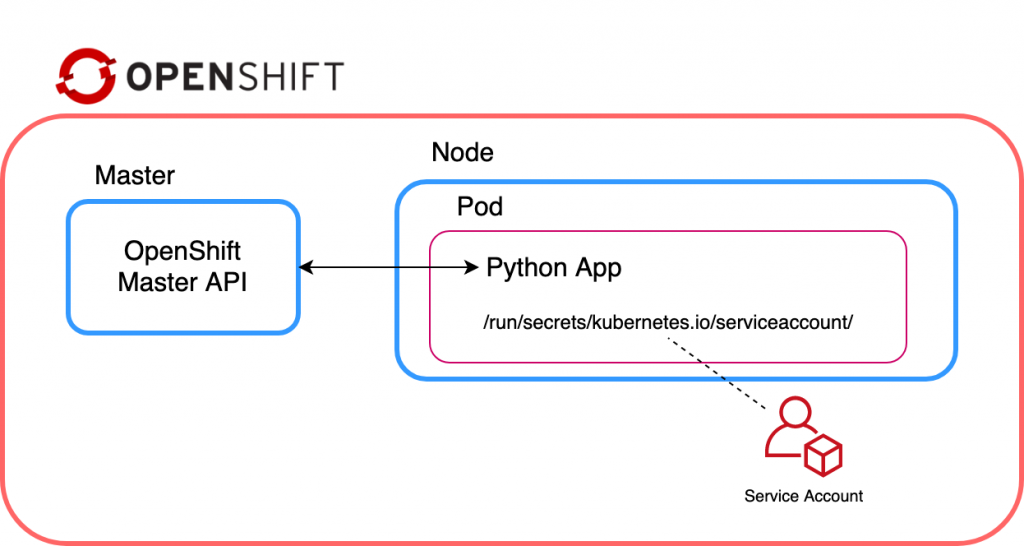
Red Hat Developers: Controlling Red Hat OpenShift from an OpenShift pod
This article explains how to configure a Python application running within an OpenShift pod to communicate with the Red Hat OpenShift cluster via openshift-restclient-python, the OpenShift Python client.
tl;dr
The code sample below is a sample application running within a pod, which connects to an OpenShift cluster and prints a list of projects:
import os
import sys
import yaml
from kubernetes import client, config
from openshift.dynamic import DynamicClient

config.load_incluster_config()
k8s_config = client.Configuration()
k8s_client = client.api_client.ApiClient(configuration=k8s_config)
dyn_client = DynamicClient(k8s_client)

v1_projects = dyn_client.resources.get(api_version="project.openshift.io/v1", kind="Project")

print(v1_projects.get())
Running locally
Using openshift-restclient-python from your laptop is relatively easy. This OpenShift dynamic client extends the standard Kubernetes Python client. The first step is to install openshift-restclient-python, which will pull in the kubernetes dependency:
$ pip install openshift
Next, we load a Kube configuration. The Kubernetes function new_client_from_config() searches for the file ~/.kube/config. The new_client_from_config() function is similar to the load_kube_config() function, but also returns an ApiClient to be used with any API object. This task allows the caller to concurrently talk with multiple clusters.
The code example below uses the OpenShift dynamic client to list every project the user can access:
#!/usr/bin/env python3

from kubernetes import client, config
from openshift.dynamic import DynamicClient

k8s_client = config.new_client_from_config()
dyn_client = DynamicClient(k8s_client)

v1_projects = dyn_client.resources.get(api_version='project.openshift.io/v1', kind='Project')

project_list = v1_projects.get()

for project in project_list.items:
    print(project.metadata.name)
Running locally after logging into OpenShift works as expected:
oc login -u user https://ocp.lab.example.com

./cmdlineclient.py
ProjectA
ProjectB
Running within Red Hat OpenShift
However, running the same code with an OpenShift pod will result in a TypeError, as shown below:
oc rsh api-gateway-dfs3
cd /opt/app-root/src/
./cmdlineclient.py

Traceback (most recent call last):
  File "./cmdlineclient.py", line 6, in <module>
    k8s_client = config.new_client_from_config()
  File "/opt/app-root/lib/python3.6/site-packages/kubernetes/config/kube_config.py", line 667, in new_client_from_config
    persist_config=persist_config)
  File "/opt/app-root/lib/python3.6/site-packages/kubernetes/config/kube_config.py", line 645, in load_kube_config
    persist_config=persist_config)
  File "/opt/app-root/lib/python3.6/site-packages/kubernetes/config/kube_config.py", line 613, in _get_kube_config_loader_for_yaml_file
    **kwargs)
  File "/opt/app-root/lib/python3.6/site-packages/kubernetes/config/kube_config.py", line 153, in __init__
    self.set_active_context(active_context)
  File "/opt/app-root/lib/python3.6/site-packages/kubernetes/config/kube_config.py", line 173, in set_active_context
    context_name = self._config['current-context']
  File "/opt/app-root/lib/python3.6/site-packages/kubernetes/config/kube_config.py", line 495, in __getitem__
    v = self.safe_get(key)
  File "/opt/app-root/lib/python3.6/site-packages/kubernetes/config/kube_config.py", line 491, in safe_get
    key in self.value):
TypeError: argument of type 'NoneType' is not iterable
Unfortunately, the current documentation provided by openshift-restclient-python is lacking. It does not explain how to connect to OpenShift or Kubernetes from within a pod.
After much searching, I found a section within the Kubernetes documentation which states that when accessing the Kube API from a pod, locating and authenticating the API server are somewhat different. They recommend using one of the official client libraries, which I was already doing. These libraries should automatically discover the API server and authenticate.
The Kubernetes config library also has the function load_incluster_config(). This function uses a combination of environment variables and a token to authenticate the API server. The recommended way to do this is to associate a pod with a service account. When the pod is started, a token for the service account is placed into the filesystem tree of each container in that pod, at /var/run/secrets/kubernetes.io/serviceaccount/token.
That all sounds simple enough. But, before updating the cmdlineclient, we need to create a service account, assign it a role, and then associate it with a pod (via a deployment config). The following instructions outline how to use the oc client to achieve this:
oc create serviceaccount robot

oc policy add-role-to-user admin -z robot

oc patch dc/api-gw --patch '{"spec":{"template":{"spec":{"serviceAccountName": "robot"}}}}'

oc rsh api-gw-9-kzrhn
(app-root) sh-4.2$ ls -al /var/run/secrets/kubernetes.io/serviceaccount/token
lrwxrwxrwx. 1 root root 12 Jul 14 06:13 /var/run/secrets/kubernetes.io/serviceaccount/token -> ..data/token
Now that we confirmed that a token is being injected within the pod, we need to update our function to use load_incluster_config(). However, remember that new_client_from_config() returns an ApiClient. We need to ensure we do this update before passing the ApiClient to the OpenShift dynamic client. Another undocumented step relates to the OpenShift dynamic client requiring a client.configuration object within the Kubernetes ApiClient object.
Lastly, we should also ensure that our code will work both within OpenShift and on our laptop. The updated cmdlineclientv2.py (below) determines if the client is running within OpenShift before calling the load_incluster_config(). It will also fall back to reading ~/.kube/config, which enables the program to run locally:
#!/usr/bin/env python3

import os
import sys

import yaml
from kubernetes import client, config
from openshift.dynamic import DynamicClient

# Check if code is running in OpenShift
if "OPENSHIFT_BUILD_NAME" in os.environ:
    config.load_incluster_config()
    file_namespace = open(
        "/run/secrets/kubernetes.io/serviceaccount/namespace", "r"
    )
    if file_namespace.mode == "r":
        namespace = file_namespace.read()
        print("namespace: %s\n" %(namespace))
else:
    config.load_kube_config()

# Create a client config
k8s_config = client.Configuration()

k8s_client = client.api_client.ApiClient(configuration=k8s_config)
dyn_client = DynamicClient(k8s_client)

v1_projects = dyn_client.resources.get(api_version="project.openshift.io/v1", kind="Project")

project_list = v1_projects.get()

for project in project_list.items:
    print("Project Name: %s" % (project.metadata.name))
When running cmdlineclientv2, notice that although we have assigned the admin role to the service account, it is only admin within the ProjectA namespace:
./cmdlineclientv2.py
namespace: ProjectA

Project Name: ProjectA
I hope you found this post helpful. Comments and questions are welcome.

The post Controlling Red Hat OpenShift from an OpenShift pod appeared first on Red Hat Developer Blog.
↧
PSF GSoC students blogs: Coding week #8
What did I do this week?
This week I read and experimented with the literature on Logistic Regression GAMs. After trying many approaches to model a binomial dependent variable, none of those seem to work to give the expected bandwidths or parameters. Looking forward to the discussion with the mentors to maybe understand the best next steps to resolve the model convergence. Also read and understood the predictions for un-sampled locations in the GWR code and will attempt to resolve the recurring errors and build the prediction model for MGWR.
What is coming up next?
In the coming week I will work on finalizing the approach or way forward for the Logistic Regression within MGWR with the mentors' guidance and build on the final part of the project around predictions.
Did I get stuck anywhere?
The modeling of the binary response variable with MGWR is not resolved and has been a blocker for a little bit. Hoping to find an approach that works with the mentors' advice soon and work further on the predictions with GWR and MGWR.
Looking forward to the progress update next week!
↧
↧
ListenData: How to drop one or more columns in Pandas Dataframe
In this tutorial, we will cover how to drop or remove one or multiple columns from pandas dataframe.
![drop columns python]()
What is pandas in Python?
pandas is a python package for data manipulation. It has several functions for the following data tasks: - Drop or Keep rows and columns
- Aggregate data by one or more columns
- Sort or reorder data
- Merge or append multiple dataframes
- String Functions to handle text data
- DateTime Functions to handle date or time format columns

Import or Load Pandas library
To make use of any python library, we first need to load them up by using import command. import pandas as pd
import numpy as np
Let's create a fake dataframe for illustration
The code below creates 4 columns named A through D. df = pd.DataFrame(np.random.randn(6, 4), columns=list('ABCD'))
          A         B         C         D
0 -1.236438 -1.656038  1.655995 -1.413243
1  0.507747  0.710933 -1.335381  0.832619
2  0.280036 -0.411327  0.098119  0.768447
3  0.858730 -0.093217  1.077528  0.196891
4 -0.905991  0.302687  0.125881 -0.665159
5 -2.012745 -0.692847 -1.463154 -0.707779
Drop a column in python
In pandas,drop( ) function is used to remove column(s).axis=1 tells Python that you want to apply function on columns instead of rows. df.drop(['A'], axis=1)Column A has been removed. See the output shown below.
B C DIn order to create a new dataframe
0 -1.656038 1.655995 -1.413243
1 0.710933 -1.335381 0.832619
2 -0.411327 0.098119 0.768447
3 -0.093217 1.077528 0.196891
4 0.302687 0.125881 -0.665159
5 -0.692847 -1.463154 -0.707779
newdf storing remaining columns, you can use the command below. newdf = df.drop(['A'], axis=1)To delete the column permanently from original dataframe
df, you can use the option inplace=Truedf.drop(['A'], axis=1, inplace=True)
#Check columns in df after dropping column A
df.columns

Output
Index(['B', 'C', 'D'], dtype='object')
The parameter
If you want to change the existing dataframe, try this
inplace= can be deprecated (removed) in future which means you might not see it working in the upcoming release of pandas package. You should avoid using this parameter if you are not already habitual of using it. Instead you can store your data after removing columns in a new dataframe (as explained in the above section). If you want to change the existing dataframe, try this
df = df.drop(['A'], axis=1) Remove Multiple Columns in Python
You can specify all the columns you want to remove in a list and pass it indrop( ) function. Method I
df2 = df.drop(['B','C'], axis=1)
Method II
cols = ['B','C']
df2 = df.drop(cols, axis=1)
Select or Keep Columns
If you wish to select a column (instead of drop), you can use the command df['A']To select multiple columns, you can submit the following code.
df[['A','B']]
How to drop column by position number from pandas Dataframe?
You can find out name of first column by using this commanddf.columns[0]. Indexing in python starts from 0. df.drop(df.columns[0], axis =1)To drop multiple columns by position (first and third columns), you can specify the position in list
[0,2]. cols = [0,2]
df.drop(df.columns[cols], axis =1)
Drop columns by name pattern
df = pd.DataFrame({"X1":range(1,6),"X_2":range(2,7),"YX":range(3,8),"Y_1":range(2,7),"Z":range(5,10)})X1 X_2 YX Y_1 Z
0 1 2 3 2 5
1 2 3 4 3 6
2 3 4 5 4 7
3 4 5 6 5 8
4 5 6 7 6 9
Drop column whose name starts with letter 'X'
df.loc[:,~df.columns.str.contains('^X')]
How it works?
^Xis a expression of regex language which refers to beginning of letter 'X'df.columns.str.contains('^X')returns array [True, True, False, False, False].
True where condition meets. Otherwise False- Sign
~refers to negate the condition. df.loc[ ]is used to select columns
df.drop(df.columns[df.columns.str.contains('^X')], axis=1)Other Examples
#Removing columns whose name contains string 'X'
df.loc[:,~df.columns.str.contains('X')]

#Removing columns whose name contains string either 'X' or 'Y'
df.loc[:,~df.columns.str.contains('X|Y')]

#Removing columns whose name ends with string 'X'
df.loc[:,~df.columns.str.contains('X$')]
Drop columns where percentage of missing values is greater than 50%
df = pd.DataFrame({'A':[1,3,np.nan,5,np.nan],
                   'B':[4,np.nan,np.nan,5,np.nan]
                   })
% of missing values can be calculated by mean of NAs in each column. cols = df.columns[df.isnull().mean()>0.5]
df.drop(cols, axis=1)
↧
IslandT: Get the market data of cryptocurrency-currency pair
- Create a market combo box for all the available currency market.
- Create a search function to retrieve the cryptocurrency-currency pair data from a particular market.
Hello and welcome back, in this chapter we will continue to develop our cryptocurrency project with the above new features.
Before we start we will create a new loader class which will load the currency’s market data as well as the cryptocurrency data into the combo box at the beginning of the main program to further tidy up the main program file.
class Loader(object):

    def __init__(self, crypto, market):
        self.crypto = crypto
        self.market = market

    def load_data(self):

        # read the data from crypto.txt file then populate the crypto combo box
        curr = tuple()  # the tuple which will be populated by cryptocurrencies
        with open('crypto.txt') as fp:
            for currency in fp.readlines():
                curr += (currency[:-1],)
        self.crypto['values'] = curr
        self.crypto.current(0)

        # read the data from market.txt file then populate the market combo box
        curr = tuple()  # the tuple which will be populated by market symbols
        with open('market.txt') as fp:
            for currency in fp.readlines():
                curr += (currency[:-1],)
        self.market['values'] = curr
        self.market.current(0)
If you have read the previous article then you know that the program will load the cryptocurrency symbols from a file to the combo box, the same technique will apply for the market’s combo box as well under the above function.
In the main program, we will create the instance of the loader class and call the load data method of this class to populate those combo boxes.
# create loader object then load the data into the crypto and market combo box
loader = Loader(crypto, market)
loader.load_data()
We need to further organize our project in the next chapter but for now this should be good enough.
The next step is to create the market combo box above the loader object like so. This box will besituated on the left side of the currency combo box.
# Create a combo box for markets
market = tk.Combobox(selectorFrame)
market.pack(side = LEFT, padx=3)
Besides that, we have also rearranged the currency combo box and the search button position as well as moved the cryptocurrency combo box to the bottom of the display panel.
Next we will create the search function which will retrieve the crytocurrency-currency pair data plus display those data on the display panel.
def search_currency(): # display all market data of the cryptocurrency-currency pair

    sell_buy = ''
    try:
        base_crypto = crypto.get()  # get the desired crypto currency
        currency_symbol = based.get() # get the currency symbol
        market_exchange = market.get() # get the market
        url = "https://min-api.cryptocompare.com/data/generateAvg"
        data = {'fsym' : base_crypto, 'tsym':currency_symbol, 'e' : market_exchange}
        r = requests.get(url, params=data)
        exchange_rate_s = json.loads(json.dumps(r.json()))
    except:
        print("An exception occurred")

    for key, value in exchange_rate_s.items():  # populate exchange rate string and the currency tuple
        for key1, value1 in value.items():
            sell_buy += str(key1) + " : " + str(value1) + "\n"

    text_widget.delete('1.0', END)  # clear all those previous text first
    s.set(sell_buy)
    text_widget.insert(INSERT, s.get())  # populate the text widget with new exchange rate data
We also will disable the search button and only enable it after the program has loaded the bitcoin-currencies exchange rate data for the first time after the user has clicked on the load button. We might further change this mechanism in the next chapter but for now, this should be sufficient enough.
This is how the program work at this moment, when the user has started the program, he needs to click on the Load button to load the bitcoin-currencies pair data for the first time, then the currency combo box will be filled up with currency symbols and the search button will be enabled where the user can now select the market, any cryptocurrency and any currency symbol then press the search button to display the one on one detail data of the cryptocurrency-currency pair.
import json
from tkinter import *
import tkinter.ttk as tk
import requests
from Loader import Loader

win = Tk() # Create tk instance
win.title("Crypto Calculator") # Add a title
win.resizable(0, 0) # Disable resizing the GUI
win.configure(background='white') # change window background color

selectorFrame = Frame(win, background="white") # create top frame to hold search button and combobox
selectorFrame.pack(anchor = "nw", pady = 2, padx=10)
currency_label = Label(selectorFrame, text = "Select market / currency pair :", background="white")
currency_label.pack(anchor="w")

# create currency frame and text widget to display the incoming exchange rate data
s = StringVar() # create string variable
currencyFrame = Frame(win)
currencyFrame.pack(side=TOP)
currency = Label(currencyFrame)
currency.pack()
text_widget = Text(currency, fg='white', background='black')
text_widget.pack()
s.set("Click the find button below to load the crypto currency - currency exchange rate from CCCAGG market")
text_widget.insert(END, s.get())

buttonFrame = Frame(win) # create a bottom frame to hold the load button
buttonFrame.pack(side = BOTTOM, fill=X, pady = 6)

# Create a combo box for crypto currency
crypto = tk.Combobox(buttonFrame)
crypto.pack(side = LEFT, padx=3)

# Create a combo box for markets
market = tk.Combobox(selectorFrame)
market.pack(side = LEFT, padx=3)

# create loader object then load the data into the crypto and market combo box
loader = Loader(crypto, market)
loader.load_data()

def search_currency(): # display all market data of the cryptocurrency-currency pair

    sell_buy = ''
    try:
        base_crypto = crypto.get()  # get the desired crypto currency
        currency_symbol = based.get() # get the currency symbol
        market_exchange = market.get() # get the market
        url = "https://min-api.cryptocompare.com/data/generateAvg"
        data = {'fsym' : base_crypto, 'tsym':currency_symbol, 'e' : market_exchange}
        r = requests.get(url, params=data)
        exchange_rate_s = json.loads(json.dumps(r.json()))
    except:
        print("An exception occurred")

    for key, value in exchange_rate_s.items():  # populate exchange rate string and the currency tuple
        for key1, value1 in value.items():
            sell_buy += str(key1) + " : " + str(value1) + "\n"

    text_widget.delete('1.0', END)  # clear all those previous text first
    s.set(sell_buy)
    text_widget.insert(INSERT, s.get())  # populate the text widget with new exchange rate data

# Create currency combo box
base_currency = StringVar() # create a string variable
based = tk.Combobox(selectorFrame, textvariable=base_currency)
based.pack(side = LEFT, padx=3)

action_search = tk.Button(selectorFrame, text="Search", command=search_currency, state=DISABLED) # button used to get the cryptocurrency/currency pair exchange rate
action_search.pack(side=LEFT)

def get_exchange_rate(): # this method will display the incoming exchange rate data after the api called

    global exchange_rate
    global base_crypto

    # read the currency file
    c_string = ''
    with open('currency.txt') as fp:
        for currency in fp.readlines():
            c_string += currency[:-1] + ","
    c_string = c_string[:-1]

    base_crypto = crypto.get()  # get the desired crypto currency
    try:
        url = "https://min-api.cryptocompare.com/data/price" #url for API call
        data = {'fsym' : base_crypto, 'tsyms':c_string}
        r = requests.get(url, params=data)
        exchange_rate_s = json.loads(json.dumps(r.json()))

    except:
        print("An exception occurred")

    curr1 = tuple() # the tuple which will be populated by currency
    sell_buy = ''

    for key, value in exchange_rate_s.items():  # populate exchange rate string and the currency tuple
        sell_buy += base_crypto + ":" + key + "  " + str(value) + "\n"
        curr1 += (key,)

    # fill up combo boxes for both currency and cryptocurrency
    based['values'] = curr1
    based.current(0)

    text_widget.delete('1.0', END)  # clear all those previous text first
    s.set(sell_buy)
    text_widget.insert(INSERT, s.get())  # populate the text widget with new exchange rate data

    action_search.config(state=NORMAL)

action_vid = tk.Button(buttonFrame, text="Load", command=get_exchange_rate) # button used to load the exchange rate of currency pairs
action_vid.pack()

win.iconbitmap(r'ico.ico')
win.mainloop()
 The details Kraken market data for the BTC-USD pair
 In the next chapter, we will use Pandas to plot the currency graph of those data.
↧
PSF GSoC students blogs: Sphinx Internationalization....
So, after the first phase was over, I was really happy that I had got some work done on my project, and finally could move on to the biggest issue that I was going to face for completing the project - Internationalization. Before that, I had to first readjust the videos in the lecture files according to the subtopics, and I had that done quickly, and made the web build with that update as well. Now, it was time for translating the lecture files and the assignments , which were in Portuguese, to Spanish. Initially, I had a major concern as I didn't know any of those languages, but finally I decided that I would take help of Google Translate and my intuition as much as I can to translate the files.
I started with making sphinx quickstart projects in each clone of the master branch of the repository on my local system. Created the po files. And now, I had to translate all the strings that had been recognized, to Spanish. I started working on that, and it was tiresome, because I had to also make sure that I don't disturb the syntax of the Runestone components that made a big part of the files. I took care, and finally managed to translate all the po files using Google Translate. I had to tweak around with the rst files in between a lot. After that, I went on to making the mo files, and remove any syntax errors that might be present. However, there was a problem. The assignment files consisted majorly of Runestone components, and the text inside them was not getting detected by Sphinx. I kept that issue aside, and concentrated on the lectures.
Finally, it was now the turn to make the final web build in order to get the translated rst files, and then use them in the project and move on forward. But again, there was an issue. A problem popped up related to duplicate key ids, and I was not able to convert the po and mo files to translated documents. I then filed an issue in the Sphinx repository for help.
I started work on the remaining issues, which consisted of making automated subtitles and creating advanced assignments that can incorporate within them advanced Python libraries like Tkinter and Pygame.
I hope to make some headway this week.
↧