Quantcast
Channel: Planet Python
Viewing all 22639 articles
Browse latest View live

Made With Mu: PortaMu - Making Mu Portable

$
0
0

(In this guest post, 14 year old Mu user and wunderkind Josh Lowe explains how to get Mu working on locked-down school computers running Windows. School network admins are going to go nuts over this!)

I’ve been using Mu since it was just an editor for MicroPython on the BBC micro:bit. I find myself using it nearly every day because it removes all the features I don’t need and keeps the ones I do need, in a simple layout. So when I started my GCSE Computer Science course, with the first topic being Python Programming, I instantly wanted to use Mu in class.

Simple, right?

Unfortunately it’s not: if you’ve ever worked in a school, you’ll know about the hassle of getting stuff installed on school computers, it’s not easy at all. Even if it’s an educational program like Mu (that’s going to benefit students) there are tons of hurdles to jump over to get in touch with the people who do that sort of thing. This looked like the end of the line for me using Mu in class.

I needed to come up with a solution.

So, with a bit of thinking about how I could tackle the issue, the solution came to me. Why not install Mu on a pendrive?

Unfortunately the computers at school are locked down so there is no command prompt, you can’t use pip, run exe files or use installers that require admin privileges. School rules banned me from downloading Mu onto a pendrive. So I had to find another way to install Mu on my pendrive.

Easy, I did it at home! ;-)

I’d like to introduce PortaMu, my solution to running Mu anywhere. I’ve also put Mu into a zip file so that you only need download and extract it without having to go through all the steps I explain below.

How did I get Mu to install and run on the pendrive?

Firstly, I had to install Mu on the pendrive. This is a very simple thing to do: when you run the Mu installer, select the installation path as your pendrive.

Once installed I faced an issue when I got to school to test it out: when Windows detects a drive it assigns a letter (e.g. F:) and this can change when you plug the pendrive into another computer. I had to keep changing the shortcut properties each time, and it became a pain. So instead of launching Mu from a shortcut, I created a simple BATCH file that ran everything needed to launch Mu and this works perfectly.

Really? Does Mu actually work? Is that it?

Yes! You get the full Mu experience. I’ve been using it in class for about a week and it’s working really well. It’s grabbed lots of people’s attention who have been using IDLE in class and they’re now starting to use Mu instead!

How can I get my hands on PortaMu?

I’ve uploaded the zip files for people to use, and they’re available in the PortaMu section of Mu’s download page.

It’s just a case of downloading the zip and extracting it onto the pendrive. Once you’ve done that, double click the Launch Mu file and a window will pop up and you’ll see Mu load, it may take some time depending on how quick your computer is.

I hope you find PortaMu useful, just like I have. It’s not only handy for schools but PortaMu can go anywhere with you, whether that be a friend’s house or a library computer.

Why not download it and share the power of Mu with even more people who maybe can’t install things on their computer!


Blue Yonder Tech: Oxidizing Python: Speeding up URL quoting by 10x using Rust

Chris Moffitt: Pandas Crosstab Explained

$
0
0

Introduction

Pandas offers several options for grouping and summarizing data but this variety of options can be a blessing and a curse. These approaches are all powerful data analysis tools but it can be confusing to know whether to use a groupby , pivot_table or crosstab to build a summary table. Since I have previously covered pivot_tables, this article will discuss the pandas crosstab function, explain its usage and illustrate how it can be used to quickly summarize data. My goal is to have this article be a resource that you can bookmark and refer to when you need to remind yourself what you can do with the crosstab function.

Overview

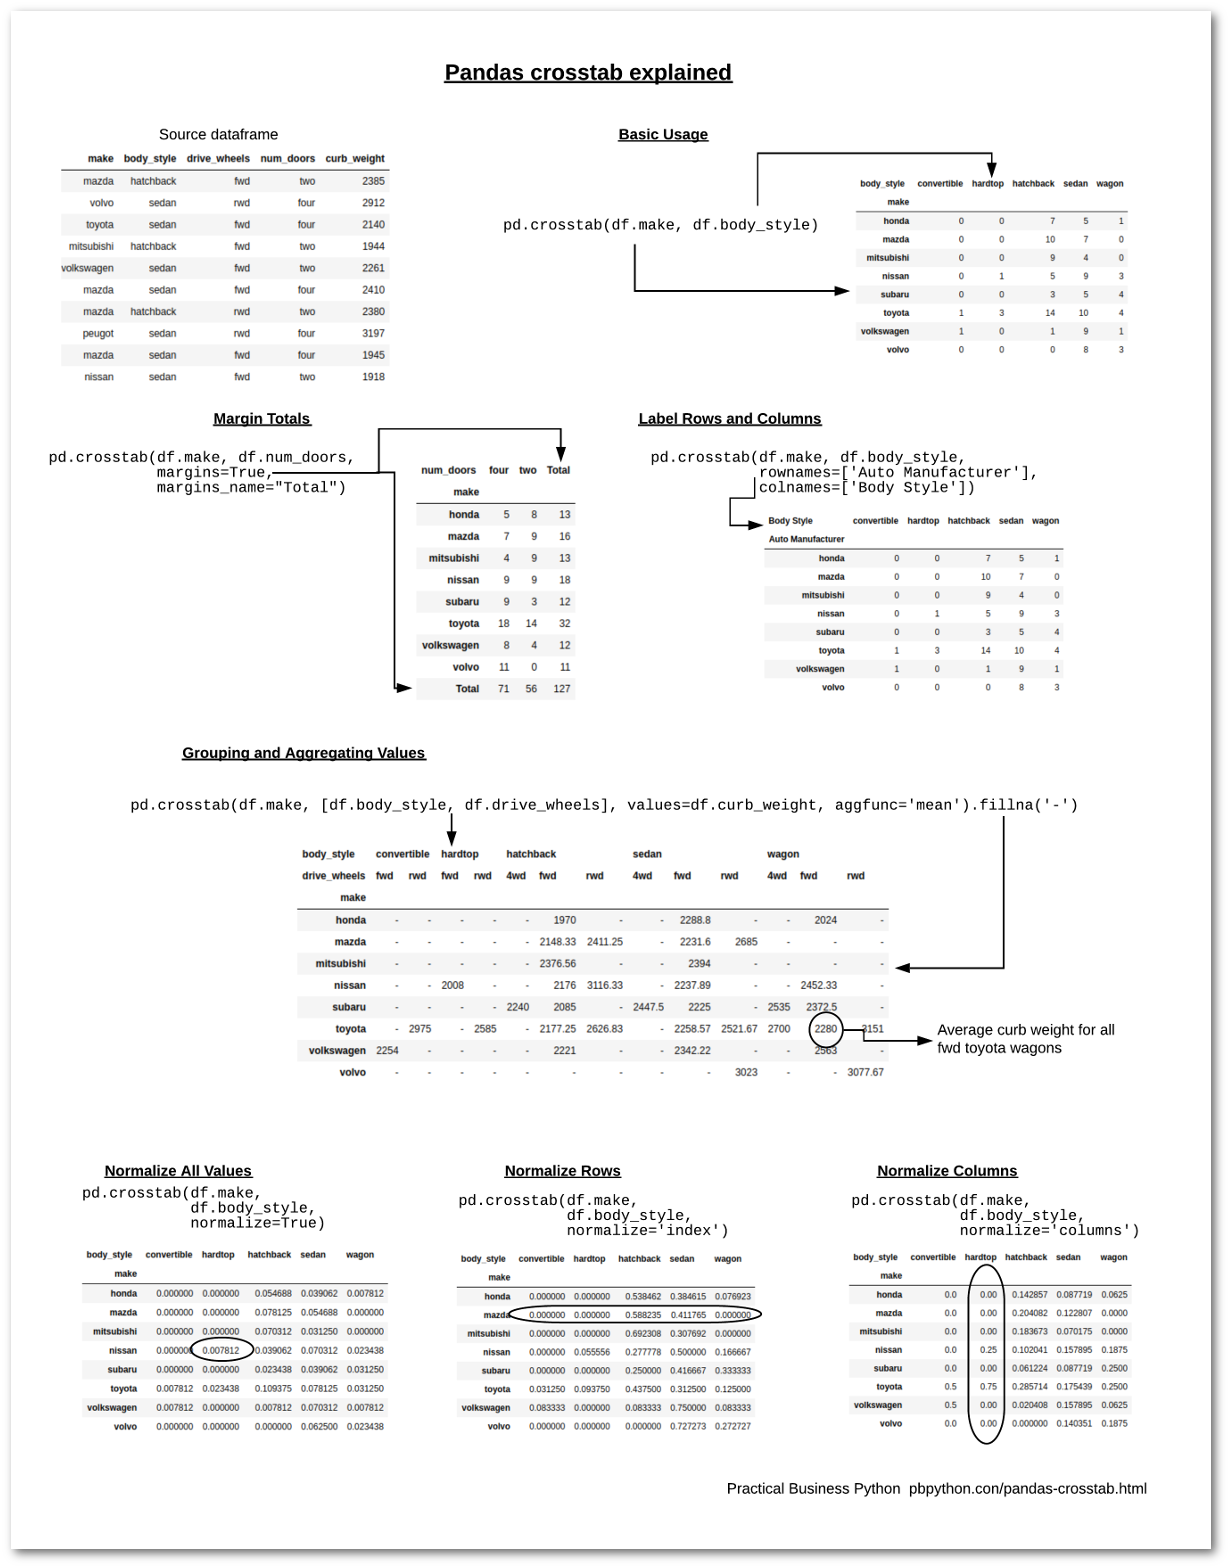
The pandas crosstab function builds a cross-tabulation table that can show the frequency with which certain groups of data appear. For a quick example, this table shows the number of two or four door cars manufactured by various car makers:

num_doorsfourtwoTotal
make
honda5813
mazda7916
mitsubishi4913
nissan9918
subaru9312
toyota181432
volkswagen8412
volvo11011
Total7156127

In the table above, you can see that the data set contains 32 Toyota cars of which 18 are four door and 14 are two door. This is a relatively simple table to interpret and illustrates why this approach can be a powerful way to summarize large data sets.

Pandas makes this process easy and allows us to customize the tables in several different manners. In the rest of the article, I will walk through how to create and customize these tables.

Start the Process

Let’s get started by importing all the modules we need. If you want to follow along on your own, I have placed the notebook on github:

importpandasaspdimportseabornassns

Now we’ll read in the automobile data set from the UCI Machine Learning Repository and make some label changes for clarity:

# Define the headers since the data does not have anyheaders=["symboling","normalized_losses","make","fuel_type","aspiration","num_doors","body_style","drive_wheels","engine_location","wheel_base","length","width","height","curb_weight","engine_type","num_cylinders","engine_size","fuel_system","bore","stroke","compression_ratio","horsepower","peak_rpm","city_mpg","highway_mpg","price"]# Read in the CSV file and convert "?" to NaNdf_raw=pd.read_csv("http://mlr.cs.umass.edu/ml/machine-learning-databases/autos/imports-85.data",header=None,names=headers,na_values="?")# Define a list of models that we want to reviewmodels=["toyota","nissan","mazda","honda","mitsubishi","subaru","volkswagen","volvo"]# Create a copy of the data with only the top 8 manufacturersdf=df_raw[df_raw.make.isin(models)].copy()

For this example, I wanted to shorten the table so I only included the 8 models listed above. This is done solely to make the article more compact and hopefully more understandable.

For the first example, let’s use pd.crosstab to look at how many different body styles these car makers made in 1985 (the year this dataset contains).

pd.crosstab(df.make,df.body_style)
body_styleconvertiblehardtophatchbacksedanwagon
make
honda00751
mazda001070
mitsubishi00940
nissan01593
subaru00354
toyota1314104
volkswagen10191
volvo00083

The crosstab function can operate on numpy arrays, series or columns in a dataframe. For this example, I pass in df.make for the crosstab index and df.body_style for the crosstab’s columns. Pandas does that work behind the scenes to count how many occurrences there are of each combination. For example, in this data set Volvo makes 8 sedans and 3 wagons.

Before we go much further with this example, more experienced readers may wonder why we use the crosstab instead of a another pandas option. I will address that briefly by showing two alternative approaches.

First, we could use a groupby followed by an unstack to get the same results:

df.groupby(['make','body_style'])['body_style'].count().unstack().fillna(0)

The output for this example looks very similar to the crosstab but it took a couple of extra steps to get it formatted correctly.

It is also possible to do something similar using a pivot_table :

df.pivot_table(index='make',columns='body_style',aggfunc={'body_style':len},fill_value=0)

Make sure to review my previous article on pivot_tables if you would like to understand how this works.

The question still remains, why even use a crosstab function? The short answer is that it provides a couple of handy functions to more easily format and summarize the data.

The longer answer is that sometimes it can be tough to remember all the steps to make this happen on your own. The simple crosstab API is the quickest route to the solution and provides some useful shortcuts for certain types of analysis.

In my experience, it is important to know about the options and use the one that flows most naturally from the analysis. I have had experiences where I struggled trying to make a pivot_table solution and then quickly got what I wanted by using a crosstab. The great thing about pandas is that once the data is in a dataframe all these manipulations are 1 line of code so you are free to experiment.

Diving Deeper into the Crosstab

Now that we have walked through the basic crosstab process, I will explain some of the other useful changes you can make to the output by altering the parameters.

One common need in a crosstab is to include subtotals. We can add them using the margins keyword:

pd.crosstab(df.make,df.num_doors,margins=True,margins_name="Total")
num_doorsfourtwoTotal
make
honda5813
mazda7916
mitsubishi4913
nissan9918
subaru9312
toyota181432
volkswagen8412
volvo11011
Total7156127

The margins keyword instructed pandas to add a total for each row as well as a total at the bottom. I also passed a value to margins_name in the function call because I wanted to label the results “Total” instead of the default “All”.

All of these examples have simply counted the individual occurrences of the data combinations. crosstab allows us to do even more summarization by including values to aggregate. To illustrate this, we can calculate the average curb weight of cars by body style and manufacturer:

pd.crosstab(df.make,df.body_style,values=df.curb_weight,aggfunc='mean').round(0)
body_styleconvertiblehardtophatchbacksedanwagon
make
hondaNaNNaN1970.02289.02024.0
mazdaNaNNaN2254.02361.0NaN
mitsubishiNaNNaN2377.02394.0NaN
nissanNaN2008.02740.02238.02452.0
subaruNaNNaN2137.02314.02454.0
toyota2975.02585.02370.02338.02708.0
volkswagen2254.0NaN2221.02342.02563.0
volvoNaNNaNNaN3023.03078.0

By using aggfunc='mean' and values=df.curb_weight we are telling pandas to apply the mean function to the curb weight of all the combinations of the data. Under the hood, pandas is grouping all the values together by make and body_style, then calculating the average. In those areas where there is no car with those values, it displays NaN . In this example, I am also rounding the results.

We have seen how to count values and determine averages of values. However, there is another common case of data sumarization where we want to understand the percentage of time each combination occurs. This can be accomplished using the normalize parameter:

pd.crosstab(df.make,df.body_style,normalize=True)
body_styleconvertiblehardtophatchbacksedanwagon
make
honda0.0000000.0000000.0546880.0390620.007812
mazda0.0000000.0000000.0781250.0546880.000000
mitsubishi0.0000000.0000000.0703120.0312500.000000
nissan0.0000000.0078120.0390620.0703120.023438
subaru0.0000000.0000000.0234380.0390620.031250
toyota0.0078120.0234380.1093750.0781250.031250
volkswagen0.0078120.0000000.0078120.0703120.007812
volvo0.0000000.0000000.0000000.0625000.023438

This table shows us that 2.3% of the total population are Toyota hardtops and 6.25% are Volvo sedans.

The normalize parameter is even smarter because it allows us to perform this summary on just the columns or rows. For example, if we want to see how the body styles are distributed across makes:

pd.crosstab(df.make,df.body_style,normalize='columns')
body_styleconvertiblehardtophatchbacksedanwagon
make
honda0.00.000.1428570.0877190.0625
mazda0.00.000.2040820.1228070.0000
mitsubishi0.00.000.1836730.0701750.0000
nissan0.00.250.1020410.1578950.1875
subaru0.00.000.0612240.0877190.2500
toyota0.50.750.2857140.1754390.2500
volkswagen0.50.000.0204080.1578950.0625
volvo0.00.000.0000000.1403510.1875

Looking at just the convertible column, you can see that 50% of the convertibles are made by Toyota and the other 50% by Volkswagen.

We can do the same thing row-wise:

pd.crosstab(df.make,df.body_style,normalize='index')
body_styleconvertiblehardtophatchbacksedanwagon
make
honda0.0000000.0000000.5384620.3846150.076923
mazda0.0000000.0000000.5882350.4117650.000000
mitsubishi0.0000000.0000000.6923080.3076920.000000
nissan0.0000000.0555560.2777780.5000000.166667
subaru0.0000000.0000000.2500000.4166670.333333
toyota0.0312500.0937500.4375000.3125000.125000
volkswagen0.0833330.0000000.0833330.7500000.083333
volvo0.0000000.0000000.0000000.7272730.272727

This view of the data shows that of the Mitsubishi cars in this dataset, 69.23% are hatchbacks and the remainder (30.77%) are sedans.

I hope you will agree that these shortcuts can be helpful in many kinds of analysis.

Grouping

One of the most useful features of the crosstab is that you can pass in multiple dataframe columns and pandas does all the grouping for you. For instance, if we want to see how the data is distributed by front wheel drive (fwd) and rear wheel drive (rwd), we can include the drive_wheels column by including it in the list of valid columns in the second argument to the crosstab .

pd.crosstab(df.make,[df.body_style,df.drive_wheels])
body_styleconvertiblehardtophatchbacksedanwagon
drive_wheelsfwdrwdfwdrwd4wdfwdrwd4wdfwdrwd4wdfwdrwd
make
honda0000070050010
mazda0000064052000
mitsubishi0000090040000
nissan0010023090030
subaru0000120230220
toyota0103086073211
volkswagen1000010090010
volvo0000000008003

We can also do the same thing with the index:

pd.crosstab([df.make,df.num_doors],[df.body_style,df.drive_wheels],rownames=['Auto Manufacturer',"Doors"],colnames=['Body Style',"Drive Type"],dropna=False)
Body Styleconvertiblehardtophatchbacksedanwagon
Drive Type4wdfwdrwd4wdfwdrwd4wdfwdrwd4wdfwdrwd4wdfwdrwd
Auto ManufacturerDoors
hondafour000000000040010
two000000070010000
mazdafour000000010042000
two000000054000000
mitsubishifour000000000040000
two000000090000000
nissanfour000000010050030
two000010013040000
subarufour000000000230220
two000000120000000
toyotafour000000060071211
two001003026002000
volkswagenfour000000000070010
two010000010020000
volvofour000000000008003
two000000000000000

I have introduced a couple of extra parameter to control the way the output is displayed.

First, I included the specific rownames and colnames that I want to include in the output. This is purely for display purposes but can be useful if the column names in the dataframe are not very specific.

Next, I used dropna=False at the end of the function call. The reason I included this is that I wanted to make sure to include all the rows and columns even if they had all 0’s. If I did not include it, then the final Volvo, two door row would have been omitted from the table.

I want to make one final note on this table. It does include a lot of information and may be too difficult to interpret. That’s where the art of data science (or any analysis) comes in and you need to determine the best way to present the data. Which leads to the final part of this article.

Visualizing

For the final example, I will bring it all together by showing how the output of the crosstab can be passed to a seaborn heatmap in order to visually summarize the data.

In our last table, we ended up with a table of 240 values. This is too dense to quickly analyze but if we use a heatmap, we can easily interpret the data. Fortunately, seaborn can take the output from the crosstab and visualize it:

sns.heatmap(pd.crosstab([df.make,df.num_doors],[df.body_style,df.drive_wheels]),cmap="YlGnBu",annot=True,cbar=False)
crosstab heatmap

One of the really useful aspects of this approach is that seaborn collapses the grouped column and row names so that they can be more easily read.

If you would like to learn more about Seaborn, take a look at my course on datacamp.

Cheat Sheet

In order to bring this all together, here is a cheat sheet showing how to use all the various components of the crosstab function. You can download the PDF version here.

Crosstab cheatsheet

Conclusion

The pandas crosstab function is a useful tool for summarizing data. The functionality overlaps with some of the other pandas tools but it occupies a useful place in your data analysis toolbox. After reading this article, you should be able to incorporate it in your own data analysis.

PythonClub - A Brazilian collaborative blog about Python: Trabalhando com operadores ternários

$
0
0

Quando estamos escrevendo um código qualquer, possivelmente a expressão que mais utilizamos é o if. Para qualquer tarefas que buscamos automatizar ou problemas que buscamos resolver, sempre acabamos caindo em lógicas como "Se isso acontecer, então faça aquilo, senão faça aquele outro...".

Quando estamos falando de ações a serem executadas, pessoalmente gosto da forma com que o código fica organizado em python quando usamos este tipo de condições, por exemplo:

ifvencer_o_thanos:restaurar_a_paz()else:foo()

Graças a indentação e ao espaçamento, vemos onde onde começa e/ou termina o bloco executado caso a varável vencer_o_thanos seja True. Quanto mais if's você aninhar, mais bonito seu código fica e em momento algum o mesmo se torna mais confuso (ao menos, não deveria se tornar). Entretanto, sempre fico extremamente incomodado quando tenho de escrever um bloco apenas marcar uma variável, como por exemplo:

ifvencer_o_thanos:paz=Trueelse:paz=False

Por isso, para trabalhar com variáveis que possuem um valor condicional, gosto sempre de trabalhar com expressões condicionais, ou como costumam ser chamadas, operadores ternários.

Operadores ternários são todos os operadores que podem receber três operandos. Como as expressões condicionais costumam ser os operadores ternários mais populares nas linguagens em que aparecem, acabamos por associar estes nomes e considerar que são a mesma coisa. Cuidado ao tirar este tipo de conclusão, mesmo que toda vogal esteja no alfabeto, o alfabeto não é composto apenas por vogais.

A estrutura de uma expressão condicional é algo bem simples, veja só:

paz=Trueifvencer_o_thanoselseFalsetipo_de_x="Par"ifx%2==0else"impar"

Resumidamente, teremos um valor seguido de uma condição e por fim seu valor caso a condição seja falsa. Pessoalmente acredito que apesar de um pouco diferente, essa forma de escrita para casos como o exemplificado acima é muito mais clara, mais explicita.

Se você fizer uma tradução literal das booleanas utilizadas no primeiro exemplo, lerá algo como paz é verdadeira caso vencer_o_thanos, caso contrário é Falsa. já o segundo exemplo fica mais claro ainda, pois lemos algo como tipo_de_x é par caso o resto da divisão de x por 2 seja 0, se não, tipo_de_x é impar..

Interpretar código dessa forma pode ser estranho para um programador. Interpretar uma abertura de chave ou uma indentação já é algo mas natural. Todavia, para aqueles que estão começando, o raciocínio ocorre de forma muito mais parecida com a descrita acima. Espero que tenham gostado do texto e que esse conhecimento lhes seja útil.

Python Bytes: #98 Python-Electron as a Python GUI

Real Python: How to Round Numbers in Python

$
0
0

It’s the era of big data, and every day more and more business are trying to leverage their data to make informed decisions. Many businesses are turning to Python’s powerful data science ecosystem to analyze their data, as evidenced by Python’s rising popularity in the data science realm.

One thing every data science practitioner must keep in mind is how a dataset may be biased. Drawing conclusions from biased data can lead to costly mistakes.

There are many ways bias can creep into a dataset. If you’ve studied some statistics, you’re probably familiar with terms like reporting bias, selection bias and sampling bias. There is another type of bias that plays an important role when you are dealing with numeric data: rounding bias.

In this article, you will learn:

  • Why the way you round numbers is important
  • How to round a number according to various rounding strategies, and how to implement each method in pure Python
  • How rounding affects data, and which rounding strategy minimizes this effect
  • How to round numbers in NumPy arrays and Pandas DataFrames
  • When to apply different rounding strategies

Take the Quiz: Test your knowledge with our interactive “Rounding Numbers in Python” quiz. Upon completion you will receive a score so you can track your learning progress over time.

Click here to start the quiz »

This article is not a treatise on numeric precision in computing, although we will touch briefly on the subject. Only a familiarity with the fundamentals of Python is necessary, and the math involved here should feel comfortable to anyone familiar with the equivalent of high school algebra.

Let’s start by looking at Python’s built-in rounding mechanism.

Python’s Built-in round() Function

Python has a built-in round() function that takes two numeric arguments, n and ndigits, and returns the number n rounded to ndigits. The ndigits argument defaults to zero, so leaving it out results in a number rounded to an integer. As you’ll see, round() may not work quite as you expect.

The way most people are taught to round a number goes something like this:

Round the number n to p decimal places by first shifting the decimal point in n by p places by multiplying n by 10ᵖ (10 raised to the pth power) to get a new number m.

Then look at the digit d in the first decimal place of m. If d is less than 5, round m down to the nearest integer. Otherwise, round m up.

Finally, shift the decimal point back p places by dividing m by 10ᵖ.

It’s a straightforward algorithm! For example, the number 2.5 rounded to the nearest whole number is 3. The number 1.64 rounded to one decimal place is 1.6.

Now open up an interpreter session and round 2.5 to the nearest whole number using Python’s built-in round() function:

>>>
>>> round(2.5)2

Gasp!

How does round() handle the number 1.5?

>>>
>>> round(1.5)2

So, round() rounds 1.5 up to 2, and 2.5 down to 2!

Before you go raising an issue on the Python bug tracker, let me assure you that round(2.5) is supposed to return 2. There is a good reason why round() behaves the way it does.

In this article, you’ll learn that there are more ways to round a number than you might expect, each with unique advantages and disadvantages. round() behaves according to a particular rounding strategy—which may or may not be the one you need for a given situation.

You might be wondering, “Can the way I round numbers really have that much of an impact?” Let’s take a look at just how extreme the effects of rounding can be.

How Much Impact Can Rounding Have?

Suppose you have an incredibly lucky day and find $100 on the ground. Rather than spending all your money at once, you decide to play it smart and invest your money by buying some shares of different stocks.

The value of a stock depends on supply and demand. The more people there are who want to buy a stock, the more value that stock has, and vice versa. In high volume stock markets, the value of a particular stock can fluctuate on a second-by-second basis.

Let’s run a little experiment. We’ll pretend the overall value of the stocks you purchased fluctuates by some small random number each second, say between $0.05 and -$0.05. This fluctuation may not necessarily be a nice value with only two decimal places. For example, the overall value may increase by $0.031286 one second and decrease the next second by $0.028476.

You don’t want to keep track of your value to the fifth or sixth decimal place, so you decide to chop everything off after the third decimal place. In rounding jargon, this is called truncating the number to the third decimal place. There’s some error to be expected here, but by keeping three decimal places, this error couldn’t be substantial. Right?

To run our experiment using Python, let’s start by writing a truncate() function that truncates a number to three decimal places:

>>>
>>> deftruncate(n):... returnint(n*1000)/1000

The truncate() function works by first shifting the decimal point in the number n three places to the right by multiplying n by 1000. The integer part of this new number is taken with int(). Finally, the decimal point is shifted three places back to the left by dividing n by 1000.

Next, let’s define the initial parameters of the simulation. You’ll need two variables: one to keep track of the actual value of your stocks after the simulation is complete and one for the value of your stocks after you’ve been truncating to three decimal places at each step.

Start by initializing these variables to 100:

>>>
>>> actual_value,truncated_value=100,100

Now let’s run the simulation for 1,000,000 seconds (approximately 11.5 days). For each second, generate a random value between -0.05 and 0.05 with the uniform() function in the random module, and then update actual and truncated:

>>>
>>> importrandom>>> random.seed(100)>>> for_inrange(1000000):... randn=random.uniform(-0.05,0.05)... actual_value=actual_value+randn... truncated_value=truncate(truncated_value+randn)...>>> actual_value96.45273913513529>>> truncated_value0.239

The meat of the simulation takes place in the for loop, which loops over the range(1000000) of numbers between 0 and 999,999. The value taken from range() at each step is stored in the variable _, which we use here because we don’t actually need this value inside of the loop.

At each step of the loop, a new random number between -0.05 and 0.05 is generated using random.randn() and assigned to the variable randn. The new value of your investment is calculated by adding randn to actual_value, and the truncated total is calculated by adding randn to truncated_value and then truncating this value with truncate().

As you can see by inspecting the actual_value variable after running the loop, you only lost about $3.55. However, if you’d been looking at truncated_value, you’d have thought that you’d lost almost all of your money!

Note: In the above example, the random.seed() function is used to seed the pseudo-random number generator so that you can reproduce the output shown here.

To learn more about randomness in Python, check out Real Python’s Generating Random Data in Python (Guide).

Ignoring for the moment that round() doesn’t behave quite as you expect, let’s try re-running the simulation. We’ll use round() this time to round to three decimal places at each step, and seed() the simulation again to get the same results as before:

>>>
>>> random.seed(100)>>> actual_value,rounded_value=100,100>>> for_inrange(1000000):... randn=random.uniform(-0.05,0.05)... actual_value=actual_value+randn... rounded_value=round(rounded_value+randn,3)...>>> actual_value96.45273913513529>>> rounded_value96.258

What a difference!

Shocking as it may seem, this exact error caused quite a stir in the early 1980s when the system designed for recording the value of the Vancouver Stock Exchange truncated the overall index value to three decimal places instead of rounding. Rounding errors have swayed elections and even resulted in the loss of life.

How you round numbers is important, and as a responsible developer and software designer, you need to know what the common issues are and how to deal with them. Let’s dive in and investigate what the different rounding methods are and how you can implement each one in pure Python.

A Menagerie of Methods

There are a plethora of rounding strategies, each with advantages and disadvantages. In this section, you’ll learn about some of the most common techniques, and how they can influence your data.

Truncation

The simplest, albeit crudest, method for rounding a number is to truncate the number to a given number of digits. When you truncate a number, you replace each digit after a given position with 0. Here are some examples:

ValueTruncated ToResult
12.345Tens place10
12.345Ones place12
12.345Tenths place12.3
12.345Hundredths place12.34

You’ve already seen one way to implement this in the truncate() function from the How Much Impact Can Rounding Have? section. In that function, the input number was truncated to three decimal places by:

  • Multiplying the number by 1000 to shift the decimal point three places to the right
  • Taking the integer part of that new number with int()
  • Shifting the decimal place three places back to the left by dividing by 1000

You can generalize this process by replacing 1000 with the number 10ᵖ (10 raised to the pth power), where p is the number of decimal places to truncate to:

deftruncate(n,decimals=0):multiplier=10**decimalsreturnint(n*multiplier)/multiplier

In this version of truncate(), the second argument defaults to 0 so that if no second argument is passed to the function, then truncate() returns the integer part of whatever number is passed to it.

The truncate() function works well for both positive and negative numbers:

>>>
>>> truncate(12.5)12.0>>> truncate(-5.963,1)-5.9>>> truncate(1.625,2)1.62

You can even pass a negative number to decimals to truncate to digits to the left of the decimal point:

>>>
>>> truncate(125.6,-1)120.0>>> truncate(-1374.25,-3)-1000.0

When you truncate a positive number, you are rounding it down. Likewise, truncating a negative number rounds that number up. In a sense, truncation is a combination of rounding methods depending on the sign of the number you are rounding.

Let’s take a look at each of these rounding methods individually, starting with rounding up.

Rounding Up

The second rounding strategy we’ll look at is called “rounding up.” This strategy always rounds a number up to a specified number of digits. The following table summarizes this strategy:

ValueRound Up ToResult
12.345Tens place20
12.345Ones place13
12.345Tenths place12.4
12.345Hundredths place12.35

To implement the “rounding up” strategy in Python, we’ll use the ceil() function from the math module.

The ceil() function gets its name from the term “ceiling,” which is used in mathematics to describe the nearest integer that is greater than or equal to a given number.

Every number that is not an integer lies between two consecutive integers. For example, the number 1.2 lies in the interval between 1 and 2. The “ceiling” is the greater of the two endpoints of the interval. The lesser of the two endpoints in called the “floor.” Thus, the ceiling of 1.2 is 2, and the floor of 1.2 is 1.

In mathematics, a special function called the ceiling function maps every number to its ceiling. To allow the ceiling function to accept integers, the ceiling of an integer is defined to be the integer itself. So the ceiling of the number 2 is 2.

In Python, math.ceil() implements the ceiling function and always returns the nearest integer that is greater than or equal to its input:

>>>
>>> importmath>>> math.ceil(1.2)2>>> math.ceil(2)2>>> math.ceil(-0.5)0

Notice that the ceiling of -0.5 is 0, not -1. This makes sense because 0 is the nearest integer to -0.5 that is greater than or equal to -0.5.

Let’s write a function called round_up() that implements the “rounding up” strategy:

defround_up(n,decimals=0):multiplier=10**decimalsreturnmath.ceil(n*multiplier)/multiplier

You may notice that round_up() looks a lot like truncate(). First, the decimal point in n is shifted the correct number of places to the right by multiplying n by 10 ** decimals. This new value is rounded up to the nearest integer using math.ceil(), and then the decimal point is shifted back to the left by dividing by 10 ** decimals.

This pattern of shifting the decimal point, applying some rounding method to round to an integer, and then shifting the decimal point back will come up over and over again as we investigate more rounding methods. This is, after all, the mental algorithm we humans use to round numbers by hand.

Let’s look at how well round_up() works for different inputs:

>>>
>>> round_up(1.1)2.0>>> round_up(1.23,1)1.3>>> round_up(1.543,2)1.55

Just like truncate(), you can pass a negative value to decimals:

>>>
>>> round_up(22.45,-1)30.0>>> round_up(1352,-2)1400

When you pass a negative number to decimals, the number in the first argument of round_up() is rounded to the correct number of digits to the left of the decimal point.

Take a guess at what round_up(-1.5) returns:

>>>
>>> round_up(-1.5)-1.0

Is -1.0 what you expected?

If you examine the logic used in defining round_up()—in particular, the way the math.ceil() function works—then it makes sense that round_up(-1.5) returns -1.0. However, some people naturally expect symmetry around zero when rounding numbers, so that if 1.5 gets rounded up to 2, then -1.5 should get rounded up to -2.

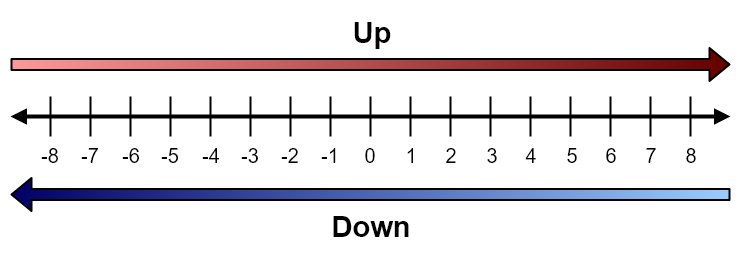
Let’s establish some terminology. For our purposes, we’ll use the terms “round up” and “round down” according to the following diagram:

Round up to the right and down to the leftRound up to the right and down to the left. (Image: David Amos)

Rounding up always rounds a number to the right on the number line, and rounding down always rounds a number to the left on the number line.

Rounding Down

The counterpart to “rounding up” is the “rounding down” strategy, which always rounds a number down to a specified number of digits. Here are some examples illustrating this strategy:

ValueRounded Down ToResult
12.345Tens place10
12.345Ones place12
12.345Tenths place12.3
12.345Hundredths place12.34

To implement the “rounding down” strategy in Python, we can follow the same algorithm we used for both trunctate() and round_up(). First shift the decimal point, then round to an integer, and finally shift the decimal point back.

In round_up(), we used math.ceil() to round up to the ceiling of the number after shifting the decimal point. For the “rounding down” strategy, though, we need to round to the floor of the number after shifting the decimal point.

Lucky for us, the math module has a floor() function that returns the floor of its input:

>>>
>>> math.floor(1.2)1>>> math.floor(-0.5)-1

Here’s the definition of round_down():

defround_down(n,decimals=0):multiplier=10**decimalsreturnmath.floor(n*multiplier)/multiplier

That looks just like round_up(), except math.ceil() has been replaced with math.floor().

You can test round_down() on a few different values:

>>>
>>> round_down(1.5)1>>> round_down(1.37,1)1.3>>> round_down(-0.5)-1

The effects of round_up() and round_down() can be pretty extreme. By rounding the numbers in a large dataset up or down, you could potentially remove a ton of precision and drastically alter computations made from the data.

Before we discuss any more rounding strategies, let’s stop and take a moment to talk about how rounding can make your data biased.

Interlude: Rounding Bias

You’ve now seen three rounding methods: truncate(), round_up(), and round_down(). All three of these techniques are rather crude when it comes to preserving a reasonable amount of precision for a given number.

There is one important difference between truncate() and round_up() and round_down() that highlights an important aspect of rounding: symmetry around zero.

Recall that round_up() isn’t symmetric around zero. In mathematical terms, a function f(x) is symmetric around zero if, for any value of x, f(x) + f(-x) = 0. For example, round_up(1.5) returns 2, but round_up(-1.5) returns -1. The round_down() function isn’t symmetric around 0, either.

On the other hand, the truncate() function is symmetric around zero. This is because, after shifting the decimal point to the right, truncate() chops off the remaining digits. When the initial value is positive, this amounts to rounding the number down. Negative numbers are rounded up. So, truncate(1.5) returns 1, and truncate(-1.5) returns -1.

The concept of symmetry introduces the notion of rounding bias, which describes how rounding affects numeric data in a dataset.

The “rounding up” strategy has a round towards positive infinity bias, because the value is always rounded up in the direction of positive infinity. Likewise, the “rounding down” strategy has a round towards negative infinity bias.

The “truncation” strategy exhibits a round towards negative infinity bias on positive values and a round towards positive infinity for negative values. Rounding functions with this behavior are said to have a round towards zero bias, in general.

Let’s see how this works in practice. Consider the following list of floats:

>>>
>>> data=[1.25,-2.67,0.43,-1.79,4.32,-8.19]

Let’s compute the mean value of the values in data using the statistics.mean() function:

>>>
>>> importstatistics>>> statistics.mean(data)-1.1083333333333332

Now apply each of round_up(), round_down(), and truncate() in a list comprehension to round each number in data to one decimal place and calculate the new mean:

>>>
>>> ru_data=[round_up(n,1)fornindata]>>> ru_data[1.3, -2.6, 0.5, -1.7, 4.4, -8.1]>>> statistics.mean(ru_data)-1.0333333333333332>>> rd_data=[round_down(n,1)fornindata]>>> statistics.mean(rd_data)-1.1333333333333333>>> tr_data=[truncate(n,1)fornindata]>>> statistics.mean(tr_data)-1.0833333333333333

After every number in data is rounded up, the new mean is about -1.033, which is greater than the actual mean of about 1.108. Rounding down shifts the mean downwards to about -1.133. The mean of the truncated values is about -1.08 and is the closest to the actual mean.

This example does not imply that you should always truncate when you need to round individual values while preserving a mean value as closely as possible. The data list contains an equal number of positive and negative values. The truncate() function would behave just like round_up() on a list of all positive values, and just like round_down() on a list of all negative values.

What this example does illustrate is the effect rounding bias has on values computed from data that has been rounded. You will need to keep these effects in mind when drawing conclusions from data that has been rounded.

Typically, when rounding, you are interested in rounding to the nearest number with some specified precision, instead of just rounding everything up or down.

For example, if someone asks you to round the numbers 1.23 and 1.28 to one decimal place, you would probably respond quickly with 1.2 and 1.3. The truncate(), round_up(), and round_down() functions don’t do anything like this.

What about the number 1.25? You probably immediately think to round this to 1.3, but in reality, 1.25 is equidistant from 1.2 and 1.3. In a sense, 1.2 and 1.3 are both the nearest numbers to 1.25 with single decimal place precision. The number 1.25 is called a tie with respect to 1.2 and 1.3. In cases like this, you must assign a tiebreaker.

The way that most people are taught break ties is by rounding to the greater of the two possible numbers.

Rounding Half Up

The “rounding half up” strategy rounds every number to the nearest number with the specified precision, and breaks ties by rounding up. Here are some examples:

ValueRound Half Up ToResult
13.825Tens place10
13.825Ones place14
13.825Tenths place13.8
13.825Hundredths place13.83

To implement the “rounding half up” strategy in Python, you start as usual by shifting the decimal point to the right by the desired number of places. At this point, though, you need a way to determine if the digit just after the shifted decimal point is less than or greater than or equal to 5.

One way to do this is to add 0.5 to the shifted value and then round down with math.floor(). This works because:

  • If the digit in the first decimal place of the shifted value is less than five, then adding 0.5 won’t change the integer part of the shifted value, so the floor is equal to the integer part.

  • If the first digit after the decimal place is greater than or equal to 5, then adding 0.5 will increase the integer part of the shifted value by 1, so the floor is equal to this larger integer.

Here’s what this looks like in Python:

defround_half_up(n,decimals=0):multiplier=10**decimalsreturnmath.floor(n*multiplier+0.5)/multiplier

Notice that round_half_up() looks a lot like round_down(). This might be somewhat counter-intuitive, but internally round_half_up() only rounds down. The trick is to add the 0.5 after shifting the decimal point so that the result of rounding down matches the expected value.

Let’s test round_half_up() on a couple of values to see that it works:

>>>
>>> round_half_up(1.23,1)1.2>>> round_half_up(1.28,1)1.3>>> round_half_up(1.25,1)1.3

Since round_half_up() always breaks ties by rounding to the greater of the two possible values, negative values like -1.5 round to -1, not to -2:

>>>
>>> round_half_up(-1.5)-1.0>>> round_half_up(-1.25,1)-1.2

Great! You can now finally get that result that the built-in round() function denied to you:

>>>
>>> round_half_up(2.5)3.0

Before you get too excited though, let’s see what happens when you try and round -1.225 to 2 decimal places:

>>>
>>> round_half_up(-1.225,2)-1.23

Wait. We just discussed how ties get rounded to the greater of the two possible values. -1.225 is smack in the middle of -1.22 and -1.23. Since -1.22 is the greater of these two, round_half_up(-1.225, 2) should return -1.22. But instead, we got -1.23.

Is there a bug in the round_half_up() function?

When round_half_up() rounds -1.225 to two decimal places, the first thing it does is multiply -1.225 by 100. Let’s make sure this works as expected:

>>>
>>> -1.225*100-122.50000000000001

Well… that’s wrong! But it does explain why round_half_up(-1.225, 2) returns -1.23. Let’s continue the round_half_up() algorithm step-by-step, utilizing _ in the REPL to recall the last value output at each step:

>>>
>>> _+0.5-122.00000000000001>>> math.floor(_)-123>>> _/100-1.23

Even though -122.00000000000001 is really close to -122, the nearest integer that is less than or equal to it is -123. When the decimal point is shifted back to the left, the final value is -1.23.

Well, now you know how round_half_up(-1.225, 2) returns -1.23 even though there is no logical error, but why does Python say that -1.225 * 100 is -122.50000000000001? Is there a bug in Python?

Aside: In a Python interpreter session, type the following:

>>>
>>> 0.1+0.1+0.10.30000000000000004

Seeing this for the first time can be pretty shocking, but this is a classic example of floating-point representation error. It has nothing to do with Python. The error has to do with how machines store floating-point numbers in memory.

Most modern computers store floating-point numbers as binary decimals with 53-bit precision. Only numbers that have finite binary decimal representations that can be expressed in 53 bits are stored as an exact value. Not every number has a finite binary decimal representation.

For example, the decimal number 0.1 has a finite decimal representation, but infinite binary representation. Just like the fraction 1/3 can only be represented in decimal as the infinitely repeating decimal 0.333..., the fraction 1/10 can only be expressed in binary as the infinitely repeating decimal 0.0001100110011....

A value with an infinite binary representation is rounded to an approximate value to be stored in memory. The method that most machines use to round is determined according to the IEEE-754 standard, which specifies rounding to the nearest representable binary fraction.

The Python docs have a section called Floating Point Arithmetic: Issues and Limitations which has this to say about the number 0.1:

On most machines, if Python were to print the true decimal value of the binary approximation stored for 0.1, it would have to display

>>>
>>> 0.10.1000000000000000055511151231257827021181583404541015625

That is more digits than most people find useful, so Python keeps the number of digits manageable by displaying a rounded value instead

>>>
>>> 1/100.1

Just remember, even though the printed result looks like the exact value of 1/10, the actual stored value is the nearest representable binary fraction. (Source)

For a more in-depth treatise on floating-point arithmetic, check out David Goldberg’s article What Every Computer Scientist Should Know About Floating-Point Arithmetic, originally published in the journal ACM Computing Surveys, Vol. 23, No. 1, March 1991.

The fact that Python says that -1.225 * 100 is -122.50000000000001 is an artifact of floating-point representation error. You might be asking yourself, “Okay, but is there a way to fix this?” A better question to ask yourself is “Do I need to fix this?”

Floating-point numbers do not have exact precision, and therefore should not be used in situations where precision is paramount. For applications where the exact precision is necessary, you can use the Decimal class from Python’s decimal module. You’ll learn more about the Decimal class below.

If you have determined that Python’s standard float class is sufficient for your application, some occasional errors in round_half_up() due to floating-point representation error shouldn’t be a concern.

Now that you’ve gotten a taste of how machines round numbers in memory, let’s continue our discussion on rounding strategies by looking at another way to break a tie.

Rounding Half Down

The “rounding half down” strategy rounds to the nearest number with the desired precision, just like the “rounding half up” method, except that it breaks ties by rounding to the lesser of the two numbers. Here are some examples:

ValueRound Half Down ToResult
13.825Tens place10
13.825Ones place14
13.825Tenths place13.8
13.825Hundredths place13.82

You can implement the “rounding half down” strategy in Python by replacing math.floor() in the round_half_up() function with math.ceil() and subtracting 0.5 instead of adding:

defround_half_down(n,decimals=0):multiplier=10**decimalsreturnmath.ceil(n*multiplier-0.5)/multiplier

Let’s check round_half_down() against a few test cases:

>>>
>>> round_half_down(1.5)1.0>>> round_half_down(-1.5)-2.0>>> round_half_down(2.25,1)2.2

Both round_half_up() and round_half_down() have no bias in general. However, rounding data with lots of ties does introduce a bias. For an extreme example, consider the following list of numbers:

>>>
>>> data=[-2.15,1.45,4.35,-12.75]

Let’s compute the mean of these numbers:

>>>
>>> statistics.mean(data)-2.275

Next, compute the mean on the data after rounding to one decimal place with round_half_up() and round_half_down():

>>>
>>> rhu_data=[round_half_up(n,1)fornindata]>>> statistics.mean(rhu_data)-2.2249999999999996>>> rhd_data=[round_half_down(n,1)fornindata]>>> statistics.mean(rhd_data)-2.325

Every number in data is a tie with respect to rounding to one decimal place. The round_half_up() function introduces a round towards positive infinity bias, and round_half_down() introduces a round towards negative infinity bias.

The remaining rounding strategies we’ll discuss all attempt to mitigate these biases in different ways.

Rounding Half Away From Zero

If you examine round_half_up() and round_half_down() closely, you’ll notice that neither of these functions is symmetric around zero:

>>>
>>> round_half_up(1.5)2.0>>> round_half_up(-1.5)-1.0>>> round_half_down(1.5)1.0>>> round_half_down(-1.5)-2.0

One way to introduce symmetry is to always round a tie away from zero. The following table illustrates how this works:

ValueRound Half Away From Zero ToResult
15.25Tens place20
15.25Ones place15
15.25Tenths place15.3
-15.25Tens place-20
-15.25Ones place-15
-15.25Tenths place-15.3

To implement the “rounding half away from zero” strategy on a number n, you start as usual by shifting the decimal point to the right a given number of places. Then you look at the digit d immediately to the right of the decimal place in this new number. At this point, there are four cases to consider:

  1. If n is positive and d >= 5, round up
  2. If n is positive and d < 5, round down
  3. If n is negative and d >= 5, round down
  4. If n is negative and d < 5, round up

After rounding according to one of the above four rules, you then shift the decimal place back to the left.

Given a number n and a value for decimals, you could implement this in Python by using round_half_up() and round_half_down():

ifn>=0:rounded=round_half_up(n,decimals)else:rounded=round_half_down(n,decimals)

That’s easy enough, but there’s actually a simpler way!

If you first take the absolute value of n using Python’s built-in abs() function, you can just use round_half_up() to round the number. Then all you need to do is give the rounded number the same sign as n. One way to do this is using the math.copysign() function.

math.copysign() takes two numbers a and b and returns a with the sign of b:

>>>
>>> math.copysign(1,-2)-1.0

Notice that math.copysign() returns a float, even though both of its arguments were integers.

Using abs(), round_half_up() and math.copysign(), you can implement the “rounding half away from zero” strategy in just two lines of Python:

defround_half_away_from_zero(n,decimals=0):rounded_abs=round_half_up(abs(n),decimals)returnmath.copysign(rounded_abs,n)

In round_half_away_from_zero(), the absolute value of n is rounded to decimals decimal places using round_half_up() and this result is assigned to the variable rounded_abs. Then the original sign of n is applied to rounded_abs using math.copysign(), and this final value with the correct sign is returned by the function.

Checking round_half_away_from_zero() on a few different values shows that the function behaves as expected:

>>>
>>> round_half_away_from_zero(1.5)2.0>>> round_half_away_from_zero(-1.5)-2.0>>> round_half_away_from_zero(-12.75,1)-12.8

The round_half_away_from_zero() function rounds numbers the way most people tend to round numbers in everyday life. Besides being the most familiar rounding function you’ve seen so far, round_half_away_from_zero() also eliminates rounding bias well in datasets that have an equal number of positive and negative ties.

Let’s check how well round_half_away_from_zero() mitigates rounding bias in the example from the previous section:

>>>
>>> data=[-2.15,1.45,4.35,-12.75]>>> statistics.mean(data)-2.275>>> rhaz_data=[round_half_away_from_zero(n,1)fornindata]>>> statistics.mean(rhaz_data)-2.2750000000000004

The mean value of the numbers in data is preserved almost exactly when you round each number in data to one decimal place with round_half_away_from_zero()!

However, round_half_away_from_zero() will exhibit a rounding bias when you round every number in datasets with only positive ties, only negative ties, or more ties of one sign than the other. Bias is only mitigated well if there are a similar number of positive and negative ties in the dataset.

How do you handle situations where the number of positive and negative ties are drastically different? The answer to this question brings us full circle to the function that deceived us at the beginning of this article: Python’s built-in round() function.

Rounding Half To Even

One way to mitigate rounding bias when rounding values in a dataset is to round ties to the nearest even number at the desired precision. Here are some examples of how to do that:

ValueRound Half To Even ToResult
15.255Tens place20
15.255Ones place15
15.255Tenths place15.2
15.255Hundredths place15.26

The “rounding half to even strategy” is the strategy used by Python’s built-in round() function and is the default rounding rule in the IEEE-754 standard. This strategy works under the assumption that the probabilities of a tie in a dataset being rounded down or rounded up are equal. In practice, this is usually the case.

Now you know why round(2.5) returns 2. It’s not a mistake. It is a conscious design decision based on solid recommendations.

To prove to yourself that round() really does round to even, try it on a few different values:

>>>
>>> round(4.5)4>>> round(3.5)4>>> round(1.75,1)1.8>>> round(1.65,1)1.6

The round() function is nearly free from bias, but it isn’t perfect. For example, rounding bias can still be introduced if the majority of the ties in your dataset round up to even instead of rounding down. Strategies that mitigate bias even better than “rounding half to even” do exist, but they are somewhat obscure and only necessary in extreme circumstances.

Finally, round() suffers from the same hiccups that you saw in round_half_up() thanks to floating-point representation error:

>>>
>>> # Expected value: 2.68>>> round(2.675,2)2.67

You shouldn’t be concerned with these occasional errors if floating-point precision is sufficient for your application.

When precision is paramount, you should use Python’s Decimal class.

The Decimal Class

Python’s decimal module is one of those “batteries-included” features of the language that you might not be aware of if you’re new to Python. The guiding principle of the decimal module can be found in the documentation:

Decimal “is based on a floating-point model which was designed with people in mind, and necessarily has a paramount guiding principle – computers must provide an arithmetic that works in the same way as the arithmetic that people learn at school.” – excerpt from the decimal arithmetic specification. (Source)

The benefits of the decimal module include:

  • Exact decimal representation: 0.1 is actually0.1, and 0.1 + 0.1 + 0.1 - 0.3 returns 0, as you’d expect.
  • Preservation of significant digits: When you add 1.20 and 2.50, the result is 3.70 with the trailing zero maintained to indicate significance.
  • User-alterable precision: The default precision of the decimal module is twenty-eight digits, but this value can be altered by the user to match the problem at hand.

Let’s explore how rounding works in the decimal module. Start by typing the following into a Python REPL:

>>>
>>> importdecimal>>> decimal.getcontext()Context(    prec=28,    rounding=ROUND_HALF_EVEN,    Emin=-999999,    Emax=999999,    capitals=1,    clamp=0,    flags=[],    traps=[        InvalidOperation,        DivisionByZero,        Overflow    ])

decimal.getcontext() returns a Context object representing the default context of the decimal module. The context includes the default precision and the default rounding strategy, among other things.

As you can see in the example above, the default rounding strategy for the decimal module is ROUND_HALF_EVEN. This aligns with the built-in round() function and should be the preferred rounding strategy for most purposes.

Let’s declare a number using the decimal module’s Decimal class. To do so, create a new Decimal instance by passing a string containing the desired value:

>>>
>>> fromdecimalimportDecimal>>> Decimal("0.1")Decimal('0.1')

Note: It is possible to create a Decimal instance from a floating-point number, but doing so introduces floating-point representation error right off the bat. For example, check out what happens when you create a Decimal instance from the floating-point number 0.1:

>>>
>>> Decimal(0.1)Decimal('0.1000000000000000055511151231257827021181583404541015625')

In order to maintain exact precision, you must create Decimal instances from strings containing the decimal numbers you need.

Just for fun, let’s test the assertion that Decimal maintains exact decimal representation:

>>>
>>> Decimal('0.1')+Decimal('0.1')+Decimal('0.1')Decimal('0.3')

Ahhh. That’s satisfying, isn’t it?

Rounding a Decimal is done with the .quantize() method:

>>>
>>> Decimal("1.65").quantize(Decimal("1.0"))Decimal('1.6')

Okay, that probably looks a little funky, so let’s break that down. The Decimal("1.0") argument in .quantize() determines the number of decimal places to round the number. Since 1.0 has one decimal place, the number 1.65 rounds to a single decimal place. The default rounding strategy is “rounding half to even,” so the result is 1.6.

Recall that the round() function, which also uses the “rounding half to even strategy,” failed to round 2.675 to two decimal places correctly. Instead of 2.68, round(2.675, 2) returns 2.67. Thanks to the decimal modules exact decimal representation, you won’t have this issue with the Decimal class:

>>>
>>> Decimal("2.675").quantize(Decimal("1.00"))Decimal('2.68')

Another benefit of the decimal module is that rounding after performing arithmetic is taken care of automatically, and significant digits are preserved. To see this in action, let’s change the default precision from twenty-eight digits to two, and then add the numbers 1.23 and 2.32:

>>>
>>> decimal.getcontext().prec=2>>> Decimal("1.23")+Decimal("2.32")Decimal('3.6')

To change the precision, you call decimal.getcontext() and set the .prec attribute. If setting the attribute on a function call looks odd to you, you can do this because .getcontext() returns a special Context object that represents the current internal context containing the default parameters used by the decimal module.

The exact value of 1.23 plus 2.32 is 3.55. Since the precision is now two digits, and the rounding strategy is set to the default of “rounding half to even,” the value 3.55 is automatically rounded to 3.6.

To change the default rounding strategy, you can set the decimal.getcontect().rounding property to any one of several flags. The following table summarizes these flags and which rounding strategy they implement:

FlagRounding Strategy
decimal.ROUND_CEILINGRounding up
decimal.ROUND_FLOORRounding down
decimal.ROUND_DOWNTruncation
decimal.ROUND_UPRounding away from zero
decimal.ROUND_HALF_UPRounding half away from zero
decimal.ROUND_HALF_DOWNRounding half towards zero
decimal.ROUND_HALF_EVENRounding half to even
decimal.ROUND_05UPRounding up and rounding towards zero

The first thing to notice is that the naming scheme used by the decimal module differs from what we agreed to earlier in the article. For example, decimal.ROUND_UP implements the “rounding away from zero” strategy, which actually rounds negative numbers down.

Secondly, some of the rounding strategies mentioned in the table may look unfamiliar since we haven’t discussed them. You’ve already seen how decimal.ROUND_HALF_EVEN works, so let’s take a look at each of the others in action.

The decimal.ROUND_CEILING strategy works just like the round_up() function we defined earlier:

>>>
>>> decimal.getcontext().rounding=decimal.ROUND_CEILING>>> Decimal("1.32").quantize(Decimal("1.0"))Decimal('1.4')>>> Decimal("-1.32").quantize(Decimal("1.0"))Decimal('-1.3')

Notice that the results of decimal.ROUND_CEILING are not symmetric around zero.

The decimal.ROUND_FLOOR strategy works just like our round_down() function:

>>>
>>> decimal.getcontext().rounding=decimal.ROUND_FLOOR>>> Decimal("1.32").quantize(Decimal("1.0"))Decimal('1.3')>>> Decimal("-1.32").quantize(Decimal("1.0"))Decimal('-1.4')

Like decimal.ROUND_CEILING, the decimal.ROUND_FLOOR strategy is not symmetric around zero.

The decimal.ROUND_DOWN and decimal.ROUND_UP strategies have somewhat deceptive names. Both ROUND_DOWN and ROUND_UP are symmetric around zero:

>>>
>>> decimal.getcontext().rounding=decimal.ROUND_DOWN>>> Decimal("1.32").quantize(Decimal("1.0"))Decimal('1.3')>>> Decimal("-1.32").quantize(Decimal("1.0"))Decimal('-1.3')>>> decimal.getcontext().rounding=decimal.ROUND_UP>>> Decimal("1.32").quantize(Decimal("1.0"))Decimal('1.4')>>> Decimal("-1.32").quantize(Decimal("1.0"))Decimal('-1.4')

The decimal.ROUND_DOWN strategy rounds numbers towards zero, just like the truncate() function. On the other hand, decimal.ROUND_UP rounds everything away from zero. This is a clear break from the terminology we agreed to earlier in the article, so keep that in mind when you are working with the decimal module.

There are three strategies in the decimal module that allow for more nuanced rounding. The decimal.ROUND_HALF_UP method rounds everything to the nearest number and breaks ties by rounding away from zero:

>>>
>>> decimal.getcontext().rounding=decimal.ROUND_HALF_UP>>> Decimal("1.35").quantize(Decimal("1.0"))Decimal('1.4')>>> Decimal("-1.35").quantize(Decimal("1.0"))Decimal('-1.4')

Notice that decimal.ROUND_HALF_UP works just like our round_half_away_from_zero() and not like round_half_up().

There is also a decimal.ROUND_HALF_DOWN strategy that breaks ties by rounding towards zero:

>>>
>>> decimal.getcontext().rounding=decimal.ROUND_HALF_DOWN>>> Decimal("1.35").quantize(Decimal("1.0"))Decimal('1.3')>>> Decimal("-1.35").quantize(Decimal("1.0"))Decimal('-1.3')

The final rounding strategy available in the decimal module is very different from anything we have seen so far:

>>>
>>> decimal.getcontext().rounding=decimal.ROUND_05UP>>> Decimal("1.38").quantize(Decimal("1.0"))Decimal('1.3')>>> Decimal("1.35").quantize(Decimal("1.0"))Decimal('1.3')>>> Decimal("-1.35").quantize(Decimal("1.0"))Decimal('-1.3')

In the above examples, it looks as if decimal.ROUND_05UP rounds everything towards zero. In fact, this is exactly how decimal.ROUND_05UP works, unless the result of rounding ends in a 0 or 5. In that case, the number gets rounded away from zero:

>>>
>>> Decimal("1.49").quantize(Decimal("1.0"))Decimal('1.4')>>> Decimal("1.51").quantize(Decimal("1.0"))Decimal('1.6')

In the first example, the number 1.49 is first rounded towards zero in the second decimal place, producing 1.4. Since 1.4 does not end in a 0 or a 5, it is left as is. On the other hand, 1.51 is rounded towards zero in the second decimal place, resulting in the number 1.5. This ends in a 5, so the first decimal place is then rounded away from zero to 1.6.

In this section, we have only focused on the rounding aspects of the decimal module. There are a large number of other features that make decimal an excellent choice for applications where the standard floating-point precision is inadequate, such as banking and some problems in scientific computing.

For more information on Decimal, check out the Quick-start Tutorial in the Python docs.

Next, let’s turn our attention to two staples of Python’s scientific computing and data science stacks: NumPy and Pandas.

Rounding NumPy Arrays

In the domains of data science and scientific computing, you often store your data as a NumPy array. One of NumPy’s most powerful features is its use of vectorization and broadcasting to apply operations to an entire array at once instead of one element at a time.

Let’s generate some data by creating a 3×4 NumPy array of pseudo-random numbers:

>>>
>>> importnumpyasnp>>> np.random.seed(444)>>> data=np.random.randn(3,4)>>> dataarray([[ 0.35743992,  0.3775384 ,  1.38233789,  1.17554883],       [-0.9392757 , -1.14315015, -0.54243951, -0.54870808],       [ 0.20851975,  0.21268956,  1.26802054, -0.80730293]])

First, we seed the np.random module so that you can easily reproduce the output. Then a 3×4 NumPy array of floating-point numbers is created with np.random.randn().

Note: You’ll need to pip3 install numpy before typing the above code into your REPL if you don’t already have NumPy in your environment. If you installed Python with Anaconda, you’re already set!

If you haven’t used NumPy before, you can get a quick introduction in the Getting Into Shape section of Brad Solomon’s Look Ma, No For-Loops: Array Programming With NumPy here at Real Python.

For more information on NumPy’s random module, check out the PRNG’s for Arrays section of Brad’s Generating Random Data in Python (Guide).

To round all of the values in the data array, you can pass data as the argument to the np.around() function. The desired number of decimal places is set with the decimals keyword argument. The round half to even strategy is used, just like Python’s built-in round() function.

For example, the following rounds all of the values in data to three decimal places:

>>>
>>> np.around(data,decimals=3)array([[ 0.357,  0.378,  1.382,  1.176],       [-0.939, -1.143, -0.542, -0.549],       [ 0.209,  0.213,  1.268, -0.807]])

np.around() is at the mercy of floating-point representation error, just like round() is.

For example, the value in the third row of the first column in the data array is 0.20851975. When you round this to three decimal places using the “rounding half to even” strategy, you expect the value to be 0.208. But you can see in the output from np.around() that the value is rounded to 0.209. However, the value 0.3775384 in the first row of the second column rounds correctly to 0.378.

If you need to round the data in your array to integers, NumPy offers several options:

The np.ceil() function rounds every value in the array to the nearest integer greater than or equal to the original value:

>>>
>>> np.ceil(data)array([[ 1.,  1.,  2.,  2.],       [-0., -1., -0., -0.],       [ 1.,  1.,  2., -0.]])

Hey, we discovered a new number! Negative zero!

Actually, the IEEE-754 standard requires the implementation of both a positive and negative zero. What possible use is there for something like this? Wikipedia knows the answer:

Informally, one may use the notation “−0” for a negative value that was rounded to zero. This notation may be useful when a negative sign is significant; for example, when tabulating Celsius temperatures, where a negative sign means below freezing. (Source)

To round every value down to the nearest integer, use np.floor():

>>>
>>> np.floor(data)array([[ 0.,  0.,  1.,  1.],       [-1., -2., -1., -1.],       [ 0.,  0.,  1., -1.]])

You can also truncate each value to its integer component with np.trunc():

>>>
>>> np.trunc(data)array([[ 0.,  0.,  1.,  1.],       [-0., -1., -0., -0.],       [ 0.,  0.,  1., -0.]])

Finally, to round to the nearest integer using the “rounding half to even” strategy, use np.rint():

>>>
>>> np.rint(data)array([[ 0.,  0.,  1.,  1.],       [-1., -1., -1., -1.],       [ 0.,  0.,  1., -1.]])

You might have noticed that a lot of the rounding strategies we discussed earlier are missing here. For the vast majority of situations, the around() function is all you need. If you need to implement another strategy, such as round_half_up(), you can do so with a simple modification:

defround_half_up(n,decimals=0):multiplier=10**decimals# Replace math.floor with np.floorreturnnp.floor(n*multiplier+0.5)/multiplier

Thanks to NumPy’s vectorized operations, this works just as you expect:

>>>
>>> round_half_up(data,decimals=2)array([[ 0.36,  0.38,  1.38,  1.18],       [-0.94, -1.14, -0.54, -0.55],       [ 0.21,  0.21,  1.27, -0.81]])

Now that you’re a NumPy rounding master, let’s take a look at Python’s other data science heavy-weight: the Pandas library.

Rounding Pandas Series and DataFrame

The Pandas library has become a staple for data scientists and data analysts who work in Python. In the words of Real Python’s own Joe Wyndham:

Pandas is a game-changer for data science and analytics, particularly if you came to Python because you were searching for something more powerful than Excel and VBA. (Source)

Note: Before you continue, you’ll need to pip3 install pandas if you don’t already have it in your environment. As was the case for NumPy, if you installed Python with Anaconda, you should be ready to go!

The two main Pandas data structures are the DataFrame, which in very loose terms works sort of like an Excel spreadsheet, and the Series, which you can think of as a column in a spreadsheet. Both Series and DataFrame objects can also be rounded efficiently using the Series.round() and DataFrame.round() methods:

>>>
>>> importpandasaspd>>> # Re-seed np.random if you closed your REPL since the last example>>> np.random.seed(444)>>> series=pd.Series(np.random.randn(4))>>> series0    0.3574401    0.3775382    1.3823383    1.175549dtype: float64>>> series.round(2)0    0.361    0.382    1.383    1.18dtype: float64>>> df=pd.DataFrame(np.random.randn(3,3),columns=["A","B","C"])>>> df          A         B         C0 -0.939276 -1.143150 -0.5424401 -0.548708  0.208520  0.2126902  1.268021 -0.807303 -3.303072>>> df.round(3)       A      B      C0 -0.939 -1.143 -0.5421 -0.549  0.209  0.2132  1.268 -0.807 -3.303

The DataFrame.round() method can also accept a dictionary or a Series, to specify a different precision for each column. For instance, the following examples show how to round the first column of df to one decimal place, the second to two, and the third to three decimal places:

>>>
>>> # Specify column-by-column precision with a dictionary>>> df.round({"A":1,"B":2,"C":3})     A     B      C0 -0.9 -1.14 -0.5421 -0.5  0.21  0.2132  1.3 -0.81 -3.303>>> # Specify column-by-column precision with a Series>>> decimals=pd.Series([1,2,3],index=["A","B","C"])>>> df.round(decimals)     A     B      C0 -0.9 -1.14 -0.5421 -0.5  0.21  0.2132  1.3 -0.81 -3.303

If you need more rounding flexibility, you can apply NumPy’s floor(), ceil(), and rint() functions to Pandas Series and DataFrame objects:

>>>
>>> np.floor(df)     A    B    C0 -1.0 -2.0 -1.01 -1.0  0.0  0.02  1.0 -1.0 -4.0>>> np.ceil(df)     A    B    C0 -0.0 -1.0 -0.01 -0.0  1.0  1.02  2.0 -0.0 -3.0>>> np.rint(df)     A    B    C0 -1.0 -1.0 -1.01 -1.0  0.0  0.02  1.0 -1.0 -3.0

The modified round_half_up() function from the previous section will also work here:

>>>
>>> round_half_up(df,decimals=2)      A     B     C0 -0.94 -1.14 -0.541 -0.55  0.21  0.212  1.27 -0.81 -3.30

Congratulations, you’re well on your way to rounding mastery! You now know that there are more ways to round a number than there are taco combinations. (Well… maybe not!) You can implement numerous rounding strategies in pure Python, and you have sharpened your skills on rounding NumPy arrays and Pandas Series and DataFrame objects.

There’s just one more step: knowing when to apply the right strategy.

Applications and Best Practices

The last stretch on your road to rounding virtuosity is understanding when to apply your newfound knowledge. In this section, you’ll learn some best practices to make sure you round your numbers the right way.

Store More and Round Late

When you deal with large sets of data, storage can be an issue. In most relational databases, each column in a table is designed to store a specific data type, and numeric data types are often assigned precision to help conserve memory.

For example, a temperature sensor may report the temperature in a long-running industrial oven every ten seconds accurate to eight decimal places. The readings from this are used to detect abnormal fluctuations in temperature that could indicate the failure of a heating element or some other component. So, there might be a Python script running that compares each incoming reading to the last to check for large fluctuations.

The readings from this sensor are also stored in a SQL database so that the daily average temperature inside the oven can be computed each day at midnight. The manufacturer of the heating element inside the oven recommends replacing the component whenever the daily average temperature drops .05 degrees below normal.

For this calculation, you only need three decimal places of precision. But you know from the incident at the Vancouver Stock Exchange that removing too much precision can drastically affect your calculation.

If you have the space available, you should store the data at full precision. If storage is an issue, a good rule of thumb is to store at least two or three more decimal places of precision than you need for your calculation.

Finally, when you compute the daily average temperature, you should calculate it to the full precision available and round the final answer.

Obey Local Currency Regulations

When you order a cup of coffee for $2.40 at the coffee shop, the merchant typically adds a required tax. The amount of that tax depends a lot on where you are geographically, but for the sake of argument, let’s say it’s 6%. The tax to be added comes out to $0.144. Should you round this up to $0.15 or down to $0.14? The answer probably depends on the regulations set forth by the local government!

Situations like this can also arise when you are converting one currency to another. In 1999, the European Commission on Economical and Financial Affairs codified the use of the “rounding half away from zero” strategy when converting currencies to the Euro, but other currencies may have adopted different regulations.

Another scenario, “Swedish rounding”, occurs when the minimum unit of currency at the accounting level in a country is smaller than the lowest unit of physical currency. For example, if a cup of coffee costs $2.54 after tax, but there are no 1-cent coins in circulation, what do you do? The buyer won’t have the exact amount, and the merchant can’t make exact change.

How situations like this are handled is typically determined by a country’s government. You can find a list of rounding methods used by various countries on Wikipedia.

If you are designing software for calculating currencies, you should always check the local laws and regulations in your users’ locations.

When In Doubt, Round Ties To Even

When you are rounding numbers in large datasets that are used in complex computations, the primary concern is limiting the growth of the error due to rounding.

Of all the methods we’ve discussed in this article, the “rounding half to even” strategy minimizes rounding bias the best. Fortunately, Python, NumPy, and Pandas all default to this strategy, so by using the built-in rounding functions you’re already well protected!

Summary

Whew! What a journey this has been!

In this article, you learned that:

  • There are various rounding strategies, which you now know how to implement in pure Python.

  • Every rounding strategy inherently introduces a rounding bias, and the “rounding half to even” strategy mitigates this bias well, most of the time.

  • The way in which computers store floating-point numbers in memory naturally introduces a subtle rounding error, but you learned how to work around this with the decimal module in Python’s standard library.

  • You can round NumPy arrays and Pandas Series and DataFrame objects.

  • There are best practices for rounding with real-world data.

Take the Quiz: Test your knowledge with our interactive “Rounding Numbers in Python” quiz. Upon completion you will receive a score so you can track your learning progress over time.

Click here to start the quiz »

If you are interested in learning more and digging into the nitty-gritty details of everything we’ve covered, the links below should keep you busy for quite a while.

At the very least, if you’ve enjoyed this article and learned something new from it, pass it on to a friend or team member! Be sure to share your thoughts with us in the comments. We’d love to hear some of your own rounding-related battle stories!

Happy Pythoning!

Additional Resources

Rounding strategies and bias:

Floating-point and decimal specifications:

Interesting Reads:


[ Improve Your Python With 🐍 Python Tricks 💌 – Get a short & sweet Python Trick delivered to your inbox every couple of days. >> Click here to learn more and see examples ]

Full Stack Python: How to Add User Authentication to Flask Apps with Okta

$
0
0

User authentication is a basic feature in web applications so that people can create and access their own accounts. Unfortunately, there are many ways to improperly implement authentication.

This tutorial walks through how to use the secure identity authentication service called Okta, which is free for up to 1,000 active user accounts, to handle user data in Flask applications.

Our Tools

Python 3 is strongly recommended for building applications and this tutorial was built with Python 3.7 although earlier versions of Python 3 should also work fine. In addition to Python 3.x we will also use:

All of the code in this blog post is provided as open source under the MIT license on GitHub under the flask-auth-okta directory of the blog-code-examples repository. Use and abuse the source code for applications you want to build.

Installing Dependencies

Create a new Python virtualenv for this project:

python3 -m venv flaskauth

Activate the virtual environment with the activate script:

. ./flaskauth/bin/activate

The command prompt should change after activation:

Activating the flaskauth virtualenv.

Remember that you will have to activate the virtualenv in every terminal window where you want to use the dependencies contained in this virtualenv.

Now we can install Flask and the Okta dependencies.

pip install flask>=1.0.2 flask-oidc>=1.4.0 okta==0.0.4

Look for output similar to the following to confirm that the dependencies successfully installed:

...
Collecting idna<2.8,>=2.5 (from requests>=2.5.3->okta)
  Downloading https://files.pythonhosted.org/packages/4b/2a/0276479a4b3caeb8a8c1af2f8e4355746a97fab05a372e4a2c6a6b876165/idna-2.7-py2.py3-none-any.whl (58kB)
    100% |████████████████████████████████| 61kB 16.6MB/s 
Collecting urllib3<1.24,>=1.21.1 (from requests>=2.5.3->okta)
  Downloading https://files.pythonhosted.org/packages/bd/c9/6fdd990019071a4a32a5e7cb78a1d92c53851ef4f56f62a3486e6a7d8ffb/urllib3-1.23-py2.py3-none-any.whl (133kB)
    100% |████████████████████████████████| 143kB 14.0MB/s 
Installing collected packages: MarkupSafe, Jinja2, click, itsdangerous, Werkzeug, flask, pyasn1, pyasn1-modules, rsa, httplib2, six, oauth2client, flask-oidc, chardet, certifi, idna, urllib3, requests, python-dateutil, okta
  Running setup.py install for MarkupSafe ... done
  Running setup.py install for itsdangerous ... done
  Running setup.py install for httplib2 ... done
  Running setup.py install for flask-oidc ... done
  Running setup.py install for okta ... done
Successfully installed Jinja2-2.10 MarkupSafe-1.0 Werkzeug-0.14.1 certifi-2018.8.24 chardet-3.0.4 click-6.7 flask-1.0.2 flask-oidc-1.4.0 httplib2-0.11.3 idna-2.7 itsdangerous-0.24 oauth2client-4.1.3 okta-0.0.4 pyasn1-0.4.4 pyasn1-modules-0.2.2 python-dateutil-2.7.3 requests-2.19.1 rsa-4.0 six-1.11.0 urllib3-1.23

We installed our required Flask and the Okta dependencies so let's get to building the Flask application.

Creating A Basic Flask App

The first step before adding authentication to our Flask application is to write some scaffolding functions. The authentication will hook into these functions, such as signin and signout, to ensure the auth process works properly.

Create a directory for your project named thundercats. Why thundercats? Why not Thundercats?

Within the thundercats directly create a file named app.py with the following initial contents:

# imports for FlaskfromflaskimportFlask,Responseapp=Flask(__name__)@app.route("/lair")deflair():returnResponse("Thundercats (supposed to be hidden) lair.")@app.route("/")deflanding_page():returnResponse("Thundercats, Thundercats, hoooooooooooo!")

We can run our Flask app using the following command:

set FLASK_APP=app.py
flask run

Go to localhost:5000 in your web browser and you should see:

Simple version of Flask application running.

Now go to our "hidden lair" at localhost:5000/lair/. Eventually this page should require authentication to access, but for now it appears without any login challenge:

Part of Flask app that should be hidden behind a login page.

Awesome, our basic app is up and running, let's get to the authentication functionality.

Auth-as-a-Service

Head to the Okta developers sign up page.

Okta developers landing page for signing up.

Sign up for a new account or log into your existing account.

Okta developer sign up flow.

The interesting bit about the Okta developer sign up flow is that now you should check your email to finish creating your account. Look for an email like this one:

Okta sign up email.

Click the "Sign In" button and log into developer account using the temporary password found in the email. Set a new password and challenge question. Then pick an image to match your account login process.

Okta finish creating an account.

Click the "Create Account" button and you will be wisked away to the Okta developer dashboard.

Okta developer dashboard.

Find the "Org URL" as shown in the following image.

Okta Org URL value.

We are going to use that URL in our secret credentials file so that our Flask web app can properly connect to the Okta service.

Create a new file in your project directory named openidconnect_secrets.json with the following contents:

{"web":{"client_id":"{{ OKTA_CLIENT_ID }}","client_secret":"{{ OKTA_CLIENT_SECRET }}","auth_uri":"{{ OKTA_ORG_URL }}/oauth2/default/v1/authorize","token_uri":"{{ OKTA_ORG_URL }}/oauth2/default/v1/token","issuer":"{{ OKTA_ORG_URL }}/oauth2/default","userinfo_uri":"{{ OKTA_ORG_URL }}/oauth2/default/userinfo","redirect_uris":["http://localhost:5000/oidc/callback"]}}

Replace the four {{ OKTA_ORG_URL }} placeholders with the Org URL value found in your dashboard. We will fill in the rest of the placeholders with actual values as we proceed through the tutorial. My openidconnect_secret.json file would currently have the following values based on my developer dashboard Org URL. Remember that your URL values will be different!

{"web":{"client_id":"{{ OKTA_CLIENT_ID }}","client_secret":"{{ OKTA_CLIENT_SECRET }}",~~"auth_uri":"https://dev-860408.oktapreview.com/oauth2/default/v1/authorize",~~"token_uri":"https://dev-860408.oktapreview.com/oauth2/default/v1/token",~~"issuer":"https://dev-860408.oktapreview.com/oauth2/default",~~"userinfo_uri":"https://dev-860408.oktapreview.com/oauth2/default/userinfo","redirect_uris":["http://localhost:5000/oidc/callback"]}}

Okay awesome, we have our Okta account set up so we can add the authentication code to our Flask application.

Connecting Flask to Okta

We need to connect our Flask code to our new Okta account. The recommended way of including variables such as account credentials in a Flask application is through configuration handling so we will use that in our account.

Update the Flask code with the following highlighted lines.

# imports for both Flask and Okta connection~~fromosimportenvironfromflaskimportFlask,Response~~fromflask_oidcimportOpenIDConnect~~fromoktaimportUsersClientapp=Flask(__name__)~~# secret credentials for Okta connection~~app.config["OIDC_CLIENT_SECRETS"]="openidconnect_secrets.json"~~app.config["OIDC_COOKIE_SECURE"]=False~~app.config["OIDC_CALLBACK_ROUTE"]="/oidc/callback"~~app.config["OIDC_SCOPES"]=["openid","email","profile"]~~app.config["SECRET_KEY"]=environ.get("SECRET_KEY")~~app.config["OIDC_ID_TOKEN_COOKIE_NAME"]="oidc_token"~~# instantiate OpenID client to handle user session~~oidc=OpenIDConnect(app)~~# Okta client will determine if a user has an appropriate account~~okta_client=UsersClient(environ.get("OKTA_ORG_URL"),~~environ.get("OKTA_AUTH_TOKEN"))@app.route("/lair")deflair():returnResponse("Thundercats (supposed to be hidden) lair.")@app.route("/")deflanding_page():returnResponse("Thundercats, Thundercats, hoooooooooooo!")

We first add three import lines, one to pull values from environment variables, and the next two imports to make it possible to use OpenID Connect and Okta in our application.

The rest of the new code sets Flask application configuration values that can be used to instantiate the OpenID Connect and Okta clients.

  • OIDC_CLIENT_SECRETS: the location of the OpenID Connect secrets file
  • OIDC_COOKIE_SECURE: allows development mode for testing user login and registration without SSL. Your application must set this to True in a production application.
  • OIDC_CALLBACK_ROUTE: URL in the web app for handling user logins
  • OIDC_SCOPES: what data to request about the user when they log in. Our application requests the basic email, name and profile information
  • SECRET_KEY: this is a Flask setting to keep sessions secure. The key must never be made public or your web application user sessions will be compromised.

Where do we get those application configuration values though? We need to obtain them from our Okta account so go back to the dashboard to create a new OpenID Connect application.

Select applications on the Okta developer dashboard.

OpenID Connect applications use a client ID and client secret in place of traditional usernames and passwords. The client ID and client secret will tell your authorization server to recognize your application. Press the "Add Application" button.

Click the Add Application button.

On the new application screen choose "Web" and then press "Next".

Choose a web application.

On the next page there are numerous configuration options but only a few values we need to fill in before we can get our credentials. Set the following values to the Name, Base URIs and Login redirect URIs properties:

  1. ThunderFlaskCats for Name
  2. http://localhost:5000 for Base URIs
  3. http://localhost:5000/oidc/callback for Login redirect URIs

Set application configuration values.

Those are the three values you need to fill in for now so save the application to create it.

On the next page scroll down to find your client and secret keys.

Save the client credentials for later use.

Copy and paste the client ID and client secret into the following highlighted lines to replace the {{ OKTA_CLIENT_ID }} and {{ OKTA_CLIENT_SECRET }} placeholders.

{"web":{~~"client_id":"{{ OKTA_CLIENT_ID }}",~~"client_secret":"{{ OKTA_CLIENT_SECRET }}","auth_uri":"https://dev-860408.oktapreview.com/oauth2/default/v1/authorize","token_uri":"https://dev-860408.oktapreview.com/oauth2/default/v1/token","issuer":"https://dev-860408.oktapreview.com/oauth2/default","userinfo_uri":"https://dev-860408.oktapreview.com/oauth2/default/userinfo","redirect_uris":["http://localhost:5000/oidc/callback"]}}

Save the file and make sure to keep it out of version control as those secret values need to stay secret.

We have one more step in the Okta developer dashboard before we upgrade our Flask application with the authentication code: creating an API authentication token. Go to the API tab.

Click the API tab in the dashboard.

Click the "Create Token" button.

Create an authentication token to access Okta.

Name the token ThunderFlaskCatsToken and copy it. Save the token somewhere safe as we will not be able to access it through the dashboard again. We are going to use this token when setting the OKTA_AUTH_TOKEN environment variable in the next section of this tutorial.

Okay, we finally have all the Okta service configuration and tokens in our openidconnect_secret.json file that we need to finish our application.

Protecting the Lair

Our configuration is set so update the app.py file with the following highlighted lines:

# imports for both Flask and Okta connectionfromosimportenviron~~fromflaskimportFlask,Response,redirect,g,url_forfromflask_oidcimportOpenIDConnectfromoktaimportUsersClientapp=Flask(__name__)# secret credentials for Okta connectionapp.config["OIDC_CLIENT_SECRETS"]="openidconnect_secrets.json"app.config["OIDC_COOKIE_SECURE"]=Falseapp.config["OIDC_CALLBACK_ROUTE"]="/oidc/callback"app.config["OIDC_SCOPES"]=["openid","email","profile"]app.config["SECRET_KEY"]=environ.get("SECRET_KEY")app.config["OIDC_ID_TOKEN_COOKIE_NAME"]="oidc_token"# instantiate OpenID client to handle user sessionoidc=OpenIDConnect(app)# Okta client will determine if a user has an appropriate accountokta_client=UsersClient(environ.get("OKTA_ORG_URL"),environ.get("OKTA_AUTH_TOKEN"))~~@app.before_request~~defbefore_request():~~ifoidc.user_loggedin:~~g.user=okta_client.get_user(oidc.user_getfield("sub"))~~else:~~g.user=None@app.route("/lair")~~@oidc.require_logindeflair():returnResponse("Thundercats (supposed to be hidden) lair.")@app.route("/")deflanding_page():returnResponse("Thundercats, Thundercats, hoooooooooooo!")~~@app.route("/login")~~@oidc.require_login~~deflogin():~~returnredirect(url_for(".lair"))~~~~~~@app.route("/logout")~~deflogout():~~oidc.logout()~~returnredirect(url_for(".landing_page"))

The above new highlighted lines do x.

Set three environment variables so our application can use them when we run it. Make sure the placeholders ORG_URL and AUTH_TOKEN are set with your actual Org URL value and auth token from the Okta developer dashboard.

On the command line run the following commands, making sure to replace any placeholder values with your own tokens and URLs:

# this tells Flask we want to run the built-in server in dev mode
export FLASK_ENV=development
# make sure to use a very long random string here that cannot be guessed
export SECRET_KEY='a very long string with lots of numbers and letters'
# this is the same Org URL found on your developer dashboard
# for example, https://dev-860408.oktapreview.com
export OKTA_ORG_URL='ORG_URL'
# this is the API authentication token we created
export OKTA_AUTH_TOKEN='AUTH_TOKEN'

Now re-run the Flask application:

set FLASK_APP=app.py
flask run

You should be in good shape if the development server starts up with output like this:

(flaskauth)$ flask run
 * Environment: development
 * Debug mode: on
 * Running on http://127.0.0.1:5000/ (Press CTRL+C to quit)
 * Restarting with stat
 * Debugger is active!
 * Debugger PIN: 415-920-546

Head to localhost:5000 in a browser where you are not already logged into your Okta account (an incognito window of your web browser works great).

Landing page while in incognito mode.

Let's test the redirect functionality when we try to go to the /lair route by going to localhost:5000/lair. We get redirected to the Okta login page.

Getting redirected while in incognito mode.

Enter your Okta developer username and password to log into your application. For development purposes this will work fine for testing but obviously in a production application you will create other accounts for users to log into.

Got into the lair URL after logging in.

Let's tweak one more bit in our application to fix the glaring lack of excitement in successfully completing the authentication code for this tutorial.

# imports for both Flask and Okta connectionfromosimportenvironfromflaskimportFlask,Response,redirect,g,url_forfromflask_oidcimportOpenIDConnectfromoktaimportUsersClientapp=Flask(__name__)# secret credentials for Okta connectionapp.config["OIDC_CLIENT_SECRETS"]="openidconnect_secrets.json"app.config["OIDC_COOKIE_SECURE"]=Falseapp.config["OIDC_CALLBACK_ROUTE"]="/oidc/callback"app.config["OIDC_SCOPES"]=["openid","email","profile"]app.config["SECRET_KEY"]=environ.get("SECRET_KEY")app.config["OIDC_ID_TOKEN_COOKIE_NAME"]="oidc_token"# instantiate OpenID client to handle user sessionoidc=OpenIDConnect(app)# Okta client will determine if a user has an appropriate accountokta_client=UsersClient(environ.get("OKTA_ORG_URL"),environ.get("OKTA_AUTH_TOKEN"))@app.before_requestdefbefore_request():ifoidc.user_loggedin:g.user=okta_client.get_user(oidc.user_getfield("sub"))else:g.user=None@app.route("/lair")@oidc.require_logindeflair():thundercats_lair='<html><head><title>Thundercats, hoooo!</title></head><body><h1>Thundercats now hidden lair.</h1><iframe src="https://giphy.com/embed/ahXtBEbHiraxO" width="480" height="273" frameBorder="0" class="giphy-embed" allowFullScreen></iframe><p><a href="https://giphy.com/gifs/retro-cartoons-thundercats-ahXtBEbHiraxO">via GIPHY</a></p></body></html>'returnResponse(thundercats_lair)@app.route("/")deflanding_page():returnResponse("Thundercats, Thundercats, hoooooooooooo!")@app.route("/login")@oidc.require_logindeflogin():"""Force user to login and then redirect them to the lair."""returnredirect(url_for(".lair"))@app.route("/logout")deflogout():oidc.logout()returnredirect(url_for(".landing_page"))

Refresh the lair page.

Lair page with new GIF.

Alright that's just a little bit better! Go to localhost:5000/logout to unauthenticate your user. When you go to localhost:5000/lair again you will now have to re-authenticate.

What Now?

We just built an example Flask application with user authentication via the Okta API.

Next up try the following tutorials to add other features to your Flask application:

You can also determine what to code next in your Python project by reading the Full Stack Python table of contents page.

Questions? Contact me via Twitter @fullstackpython or @mattmakai. I'm also on GitHub with the username mattmakai.

Something wrong with this post? Fork this page's source on GitHub and submit a pull request.

Peter Bengtsson: The ideal number of workers in Jest

$
0
0

tl;dr; Use --runInBand when running jest in CI and use --maxWorkers=3 on your laptop.

Running out of memory on CircleCI

We have a test suite that covers 236 tests across 68 suites and runs mainly a bunch of enzyme rendering of React component but also some plain old JavaScript function tests. We hit a problem where tests utterly failed in CircleCI due to running out of memory. Several individual tests, before it gave up or failed, reported to take up to 45 seconds.
Turns out, jest tried to use 36 workers because the Docker OS it was running was reporting 36 CPUs.

> circleci@9e4c489cf76b:~/repo$ node
> var os= require('os')
undefined
> os.cpus().length
36

After forcibly setting --maxWorkers=2 to the jest command, the tests passed and it took 20 seconds. Yay!

But that got me thinking, what is the ideal number of workers when I'm running the suite here on my laptop? To find out, I wrote a Python script that would wrap the call CI=true yarn run test --maxWorkers=%(WORKERS) repeatedly and report which number is ideal for my laptop.

After leaving it running for a while it spits out this result:

SORTED BY BEST TIME:
3 8.47s
4 8.59s
6 9.12s
5 9.18s
2 9.51s
7 10.14s
8 10.59s
1 13.80s

The conclusion is vague. There is some benefit to using some small number greater than 1. If you attempt a bigger number it might backfire and take longer than necessary and if you do do that your laptop is likely to crawl and cough.

Notes and conclusions


Made With Mu: Awesome Adafruit: Python, Lasers and Mu!

$
0
0

Limor ‘Ladyada’ Fried, founder of Adafruit and maker extraordinaire, has just released a video demonstrating LIDAR (laser based distance measurement) with CircuitPython and Mu.


The source code and documentation for the library Limor demonstrates can be found on GitHub. Under the hood, it’s an I2C based API which has beed abstracted into something Pythonic. The code example included in the README (reproduced below) demonstrates how easy it is to use the LIDAR sensor with CircuitPython. In only a few lines of code it outputs data which Mu can use with its built-in plotter:

import time
import board
import busio
import adafruit_lidarlite

# Create library object using our Bus I2C port
i2c = busio.I2C(board.SCL, board.SDA)

# Default configuration, with only i2c wires
sensor = adafruit_lidarlite.LIDARLite(i2c)

while True:
    try:
        # We print tuples so you can plot with Mu Plotter
        print((sensor.distance,))
    except RuntimeError as e:
        # If we get a reading error, just print it and keep truckin'
        print(e)
    time.sleep(0.01) # you can remove this for ultra-fast measurements!

Great stuff!

It’s at this point in geeky blog posts that it’s traditional to bring up sharks, lasers and Dr.Evil. Happily, I ironically understand apophasis. ;-)

Podcast.__init__: Building A Game In Python At PyWeek with Daniel Pope

$
0
0
Many people learn to program because of their interest in building their own video games. Once the necessary skills have been acquired, it is often the case that the original idea of creating a game is forgotten in favor of solving the problems we confront at work. Game jams are a great way to get inspired and motivated to finally write a game from scratch. This week Daniel Pope discusses the origin and format for PyWeek, his experience as a participant, and the landscape of options for building a game in Python. He also explains how you can register and compete in the next competition.

Summary

Many people learn to program because of their interest in building their own video games. Once the necessary skills have been acquired, it is often the case that the original idea of creating a game is forgotten in favor of solving the problems we confront at work. Game jams are a great way to get inspired and motivated to finally write a game from scratch. This week Daniel Pope discusses the origin and format for PyWeek, his experience as a participant, and the landscape of options for building a game in Python. He also explains how you can register and compete in the next competition.

Preface

  • Hello and welcome to Podcast.__init__, the podcast about Python and the people who make it great.
  • When you’re ready to launch your next app you’ll need somewhere to deploy it, so check out Linode. With private networking, shared block storage, node balancers, and a 40Gbit network, all controlled by a brand new API you’ve got everything you need to scale up. Go to podcastinit.com/linode to get a $20 credit and launch a new server in under a minute.
  • Visit the site to subscribe to the show, sign up for the newsletter, and read the show notes. And if you have any questions, comments, or suggestions I would love to hear them. You can reach me on Twitter at @Podcast__init__ or email hosts@podcastinit.com)
  • To help other people find the show please leave a review on iTunes, or Google Play Music, tell your friends and co-workers, and share it on social media.
  • Join the community in the new Zulip chat workspace at podcastinit.com/chat
  • Your host as usual is Tobias Macey and today I’m interviewing Daniel Pope about PyWeek, a one week challenge to build a game in Python

Interview

  • Introductions
  • How did you get introduced to Python?
  • Can you start by describing what PyWeek is and how the competition got started?
    • What is your current role in relation to PyWeek and how did you get involved?
  • What are the strengths of the Python lanaguage and ecosystem for developing a game?
  • What are some of the common difficulties encountered by participants in the challenge?
  • What are some of the most commonly used libraries and tools for creating and packaging the games?
  • What are some shortcomings in the available tools or libraries for Python when it comes to game development?
  • What are some examples of libraries or tools that were created and released as a result of a team’s efforts during PyWeek?
  • How often do games that get started during PyWeek continue to be developed and improved?
    • Have there ever been games that went on to be commercially viable?
  • What are some of the most interesting or unusual games that you have seen submitted to PyWeek?
  • Can you describe your experience as a competitor in PyWeek?
    • How do you structure your time during the competition week to ensure that you can complete your game?
  • What are the benefits and difficulties of the one week constraint for development?
  • How has PyWeek changed over the years that you have been involved with it?
  • What are your hopes for the competition as it continues into the future?

Keep In Touch

Picks

Links

The intro and outro music is from Requiem for a Fish The Freak Fandango Orchestra / CC BY-SA

Mike Driscoll: How to Export Jupyter Notebooks into Other Formats

$
0
0

When working with Jupyter Notebook, you will find yourself needing to distribute your Notebook as something other than a Notebook file. The most likely reason is that you want to share the content of your Notebook to non-technical users that don’t want to install Python or the other dependencies necessary to use your Notebook. The most popular solution for exporting your Notebook into other formats is the built-in nbconvert tool. You can use nbconvert to export to the following formats:

  • HTML (–to html)
  • LaTeX (–to latex)
  • PDF (–to pdf)
  • Reveal JS (–to slides)
  • Markdown (md) (–to markdown)
  • ReStructured Text (rst) (–to rst)
  • executable script (–to script)

The nbconvert tool uses Jinja templates to convert your Notebook files (.ipynb) to these other static formats. Jinja is a template engine for Python. The nbconvert tool depends on Pandoc and TeX for some of the conversions that it does. You may need to install these separately on your machine. This is documented on ReadTheDocs.


Using nbconvert

The first thing we need is a Notebook that we want to convert. I did a presentation on Python decorators where I used a Jupyter Notebook. We will use that one. You can get it on Github. If you would like to use something else, feel free to go download your favorite Notebook. I also found this gallery of interesting Notebooks that you could use for too.

The Notebook that we will be using is called Decorators.ipynb. The typical command you use to export using nbconvert is as follows:

jupyter nbconvert <input notebook> --to <output format>

The default output format is HTML. But let’s start out by trying to convert the Decorators Notebook into a PDF:

jupyter nbconvert Decorators.ipynb --to pdf

I won’t mention this for every nbconvert run, but when I ran this command, I got the following output in my terminal:

[NbConvertApp] Converting notebook Decorators.ipynb to pdf
[NbConvertApp] Writing 45119 bytes to notebook.tex[NbConvertApp] Building PDF
[NbConvertApp] Running xelatex 3 times: [u'xelatex', u'notebook.tex'][NbConvertApp] Running bibtex 1time: [u'bibtex', u'notebook'][NbConvertApp] WARNING | bibtex had problems, most likely because there were no citations
[NbConvertApp] PDF successfully created
[NbConvertApp] Writing 62334 bytes to Decorators.pdf

You will see something similar when you convert your Notebook to other formats, although the output will differ obviously. This is what the output looked like:

If you convert a Notebook to reStructuredText or latex, than nbconvert will use pandoc underneath the covers to do the conversion. That means that pandoc is a dependency that you may need to install before you can do a conversion to one of those formats.

Let’s try converting our Notebook to Markdown just to see what we get:

jupyter nbconvert Decorators.ipynb --to markdown

When you run this command, you will get output that looks like this:

Let’s do one conversion of our Notebook. For this conversion, we will turn our Notebook into HTML. The HTML conversion actually has two modes:

  • –template full (default)
  • –template basic

The full version will make the HTML render of the Notebook look very much like a regular Notebook looks when it is in its “interactive view” whereas the basic version uses HTML headers and is mostly aimed at people who want to embed the Notebook in a web page or blog. Let’s give it a try:

jupyter nbconvert Decorators.ipynb --to html

When I ran this, I got a nice single HTML file. If you open the HTML in your web browser, you should see the following:


Converting Multiple Notebooks

The nbconvert utility also supports converting multiple Notebooks at once. If you have a set of Notebooks with similar names, you could use the following command:

jupyter nbconvert notebook*.ipynb --to FORMAT

This would convert all the Notebooks in your folder to the format you specify as long as the Notebook began with “notebook”. You can also just provide a space delimited list of Notebooks to nbconvert:

jupyter nbconvert Decorators.ipynb my_other_notebook.ipynb --to FORMAT

If you have many Notebooks, another method of converting them in bulk is to create a Python script that acts as configuration file. According to this documentation you can create a Python script with the following contents:

c = get_config()
c.NbConvertApp.notebooks = ["notebook1.ipynb", "notebook2.ipynb"]

If you save this, you can then run it using the following command:

jupyter nbconvert --config mycfg.py

This will then convert the listed Notebooks to the format of your choice.


Executing Notebooks

As you might expect, most of the time, Jupyter Notebooks are saved with the output cells cleared. What this means is that when you run the conversion you won’t get the output in your export automatically. To do this feat, you must use the –execute flag. Here is an example:

jupyter nbconvert --execute my_notebook.ipynb --to pdf

Note that the code in your Notebook cannot have any errors or the conversion will fail. This is why I am not using the Decorators Notebook in this example as I have some purposely created cells that fail for demonstration purposes.


Executing Notebooks with Python

You can also create a Python script that you can use to execute your Notebooks programmatically. Let’s write some code that will run all the cells in my Decorators Notebook including the ones that will throw exceptions. Let’s create an empty Python script and name it notebook_runner.py. Enter the following code into your editor:

# notebook_runner.py 
import nbformat
importos 
from nbconvert.preprocessorsimport ExecutePreprocessor
 
 
def run_notebook(notebook_path):
    nb_name, _ = os.path.splitext(os.path.basename(notebook_path))
    dirname = os.path.dirname(notebook_path) 
    with open(notebook_path) as f:
        nb = nbformat.read(f, as_version=4) 
    proc = ExecutePreprocessor(timeout=600, kernel_name='python3')
    proc.allow_errors = True 
    proc.preprocess(nb, {'metadata': {'path': '/'}})
    output_path = os.path.join(dirname, '{}_all_output.ipynb'.format(nb_name)) 
    with open(output_path, mode='wt') as f:
        nbformat.write(nb, f) 
if __name__ == '__main__':
    run_notebook('Decorators.ipynb')

The first items of interest are at the top of the code. Here we import nbformat and a preprocessor from nbconvert.preprocessors that is called ExecutePreprocessor. Next we create a function called run_notebook that accepts a path to the Notebook that we want to run. Inside of this function we extract the file name and the directory name from the path that we passed in.

Then we read the Notebook file using nbformat.read. You will note that you can tell nbformat what version to read the file as. Be sure to set this to match whichever version of Jupyter Notebook you are using. The next step is to instantiate the ExecutePreprocessor class. Here we give it a timeout and the kernel name. If you were using something other than Python this is where you would want to specify that information.

Since we want to ignore errors, we set the allow_errors attribute to True. The default is False. If we hadn’t done this, we would need to wrap the next step in a try/except block. Anyway, we then tell Python to do the preprocessing via the preprocess method call. You will note that we need to pass in the Notebook data that we read as well as tell it where the Notebook is located via a dictionary of metadata. Be sure to update this if your path is different than the one used in this example.

Finally we create the output path and write out our the Notebook to a new location. If you open it up, you should see output for all of the code cells that actually produce output.


Configuration

The nbconvert utility has many configuration options that you can use to customize how it works. For full details, I recommend reading the documentation here.


Wrapping Up

In this article we learned how to export / convert our Jupyter Notebooks into other formats such as HTML, Markdown, and PDF. We also learned that we can convert multiple Notebooks at once in several different ways. Finally we learned different ways to execute a Notebook before exporting it.


PyBites: A Short Primer on Assembers, Compilers and Interpreters

$
0
0

A gentle introduction to the historical evolution of programming practices.

Beginnings

In the early days of computing, hardware was expensive and programmers were cheap. In fact, programmers were so cheap they weren't even called "programmers" and were in fact usually mathematicans or electrical engineers. Early computers were used to solve complex mathematical problems quickly, so mathematicans were a natural fit for the job of "programming".

First a little background on what a program is.

Computers can't do anything by themselves, they require programs to drive their behavior. Programs can be thought of as very detailed recipes that take an input and produce an output. The steps in the recipe are composed of instructions that operate on data. While that sounds complicated, you probably know how this statement works:

1 + 2 = 3

The plus sign is the "instruction" while the numbers 1 and 2 are the data. Mathematically, the equal sign indicates that both sides of an equation are "equivalent", however most computer languages use some variant of equals to mean "assignment". If a computer were executing that statment, it would store the results of the addition, the "3", somewhere in memory.

Computers know how to do math with numbers and move data around the machine's memory heirarchy. I won't say too much about memory except to say it generally comes in two different flavors: fast/small, and slow/big. CPU registers are very fast, very small and act as scratch pads. Main memory is typically very big and not nearly as fast as register memory. CPUs shuffle the data they are working with from main memory to registers and back again while a program executes.

Assembler

Computers were very expensive and people were cheap. Programmers spent endless hours translating hand written math into computer instructions that the computer could execute. The very first computers had terrible user interfaces, some only consisting of toggle switches on the front panel. The switches represented 1s and 0s in a single "word" of memory. The programmer would configure a word, indicate where to store it and then commit the word to memory. It was time consuming and error prone.

Eventually, an electrical engineer decided his time wasn't cheap and wrote a program whose input was a recipe expressed in terms people could read and output a computer readable version. This was the first "assembler" and it was very controversial. The people that owned the expensive machines didn't want to "waste" compute time on a task that people were already doing; albeit slowly and with errors. Over time, people came to appreciate the speed and accuracy of the assembler versus a hand-assembled program and the amount of "real work" done with the computer increased.

While assembler programs were a big step up from toggling bit patterns into the front panel of a machine, they were still pretty specialized. The addition example from above might have looked something like this:

01MOVR0,102MOVR1,203ADDR0,R1,R204MOV64,R005STOR2,R0

Each line is a computer instruction, beginning with a shorthand name of the instruction followed by the data the instruction works on. This little program will first "move" the value 1 into a register called R0, then 2 into register R1. Line 03 adds the contents of registers R0 and R1 and stores the resulting value into register R2. Finally, lines 04 and 05 identify where the result should be stored in main memory (address 64). Mananaging where data is stored in memory is one of the most time consuming and error-prone parts of writing computer programs.

Compiler

Assembly was much better than writing computer instructions by hand, however early programmers yearned to write programs like they were accustomed to writing mathematical formulae. This drove the development of higher level compiled languages, some of which are historical footnotes and others are still in use today. Algo is one such footnote, while real problems continue to be solved today with languages like FORTRAN and C.

These new "high level" langagues allowed programmers to write their programs in simpler terms. In the C language, our addition assembly program would be written as:

intx;x=1+2;

The first statement describes a piece of memory that the program will use. In this case, the memory should be the size of an integer and it's name is 'x'. The second statement is the addition, although written "backwards". A C programmer would read that as "X is assigned the result of one plus two". Notice the programmer doesn't need to say where to put 'x' in memory, the compiler takes care of that.

A new type of program, called a "compiler", would turn the program written in a high level language into an assembly language version and then finally run it thru the assembler to produce a machine-readable version of the program. This composition of programs is often called a "tool chain", in that one program's output is sent directly to another program's input.

The huge advantage of compiled languages over assembly language programs was porting from one computer model or brand to another. In the early days of computing there was an explosion of different types of computing hardware from companies like IBM, Digital Equipment Corporation, Texas Instruments, UNIVAC, Hewlet Packard and others. None of these computers shared much in common besides needing to be plugged in to an electrical power supply. Memory and CPU architectures differed wildly and it often took man-years to translate programs from one computer to another.

With high level languages, it was only necessary to port the compiler tool chain to the new platfrom. Once the compiler was available, high level language programs could be re-compiled for the new computer with little or no modification. Compliation of high level languages was truly revolutionary.

Life was very good now for programmers. It was much easier to express the problems they wanted to solve using high level languages. The cost of computer hardware was falling dramatically due to advances in semiconductors and the invention of integrated chips. Computers were getting faster and more capable in addition to become much less expensive. At some point, in the late 80s possibly, there was an inversion and programmers became more expensive than the hardware they used.

Interpreter

Over time a new programming model arose where a special program called an "interpreter" would read a program and turn it into computer instructions to be executed immediately. The interpreter takes the program as input and interprets it into an intermediate form, much like a compiler. Unlike a compiler, the interpreter then executes the intermediate form of the program. This happens every time an interpreted program runs, whereas a compiled program is only compiled one time and the computer only has to execute the machine instructions "as written".

As a sidenote, when people say that "interpreted programs are slow", that is the main source of the perceived lack of performance. Modern computers are so amazingly capable that most people aren't usually able to tell the difference between compiled and interpreted programs.

Interpreted programs, sometimes called "scripts", are even easier to port to different hardware platforms. Because the script doesn't contain any machine specific instructions, a single version of a program can run on many different computers without change. The catch of course is the interpreter must be ported to the new machine to make that possible.

One example of a very popular interpreted language is Python. A complete python expression of our addition problem would be:

x=1+2

While it looks and acts much like the C version, it lacks the variable initialization statement. There are other differences which are beyond the scope of this article, but you can see that we are able to write a computer program that is very close to how a mathematician would write it by hand with pencil and paper.


Keep Calm and Code in Python!

-- Erik

PyBites: Code Challenge 53 - Query the Spotify API - Review

$
0
0

In this article we review last week's Query the Spotify API code challenge.

Reminder: new structure review post / Hacktoberfest is back!

From now on we will merge our solution into our Community branch and include anything noteworthy here, because:

  • we are learning just like you, we are all equals :)

  • we need the PRs too ;) ... as part of Hacktoberfest No. 5 that just kicked of (5 PRs and you get a cool t-shirt)

Don't be shy, share your work!

Community Pull Requests

20+ PRs this week, wow!

$ git pull origin community
...
104 files changed, 242507 insertions(+)

Check out the awesome PRs by our community for PCC53 (or from fork: git checkout community && git merge upstream/community):

Some learnings for PCC53:

Spotify Web apis are not so straight forward. It takes a bit of time to understand the type of Authorization approach to call the APIs. I've started with Spotipy module and did a test run. Once all good, I've walked through the Spotipy code in github and coded my own Wrapper classes.

The Spotify API was more complex than I realised. Had to wrap my head around their authentication which was tough. Parsing the returned super nested dict was also a bit of a challenge. Once I figured that out though it was a matter of presenting it. I wrapped it all in Flask so that was fun!

Always nice to keep practicing Flask and Web APIs. Funny to see that out of Git's 200 additions, 152 lines are html/css and the Python took no more than 30 lines, awesome when you can just plug these robust libraries in!

Read Code for Fun and Profit

You can look at all submitted code here and/or on our Community branch.

Other learnings we spotted in Pull Requests for other challenges this week:

(PCC01) I learned a shortcut using .read().splitlines() instead of .readlines() and requiring me to .split() afterwords.

(PCC02) Learned about itertools.permutations.

(PCC03) I got introduced to difflib.SequenceMatcher and itertools.product. Which are both very nice and I learned about a method of the Counter object called most_common which I didn't know about yet.

(PCC19) Interacted with any Google API for the first time. Learned about doing an HTTP POST. Learning about clean code. Explored .gitignore

(PCC22) Learned a lot on web scraping, selenium and email notifications.

(PCC28) New package 'bokeh'!. So easy to plot the data!. Python ecosystem for visualization is awesome. It's a good challenge to get hands own on Flask and Bokeh.

(PCC42) Find consecutive equal words, how to handle greedy regex

(PCC44) This was a good challenge to go back to the basics of Data analysis (cleaning, parsing and manipulate).

We are happy to include more detailed learning, just send us a quotable blurb for this post when preparing your PR on our platform.

Thanks to everyone for your participation in our blog code challenges!

Keep the PRs coming, again this month it counts for Hacktoberfest!

Need more Python Practice?

Subscribe to our blog (sidebar) to get a new PyBites Code Challenge (PCC) in your inbox every start of the week.

And/or take any of our 50+ challenges on our platform.

Prefer coding self contained exercises in the comfort of your browser? Try our growing collection of Bites of Py.

Want to do the #100DaysOfCode but not sure what to work on? Take our course and/or start logging your progress on our platform.


Keep Calm and Code in Python!

-- Bob and Julian

PyBites: Code Challenge 54 - Python Clipboard History

$
0
0

It's not that I'm so smart, it's just that I stay with problems longer. - A. Einstein

Hey Pythonistas,

It's time for another code challenge! This week we're asking you to create your own Clipboard History Tool in Python.

This is something that we've been wanting to do for a while so we're looking forward to seeing what you come up with!

The Challenge

The idea here is to capture whatever the user copies to the clipboard (think CTRL C) and "store" it in some way such that the user can see the history of everything they've copied for later reference.

  • A great starting point would be to look at the pyperclip module for Python.

  • This can be as simple or as complex as you like. If all you manage to do is get the basics down, that's fine!

  • Consider creating a GUI!

  • How will you store text copied to the clipboard? Persistent storage or will the history be wiped every time the script is stopped and started?

  • How far back will your historical data go?

If you need help getting ready with Github, see our new instruction video.

PyBites Community

A few more things before we take off:

  • Do you want to discuss this challenge and share your Pythonic journey with other passionate Pythonistas? Confirm your email on our platform then request access to our Slack via settings.

  • PyBites is here to challenge you because becoming a better Pythonista requires practice, a lot of it. For any feedback, issues or ideas use GH Issues, tweet us or ping us on our Slack.


>>>frompybitesimportBob,JulianKeepCalmandCodeinPython!

PyCon: Hatchery Program Returns for 2019

$
0
0
PyCon is known around the world as the Python community’s premier event, attracting people from 39 countries. Outside of the main track of talks, PyCon is home to a growing number of events such as Young Coders, the Education Summit, Language Summit, Poster Session, and most recently the PyCon Charlas. The conference strives to be globally representative by promoting diversity and inclusion through these additional events and outreach programs.
Our community works to approach these goals year on year. While we regularly receive requests to add events to PyCon, we have not had an established process for accepting and evaluating the community’s suggestions. By introducing the PyCon Hatchery Program in 2018, we took an initial step to introduce a long term process for evolving PyCon.

What is our goal?

We want to support our community and enable them to add events to PyCon that are important to our community. The long-term goals of this program are to support and grow sustainable programs that will become a recurring part of PyCon or find their place as a stand-alone event in the future. Programs that may be of specific temporal interest are also welcome, but will generally be given lower priority.
Our goal is to continue improving our community through inclusivity and diversity efforts. We believe that PyCon is a well suited venue to lead these efforts. The organizers of PyCon are responsible for the largest public event in the community, have the highest notoriety for a Python conference, and can bring in the most funding to support these efforts directly. We also hope that other international conferences, regional conferences, and local user groups can find inspiration in these efforts as they have in the past adapting components of PyCon into their own organizing.

What steps have we taken?

At the 2018 conference, we assigned one room equipped similarly to other PyCon events for the hatchery program.
October 24, 2017 through January 3, 2018 we accepted proposals for the hatchery program. An ad-hoc group of the Conference Chair, PSF Directors, and community volunteers reviewed the proposals, discussed, and requested any necessary clarification from the proposers.
Initially we wanted to gauge interest for this type of program, by launching in 2018 using a lightweight process we gained experience, were able to see how many proposals we might be able to expect, and learned a bit more about what kind of programs the community might propose.
At the end of the process, we accepted the PyCon Charlas as our first Hatchery program and introduced it on January 26th, 2018. You can read the announcement blog post here.
PyCon Charlas was welcomed by attendees and had a successful day of talks in Spanish, with speakers originating from Spain and Latin America covering a wide spectrum from astronomy to functional programming. By scheduling the track’s slots in line with the concurrently running PyCon talks track attendees were able to drop in to Charlas for a single talk, attend the whole day, or anything in between.
We’re looking forward to PyCon Charlas returning for 2019 and are excited to include their CFP launch as part of PyCon 2019’s CFP.

What will change for 2019

The proposals we received and process we used for 2018 were excellent experience as we continue to develop the program. This year we will generally be maintaining the same process with a few updates.
  • We’re excited to welcome Naomi Ceder as the Chair of the PyCon Hatchery program. Naomi has an impeccable track record as a leader in developing new programs at PyCon and that experience will be well applied in helping to carry the Hatchery program forward and developing it further.
  • Updates to the Hatchery CFP. We clarify that any and all concepts for PyCon events are welcome, not just talk tracks! We also reaffirm the community nature of the Hatchery program to better state our intent.
  • Internal improvements for the review process including better specified commitments for reviewers and a more explicit timeline for the review phase.

Looking toward the future

The PyCon Hatchery Program is positioned to become a fundamental part of how PyCon as a conference adapts to best serve the Python community as it grows and changes with time. With Naomi taking on the leadership role, I’m confident that the Hatchery Program will bring new and important programs for attendees of PyCon.
The Hatchery Program CFP is open now. You can find the details here. Proposals will be accepted through January 3, 2019 AoE.

Mike Driscoll: Python: World’s Most Popular Language in 2018

$
0
0

According to The Economist, Python is “becoming the world’s most popular coding language”.

Here’s a chart that shows how popular the language is:

There’s a lot of interesting information in that article and there’s some interesting conversation going on in this Reddit thread which is related to the article.

Python Engineering at Microsoft: Python in Visual Studio Code – September 2018 Release

$
0
0

We are pleased to announce that the September 2018 release of the Python Extension for Visual Studio Code is now available. You can download the Python extension from the marketplace, or install it directly from the extension gallery in Visual Studio Code. You can learn more about Python support in Visual Studio Code in the documentation.

In this release we have closed a total of 45 issues, including:

  • Automatic activation of environments in the terminal.
  • Support for Python environments in split terminals.
  • Debugger support for the breakpoint() built-in.
  • Improved Go To Definition and find all references in the Python Language Server.
  • Reduced CPU and Memory consumption in the Python Language Server.

Also be sure to check out the September Update to Visual Studio Code, which includes a new custom title and menu bar on windows and the tutorial on how to Use Django in Visual Studio Code.

Automatic Activation of Environments in the Terminal

When you create a new terminal, the extension now automatically activates the selected Python pipenv, conda, pyenv, or virtual environment so that you can run python and pip/conda commands. In the below screenshot we have the 'env' virtual environment selected (as indicated in the status bar) and then created a new terminal using Terminal > New Terminal (Ctrl+Shift+`), and the virtual environment is activated automatically when the terminal is created:

You no longer need to use the Python: Create Terminal command to create an activated Python terminal (terminals with a Python environment activated).

It is also possible to use activated Python terminals in split terminal mode.  The extension uses the selected Python environment at the time the terminal is created, so if you want to have terminals with two different environments activated, you can change your environment and create a new terminal.

The screenshot below shows two different Python environments side-by-side terminals, resulting from clicking on the Python interpreter in the status bar and changing it to 'otherenv' and then clicking the split icon in the terminal:

The extension now shows the name of the environment in the status bar, making it easy to determine which environment is active if you have multiple environments in your workspace.

If you are not seeing your environment selected, you may need to first open a Python file to load the Python extension, or if the terminal was created before an environment was selected you may need to create a new terminal. Note that global interpreters do not get activated in terminals, so you'll need to run those using e.g. python3 (Linux/macOS) or py -3 (Windows).

Debugger Improvements

The debugger now supports the breakpoint() built-in in Python 3.7. If you are on Python 3.7 you can add a breakpoint() call, and the debugger will automatically stop on that line when it is hit (you must already be running under the debugger for this functionality; it will not launch the debugger automatically for you).

In the below example the debugger stops on a breakpoint() call inside of a Django view:

The extension now displays auto-complete for expressions typed into the debug console, after hitting the above breakpoint we can get auto-complete for the request object in the debug-console:

Improvements to Language Server Preview

We've made improvements to the preview of the Microsoft Python Language Server, first released in the July release of the Python extension. In this release we have fixed cases where runaway CPU and Memory consumption caused by storing too many symbols, particularly when using the outline view, and fixed various issues where Find All References and Go to Definition weren’t working as expected.

Rename symbol is also available with the language server without installing rope, to rename a symbol right->click and select Rename Symbol (F2).

As a reminder, to opt-in to the language server, change the python.jediEnabled setting to false in File > Preferences > User Settings. We are working towards making the language server the default in future releases.

Various Fixes and Enhancements

This release includes a number of other fixes an enhancements to the Python extension, the ptvsd 4.1.3 release of the debugger, and the Microsoft Python Language Server 2018.9.0 release. The full list is improvements is available in our changelog, some notable ones include:

  • Files on network drives can now be debugged. #786, #817
  • Support for code completion in the debug console window. (#1076)
  • Display notification when attempting to debug without selecting a python interpreter. (#2494)
  • Add support for activation of pyenv environments in the Terminal. (#1526)
  • Search for default known paths for conda environments on windows. (#2794)
  • Use full path to activate command in conda environments on windows when python.condaPath is set. (#2753)

Be sure to download the Python extension for VS Code now to try out the above improvements. If you run into any issues be sure to file an issue on the Python VS Code GitHub page.

Mike Driscoll: Python 101: Episode #28 – An intro to Testing

Continuum Analytics Blog: Bringing Dataframe Acceleration to the GPU with RAPIDS Open-Source Software from NVIDIA

$
0
0

Today we are excited to talk about the RAPIDS GPU dataframe release along with our partners in this effort: NVIDIA, BlazingDB, and Quansight. RAPIDS is the culmination of 18 months of open source development to address a common need in data science: fast, scalable processing of tabular data for extract-transform-load (ETL) operations. ETL tasks typically …
Read more →

The post Bringing Dataframe Acceleration to the GPU with RAPIDS Open-Source Software from NVIDIA appeared first on Anaconda.

Python Software Foundation: Python Software Foundation Fellow Members for Q3 2018

$
0
0
We are happy to announce our 2018 3rd Quarter Python Software Foundation Fellow Members: 

Stefan Behnel

Blog, Github
Andrew Godwin
Website, Twitter
David Markey
Eduardo Mendes
Github, Twitter, LinkedIn
Claudiu Popa
Github

Congratulations! Thank you for your continued contributions. We have added you to our Fellow roster online.

The above members have contributed to the Python ecosystem by maintaining popular libraries/tools, organizing Python events, hosting Python meet ups, teaching via YouTube videos, contributing to CPython, and overall being great mentors in our community. Each of them continues to help make Python more accessible around the world. To learn more about the new Fellow members, check out their links above.

If you would like to nominate someone to be a PSF Fellow, please send a description of their Python accomplishments and their email address to psf-fellow at python.org. Here is the nomination review schedule for 2018:

  • Q4: October to the end of December (01/10 - 31/12) Cut-off for quarter four will be November 20. New fellows will be announced before December 31. 

We are looking for a few more voting members to join the Work Group to help review nominations. If you are a PSF Fellow and would like to join, please write to psf-fellow at python.org.
Viewing all 22639 articles
Browse latest View live


<script src="https://jsc.adskeeper.com/r/s/rssing.com.1596347.js" async> </script>