Quantcast
Channel: Planet Python
Viewing all 23136 articles
Browse latest View live

PyCharm: Webinar Recording: “Getting the Most Out of Django’s User Model” with Julia Looney

$
0
0

Yesterday we hosted Julia Looney for a webinar on Django user models. Julia has spoken on this topic at recent conferences and we were fortunate to have her with us. Julia’s slides, repositories, and the recording are now available.

During the webinar, Julia gave an overview of 3 options for custom user models:

  • Proxy Model
  • One-to-One Relationship
  • Custom User Model

-PyCharm Team-
The Drive to Develop


Real Python: Working With JSON Data in Python

$
0
0

Since its inception, JSON has quickly become the de facto standard for information exchange. Chances are you’re here because you need to transport some data from here to there. Perhaps you’re gathering information through an API or storing your data in a document database. One way or another, you’re up to your neck in JSON, and you’ve got to Python your way out.

Luckily, this is a pretty common task, and—as with most common tasks—Python makes it almost disgustingly easy. Have no fear, fellow Pythoneers and Pythonistas. This one’s gonna be a breeze!

So, we use JSON to store and exchange data? Yup, you got it! It’s nothing more than a standardized format the community uses to pass data around. Keep in mind, JSON isn’t the only format available for this kind of work, but XML and YAML are probably the only other ones worth mentioning in the same breath.

A (Very) Brief History of JSON

Not so surprisingly, JavaScript Object Notation was inspired by a subset of the JavaScript programming language dealing with object literal syntax. They’ve got a nifty website that explains the whole thing. Don’t worry though: JSON has long since become language agnostic and exists as its own standard, so we can thankfully avoid JavaScript for the sake of this discussion.

Ultimately, the community at large adopted JSON because it’s easy for both humans and machines to create and understand.

Look, it’s JSON!

Get ready. I’m about to show you some real life JSON—just like you’d see out there in the wild. It’s okay: JSON is supposed to be readable by anyone who’s used a C-style language, and Python is a C-style language…so that’s you!

{"firstName":"Jane","lastName":"Doe","hobbies":["running","sky diving","singing"],"age":35"children":[{"firstName":"Alice","age":6},{"firstName":"Bob","age":8}]}

As you can see, JSON supports primitive types, like strings and numbers, as well as nested lists and objects.

Wait, that looks like a Python dictionary! I know, right? It’s pretty much universal object notation at this point, but I don’t think UON rolls off the tongue quite as nicely. Feel free to discuss alternatives in the comments.

Whew! You survived your first encounter with some wild JSON. Now you just need to learn how to tame it.

Python Supports JSON Natively!

Python comes with a built-in package called json for encoding and decoding JSON data.

Just throw this little guy up at the top of your file:

importjson

A Little Vocabulary

The process of encoding JSON is usually called serialization. This term refers to the transformation of data into a series of bytes (hence serial) to be stored or transmitted across a network. You may also hear the term marshaling, but that’s a whole other discussion. Naturally, deserialization is the reciprocal process of decoding data that has been stored or delivered in the JSON standard.

Yikes! That sounds pretty technical. Definitely. But in reality, all we’re talking about here is reading and writing. Think of it like this: encoding is for writing data to disk, while decoding is for reading data into memory.

Serializing JSON

What happens after a computer processes lots of information? It needs to take a data dump. Accordingly, the json library exposes the dump() method for writing data to files. There is also a dumps() method (pronounced as “dump-s”) for writing to a Python string.

Simple Python objects are translated to JSON according to a fairly intuitive conversion.

PythonJSON
dictobject
list, tuplearray
strstring
int, long, floatnumber
Truetrue
Falsefalse
Nonenull

A Simple Serialization Example

Imagine you’re working with a Python object in memory that looks a little something like this:

data={'president':{'name':"Zaphod Beeblebrox",'species':"Betelgeusian"}}

It is critical that you save this information to disk, so your mission is to write it to a file.

Using Python’s context manager, you can create a file called data_file.json and open it in write mode. (JSON files conveniently end in a .json extension.)

withopen('data_file.json','w')aswrite_file:json.dump(data,write_file)

Note that dump() takes two positional arguments: (1) the data object to be serialized, and (2) the file-like object to which the bytes will be written.

Or, if you were so inclined as to continue using this serialized JSON data in your program, you could write it to a native Python str object.

json_string=json.dumps(data)

Notice that the file-like object is absent since you aren’t actually writing to disk. Other than that, dumps() is just like dump().

Hooray! You’ve birthed some baby JSON, and you’re ready to release it out into the wild to grow big and strong.

Some Useful Keyword Arguments

Remember, JSON is meant to be easily readable by humans, but readable syntax isn’t enough if it’s all squished together. Plus you’ve probably got a different programming style than me, and it might be easier for you to read code when it’s formatted to your liking.

NOTE: Both the dump() and dumps() methods use the same keyword arguments.

The first option most people want to change is whitespace. You can use the indent keyword argument to specify the indentation size for nested structures. Check out the difference for yourself by using data, which we defined above, and running the following commands in a console:

>>> json.dumps(data)>>> json.dumps(data,indent=4)

Another formatting option is the separators keyword argument. By default, this is a 2-tuple of the separator strings (", ", ": "), but a common alternative for compact JSON is (",", ":"). Take a look at the sample JSON again to see where these separators come into play.

There are others, like sort_keys, but I have no idea what that one does. You can find a whole list in the docs if you’re curious.

Deserializing JSON

Great, looks like you’ve captured yourself some wild JSON! Now it’s time to whip it into shape. In the json library, you’ll find load() and loads() for turning JSON encoded data into Python objects.

Just like serialization, there is a simple conversion table for deserialization, though you can probably guess what it looks like already.

JSONPython
objectdict
arraylist
stringstr
number (int)int
number (real)float
trueTrue
falseFalse
nullNone

Technically, this conversion isn’t a perfect inverse to the serialization table. That basically means that if you encode an object now and then decode it again later, you may not get exactly the same object back. I imagine it’s a bit like teleportation: break my molecules down over here and put them back together over there. Am I still the same person?

In reality, it’s probably more like getting one friend to translate something into Japanese and another friend to translate it back into English. Regardless, the simplest example would be encoding a tuple and getting back a list after decoding, like so:

>>> blackjack_hand=(8,'Q')>>> encoded_hand=json.dumps(blackjack_hand)>>> decoded_hand=json.loads(encoded_hand)>>> blackjack_hand==decoded_handFalse>>> type(blackjack_hand)<class 'tuple'>>>> type(decoded_hand)<class 'list'>>>> blackjack_hand==tuple(decoded_hand)True

A Simple Deserialization Example

This time, imagine you’ve got some data stored on disk that you’d like to manipulate in memory. You’ll still use the context manager, but this time you’ll open up the existing data_file.json in read mode.

withopen('data_file.json','r')asread_file:data=json.load(read_file)

Things are pretty straightforward here, but keep in mind that the result of this method could return any of the allowed data types from the conversion table. This is only important if you’re loading in data you haven’t seen before. In most cases, the root object will be a dict or a list.

If you’ve pulled JSON data in from another program or have otherwise obtained a string of JSON formatted data in Python, you can easily deserialize that with loads(), which naturally loads from a string:

json_string="""{"researcher": {"name": "Ford Prefect","species": "Betelgeusian","relatives": [            {"name": "Zaphod Beeblebrox","species": "Betelgeusian"            }        ]    }}"""data=json.loads(json_string)

Voilà! You’ve tamed the wild JSON, and now it’s under your control. But what you do with that power is up to you. You could feed it, nurture it, and even teach it tricks. It’s not that I don’t trust you…but keep it on a leash, okay?

A Real World Example (sort of)

For your introductory example, you’ll use JSONPlaceholder, a great source of fake JSON data for practice purposes.

First create a script file called scratch.py, or whatever you want. I can’t really stop you.

You’ll need to make an API request to the JSONPlaceholder service, so just use the requests package to do the heavy lifting. Add these imports at the top of your file:

importjsonimportrequests

Now, you’re going to be working with a list of TODOs cuz like…you know, it’s a rite of passage or whatever.

Go ahead and make a request to the JSONPlaceholder API for the /todos endpoint. If you’re unfamiliar with requests, there’s actually a handy json() method that will do all of the work for you, but you can practice using the json library to deserialize the text attribute of the response object. It should look something like this:

response=requests.get('https://jsonplaceholder.typicode.com/todos')todos=json.loads(response.text)

You don’t believe this works? Fine, run the file in interactive mode and test it for yourself. While you’re at it, check the type of todos. If you’re feeling adventurous, take a peek at the first 10 or so items in the list.

>>> todos==response.json()True>>> type(todos)<class 'list'>>>> todos[:10]...

See, I wouldn’t lie to you, but I’m glad you’re a skeptic.

What’s interactive mode? Ah, I thought you’d never ask! You know how you’re always jumping back and forth between the your editor and the terminal? Well, us sneaky Pythoneers use the -i interactive flag when we run the script. This is a great little trick for testing code because it runs the script and then opens up an interactive command prompt with access to all the data from the script!

All right, time for some action. You can see the structure of the data by visiting the endpoint in a browser, but here’s a sample TODO:

{"userId":1,"id":1,"title":"delectus aut autem","completed":false}

There are multiple users, each with a unique userId, and each task has a Boolean completed property. Can you determine which users have completed the most tasks?

# Map of userId to number of complete TODOs for that usertodos_by_user={}# Increment complete TODOs count for each user.fortodointodos:iftodo["completed"]:try:# Increment the existing user's count.todos_by_user[todo["userId"]]+=1exceptKeyError:# This user has not been seen. Set their count to 1.todos_by_user[todo["userId"]]=1# Create a sorted list of (userId, num_complete) pairs.top_users=sorted(todos_by_user.items(),key=lambdax:x[1],reverse=True)# Get the maximum number of complete TODOs.max_complete=top_users[0][1]# Create a list of all users who have completed# the maximum number of TODOs.users=[]foruser,num_completeintop_users:ifnum_complete<max_complete:breakusers.append(str(user))max_users=' and '.join(users)

Yeah, yeah, your implementation is better, but the point is, you can now manipulate the JSON data as a normal Python object!

I don’t know about you, but when I run the script interactively again, I get the following results:

>>> s='s'iflen(users)>1else''>>> print(f"user{s} {max_users} completed {max_complete} TODOs")users 5 and 10 completed 12 TODOs

That’s cool and all, but you’re here to learn about JSON. For your final task, you’ll create a JSON file that contains the completed TODOs for each of the users who completed the maximum number of TODOs.

All you need to do is filter todos and write the resulting list to a file. For the sake of originality, you can call the output file filtered_data_file.json. There are may ways you could go about this, but here’s one:

# Define a function to filter out completed TODOs # of users with max completed TODOS.defkeep(todo):is_complete=todo["completed"]has_max_count=todo["userId"]inusersreturnis_completeandhas_max_count# Write filtered TODOs to file.withopen("filtered_data_file.json",'w')asdata_file:filtered_todos=list(filter(keep,todos))json.dump(filtered_todos,data_file,indent=2)

Perfect, you’ve gotten rid of all the data you don’t need and saved the good stuff to a brand new file! Run the script again and check out filtered_data_file.json to verify everything worked. It’ll be in the same directory as scratch.py when you run it.

Now that you’ve made it this far, I bet you’re feeling like some pretty hot stuff, right? Don’t get cocky: humility is a virtue. I am inclined to agree with you though. So far, it’s been smooth sailing, but you might want to batten down the hatches for this last leg of the journey.

Encoding and Decoding Custom Python Objects

What happens when we try to serialize the Elf class from that Dungeons & Dragons app you’re working on?

classElf:def__init__(self,level,ability_scores=None):self.level=levelself.ability_scores={'str':11,'dex':12,'con':10,'int':16,'wis':14,'cha':13}ifability_scoresisNoneelseability_scoresself.hp=10+self.ability_scores['con']

Not so surprisingly, Python complains that Elf isn’t serializable (which you’d know if you’ve ever tried to tell an Elf otherwise):

>>> elf=Elf(level=4)>>> json.dumps(elf)TypeError: Object of type 'Elf' is not JSON serializable

Although the json module can handle most built-in Python types, it doesn’t understand how to encode customized data types by default. It’s like trying to fit a square peg in a round hole—you need a buzzsaw and parental supervision.

Simplifying Data Structures

Now, the question is how to deal with more complex data structures. Well, you could try to encode and decode the JSON by hand, but there’s a slightly more clever solution that’ll save you some work. Instead of going straight from the custom data type to JSON, you can throw in an intermediary step.

All you need to do is represent your data in terms of the built-in types json already understands. Essentially, you translate the more complex object into a simpler representation, which the json module then translates into JSON. It’s like the transitive property in mathematics: if A = B and B = C, then A = C.

To get the hang of this, you’ll need a complex object to play with. You could use any custom class you like, but Python has a built-in type called complex for representing complex numbers, and it isn’t serializable by default. So, for the sake of these examples, your complex object is going to be a complex object. Confused yet?

>>> z=3+8j>>> type(z)<class 'complex'>>>> json.dumps(z)TypeError: Object of type 'complex' is not JSON serializable

Where do complex numbers come from? You see, when a real number and an imaginary number love each other very much, they add together to produce a number which is (justifiably) called complex.

A good question to ask yourself when working with custom types is What is the minimum amount of information necessary to recreate this object? In the case of complex numbers, you only need to know the real and imaginary parts, both of which you can access as attributes on the complex object:

>>> z.real3.0>>> z.imag8.0

Passing the same numbers into a complex constructor is enough to satisfy the __eq__ comparison operator:

>>> complex(3,8)==zTrue

Breaking custom data types down into their essential components is critical to both the serialization and deserialization processes.

Encoding Custom Types

To translate a custom object into JSON, all you need to do is provide an encoding function to the dump() method’s default parameter. The json module will call this function on any objects that aren’t natively serializable. Here’s a simple decoding function you can use for practice:

defencode_complex(z):ifisinstance(z,complex):return(z.real,z.imag)else:type_name=z.__class__.__name__raiseTypeError(f"Object of type '{type_name}' is not JSON serializable")

Notice that you’re expected to raise a TypeError if you don’t get the kind of object you were expecting. This way, you avoid accidentally serializing any Elves. Now you can try encoding complex objects for yourself!

>>> json.dumps(9+5j,default=encode_complex)'[9.0, 5.0]'>>> json.dumps(elf,default=encode_complex)TypeError: Object of type 'Elf' is not JSON serializable

Why did we encode the complex number as a tuple? Great question! That certainly wasn’t the only choice, nor is it necessarily the best choice. In fact, this wouldn’t be a very good representation if you ever wanted to decode the object later, as you’ll see shortly.

The other common approach is to subclass the standard JSONEncoder and override its default() method:

classComplexEncoder(json.JSONEncoder):defdefault(self,z):ifisinstance(z,complex):return(z.real,z.imag)else:super().default(self,z)

Instead of raising the TypeError yourself, you can simply let the base class handle it. You can use this either directly in the dump() method via the cls parameter or by creating an instance of the encoder and calling its encode() method:

>>> json.dumps(2+5j,cls=ComplexEncoder)'[2.0, 5.0]'>>> encoder=ComplexEncoder()>>> encoder.encode(3+6j)'[3.0, 6.0]'

Decoding Custom Types

While the real and imaginary parts of a complex number are absolutely necessary, they are actually not quite sufficient to recreate the object. This is what happens when you try encoding a complex number with the ComplexEncoder and then decoding the result:

>>> complex_json=json.dumps(4+17j,cls=ComplexEncoder)>>> json.loads(complex_json)[4.0, 17.0]

All you get back is a list, and you’d have to pass the values into a complex constructor if you wanted that complex object again. Recall our discussion about teleportation. What’s missing is metadata, or information about the type of data you’re encoding.

I suppose the question you really ought ask yourself is What is the minimum amount of information that is both necessary and sufficient to recreate this object?

The json module expects all custom types to be expressed as objects in the JSON standard. For variety, you can create a JSON file this time called complex_data.json and add the following object representing a complex number:

{"__complex__":true,"real":42,"imag":36}

See the clever bit? That "__complex__" key is the metadata we just talked about. It doesn’t really matter what the associated value is. To get this little hack to work, all you need to do is verify that the key exists:

defdecode_complex(dct):if'__complex__'indct:returncomplex(dct['real'],dct['imag'])returndct

If "__complex__" isn’t in the dictionary, you can just return the object and let the default decoder deal with it.

Every time the load() method attempts to parse an object, you are given the opportunity to intercede before the default decoder has its way with the data. You can do this by passing your decoding function to the object_hook parameter.

Now play the same kind of game as before:

>>> withopen('complex_data.json')ascomplex_data:... data=complex_data.read()... z=json.loads(data,object_hook=decode_complex)... >>> type(z)<class 'complex'>

While object_hook might feel like the counterpart to the dump() method’s default parameter, the analogy really begins and ends there.

This doesn’t just work with one object either. Try putting this list of complex numbers into complex_data.json and running the script again:

[{"__complex__":true,"real":42,"imag":36},{"__complex__":true,"real":64,"imag":11}]

If all goes well, you’ll get a list of complex objects:

>>> withopen('complex_data.json')ascomplex_data:... data=complex_data.read()... numbers=json.loads(data,object_hook=decode_complex)... >>> numbers[(42+36j), (64+11j)]

You could also try subclassing JSONDecoder and overriding object_hook, but it’s better to stick with the lightweight solution whenever possible.

All done!

Congratulations, you can now wield the mighty power of JSON for any and all of your nefarious Python needs.

While the examples you’ve worked with here are certainly contrived and overly simplistic, they illustrate a workflow you can apply to more general tasks:

  1. Import the json package.
  2. Read the data with load() or loads().
  3. Process the data.
  4. Write the altered data with dump() or dumps().

What you do with your data once it’s been loaded into memory will depend on your use case. Generally, your goal will be gathering data from a source, extracting useful information, and passing that information along or keeping a record of it.

Today you took a journey: you captured and tamed some wild JSON, and you made it back in time for supper! As an added bonus, learning the json package will make learning pickle and marshal a snap.

Good luck with all of your future Pythonic endeavors!


[ Improve Your Python With 🐍 Python Tricks 💌 – Get a short & sweet Python Trick delivered to your inbox every couple of days. >> Click here to learn more and see examples ]

Full Stack Python: Monitoring Django Projects with Rollbar

$
0
0

One fast way to scan for exceptions and errors in your Django web application projects is to add a few lines of code to include a hosted monitoring tool.

In this tutorial we will learn to add the Rollbar monitoring service to a web app to visualize any issues produced by our web app. This tutorial will use Django as the web framework to build the web application but there are also tutorials for the Flask and Bottle frameworks as well. You can also check out a list of other hosted and open source tools on the monitoring page.

Our Tools

Python 3 is strongly recommended for this tutorial because Python 2 will no longer be supported starting January 1, 2019. Python 3.6.4 to was used to build this tutorial. We will also use the following application dependencies to build our application:

If you need help getting your development environment configured before running this code, take a look at this guide for setting up Python 3 and Django on Ubuntu 16.04 LTS.

All code in this blog post is available open source on GitHub under the MIT license within the monitor-python-django-apps directory of the blog-code-examples repository. Use and modify the code however you like for your own applications.

Installing Dependencies

Start the project by creating a new virtual environment using the following command. I recommend keeping a separate directory such as ~/venvs/ so that you always know where all your virtualenvs are located.

python3 -m venv monitordjango

Activate the virtualenv with the activate shell script:

source monitordjango/bin/activate

The command prompt will change after activating the virtualenv:

Activate the virtualenv on the command line.

Remember that you need to activate your virtualenv in every new terminal window where you want to use the virtualenv to run the project.

We can now install the Django and Rollbar packages into the activated, empty virtualenv.

pip install django==2.0.4 rollbar==0.13.18

Look for output like the following to confirm the dependencies installed correctly.

Collecting certifi>=2017.4.17 (from requests>=0.12.1->rollbar==0.13.18)
  Downloading certifi-2018.1.18-py2.py3-none-any.whl (151kB)
    100% |████████████████████████████████| 153kB 767kB/s 
Collecting urllib3<1.23,>=1.21.1 (from requests>=0.12.1->rollbar==0.13.18)
  Using cached urllib3-1.22-py2.py3-none-any.whl
Collecting chardet<3.1.0,>=3.0.2 (from requests>=0.12.1->rollbar==0.13.18)
  Using cached chardet-3.0.4-py2.py3-none-any.whl
Collecting idna<2.7,>=2.5 (from requests>=0.12.1->rollbar==0.13.18)
  Using cached idna-2.6-py2.py3-none-any.whl
Installing collected packages: pytz, django, certifi, urllib3, chardet, idna, requests, six, rollbar
  Running setup.py install for rollbar ... done
Successfully installed certifi-2018.1.18 chardet-3.0.4 django-2.0.4 idna-2.6 pytz-2018.3 requests-2.18.4 rollbar-0.13.18 six-1.11.0 urllib3-1.22

We have our dependencies ready to go so now we can write the code for our Django project.

Our Django Web App

Django makes it easy to generate the boilerplate code for new projects and apps using the django-admin.py commands. Go to the directory where you typically store your coding projects. For example, on my Mac I use /Users/matt/devel/py/. Then run the following command to start a Django project named djmonitor:

django-admin.py startproject djmonitor

The command will create a directory named djmonitor with several subdirectories that you should be familiar with when you've previously worked with Django.

Change directories into the new project.

cd djmonitor

Start a new Django app for our example code.

python manage.py startapp billions

Django will create a new folder named billions for our project. Let's make sure our Django URLS work properly before before we write the code for the app.

Now open djmonitor/djmonitor/urls.py and add the highlighted lines so that URLs with the path /billions/ will be routed to the app we are working on.

""" (comments section)"""~~fromdjango.conf.urlsimportincludefromdjango.contribimportadminfromdjango.urlsimportpathurlpatterns=[~~path('billions/',include('billions.urls')),path('admin/',admin.site.urls),]

Save djmonitor/djmonitor/urls.py and open djmonitor/djmonitor/settings.py. Add the billions app to settings.py by inserting the highlighted line, which will become line number 40 after insertion:

# Application definitionINSTALLED_APPS=['django.contrib.admin','django.contrib.auth','django.contrib.contenttypes','django.contrib.sessions','django.contrib.messages','django.contrib.staticfiles',~~'billions',]

Save and close settings.py.

Reminder: make sure you change the default DEBUG and SECRET_KEY values in settings.py before you deploy any code to production. Secure your app properly with the information from Django production deployment checklist so that you do not add your project to the list of hacked applications on the web.

Next change into the djmonitor/billions directory. Create a new file named urls.py that will be specific to the routes for the billions app within the djmonitor project.

Add the following lines to the currently-blank djmonitor/billions/urls.py file.

fromdjango.conf.urlsimporturlfrom.importviewsurlpatterns=[url(r'(?P<slug>[\wa-z-]+)',views.they,name="they"),]

Save djmonitor/billions/urls.py. One more file before we can test that our simple Django app works. Open djmonitor/billions/views.py.

fromdjango.core.exceptionsimportPermissionDeniedfromdjango.shortcutsimportrenderdefthey(request,slug):ifslugandslug=="are":returnrender(request,'billions.html',{})else:raisePermissionDenied("Hmm, can't find what you're looking for.")

Create a directory for your template files named templates under the djmonitor/billions app directory.

mkdir templates

Within templates create a new file named billions.html that contains the following Django template markup.

<!DOCTYPE html><html><head><title>They... are BILLIONS!</title></head><body><h1><ahref="http://store.steampowered.com/app/644930/They_Are_Billions/">They Are Billions</a></h1><imgsrc="https://media.giphy.com/media/2jUHXTGhGo156/giphy.gif"></body></html>

Alright, all of our files are in place so we can test the application. Within the base directory of your project run the Django development server:

python manage.py runserver

The Django development server will start up with no issues other than an unapplied migrations warning.

(monitordjango) $ python manage.py runserver
Performing system checks...

System check identified no issues (0 silenced).

You have 14 unapplied migration(s). Your project may not work properly until you apply the migrations for app(s): admin, auth, contenttypes, sessions.
Run 'python manage.py migrate' to apply them.

April 08, 2018 - 19:06:44
Django version 2.0.4, using settings 'djmonitor.settings'
Starting development server at http://127.0.0.1:8000/
Quit the server with CONTROL-C.

Only the /billions/ route will successfully hit our billions app. Try to access "http://localhost:8000/billions/are/". We should see our template render with the gif:

Testing local development server at /billions/are/.

Cool, our application successfully rendered a super-simple HTML page with a GIF of one of my favorite computer games. What if we try another path under /billions/ such as "http://localhost:8000/billions/arenot/"?

403 Forbidden error with any path under /billions/ other than /billions/are/.

Our 403 Forbidden is raised, which is what we expected based on our code. That is a somewhat contrived block of code but let's see how we can catch and report this type of error without changing our views.py code at all. This approach will be much easier on us when modifying an existing application than having to refactor the code to report on these types of errors, if we even know where they exist.

Monitoring with Rollbar

Go to the Rollbar homepage in your browser to add their tool to our Django app.

rollbar.com in Chrome.

Click the "Sign Up" button in the upper right-hand corner. Enter your email address, a username and the password you want on the sign up page.

Sign up for Rollbar.

After the sign up page you will see the onboarding flow where you can enter a project name and select a programming language. For the project name type in "Full Stack Python" (or whatever project name you are working on) then select that you are monitoring a Python-based application.

Create a project named 'Full Stack Python' and select Python for programming language.

Press the "Continue" button at the bottom to move along. The next screen shows us a few instructions on how to add monitoring.

Configure project using your server-side access token.

Let's change our Django project code to let Rollbar collect and aggregate the errors that pop up in our application.

Re-open djmonitor/djmonitor/settings.py and look for the MIDDLEWARE list. Add rollbar.contrib.django.middleware.RollbarNotifierMiddleware as the last item:

MIDDLEWARE=['django.middleware.security.SecurityMiddleware','django.contrib.sessions.middleware.SessionMiddleware','django.middleware.common.CommonMiddleware','django.middleware.csrf.CsrfViewMiddleware','django.contrib.auth.middleware.AuthenticationMiddleware','django.contrib.messages.middleware.MessageMiddleware','django.middleware.clickjacking.XFrameOptionsMiddleware',~~'rollbar.contrib.django.middleware.RollbarNotifierMiddleware',]

Do not close settings.py just yet. Next add the following lines to the bottom of the file. Change the access_token value to your Rollbar server side access token and root to the directory where you are developing your project.

ROLLBAR = {
    'access_token': 'access token from dashboard',
    'environment': 'development' if DEBUG else 'production',
    'branch': 'master',
    'root': '/Users/matt/devel/py/blog-code-examples/monitor-django-apps/djmonitor',
    'patch_debugview': False,
}

If you are uncertain about what your secret token is, it can be found on the Rollbar onboarding screen or "Settings" -> "Access Tokens" within rollbar.com.

Note that I typically store all my environment variables in a .env

We can test that Rollbar is working as we run our application. Run it now using the development server.

python manage.py runserver

Back in your web browser press the "Done! Go to Dashboard" button.

If an event hasn't been reported yet we'll see a waiting screen like this one:

Waiting for events data on the dashboard.

Make sure your Django development still server is running and try to go to "http://localhost:8000/billions/arenot/". A 403 error is immediately reported on the dashboard:

403 Forbidden exceptions on the Rollbar dashboard screen.

We even get an email with the error (which can also be turned off if you don't want emails for every error):

Email report on the errors in your Django application.

Alright we now have monitoring and error reporting all configured for our Django application!

What now?

We learned to catch issues in our Django project using Rollbar and view the errors in Rollbar's interface. Next try out Rollbar's more advanced monitoring features such as:

There is plenty more to learn about in the areas of web development and deployments so keep learning by reading about web frameworks. You can also learn more about integrating Rollbar with Python applications via their Python documentation.

Questions? Let me know via a GitHub issue ticket on the Full Stack Python repository, on Twitter @fullstackpython or @mattmakai.

Do you see a typo, syntax issue or wording that's confusing in this blog post? Fork this page's source on GitHub and submit a pull request with a fix or file an issue ticket on GitHub.

Python Insider: New PyPI launched, legacy PyPI shutting down April 30

$
0
0
New PyPI launched, legacy PyPI shutting down April 30

Starting today, the canonical Python Package Index is at https://pypi.org and uses the new Warehouse codebase.

We announced the https://pypi.org beta on March 26 and your feedback and test usage have helped us get it production-ready.

Monday April 16 (2018-04-16): We launched the new PyPI, redirecting browser traffic and API calls (including "pip install") from pypi.python.org to the new site. The old codebase is still available at https://legacy.pypi.org for now.

Monday April 30 (2018-04-30): We plan to shut down legacy PyPI https://legacy.pypi.org . The address pypi.python.org will continue to redirect to Warehouse.

For more details, see our roadmap: https://wiki.python.org/psf/WarehouseRoadmap

If your site/service links to or uses pypi.python.org, you should start using pypi.org instead: https://warehouse.readthedocs.io/api-reference/integration-guide/#migrating-to-the-new-pypi

Thank you.

-Sumana Harihareswara on behalf of the PyPI Team

Davide Moro: Test automation framework thoughts and examples with Python, pytest and Jenkins

$
0
0
In this article I'll share some personal thoughts about Test Automation Frameworks; you can take inspiration from them if you are going to evaluate different test automation platforms or assess your current test automation solution (or solutions).

Despite it is a generic article about test automation, you'll find many examples explaining how to address some common needs using the Python based test framework named pytest and the Jenkins automation server: use the information contained here just as a comparison and feel free to comment sharing alternative methods or ideas coming from different worlds.

It contains references to some well (or less) known pytest plugins or testing libraries too.

Before talking about automation and test automation framework features and characteristics let me introduce the most important test automation goal you should always keep in mind.

Test automation goals: ROI

You invest in automation for a future return of investment.
Simpler approaches let you start more quickly but in the long term they don't perform well in terms of ROI and vice versa. In addition the initial complexity due to a higher level of abstraction may produce better results in the medium or long term: better ROI and some benefits for non technical testers too. Have a look at the test automation engineer ISTQB certification syllabus for more information:

So what I mean is that test automation is not easy: it doesn't mean just recording some actions or write some automated test procedures because how you decide to automate things affects the ROI. Your test automation strategy should consider your tester technical skills now and future evolutions, considerations about how to improve your system testability (is your software testable?), good test design and architecture/system/domain knowledge. In other words be aware of vendors selling "silver bullet" solutions promising smooth test automation for everyone, especially rec&play solutions: there are no silver bullets.

Test automation solution features and characteristics

A test automation solution should be enough generic and flexible, otherwise there is the risk of having to adopt different and maybe incompatible tools for different kind of tests. Try to imagine the mess of having the following situation: one tool or commercial service for browser based tests only based on rec&play, one tool for API testing only, performance test frameworks that doesn't let you reuse existing scenarios, one tool for BDD only scenarios, different Jenkins jobs with different settings for each different tool, no test management tool integration, etc. A unique solution, if possible, would be better: something that let you choose the level of abstraction and that doesn't force you. Something that let you start simple and that follow your future needs and the skill evolution of your testers.
That's one of the reasons why I prefer pytest over an hyper specialized solution like behave for example: if you combine pytest+pytest-bdd you can write BDD scenarios too and you are not forced to use a BDD only capable test framework (without having the pytest flexibility and tons of additional plugins).

And now, after this preamble, an unordered list of features or characteristics that you may consider for your test automation solution software selection:
  • fine grained test selection mechanism that allows to be very selective when you have to choose which tests you are going to launch
  • parametrization
  • high reuse
  • test execution logs easy to read and analyze
  • easy target environment switch
  • block on first failure
  • repeat your tests for a given amount of times
  • repeat your tests until a failure occurs
  • support parallel executions
  • provide integration with third party software like test management tools
  • integration with cloud services or browser grids
  • execute tests in debug mode or with different log verbosity
  • support random tests execution order (the order should be reproducible if some problems occur thanks to a random seed if needed)
  • versioning support
  • integration with external metrics engine collectors
  • support different levels of abstraction (e.g., keyword driven testing, BDD, etc)
  • rerun last failed
  • integration with platforms that let you test against a large combination of OS and browsers if needed
  • are you able to extend your solution writing or installing third party plugins?
Typically a test automation engineer will be able to drive automated test runs using the framework command line interface (CLI) during test development but you'll find out very soon that you need an automation server for long running tests, scheduled builds, CI and here it comes Jenkins. Jenkins could be used by non technical testers for launching test runs or initialize an environment with some test data.

Jenkins

What is Jenkins? From the Jenkins website:
Continuous Integration and Continuous Delivery. As an extensible automation server, Jenkins can be used as a simple CI server or turned into the continuous delivery hub for any project.
So thanks to Jenkins everyone can launch a parametrized automated test session just using a browser: no command line and nothing installed on your personal computer. So more power to non technical users thanks to Jenkins!

With Jenkins you can easily schedule recurrent automatic test runs, start remotely via external software some parametrized test runs, implement a CI and many other things. In addition as we will see Jenkins is quite easy to configure and manage thanks to through the web configuration and/or Jenkins pipelines.

Basically Jenkins is very good at starting builds and generally jobs. In this case Jenkins will be in charge of launching our parametrized automated test runs.

And now let's talk a little bit of Python and the pytest test framework.

Python for testing

I don't know if there are some articles talking about statistics on the net about the correlation between Test Automation Engineer job offers and the Python programming language, with a comparison between other programming languages. If you find a similar resource share with me please!

My personal feeling observing for a while many Test Automation Engineer job offers (or any similar QA job with some automation flavor) is that the Python word is very common. Most of times is one of the nice to have requirements and other times is mandatory.

Let's see why the programming language of choice for many QA departments is Python, even for companies that are not using Python for building their product or solutions.

Why Python for testing

Why Python is becoming so popular for test automation? Probably because it is more affordable for people with no or little programming knowledge compared to other languages. In addition the Python community is very supportive and friendly especially with new comers, so if you are planning to attend any Python conference be prepared to fall in love with this fantastic community and make new friends (friends, not only connections!). For example at this time of writing you are still in time for attending PyCon Nove 2018 in the beautiful Florence (even better if you like history, good wine, good food and meet great people): 
You can just compare the most classical hello world, for example with Java:
public class HelloWorld {
    public static void main(String[] args) {
        System.out.println("Hello, World!");
    }
}
and compare it with the Python version now:
print("Hello, World!")
Do you see any difference? If you are trying to explain to a non programmer how to print a line in the terminal window with Java you'll have to introduce public, static, void, class, System, installing a runtime environment choosing from different version, installing an IDE, running javac, etc and only at the end you will be able to see something printed on the screen. With Python, most of times it comes preinstalled in many distributions, you just focus on what to need to do. Requirements: a text editor and Python installed. If you are not experienced you start with a simple approach and later you can progressively learn more advanced testing approaches.

And what about test assertions? Compare for example a Javascript based assertions:
expect(b).not.toEqual(c);
with the Python version:
assert b != c
So no expect(a).not.toBeLessThan(b), expect(c >= d).toBeTruthy() or expect(e).toBeLessThan(f): with Python you just say assert a >= 0 so nothing to remember for assertions!

Python is a big fat and very powerful programming language but it follows a "pay only for what you eat" approach.

Why pytest

If Python is the language of your choice you should consider the pytest framework and its high quality community plugins and I think it is a good starting point for building your own test automation solution.

The pytest framework (https://docs.pytest.org/en/latest/) makes it easy to write small tests, yet scales to support complex functional testing for applications and libraries.

Most important pytest features:
  • simple assertions instead of inventing assertion APIs (.not.toEqual or self.assert*)
  • auto discovery test modules and functions
  • effective CLI for controlling what is going to be executed or skipped using expressions
  • fixtures, easy to manage fixtures lifecycle for long-lived test resources and parametrized features make it easy and funny implementing what you found hard and boring with other frameworks
  • fixtures as function arguments, a dependency injection mechanism for test resources
  • overriding fixtures at various levels
  • framework customizations thanks to pluggable hooks
  • very large third party plugins ecosystem
I strongly suggest to have a look at the pytest documentation but I'd like to make some examples showing something about fixtures, code reuse, test parametrization and improved maintainability of your tests. If you are not a technical reader you can skip this section.

I'm trying to explain fixtures with practical examples based on answers and questions:
  • When should be created a new instance of our test resource?
    You can do that with the fixture scope (session, module, class, function or more advanced options like autouse). Session means that your test resource will live for the entire session, module/class for all the tests contained in that module or class, with function you'll have an always fresh instance of your test resource for each test
  • How can I determine some teardown actions at the end of the test resource life?
    You can add a sort of fixture finalizer after the yield line that will be invoked at the end of our test resource lifecycle. For example you can close a connection, wipe out some data, etc.
  • How can I execute all my existing tests using that fixture as many as your fixture configurations?
    You can do that with params. For example you can reuse all your existing tests verifying the integration with different real databases, smtp servers. Or if you have the web application offering the same features deployed with a different look&feel for different brands you can reuse all your existing functional UI tests thanks to pytest's fixture parametrization and a page objects pattern where for different look&feel I don't mean only different CSS but different UI components (e.g. completely different datetime widgets or navigation menu), components disposition in page, etc.
  • How can I decouple test implementation and test data? Thanks to parametrize you can decouple them and write just one time your test implementation. Your test will be executed as many times as your different test data
Here you can see an example of fixture parametrization (the test_smtp will be executed twice because you have 2 different fixture configurations):
import pytest
import smtplib

@pytest.fixture(scope="module",
                        params=["smtp1.com", "smtp2.org"])
def smtp(request):
    smtp = smtplib.SMTP(request.param, 587, timeout=5)
    yield smtp
    print("finalizing %s" % smtp)
    smtp.close()

def test_smtp(smtp):
    # use smtp fixture (e.g., smtp.sendmail(...))
    # and make some assertions.
    # The same test will be executed twice (2 different params)

    ...
 And now an example of test parametrization:
import pytest
@pytest.mark.parametrize("test_input,expected", [
    ("3+5", 8),
    ("2+4", 6),
    ("6*9", 42), ])
def test_eval(test_input, expected):
    assert eval(test_input) == expected
For more info see:
This is only pytest, as we will see there are many pytest plugins that extend the pytest core features.

Pytest plugins

There are hundreds of pytest plugins, the ones I am using more frequently are:
  • pytest-bdd, BDD library for the pytest runner
  • pytest-variables, plugin for pytest that provides variables to tests/fixtures as a dictionary via a file specified on the command line
  • pytest-html, plugin for generating HTML reports for pytest results
  • pytest-selenium, plugin for running Selenium with pytest
  • pytest-splinter, a pytest-selenium alternative based on Splinter. pPytest splinter and selenium integration for anyone interested in browser interaction in tests
  • pytest-xdist, a py.test plugin for test parallelization, distributed testing and loop-on-failures testing modes
  • pytest-testrail, pytest plugin for creating TestRail runs and adding results on the TestRail test management tool
  • pytest-randomly, a pytest plugin to randomly order tests and control random seed (but there are different random order plugins if you search for "pytest random")
  • pytest-repeat, plugin for pytest that makes it easy to repeat a single test, or multiple tests, a specific number of times. You can repeat a test or group of tests until a failure occurs
  • pytest-play, an experimental rec&play pytest plugin that let you execute a set of actions and assertions using commands serialized in JSON format. Makes test automation more affordable for non programmers or non Python programmers for browser, functional, API, integration or system testing thanks to its pluggable architecture and many plugins that let you interact with the most common databases and systems. It provides also some facilitations for writing browser UI actions (e.g., implicit waits before interacting with an input element) and asynchronous checks (e.g., wait until a certain condition is true)
Python libraries for testing:
  • PyPOM, python page object model for Selenium or Splinter 
  • pypom_form, a PyPOM abstraction that extends the page object model applied to forms thanks to declarative form schemas
Scaffolding tools:
  • cookiecutter-qa, generates a test automation project ready to be integrated with Jenkins and with the test management tool TestRail that provides working hello world examples. It is shipped with all the above plugins and it provides examples based on raw splinter/selenium calls, a BDD example and a pytest-play example 
  • cookiecutter-performance, generate a tox based environment based on Taurus bzt for performance test. BlazeMeter ready for distributed/cloud performance tests. Thanks to the bzt/taurus pytest executor you will be able to reuse all your pytest based automated tests for performance tests

Pytest + Jenkins together

We've discussed about Python, pytest and Jenkins main ingredients for our cocktail recipe (shaken, not stirred). Optional ingredients: integration with external test management tools and selenium grid providers.

Thanks to pytest and its plugins you have a rich command line interface (CLI); with Jenkins you can schedule automated builds, setup a CI, let not technical users or other stakeholders executing parametrized test runs or building test always fresh test data on the fly for manual testing, etc. You just need a browser, nothing installed on your computer.

Here you can see how our recipe looks like:


Now lets comment all our features provided by the Jenkins "build with parameters" graphical interface, explaining option by option when and why they are useful.

Target environment (ENVIRONMENT)

In this article we are not talking about regular unit tests, the basis for your testing pyramid. Instead we are talking about system, functional, API, integration, performance tests to be launched against a particular instance of an integrated system (e.g., dev, alpha or beta environments).

You know, unit tests are good they are not sufficient: it is important to verify if the integrated system (sometimes different complex systems developed by different teams under the same or third party organizations) works fine as it is supposed to do. It is important because it might happen that 100% unit tested systems doesn't play well after the integration for many different reasons. So with unit tests you take care about your code quality, with higher test levels you take care about your product quality. Thanks to these tests you can confirm an expected product behavior or criticize your product.

So thanks to the ENVIRONMENT option you will be able to choose one of the target environments. It is important to be able to reuse all your tests and launch them against different environments without having to change your testware code. Under the hood the pytest launcher will be able to switch between different environments thanks to the pytest-variables parametrization using the --variables command line option, where each available option in the ENVIRONMENT select element is bound to a variables files (e.g., DEV.yml, ALPHA.yml, etc) containing what the testware needs to know about the target environment.

Generally speaking you should be able to reuse your tests without any modification thanks to a parametrization mechanism.If your test framework doesn't let you change target environment and it forces you to modify your code, change framework.

Browser settings (BROWSER)

This option makes sense only if you are going to launch browser based tests otherwise it will be ignored for other type of tests (e.g., API or integration tests).

You should be able to select a particular version of browser (latest or a specific version) if any of your tests require a real browser (not needed for API tests just for making one example) and preferably you should be able to integrate with a cloud system that allows you to use any combination of real browsers and OS systems (not only a minimal subset of versions and only Firefox and Chrome like several test platforms online do). Thanks to the BROWSER option you can choose which browser and version use for your browser based tests. Under the hood the pytest launcher will use the --variables command line option provided by the pytest-variables plugin, where each option is bound to a file containing the browser type, version and capabilities (e.g., FIREFOX.yml, FIREFOX-xy.yml, etc). Thanks to pytest, or any other code based testing framework, you will be able to combine browser interactions with non browser actions or assertions.

A lot of big fat warnings about rec&play online platforms for browser testing or if you want to implement your testing strategy using only or too many browser based tests. You shouldn't consider only if they provide a wide range of OS and versions, the most common browsers. They should let you perform also non browser based actions or assertions (interaction with queues, database interaction, http POST/PUT/etc calls, etc). What I mean is that sometimes only a browser is not sufficient for testing your system: it might be good for a CMS but if you are testing an IoT platform you don't have enough control and you will write completely useless tests or low value tests (e.g., pure UI checks instead of testing reactive side effects depending on eternal triggers, reports, device activity simulations causing some effects on the web platform under test, etc).

In addition be aware that some browser based online testing platforms doesn't use Selenium for their browser automation engine under the hood. For example during a software selection I found an online platform using some Javascript injection for implementing user actions interaction inside the browser and this might be very dangerous. For example let's consider a login page that takes a while before the input elements become ready for accepting the user input when some conditions are met. If for some reasons a bug will never unlock the disabled login form behind a spinner icon, your users won't be able to login to that platform. Using Selenium you'll get a failing result in case of failure due to a timeout error (the test will wait for elements won't never be ready to interact with and after few seconds it will raise an exception) and it's absolutely correct. Using that platform the test was green because under the hood the input element interaction was implemented using DOM actions with the final result of having all your users stuck: how can you trust such platform?

OS settings (OS)

This option is useful for browser based tests too. Many Selenium grid vendors provide real browser on real OS systems and you can choose the desired combination of versions.

Resolution settings (RESOLUTION)

Same for the above options, many vendor solutions let you choose the desired screen resolution for automated browser based testing sessions.

Select tests by names expressions (KEYWORDS)

Pytest let you select the tests you are going to launch selecting a subset of tests that matches a pattern language based on test and module names.

For example I find very useful to add the test management tool reference in test names, this way you will be able to launch exactly just that test:
c93466
Or for example all test names containing the login word but not c92411:
login and not c92411
Or if you organize your tests in different modules you can just specify the folder name and you'll select all the tests that live under that module:
api
Under the hood the pytest command will be launched with -k "EXPRESSION", for example
-k "c93466"
It is used in combination with markers, a sort of test tags.

Select tests to be executed by tag expressions (MARKERS)

Markers can be used alone or in conjunction with keyword expressions. They are a sort of tag expression that let you select just the minimum set of tests for your test run.

Under the hood the pytest launcher uses the command line syntax -m "EXPRESSION".

For example you can see a marker expression that selects all tests marked with the edit tag excluding the ones marked with CANBusProfileEdit:
edit and not CANBusProfileEdit
Or execute only edit negative tests: 
edit and negative
Or all integration tests
integration
It's up to you creating granular keywords for features and all you need for select your tests (e.g., functional, integration, fast, negative, ci, etc).

Test management tool integration (TESTRAIL_ENABLE)

All my tests are decorated with the test case identifier provided by the test management tool, in my company we are using TestRail.

If this option is enabled the test results of executed tests will be reported in the test management tool.

Implemented using the pytest-testrail plugin.

Enable debug mode (DEBUG)

The debug mode enables verbose logging.

In addition for browser based tests open selenium grid sessions activating debug capabilities options (https://www.browserstack.com/automate/capabilities). For example verbose browser console logs, video recordings, screenshots for each step, etc. In my company we are using a local installation of Zalenium and BrowserStack automate.

Block on first failure (BLOCK_FIRST_FAILURE)

This option is very useful for the following needs:
  • a new build was deployed and you want to stop on the very first failure for a subset of sanity/smoke tests
  • you are launching repeated, long running, parallel tests and you want to block on first failure
The first usage let you gain confidence with a new build and you want to stop on the very first failure for analyzing what happened.

The second usage is very helpful for:
  • random problems (playing with number of repeated executions, random order and parallelism you can increase the probability of reproducing a random problem in less time)
  • memory leaks
  • testing system robustness, you can stimulate your system running some integration tests sequentially and then augment the parallelism level until your local computer is able to sustain the load. For example launching 24+ parallel integration tests on a simple laptop with pytest running on virtual machine is still fine. If you need something more heavy you can use distribuited pytest-xdist sessions or scale more with BlazeMeter
As you can imagine you may combine this option with COUNT, PARALLEL_SESSIONS, RANDOM_ENABLE and DEBUG depending on your needs. You can test your tests robustness too.

Under the hood implemented using the pytest's -x option.

Parallel test executions (PARALLEL_SESSIONS)

Under the hood implemented with pytest-xdist's command line option called -n NUM and let you execute your tests with the desired parallelism level.

pytest-xdist is very powerful and provides more advanced options and network distributed executions. See https://github.com/pytest-dev/pytest-xdist for further options.

Switch from different selenium grid providers (SELENIUM_GRID_URL)

For browser based testing by default your tests will be launched on a remote grid URL. If you don't touch this option the default grid will be used (a local Zalenium or any other provider) but in case of need you can easily switch provider without having to change nothing in your testware.

If you want you can save money maintaining and using a local Zalenium as default option; Zalenium can be configured as a selenium grid router that will dispatch capabilities that it is not able to satisfy. This way you will be able to save money and augment a little bit the parallelism level without having to change plan.

Repeat test execution for a given amount of times (COUNT)

Already discussed before, often used in conjunction with BLOCK_FIRST_FAILURE (pytest core -x option)

If you are trying to diagnose an intermittent failure, it can be useful to run the same test or group of tests over and over again until you get a failure. You can use py.test's -x option in conjunction with pytest-repeat to force the test runner to stop at the first failure.

Based on pytest-repeat's --count=COUNT command line option.

Enable random test ordering execution (RANDOM_ENABLE)

This option enables random test execution order.

At the moment I'm using the pytest-randomly plugin but there are 3 or 4 similar alternatives I have to try out.

By randomly ordering the tests, the risk of surprising inter-test dependencies is reduced.

Specify a random seed (RANDOM_SEED)

If you get a failure executing a random test, it should be possible to reproduce systematically rerunning the same tests order with the same test data.

Always from the pytest-randomly readme:
By resetting the random seed to a repeatable number for each test, tests can create data based on random numbers and yet remain repeatable, for example factory boy’s fuzzy values. This is good for ensuring that tests specify the data they need and that the tested system is not affected by any data that is filled in randomly due to not being specified.

Play option (PLAY)

This option will be discussed in a dedicated blog post I am going to write.

Basically you are able to paste a JSON serialization of actions and assertions and the pytest runner will be able to execute your test procedure.

You need just a computer with a browser for running any test (API, integration, system, UI, etc). You can paste how to reproduce a bug on a JIRA bug and everyone will be able to paste it on the Jenkins build with parameters form.

See pytest-play for further information.

If you are going to attending next Pycon in Florence don't miss the following pytest-play talk presented by Serena Martinetti:

How to create a pytest project

If you are a little bit curious about how to install pytest or create a pytest runner with Jenkins you can have a look at the following scaffolding tool:
It provides a hello world example that let you start with the test technique more suitable for you: plain selenium scripts, BDD or pytest-play JSON test procedures. If you want you can install page objects library. So you can create a QA project in minutes.

Your QA project will be shipped with a Jenkinsfile file that requires a tox-py36 docker executor that provides a python3.6 environment with tox already installed; unfortunately tox-py36 is not yet public so you should implement it by your own at the moment.
Once you provide a tox-py36 docker executor the Jenkinsfile will create for you the build with parameters Jenkins form for you automatically on the very first Jenkins build for your project.

Conclusions

I hope you'll find some useful information in this article: nice to have features for test frameworks or platform, a little bit of curiosity for the Python world or  new pytest plugin you never heard about.

Feedback and contributions are always welcome.

Tweets about test automation and new articles happens here:

    Montreal Python User Group: Montréal-Python 71 - Burning Yeti

    $
    0
    0

    Hey!

    We are looking for speakers for our next Montreal-Python meetup. Submit your proposals (up to 30 minutes) at team@montrealpython.org or come join us in our Slack if you would like to discuss about it at http://slack.mtlpy.org/

    Cheers!

    When

    Monday, May 7th, 2018, 6:00PM-9:00PM

    Where

    TBD

    Gocept Weblog: “allow-hosts” in buildout considered harmful

    $
    0
    0

    Today we had the following error message when re-installing a project from scratch:

     While:
       Installing.
       Getting section application.
       Initializing section application.
       Installing recipe zc.zope3recipes.
       Getting distribution for 'zc.zope3recipes==0.13.0'.
     Error: Couldn't find a distribution for 'zc.zope3recipes==0.13.0'.

    Yes this is a really old recipe but it still exists on PyPI. We are using zc.buildout in Version 2.10, and do not use a custom index. So being forced to use HTTPS to access PyPI does not seem be the problem.

    After searching way too long we found that .buildout/default.cfg contains the following statement:

    allow-hosts =
       *.python.org
       *.gocept.com
       *.gocept.net
       effbot.org
       dist.plone.org

    It restricts the allowed hosts for download but it seems to restrict the index, too. https://pypi.python.org/simple nowadays redirects to https://pypi.org/simple which is not on the list.

    Suggestion: Remove allow-hosts if possible. It is more harmful than good, especially because packages are nowadays downloaded from https://files.pythonhosted.org.

    Real Python: Python Modules and Packages – An Introduction

    $
    0
    0

    This article explores Python modules and Python packages, two mechanisms that facilitate modular programming.

    Modular programming refers to the process of breaking a large, unwieldy programming task into separate, smaller, more manageable subtasks or modules. Individual modules can then be cobbled together like building blocks to create a larger application.

    There are several advantages to modularizing code in a large application:

    • Simplicity: Rather than focusing on the entire problem at hand, a module typically focuses on one relatively small portion of the problem. If you’re working on a single module, you’ll have a smaller problem domain to wrap your head around. This makes development easier and less error-prone.

    • Maintainability: Modules are typically designed so that they enforce logical boundaries between different problem domains. If modules are written in a way that minimizes interdependency, there is decreased likelihood that modifications to a single module will have an impact on other parts of the program. (You may even be able to make changes to a module without having any knowledge of the application outside that module.) This makes it more viable for a team of many programmers to work collaboratively on a large application.

    • Reusability: Functionality defined in a single module can be easily reused (through an appropriately defined interface) by other parts of the application. This eliminates the need to recreate duplicate code.

    • Scoping: Modules typically define a separate namespace, which helps avoid collisions between identifiers in different areas of a program. (One of the tenets in the Zen of Python is Namespaces are one honking great idea—let’s do more of those!)

    Functions, modules and packages are all constructs in Python that promote code modularization.

    Python Modules: Overview

    There are actually three different ways to define a module in Python:

    1. A module can be written in Python itself.
    2. A module can be written in C and loaded dynamically at run-time, like the re (regular expression) module.
    3. A built-in module is intrinsically contained in the interpreter, like the itertools module.

    A module’s contents are accessed the same way in all three cases: with the import statement.

    Here, the focus will mostly be on modules that are written in Python. The cool thing about modules written in Python is that they are exceedingly straightforward to build. All you need to do is create a file that contains legitimate Python code and then give the file a name with a .py extension. That’s it! No special syntax or voodoo is necessary.

    For example, suppose you have created a file called mod.py containing the following:

    mod.py

    s="If Comrade Napoleon says it, it must be right."a=[100,200,300]deffoo(arg):print(f'arg = {arg}')classFoo:pass

    Several objects are defined in mod.py:

    • s (a string)
    • a (a list)
    • foo() (a function)
    • Foo (a class)

    Assuming mod.py is in an appropriate location, which you will learn more about shortly, these objects can be accessed by importing the module as follows:

    >>> importmod>>> print(mod.s)If Comrade Napoleon says it, it must be right.>>> mod.a[100, 200, 300]>>> mod.foo(['quux','corge','grault'])arg = ['quux', 'corge', 'grault']>>> x=mod.Foo()>>> x<mod.Foo object at 0x03C181F0>

    The Module Search Path

    Continuing with the above example, let’s take a look at what happens when Python executes the statement:

    importmod

    When the interpreter executes the above import statement, it searches for mod.py in a list of directories assembled from the following sources:

    • The directory from which the input script was run or the current directory if the interpreter is being run interactively
    • The list of directories contained in the PYTHONPATH environment variable, if it is set. (The format for PYTHONPATH is OS-dependent but should mimic the PATH environment variable.)
    • An installation-dependent list of directories configured at the time Python is installed

    The resulting search path is accessible in the Python variable sys.path, which is obtained from a module named sys:

    >>> importsys>>> sys.path['', 'C:\\Users\\john\\Documents\\Python\\doc', 'C:\\Python36\\Lib\\idlelib','C:\\Python36\\python36.zip', 'C:\\Python36\\DLLs', 'C:\\Python36\\lib','C:\\Python36', 'C:\\Python36\\lib\\site-packages']

    Note: The exact contents of sys.path are installation-dependent. The above will almost certainly look slightly different on your computer.

    Thus, to ensure your module is found, you need to do one of the following:

    • Put mod.py in the directory where the input script is located or the current directory, if interactive
    • Modify the PYTHONPATH environment variable to contain the directory where mod.py is located before starting the interpreter
        or
      Put mod.py in one of the directories already contained in the PYTHONPATH variable
    • Put mod.py in one of the installation-dependent directories, which you may or may not have write-access to, depending on the OS

    There is actually one additional option: you can put the module file in any directory of your choice and then modify sys.path at run-time so that it contains that directory. For example, in this case, you could put mod.py in directory C:\Users\john and then issue the following statements:

    >>> sys.path.append(r'C:\Users\john')>>> sys.path['', 'C:\\Users\\john\\Documents\\Python\\doc', 'C:\\Python36\\Lib\\idlelib','C:\\Python36\\python36.zip', 'C:\\Python36\\DLLs', 'C:\\Python36\\lib','C:\\Python36', 'C:\\Python36\\lib\\site-packages', 'C:\\Users\\john']>>> importmod

    Once a module has been imported, you can determine the location where it was found with the module’s __file__ attribute:

    >>> importmod>>> mod.__file__'C:\\Users\\john\\mod.py'>>> importre>>> re.__file__'C:\\Python36\\lib\\re.py'

    The directory portion of __file__ should be one of the directories in sys.path.

    The import Statement

    Module contents are made available to the caller with the import statement. The import statement takes many different forms, shown below.

    import <module_name>

    The simplest form is the one already shown above:

    import<module_name>

    Note that this does not make the module contents directly accessible to the caller. Each module has its own private symbol table, which serves as the global symbol table for all objects defined in the module. Thus, a module creates a separate namespace, as already noted.

    The statement import <module_name> only places <module_name> in the caller’s symbol table. The objects that are defined in the module remain in the module’s private symbol table. From the caller, objects in the module are only accessible when prefixed with <module_name> via dot notation, as illustrated below:

    After the following import statement, mod is placed into the local symbol table. Thus, mod has meaning in the caller’s local context:

    import modmod<module 'mod' from 'C:\\Users\\john\\Documents\\Python\\doc\\mod.py'>

    But s and foo remain in the module’s private symbol table and are not meaningful in the local context:

    sTraceback (most recent call last):> File "<pyshell#58>", line 1, in <module>> sNameError: name 's' is not definedfoo('quux')Traceback (most recent call last):> File "<pyshell#59>", line 1, in <module>> foo('quux')NameError: name 'foo' is not defined

    To be accessed in the local context, names of objects defined in the module must be prefixed by mod:

    mod.s'If Comrade Napoleon says it, it must be right.'mod.foo('quux')arg = quux

    Several comma-separated modules may be specified in a single import statement:

    import<module_name>[,<module_name>...]

    from <module_name> import <name(s)>

    An alternate form of the import statement allows individual objects from the module to be imported directly into the caller’s symbol table:

    from<module_name>import<name(s)>

    Following execution of the above statement, <name(s)> can be referenced in the caller’s environment without the <module_name> prefix:

    >>> frommodimports,foo>>> s'If Comrade Napoleon says it, it must be right.'>>> foo('quux')arg = quux>>> frommodimportFoo>>> x=Foo()>>> x<mod.Foo object at 0x02E3AD50>

    Because this form of import places the object names directly into the caller’s symbol table, any objects that already exist with the same name will be overwritten:

    >>> a=['foo','bar','baz']>>> a['foo', 'bar', 'baz']>>> frommodimporta>>> a[100, 200, 300]

    It is even possible to indiscriminately import everything from a module at one fell swoop:

    from<module_name>import*

    This will place the names of all objects from <module_name> into the local symbol table, with the exception of any that begin with the underscore (_) character.

    For example:

    >>> frommodimport*>>> s'If Comrade Napoleon says it, it must be right.'>>> a[100, 200, 300]>>> foo<function foo at 0x03B449C0>>>> Foo<class 'mod.Foo'>

    This isn’t necessarily recommended in large-scale production code. It’s a bit dangerous because you are entering names into the local symbol table en masse. Unless you know them all well and can be confident there won’t be a conflict, you have a decent chance of overwriting an existing name inadvertently. However, this syntax is quite handy when you are just mucking around with the interactive interpreter, for testing or discovery purposes, because it quickly gives you access to everything a module has to offer without a lot of typing.

    from <module_name> import <name> as <alt_name>

    It is also possible to import individual objects but enter them into the local symbol table with alternate names:

    from<module_name>import<name>as<alt_name>[,<name>as<alt_name>]

    This makes it possible to place names directly into the local symbol table but avoid conflicts with previously existing names:

    >>> s='foo'>>> a=['foo','bar','baz']>>> frommodimportsasstring,aasalist>>> s'foo'>>> string'If Comrade Napoleon says it, it must be right.'>>> a['foo', 'bar', 'baz']>>> alist[100, 200, 300]

    import <module_name> as <alt_name>

    You can also import an entire module under an alternate name:

    import<module_name>as<alt_name>
    >>> importmodasmy_module>>> my_module.a[100, 200, 300]>>> my_module.foo('qux')arg = qux

    Module contents can be imported from within a function definition. In that case, the import does not occur until the function is called:

    >>> defbar():... frommodimportfoo... foo('corge')...>>> bar()arg = corge

    However, Python 3 does not allow the indiscriminate import * syntax from within a function:

    >>> defbar():... frommodimport*...SyntaxError: import * only allowed at module level

    Lastly, a try statement with an except ImportError clause can be used to guard against unsuccessful import attempts:

    >>> try:... # Non-existent module... importbaz... exceptImportError:... print('Module not found')...Module not found
    >>> try:... # Existing module, but non-existent object... frommodimportbaz... exceptImportError:... print('Object not found in module')...Object not found in module

    The dir() Function

    The built-in function dir() returns a list of defined names in a namespace. Without arguments, it produces an alphabetically sorted list of names in the current local symbol table:

    >>> dir()['__annotations__', '__builtins__', '__doc__', '__loader__', '__name__','__package__', '__spec__']>>> qux=[1,2,3,4,5]>>> dir()['__annotations__', '__builtins__', '__doc__', '__loader__', '__name__','__package__', '__spec__', 'qux']>>> classBar():... pass...>>> x=Bar()>>> dir()['Bar', '__annotations__', '__builtins__', '__doc__', '__loader__', '__name__','__package__', '__spec__', 'qux', 'x']

    Note how the first call to dir() above lists several names that are automatically defined and already in the namespace when the interpreter starts. As new names are defined (qux, Bar, x), they appear on subsequent invocations of dir().

    This can be useful for identifying what exactly has been added to the namespace by an import statement:

    >>> dir()['__annotations__', '__builtins__', '__doc__', '__loader__', '__name__','__package__', '__spec__']>>> importmod>>> dir()['__annotations__', '__builtins__', '__doc__', '__loader__', '__name__','__package__', '__spec__', 'mod']>>> mod.s'If Comrade Napoleon says it, it must be right.'>>> mod.foo([1,2,3])arg = [1, 2, 3]>>> frommodimporta,Foo>>> dir()['Foo', '__annotations__', '__builtins__', '__doc__', '__loader__', '__name__','__package__', '__spec__', 'a', 'mod']>>> a[100, 200, 300]>>> x=Foo()>>> x<mod.Foo object at 0x002EAD50>>>> frommodimportsasstring>>> dir()['Foo', '__annotations__', '__builtins__', '__doc__', '__loader__', '__name__','__package__', '__spec__', 'a', 'mod', 'string', 'x']>>> string'If Comrade Napoleon says it, it must be right.'

    When given an argument that is the name of a module, dir() lists the names defined in the module:

    >>> importmod>>> dir(mod)['Foo', '__builtins__', '__cached__', '__doc__', '__file__', '__loader__','__name__', '__package__', '__spec__', 'a', 'foo', 's']
    >>> dir()['__annotations__', '__builtins__', '__doc__', '__loader__', '__name__','__package__', '__spec__']>>> frommodimport*>>> dir()['Foo', '__annotations__', '__builtins__', '__doc__', '__loader__', '__name__','__package__', '__spec__', 'a', 'foo', 's']

    Executing a Module as a Script

    Any .py file that contains a module is essentially also a Python script, and there isn’t any reason it can’t be executed like one.

    Here again is mod.py as it was defined above:

    mod.py

    s="If Comrade Napoleon says it, it must be right."a=[100,200,300]deffoo(arg):print(f'arg = {arg}')classFoo:pass

    This can be run as a script:

    C:\Users\john\Documents>python mod.py
    C:\Users\john\Documents>

    There are no errors, so it apparently worked. Granted, it’s not very interesting. As it is written, it only defines objects. It doesn’t do anything with them, and it doesn’t generate any output.

    Let’s modify the above Python module so it does generate some output when run as a script:

    mod.py

    s="If Comrade Napoleon says it, it must be right."a=[100,200,300]deffoo(arg):print(f'arg = {arg}')classFoo:passprint(s)print(a)foo('quux')x=Foo()print(x)

    Now it should be a little more interesting:

    C:\Users\john\Documents>python mod.py
    If Comrade Napoleon says it, it must be right.[100, 200, 300]arg = quux<__main__.Foo object at 0x02F101D0>

    Unfortunately, now it also generates output when imported as a module:

    >>> importmodIf Comrade Napoleon says it, it must be right.[100, 200, 300]arg = quux<mod.Foo object at 0x0169AD50>

    This is probably not what you want. It isn’t usual for a module to generate output when it is imported.

    Wouldn’t it be nice if you could distinguish between when the file is loaded as a module and when it is run as a standalone script?

    Ask and ye shall receive.

    When a .py file is imported as a module, Python sets the special dunder variable __name__ to the name of the module. However, if a file is run as a standalone script, __name__ is (creatively) set to the string '__main__'. Using this fact, you can discern which is the case at run-time and alter behavior accordingly:

    mod.py

    s="If Comrade Napoleon says it, it must be right."a=[100,200,300]deffoo(arg):print(f'arg = {arg}')classFoo:passif(__name__=='__main__'):print('Executing as standalone script')print(s)print(a)foo('quux')x=Foo()print(x)

    Now, if you run as a script, you get output:

    C:\Users\john\Documents>python mod.py
    Executing as standalone scriptIf Comrade Napoleon says it, it must be right.[100, 200, 300]arg = quux<__main__.Foo object at 0x03450690>

    But if you import as a module, you don’t:

    >>> importmod>>> mod.foo('grault')arg = grault

    Modules are often designed with the capability to run as a standalone script for purposes of testing the functionality that is contained within the module. This is referred to as unit testing. For example, suppose you have created a module fact.py containing a factorial function, as follows:

    fact.py

    deffact(n):return1ifn==1elsen*fact(n-1)if(__name__=='__main__'):importsysiflen(sys.argv)>1:print(fact(int(sys.argv[1])))

    The file can be treated as a module, and the fact() function imported:

    >>> fromfactimportfact>>> fact(6)720

    But it can also be run as a standalone by passing an integer argument on the command-line for testing:

    C:\Users\john\Documents>python fact.py 6
    720

    Reloading a Module

    For reasons of efficiency, a module is only loaded once per interpreter session. That is fine for function and class definitions, which typically make up the bulk of a module’s contents. But a module can contain executable statements as well, usually for initialization. Be aware that these statements will only be executed the first time a module is imported.

    Consider the following file mod.py:

    mod.py

    a=[100,200,300]print('a =',a)
    >>> importmoda = [100, 200, 300]>>> importmod>>> importmod>>> mod.a[100, 200, 300]

    The print() statement is not executed on subsequent imports. (For that matter, neither is the assignment statement, but as the final display of the value of mod.a shows, that doesn’t matter. Once the assignment is made, it sticks.)

    If you make a change to a module and need to reload it, you need to either restart the interpreter or use a function called reload() from module importlib:

    >>> importmoda = [100, 200, 300]>>> importmod>>> importimportlib>>> importlib.reload(mod)a = [100, 200, 300]<module 'mod' from 'C:\\Users\\john\\Documents\\Python\\doc\\mod.py'>

    Python Packages

    Suppose you have developed a very large application that includes many modules. As the number of modules grows, it becomes difficult to keep track of them all if they are dumped into one location. This is particularly so if they have similar names or functionality. You might wish for a means of grouping and organizing them.

    Packages allow for a hierarchical structuring of the module namespace using dot notation. In the same way that modules help avoid collisions between global variable names, packages help avoid collisions between module names.

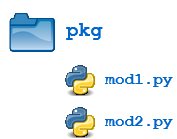
    Creating a package is quite straightforward, since it makes use of the operating system’s inherent hierarchical file structure. Consider the following arrangement:

    python package 1

    Here, there is a directory named pkg that contains two modules, mod1.py and mod2.py. The contents of the modules are:

    mod1.py

    deffoo():print('[mod1] foo()')classFoo:pass

    mod2.py

    defbar():print('[mod2] bar()')classBar:pass

    Given this structure, if the pkg directory resides in a location where it can be found (in one of the directories contained in sys.path), you can refer to the two modules with dot notation (pkg.mod1, pkg.mod2) and import them with the syntax you are already familiar with:

    import<module_name>[,<module_name>...]
    >>> importpkg.mod1,pkg.mod2>>> pkg.mod1.foo()[mod1] foo()>>> x=pkg.mod2.Bar()>>> x<pkg.mod2.Bar object at 0x033F7290>
    from<module_name>import<name(s)>
    >>> frompkg.mod1importfoo>>> foo()[mod1] foo()
    from<module_name>import<name>as<alt_name>
    >>> frompkg.mod2importBarasQux>>> x=Qux()>>> x<pkg.mod2.Bar object at 0x036DFFD0>

    You can import modules with these statements as well:

    from<package_name>import<modules_name>[,<module_name>...]from<package_name>import<module_name>as<alt_name>
    >>> frompkgimportmod1>>> mod1.foo()[mod1] foo()>>> frompkgimportmod2asquux>>> quux.bar()[mod2] bar()

    You can technically import the package as well:

    >>> importpkg>>> pkg<module 'pkg' (namespace)>

    But this is of little avail. Though this is, strictly speaking, a syntactically correct Python statement, it doesn’t do much of anything useful. In particular, it does not place any of the modules in pkg into the local namespace:

    >>> pkg.mod1Traceback (most recent call last):
      File "<pyshell#34>", line 1, in <module>pkg.mod1AttributeError: module 'pkg' has no attribute 'mod1'>>> pkg.mod1.foo()Traceback (most recent call last):
      File "<pyshell#35>", line 1, in <module>pkg.mod1.foo()AttributeError: module 'pkg' has no attribute 'mod1'>>> pkg.mod2.Bar()Traceback (most recent call last):
      File "<pyshell#36>", line 1, in <module>pkg.mod2.Bar()AttributeError: module 'pkg' has no attribute 'mod2'

    To actually import the modules or their contents, you need to use one of the forms shown above.

    Package Initialization

    If a file named __init__.py is present in a package directory, it is invoked when the package or a module in the package is imported. This can be used for execution of package initialization code, such as initialization of package-level data.

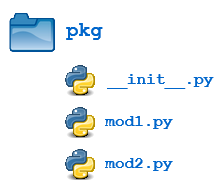
    For example, consider the following __init__.py file:

    __init__.py

    print(f'Invoking __init__.py for {__name__}')A=['quux','corge','grault']

    Let’s add this file to the pkg directory from the above example:

    python package 2

    Now when the package is imported, global list A is initialized:

    >>> importpkgInvoking __init__.py for pkg>>> pkg.A['quux', 'corge', 'grault']

    A module in the package can access the global by importing it in turn:

    mod1.py

    deffoo():frompkgimportAprint('[mod1] foo() / A = ',A)classFoo:pass
    >>> frompkgimportmod1Invoking __init__.py for pkg>>> mod1.foo()[mod1] foo() / A =  ['quux', 'corge', 'grault']

    __init__.py can also be used to effect automatic importing of modules from a package. For example, earlier you saw that the statement import pkg only places the name pkg in the caller’s local symbol table and doesn’t import any modules. But if __init__.py in the pkg directory contains the following:

    __init__.py

    print(f'Invoking __init__.py for {__name__}')importpkg.mod1,pkg.mod2

    then when you execute import pkg, modules mod1 and mod2 are imported automatically:

    >>> importpkgInvoking __init__.py for pkg>>> pkg.mod1.foo()[mod1] foo()>>> pkg.mod2.bar()[mod2] bar()

    Note: Much of the Python documentation states that an __init__.py file must be present in the package directory when creating a package. This was once true. It used to be that the very presence of __init__.py signified to Python that a package was being defined. The file could contain initialization code or even be empty, but it had to be present.

    Starting with Python 3.3, Implicit Namespace Packages were introduced. These allow for the creation of a package without any __init__.py file. Of course, it can still be present if package initialization is needed. But it is no longer required.

    Importing * From a Package

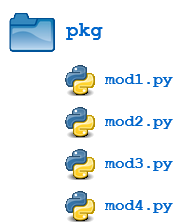
    For the purposes of the following discussion, the previously defined package is expanded to contain some additional modules:

    python package 3

    There are now four modules defined in the pkg directory. Their contents are as shown below:

    mod1.py

    deffoo():print('[mod1] foo()')classFoo:pass

    mod2.py

    defbar():print('[mod2] bar()')classBar:pass

    mod3.py

    defbaz():print('[mod3] baz()')classBaz:pass

    mod4.py

    defqux():print('[mod4] qux()')classQux:pass

    (Imaginative, aren’t they?)

    You have already seen that when import * is used for a module, all objects from the module are imported into the local symbol table, except those whose names begin with an underscore, as always:

    >>> dir()['__annotations__', '__builtins__', '__doc__', '__loader__', '__name__','__package__', '__spec__']>>> frompkg.mod3import*>>> dir()['Baz', '__annotations__', '__builtins__', '__doc__', '__loader__', '__name__','__package__', '__spec__', 'baz']>>> baz()[mod3] baz()>>> Baz<class 'pkg.mod3.Baz'>

    The analogous statement for a package is this:

    from<package_name>import*

    What does that do?

    >>> dir()['__annotations__', '__builtins__', '__doc__', '__loader__', '__name__','__package__', '__spec__']>>> frompkgimport*>>> dir()['__annotations__', '__builtins__', '__doc__', '__loader__', '__name__','__package__', '__spec__']

    Hmph. Not much. You might have expected (assuming you had any expectations at all) that Python would dive down into the package directory, find all the modules it could, and import them all. But as you can see, by default that is not what happens.

    Instead, Python follows this convention: if the __init__.py file in the package directory contains a list named __all__, it is taken to be a list of modules that should be imported when the statement from <package_name> import * is encountered.

    For the present example, suppose you create an __init__.py in the pkg directory like this:

    pkg/__init__.py

    __all__=['mod1','mod2','mod3','mod4']

    Now from pkg import * imports all four modules:

    >>> dir()['__annotations__', '__builtins__', '__doc__', '__loader__', '__name__','__package__', '__spec__']>>> frompkgimport*>>> dir()['__annotations__', '__builtins__', '__doc__', '__loader__', '__name__','__package__', '__spec__', 'mod1', 'mod2', 'mod3', 'mod4']>>> mod2.bar()[mod2] bar()>>> mod4.Qux<class 'pkg.mod4.Qux'>

    Using import * still isn’t considered terrific form, any more for packages than for modules. But this facility at least gives the creator of the package some control over what happens when import * is specified. (In fact, it provides the capability to disallow it entirely, simply by declining to define __all__ at all. As you have seen, the default behavior for packages is to import nothing.)

    By the way, __all__ can be defined in a module as well and serves the same purpose: to control what is imported with import *. For example, modify mod1.py as follows:

    pkg/mod1.py

    __all__=['foo']deffoo():print('[mod1] foo()')classFoo:pass

    Now an import * statement from pkg.mod1 will only import what is contained in __all__:

    >>> dir()['__annotations__', '__builtins__', '__doc__', '__loader__', '__name__','__package__', '__spec__']>>> frompkg.mod1import*>>> dir()['__annotations__', '__builtins__', '__doc__', '__loader__', '__name__','__package__', '__spec__', 'foo']>>> foo()[mod1] foo()>>> FooTraceback (most recent call last):
      File "<pyshell#37>", line 1, in <module>FooNameError: name 'Foo' is not defined

    foo() (the function) is now defined in the local namespace, but Foo (the class) is not, because the latter is not in __all__.

    In summary, __all__ is used by both packages and modules to control what is imported when import * is specified. But the default behavior differs:

    • For a package, when __all__ is not defined, import * does not import anything.
    • For a module, when __all__ is not defined, import * imports everything (except—you guessed it—names starting with an underscore).

    Subpackages

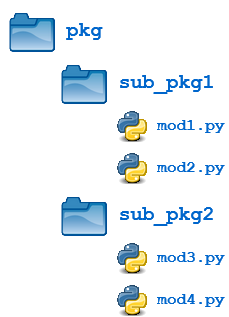
    Packages can contain nested subpackages to arbitrary depth. For example, let’s make one more modification to the example package directory as follows:

    python package 4

    The four modules (mod1.py, mod2.py, mod3.py and mod4.py) are defined as previously. But now, instead of being lumped together into the pkg directory, they are split out into two subpackage directories, sub_pkg1 and sub_pkg2.

    Importing still works the same as shown previously. Syntax is similar, but additional dot notation is used to separate package name from subpackage name:

    >>> importpkg.sub_pkg1.mod1>>> pkg.sub_pkg1.mod1.foo()[mod1] foo()>>> frompkg.sub_pkg1importmod2>>> mod2.bar()[mod2] bar()>>> frompkg.sub_pkg2.mod3importbaz>>> baz()[mod3] baz()>>> frompkg.sub_pkg2.mod4importquxasgrault>>> grault()[mod4] qux()

    In addition, a module in one subpackage can reference objects in a sibling subpackage (in the event that the sibling contains some functionality that you need). For example, suppose you want to import and execute function foo() (defined in module mod1) from within module mod3. You can either use an absolute import:

    pkg/sub__pkg2/mod3.py

    defbaz():print('[mod3] baz()')classBaz:passfrompkg.sub_pkg1.mod1importfoofoo()
    >>> frompkg.sub_pkg2importmod3[mod1] foo()>>> mod3.foo()[mod1] foo()

    Or you can use a relative import, where .. refers to the package one level up. From within mod3.py, which is in subpackage sub_pkg2,

    • .. evaluates to the parent package (pkg), and
    • ..sub_pkg1 evaluates to subpackage sub_pkg1 of the parent package.

    pkg/sub__pkg2/mod3.py

    defbaz():print('[mod3] baz()')classBaz:passfrom..importsub_pkg1print(sub_pkg1)from..sub_pkg1.mod1importfoofoo()
    >>> frompkg.sub_pkg2importmod3<module 'pkg.sub_pkg1' (namespace)>[mod1] foo()

    Conclusion

    In this tutorial, you covered the following topics:

    • How to create a Python module
    • Locations where the Python interpreter searches for a module
    • How to obtain access to the objects defined in a module with the import statement
    • How to create a module that is executable as a standalone script
    • How to organize modules into packages and subpackages
    • How to control package initialization

    This will hopefully allow you to better understand how to gain access to the functionality available in the many third-party and built-in modules available in Python.

    Additionally, if you are developing your own application, creating your own modules and packages will help you organize and modularize your code, which makes coding, maintenance, and debugging easier.

    If you want to learn more, check out the following documentation at Python.org:

    Happy Pythoning!


    [ Improve Your Python With 🐍 Python Tricks 💌 – Get a short & sweet Python Trick delivered to your inbox every couple of days. >> Click here to learn more and see examples ]


    Stack Abuse: Implementing SVM and Kernel SVM with Python's Scikit-Learn

    $
    0
    0

    A support vector machine (SVM) is a type of supervised machine learning classification algorithm. SVMs were introduced initially in 1960s and were later refined in 1990s. However, it is only now that they are becoming extremely popular, owing to their ability to achieve brilliant results. SVMs are implemented in a unique way when compared to other machine learning algorithms.

    In this article we'll see what support vector machines algorithms are, the brief theory behind support vector machine and their implementation in Python's Scikit-Learn library. We will then move towards an advanced SVM concept, known as Kernel SVM, and will also implement it with the help of Scikit-Learn.

    Simple SVM

    In case of linearly separable data in two dimensions, as shown in Fig. 1, a typical machine learning algorithm tries to find a boundary that divides the data in such a way that the misclassification error can be minimized. If you closely look at Fig. 1, there can be several boundaries that correctly divide the data points. The two dashed lines as well as one solid line classify the data correctly.

    Multiple Decision Boundaries

    Fig 1: Multiple Decision Boundaries

    SVM differs from the other classification algorithms in the way that it chooses the decision boundary that maximizes the distance from the nearest data points of all the classes. An SVM doesn't merely find a decision boundary; it finds the most optimal decision boundary.

    The most optimal decision boundary is the one which has maximum margin from the nearest points of all the classes. The nearest points from the decision boundary that maximize the distance between the decision boundary and the points are called support vectors as seen in Fig 2. The decision boundary in case of support vector machines is called the maximum margin classifier, or the maximum margin hyper plane.

    Decision Boundary with Support Vectors

    Fig 2: Decision Boundary with Support Vectors

    There is complex mathematics involved behind finding the support vectors, calculating the margin between decision boundary and the support vectors and maximizing this margin. In this tutorial we will not go into the detail of the mathematics, we will rather see how SVM and Kernel SVM are implemented via the Python Scikit-Learn library.

    Implementing SVM with Scikit-Learn

    The dataset that we are going to use in this section is the same that we used in the classification section of the decision tree tutorial.

    Our task is to predict whether a bank currency note is authentic or not based upon four attributes of the note i.e. skewness of the wavelet transformed image, variance of the image, entropy of the image, and curtosis of the image. This is a binary classification problem and we will use SVM algorithm to solve this problem. The rest of the section consists of standard machine learning steps.

    Importing libraries

    The following script imports required libraries:

    import pandas as pd  
    import numpy as np  
    import matplotlib.pyplot as plt  
    %matplotlib inline
    

    Importing the Dataset

    The data is available for download at the following link:

    https://drive.google.com/file/d/13nw-uRXPY8XIZQxKRNZ3yYlho-CYm_Qt/view

    The detailed information about the data is available at the following link:

    https://archive.ics.uci.edu/ml/datasets/banknote+authentication

    Download the dataset from the Google drive link and store it locally on your machine. For this example the CSV file for the dataset is stored in the "Datasets" folder of the D drive on my Windows computer. The script reads the file from this path. You can change the file path for your computer accordingly.

    To read data from CSV file, the simplest way is to use read_csv method of the pandas library. The following code reads bank currency note data into pandas dataframe:

    bankdata = pd.read_csv("D:/Datasets/bill_authentication.csv")  
    

    Exploratory Data Analysis

    There are virtually limitless ways to analyze datasets with a variety of Python libraries. For the sake of simplicity we will only check the dimensions of the data and see first few records. To see the rows and columns and of the data, execute the following command:

    bankdata.shape  
    

    In the output you will see (1372,5). This means that the bank note dataset has 1372 rows and 5 columns.

    To get a feel of how our dataset actually looks, execute the following command:

    bankdata.head()  
    

    The output will look like this:

    VarianceSkewnessCurtosisEntropyClass
    03.621608.6661-2.8073-0.446990
    14.545908.1674-2.4586-1.462100
    23.86600-2.63831.92420.106450
    33.456609.5228-4.0112-3.594400
    40.32924-4.45524.5718-0.988800

    You can see that all of the attributes in the dataset are numeric. The label is also numeric i.e. 0 and 1.

    Data Preprocessing

    Data preprocessing involves (1) Dividing the data into attributes and labels and (2) dividing the data into training and testing sets.

    To divide the data into attributes and labels, execute the following code:

    X = bankdata.drop('Class', axis=1)  
    y = bankdata['Class']  
    

    In the first line of the script above, all the columns of the bankdata dataframe are being stored in the X variable except the "Class" column, which is the label column. The drop() method drops this column.

    In the second line, only the class column is being stored in the y variable. At this point of time X variable contains attributes while y variable contains corresponding labels.

    Once the data is divided into attributes and labels, the final preprocessing step is to divide data into training and test sets. Luckily, the model_selection library of the Scikit-Learn library contains the train_test_split method that allows us to seamlessly divide data into training and test sets.

    Execute the following script to do so:

    from sklearn.model_selection import train_test_split  
    X_train, X_test, y_train, y_test = train_test_split(X, y, test_size = 0.20)  
    

    Training the Algorithm

    We have divided the data into training and testing sets. Now is the time to train our SVM on the training data. Scikit-Learn contains the svm library, which contains built-in classes for different SVM algorithms. Since we are going to perform a classification task, we will use the support vector classifier class, which is written as SVC in the Scikit-Learn's svm library. This class takes one parameter, which is the kernel type. This is very important. In the case of a simple SVM we simply set this parameter as "linear" since simple SVMs can only classify linearly separable data. We will see non-linear kernels in the next section.

    The fit method of SVC class is called to train the algorithm on the training data, which is passed as a parameter to the fit method. Execute the following code to train the algorithm:

    from sklearn.svm import SVC  
    svclassifier = SVC(kernel='linear')  
    svclassifier.fit(X_train, y_train)  
    

    Making Predictions

    To make predictions, the predict method of the SVC class is used. Take a look at the following code:

    y_pred = svclassifier.predict(X_test)  
    

    Evaluating the Algorithm

    Confusion matrix, precision, recall, and F1 measures are the most commonly used metrics for classification tasks. Scikit-Learn's metrics library contains the classification_report and confusion_matrix methods, which can be readily used to find out the values for these important metrics.

    Here is the code for finding these metrics:

    from sklearn.metrics import classification_report, confusion_matrix  
    print(confusion_matrix(y_test,y_pred))  
    print(classification_report(y_test,y_pred))  
    

    Results

    The evaluation results are as follows:

    [[152    0]
     [  1  122]]
                  precision   recall   f1-score   support
    
               0       0.99     1.00       1.00       152
               1       1.00     0.99       1.00       123
    
    avg / total        1.00     1.00       1.00       275  
    

    From the results it can be observed that SVM slightly outperformed the decision tree algorithm. There is only one misclassification in the case of SVM algorithm compared to four misclassifications in the case of the decision tree algorithm.

    Kernel SVM

    In the previous section we saw how the simple SVM algorithm can be used to find decision boundary for linearly separable data. However, in the case of non-linearly separable data, such as the one shown in Fig. 3, a straight line cannot be used as a decision boundary.

    Non-linearly Separable Data

    Fig 3: Non-linearly Separable Data

    In case of non-linearly separable data, the simple SVM algorithm cannot be used. Rather, a modified version of SVM, called Kernel SVM, is used.

    Basically, the kernel SVM projects the non-linearly separable data lower dimensions to linearly separable data in higher dimensions in such a way that data points belonging to different classes are allocated to different dimensions. Again, there is complex mathematics involved in this, but you do not have to worry about it in order to use SVM. Rather we can simply use Python's Scikit-Learn library that to implement and use the kernel SVM.

    Implementing Kernel SVM with Scikit-Learn

    Implementing Kernel SVM with Scikit-Learn is similar to the simple SVM. In this section, we will use the famous iris dataset to predict the category to which a plant belongs based on four attributes: sepal-width, sepal-length, petal-width and petal-length.

    The dataset can be downloaded from the following link:

    https://archive.ics.uci.edu/ml/datasets/iris4

    The rest of the steps are typical machine learning steps and need very little explanation until we reach the part where we train our Kernel SVM.

    Importing Libraries

    import numpy as np  
    import matplotlib.pyplot as plt  
    import pandas as pd  
    

    Importing the Dataset

    url = "https://archive.ics.uci.edu/ml/machine-learning-databases/iris/iris.data"
    
    # Assign colum names to the dataset
    colnames = ['sepal-length', 'sepal-width', 'petal-length', 'petal-width', 'Class']
    
    # Read dataset to pandas dataframe
    irisdata = pd.read_csv(url, names=colnames)  
    

    Preprocessing

    X = irisdata.drop('Class', axis=1)  
    y = irisdata['Class']  
    

    Train Test Split

    from sklearn.model_selection import train_test_split  
    X_train, X_test, y_train, y_test = train_test_split(X, y, test_size = 0.20)  
    

    Training the Algorithm

    To train the kernel SVM, we use the same SVC class of the Scikit-Learn's svm library. The difference lies in the value for the kernel parameter of the SVC class. In the case of the simple SVM we used "linear" as the value for the kernel parameter. However, for kernel SVM you can use Gaussian, polynomial, sigmoid, or computable kernel. We will implement polynomial, Gaussian, and sigmoid kernels to see which one works better for our problem.

    1. Polynomial Kernel

    In the case of polynomial kernel, you also have to pass a value for the degree parameter of the SVC class. This basically is the degree of the polynomial. Take a look at how we can use a polynomial kernel to implement kernel SVM:

    from sklearn.svm import SVC  
    svclassifier = SVC(kernel='poly', degree=8)  
    svclassifier.fit(X_train, y_train)  
    

    Making Predictions

    Now once we have trained the algorithm, the next step is to make predictions on the test data.

    Execute the following script to do so:

    y_pred = svclassifier.predict(X_test)  
    

    Evaluating the Algorithm

    As usual, the final step of any machine learning algorithm is to make evaluations for polynomial kernel. Execute the following script:

    from sklearn.metrics import classification_report, confusion_matrix  
    print(confusion_matrix(y_test, y_pred))  
    print(classification_report(y_test, y_pred))  
    

    The output for the kernel SVM using polynomial kernel looks like this:

    [[11  0  0]
     [ 0 12  1]
     [ 0  0  6]]
                     precision   recall   f1-score   support
    
        Iris-setosa       1.00     1.00       1.00        11
    Iris-versicolor       1.00     0.92       0.96        13  
     Iris-virginica       0.86     1.00       0.92         6
    
        avg / total       0.97     0.97       0.97        30
    

    Now let's repeat the same steps for Gaussian and sigmoid kernels.

    2. Gaussian Kernel

    Take a look at how we can use polynomial kernel to implement kernel SVM:

    from sklearn.svm import SVC  
    svclassifier = SVC(kernel='rbf')  
    svclassifier.fit(X_train, y_train)  
    

    To use Gaussian kernel, you have to specify 'rbf' as value for the Kernel parameter of the SVC class.

    Prediction and Evaluation

    y_pred = svclassifier.predict(X_test)  
    
    from sklearn.metrics import classification_report, confusion_matrix  
    print(confusion_matrix(y_test, y_pred))  
    print(classification_report(y_test, y_pred))  
    

    The output of the Kernel SVM with Gaussian kernel looks like this:

    [[11  0  0]
     [ 0 13  0]
     [ 0  0  6]]
                     precision   recall   f1-score   support
    
        Iris-setosa       1.00     1.00       1.00        11
    Iris-versicolor       1.00     1.00       1.00        13  
     Iris-virginica       1.00     1.00       1.00         6
    
        avg / total       1.00     1.00       1.00        30
    

    3. Sigmoid Kernel

    Finally, let's use a sigmoid kernel for implementing Kernel SVM. Take a look at the following script:

    from sklearn.svm import SVC  
    svclassifier = SVC(kernel='sigmoid')  
    svclassifier.fit(X_train, y_train)  
    

    To use the sigmoid kernel, you have to specify 'sigmoid' as value for the kernel parameter of the SVC class.

    Prediction and Evaluation

    y_pred = svclassifier.predict(X_test)  
    
    from sklearn.metrics import classification_report, confusion_matrix  
    print(confusion_matrix(y_test, y_pred))  
    print(classification_report(y_test, y_pred))  
    

    The output of the Kernel SVM with Sigmoid kernel looks like this:

    [[ 0  0 11]
     [ 0  0 13]
     [ 0  0  6]]
                     precision   recall   f1-score   support
    
        Iris-setosa       0.00     0.00       0.00        11
    Iris-versicolor       0.00     0.00       0.00        13  
     Iris-virginica       0.20     1.00       0.33         6
    
        avg / total       0.04     0.20       0.07        30
    

    Comparison of Kernel Performance

    If we compare the performance of the different types of kernels we can clearly see that the sigmoid kernel performs the worst. This is due to the reason that sigmoid function returns two values, 0 and 1, therefore it is more suitable for binary classification problems. However, in our case we had three output classes.

    Amongst the Gaussian kernel and polynomial kernel, we can see that Gaussian kernel achieved a perfect 100% prediction rate while polynomial kernel misclassified one instance. Therefore the Gaussian kernel performed slightly better. However, there is no hard and fast rule as to which kernel performs best in every scenario. It is all about testing all the kernels and selecting the one with the best results on your test dataset.

    Conclusion

    In this article we studied both simple and kernel SVMs. We studied the intuition behind the SVM algorithm and how it can be implemented with Python's Scikit-Learn library. We also studied different types of kernels that can be used to implement kernel SVM. I would suggest you try to implement these algorithms on real-world datasets available at places like kaggle.com.

    I would also suggest that you explore the actual mathematics behind the SVM. Although you are not necessarily going to need it in order to use the SVM algorithm, it is still very handy to know what is actually going on behind the scene while your algorithm is finding decision boundaries.

    PyCharm: Webinar: “Set Theory and Practice: Grok Pythonic Collection Types” with Luciano Ramalho

    $
    0
    0

    With PyCon US coming up, we wanted to squeeze in one more webinar, one themed towards PyCon. Luciano Ramalho, long-time Python speaker and teacher, PyCon luminary, and author of one of the best recent Python books, will join us to talk about Python’s data model.

    • Thursday, May 3
    • 5:00 PM – 6:00 PM CEST (11:00 AM – 12:00 PM EDT)
    • Register here
    • Aimed at intermediate Python developers

    r2

    Luciano’s Fluent Python book from O’Reilly gives deep treatment to this topic, and Luciano is focusing on one aspect: Python’s collection types. It’s a real pleasure for me personally to have Luciano on our webinar: we’ve been friends for many years and he’s one of the truly kind people that makes our community remarkable.

    Speaking to You

    Luciano Ramalho is a Principal Consultant at ThoughtWorks and the author of Fluent Python. He is the co-founder of the Brazilian Python Association and of Garoa Hacker Clube and a longtime web pioneer.

    -PyCharm Team-
    The Drive to Develop

    Continuum Analytics Blog: Machines Learning about Humans Learning about Machines Learning

    $
    0
    0
    I had the great honor and pleasure of presenting the first tutorial at AnacondaCon 2018, on machine learning with scikit-learn. I spoke to a full room of about 120 enthusiastic data scientists and aspiring data scientists. I would like to thank my colleagues at Anaconda, Inc. who did such a wonderful job of organizing this …
    Read more →

    Davide Moro: Hello pytest-play!

    $
    0
    0
    pytest-play is a rec&play (rec not yet available) pytest plugin that let you execute a set of actions and assertions using commands serialized in JSON format. It tries to make test automation more affordable for non programmers or non Python programmers for browser, functional, API, integration or system testing thanks to its pluggable architecture and third party plugins that let you interact with the most common databases and systems.

    In addition it provides also some facilitations for writing browser UI actions (e.g., implicit waits before interacting with an input element. The Cypress framework for me was a great source of inspiration) and asynchronous checks (e.g., wait until a certain condition is true).

    You can use pytest-play programmatically (e.g., use the pytest-play engine as a library for pytest-play standalone scenarios or using the pytest-play API implementing BDD steps).

    Starting from pytest-play>1.4.x it was introduced a new experimental feature that let you use pytest-playas a framework creating Python-free automated tests based on a JSON based serialization format for actions and assertions (in the next future the more user friendly YAML format will be supported).

    So now depending on your needs and skills you can choose to use pytest-play as a library or as a framework.

    In this article I'm going to show how to implement a Plone CMS based login test using the python-free approach without having to write any line of Python code.

    What is pytest-play and why it exists

    In this section I'm going to add more information about the pytest-play approach and other considerations: if you want to see now how to implement our Python-free automated login test jump to the next section!

    Hyper specialized tool problems


    There are many commercial products or tools that offer solutions for API testing only, browser testing only. Sometimes hyper specialized tools might fit your needs (e.g., a content management system based web application) but sometimes they are not helpful for other distributed applications.

    For example an API-only platform is not effective for testing a CQRS based application. It is not useful testing only HTTP 200 OK response, you should test that all the expected commands are generated on the event store (e.g., Cassandra) or other side effects.

    Another example for an IoT applications and UI/browser only testing platforms. You cannot test reactive web apps only with a browser, you should control also simulated device activities (e.g., MQTT, queues, API) for messages/alarms/reports) or any other web based interactions performed by other users (e.g., HTTP calls); you might need to check asynchronously the expected results on web sockets instead of using a real browser implementing when some actions are performed.

    What is pytest-play

    In other words pytest-play is an open source testing solution based on the pytest framework that let you:
    • write actions and cross assertions against different protocols and test levels in the same scenario (e.g., check HTTP response and database assertions)
    • minimize the development of Selenium-based asynchronous wait functions before interacting with input elements thanks to implicit wait functions that let you interact with web elements only when they are ready. You just focus on user actions, you are more productive and you reduce the chance of writing bad or not robust asynchronous wait functions
    • implement polling-based asynchronous waiter commands based on custom expressions when needed
    using a serialization format (JSON at this time of writing, YAML in the next future) that should be more affordable for non technical testers, non programmers or programmers with no Python knowledge.

    Potentially you will be able to share and execute a new scenario not yet included in your test library copying and pasting a pytest-play JSON to a Jenkins build with parameters form like the following one (see the PLAY textarea):

    From http://davidemoro.blogspot.it/2018/03/test-automation-python-pytest-jenkins.html

    In addition if you are a technical user you can extend it writing your own plugins, you can provide the integration with external tools (e.g., test management tools, software metrics engines, etc), you can decide the test abstraction depending on deadlines/skills/strategy (e.g., use plain json files, a programmatic approach based on json scenarios or BDD steps based on pytest-play).

    What pytest-play is not

    For example pytest-play doesn't provide a test scenario recorder but it enforces users to understand what they are doing.

    It requires a very very little programming knowledge for writing some assertions using simple code expressions but with a little training activity it is still affordable by non programmers (you don't have to learn a programming language, just some basic assertions).

    It is not feature complete but it is free software.

    If you want to know more in this previous article I've talked about:

    A pytest-play example: parametrized login (featuring Plone CMS)

    In this example we'll see how to write and execute pure json pytest-play scenarios with test data decoupled by the test implementation and test parametrization. I'm using the available online Plone 5 demo site kindly hosted by Andreas Jung (www.zopyx.com).

    The project is available here:
    The tests could be launched this way as a normal pytest project once you installed pytest and the dependencies (there is a requirements.txt file, see the above link):

    $ pytest --variables env-ALPHA.yml --splinter-webdriver firefox --splinter-screenshot-dir /tmp -x
    Where the you can have multiple environment/variable files. E.g., env-ALPHA.yml containing the alpha base url and any other variables:
    pytest-play:
    base_url: https://plone-demo.info
    Our login test_login.json scenario contains (as you can see there are NO asynchronous waits because they are not needed for basic examples so you can focus on actions and assertions thanks to implicit waits):
    {
    "steps": [
    {
    "comment": "visit base url",
    "type": "get",
    "url": "$base_url"
    },
    {
    "comment": "click on login link",
    "locator": {
    "type": "id",
    "value": "personaltools-login"
    },
    "type": "clickElement"
    },
    {
    "comment": "provide a username",
    "locator": {
    "type": "id",
    "value": "__ac_name"
    },
    "text": "$username",
    "type": "setElementText"
    },
    {
    "comment": "provide a password",
    "locator": {
    "type": "id",
    "value": "__ac_password"
    },
    "text": "$password",
    "type": "setElementText"
    },
    {
    "comment": "click on login submit button",
    "locator": {
    "type": "css",
    "value": ".pattern-modal-buttons > input[name=submit]"
    },
    "type": "clickElement"
    },
    {
    "comment": "wait for page loaded",
    "locator": {
    "type": "css",
    "value": ".icon-user"
    },
    "type": "waitForElementVisible"
    }
    ]
    }
    Plus an optional test scenario metadata file test_login.ini that contains pytest keyword and decoupled test data:
    [pytest]
    markers =
    login
    test_data =
    {"username": "siteadmin", "password": "siteadmin"}
    {"username": "editor", "password": "editor"}
    {"username": "reader", "password": "reader"}
    Thanks to the metadata file you have just one scenario and it will be executed 3 times (as many times as test data rows)!

    Et voilà, let's see it in action out scenario without having to write any line of Python code:
     

    There is only a warning I have to remove but it worked and we got exactly 3 different test runs for our login scenario as expected!

    pytest-play status

    pytest-play should be still considered experimental software and many features needs to be implemented or refactored:
    • yaml instead of json. YAML will become the primary configuration format (it should be more user friendly as suggested by some users)
    • API should not be considered stable until future 2.x version
    • improve API testing when using pure json scenarios registering functions (e.g., invoke a function returning a valid authentication bearer for authenticated API testing)
    • implement some python requests library features not yet implemented in play_requests (e.g., cookies)
    • refactor parametrization and templating (Jinja?)
    • implement additional Selenium actions (e.g., right clicks, upload files, etc)
    • implement other cool Cypress ideas enabling non expert testers in writing more robust Selenium scenarios
    • add page object abstraction in pytest-play based Selenium scenarios with new commands that let you interact with page regions and interact with complex UI widgets
    • ownership change, waiting for pytest-dev core developers approval. Probably soon the ownership will change from davidemoro/pytest-play to pytest-dev/pytest-play once the approvation iter will finish

    PyCon Nove @ Florence

    If you are going to attending next PyCon Nove in Florence don't miss the following pytest-play talk presented by Serena Martinetti:

      Do you like pytest-play?

      Tweets about pytest-play happens on @davidemoro.
      Positive or negative feedback is always appreciated. If you find interesting the concepts behind pytest-play let me know with a tweet, add a new pytest-play adapter and/or add a GitHub star if you liked it:

      Star

      Mike Driscoll: Getting Started with Qt for Python

      $
      0
      0

      The Qt Team recently posted that Qt will now be officially supporting the PySide2 project, which they are calling “Qt for Python”. It will be a complete port of the original PySide, which only supported Qt 4. PySide2 supports Qt 5. Qt for Python will have the following license types: GPL, LGPL and commercial.

      PySide2 supports Python 2.7 as well as Python 3.4 – 3.6. There are snapshot wheel builds available here.Let’s say we downloaded the Windows Python wheel. To install it, you can use pip like this:

      python -m pip install PySide2-5.11.0a1-5.11.0-cp36-cp36m-win_amd64.whl

      Once you have PySide2 installed, we can get started by looking at a really simple example:

      importsysfrom PySide2.QtWidgetsimport QApplication, QLabel
       
      if __name__ == '__main__':
          app = QApplication([])
          label = QLabel("Qt for Python!")
          label.show()sys.exit(app.exec_())

      This code will create our application object (QApplication) and a QLabel to go on it. When you run app.exec_(), you start PySide2’s event loop. Since we do not specify a size for the label or the application, the size of the application defaults to be just large enough to fit the label on-screen:

      That’s kind of a boring example, so let’s look at how we might connect an event to a button.


      Adding Event Handling

      Event handling in PySide2 uses the concept of Signals and Slots underneath the covers. You can read about how that works in their documentation. Let’s take a look at how we might set up a button event:

      importsysfrom PySide2.QtWidgetsimport QApplication, QLabel, QLineEdit
      from PySide2.QtWidgetsimport QDialog, QPushButton, QVBoxLayout
       
      class Form(QDialog):
          """""" 
          def__init__(self, parent=None):
              """Constructor"""super(Form, self).__init__(parent) 
              self.edit = QLineEdit("What's up?")self.button = QPushButton("Print to stdout") 
              layout = QVBoxLayout()
              layout.addWidget(self.edit)
              layout.addWidget(self.button) 
              self.setLayout(layout) 
              self.button.clicked.connect(self.greetings) 
       
          def greetings(self):
              """"""
              text = self.edit.text()print('Contents of QLineEdit widget: {}'.format(text)) 
      if __name__ == "__main__":
          app = QApplication([])
          form = Form()
          form.show()sys.exit(app.exec_())

      Here we create a text box via the QLineEdit widget along with a button via the QPushButton widget. Then we put both of those widgets inside of a QVBoxLayout, which is a container that will allow you to change the size of the application and have the widgets contained inside of the layout change sizes and position accordingly. In this case, we use a vertically oriented layout, which means that the widgets get “stacked” vertically.

      Finally we connect button’s “clicked” signal with the greetings (slot) function. Whenever we click our button, it should call the function we specified. This function will grab the contents of our text box and print it to stdout. Here’s what it looks like when I ran the code:

      I think that looks alright, but it’s still not a very interesting looking UI.


      Creating a Simple Form

      Let’s wrap things up by creating a simple form with PySide2. We won’t hook the form up to anything in this example. It will just be a quick and dirty piece of sample code that shows how you might create a simple form:

      importsys 
      from PySide2.QtWidgetsimport QDialog, QApplication
      from PySide2.QtWidgetsimport QHBoxLayout, QVBoxLayout
      from PySide2.QtWidgetsimport QLineEdit, QLabel, QPushButton
       
      class Form(QDialog):
          """""" 
          def__init__(self, parent=None):
              """Constructor"""super(Form, self).__init__(parent)
              main_layout = QVBoxLayout() 
              name_layout = QHBoxLayout()
              lbl = QLabel("Name:")self.name = QLineEdit("")
              name_layout.addWidget(lbl)
              name_layout.addWidget(self.name)
              name_layout.setSpacing(20) 
              add_layout = QHBoxLayout()
              lbl = QLabel("Address:")self.address = QLineEdit("")
              add_layout.addWidget(lbl)
              add_layout.addWidget(self.address) 
              phone_layout = QHBoxLayout()self.phone = QLineEdit("")
              phone_layout.addWidget(QLabel("Phone:"))
              phone_layout.addWidget(self.phone)
              phone_layout.setSpacing(18) 
              button = QPushButton('Submit') 
              main_layout.addLayout(name_layout, stretch=1)
              main_layout.addLayout(add_layout, stretch=1)
              main_layout.addLayout(phone_layout, stretch=1)
              main_layout.addWidget(button)self.setLayout(main_layout) 
      if __name__ == "__main__":
          app = QApplication([])
          form = Form()
          form.show()sys.exit(app.exec_())

      In this code, we use several box layouts to arrange the widgets on screen. Namely, we use a QVBoxLayout as our top-level layout and then nest QHBoxLayouts inside of it. You will also note that when we add the QHBoxLayouts, we tell them to stretch when we resize the main widget. The rest of the code is pretty much the same as what you have already seen.


      Wrapping Up

      I haven’t played around with PySide2 (or PyQt) in a number of years, so it was exciting to see Qt picking this back up again. I think having some competition between PySide2 and PyQt will be a good thing and it might also drive some innovation with other Python UI frameworks. While the developers behind PySide2 don’t have current plans to support mobile platforms, unfortunately, they do seem interested in hearing if that’s something that developers would be interested in. Frankly, I hope a LOT of people chime in and tell them yes because we need other options in the Python mobile UI space.

      Anyway, I think this project has a lot of potential and I look forward to seeing how it grows.


      Related Reading

      Test and Code: 41: Testing in DevOps and Agile - Anthony Shaw

      $
      0
      0

      We talk with Anthony Shaw about some of the testing problems facing both DevOps teams, and Agile teams. We also talk about his recent pull request accepted into pytest.

      Special Guest: Anthony Shaw.

      Sponsored By:

      Links:

      <p>We talk with Anthony Shaw about some of the testing problems facing both DevOps teams, and Agile teams. We also talk about his recent pull request accepted into pytest.</p><p>Special Guest: Anthony Shaw.</p><p>Sponsored By:</p><ul><li><a rel="nofollow" href="http://amzn.to/2E6cYZ9">Python Testing with pytest</a>: <a rel="nofollow" href="http://amzn.to/2E6cYZ9">Simple, Rapid, Effective, and Scalable The fastest way to learn pytest. From 0 to expert in under 200 pages.</a></li><li><a rel="nofollow" href="https://www.patreon.com/testpodcast">Patreon Supporters</a>: <a rel="nofollow" href="https://www.patreon.com/testpodcast">Help support the show with as little as $1 per month. Funds help pay for expenses associated with the show.</a></li></ul><p>Links:</p><ul><li><a title="Anthony Shaw on github.io" rel="nofollow" href="https://tonybaloney.github.io/">Anthony Shaw on github.io</a></li><li><a title="Support for the new builtin breakpoint function in Python 3.7 by tonybaloney · Pull Request #3331 · pytest-dev/pytest" rel="nofollow" href="https://github.com/pytest-dev/pytest/pull/3331">Support for the new builtin breakpoint function in Python 3.7 by tonybaloney · Pull Request #3331 · pytest-dev/pytest</a></li></ul>

      PyCharm: PyCharm 2018.1.2 RC

      $
      0
      0

      We’re happy to announce that the release candidate of PyCharm 2018.1.2 is available for download on our Confluence page.

      What’s New

      Docker Compose Improvements

      Our Docker Compose interpreter in PyCharm 2018.1.1 starts your application service together with its dependencies, but leaves your dependencies running after shutting down the application. This has now been changed to match the command-line behavior, and will shut down your dependencies as well. Have you not tried using Docker Compose interpreters yet? Learn how to do so on our blog with Django on Windows, or with Flask on Linux.

      Docker Compose users on Windows will be happy to learn that we’re now using named pipes to connect to the Docker daemon, which resolves an issue where some users were unable to run their scripts.

      Further Improvements

      • The Python Console now receives focus when its opened
      • Various improvements to database support: columns that show the result of a custom function in MSSQL are now correctly highlighted, and more. Did you know that PyCharm Professional Edition includes all database features from DataGrip, JetBrains’ SQL IDE?
      • Improvements in optimizing Python imports
      • Various issues regarding React lifecycles have been resolved
      • Read more in our release notes

      Interested?

      Download PyCharm now. The release candidate is not an EAP version. Therefore, if you’d like to try out the Professional Edition, you will either need to have an active license, or you’ll receive a 30-day trial period. The Community Edition is free and open source software and can be used without restrictions (apart from the Apache License’s terms).

      If you have any comments on our RC version (or any other version of PyCharm), please reach out to us! We’re @pycharm on Twitter, and you can of course always create a ticket on YouTrack, our issue tracker.


      Test and Code: 41: Testing in DevOps and Agile - Anthony Shaw

      $
      0
      0

      We talk with Anthony Shaw about some of the testing problems facing both DevOps teams, and Agile teams. We also talk about his recent pull request accepted into pytest.

      Special Guest: Anthony Shaw.

      Sponsored By:

      Links:

      <p>We talk with Anthony Shaw about some of the testing problems facing both DevOps teams, and Agile teams. We also talk about his recent pull request accepted into pytest.</p><p>Special Guest: Anthony Shaw.</p><p>Sponsored By:</p><ul><li><a rel="nofollow" href="http://amzn.to/2E6cYZ9">Python Testing with pytest</a>: <a rel="nofollow" href="http://amzn.to/2E6cYZ9">Simple, Rapid, Effective, and Scalable The fastest way to learn pytest. From 0 to expert in under 200 pages.</a></li><li><a rel="nofollow" href="https://www.patreon.com/testpodcast">Patreon Supporters</a>: <a rel="nofollow" href="https://www.patreon.com/testpodcast">Help support the show with as little as $1 per month. Funds help pay for expenses associated with the show.</a></li></ul><p>Links:</p><ul><li><a title="Anthony Shaw on github.io" rel="nofollow" href="https://tonybaloney.github.io/">Anthony Shaw on github.io</a></li><li><a title="Support for the new builtin breakpoint function in Python 3.7 by tonybaloney · Pull Request #3331 · pytest-dev/pytest" rel="nofollow" href="https://github.com/pytest-dev/pytest/pull/3331">Support for the new builtin breakpoint function in Python 3.7 by tonybaloney · Pull Request #3331 · pytest-dev/pytest</a></li></ul>

      PyCharm: Python 3.7: Introducing Data Classes

      $
      0
      0

      Python 3.7 is set to be released this summer, let’s have a sneak peek at some of the new features! If you’d like to play along at home with PyCharm, make sure you get PyCharm 2018.1 (or later if you’re reading this from the future).

      There are many new things in Python 3.7: various character set improvements, postponed evaluation of annotations, and more. One of the most exciting new features is support for the dataclass decorator.

      What is a Data Class?

      Most Python developers will have written many classes which looks like:

      class MyClass:
      	def __init__(self, var_a, var_b):
      		self.var_a = var_a
      		self.var_b = var_b

      Data classes help you by automatically generating dunder methods for simple cases. For example, a __init__ which accepted those arguments and assigned each to self. The small example before could be rewritten like:

      @dataclass
      class MyClass:
      	var_a: str
      	var_b: str

      A key difference is that type hints are actually required for data classes. If you’ve never used a type hint before: they allow you to mark what type a certain variable _should_ be. At runtime, these types are not checked, but you can use PyCharm or a command-line tool like mypy to check your code statically.

      So let’s have a look at how we can use this!

      The Star Wars API

      You know a movie’s fanbase is passionate when a fan creates a REST API with the movie’s data in it. One Star Wars fan has done exactly that, and created the Star Wars API. He’s actually gone even further, and created a Python wrapper library for it.

      Let’s forget for a second that there’s already a wrapper out there, and see how we could write our own.

      We can use the requests library to get a resource from the Star Wars API:

      response = requests.get('https://swapi.co/api/films/1/')

      This endpoint (like all swapi endpoints) responds with a JSON message. Requests makes our life easier by offering JSON parsing:

      dictionary = response.json()

      And at this point we have our data in a dictionary. Let’s have a look at it (shortened):

      {
       'characters': ['https://swapi.co/api/people/1/',
                      … ],
       'created': '2014-12-10T14:23:31.880000Z',
       'director': 'George Lucas',
       'edited': '2015-04-11T09:46:52.774897Z',
       'episode_id': 4,
       'opening_crawl': 'It is a period of civil war.\r\n … ',
       'planets': ['https://swapi.co/api/planets/2/',
           ...],
       'producer': 'Gary Kurtz, Rick McCallum',
       'release_date': '1977-05-25',
       'species': ['https://swapi.co/api/species/5/',
                       ...],
       'starships': ['https://swapi.co/api/starships/2/',
                         ...],
       'title': 'A New Hope',
       'url': 'https://swapi.co/api/films/1/',
       'vehicles': ['https://swapi.co/api/vehicles/4/',
                        ...]
      }

      Wrapping the API

      To properly wrap an API, we should create objects that our wrapper’s user can use in their application. So let’s define an object in Python 3.6 to contain the responses of requests to the /films/ endpoint:

      class StarWarsMovie:
      
         def __init__(self,
                      title: str,
                      episode_id: int,
                      opening_crawl: str,
                      director: str,
                      producer: str,
                      release_date: datetime,
                      characters: List[str],
                      planets: List[str],
                      starships: List[str],
                      vehicles: List[str],
                      species: List[str],
                      created: datetime,
                      edited: datetime,
                      url: str
                      ):
      
             self.title = title
             self.episode_id = episode_id
             self.opening_crawl= opening_crawl
             self.director = director
             self.producer = producer
             self.release_date = release_date
             self.characters = characters
             self.planets = planets
             self.starships = starships
             self.vehicles = vehicles
             self.species = species
             self.created = created
             self.edited = edited
             self.url = url
      
             if type(self.release_date) is str:
                 self.release_date = dateutil.parser.parse(self.release_date)
      
             if type(self.created) is str:
                 self.created = dateutil.parser.parse(self.created)
      
             if type(self.edited) is str:
                 self.edited = dateutil.parser.parse(self.edited)

      Careful readers may have noticed a little bit of duplicated code here. Not so careful readers may want to have a look at the complete Python 3.6 implementation: it’s not short.

      This is a classic case of where the data class decorator can help you out. We’re creating a class that mostly holds data, and only does a little validation. So let’s have a look at what we need to change.

      Firstly, data classes automatically generate several dunder methods. If we don’t specify any options to the dataclass decorator, the generated methods are: __init__, __eq__, and __repr__. Python by default (not just for data classes) will implement __str__ to return the output of __repr__ if you’ve defined __repr__ but not __str__. Therefore, you get four dunder methods implemented just by changing the code to:

      @dataclass
      class StarWarsMovie:
         title: str
         episode_id: int
         opening_crawl: str
         director: str
         producer: str
         release_date: datetime
         characters: List[str]
         planets: List[str]
         starships: List[str]
         vehicles: List[str]
         species: List[str]
         created: datetime
         edited: datetime
         url: str

      We removed the __init__ method here to make sure the data class decorator can add the one it generates. Unfortunately, we lost a bit of functionality in the process. Our Python 3.6 constructor didn’t just define all values, but it also attempted to parse dates. How can we do that with a data class?

      If we were to override __init__, we’d lose the benefit of the data class. Therefore a new dunder method was defined for any additional processing: __post_init__. Let’s see what a __post_init__ method would look like for our wrapper class:

      def __post_init__(self):
         if type(self.release_date) is str:
             self.release_date = dateutil.parser.parse(self.release_date)
      
         if type(self.created) is str:
             self.created = dateutil.parser.parse(self.created)
      
         if type(self.edited) is str:
             self.edited = dateutil.parser.parse(self.edited)

      And that’s it! We could implement our class using the data class decorator in under a third of the number of lines as we could without the data class decorator.

      More goodies

      By using options with the decorator, you can tailor data classes further for your use case. The default options are:

      @dataclass(init=True, repr=True, eq=True, order=False, unsafe_hash=False, frozen=False)

      • init determines whether to generate the __init__ dunder method.
      • repr determines whether to generate the __repr__ dunder method.
      • eq does the same for the __eq__ dunder method, which determines the behavior for equality checks (your_class_instance == another_instance).
      • order actually creates four dunder methods, which determine the behavior for all lesser than and/or more than checks. If you set this to true, you can sort a list of your objects.

      The last two options determine whether or not your object can be hashed. This is necessary (for example) if you want to use your class’ objects as dictionary keys. A hash function should remain constant for the life of the objects, otherwise the dictionary will not be able to find your objects anymore. The default implementation of a data class’ __hash__ function will return a hash over all objects in the data class. Therefore it’s only generated by default if you also make your objects read-only (by specifying frozen=True).

      By setting frozen=True any write to your object will raise an error. If you think this is too draconian, but you still know it will never change, you could specify unsafe_hash=True instead. The authors of the data class decorator recommend you don’t though.

      If you want to learn more about data classes, you can read the PEP or just get started and play with them yourself! Let us know in the comments what you’re using data classes for!

      NumFOCUS: Optiver joins NumFOCUS Corporate Sponsors

      Roberto Alsina: My Git tutorial for people who don't know Git

      $
      0
      0

      As part of a book project aimed at almost-beginning programmers I have written what may as well pass as the first part of a Git tutorial. It's totally standalone, so it may be interesting outside the context of the book.

      It's aimed at people who, of course, don't know Git and could use it as a local version control system. In the next chapter (being written) I cover things like remotes and push/pull.

      So, if you want to read it: Git tutorial for people who don't know git (part I)

      PS: If the diagrams are all black and white, reload the page. Yes, it's a JS issue. Yes, I know how to fix it.

      Viewing all 23136 articles
      Browse latest View live


      <script src="https://jsc.adskeeper.com/r/s/rssing.com.1596347.js" async> </script>