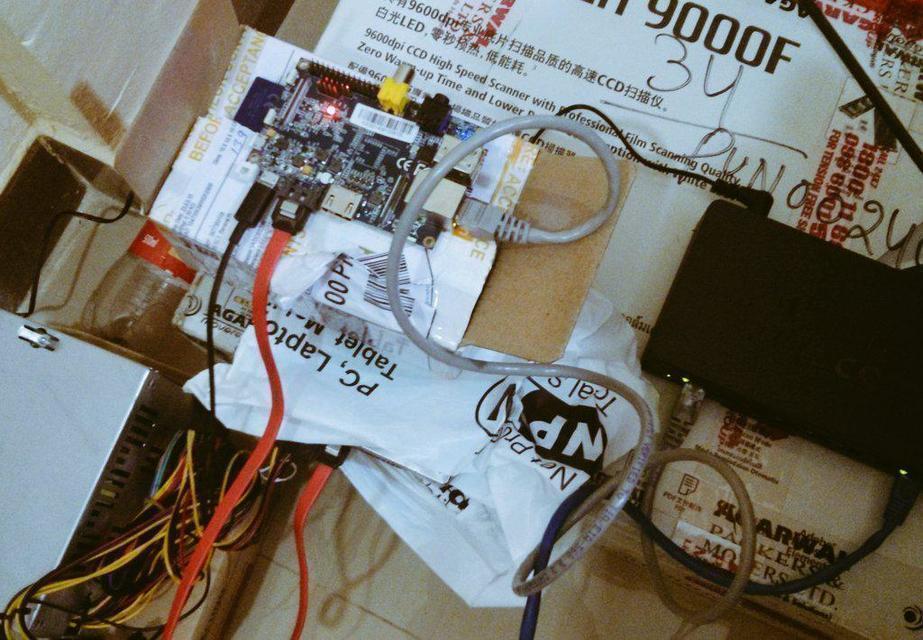
Buying the hardware
I was looking forward to setup a new storage box at home. The biggest two points were about being able to run Fedora, and to be in the cheaper side. After looking at the available hardware prices for the desktops, I thought I should look into something else.
While asking about the similar setups, Dennis Gilmore, and Peter Robinson from Fedora release engineering team suggested me to look at the ARM boards which can run the standard Fedora ARM. After looking into the boards which I can buy online from an Indian shop, I decided to go for a Banana Pi. It has Allwinner A20, 1GB DDR DRAM, and most important a SATA connector. I ordered the device from crazypi, I have bought many other things from them before. The device was delivered within 24 hours :)
The next issue was to get the hard drive for the system. After a few failed attempts to find a power cable for a SATA drive, I just decided to buy a desktop SMPS to power the hard drive (and it will power the future ones too), I also bought a 8 port switch as I was out of available ports in my home network.

OS installation
I downloaded the minimal Fedora ARM image (find it here). On my laptop first I installed fedora-arm-installer package. Used the same to get the image on a SD card
# dnf install fedora-arm-installer
# fedora-arm-image-installer --image=Fedora-Minimal-armhfp-22-3-sda.raw.xz --target=Bananapi --media=/dev/sdb --selinux=OFF
After everything was done, I reinserted the card in my laptop, and then edited the file extlinux.conf under boot partition, added the words console=tty0 as a parameter.
Network configuration
Next step was to connect the Banana Pi to a TV (it has HDMI), and boot the system, setup root password, timezone, and another user. After logging into the system, my next job was to setup a static ip for the system. To do so, add a new file /etc/sysconfig/network-scripts/ifcfg-eth0 and put the following (after changing the ip details) into it.
DEVICE="eth0"
BOOTPROTO="static"
OBBOOT="yes"
TYPE="ETHERNET"
IPADDR="192.168.1.250"
NETMASK="255.255.255.0"
GATEWAY="192.168.1.1"
DNS="8.8.8.8"
Brought back the system to my office room, setup the network switch, and the cables. Connected the system along with the hard drive, and I managed to connect to system from my laptop using ssh.
Setting up the SATA drive
The drive came up as /dev/sda in the system. I wanted to encrypt it first, that will keep the data secured in case it gets stolen. Install the following package for the same.
# dnf install cryptsetup
Then wanted to fill up the drive with some random data (this will take some time).
# dd if=/dev/urandom of=/dev/sda1 bs=1M
Then encrypted the drive.
# cryptsetup luksFormat /dev/sda1

WARNING!
========
This will overwrite data on /dev/sda1 irrevocably.

Are you sure? (Type uppercase yes): YES
Enter passphrase:
Verify passphrase:
Next step is to open it with a given name (the name will come up under /dev/mapper), and format the partition as ext4.
[root@localhost ~]# cryptsetup luksOpen /dev/sda1 store1
Enter passphrase for /dev/sda1:
[root@localhost ~]#
[root@localhost ~]# ls /dev/mapper/
control  store1
[root@localhost ~]# mkfs.ext4 /dev/mapper/store1
mke2fs 1.42.12 (29-Aug-2014)
Creating filesystem with 244189878 4k blocks and 61054976 inodes
Filesystem UUID: 43a8b791-3fac-43cb-8244-8988ff3fb749
Superblock backups stored on blocks:
32768, 98304, 163840, 229376, 294912, 819200, 884736, 1605632, 2654208,
4096000, 7962624, 11239424, 20480000, 23887872, 71663616, 78675968,
102400000, 214990848

Allocating group tables: done
Writing inode tables: done
Creating journal (32768 blocks): done
Writing superblocks and filesystem accounting information: done
Now I do not want the drive to be automounted, that is why I added a script which will open it, and mount to /mnt in the future.
Software configuration
I tried to use Owncloud for some time on that box, it is an excellent application, but sadly mariadb was taking a lot of CPU. Later at night Dennis suggested me rdiff-backup. I am using that for now, I will update the post later with my experience.