LDAP and Active Directory as Python API Services
LDAP and Active Directory often play key a role in the management of a company's network resources yet it is not always very convenient to query a directory directly using the LDAP syntax and protocol that few people truly specialize in. This is why in this article we are using Zato to offer a REST API on top of directory services so that API clients can use REST and JSON instead.
Installing Zato
Start off by installing Zato - if you are not sure what to choose, pick the Docker Quickstart option and this will set up a working environment in a few minutes.
Creating connections
Once Zato is running, connections can be easily created in its Dashboard (by default, http://127.0.0.1:8183). Navigate to Connections -> Outgoing -> LDAP ..

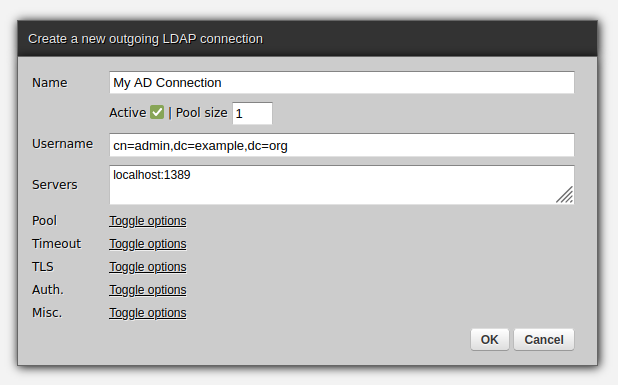
.. and then click Create a new connection which will open a form as below:

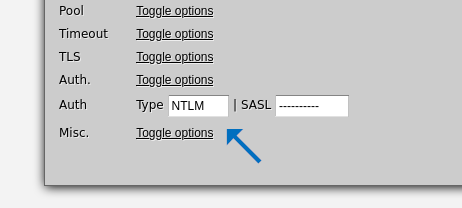
The same form works for both regular LDAP and Active Directory - in the latter case, make sure that Auth type is set to NTLM.

The most important information is:
- User credentials
- Authentication type
- Server or servers to connect to
Note that if authentication type is not NTLM, user credentials can be provided using the LDAP syntax, e.g. uid=MyUser,ou=users,o=MyOrganization,dc=example,dc=com.
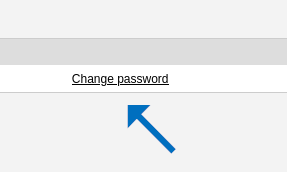
Right after creating a connection be sure to set its password too - the password asigned by default is a randomly generated one.

Pinging
It is always prudent to ping a newly created connection to ensure that all the information entered was correct.
Note that if you have more than one server in a pool then the first available one of them will be pinged - it is the whole pool that is pinged, not a particular part of it.


Active Directory as a REST service
As the first usage example, let's create a service that will translate JSON queries into LDAP lookups - given username or email the service will basic information about the person's account, such as first and last name.
Note that the conn object returned by client.get() below is capable of running any commands that its underlying Python library offers - in this case we are only using searches but any other operation can also be used, e.g. add or modify as well.
# -*- coding: utf-8 -*-# stdlibfromjsonimportloads# Bunchfrombunchimportbunchify# Zatofromzato.server.serviceimportService# Where in the directory we expect to find the usersearch_base='cn=users, dc=example, dc=com'# On input, we are looking users up by either username or emailsearch_filter='(&(|(uid={user_info})(mail={user_info})))'# On output, we are interested in username, first name, last name and the person's emailquery_attributes=['uid','givenName','sn','mail']classADService(Service):""" Looks up users in AD by their username or email."""classSimpleIO:input_required='user_info'output_optional='message','username','first_name','last_name','email'response_elem=Noneskip_empty_keys=Truedefhandle(self):# Connection name to useconn_name='My AD Connection'# Get a handle to the connection poolwithself.out.ldap[conn_name].conn.client()asclient:# Get a handle to a particular connectionwithclient.get()asconn:# Build a filter to find a user byuser_info=self.request.input['user_info']user_filter=search_filter.format(user_info=user_info)# Returns True if query succeeds and has any information on outputifconn.search(search_base,user_filter,attributes=query_attributes):# This is where the actual response can be foundresponse=conn.entries# In this case, we expect at most one user matching input criteriaentry=response[0]# Convert it to JSON for easier handling ..entry=entry.entry_to_json()# .. and load it from JSON to a Python dictentry=loads(entry)# Convert to a Bunch instance to get dot access to dictionary keysentry=bunchify(entry['attributes'])# Now, actually produce a JSON response. For simplicity's sake,# assume that users have only one of email or other attributes.self.response.payload.message='User found'self.response.payload.username=entry.uid[0]self.response.payload.first_name=entry.givenName[0]self.response.payload.last_name=entry.sn[0]self.response.payload.email=entry.mail[0]else:# No business response = no such user foundself.response.payload.message='No such user'After creating a REST channel, we can invoke the service from command line, thus confirming that we can offer the directory as a REST service:
$curl"localhost:11223/api/get-user?user_info=MyOrganization\\MyUser";echo{"message":"User found",
"username":"MyOrganization\\MyUser",
"first_name":"First",
"last_name":"Last",
"email":"address@example.com"}$
More resources
➤ Python API integration tutorial
➤ What is a Network Packet Broker? How to automate networks in Python?
➤ What is an integration platform?
➤ Python Integration platform as a Service (iPaaS)
➤ What is an Enterprise Service Bus (ESB)? What is SOA?
➤ Open-source iPaaS in Python
