Looking around the community, at other people products and such I get the feeling that Python is being used more for services and scientific applications rather than desktop applications. That being said, python desktop applications are by no means dead and lots of people want to create them (me included).
In order to create a desktop application we need to use a GUI library to help us build it. Now, if you are a Python 2.7, or even 3.3 and below user then your choices are plentiful. With Python 3.5 and above however, at the time of writing this post, we are quite limited.
THE CURRENT STATE OF PYTHON 3.5 GUI LIBRARIES
After doing some research into what is available to me I was quite disappointed if I'm quite honest. A lot of popular libraries just haven't been ported forward to 3.5 yet, especially the 64 bit version.
I was looking for a native-looking, cross-platform option and neither wxPython-Phoenix (Python's wx binding) nor PySide (a Python QT binding) seemed to work with Python 3.5 64 bit version and these seemed to be the popular choices with the most relaxed licenses. They seemed to work with Python 3.3 and I believe wxPython works with 32 bit Python 3.5 from what people have been saying online, but has problems compiling with Python 3.5 64 bit version.
So what do we do? Well, we go for Tkinter. Tkinter is a GUI library built on top of tcl/Tk, it also happens to be included in Python's standard library and so very convenient.
Where possible, we will be using tkinter.ttk widgets. The different between vanilla tkinter and tkinter.ttk widgets is that tkinter.ttk widgets use style to define their appearance. They are less customisable than the plain tkinter widgets, but give a more 'native' look.
Where possible, we will be using tkinter.ttk widgets. The different between vanilla tkinter and tkinter.ttk widgets is that tkinter.ttk widgets use style to define their appearance. They are less customisable than the plain tkinter widgets, but give a more 'native' look.
THE BASIC STRUCTURE OF A TK GUI
During this post we will be creating a very simple program that adds two numbers to outline the basics of GUI programmings with tkinter and ttk in Python 3.5.
import tkinter
from tkinter import ttk

class Adder(ttk.Frame):
"""The adders gui and functions."""
    def __init__(self, parent, *args, **kwargs):
        ttk.Frame.__init__(self, parent, *args, **kwargs)
        self.root = parent
        self.init_gui()

    def init_gui(self):
"""Builds GUI."""
        self.root.title('Number Adder')

if __name__ == '__main__':
    root = tkinter.Tk()
    Adder(root)
    root.mainloop()
This is an object orientated approach to GUI building and seems as Tkinter is an object orientated GUI framework, it works well. It's simple enough, first of all we import tkinter and ttk so we can access the GUI tools we need.
We then create our own class which extends the ttk.Frame class. This is where the GUI building will go on. Pretty much everything to do with our GUI will be handled in here.
The init_gui() method is where the definition of our GUI will be, for now we will just set the title of the window. We do this by accessing the root of our application and setting its title.
Then, down in the if __name__ == '__main__' section we create our top level widget; the main window of the application and then create an instance of our class and start it's mainloop.
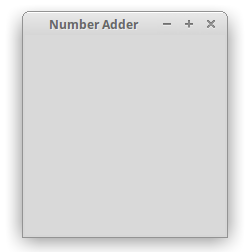
Our GUI now looks like this:
One thing you should note here, is that we don't do this:
from tkinter import *
Most tutorials and documentation online, including the official Python documentation tell you to do this. Don't, from x import * is the devil. Keep your code concise, easy to follow and avoid naming clashes.
BASIC WIDGETS
def init_gui(self):
"""Builds GUI."""
    self.root.title('Number Adder')

    self.num1_entry = ttk.Entry(self, width=5)

    self.num2_entry = ttk.Entry(self, width=5)
    self.calc_button = ttk.Button(self, text='Calculate')

    self.answer_frame = ttk.LabelFrame(self, text='Answer',
            height=100)

    self.answer_label = ttk.Label(self.answer_frame, text='')

    # Labels that remain constant throughout execution.
    ttk.Label(self, text='Number Adder')
    ttk.Label(self, text='Number one')
    ttk.Label(self, text='Number two')

    ttk.Separator(self, orient='horizontal')
You will notice that widget creation is simply instantiating a new object. The first argument you need to enter when creating a new widget is its parent. Its parent is the widget that will contain the new one you are making, in this case we are putting all our widgets inside the main all encompassing frame; our custom class that we made, and we reference it via 'self'.
You may be wondering what the parent of the topmost widget it. Well, if you take a look at the code we wrote in the previous section you will see.
root = tkinter.Tk()
That is our top level widget and so clearly doesn't have a parent.
If you run this code you will notice that nothing appears. The GUI is hasn't changed at all. That's because although we have created new widgets, we haven't placed them anywhere in our GUI, they are just floating about somewhere. In the next two sections we will see two ways of making them appear.
With Tkinter there are lots of widgets at our disposal and we only use a few here, for a full list of tkinter widgets click here, and for a full list of tkinter.ttk widgets click here.
PACK
The first way we can make our widgets appear is by using pack(). This is the quickest and easiest way, but gives you less freedom when defining the way your GUI is layed out.
def init_gui(self):
"""Builds GUI."""
    self.root.title('Number Adder')
    self.pack(fill='both', padx=10, pady=5)

    ttk.Label(self, text='Number Adder').pack(pady='5')

    ttk.Label(self, text='Number one').pack(side='left', padx=5, pady=5)
    self.num1_entry = ttk.Entry(self, width=5)
    self.num1_entry.pack(side='left', padx=5, pady=5)

    ttk.Label(self, text='Number two').pack(side='left', padx=5, pady=5)
    self.num2_entry = ttk.Entry(self, width=5)
    self.num2_entry.pack(side='left', padx=5, pady=5)
Using pack() without any arguments will arrange your widgets in a column, you can change this behaviour with the optional argument 'side' where you can define 'top', 'bottom', 'left' or 'right'. The default is 'top', which will align widgets vertically. To align things horizontally, use 'left'.
You can also make a widget fill it's parent element along the x or y axis using the optional argument 'fill'. You can make it fill the x or y axis by specifying 'x' or 'y' and can make it fill both by specifying 'both'.
The padding for a widget can be set via the 'padx', 'pady', 'ipadx' and 'ipady' where padx and pady are the external padding and ipadx and ipady is internal padding.
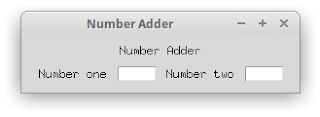
Our GUI should now look like this:
Using pack() however, is only practical for very simple GUIs, for more complicated ones, it's best to use the grid layout.
UNDERSTANDING THE GRID LAYOUT
The grid layout is a powerful tool for defining the layout of your GUI, much more so than pack and is the method that I have come to favour. Obviously, the grid layout is, well, a grid. A collection of rows and columns that you can insert widgets into to structure your GUI.
def init_gui(self):
"""Builds GUI."""
    self.root.title('Number Adder')

    self.grid(column=0, row=0, sticky='nsew')

    self.num1_entry = ttk.Entry(self, width=5)
    self.num1_entry.grid(column=1, row = 2)

    self.num2_entry = ttk.Entry(self, width=5)
    self.num2_entry.grid(column=3, row=2)

    self.calc_button = ttk.Button(self, text='Calculate')
    self.calc_button.grid(column=0, row=3, columnspan=4)

    self.answer_frame = ttk.LabelFrame(self, text='Answer',
            height=100)
    self.answer_frame.grid(column=0, row=4, columnspan=4, sticky='nesw')

    self.answer_label = ttk.Label(self.answer_frame, text='')
    self.answer_label.grid(column=0, row=0)

    # Labels that remain constant throughout execution.
    ttk.Label(self, text='Number Adder').grid(column=0, row=0,
            columnspan=4)
    ttk.Label(self, text='Number one').grid(column=0, row=2,
            sticky='w')
    ttk.Label(self, text='Number two').grid(column=2, row=2,
            sticky='w')

    ttk.Separator(self, orient='horizontal').grid(column=0,
            row=1, columnspan=4, sticky='ew')

    for child in self.winfo_children():
        child.grid_configure(padx=5, pady=5)
When using the grid layout you should first have a good idea of what you want your GUI to look like. Then using a combination of placing widgets in specified rows and columns, making them span across multiple rows and columns and setting sides for them to stick to we can create complex GUIs.
Using the grid manager is incredibly easy, simply use the grid() method to place your widget in the desired row and column on the grid. Note that the grid starts at 0 and not entering a row or column will result in them defaulting to this value.
When you place your widget on the grid, by default it will be centred within the cell. To change this you can enter a 'sticky' argument in the grid() method. You can pass it in a string containing any of 'n', 'e', 's', 'w' and can combine them together too.
Another useful feature of the grid layout it the ability to make widgets span across multiple rows and columns using the optional arguments 'rowspan' and 'columnspan'. Remember that if your last column is '4' then you actually have five columns, so if you want something to span across the whole grid, that is something to remember.
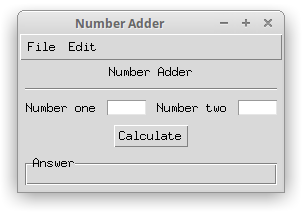
Our GUI now looks like this:
An important point to note here is that grid.() returns None, so when you need to access the widget at a later date, first create the widget and assign it to a variable, then call the grid method on that variable.
CREATING A MENU BAR
I feel creating a menu bar in Tkinter is not as simple as it could be, that being said, it's not difficult either.
self.root.option_add('*tearOff', 'FALSE')First what we do is turn off tearing off. What this does is prevent you from being able to detach the menu bar from the main window. When it is turned on you can drag the menu bar off the main application window into a window of its own. We don't want this behaviour, so we will turn it off.
self.menubar = tkinter.Menu(self.root)

self.menu_file = tkinter.Menu(self.menubar)

self.menu_edit = tkinter.Menu(self.menubar)
We then create the main menu bar itself and set it's parent to the root element. On the menu bar we will have 'File' and 'Edit' menus, so we create those exactly as before, except we set their parents to the main menu bar.
self.menu_file = tkinter.Menu(self.menubar)
self.menu_file.add_command(label='Exit',)
Now, under the 'File' menu we will create an item that exits the application when you click it as an example of how to add things to menus. We can do this via the add_command() method. We will see later how to make this do something.
self.menubar.add_cascade(menu=self.menu_file, label='File')
self.menubar.add_cascade(menu=self.menu_edit, label='Edit')
self.root.config(menu=self.menubar)
The final thing we need to do is set the root's menu to our newly created menu bar and we are done.
Our GUI should now have a menu bar:
BINDING FUNCTIONS
In our example program we have 'Exit' in the file menu and the calculate button, but neither of them do anything. We need to give them functionality, which in Tkinter is laughably simple.# Inside the Adder class but not inside init_gui()First what we need to do is create methods inside our Adder class (our Frame class) to take care of the functionality that we need.
def on_quit(self):
"""Exits program."""
quit()
def calculate(self):
"""Calculates the sum of the two inputted numbers."""
num1 = int(self.num1_entry.get())
num2 = int(self.num2_entry.get())
num3 = num1 + num2
self.answer_label['text'] = num3
# Inside init_gui()
self.menu_file.add_command(label='Exit', command=self.on_quit)

self.calc_button = ttk.Button(self, text='Calculate',
    command=self.calculate)
Then all we do is add the 'command' argument to our exit button in the file menu and our calculate button and point them to the methods we created. Simple.
A FULL EXAMPLE
"""
adder.py
~~~~~~

Creates a simple GUI for summing two numbers.
"""

import tkinter
from tkinter import ttk

class Adder(ttk.Frame):
"""The adders gui and functions."""
    def __init__(self, parent, *args, **kwargs):
        ttk.Frame.__init__(self, parent, *args, **kwargs)
        self.root = parent
        self.init_gui()

    def on_quit(self):
"""Exits program."""
        quit()

    def calculate(self):
"""Calculates the sum of the two inputted numbers."""
        num1 = int(self.num1_entry.get())
        num2 = int(self.num2_entry.get())
        num3 = num1 + num2
        self.answer_label['text'] = num3

    def init_gui(self):
"""Builds GUI."""
        self.root.title('Number Adder')
        self.root.option_add('*tearOff', 'FALSE')

        self.grid(column=0, row=0, sticky='nsew')

        self.menubar = tkinter.Menu(self.root)

        self.menu_file = tkinter.Menu(self.menubar)
        self.menu_file.add_command(label='Exit', command=self.on_quit)

        self.menu_edit = tkinter.Menu(self.menubar)

        self.menubar.add_cascade(menu=self.menu_file, label='File')
        self.menubar.add_cascade(menu=self.menu_edit, label='Edit')

        self.root.config(menu=self.menubar)

        self.num1_entry = ttk.Entry(self, width=5)
        self.num1_entry.grid(column=1, row = 2)

        self.num2_entry = ttk.Entry(self, width=5)
        self.num2_entry.grid(column=3, row=2)

        self.calc_button = ttk.Button(self, text='Calculate',
                command=self.calculate)
        self.calc_button.grid(column=0, row=3, columnspan=4)

        self.answer_frame = ttk.LabelFrame(self, text='Answer',
                height=100)
        self.answer_frame.grid(column=0, row=4, columnspan=4, sticky='nesw')

        self.answer_label = ttk.Label(self.answer_frame, text='')
        self.answer_label.grid(column=0, row=0)

        # Labels that remain constant throughout execution.
        ttk.Label(self, text='Number Adder').grid(column=0, row=0,
                columnspan=4)
        ttk.Label(self, text='Number one').grid(column=0, row=2,
                sticky='w')
        ttk.Label(self, text='Number two').grid(column=2, row=2,
                sticky='w')

        ttk.Separator(self, orient='horizontal').grid(column=0,
                row=1, columnspan=4, sticky='ew')

        for child in self.winfo_children():
            child.grid_configure(padx=5, pady=5)

if __name__ == '__main__':
    root = tkinter.Tk()
    Adder(root)
    root.mainloop()
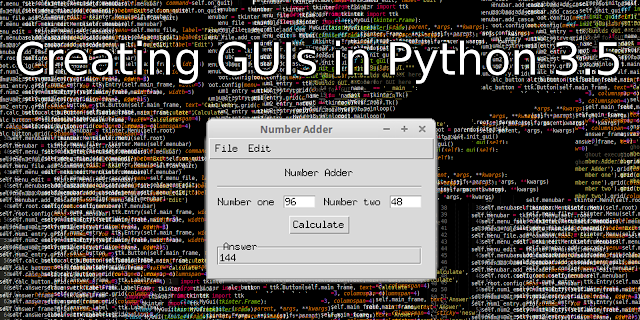
The above code should produce this GUI that calculates the sum of the two input numbers and exits when you press the exit button in the file menu:
With this we can now create complex GUIs in python 3.5 using tkinter. Hopefully in the near future other GUI tool kits will be ported forward, giving us more choice.
That's it for this post, I hope now you feel a little more confident producing GUIs for your applications written in Python 3.5. Make sure you give this post a share so others can read it too. Also don't forget to subscribe to my post feed, follow me on Twitter and/or add me on Google+ to make sure your don't miss any future posts.


