In a previous post I mentioned how I'm going to stop using Blogger's built in post editor due to the horrendous HTML is produces. Well, I had no luck finding a desktop blogging client that worked well. The existing blogging clients either don't work on linux or development was stopped some ten years ago.
As such, I am now developing my own desktop blogging client in Python. You can view the project on GitHub.
One of the things that was a bit a pain to figure out was authenticating the desktop client with Google's API using OAuth 2.0. Personally I don't think it's very well explained on Google's website and find the site uncomfortable to navigate. So, for the convenience of all of you that want to connect to and authorise a desktop application with Google's API, here's how to do it.
GETTING THE CLIENT LIBRARY
First off, we need to download the Python client library. I'm going to assume that everyone reading this blog is using pip, if you aren't... Start using it. If you are one of the elite using Python 3 (did I ruffle a few feathers?), then lucky you, you should already have in installed. If you don't have it, google is your friend.
In our terminal we execute the following command:
$ pip install --upgrade google-api-python-client...And that's it, well done.
CREATING A NEW GOOGLE APIS CONSOLE PROJECT AND DOWNLOADING YOUR CLIENT SECRET
To use Google's API, we need to have a google account (you have one, right?) for accessing the Google Developer's Console with.
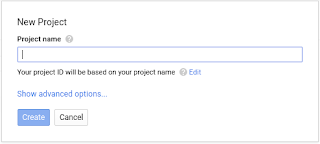
We then navigate to the Developer Console's projects page and create a new project for our application by clicking the 'Create project' button and filling in the form that pops up.
 |
| Enter your projects name and hit create. |
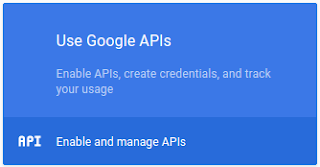
Then we get redirected to our project's dashboard. On this dashboard there is a large blue box saying 'Use Google APIs' which we click.
 |
| Click this to be taken to the Google APIs page. |
We then get taken to a page which displays all of the APIs available to us; there are lot's and select the API that we are planning on using, I will be using blogger as an example.
Once we've selected the API we will be using, we will again be redirected to another page, on this page there will be a button that says 'Enable', clicking this lets us use the selected API.
We are then presented with a warning box that prompts us to create credentials, which is exactly what we will do.
 |
| Click the 'Go to Credentials' button. |
We then get taken to a new page with a few options for us to fill in. We select the version of the API we want and for 'Where will you be calling the API from?' select 'Other UI (e.g. Windows, CLI tool)'. Also, we will be accessing user data so select the 'User data' option and click the 'What credentials do I need?' button.
 |
| Fill in the appropriate details and hit the blue button. |
Then go through the next two steps; 'Create an OAuth 2.0 client ID' and 'Set up the OAuth 2.0 consent screen' and input the information that applies to us. Download the credential information if you like and click the done button.
We get taken to a page listing credentials. Next to the credential we just created there is a download button, press that to download the 'client secret' which we will need later and move it to the root directory of your project.
 |
| Download the client secret by clicking the circled button. |
That's all we need to do with the Google Developer's Console. Next, onto the code.
USING GOOGLE'S PYTHON CLIENT LIBRARY TO AUTHORISE YOUR APPLICATION
The code consists of four steps:
- Getting an authorisation code
- Exchanging the authorisation code for credentials
- Creating an httplib2.Http object and authorising it using the credentials
- Creating an API service object to make calls to the API
THE CODE
def get_credentials():
"""Gets google api credentials, or generates new credentials
    if they don't exist or are invalid."""
    scope = 'https://www.googleapis.com/auth/blogger'

    flow = oauth2client.client.flow_from_clientsecrets(
            'client_secret.json', scope,
            redirect_uri='urn:ietf:wg:oauth:2.0:oob')

    storage = oauth2client.file.Storage('credentials.dat')
    credentials = storage.get()

    if not credentials or credentials.invalid:
        auth_uri = flow.step1_get_authorize_url()
        webbrowser.open(auth_uri)

        auth_code = input('Enter the auth code: ')
        credentials = flow.step2_exchange(auth_code)

        storage.put(credentials)

    return credentials

def get_service():
"""Returns an authorised blogger api service."""
    credentials = self.get_credentials()
    http = httplib2.Http()
    http = credentials.authorize(http)
    service = apiclient.discovery.build('blogger', 'v3', http=http)

    return service
WHAT'S GOING ON
scope = 'https://www.googleapis.com/auth/blogger'

flow = oauth2client.client.flow_from_clientsecrets(
    'client_secret.json', scope,
    redirect_uri='urn:ietf:wg:oauth:2.0:oob')
First in get_credentials() we create a client object from the client_secret.json file that we downloaded earlier. We need to specify the scope, and the redirect_uri.
The scope declares the API and the level of access that we will be using, you can find a list of scopes here. The redirect_uri is how the response will be sent to our application, for more information on redirect uris read this.
This code allows us to store the credentials so we don't have to re-authorise the client every time. It creates a Storage object and loads credentials.dat, which contains our credentials. If it doesn't exist it gets created. It then gets the credentials from the storage object.
Then it checks to see if the credentials either don't exist or are for some reason invalid. If this check passes it means that new credentials are required so it generates an authorisation url and then opens it in the system's default browser.
On the page that is opened in the default browser, the user is presented with a code and then prompted to input it into the application. We then ask the user to enter the authorisation code that they were given and use it to generate credentials. Obviously there are better and more user-friendly ways to handle the inputting of the code. The credentials are then stored for later.
Next, in get_service() we get our credentials using the get_credentials() function we made earlier and use it to authorise an httplib2.Http object which the client library will use to issue HTTP requests.
Finally we create the API service object which we can use to interact with the API and we are finished.
Now your application will be able to authorise itself, connect to your api of choice and interact with it via Google's client library. It took me a while to navigate googles documentation and a little bit of trial and error to get this working properly, but hopefully this post will allow you to skip over that and get right into the actual building of your application.
If you liked this post or found it helpful, please share it so other people can find it too. Also, don't forget to subscribe to my posts feed so you don't miss anything.
The scope declares the API and the level of access that we will be using, you can find a list of scopes here. The redirect_uri is how the response will be sent to our application, for more information on redirect uris read this.
storage = oauth2client.file.Storage('credentials.dat')
credentials = storage.get()
This code allows us to store the credentials so we don't have to re-authorise the client every time. It creates a Storage object and loads credentials.dat, which contains our credentials. If it doesn't exist it gets created. It then gets the credentials from the storage object.
if not credentials or credentials.invalid:
    auth_uri = flow.step1_get_authorize_url()
    webbrowser.open(auth_uri)
Then it checks to see if the credentials either don't exist or are for some reason invalid. If this check passes it means that new credentials are required so it generates an authorisation url and then opens it in the system's default browser.
auth_code = input('Enter the auth code: ')
credentials = flow.step2_exchange(auth_code)

storage.put(credentials)
On the page that is opened in the default browser, the user is presented with a code and then prompted to input it into the application. We then ask the user to enter the authorisation code that they were given and use it to generate credentials. Obviously there are better and more user-friendly ways to handle the inputting of the code. The credentials are then stored for later.
credentials = self.get_credentials()
http = httplib2.Http()
http = credentials.authorize(http)
Next, in get_service() we get our credentials using the get_credentials() function we made earlier and use it to authorise an httplib2.Http object which the client library will use to issue HTTP requests.
service = apiclient.discovery.build('blogger', 'v3', http=http)Finally we create the API service object which we can use to interact with the API and we are finished.
Now your application will be able to authorise itself, connect to your api of choice and interact with it via Google's client library. It took me a while to navigate googles documentation and a little bit of trial and error to get this working properly, but hopefully this post will allow you to skip over that and get right into the actual building of your application.
If you liked this post or found it helpful, please share it so other people can find it too. Also, don't forget to subscribe to my posts feed so you don't miss anything.